Ergon BA3 Evo Protect User manual

BA3 Evo /
BA3 Evo Protect
Bedienungsanleitung
User Instructions
Mode d‘emploi

1. Die Vorteile der Rucksäcke BA3 Evo / BA3 Evo Protect
Das Ergon Entwicklungsteam hat nach verschiedenen Ansätzen ein einzigartiges Gurtsystem entwickelt, welches sich automa-
tisch den anatomischen Gegebenheiten des Trägers anpasst. So richten sich die Schultergurte sowie der Hüftgurt ohne weitere
Einstellungen am natürlichen Winkel der Schultern bzw. der Hüfte aus. Durch eine 4-fache Rückenlängenverstellung ergibt sich ein
vollkommen neuer, individueller Tragekomfort.
Eine weitere große Innovation stellt die Last-Kompression über das Tragesystem dar. Die beiden Schultergurte sind entlang der
Unterseite des Rucksacks miteinander verbunden. Dieses intelligente Konzept gewährt stets einen körpernahen Transport des
mitgeführten Equipments. Konstruktionsbedingt sitzt der Rucksack deutlich stabiler und näher am Rücken als herkömmliche
Rucksäcke.
Darüber hinaus bieten die Rucksäcke BA3 Evo und BA3 Evo Protect die Möglichkeiten der Aufnahme eines Protektors, bei optio-
nal gleichzeitiger Verwendung einer Trinkblase. Hier finden sich separate Einstecktaschen innerhalb des Trinkblasenfachs.
Protektor (BP100) * Trinkblase (BH300) *
* BA3 Evo und BA3 Evo Protect mit separaten Fächern für Protektor und Trinkblase.
Alle anderen Ergon Rucksäcke unterstützten lediglich ein Fach für Protektor oder Trinkblase (wahlweise).

(D)
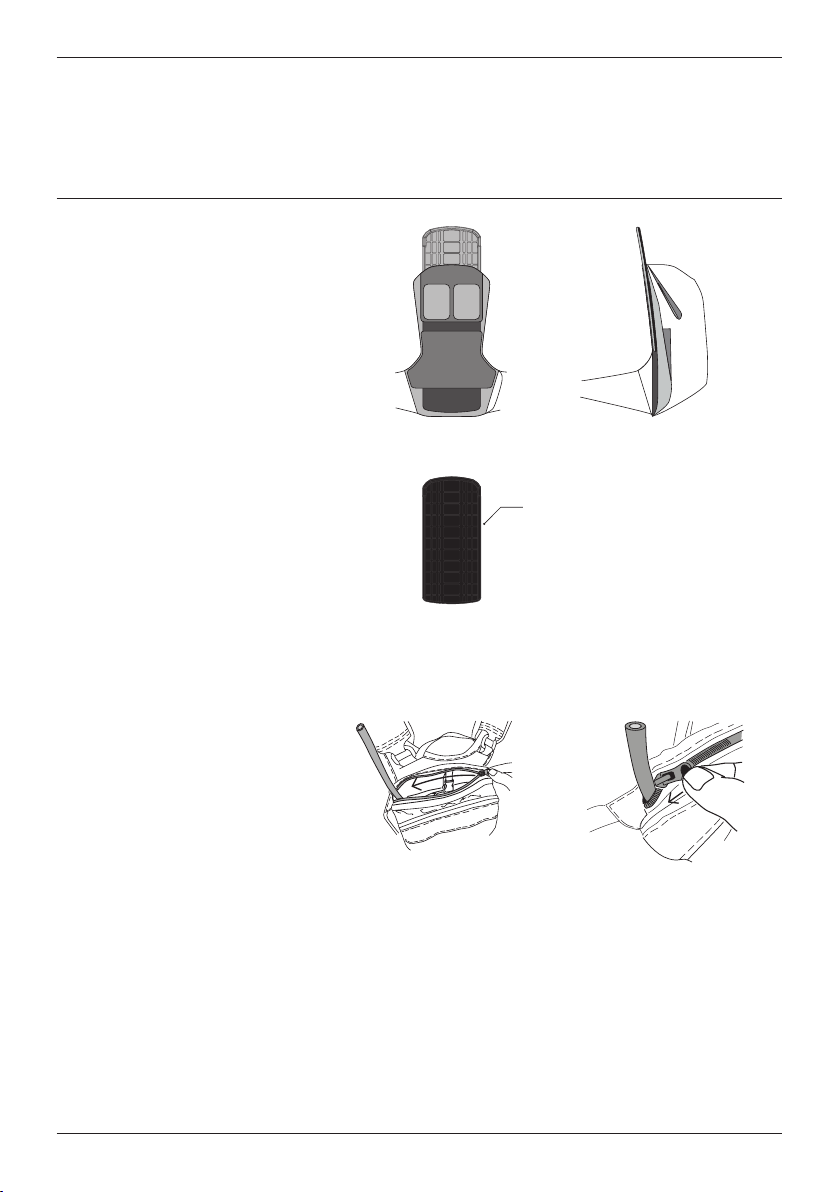
Abb. 2: Ventilation
Rückseite
3. Taschenaufteilung (empf. Einsatzzweck)
Abb. 3a: Außentaschen
1. Werkzeuge, Schlüssel
2. Reperatur-Kit, Ersatzteile
3. Erste-Hilfe
4. Pumpe
5. Verschiedenes
Seite
Abb. 3b: Innentaschen
1. Geldbeutel
2. Kamera
3. Handy
4. Verschiedenes
5. Trinkblase *
6. Protektor *
1
2
3
4
5
1
2
3
4
5
Seite
ERGON BIKE ERGONOMICS
Abb. 3a: Außentaschen
Front
Abb. 3b: Innentaschen
Front
2. Verbessertes Rückenklima
Die gepolsterten Rückenpads bestehen aus
dickem ventilierendem Abstandsgewirk. Dadurch
wird die Belüftung des Rückens während der
Fahrt gegenüber herkömmlichen Rucksäcken
deutlich verbessert. Durch diese Konstruktion
ergeben sich zwischen den Polstern Ventilati-
onskanäle, in denen der Fahrtwind zusätzlich für
einen trockeneren Rücken sorgt.
6
* BA3 Evo und BA3 Evo Protect mit separaten Fächern für Protektor und Trinkblase.
Alle anderen Ergon Rucksäcke unterstützten lediglich ein Fach für Protektor oder Trinkblase (wahlweise).

(D)
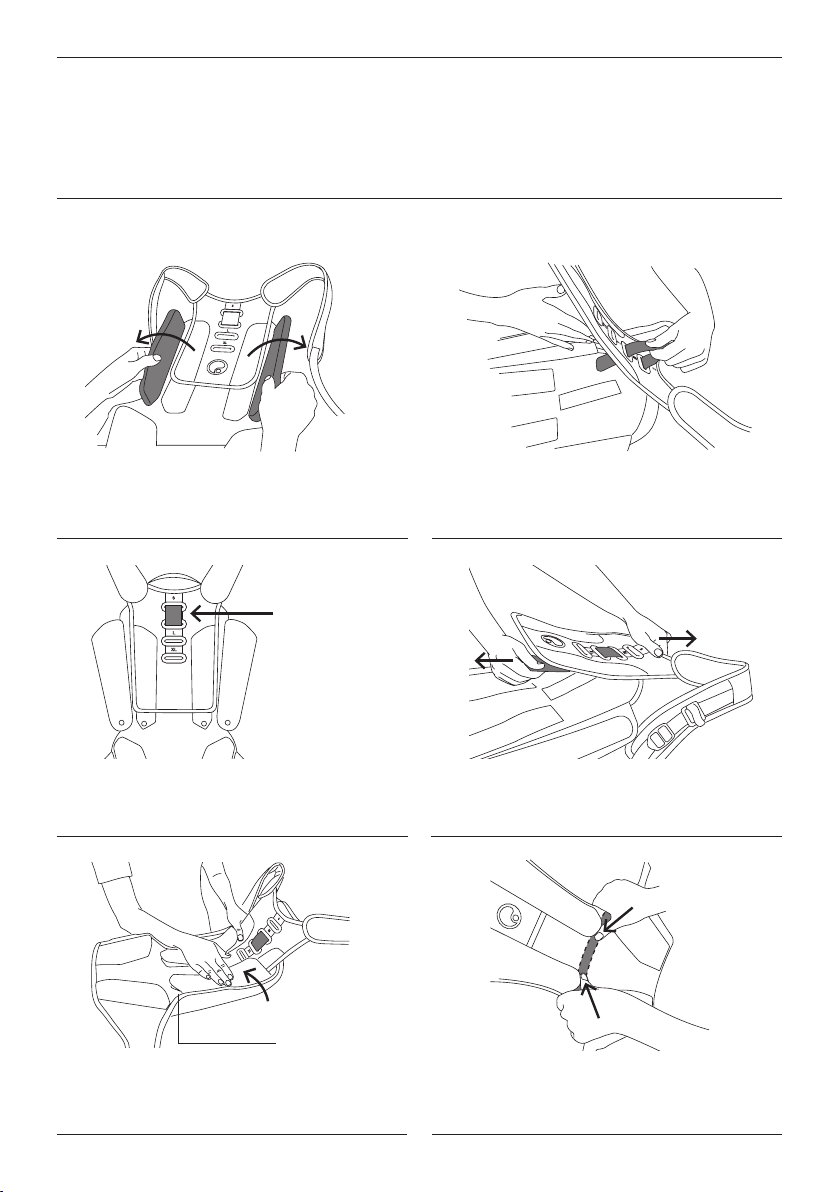
Einstellung der Rückenlänge
Klappen Sie die beiden Polsterflügel zur Seite. Heben Sie die
Schulterplatte etwas an und lösen Sie den darunter liegenden
Gurt.
Schlaufen Sie nun den Gurt aus der Rückenplatte aus und fä-
deln Sie ihn in der gleichen Weise wieder auf der gewünschten
Größe ein.
Achtung: Die jeweils eingestellte Größe ist stets vom Gurtband
verdeckt.
Achten Sie beim Einschlaufen darauf, dass die Schulterplatte
immer bis zum Anschlag auf das Gurtband geschoben wird.
Biegen Sie den Rucksack leicht durch, während Sie die Polster-
flügel wieder schließen. Auf diese Weise können Sie den Ruck-
sack Ihrer individuellen Rückenform beim Radfahren anpassen.
Durch Nachbiegen der eingenähten Aluminiumschiene (zwi-
schen den unteren und oberen Polstern) kann die Passform in
Querrichtung angepasst werden.
Achten Sie bitte darauf,
dass die Druckknöpfe
geschlossen sind.
Eingestellte Größe
z.B. „M“ (verdeckt)
1. 2.
3. 4.
5. 6.

(D)
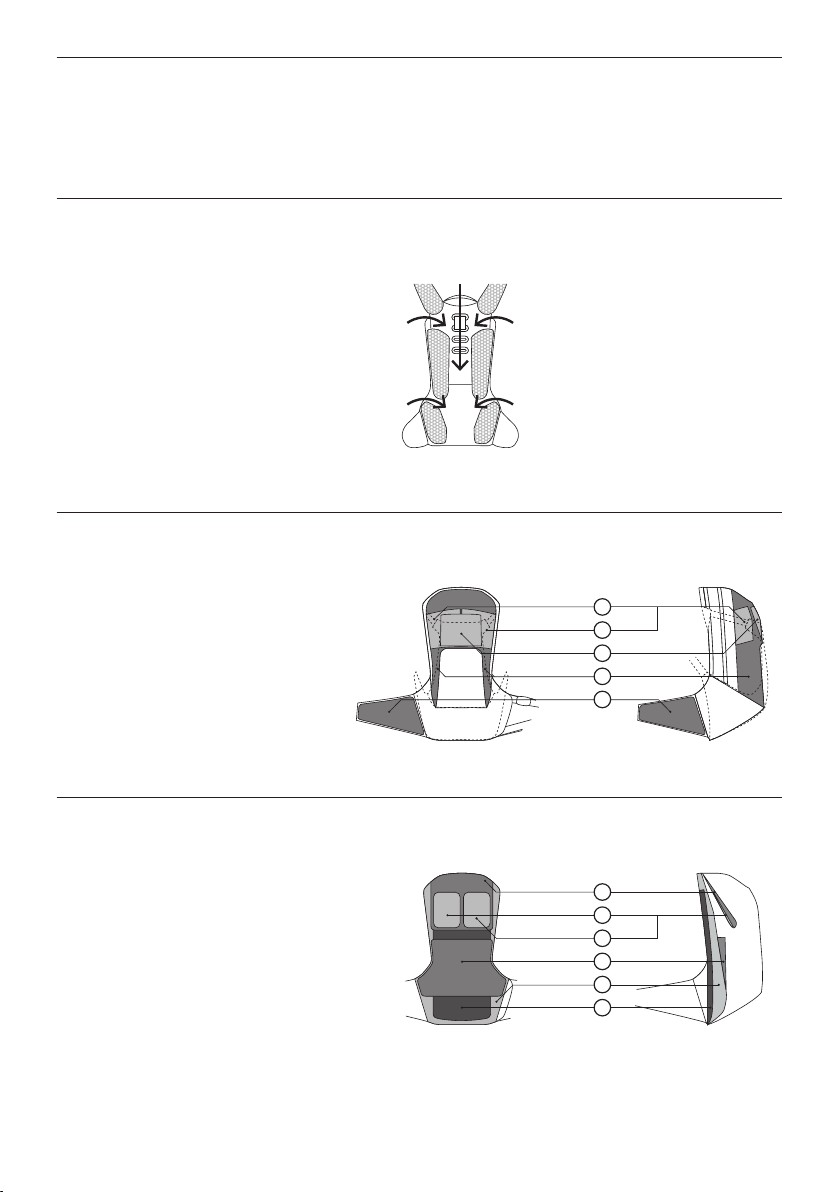
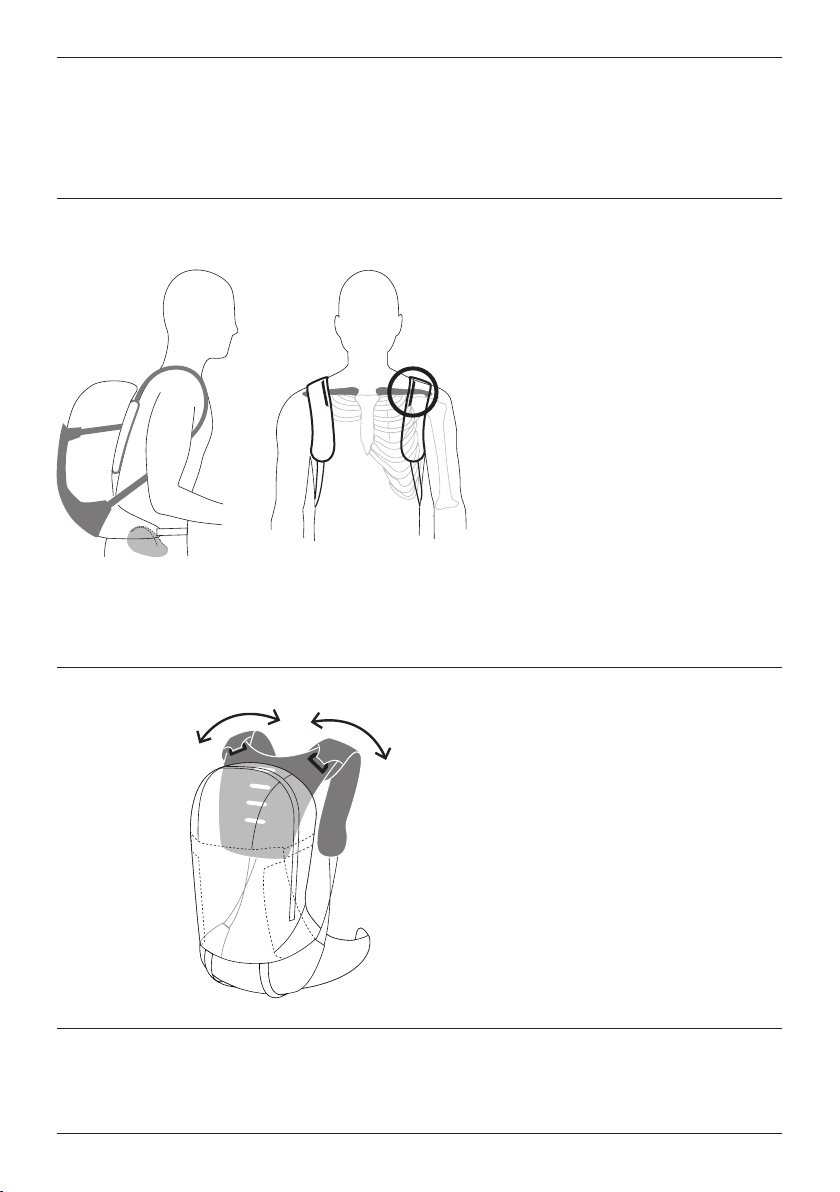
Anprobe
Abb. 1: Lösen Sie die Schultergurte etwas und
setzen Sie den Rucksack auf. Schließen Sie den
Hüftgurt. Die optimale Gewichtsverteilung wird
erreicht, wenn die Oberkante des Hüftgurtes
entlang der Oberkante des Beckenknochens
(+/– 3 cm) verläuft und die Hüfte fest umschließt
(nicht den Bauch!).
Abb. 2: Spannen Sie nun die Schultergurte bis
diese ohne großen Druck am Körper anliegen.
Setzen Sie sich auf Ihr Fahrrad oder in ähnlicher
Weise auf einen Stuhl in Fahrposition und über-
prüfen Sie die Position der grünen Justiermarke
auf den Schultergurten wie folgt: Gurtgröße und
Rückenlänge sind richtig, wenn Ihr Schlüsselbein-
knochen den Schultergurt im Bereich der grünen
Justiermarke kreuzt. Wenn dies nicht der Fall ist,
stellen Sie bitte die Rückenlänge neu ein.
Automatische Anpassung an die
Schulterneigung:
Abb. 3: Durch die zwei D-Ringe, mit denen die
Schultergurte befestigt sind, passt sich das
Tragesystem automatisch an die Schulterform an.
Durch Festziehen der Gurte wird diese Position
fixiert.
Abb. 1: Abb. 2:
Abb. 3:
Weitere Informationen finden Sie auf www.ergon-bike.com
Empfehlung zur Einstellung der Rückenlänge (siehe Tabelle auf der Rückseite dieser Anleitung).
Die Größe der Schultergurte kann anhand von Körpergröße und Konfektionsgröße ermittelt werden. Alle Angaben sind Richtwerte
und gelten für durchschnittlich proportionierte Personen. Abweichungen hiervon sind möglich und können - ebenso wie persönli-
che Vorlieben beim Tragen des Rucksacks - zu einem anderen Ergebnis führen.
ERGON BIKE ERGONOMICS
(D)
Protektor (Abb. 1a - 1c)
Durch Öffnen des Trinkblasenfachs gelangen Sie
an die Einstecktasche des Protektors. Achten Sie
bei der Benutzung des Protektors darauf, dass
dessen schwarze Seite immer zum Rücken des
Trägers zeigt. Sichern Sie den Protektor durch
Schließen der Klettlasche. Der Reißverschluss
sollte an den beiden Enden möglichst geschlos-
sen sein.
Trinkblase (Abb. 1d)
Lediglich eine kleine Öffnungen für die Durch-
führung des Trinkschlauchs der Trinkblase sollte
vorhanden sein.
Abb. 1d:
Abb. 1a:
Seite
Rückseite
Abb. 1c:
Abb. 1b:
Front
Schwarze Seite des
Protektors zeigt in Richtung
Rücken des Fahrers.
ERGON BIKE ERGONOMICS
Weitere Informationen finden Sie auf www.ergon-bike.com
Seite
Abb. 1:
Rückseite
Abb. 2a:
Abb. 3a:
Front Front
Seite
(D)
Abb. 2b:
Abb. 3b:
Regenhülle (Abb. 1)
1: Führen Sie den Hüftgurt durch die Schlaufen
der Regenhülle.
2: Ziehen Sie die Hülle rundum über den Rand
des Rucksacks.
Helmhalter (Abb. 2a / 2b)
Der variable Helmhalter ermöglicht die Befesti-
gung eines Full-Face-Helms (Abb. 2a) sowie
die Aufnahme eines Standard-Helms (Abb. 2b).
Außerdem ermöglicht er die rasche Unterbringung
zusätzlicher Ausrüstung und Bekleidung sowie die
Fixierung des Inhalts.
Halter für Protektoren (Fig. 3a / 3b)
Protektoren lassen sich durch die vertikalen
Aufnahmegurte am unteren Bereich des Ruck-
sacks befestigen. (Fig. 3a) Mit Hilfe des variablen
Helmhalters können Protektoren auch problemlos
seitlich angebracht werden (Fig. 3b).

Tipps zum Packen und Gewichtsverteilung
Packen Sie die schwersten Ausrüstungsgegenstände möglichst nahe am unteren Rücken entlang. Davor die leichteren Sachen.
Außen am Rucksack sollten nur ganz leichte Dinge wie etwa Helm oder Regenjacke verstaut werden.
Die an die Rückenform anpassbare Aluschiene (Contour Fit Aluminum Bar) verhindert, dass die gepackten Ausrüstungsgegen-
stände unangenehm in den Rückenbereich drücken.
Reinigung und Pflege
Reinigen und trocknen Sie Ihren Ergon Rucksack gründlich nach jedem Gebrauch. Nehmen Sie dazu kaltes bis handwarmes
Wasser und einen weichen Schwamm. Wischen Sie die Innenseite des Rucksacks mit einem feuchten Tuch ab, um die Beschich-
tung zu schonen. Verwenden Sie kein heißes Wasser, Bleiche, Geschirrspülmittel, Einweichlösungen oder Fleckenreiniger. Bei
starker Verschmutzung sind ausschließlich detergentienfreie Seifen zu verwenden. Verwenden Sie auf keinen Fall Lösungsmittel
zur Reinigung Ihres Ergon Rucksacks, da diese die Wasserbeständigkeit des Gewebes irreparabel beschädigen können. Durch
die Verwendung von Lösungsmitteln erlöschen jegliche Gewährleistungs- und Garantieansprüche.
Zum Trocknen hängen Sie den Rucksack in geöffnetem Zustand an einem luftigen und schattigen Ort auf und lassen ihn vollstän-
dig trocknen. Der Rucksack ist nicht für Waschmaschinen und Trockner geeignet.
Achtung
Der Rucksack ist stark wasserabweisend, jedoch nicht 100% wasserdicht! Benutzen Sie die beiliegende Regenhülle um Ihren
Rucksack und dessen Inhalt vor Nässe und Verschmutzung zu schützen. Wir empfehlen elektronische Geräte separat zu verpa-
cken.
Lagerung
Lagern Sie Ihren Ergon Rucksack nie, wenn er feucht oder schmutzig ist, da sich sonst Schimmel auf dem Gewebe bilden kann.
Schäden durch Schimmel führen zu Geruchsbildung und können nicht behoben werden. Bewahren Sie Ihren Rucksack an einem
kühlen, trockenen Ort auf und schützen Sie ihn vor direkter Sonneneinstrahlung.
Gewährleistungs-Anspruch
2 Jahre Gewährleistung auf Mängel. Reklamationen sind nur über einen Fachhändler abzuwickeln, dazu benötigen Sie den
Original-Kaufbeleg, da der Gewährleistungsanspruch damit nachgewiesen werden muss. Alle Gewährleistungsfristen werden
ungültig, wenn der Artikel auf Grund eines Unfalls beschädigt oder zweckentfremdet wurde, Systemänderungen sowie andere
Veränderungen vorgenommen wurden oder der Artikel anders verwendet wurde als in der Bedienungsanleitung beschrieben.
(D)

1. Advantages of Ergon’s BA3 Evo / BA3 Evo Protect backpacks
Taking the differing demands which users make on backpacks Ergon’s development team has come up with a unique system.
The straps automatically adjust to fit the user – the shoulder and waist straps finding the correct angle to ensure a comfortable fit.
The pack also allows for four levels of user defined adjustment.
The backpack also introduces the innovative Adaptive Carrier System. The twin shoulder straps are connected to a hammock like
structure underneath the load. This unique design allows the load to be brought as close to the user as possible. It also ensures
that the load is a lot more stable than with a traditional style pack.
The BA3 Evo backpack and BA3 Evo Protect offer a compartment for a back protector, which can be used at the same time as a
hydration bladder. There is a separate pocket for this inside the hydration bladder section.
Protector (BP100) * Bladder (BH200 / BH300) *
* BA3 Evo and BA3 Evo Protect have a separate compartment for a back protector and a hydration bladder.
All other backpacks have a single compartment which can be used for either a back protector or a hydration bladder.
(EN)
ERGON BIKE ERGONOMICS
* BA3 Evo and BA3 Evo Protect have a separate compartment for a back protector and a hydration bladder.
All other backpacks have a single compartment which can be used for either a back protector or a hydration bladder.
Fig. 2: Ventilation
Back
3. Pack layout (recommended use)
Fig. 2a: External Layout
1. Tools, Keys
2. Puncture Repair Kit, Spare parts
3. First Aid
4. Pump
5. Miscellaneous
Side
Fig. 3b: Internal Layout
1. Wallet / Purse
2. Camera
3. Mobile / Cell Phone
4. Miscellaneous
5. Bladder*
6. Protector*
1
2
3
4
5
1
2
3
4
5
Side
Abb. 3a: External Layout
Front
Abb. 3b: Internal Layout
Front
2. Improved Ventilation
The backpack using contact padding which
is specially designed with ventilation in mind
– a large open weave allows air to flow freely.
This improves air flow when riding – especially
compared to traditional designs. These pads are
laid out to create air channels – perfect for drying
any moisture which may exist.
6
(EN)

(EN)
ERGON BIKE ERGONOMICS
Adjusting the back length
Lift the pads outwards to the sides as illustrated above, pull
the shoulder plate upwards slightly and release the strap
underneath.
Pull the strap through the shoulder plate, and then thread it
through a different hole to pick the desired back length.
Note: When a back length is selected the strap covers the
selected length’s marking.
Please ensure when threading the strap that the shoulder plate
is threaded to the limit of the strap.
While replacing the pads to their original position, it is possible
to bend the shoulder plate slightly to allow the backpack to be
formed to suit the user.
By lightly bending an internal aluminium strip the user can
adjust the horizontal fit (aluminium strip is located between the
upper and lower pads).
Ensure that you have
fastened the poppers
fully.
Chosen back
length “M” hidden.
1. 2.
3. 4.
5. 6.

(EN)
Adjustment
Fig. 1: Loosen the shoulder straps and put
the pack on. Fasten the hip belt. The hip belt
is correctly positioned when the top of the hip
belt is follows the line of the pelvis (+/- 3cm) and
relatively tight. It should not be positioned across
the stomach.
Fig. 2: Tighten the shoulder straps until there is
little or no slack in the system. They should not
press into your shoulders. Sit on a bicycle, or on
a stool and mimic the position on a bicycle. The
green adjustment marks allow the user to check
that the Hip belt is the correct size and the back
length is correctly adjusted. This is the case when
the green adjustment marks cross. If this is not
the case, please re-adjust the pack.
Automatic adjustment of the shoulder
strap angles:
Fig. 3: Thanks to the two D rings at the top of
the shoulder straps, the carrying system has a
certain amount of automatic adjustment.
Fig. 1: Fig. 2:
Fig. 3:
Further information available at www.ergon-bike.com
Recommendation for the adjustment of the back length (see table on the back page of these instructions).
To assess the correct fit of your backpack, your height and clothing size can be used. All measurements are suggestions and are
based on average body sizes. Personal fit and preference may vary.

(EN)
ERGON BIKE ERGONOMICS
Protector (Fig. 1a - 1c)
Using the opening for the hydration bladder
compartment, a back protector can be inserted.
Please ensure that the black side of the back
protector faces the back of the user. Fasten the
protector using the provided fastener. The zipper
should then be closed as much as possible at
each side.
Hydration Bladder (Fig. 1d)
There is a small opening left for threading the
hydration hose.
Fig. 1d:
Fig. 1a:
Side
Back
Fig. 1c:
Fig. 1b:
Front
Please ensure that the
black side of the back
protector faces the back of
the user.

(EN)
Side
Fig. 1:
Back
Fig. 2a:
Fig. 3a:
Front Front
Side
Fig. 2b:
Fig. 3b:
Rain Cover (Fig. 1)
1: Thread the hip belt through the guides on the
rain cover.
2: Pull the rain cover up over the top of the pack.
Helmet Carrying (Fig. 2a / 2b)
The adjustable helmet holder allows a full-face
helmet to be carried (Fig 2a), or a standard
bicycle helmet (Fig 2b). In addition it can be
used to carry other items such as clothing. It also
allows the pack’s contents to be secured.
Carrying arm / leg protectors (Fig. 3a / 3b)
Arm / Leg protectors can be carried using the
vertical straps on the underside of the backpack.
(Fig. 3a) Protectors can also be carried using the
adjustable helmet flap. (Fig. 3b).

(EN)
ERGON BIKE ERGONOMICS
Tips for packing the bag and weight distribution
Pack heavy articles first (so they are at the bottom of the pack). Only pack lightweight items (such as a helmet or rain jacket) using
the helmet holder.
The integrated mouldable aluminium strip (Contour Fit Aluminium Bar) prevent the contents of the pack causing discomfort by
keeping it away from the user’s back.
Cleaning and maintenance
Clean and dry your pack after each use to keep it in top condition. Use only luke warm water and a soft sponge. Wipe the pack
internally with a damp cloth – this protects the coating on the fabric. Do not use hot water, bleach, washing up liquid, solvents,
paint or stain removers. For stubborn stains use a detergent free soap. Use of solvents on your backpack will damage the water
resistant coating irreparably. Failure to follow these instructions will result in an invalidated warranty.
To dry, hang the open pack in a cool, dry, well ventilated place out of direct sunlight. The backpack may not be machine washed
or dried.
Note
The backpack is highly water resistant, however not 100% waterproof. Use the included rain cover to protect the backpack and
contents from moisture and dirt. We recommend packing electronics in a separate waterproof container.
Storage
Never put an Ergon backpack away wet or dirty. This could lead to mould – which can damage the fabrics and cause unpleasant
smells. Store the pack in a cool, dry place out of direct sunlight.
Warranty
Warranty on our products is for two years from the date of purchase. This covers defects in materials and / or workmanship.
Any warranty claims should be made through your retailer. Proof of purchase will be necessary. Our warranty does not cover any
damage resulting from incorrect use of the product or failure to observe any of the instructions given. The warranty does not cover
crash damage. The warranty is invalid should the product have been modified in any way. We are reasonable people so if you are
in doubt as to whether you have a warranty claim or not, please contact your retailer.

1. Les avantages du sac à dos BA3 Evo / BA3 Evo Protect d’Ergon
L’équipe de conception d’Ergon a mis au point un système unique qui répond à toutes les exigences des utilisateurs de sacs à
dos. Les sangles s’ajustent automatiquement: les bretelles et la ceinture trouvent l’angle qu’il faut pour un confort optimal. Le BA3
Evo / BA3 Evo Protect d’Ergon offre quatre niveaux de réglage différents que l’utilisateur peut choisir selon ses besoins.
Le sac à dos BA3 Evo / BA3 Evo Protect offre aussi un système de compression unique. Les bretelles sont reliées à une structure
en forme de hamac située sous la charge. Ce design exceptionnel rapproche le poids le plus près possible de l’utilisateur et
stabilise la charge beaucoup mieux qu’un sac à dos traditionnel.
En outre, les sacs à dos BA3 Evo et BA3 Evo Protect vous permettent de combiner un protecteur et un sac à eau. Vous trouvez
ici des poches séparées à l‘intérieur du compartiment pour sac à eau.
Protecteur (BP100) * Sac à eau (BH200 / BH300) *
* BA3 Evo et BA3 Evo Protect avec compartiments séparés pour protecteur et sac à eau.
Tous les autres sacs Ergon possèdent seulement un compartiment pour le protecteur ou le sac à eau (au choix).
(FR)

(FR)
ERGON BIKE ERGONOMICS
Fig. 2: Ventilation
Arrière
3. Présentation du sac à dos
(usage recommandé)
Fig. 3a: Disposition extérieure
1. Outils, clés
2. Trousse de réparation pour chambre à air,
pièces de rechange diverses
3. Trousse de premiers soins
4. Pompe
5. Autres
Côté
Fig. 3b: Disposition
intérieure
1. Portefeuille / sac à main
2. Caméra
3. Téléphone cellulaire
4. Autres
5. Sac à eau*
6. Protecteur*
1
2
3
4
5
1
2
3
4
5
Côté
Fig. 3a: Disposition extérieure
Avant
Fig. 3b: Disposition intérieure
Avant
2. Ventilation améliorée
Le BA3 Evo / BA3 Evo Protect est doté de
coussinets de contact spécialement conçus pour
la ventilation. Ils sont faits d’un tissu à grandes
alvéoles qui laisse l’air circuler librement. Com-
paré aux designs traditionnels de sacs à dos,
ce tissu unique est idéal pour le vélo: l’humidité
est presque instantanément évacuée grâce à la
disposition du rembourrage.
6
* BA3 Evo et BA3 Evo Protect avec compartiments séparés pour protecteur et sac à eau.
Tous les autres sacs Ergon possèdent seulement un compartiment pour le protecteur ou le sac à eau (au choix).
(FR)
Réglage de la longueur du dos
Soulevez les coussinets vers l’extérieur (voir l’illustration au-
dessus). Faites glisser la plaque d’épaules vers le haut, puis
sortez la courroie qui s’y trouve en dessous.
Ensuite, enfilez la courroie dans un premier trou sur la plaque
d’épaules, puis dans un deuxième trou qui correspond à la
taille désirée.
Note: Une fois enfilée, la courroie est censée couvrir la marque
de la taille choisie.
Assurez-vous d’enfiler la courroie dans toute sa longueur.
Pour remettre les coussinets en place, pliez légèrement la
plaque d’épaules. Le sac s’ajustera alors à la forme désirée.
Il est possible d’effectuer un ajustement horizontal en pliant
légèrement une bande interne en aluminium située entre les
coussinets supérieurs et inférieurs.
Assurez-vous de bien
refermer les coussinets.
La taille choisie, «M», est
cachée par la courroie.
1. 2.
3. 4.
5. 6.
(FR)
Ajustement
Fig. 1: Desserrez les bretelles et enfilez le sac
à dos. Attachez maintenant la ceinture. Cette
dernière devrait être assez serrée et déposée
le long de la région pelvienne, pas au niveau du
ventre.
Fig. 2: Réglez les bretelles jusqu’à ce que tout
le système soit bien ajusté (elles ne devraient
pas presser les épaules). Asseyez-vous ensuite
sur un vélo ou placez-vous sur un tabouret et
inclinez-vous vers l’avant (comme sur un vélo).
Les marques d’ajustement vertes permettent
de déterminer si la ceinture est assez serrée
et si la longueur du dos est correctement
réglée. Si les marques d’ajustement vertes se
croisent, l’ajustement est parfait. Sinon, il faut
recommencer le réglage.
Ajustement automatique de l’angle des
bretelles:
Fig. 3: Le sac à dos BA3 Evo / BA3 Evo Protect
d’Ergon comporte un système d’ajustement
automatique: les anneaux en forme de D situés
au-dessus de chacune des bretelles règle l’angle
de ces dernières.
Fig. 1: Fig. 2:
Fig. 3:
Conseils quant au réglage de la longueur du dos (voir le tableau à la dernière page de ce manuel).
Le réglage des bretelles peut être déterminé par la taille du corps et des vêtements. Nos mesures ne sont que des suggestions;
elles sont basées sur la taille moyenne du corps. Elles peuvent varier selon les besoins et les préférences personnels de
l’utilisateur.
Pour de plus amples renseignements, veuillez consulter lewww.ergon-bike.com
ERGON BIKE ERGONOMICS

(FR)
Protecteur (fig. 1a - 1c)
Ouvrez le compartiment pour sac à eau pour
accéder à la poche du protecteur. Lors de
l‘utilisation du protecteur, assurez-vous que sa
face noire est toujours orientée vers le dos du
porteur. Bloquez le protecteur en fermant la
bande Velcro. La fermeture éclair doit si possible
est fermée aux deux extrémités.
Sac à eau (fig. 1d)
Seulement une petite ouverture pour le passage
du tuyau du sac à eau doit être présente.
fig. 1d:
fig. 1a:
Côté
Arrière
fig. 1c:
fig. 1b:
Avant
La face noire du protecteur
est orientée vers le dos du
cycliste.
This manual suits for next models
1
Table of contents
Languages:
Other Ergon Accessories manuals


Popular Accessories manuals by other brands


 owner's manual")


Thermo Scientific
Thermo Scientific 8000DH Series Operating and maintenance manual

B.E.G. LUXOMAT
B.E.G. LUXOMAT PD2N-KNX-ST-FM Mounting instructions

Wilo
Wilo DDA Installation and operating instructions

Pall
Pall WS08 Series Instruction booklet

PASCO
PASCO PS-3224 reference guide

Goobay
Goobay 44826 user manual