Yeti CNC Stylus User manual


Yeti Tool Ltd | Unit 12 Old Mill Road | Portishead | Bristol | BS20 7BX
2
CNC STYLUS –QUICK START GUIDE V1.1
Contents
1Introduction ......................................................................................................................... 4
2Getting Started .................................................................................................................... 4
2.1 Safety.............................................................................................................................. 4
2.2 What’s in the box?.......................................................................................................... 4
2.3 CNC Stylus assembly .................................................................................................... 5
3Collet system....................................................................................................................... 6
3.1 Collet sizes ..................................................................................................................... 6
3.2 Fitting and removing a collet ........................................................................................ 6
4Fitting CNC stylus ............................................................................................................... 8
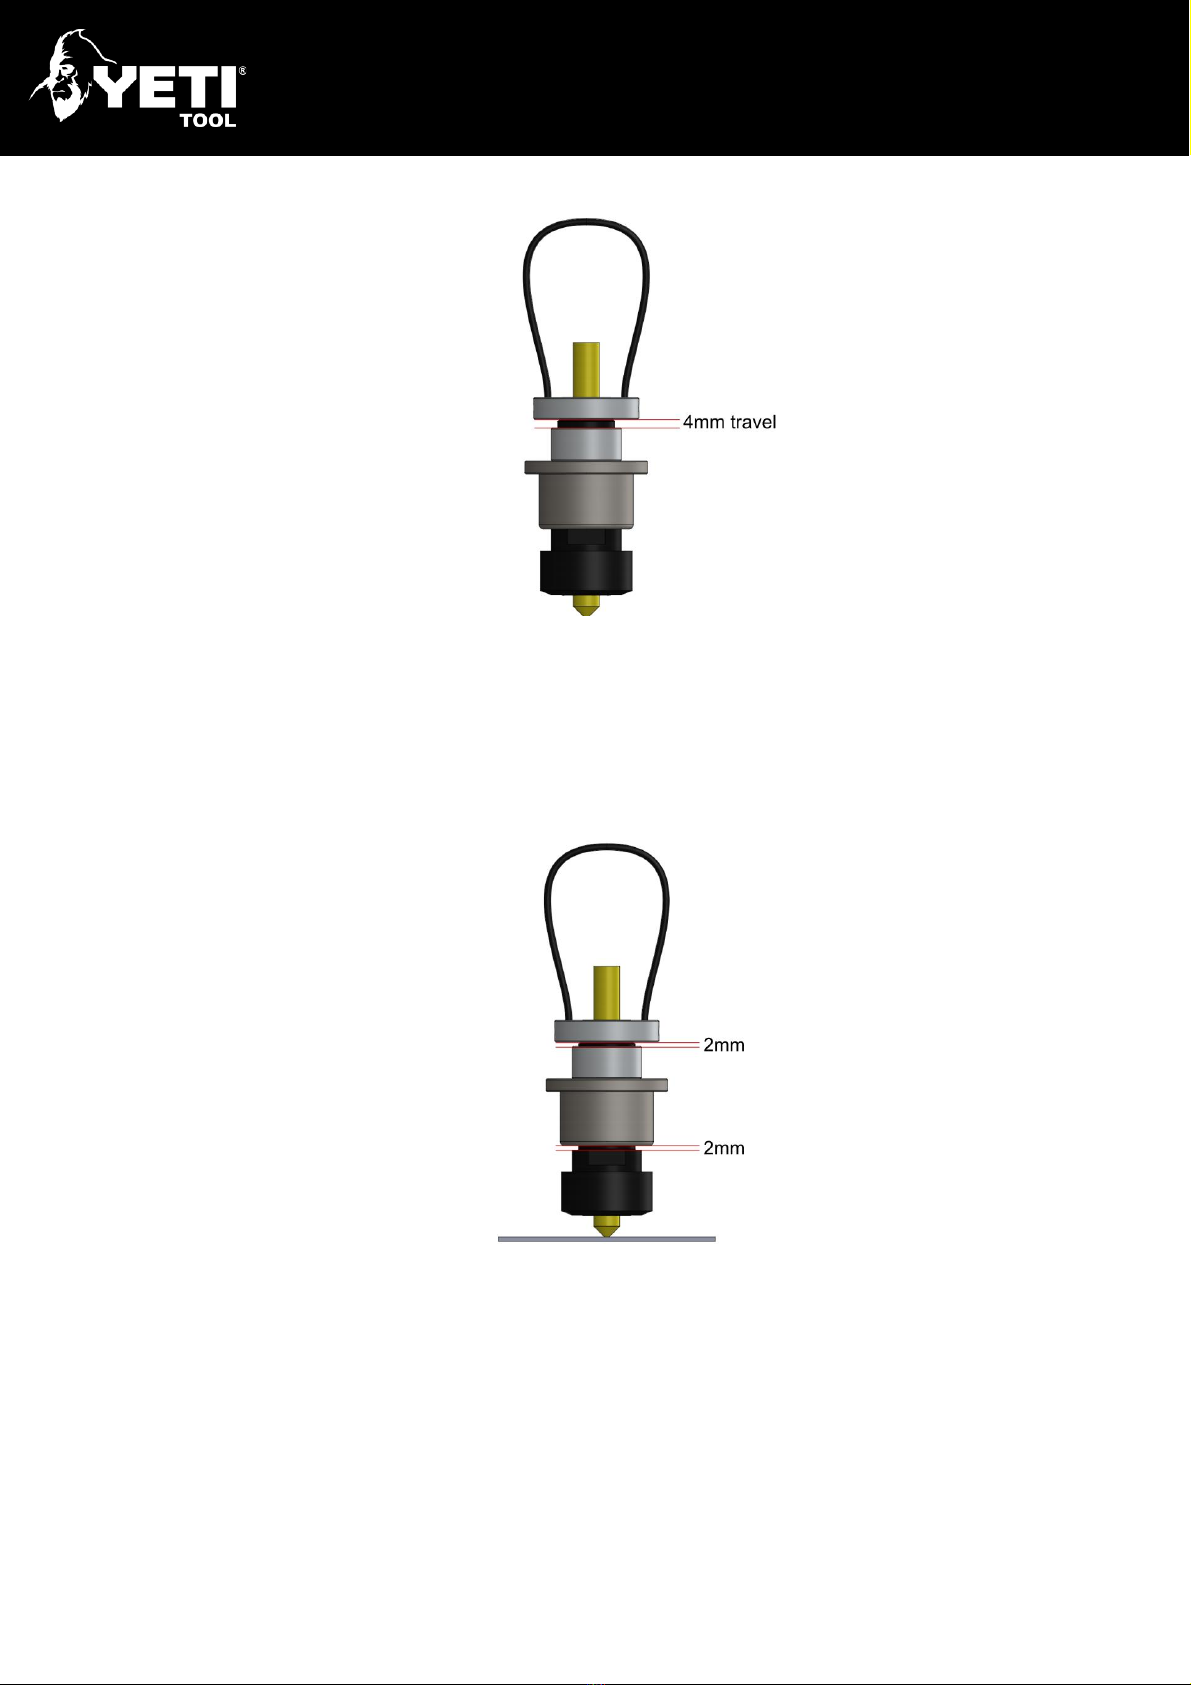
5Setting Z datum................................................................................................................... 8
6Pen plotting ....................................................................................................................... 10
6.1 Materials....................................................................................................................... 10
6.2 Preparation................................................................................................................... 10
6.2.1 Spoil board ............................................................................................................ 10
6.2.2 Work-holding ......................................................................................................... 10
6.3 Mounting a drawing device......................................................................................... 10
6.4 CAM .............................................................................................................................. 11
6.4.1 Toolpaths .............................................................................................................. 11
6.4.2 Retract height........................................................................................................ 11
7Vinyl cutting....................................................................................................................... 12
7.1 Materials....................................................................................................................... 12
7.1.1 Self-adhesive vinyl ................................................................................................ 12
7.1.2 Heat transfer vinyl ................................................................................................ 12
7.1.3 Rigid vinyl .............................................................................................................. 12
7.2 Preparation................................................................................................................... 12
7.2.1 Spoil board ............................................................................................................ 12
7.2.2 Cutting mat............................................................................................................ 12
7.2.3 Work-holding ......................................................................................................... 13
7.3 Blade types................................................................................................................... 13
7.4 Changing a blade ......................................................................................................... 14
7.5 Setting blade height..................................................................................................... 14

Yeti Tool Ltd | Unit 12 Old Mill Road | Portishead | Bristol | BS20 7BX
3
CNC STYLUS –QUICK START GUIDE V1.1
7.6 Mounting the vinyl cartridge ....................................................................................... 15
7.7 CAM .............................................................................................................................. 16
7.7.1 Toolpaths .............................................................................................................. 16
7.7.2 Blade offset........................................................................................................... 16
7.7.3 Retract height........................................................................................................ 16
8Support .............................................................................................................................. 17
8.1 Get help......................................................................................................................... 17
8.2 Knowledgebase ........................................................................................................... 17

Yeti Tool Ltd | Unit 12 Old Mill Road | Portishead | Bristol | BS20 7BX
4
CNC STYLUS –QUICK START GUIDE V1.1
1Introduction
Thank you for purchasing CNC Stylus. This quick start guide has been created to enable
you to start drawing and cutting vinyl as quickly as possible. For more detailed guidance,
please see Section 8.2 Knowledgebase, page 17.
2Getting Started
Before you start, we would recommend reading this guide to ensure you understand how
to successfully use the CNC Stylus.
2.1 Safety
Note: Vinyl cutting blades are sharp and should be handled with care. When
not in use, remove the blade and replace the cover. Blades should be
disposed of in a safe manner.
2.2 What’s in the box?
Start by getting familiar with all the components of the CNC Stylus.
Please check the box contents. If any of the above items are damaged or missing, please
contact your point of purchase immediately.
1x CNC Stylus
1x ER25 Collet set (sizes 8-16mm)
1x Vinyl cartridge
3x Set of vinyl cutting blades (30, 45 and 60 degree)
1x Set of 4 Sharpies (Marker pens)
1x Blade height jig

Yeti Tool Ltd | Unit 12 Old Mill Road | Portishead | Bristol | BS20 7BX
5
CNC STYLUS –QUICK START GUIDE V1.1
2.3 CNC Stylus assembly
The CNC Stylus comprises several different components as detailed in the diagrams
below.

Yeti Tool Ltd | Unit 12 Old Mill Road | Portishead | Bristol | BS20 7BX
6
CNC STYLUS –QUICK START GUIDE V1.1
3Collet system
3.1 Collet sizes
CNC Stylus uses an ER-25 collet system which allows you to easily interchange different
tools into the device.
We have created a quick look up table below for some common tools.
Tool
Collet size
Vinyl Cartridge
15-16mm
Sharpie
11-12mm
Biro
7-8mm
Pencil
7-8mm
3.2 Fitting and removing a collet
The collet features an eccentric washer which requires force to be applied to a specific
side to allow engagement and removal of the collet with the nut.
After selecting your collet, you will need to push it into the nut until it engages.
You will hear an audible click. You can check this by inverting the assembly. If the collet is
fitted correctly, the collet will not fall out.

Yeti Tool Ltd | Unit 12 Old Mill Road | Portishead | Bristol | BS20 7BX
7
CNC STYLUS –QUICK START GUIDE V1.1
To remove the collet, push the collet to the side using your thumb. You may need to rotate
the collet in the nut.

Yeti Tool Ltd | Unit 12 Old Mill Road | Portishead | Bristol | BS20 7BX
8
CNC STYLUS –QUICK START GUIDE V1.1
4Fitting CNC stylus
CNC Stylus has a standardised 43mm boss which is compatible with a wide range of CNC
machines. The CNC Stylus should be clamped securely around the boss.
5Setting Z datum
The CNC Stylus features a constant pressure system, using gravity. This ensures the
chosen tool maintains an even contact with the material surface, irrespective of any
deviation in flatness.
This feature is achieved by allowing the barrel to move freely inside the boss. As built,
travel is 4mm.

Yeti Tool Ltd | Unit 12 Old Mill Road | Portishead | Bristol | BS20 7BX
9
CNC STYLUS –QUICK START GUIDE V1.1
When setting the Z datum, you must position the CNC Stylus’ barrel in the middle of the
travel range. To do this, move your Z axis until the tool touches the material surface, and
then continue to move your axis by another 2mm. You can now set your Z datum to this
point.
You will need to adjust the retract settings in your CAM software to ensure the CNC Stylus
lifts clear of the material during a move to the start of a new toolpath. As shown, this value
would need to be higher than 2mm e.g., 5mm. To learn more about retracts, and how to
increase total retract height up to 19mm for special projects, please see Section 8.2
Knowledgebase, page 17.

Yeti Tool Ltd | Unit 12 Old Mill Road | Portishead | Bristol | BS20 7BX
10
CNC STYLUS –QUICK START GUIDE V1.1
6Pen plotting
6.1 Materials
CNC Stylus can be used to draw, write, and plot on many different types of material
including the following:
•Papers
•Cards
•Woods
•Textiles
•Plastics
•Metals
6.2 Preparation
6.2.1 Spoil board
When selecting a suitable spoil board, we need to ensure to use something strong, rigid,
and flat.
We would recommend using a 12mm melamine faced MDF board.
6.2.2 Work-holding
There are several different ways to hold material down to your spoil board. You should
ensure your material is as flat as possible.
We would recommend using a low tack tape along all edges. To find out more about work-
holding, please see Section 8.2 Knowledgebase, page 17.
6.3 Mounting a drawing device
To fit your tool to the CNC Stylus, you will need to ensure you select the correct collet size.

Yeti Tool Ltd | Unit 12 Old Mill Road | Portishead | Bristol | BS20 7BX
11
CNC STYLUS –QUICK START GUIDE V1.1
Please see the quick look up table in the collet sizes section –Page 6.
Once you have selected the correct size collet, fit the collet to the collet nut. You can now
insert your chosen tool into the stylus and tighten the collet nut. We would recommend
clamping onto the tool as close to the tip as possible.
6.4 CAM
6.4.1 Toolpaths
You must use your CAM software to create a toolpath for your design. You can use several
different toolpaths including profile, pocket and engrave.
To find out more about creating toolpaths with Vectric VCarve Pro please see Section 8.2
Knowledgebase, page 17.
6.4.2 Retract height
You will need to set the retract height to reflect the amount of travel set in Section 5,
page 8.

Yeti Tool Ltd | Unit 12 Old Mill Road | Portishead | Bristol | BS20 7BX
12
CNC STYLUS –QUICK START GUIDE V1.1
7Vinyl cutting
7.1 Materials
7.1.1 Self-adhesive vinyl
Self-adhesive vinyl comes in many different types which vary in thickness, colour and
finish. Adhesive vinyl is cut with the vinyl facing up and the paper carrier sheet down.
This can be used for signage and branding in both indoor and outdoor environments.
7.1.2 Heat transfer vinyl
Heat transfer vinyl (commonly called HTV) is not sticky and instead is fused with heat to
fabrics, such as shirts, tote bags, coats, scarves, blankets, stuffed animals, etc. It is
designed to be applied with a heat press or an iron. HTV is cut with the clear shiny side
facing DOWN and the duller back of the vinyl facing up.
7.1.3 Rigid vinyl
Rigid vinyl can come in a range of thicknesses from 70- 500 microns. Most commonly
made from PVC, this clear vinyl has a range of applications.
7.2 Preparation
7.2.1 Spoil board
When selecting a suitable spoil board, we need to ensure to use something smooth, rigid,
and flat.
We would recommend using a 12mm melamine faced MDF board.
7.2.2 Cutting mat
Although it is not mandatory, using a cutting mat when cutting through vinyl will maintain
the condition of the blade and avoid snagging.
A self-healing mat can for this type of application. To find out more about cutting mats,
please see Section 8.2 Knowledgebase, page 17.

Yeti Tool Ltd | Unit 12 Old Mill Road | Portishead | Bristol | BS20 7BX
13
CNC STYLUS –QUICK START GUIDE V1.1
7.2.3 Work-holding
There are several different ways to hold material down to your spoil board. We would
recommend using either a low tack tape or a spray mount adhesive. You should ensure
your material is as flat as possible. To find out more about work-holding, please see
Section 8.2 Knowledgebase, page 17.
7.3 Blade types
There are 3 different types of blade, defined by their cutting angle. The different angles
can be applied to different material types and thicknesses. The diagram below represents
the 3 different blade angles and their uses.
60 degree –Thick media such as card, rigid vinyl, fabric, cork, and magnet
45 degree –Medium media such as vinyl (adhesive and heat transfer), paper and thin card
30 degree –Thin media such as film or window tint
*Cutting mat/ backing paper

Yeti Tool Ltd | Unit 12 Old Mill Road | Portishead | Bristol | BS20 7BX
14
CNC STYLUS –QUICK START GUIDE V1.1
7.4 Changing a blade
The cutting blade is held in place with a magnet which sits on a bearing. This allows the
blade to easily swivel and rotate.
To remove the blade, simply press on the ejection pin as shown below.
You can then remove the blade by pulling it out. Remember to replace the protective cap to
ensure your blade does not get damaged or blunted.
7.5 Setting blade height
When cutting vinyl, setting the correct blade height is especially important. If you do not
set the blade height correctly, you can end up cutting too far through your material, or not
far enough.
To set the blade height:
1. Insert the blade you wish to use into the vinyl cartridge
2. Loosen the gold locking ring on the vinyl cartridge
3. Rotate the top part of the cartridge assembly until the blade extends from the
cartridge the correct amount
4. Tighten the gold locking ring to fix the blade height

Yeti Tool Ltd | Unit 12 Old Mill Road | Portishead | Bristol | BS20 7BX
15
CNC STYLUS –QUICK START GUIDE V1.1
IMPORTANT: The blade should be set to extend from the cartridge system
the same distance as the thickness of the material you wish to cut. We would
recommend you measure the material but only include the layers you wish to
cut through.
For example, if you are cutting self-adhesive vinyl then you will need to ensure you are only
cutting through the top layer and not the backing paper. We would recommend testing the
blade height on a scrap piece of vinyl before committing to your project.
We have included a blade height jig which will allow you to clearly see how far the blade
extends from the cartridge.
To use the jig, hold the cartridge against the edge of flat face. This will allow you to clearly
see how far the blade extends from the cartridge and adjust, as necessary.
7.6 Mounting the vinyl cartridge
To fit the vinyl cartridge to the CNC Stylus, you will need to ensure you select the correct
collet size.
Please see the quick look up table in the collet sizes section –Page 6.
Once you have selected the correct size collet, fit the collet to the collet nut. You can now
insert the vinyl cutting cartridge into the stylus. In the diagram below, you can see the part
of the assembly we need to clamp onto to effectively hold the cartridge.

Yeti Tool Ltd | Unit 12 Old Mill Road | Portishead | Bristol | BS20 7BX
16
CNC STYLUS –QUICK START GUIDE V1.1
7.7 CAM
7.7.1 Toolpaths
You must use your CAM software to create a toolpath for your design. Vectric Vcarve Pro
features a drag-knife tool path gadget which is pre-installed.
To find out more about creating toolpaths with Vectric VCarve Pro please see Section 8.2
Knowledgebase, page 17.
7.7.2 Blade offset
Blade offset is the distance between the point at which the blade cuts to the point at which
the blade rotates.
Most CAM software can accommodate for blade offset which needs to be entered
manually. The value is normally between 0.25 and 0.1mm. If your blade offset is set
incorrectly, you will not achieve sharp corners where required. To find out more about
blade offset please see Section 8.2 Knowledgebase, page 17.
7.7.3 Retract height
You will need to set the retract height to reflect the amount of travel set in Section 5,
page 8.

Yeti Tool Ltd | Unit 12 Old Mill Road | Portishead | Bristol | BS20 7BX
17
CNC STYLUS –QUICK START GUIDE V1.1
8Support
8.1 Get help
If you require technical support, please go to www.yetitool.com/support and submit a
support ticket.
8.2 Knowledgebase
For further information please visit our website. We have a dedicated Knowledgebase
which hosts more resources: www.yetitool.com/knowledgebase/cnc-stylus
SCAN ME TO GO
TO KNOWLEDGEBASE
SCAN ME TO GO
TO SUPPORT
Table of contents
Other Yeti Bicycle Accessories manuals
Popular Bicycle Accessories manuals by other brands

Buddyrider
Buddyrider Pet Seat installation instructions

Continental Refrigerator
Continental Refrigerator Ergon Series Original instructions

Halfords
Halfords Bicycle Computer owner's manual

The Hive
The Hive e*thirteen TRS Assembly

Crivit Pro
Crivit Pro CBGT 4 A1 operating instructions

Carry Freedom
Carry Freedom Bamboo Trailer instructions