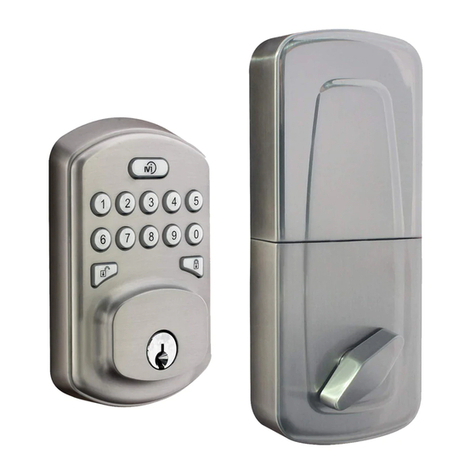
Yolink M2 Operation manual

YoLink Smart Lock M2
(Door Knob)
YS7607-UC
Installaon & User Guide
Rev 1.1

Contents
A.
B .
C .
D.
E .
F .
G.
H.
I .
J .
In the Box ······· ····· · ·· · ·1······················ ····· ···················································· · ·
Introducon ······························································································2
Set Up ····································································································· ·4·
Installaon ·······························································································6
Using the YoLink Smart Lock M2 ·······························································14
Using the YoLink App ···············································································19
Maintenance ······················································································· ···25·
Specificaons ····················································································· ····27·
Troubleshoong ················································································· ·····28·
Warning ······························································································ ····29·
Revised: 04/25/2021
Copyright 2021 YoSmart Inc. All rights reserved©

A. In the Box
A. Front Module
B. Back Module
C. Strike Plate
D. Back Mounng Plate
E. Dead Latch
F. Screws (8)
G. Mechanical key (2)
1
G.
E. F. F3
F2F1
C. D.
A. B.

2
B. Introducon
The YoLink Smart Lock M2, is a stand-alone electronic keypad door knob which provides four
methods for both unlocking and locking the door: the knob, the mechanical key, the keypad and the
YoLink app. Add the smart lock to YoLink app, you can lock or unlock the door and can check the
historical unlocked record (including member, method, date and me) though app. When the door is
unlocked, noficaons will be sent to you via the YoLink app (available noficaons types are: email,
text/SMS and push/banner noficaons on your Apple or Android smartphone, each configurable in
app sengs)
2
Doorbell Buon
Tap to nofy and send
a visit noficaon the
house host
0-9 Digit keypad
Tap to enter password
Unlocked Buon
Tap to unlock aer
password entered
Locked Buon
Tap to lock
Mechanical Key Hole
Baery Cover
Baery Compartment
Housing four AA non-rechargeable
baeries
Automac Lock 10 Seconds
Aer Being Unlocked
On: Enable automacally lock
Off: Disable automacally lock
Clear Buon
Knob
SET Buon

The LED light indicates the current status of the smart lock:
Fast Blinking Green Once
Door is Unlocked
Blinking Green
Connecng to Cloud
Fast Blinking Red Once
Door is locked
Blinking Red
Restoring to Factory Default
light Up Blue
Digit keypad backlight
3

C. Set Up
C-1. Set Up - First-Time YoLink Users (Exisng users proceed to C-2. Add Device, next page)
4
YoLink Hub is required to set
up your Smart Lock YoLink
M2. Please set up your YoLink
Hub first (refer to YoLink Hub
manual)
3
Power
Adapter
YoLink Hub
Log in the YoLink app
2
Create a new account
if required
Download the YoLink app through
Apple App Store or Google Play
Store (Search in the store or use
the QR code on the right)
1
Apple iPhone or tablet that is iOS 9.0
or higher, or an Android phone or
tablet that is Android 4.4 or higher
YS1603-UC
User Guide
2. Ethernet patch cable (included) to
your network (router, switch, etc.),
r e c o m m e n d e d , b u t o p o n a l .
Otherwise connect your Hub to your
home 2.4 GHz Wi-Fi network. Refer
to the Hub set up manual for more
informaon:
1. Make sure your Hub is connected
to the internet (green LED indicator is
blinking, blue LED indicator is always
on)

C-2. Add Device
5
Ta p “ ” buon, then scan Q R
C o d e o n t h e d e v i c e . Fo l l o w t h e
ste ps to a d d t h e d ev i c e
1
Install four AA non-rechargeable
baeries aer installaon. The
“ ” Buon LED will blink green
severa l mes, ind i ca n g your
device has connected to the cloud
and is ready to use
2
1. You will need to press the SET buon once aer installing four AA baeries or re-install the AA
baeries if the device failed to connect to the cloud
2. If the green LED does not blink as noted this may indicate a problem with the smart lock. Please
see the troubleshoong secon and the contact secon for technical support

D. Installaon
D-1. IMPORTANT SAFETY NOTICE!
DO NOT USE POWER DRILL
The back module (part B) needs to be protected from weather
6
D-2. These Tools May be Required
Phillips Screwdriver AA Baery (4,
Non-rechargeable)

7
Adjust Latch Backset
2
Anclockwise rotate to loose the buckle
Clockwise rotate to ghten the buckle
Pull right to extend the length of buckle to
70 millimeters ; push le to (23/4'' inches)
s ho r te n t h e l e ng th o f b u c k l e t o 6 0
millimeters inches)(23/8''
Default is 60 millimeters (23/8''
inches)
OR
60mm(23/8′′)
70mm(23/4′′)
E.
Please keep the square
in the circle aligned to
the latch backset
D-3. Get Ready

8
D-4. Begin Installaon
Install the door latch
1
G e n t l y p u t t h e d o o r l a t c h a c r o s s t h e
i n s t a l l a o n h o l e o n t h e d o o r
Sc rew an d fasten the dead latch wit h
two mou n ng s crews (F3 )
F3
1. Keep the inclined plane outward
E.

Install the strike plate
2
Kee p t he str ike p la te p or o n on th e d oo r f ra me al ig ne d to th e sp ri ng bo lt
Screw and fasten the latch with two mounng screws (F3)
F3
C.
9

Mount the Front Module
3
Place the front module on the side of the outdoor
Carefully hold the front module to avoid being dropped down
Keep dr i ve bar in the verca l orientao n when front m odule wa s installed , inser t the dr ive bar ac ro ss the
cam sl ot of th e dead l atc h
10
Turn ac ro ss the co n neco n cable ac ro ss the m o unng h o le
A.
Connecon Cable
Drive Bar

Fasten the Back Mounng Plate
4
a. Pla ce the bac k m oun ng plat e on th e si de o f t he i ndo or. Pass the dr ive b ar of f ront mod ule th roug h th e
mi ddl e ci rcle of t he b ack mou nn g pl ate; p as s th e con nec on cab le t hrou gh t he h ole at t h e to p of the pla t e
b. Insert and ghten two mounng screws (F1) through the two small circles on the le and right side to fasten
the plate
11
D. F1
b.
a.

Mount & Fasten Back Module
5
a. Connect the connecon ca b le of the front module and connecon cable of the back module
b. I nsert and g hten two m ounn g screws ( F2) to faste n the b ack mo dule
c. I nstall four new AA non-re c hargeab le baer ies
12
d. I nstall b a e ry cove r
Be sure the thumbturn is in the
unlocked posions
F2
B.
4X
AA
c.
b. a.
d.

Test the YoLink Smart Lock M2
6
a . Te st th e ke y pa d : p r es s a l l b u o n s o n
Ke y p a d an d co n fir m th e y w o rk . Sh o u ld a ll
b e e p
- I f sl l so me /al l u n res p on si ve , re m o ve
b a c k mo d u l e an d i ns pe ct w ir e fo r a ny
p i n ch es or cu t s
- Be sure wire isn’t pinched between door
and back module
- Disconnect the wires between front
module and back module, reconnect aer
several seconds
b. Test the key. Should be used for locking
or unlocking the door
c. Using the YoLink app, test the operaon
of the Lock (lock, unlock, etc.)
If it is not working properly, double-check or re-do through
step 4 to 5, as needed. Do not proceed to the next step unl
it works properly
13

E. Using the YoLink Smart Lock M2
E-1 Set the Local Password
1. Local password is default set to: 12345678. For your home security, please set a new local password
right now aer installaon
2. When seng the local password, keep the door open
3. If you have forgoen the password just follow the above steps to set a new local password, and the old
one will be invalid
Press the “S” buon once
on the back module
1Enter a 4-8 digits on the front module followed
by the “ ” buon
2
Each YoLink Smart Lock M2 support only one local password. You will need to set the local
password physically
14
2 Beeps = Success
3 Beeps = Try again
0 Beep = Go to troubleshoong

E-2 Unlock the Door
Enter a password (local password, user password or visitor password) on the front module
followed by the “ ” buon
When t h e passwo rd i s corre ct and valid t h at c a n
unlock t h e door
Scramble Security Feature:
You can enter a valid password before, aer or in-between a series of random numbers (up to a total of 16
digits) followed by the “ ” buon
123456780127 012712345678 1234 56780127
Keypad will be automacally locked
for 5 minutes aer wrong password
is entered for 5 mes in 5 minutes,
you can’t deal with any operaons
with the keypad. You can unlock the
door using a mechanical key or
through YoLink app
1 Beep = Success
3 Beeps = Try again
10 beeps = Low baery alert
20 seconds beeps = Enter wrong
password 5 mes in 5 minutes 15
Use a m e chanica l key
to u n l o ck the d o o r

E-3 Lock the Door
1. Make sure you have at least one method to unlock the door before you locking it
2. Make sure the spring bolt enter into the hole of strike plate when locking the door, to avoid the door frame of
being damaged if it tried to lock while ajar.
16
Method A: Press the “ ” buon
2 Beep = Success
10 beeps = Low baery alert
Method B: Use a mechanical key Method D: Rotate the knob
Method C: Automac lock 10
seconds aer the door is unlocked

E-4 Doorbell
There will be an alert noficaon sends to your YoLink account to noce you there is a someone
pressing down the doorbell key
17

E-5 Replacing the Baeries
Open the baery cover and
remove the old baeries
Observing polarity, insert
four new AA baeries
4 x AA
Do not mix old and new
baeries
Close the baery cover
18
This manual suits for next models
1
Table of contents
Other Yolink Lock manuals