manuals.online logo
Brands
  1. Home
  2. •
  3. Brands
  4. •
  5. Yoshimura
  6. •
  7. Motorcycle Accessories
  8. •
  9. Yoshimura 070BG123502 User manual

Yoshimura 070BG123502 User manual

RESEARCH&DEVELOPMENT OF AMERICA, INC.
www.yoshimura-rd.com
FENDER ELIMINATOR KIT
070BG123502
Honda CRF250L
5420 DANIELS STREET STE A, CHINO CA., 91710 · (800) 634-9166 · (909) 628-4722 · FAX (909) 591-2198
THIS PRODUCT IS NOT DOT APPROVED.
Yoshimura R&D of America, Inc. is not liable or responsible for any resulting event caused by the
installation of this product. Check with local laws and regulations for compliance prior to
installation and use. This product is not intended for use on public highways.
! !
No.
Item
Description
Qty.
1
12350-FEBKT-A
Fender Eliminator Bracket
1
2
12350-FEBKT-B
Fender Eliminator Light Bracket
1
3
12350-FEBKT-C
Fender Eliminator License Plate Bracket
1
4
HB025024
Combination Light
1
5
070BG-LPF
License Plate Frame
1
6
12350-TSB-L
Left Turn Signal Bracket
1
7
12350-TSB-R
Right Turn Signal Bracket
1
8
M6X18BHS
6mm x 18mm Button Head Screw
2
9
M6X16BHS
6mm x 16mm Button Head Screw
2
10
M6X12BHS
6mm x 12mm Button Head Screw
2
11
6MMWASHER
6mm Washer
6
12
6MMLN
6mm Nylon Lock Nut
6
**
BN-SSS-22-18
Solder Shrink Connectors
3
**
17100
Yoshimura Sticker Sheet
1
Optional Parts
072BGLTSFK
Yoshimura LED Front Turn Signal Kit
072BGLTSR
Yoshimura LED Rear Turn Signal Kit w/ Relay
070BGUNVTBKT
Universal Turn Signal Bracket Kit
2
Assembly Diagram
** Not shown on diagram.
*** The Yoshimura Universal Turn Signal Bracket Kit is to be used with aftermarket stud-mounted turn signals and is sold separately.
11
12
1
2
3
4
5
6
7
8
9
10
11
12
1. Remove rider seat.
2. Remove the two hook bolts securing upper rear
fender. Carefully spread the left and right side
covers out of the rear fender grommets and
remove the rear upper fender.
3. Locate and disconnect license plate light, brake
light, and turn signal connectors.
4. While securely supporting the stock fender
assembly, remove the four bolts securing the
fender assembly to the subframe. Carefully
remove the stock fender assembly making sure
not to damage connectors in the process.
5. Disassemble and remove left and right turn
signals from the stock fender assembly.
6. Cut the stock tail/brake light connector from
the stock fender assembly. Cut as close as
possible from the bulb socket.
Note: The 2-wire license plate light connector
will not be used. Mask off connector using
electrical tape to seal.
Removal
Installation
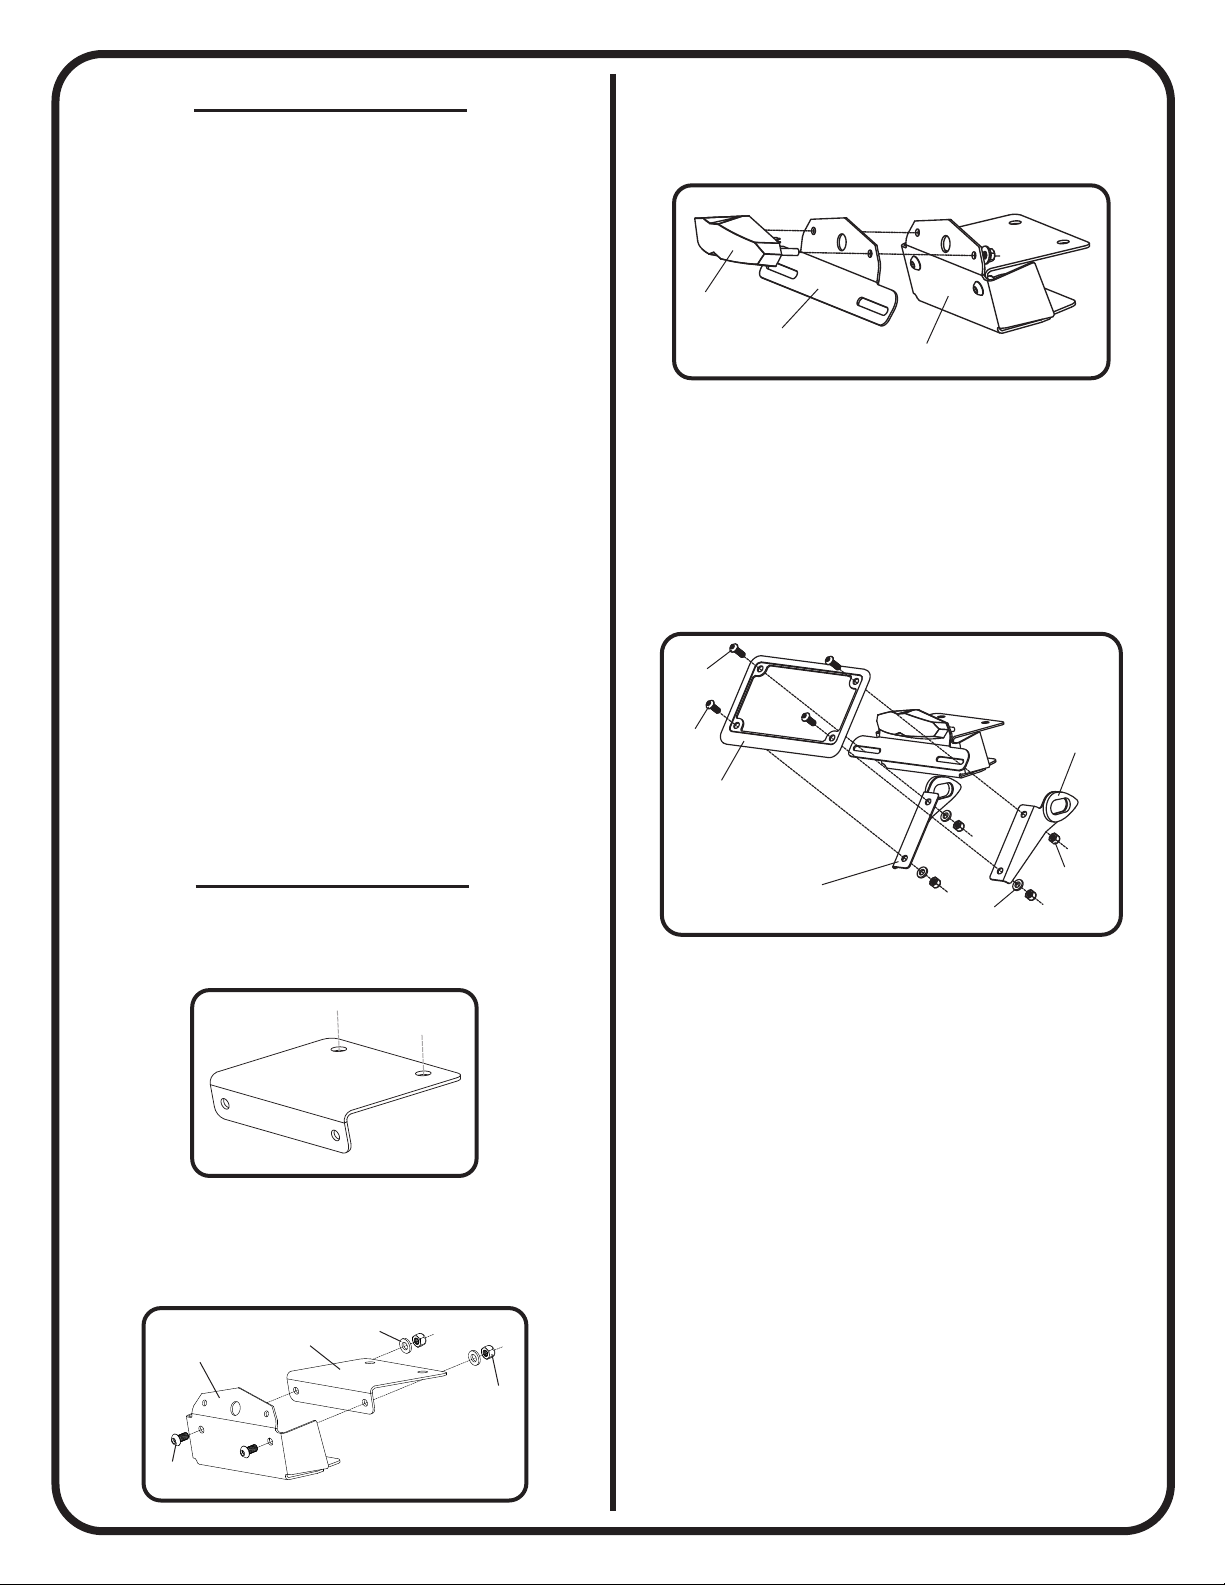
1. Install (No. 1) 12350-FEBKT-A, fender eliminator
bracket using the stock fender mounting bolts
and secure to top of subframe.
2. Install (No. 2) 12350-FEBKT-B, light bracket to
(No. 1) 12350-FEBKT-A, fender eliminator
bracket using (No. 10,11,12) 6mm bolt, washer,
and lock nut.
3. Install and secure (No. 4) HB025024,
combination light to (No. 3) 12350-FEBKT-C,
license plate bracket and (No. 2)
12350-FEBKT-B, light bracket.
4. Install stock turn signals onto (No. 6,7)
12350-TSB-L/R, left and right turn signal
brackets using the stock hardware.
5. Assemble and install (No. 5) 070BG-LPF,
license plate frame and (No. 6,7)
12350-TSB-L/R, turn signal brackets using
(No. 8,9) 6mm screws and (No. 11,12) 6mm
washers and lock nuts as shown.
6. Using the BN-SSS-22-18, solder shrink
connectors provided in the kit, connect the
Yoshimura combination light wires to the stock
tail/brake light wires as follows:
Yellow Wire -to- Black (Positive)
Black Wire -to- Green (Ground)
Red Wire -to- Green/Yellow (Brake Switch)
a) Strip the stock fender light wire ends
1/4” - 1/2” and insert into BN-SSS-22-18,
solder connectors provided in the kit.
b) Center the spliced wire ends in the
middle and using a heatgun or lighter,
apply heat evenly on the outer edges of
the connector to shrink and hold wires in
place.
c) Making sure that the stripped ends are
centered, heat the center of the connector
evenly until the solder begins to liquify.
d) Allow to cool completely and tug both
ends of the wires to verify that connection
is secured.
3
7
8
5
12
11
6
9
4
11
12
10
21
32
Scan for link to solder shrink connector
instruction video.
7. Route combination light and turn signal wires
to stock location. Re-connect brake light and
turn signal connectors.
8. Re-install upper rear fender using the reverse
steps of removal.
9. Re-install rider seat.
10. Check for proper function of license plate light
and turn signals and that all brackets and
components are secure prior to riding.
4

Other Yoshimura Motorcycle Accessories manuals

Yoshimura 070BG149500 User manual

Yoshimura

Yoshimura 070BG149500 User manual

Yoshimura 14720BP520 User manual

Yoshimura

Yoshimura 14720BP520 User manual

Yoshimura 225850S321 User manual

Yoshimura

Yoshimura 225850S321 User manual

Yoshimura RACE 13100CP520 User manual

Yoshimura

Yoshimura RACE 13100CP520 User manual

Yoshimura Street 16190BD520 User manual

Yoshimura

Yoshimura Street 16190BD520 User manual

Yoshimura 070BG141200 User manual

Yoshimura

Yoshimura 070BG141200 User manual

Yoshimura 19701BD520 User manual

Yoshimura

Yoshimura 19701BD520 User manual

Yoshimura 070BG131001 User manual

Yoshimura

Yoshimura 070BG131001 User manual

Yoshimura 070BG139600 User manual

Yoshimura

Yoshimura 070BG139600 User manual

Yoshimura Enduro Series User manual

Yoshimura

Yoshimura Enduro Series User manual

Yoshimura 15002B0520 User manual

Yoshimura

Yoshimura 15002B0520 User manual

Yoshimura X-TREAD 559-592-V000 User manual

Yoshimura

Yoshimura X-TREAD 559-592-V000 User manual

Yoshimura Street Series User manual

Yoshimura

Yoshimura Street Series User manual

Yoshimura RACE SERIES User manual

Yoshimura

Yoshimura RACE SERIES User manual

Yoshimura ZX649SO User manual

Yoshimura

Yoshimura ZX649SO User manual

Yoshimura 070BG125511 User manual

Yoshimura

Yoshimura 070BG125511 User manual

Yoshimura RACE 11621C0520 User manual

Yoshimura

Yoshimura RACE 11621C0520 User manual

Yoshimura RACE Series User manual

Yoshimura

Yoshimura RACE Series User manual

Yoshimura ENDURO 24140AH320 User manual

Yoshimura

Yoshimura ENDURO 24140AH320 User manual

Yoshimura Enduro Series User manual

Yoshimura

Yoshimura Enduro Series User manual

Yoshimura 221200B250 User manual

Yoshimura

Yoshimura 221200B250 User manual

Yoshimura Signature Series User manual

Yoshimura

Yoshimura Signature Series User manual

Yoshimura 19140NS720 User manual

Yoshimura

Yoshimura 19140NS720 User manual

Yoshimura 225851S721 User manual

Yoshimura

Yoshimura 225851S721 User manual

Popular Motorcycle Accessories manuals by other brands

SRC H-ADV150-04-01AL quick start guide

SRC

SRC H-ADV150-04-01AL quick start guide

DMD P1 owner's manual

DMD

DMD P1 owner's manual

GIVI Airflow AF1110 manual

GIVI

GIVI Airflow AF1110 manual

Suzuki 99143-00A1 000 Series installation instructions

Suzuki

Suzuki 99143-00A1 000 Series installation instructions

Cardo Systems FREECOM 4+ Pocket guide

Cardo Systems

Cardo Systems FREECOM 4+ Pocket guide

Shark S 700 user manual

Shark

Shark S 700 user manual

R&G CR0081 Fitting instructions

R&G

R&G CR0081 Fitting instructions

SRC B-TRK502-01-01-SL quick start guide

SRC

SRC B-TRK502-01-01-SL quick start guide

hepco & becker 6307520 00 01 manual

hepco & becker

hepco & becker 6307520 00 01 manual

HOMCOM AA0-077 user manual

HOMCOM

HOMCOM AA0-077 user manual

hepco & becker 6307558 00 01 manual

hepco & becker

hepco & becker 6307558 00 01 manual

SHOEI JO Instructions for use

SHOEI

SHOEI JO Instructions for use

Wunderkind Custom 106503-F15 Installation and safety

Wunderkind Custom

Wunderkind Custom 106503-F15 Installation and safety

Suzuki 57100-05881 installation instructions

Suzuki

Suzuki 57100-05881 installation instructions

SIKH HELMETS Y-61 quick start guide

SIKH HELMETS

SIKH HELMETS Y-61 quick start guide

Dräger HPS 3500 Instructions for use

Dräger

Dräger HPS 3500 Instructions for use

M-WAVE SKI manual

M-WAVE

M-WAVE SKI manual

Kuryakyn 6212 installation instructions

Kuryakyn

Kuryakyn 6212 installation instructions

manuals.online logo
manuals.online logoBrands
  • About & Mission
  • Contact us
  • Privacy Policy
  • Terms and Conditions

Copyright 2025 Manuals.Online. All Rights Reserved.