manuals.online logo
Brands
  1. Home
  2. •
  3. Brands
  4. •
  5. Zamp Solar
  6. •
  7. Inverter
  8. •
  9. Zamp Solar CAP1001 User manual

Zamp Solar CAP1001 User manual

Other Zamp Solar Inverter manuals

Zamp Solar ZS-30AD User manual

Zamp Solar

Zamp Solar ZS-30AD User manual

Zamp Solar MEGA KIT User manual

Zamp Solar

Zamp Solar MEGA KIT User manual

Zamp Solar ZS-8AW User manual

Zamp Solar

Zamp Solar ZS-8AW User manual

Zamp Solar KIT1009 User manual

Zamp Solar

Zamp Solar KIT1009 User manual

Popular Inverter manuals by other brands

Omnik New Energy Omniksol-1.5k-TL user manual

Omnik New Energy

Omnik New Energy Omniksol-1.5k-TL user manual

Agilent Technologies 33250A user guide

Agilent Technologies

Agilent Technologies 33250A user guide

4-noks ZR-SWITCH-RC instruction manual

4-noks

4-noks ZR-SWITCH-RC instruction manual

V&T V5 Series user manual

V&T

V&T V5 Series user manual

Hon Turing HT-T-S1000-12 introduction

Hon Turing

Hon Turing HT-T-S1000-12 introduction

Metabo E 140 SP Plus Original operating instructions

Metabo

Metabo E 140 SP Plus Original operating instructions

BARRON EXITRONIX Tucson Micro Series installation instructions

BARRON

BARRON EXITRONIX Tucson Micro Series installation instructions

Baumer HUBNER TDP 0,2 Series Mounting and operating instructions

Baumer

Baumer HUBNER TDP 0,2 Series Mounting and operating instructions

electroil ITTPD11W-RS-BC Operation and Maintenance Handbook

electroil

electroil ITTPD11W-RS-BC Operation and Maintenance Handbook

Silicon Solar TPS555-1230 instruction manual

Silicon Solar

Silicon Solar TPS555-1230 instruction manual

Mission Critical Xantrex Freedom SW-RVC owner's guide

Mission Critical

Mission Critical Xantrex Freedom SW-RVC owner's guide

HP 3312A Operating and service manual

HP

HP 3312A Operating and service manual

Hoymiles HM-500T user manual

Hoymiles

Hoymiles HM-500T user manual

Nitecore SPM10 user manual

Nitecore

Nitecore SPM10 user manual

AEG Protect PV installation manual

AEG

AEG Protect PV installation manual

On Board TruePower Plus 1200MS owner's manual

On Board

On Board TruePower Plus 1200MS owner's manual

Plugreen PGM-200P-230 Installation and operation manual

Plugreen

Plugreen PGM-200P-230 Installation and operation manual

Fourgroup Easy use and Programming Handbook

Fourgroup

Fourgroup Easy use and Programming Handbook

manuals.online logo
manuals.online logoBrands
  • About & Mission
  • Contact us
  • Privacy Policy
  • Terms and Conditions

Copyright 2025 Manuals.Online. All Rights Reserved.

ZampSolar.com (541) 728-0924
2 PORT ATP ROOF CAP MOUNTING
QUICK START GUIDE
STEP 1: PICK A LOCATION AND METHOD OF CABLE ENTRY
A. Ensure no solar panels are connected to the
roof cap at this time.
B. Identify best location to install roof cap. No
more than 10 linear feet from Charge Controller.
C. If wiring through roof, continue with steps D-G.
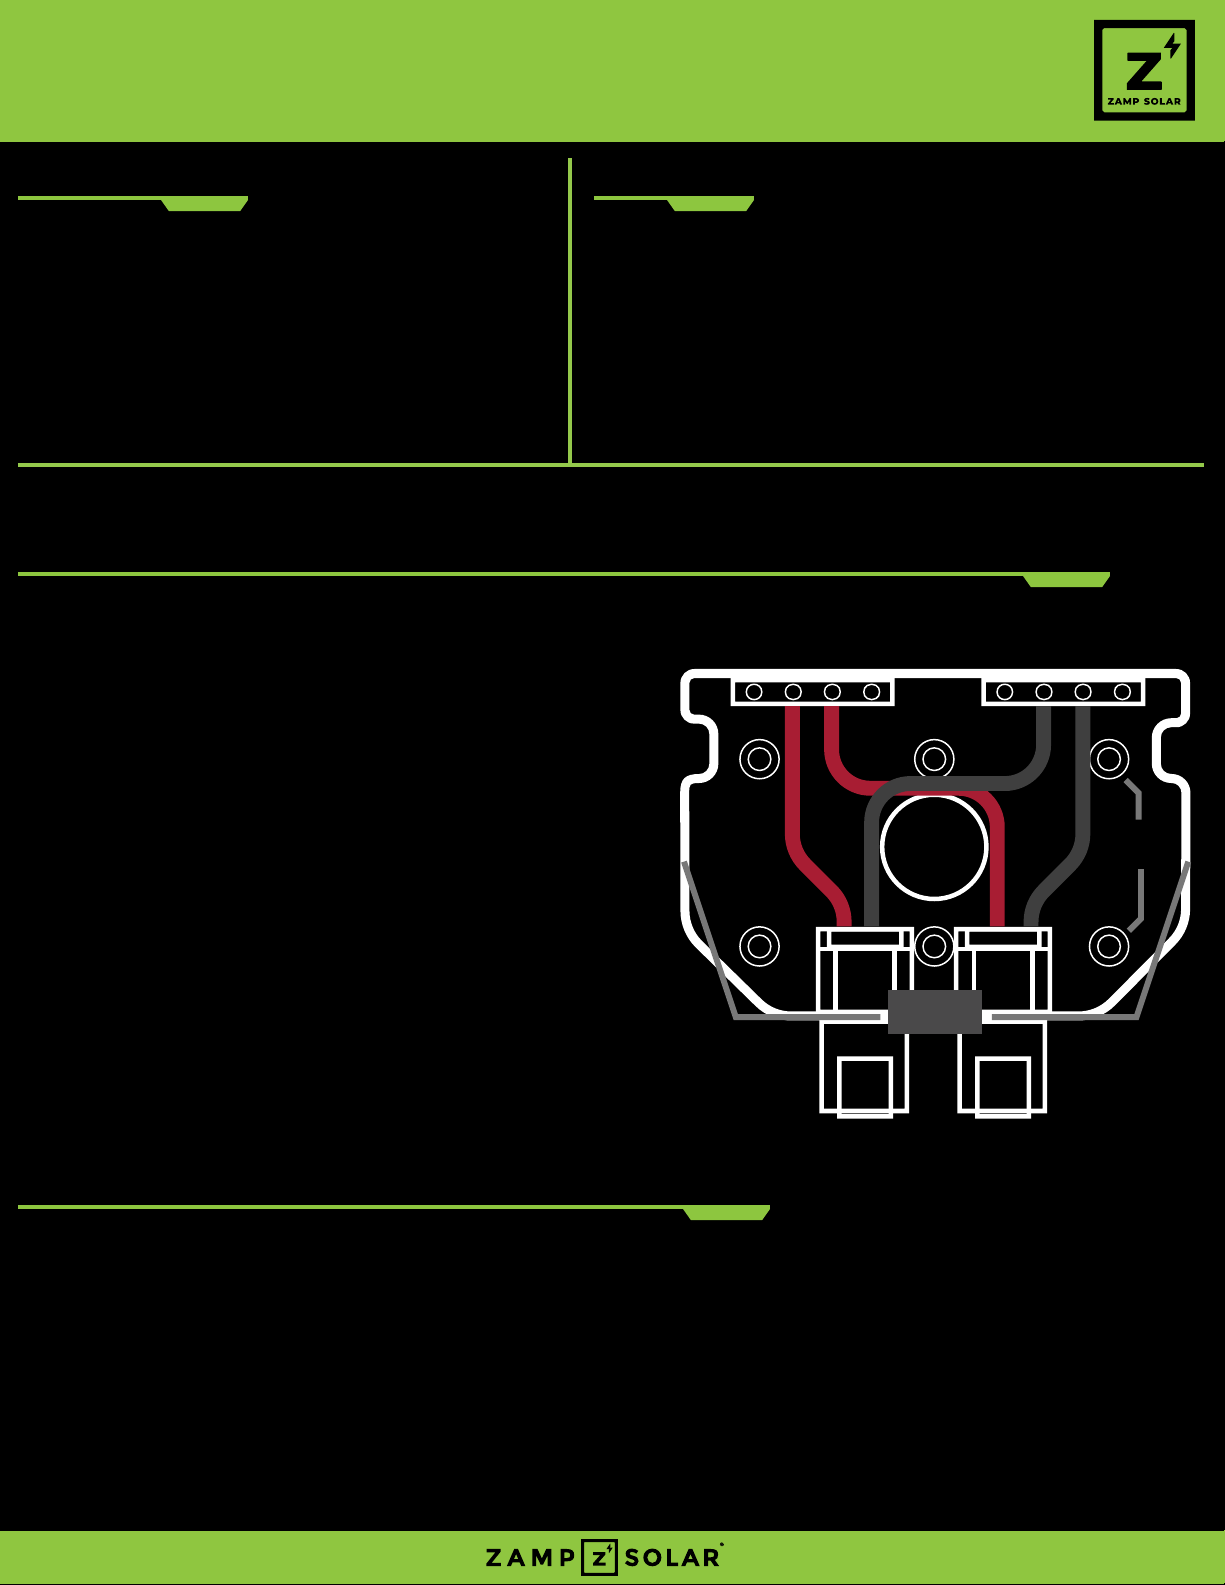
D. Using a step drill bit, knock out the plastic
circle in the bottom of the roof cap as shown in
FIGURE: 1.
E. Drill through the roof using the 1” hole saw.
F. Deburr hole if sharp edges exist.
G. Ensure wires do not make contact to sides of
newly drilled hole.
*Zamp Solar recommends using a 1” grommet to
protect the wiring from abrasion.
*Optional wire routing is available through the
knockouts located on the sides of the roof cap.
¾” NPT Cable glands are recommended to protect
wire sheathing.
STEP 2: ROOF CAP MOUNTING OPTIONS
Option 1: Mount with Screws
1. Using a 3/16” drill bit, drill holes through the base of the roof cap in the mounting hole
locations you intend to use. [FIGURE: 1]
2. Liberally apply Self-leveling sealant to the bottom of the roof cap.
3. Mount the roof cap to the roof of the vehicle with provided fasteners.
4. Allow time for sealant to fully cure
TOOLS NEEDED CONTENTS
– Drill
– 1” hole saw
– #2 Phillips Head Screwdriver
– Step drill bit
– Razor Blade
– 3/16” Drill bit
– Wire Strippers
A. 2 Port ATP Roof Cap (CAP1001)
B. ATP Receptacle Boot
C. VHB Tape
D. Roof Cap Mounting screws
NOT INCLUDED
– Solar Wire Harness (6 AWG recommended) *Included in some Kits
– Self-Leveling Adhesive
– Wire Nut (for series wiring only)
Positive Busbar Negative Busbar
Roof Hole
Knockout
Side
Knockout
Input Connectors
Roof Mounting
Holes (x6)
FIGURE: 1
ZampSolar.com (541) 728-0924
2 PORT ATP ROOF CAP MOUNTING
QUICK START GUIDE
Option 2: Mount with VHB Tape
1. See VHB preparation instructions
2. Apply VHB strips to bottom of roof cap.
3. Liberally apply Self-Leveling sealant around the perimeter of the bottom of the roof cap
for a weatherproof seal.
4. Firmly press down on the base of the roof cap to allow bonding to occur.
*100% VHB bond strength requires 72 hours cure time at room temp.
H. Using the 4 screws provided (bagged) with the roof cap, secure the lid of the roof cap to the
base of the roof cap.
I. Use the ATP Receptacle Boot(B) to cover any unused receptacles.
STEP 3: WIRING THE ROOF CAP
J. Run the stripped side of the wires through the hole created in the roof cap.
*Run wire through cable glands for side installation
K. Using wire strippers, strip back wires approximately ½”.
L. Using a Phillips head screwdriver, connect the positive solar wire to the positive busbar of
the roof cap and the negative solar wire to the negative busbar. [FIGURE: 1]
M. IF SERIES CONNECTION IS REQUIRED, use a wire nut to connect the ATP roof cap in series
as shown below. [FIGURE: 3]
Positive Busbar Negative Busbar
6 AWG
Black
6 AWG
Red
WIRE
NUT
FIGURE: 2 FIGURE: 3