manuals.online logo
Brands
  1. Home
  2. •
  3. Brands
  4. •
  5. Zanussi
  6. •
  7. Cooktop
  8. •
  9. Zanussi ZG 1102 Product guide

Zanussi ZG 1102 Product guide

GLASKERAMIK-KOCHFLÄCHEN D
CERAMIC BUILT-IN HOBS GB
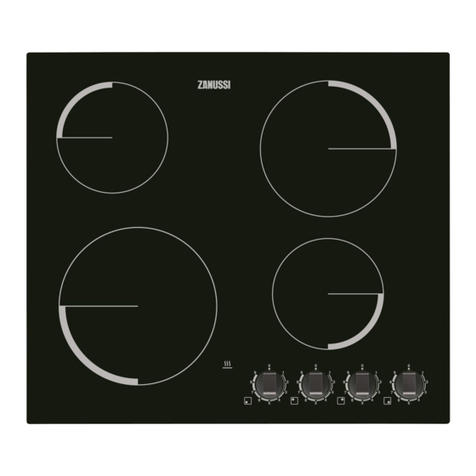
ZG 1102 / ZGW 1302 / ZGW 1302 X
Gebrauchs- und Einbauanweisung Operating and assembly instructions
ZANUSSI
10
We congratulate you on choosing a ceramic hob of
ZANUSSI. Thus you chose quality, innovation and
durability. These operating and assembly instructions
will allow you to become acquainted with the appliance
and to do everything within its possibilities.
Dear customer ( GB )
11
Content
Please note in particular ........................................ 12
Unpacking and control ........................................... 13
Descriptionofappliances ...................................... 13
Technical data ....................................................... 13
Operating your hob ................................................ 14
Cookingequipment ............................................... 14
Maintenance ......................................................... 15
Installation............................................................. 16
What to do in case of a defect............................... 17
12
The ceramic hob surface is resistant to extreme
temperatures.Neithercold nor heatcanharm it. Avoid to
drop anything on the hob. Punctiform impacts, e.g. by
the fall of a salt shaker, can cause fissures and cracks.
If any cracks appear on the hob surface, the hob has
tobe switchedoffimmediately. Disconnecttheappliance
from the mains and inform the service department.
Adefectivehobsurfaceallowsoverboilingfoodtopenetrate
and the contact with live parts.
ZANUSSI declines any liability should the appliance
be used improperly and the safety measures not be
observed. Please note the maintenance and cleaning
instructions carefully.
Using other hobs than those of ZANUSSI-Brand
excludes any liability.
Keep these operating and assembly instructions!
Please note in particular
Before using the hob for the first
time,read the operatingand assem-
bly instructions carefully.
You protect yourself and avoid
damage of your appliance.
The appliance must be installed by a qualified
electrician.
Use the hob only upon its installation. This protects
you from touching electric parts.
Repairsofelectricappliances must be undertaken by
qualified electricians only. Improper repairs can cause
serious harm and danger for the user.
The appliance is only disconnected from the mains
when the fuse is turned off or the mains connection is
interrupted.
Preventlittle children fromtouchingthe cooktopwhen
in use.
Children also can burn themselves by pulling pans or
pots off the hob.
The cooking zones heat up quickly when they are
turned on. Turn them on only when you have placed a
cooking pan onto the cooking area.
The residual heat indicator lights up to show if a
cooking zone is still running resp. is still hot.
If you use a socket close to the hob, take care that the
cable of the appliance does not touch the hot surface of
the hob.
Becareful by usingthehob asaworking-table orwhen
depositing items on the hob's surface. The items you
place on the hob could easily catch fire when turning on
the hob accidentally. Afterwards the hob should be
cleanedthoroughly.
Neverleavethe hob unattendedwhenworking with oil
and fats because of the danger of fire.
Sugar (solid or liquid) should never get onto the hot
surface of the hob. Also, never use plastic or aluminium
foil dishes. They melt at high temperatures and can
cause fissures and cracks when the hob cools down.
Spills of sugar or melted plastic or aluminium material
must be removed while the hob is still warm and before
the remains have set.
Scrapeoffthe remainsofsugar or plasticwitha scra-per.
Protect your hands.
Use only pans with flat bases without rough edges to
avoidremainingscratches.
13
Please examine the appliance for
any damage sustained during
transportation! If the appliance is
damagedpleaseimmediatelyinform
the forwarding company before the
applianceisconnected.Thepacking
materialshouldbedisposedproperly.
ZG 1102 / ZGW 1302 / ZGW 1302 X
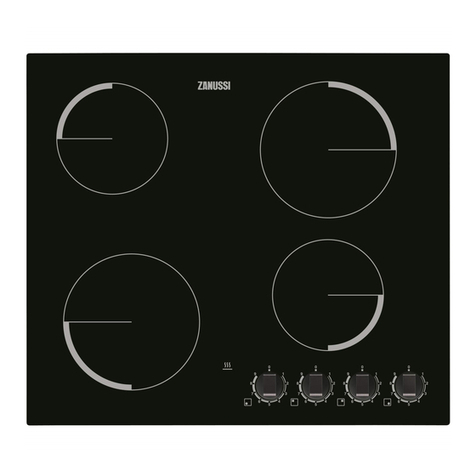
1) Cooking zone ∅180 mm 1700 W
2) Cooking zone ∅145 mm 1200 W
3) Cooking zone ∅180 mm 1700 W
4) Cooking zone ∅145 mm 1200 W
Rating plates
hobdimensions: length : 572 mm
width : 502 mm
height : 44 mm
cutoutdimensions: length : 560 mm
width : 490 mm
voltage : 230 V ~ 50 Hz
totalpower : 5.8 kW
23
14
Unpacking and control
Description of the appliance
Technical data
Typ011.0 ZG 1102 Prod.No. 941 591 682
Instr. No. Ser.No. 5.8kW
ZANUSSI
230 V ~ 50 Hz
SWISS MADE
Typ011.0 ZGW1302 Prod.No. 941 591 683
Instr. No. Ser.No. 5.8kW
ZANUSSI
230 V ~ 50 Hz
SWISS MADE
Typ011.0 ZGW 1302 X Prod.No. 941 591 684
Instr. No. Ser.No. 5.8kW
ZANUSSI
230 V ~ 50 Hz
SWISS MADE
14
Cooking zones
The cooking zones are clearly
marked on the ceramic surface.
They are operated by the corres-
ponding switch box or built-in oven.
The dimensions of the cooking
zonesaresuch that they accommo-
date standard sized saucepans.
Operating your hob
Specially tested cooking pans for ceramic hobs exist.
Pay attention to the declaration of the manufacturer.
Cooking pans with aluminium or copper bottoms
can cause metallic discolouration that can not be
removed anymore. Be especially careful in using
enamel pans. Avoid the heating-up of empty pans
since their base could be damaged in a way which
can cause scratches when removed on the hob's
surface.
Thefollowingadvice shouldbeconsidered to achie-
ve an optimal energy consumption and cooking
time as well as to avoid that overboiling food can be
burnt onto the cooking zones.
 Bottom of pans
Cooking and frying pans should have a flat and solid
base. A base with rough edges can scratch and leave
abrasion marks on the ceramic surface! Ask for electric
cooking pans.
 Size of pans
Panorpotdiameters should correspond to the diameter
of the cooking zone.
 Lid of pans
A lid prevents heat to escape, shortens the heating-up
time and reduces the energy consumption.
Cooking equipment
15
Themaintenance remainsthe same
for glass and ceramic hobs. Never
useaggressivedetergentsor scou-
ring powder and sponges with
abrasivesurfaces.
Cleaning after each use
 Slight, not burnt soiling has to be wiped off with a
damp cloth without using detergents. The use of
detergentsmaylead to discolouring.These heavy stains
can not be wiped off easily by the first attempt and
sometimes not even with a special detergent.
 Burnt soiling has to be removed with a scraper.
Afterwards wipe off the ceramic hob with a damp cloth.
Stain removal
 Light metallic stains (aluminium remains) can be
removed from the cooled down cooking zone with a
special detergent. Calcareous deposits (caused by
overboiling water) can be removed with vinegar or a
specialdetergent.
 Removalofsugar, sugar-containing food, plastic
objects or kitchen foil
The cooking zone involved must not be turned off! The
remains have to be scraped off the hot cooking zone
immediately with a scraper. The cooking zone can be
switched off after the removal of the soiling. It may be
cleanedwith a specialdetergent after ithas cooled down.
The mentioned detergents are available in super-
markets, electrical shops, drug stores, grocery stores
and kitchen studios.
Scrapers are available in craft shops and department
stores as well as in decoration stores.
Do not apply detergents on hot cooking zones. Best
is to let the detergent dry on the surface and to wipe it off
witha dampcloth.If thereareremains of cleaningagents
wipethem off beforeyouturn ontheheat again.Remains
couldcorrode.
ZANUSSIdeclinesany liability should the appliance
be used improperly and the safety measures not be
observed.
Maintenance
16
Cut out worktop to prescribed
measurements of templates (saw
exactlyalongthe scribing).
Check seal for perfect fit and
overall cover (see detail A).
Lowertheceramichobintoplace
andaligncorrectly.
Fastening according to Fig. 1
Tightenbracketagainsttheundersideoftheworktop.
UsingastandardorPhillipsscrewdriver,tightenthe
tension clamps evenly starting at the centre and
movingdiagonallyuntilthebuilt-inrimistightonthe
worktop.
Donotovertighten!
Do not use an electric or pneumatic sdrewdriver
withoutanadjustablesafetyclutch(pos.1-1.1Nm).
The installation of the control box or the oven will be
carriedoutaccordingtoseparateinstructions.Inorder
not to damage the appliance, the hob may only be
connectedtocontrolboxeswhichareapprovedbythe
supplier of the ceramic hob.
Thedistance betweentheundersideof thehobandthe
furnitureunderneathmustbeatleast20 mm (seefig.2).
The electrical connection of the ceramic hob
should only be carried out by a trained technician.
The protection against accidental contact must
be ensured by proper installation.
Attention:  Ifthereareanyrepairstobeeffected,the
appliance must be non-tensioned (e.g. by
unscrewingthefuse).
As soon as a crack is visible in the top,
theappliancehastobedisconnectedfrom
the mains.
In terms of fire protection, the appliance conforms
to type Y (IEC 335-2-6). Only appliances of this
type may be installed to cupboards or walls.
detail A
bracket
sealing glassceramic
Fig.1
worktop
20
123
1
2
3
1
2
3
1
2
3
1
2
3
1
2
3
1
2
3
1
2
3
1
2
3
1
2
3
1
2
3
1
2
3
1
2
3
1
2
3
123
Fig.2
cutout dimensions : 560 x
490 mm
hob dimensions : 572 x 502 mm
Installation
17
You are able to clear the following defects:
When the cooking zone does not heat up after you
switched it on?
=> Make sure that the fuse is turned on.
You hear a buzzing when you heat up a zone?
=> This is no defect. It stops with increasing heat.
Discolouring of a cooking zone?
=> This is not a change in the material but burnt and
notremovedfood remains. Theydo not affectthe
function and the durability of the ceramic hob.
Before calling the customer service make sure that
the hob was operated correctly and the fuse is not
blown out.
Repairsonelectricalappliancesmust be undertaken by
qualified electricians only. Improper repairs can cause
seriousharmand dangerforusers. The applianceisonly
disconnectedfromthemainswhen the fuse is turned off
or the mains connection is interrupted
Attention!
If any fissures or cracks appear on the hob's surface the
hob has to be switched off immediately. Disconnect
the appliance from the mains and inform the service
department.
Important!
Following details are necessary for the service depart-
ment:
type ......................................................
model ......................................................
product-no. ......................................................
You will find these details under "Technical data", page
13, on the rating plates.
Technical changes are subject to modification.
What to do in case of a defect
ZG 1102 / ZGW1302 / ZGW 1302 X
HN / HNW 112
HN 112 X
HN / HNW 114
HN 114 X
ZANUSSI
HaushaltsgeräteGmbH Tel. : (0222) 79503-Serie
Kundendienst-Zentrale Fax : (0222) 798 01 63 (0222)7950322 (Geräteverkauf)
Markhofgasse19 (0222)7950323 (Ersatzteilverkauf)
1034 Wien Telex : 132157
D
A
ZANUSSI
ElektrogeräteGmbH Tel. : (069) 67 80 04-0
Rennbahnstrasse72-74 Fax : (069) 67 02 501
60528 Frankfurt/Main Telex : 413 371 dezan d
Ersatzteillager Tel: : (06102) 8019
Rathenaustrasse23 Fax : (06102) 2837
63263 Neu-Isenburg
07.93 374 1043-06

Other manuals for ZG 1102

1

This manual suits for next models

17

Other Zanussi Cooktop manuals

Zanussi 178021 User manual

Zanussi

Zanussi 178021 User manual

Zanussi ZGG62414WA User manual

Zanussi

Zanussi ZGG62414WA User manual

Zanussi N 900 User manual

Zanussi

Zanussi N 900 User manual

Zanussi ZEE6940FXA User manual

Zanussi

Zanussi ZEE6940FXA User manual

Zanussi Professional 700 User manual

Zanussi

Zanussi Professional 700 User manual

Zanussi N 900 User manual

Zanussi

Zanussi N 900 User manual

Zanussi Evo 900 Series User manual

Zanussi

Zanussi Evo 900 Series User manual

Zanussi N 900 User manual

Zanussi

Zanussi N 900 User manual

Zanussi Evo 900 Series User manual

Zanussi

Zanussi Evo 900 Series User manual

Zanussi 178081 User manual

Zanussi

Zanussi 178081 User manual

Zanussi 178013 User manual

Zanussi

Zanussi 178013 User manual

Zanussi ZEV6940XBV User manual

Zanussi

Zanussi ZEV6940XBV User manual

Zanussi 178023 User manual

Zanussi

Zanussi 178023 User manual

Zanussi N 900 User manual

Zanussi

Zanussi N 900 User manual

Zanussi 200231 User manual

Zanussi

Zanussi 200231 User manual

Zanussi ZES3921IBA User manual

Zanussi

Zanussi ZES3921IBA User manual

Zanussi N 900 User manual

Zanussi

Zanussi N 900 User manual

Zanussi N 700 User manual

Zanussi

Zanussi N 700 User manual

Zanussi N 900 User manual

Zanussi

Zanussi N 900 User manual

Zanussi Evo 900 Series User manual

Zanussi

Zanussi Evo 900 Series User manual

Zanussi ZEI3921IBA User manual

Zanussi

Zanussi ZEI3921IBA User manual

Zanussi ZEV6940FBA User manual

Zanussi

Zanussi ZEV6940FBA User manual

Zanussi Professional Snack 600 User manual

Zanussi

Zanussi Professional Snack 600 User manual

Zanussi ZEE3921IXA User manual

Zanussi

Zanussi ZEE3921IXA User manual

Popular Cooktop manuals by other brands

KitchenAid KDRP467KSS02 parts list

KitchenAid

KitchenAid KDRP467KSS02 parts list

Kogan KAMTGASCTPA instruction manual

Kogan

Kogan KAMTGASCTPA instruction manual

RUSTA 900101290101 manual

RUSTA

RUSTA 900101290101 manual

Waldorf RNB8450G Installation and operation manual

Waldorf

Waldorf RNB8450G Installation and operation manual

Kenmore 93521 Use Use, care, safety manual

Kenmore

Kenmore 93521 Use Use, care, safety manual

LG LCE3010SB owner's manual

LG

LG LCE3010SB owner's manual

Miele GAS COMBISET CS 1011 Operating and installation instructions

Miele

Miele GAS COMBISET CS 1011 Operating and installation instructions

Whirlpool WCE97US0HB01 User instructions

Whirlpool

Whirlpool WCE97US0HB01 User instructions

Dash DECT100 instruction manual

Dash

Dash DECT100 instruction manual

Blue Star RGTNB364GHC brochure

Blue Star

Blue Star RGTNB364GHC brochure

Miele KM 5820 Operating and installation instructions

Miele

Miele KM 5820 Operating and installation instructions

Kenmore 3182C1412 installation instructions

Kenmore

Kenmore 3182C1412 installation instructions

NEFF M 55 Series instruction manual

NEFF

NEFF M 55 Series instruction manual

AIRFORCE SMART 60 Instruction on mounting and use

AIRFORCE

AIRFORCE SMART 60 Instruction on mounting and use

CDA HVG 93 Series Manual for installation, use and maintenance

CDA

CDA HVG 93 Series Manual for installation, use and maintenance

Frigidaire FGC30S4A Factory parts catalog

Frigidaire

Frigidaire FGC30S4A Factory parts catalog

St George IB31D Operation manual

St George

St George IB31D Operation manual

Wolf ICBCI152 Use & care guide

Wolf

Wolf ICBCI152 Use & care guide

manuals.online logo
manuals.online logoBrands
  • About & Mission
  • Contact us
  • Privacy Policy
  • Terms and Conditions

Copyright 2025 Manuals.Online. All Rights Reserved.