Zass ZKG 01 W/B User manual

Service Manual
Please read the manual carefully prior to use
ZKG 01 W/B
Ⅰ.Product profile
Thank you for choosing ZASS heater. ZASS is a domestic appliance manufacturing and
export business. ZASS convection heater of Continental style, a new product based on
high-tech R & D, featuring a novel style, quick heating, high thermal efficiency, security, no
noise, no open flame, long life and simple maintenance, has become a favorite product of
consumers both home and abroad, with its perfect combination of development trend of
electrical appliance in Europe with domestic consumption fashion. The European convection
heater features a heating element with aluminum heat sink, long-life, safe, reliable
multi-temperature control security settings, tip-over power off settings, metal housing,
universal casters, types of wall-hanging and ceiling-hang, power line, operation control panel
and work settings, etc. The heating element with aluminum heat sink generates heat rapidly
after power is on, allowing a quick air circulation flow, so that room temperature may rise
quickly to achieve desired heating effect.
display
screen
operation key
Feet
black crystal glass

Ⅱ.Product features
1.High-quality heating element with aluminum hear sink: made of advanced technology, fast
heat, big thermal area, rapid temperature rise, stable performance, no oxygen consumption,
no light consumption.
2.Options of common type and remote control type.
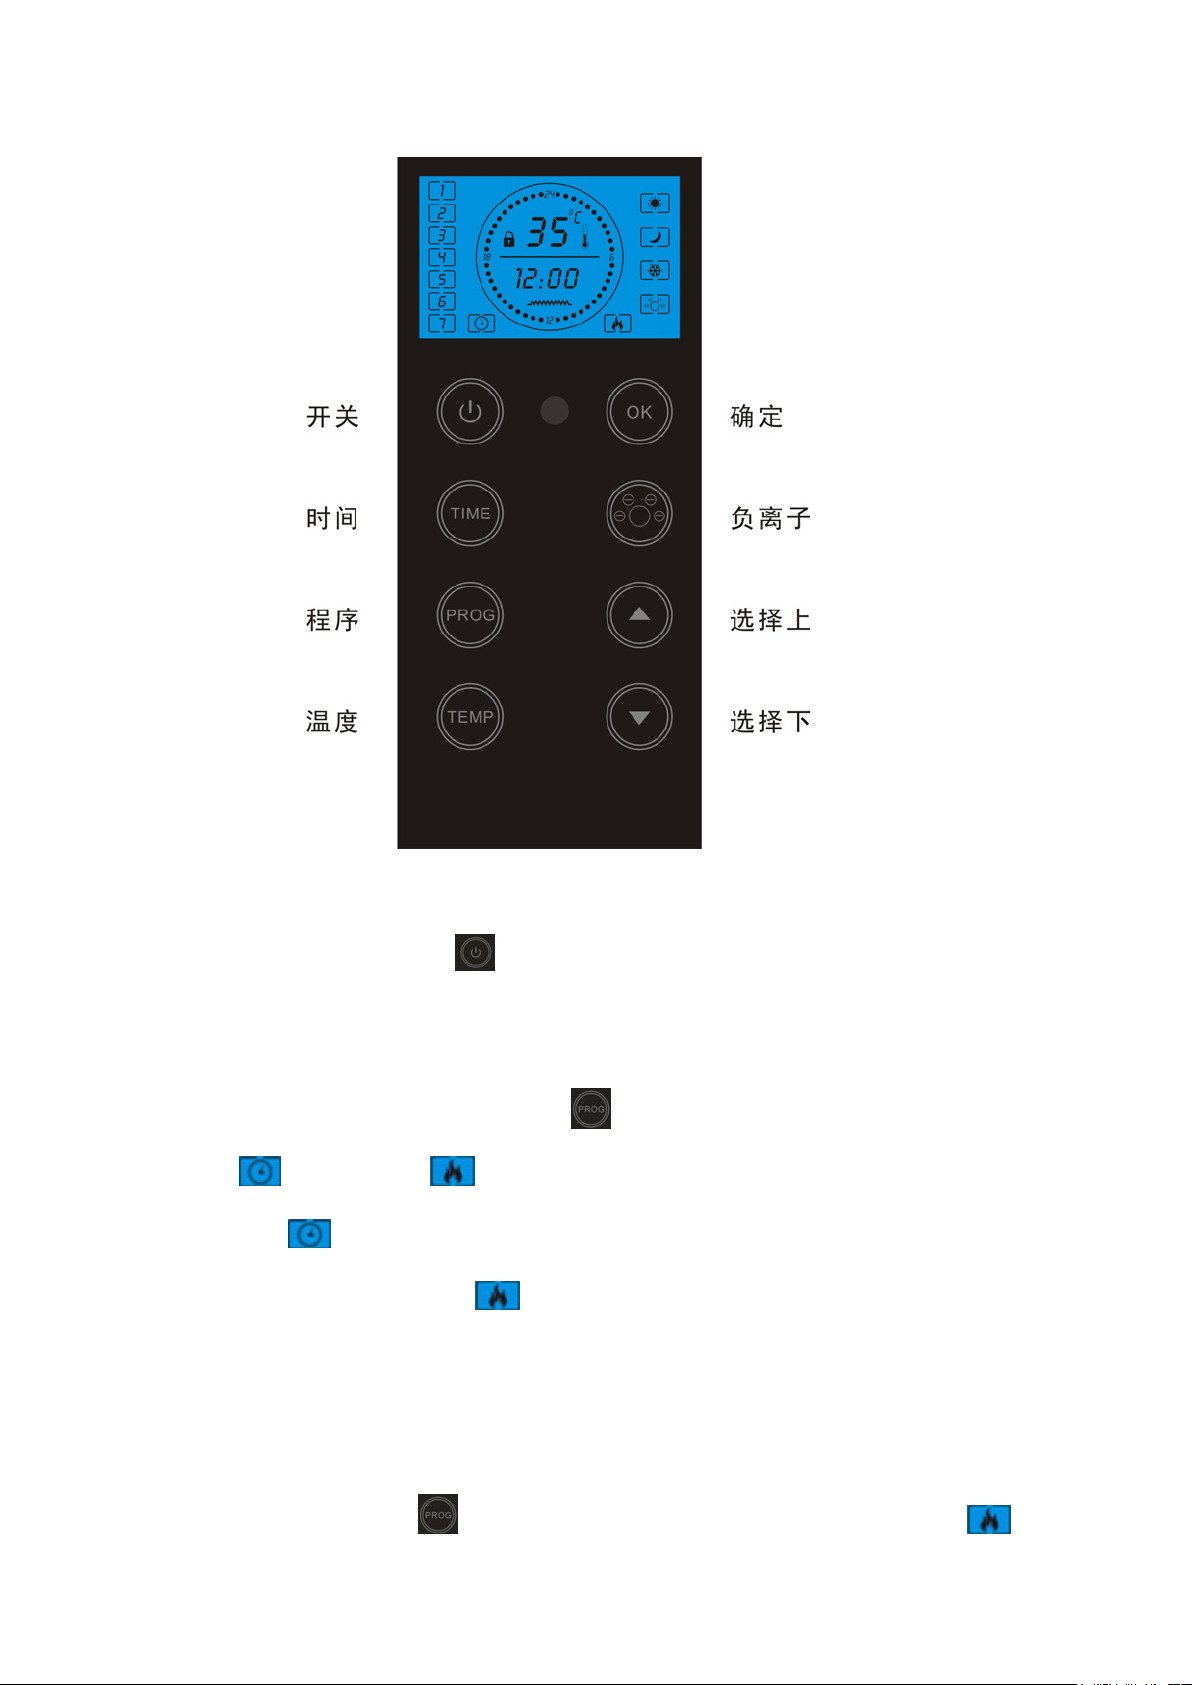
3.Display panel of digital screen, infrared remote control, easy and simple. (Remote type)
4.Silent warmth: quiet and cozy.
5.Multiple safety device: Auto power-off protection during overheating, safer and more at ease.
6.Thermal sensor design: easy for you to set room temperature that you are satisfied with.
(Remote control series)
7.24-hour switch on and off: easy, safe, reliable. (Remote control series)
8.Display of automatic determination of ambient temperature. (remote control series)
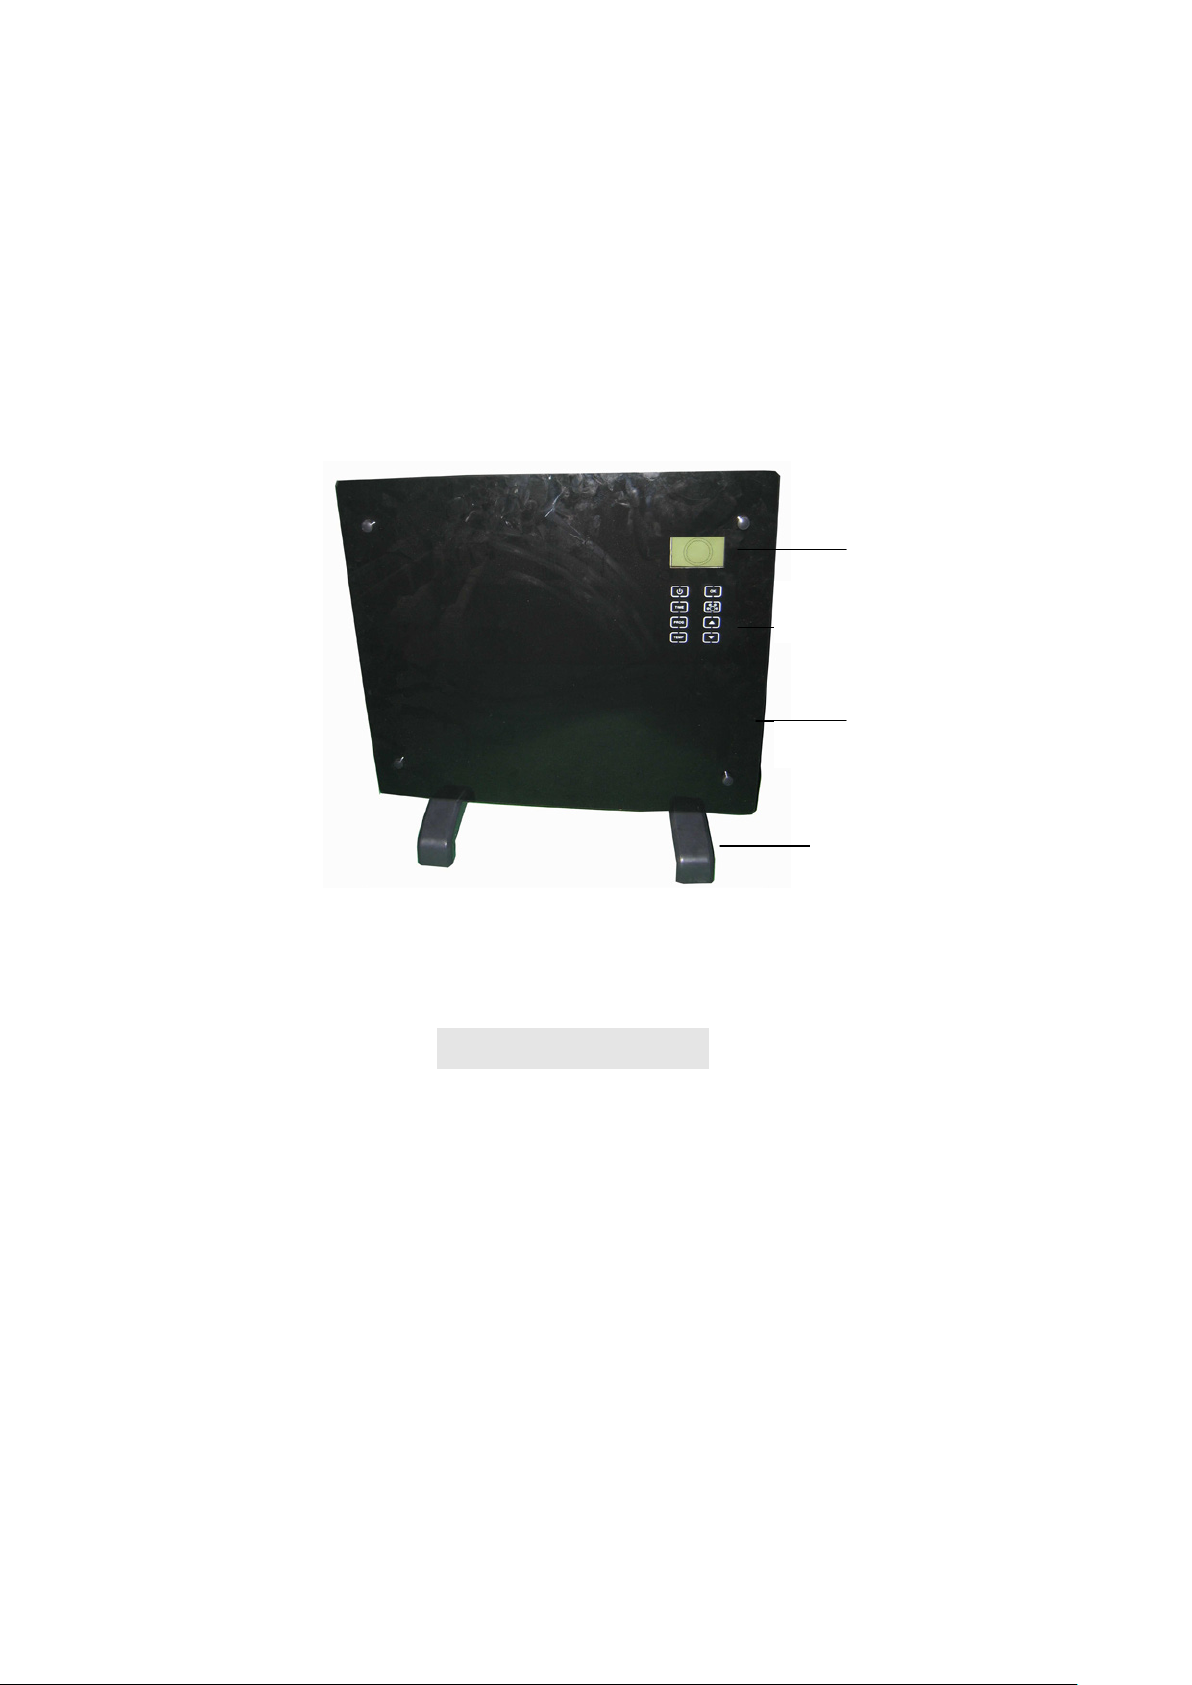
9.Portable wall-mounted structure: easy for you to install according to actual needs.
10.Operation function of touch switch. (Remote type)
11.Noble, elegant and beautiful special black crystal glass panel
Ⅲ. Safety Instructions
Open the package, take out the body, check whether the supplied accessories and the
body are complete and intact.
Power on (plug such as electrical outlet) after the equipment is installed in place
according to installation instructions and requirements.Requirements for power outlet
and power:AC 220-240V,frequency 50/60Hz,withstand current ≥ 10A.
Read the service manual before you use the electric heater. Keep the manual and have
it attached with the heater in case you offer the heater to others as a gift.
The heater is only suitable for indoor use.Do not use it outdoors!
The heater can not be directly used in tub, shower room or near pool
Do not leave the heater unattended during use.Keepthe heater out of the reach of
children. Do not use automatic switch device on the heater (for example, time switch),
otherwise automatic operation of the electric heater which is left unattended may be
caused.
Covering of the heater is strictly prohibited.Maintain a sufficient safe distance from
inflammablesand explosives to avoid risks of fires and explosions.
Inserting other items into the shell or protection grid of the electric heater is strictly
prohibited, or electric leakage and shock may be caused.
Do not touch the metal housing as it will get hot during the running of the electric heater,
and keep the heater away from children to avoid risk of burns. Set aside some time to
let the heater cool before you turn it off and store it.
If the electric heater has been idle for a long time, plug the power plug from the outlet.
Prior to the use of the electric heater, make sure that the heater is in a good condition
and intact. In case the heater shell, wire or plug is damaged, the heater may not be

connected to power
The heating unit of the heater (the heating film at the back of the protection grid of the
heater) may be damagedfrom fall. Please confirm the heating unit is not damaged
prior to each use. Do not use the electric heater if the heating element is broken.
Disconnect the power plug when moving or cleaning this appliance. When
disconnecting the appliance connection, first turnoff the switch, then unplug the plug.
Do not yank the power cable.
Demolition of the electric heater with authorization is strictly prohibited.Please look for
professional service personnel if the heater is damaged.
The product is limited to home use.
Installation of the heater directly under wall outlet is strictly forbidden.
During normal use, do not let bare skin touch the surface of the appliance, so as not to
be burnt
Avoid the use of the heater if children, animals or the disabled and those who lack self
control are present while nobody else is taking care of them.
The appliance should not be available to the following people (including children):
those with physical, sensory or mental impairments, or those who lack experience and
knowledge unless they get custody or instructions on the use of the product from the
person who is responsible for their safety.
Children should be supervised and ensuredthat they will not play with this appliance.
Only specific personnel from the technical service center may replace the power cord
of the product in case it is damaged to ensure safety.
Do not share the socket with other electrical appliances to avoid current overload,or
fire risks may be caused by excessive load
CAUTION: covering of the cooling device is prohibited to avoid overheating, or
dangerous accidents may be caused.
Ⅳ. Installation and application of the electric heater
Check whether the parts are complete and the product is intact when open the package.
If you want to usethe electric heater in a mobile way, please install the rollersprovided in the
package. Make sure the heater is correctly fixed with the screws provided. Please make sure
the base is level, stable and clean. Please note the safe distance mentioned below.

Steps for castor installation:
1. Put the product upside down on a soft cotton cloth or carpet.
2. Mount the stand in the corresponding location of the lower part of the product as shown above,
and then fix the randomly supplied screw at the bottom of the product with a screwdriver and
tighten the screw.
Wall-mount Instructions
1. Take out the wall brackets and expansion screws out from the box, and fix the screws onto the
wall according to the distances between holes of the wall brackets, as depicted in the picture
below.
Hook
Hook
Expansion Screw
Expansion Screw

2. Aim the 4 holes in the back of the machine to the 4 hooks on the wall bracket and push it on,
and then slide into the slot to click on, as shown below.
3. Fix the wall bracket lock piece onto the bracket with screws, slide the lock piece into the
locking slot on the back of the machine, and then tighten up the screw, as shown in the picture
below.
Note: Prior to the drilling,make sure there is no cable or other pipelines on the wall to
avoid damage. Remember that the screws on the wall shall be fixed and firm to ensure the
safety installation of the electric heater on the wall. Please note the safe distance
mentioned below.
During installation,the heater must be maintained sufficiently safe distance from combustible
materials and gas and away from water.
During wall-hanging installation, keep the installation height from the ground greater than 15
cm. Hanging-type heater shall be no less than 50 cm away from the ceiling.
Ⅴ. Operation notice
Make sure the heater shell, line and power plug are intact.
Check the rated voltage in the model label of the heater is in line with that of the outlet.
Power outlet requirements are: voltage 220V, frequency 50Hz, bearing current ≥ 10A. Do not
power the heater on until the requirements are met.
Wall Bracket
Lock Piece

User Manual for ZKG Series

Guidelines:
Mon.
Tue.
Wed.
Thu.
Fri.
Sat.
Sun.
Comfortable
Economical
Frost-free
Anionic
Weekly Mode Heating Mode
Child L
ock
A 24hour circle, with each gap between
dots representing half an hour
Temperature
Clock
Working
S
tatus: being heating if displayed,
off if not displayed.

Remote Control Interface
1. Turn on the power, press to get into standby, with the screen only showing the
temperature (i.e. current ambient temperature), time (00:00), and function icons of “Comfortable,
Economical, Frost-free, Anionic”.
2. How to set-up: Press the Program button to enter the configuration modes of “Weekly
Mode ” or “Free Mode ”, which can be selected by the Up and Down button. When the
timing icon at the bottom-left corner of the screen is flashing, you can set up in “Weekly
Mode”, and when the flame icon at the bottom-right corner of the screen is flashing, you
can set up in “Free Mode”. The border of the “Monday” icon will flash, and you can use the Up
and Down button to select the week days from Monday to Sunday (Note: The time of Monday to
Sunday will only display in “Weekly Mode”).
3. Free mode set-up: Press , and press the Up and Down buttons to select Free Mode

or Weekly Mode :
a. When the icon is flashing, it is in Free mode standby, with the screen showing
the temperature (i.e. current ambient temperature), time (00:00), and function icons of
“Comfortable , Economical , Frost-free , Anionic ” on the right.
No other icons are shown. The frost-free function only works in standby and after the
timing period ends, with the border of the icon flashing (the frost-free
temperature is set at 5˚C). When the machine is switched on by pressing the Heating
button , the frost-free function will be stopped while heating, and the border of
the icon will stop flashing.
b. While Standby, press the Temperature button and the temperature digits will
flash, and then you can preset the temperature with the Up and Down buttons. Press
the timing button and the time digits will flash, and then you can set up the
time to turn on the machine with the Up and Down buttons (Note: The border of the
timing icon flashes when the timing is set).
c. While standby, press the Program button and the machine starts to heat up, with
the heating icon shown and the border of the “Comfortable” icon
flashing. While heating, press the temperature button and you can change the
preset temperature with the Up and Down buttons. Press the timing button to set the
time to shut down the machine with the Up and Down buttons (Note: The border of
the timing icon flashes when the timing is set. The time shows 00:00 if the
timing is not set. The icon indicates timing under the “Free Mode”).
d. Temperature setup: While heating, press the Temperature button and the
temperature digits flash, and then you can set your comfortable room temperature with
the Up and Down buttons (Note: The temperature range to set is between 15~50˚C,
and the machine’s working temperature range is between -20~50˚C, with the default
working temperature at 35˚C.). When the ambient temperature is equal to the preset

temperature, the product will automatically switch from Comfortable mode to
Economical mode , indicated by the icon change with flashing border. When the
ambient temperature is 2˚C higher than the preset temperature, the product will stop
heating (with the heating icon , and borders of the Comfortable and
Economical icons stopping flashing). When the ambient temperature is equal to the
preset temperature, the product will automatically switch from Comfortable mode to
Economical mode along with the flashing Economical icon. When the ambient
temperature is 5˚C lower than the present temperature, the product will switch from
the Economical mode back to the Comfortable mode along with the
border of the Comfortable icon flashing.
e. Under the timing status, the displayed time will decrease along with the time elapsing.
4. Weekly mode set-up: Press , and press the Up and Down buttons to select Free mode or
Weekly Mode:
a. The flashing means it is in the Weekly mode setting, with the right side of the
screen showing Monday to Sunday, temperature in the circle in the middle (Note: The
temperature range to set is between 15~50˚C, and the machine’s working temperature
range is between -20~50˚C, with the default working temperature at 35˚C.), time as 00:00,
and function icons of “Comfortable , Economical , Frost-free , Anionic
” on the right.
b. Under the Weekly Mode, press the Timing button and the borders of the weekday
icons flash, and then you can select each day from Monday to Sunday , with
the border of the selected day’s icon flashing. Press the Timing button at this time
then you can setup the time, using the Up and Down buttons to set Hour when “00:” is
flashing, and press the Timing button again to set the Minute with the Up and
Down buttons when “:00” is flashing.
c. Program setup: Under the Weekly Mode, press the Timing button and select any
day between Monday and Sunday with the border of the selected day’s icon
flashing. Press the program button to set up the day’s configuration, with the

central circle showing function icons e.g. Comfortable , Economical , or
Frost-free , and then press the OK button to confirm. The border of Comfortable
icon on the right side will flash, and then you can use the Up and Down buttons to
select the mode you want for the time you set, i.e. “Comfortable , Economical
, Frost-free , with the border of the icon flashing when selected. Press the OK
button to confirm, with the block in the circle (i.e. the mode icons , , )
moving forward a step, and then you can select the mode you want with the same way of
configuration. Each step in the circle is a temperature change (i.e. the product’s default
temperature for Economical mode is 5˚C lower than the preset temperature for the
Comfortable mode), while each step in time is 30 minutes.
d. While heating, the wire icon and flame icon in the circle are lightened,
with the block in the circle moving and flashing along with the time passing by, and the
border of corresponding function icons “Comfortable , Economical , Frost-free
”flashing as well.
e. Time setup: Under the Weekly Mode, press the Timing button and the borders of
the weekday icons flash, and then you can select each day from Monday to Sunday
, with the border of the selected day’s icon flashing. Press the Timing button
at this time then you can setup the time, using the Up and Down buttons to set Hour when
00: is flashing, and press the Timing button again to set the Minute with the Up
and Down buttons when “:00” is flashing.
The product has memory. After you set up the time in the Weekly Mode, the machine will
run 24x7, i.e. it will automatically enter Tuesday after Monday's 24 hours, circling
through Monday to Sunday on an on according to the preset program.
f. Temperature setup: Under the Weekly Mode working status, press the Temperature button
and the temperature digits flash, and then you can set your comfortable room
temperature with the Up and Down buttons (Note: The temperature range to set is
between 15~50˚C, and the machine’s working temperature range is between -20~50˚C,
with the default working temperature at 35˚C. The temperature set up every time is the

working temperature of the Comfortable mode. The product's Economy mode's default
temperature is always 5ºC lower than the preset Comfortable mode's temperature, and the
product's Frost-free mode's default temperature is 5ºC). When the ambient temperature is
2ºC higher than the preset temperature, the product stops heating, with the heating icon
dimmed but the border of corresponding mode icon (i.e. , , )
still flashing, and the mode icon in the circle ( , , ) also flashing. When the
ambient temperature is 2ºC lower than the preset temperature, the product will
automatically restart heating up along with the heating icon displayed.
5. Anionic function: Press the Anionic button to start the Anionic function, with the border
of the Anionic function icon flashing. When the Anionic function is stopped, the border of
the Anionic function icon stops flashing.
6. Child-lock function: Press the Power button , and the interface will automatically lock up
after 10 seconds, which means all buttons do not respond. To unlock the controller, press the OK
button and then the Down button . You can only operate the controller to set up the
functions when the controller is unlocked.

Ⅵ.Technical Data
Type
Voltage
Frequency
Power
Category
ZKG 01W/B
230V
50/60Hz
2000W
I
The product is for household use only.
Correct Disposal of this product
This marking indicates that this product should not be disposed
with other household wastes throughout the EU. To prevent
pos
sible harm to the environment or human health from
uncontrolled waste disposal, recycle it responsibly to promote the
sustainable reuse of material resources. To return your used
device, please use the return and collection systems or contact
the retailer where the product was purchased. They can take this
product for environmental safe recycling.
Warranty Information
The manufacturer provides warranty in accordance with the legislation of the
customer's own country of residence, with a minimum of 2 year.
The warranty only covers defects in material or workmanship.
The repairs under warranty may only be carried out by an authorized service
centre. When making a claim under the warranty, the original bill of purchase
(with purchase date) must be submitted.
The warranty will not apply in cases of:
- Normal wear and tear
- Incorrect use, e.g. overloading of the appliance, use of non-approved
accessories
- Use of force, damage caused by external influences
- Damage caused by non-observance of the user manual, e.g. connection to
an unsuitable mains supply or non-compliance with the installation instructions
- Partially or completely dismantled appliances
Table of contents
Other Zass Heater manuals
Popular Heater manuals by other brands

Elnur Gabarron
Elnur Gabarron ECOMBI PROSSH User operating instructions

Blumfeldt
Blumfeldt 10032458 manual

Geko
Geko PH-ET07E Translation of the original operating instructions

Haverland
Haverland RCWave+ ANTHRACITE Instruction & installation manual

Qlima
Qlima DFA 1650 Premium operating manual

Newmac
Newmac NMC80 manual

Roberts Gorden
Roberts Gorden Combat CTU 22 to Combat 115 Installation, commissioning, operation & service manual

Orbegozo
Orbegozo CR 5113 instruction manual

infrasave
infrasave SchwankAir 3000 Series installation manual

Saxon
Saxon Mahogany Mk II owner's manual

Frico
Frico IHS20B24 quick start guide

BIEMMEDUE
BIEMMEDUE EK 3 A instruction manual