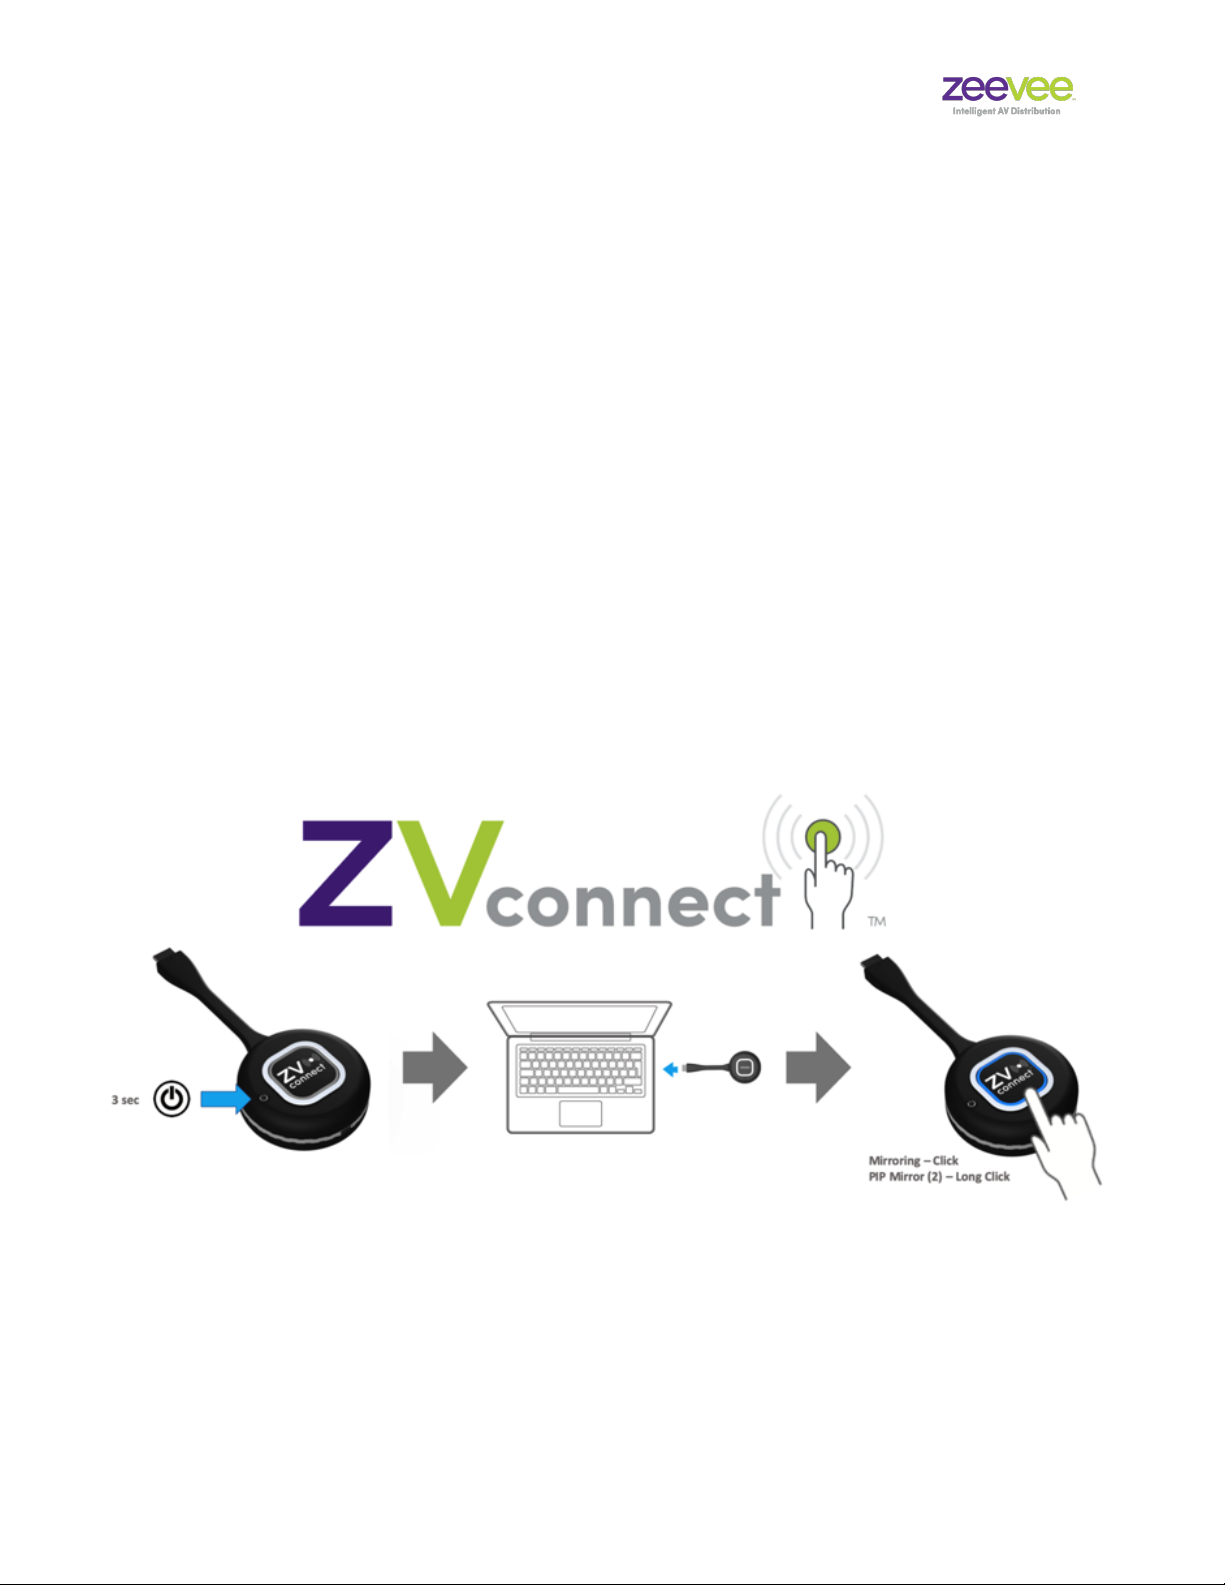
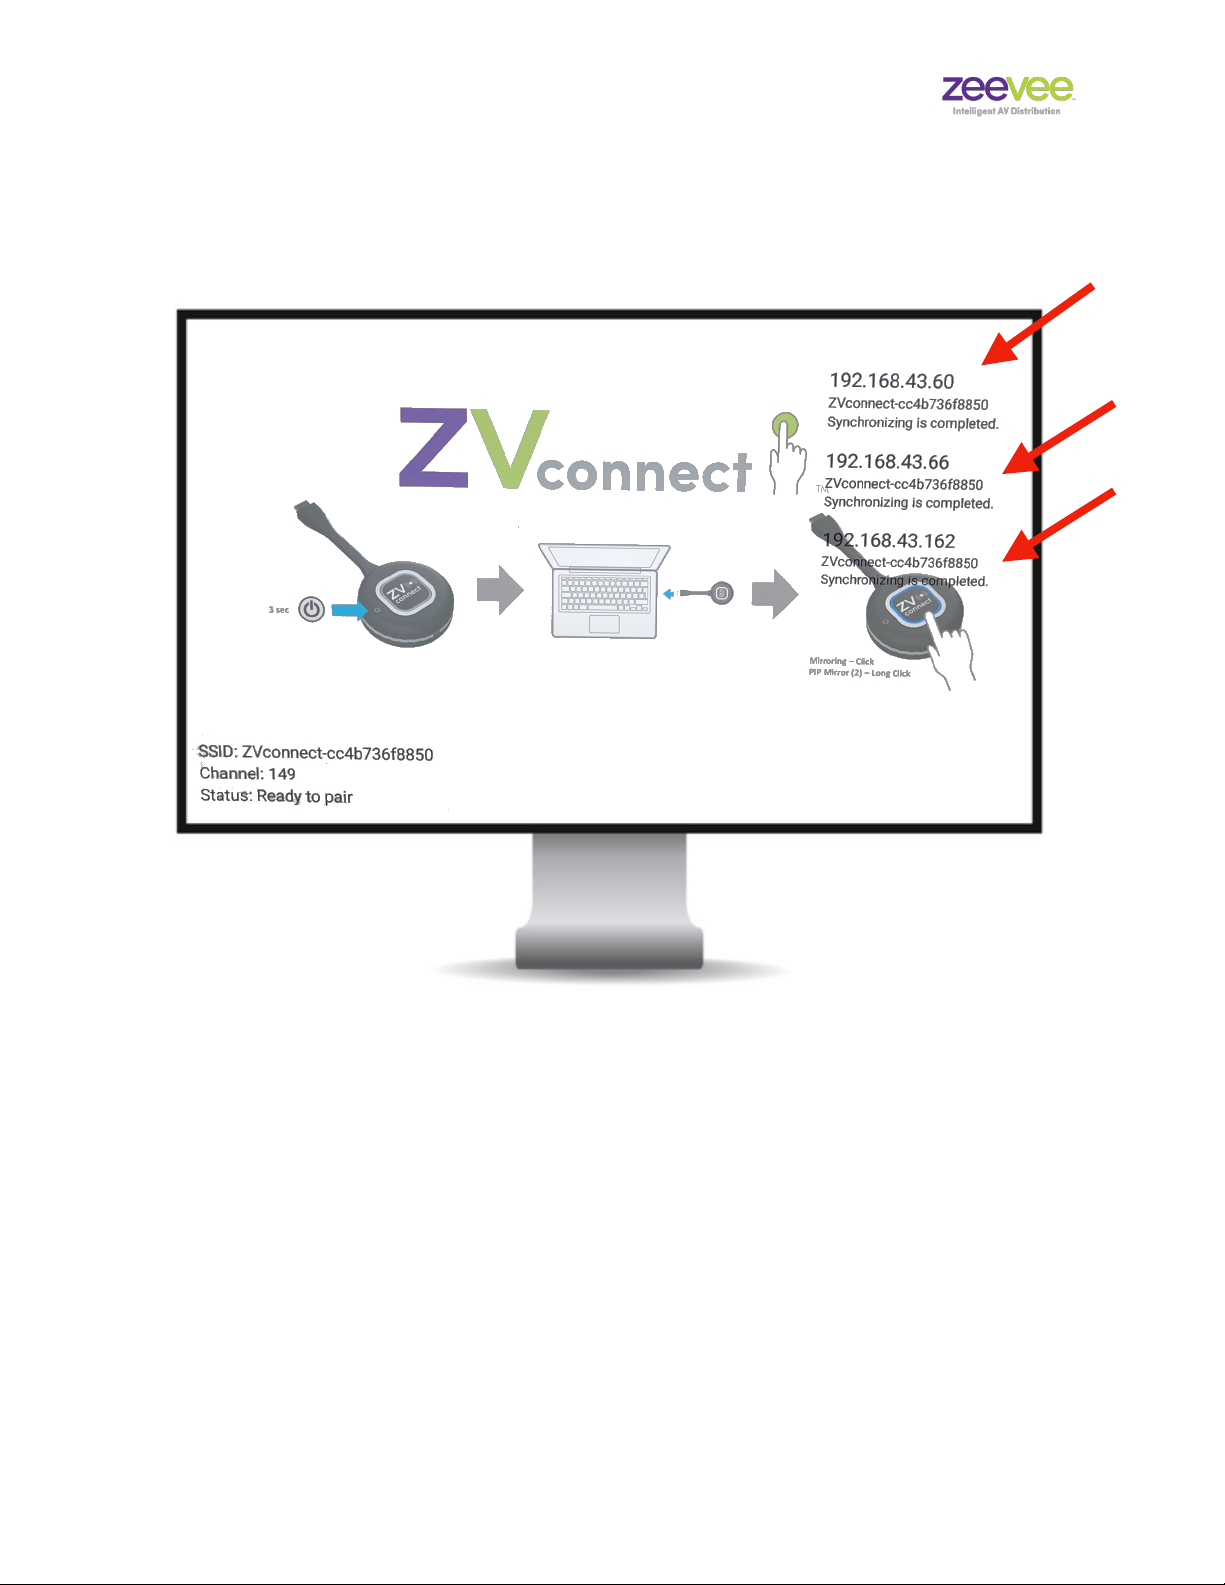
ZeeVee ZVconnect User manual

ZVconnectTM
Wireless Presentation System
——————————————————————————————————————————
User Manual
Updated February 15, 2023

ZVconnect User Guide
Table of Contents
ZVconnectTM! "1
Wireless Presentation System! "1
System Description! "3
Features! "4
Receiver Unit! "4
Transmitter Unit! "5
Operating Guide! "6
Receiver Installation! "6
Synchronization of Transmitter to a Receiver! "7
Screen Mirroring (One source to receiver)! "12
Dual Screen Mirroring (Two sources to receiver)! "13
Dual Screen Mirroring Details (Long click button for Dual Screen mode)! "14
Screen Switching in Dual Screen Mode! "15
Dual Screen Mode from 3rd Device! "16
Transmitter Factory Reset! "18
Battery Status! "19
Battery Charging! "20
Optional Charging Stand! "21
Specifications! "22
Transmitters! "22
Receiver! "23
Certifications and Warranty! "23
Part Numbers! "24
Frequently Asked Questions! "25
Disclaimers!27
Rev 20230215
Page of2 27

ZVconnect User Guide
System Description
The ZVconnect provides a simple, robust conference room video solution. The
transmitter plugs directly into your laptop’s video output, and the receiver into the
HDMI video input of your display. No drivers or software to install. No USB
limitations. No WiFi network required. Just plug the transmitter into the source
and you are ready to go.
A minimal system consists of:
•Video Source (Up to 1080p)
•ZVconnect transmitter
device
•Display with HDMI input
•ZVconnect receiver device!
!
Rev 20230215
Page of3 27

ZVconnect User Guide
Features
Receiver Unit
!
Rev 20230215
Page of4 27
HDMI Connector
Power LED
Status LED
USB Type-C Connector
for DC 5V power
Blue Flash (1s) : Ready to Play"
Blue Flash (100ms) : Channel Scanning
Setting Button
Note: The Receiver unit red rim was
added to units manufactured in June
2021. Units manufactured prior to this
date had a silver rim the same as the
Transmitter units.

ZVconnect User Guide
Transmitter Unit
#
Rev 20230215
Page of5 27
HDMI or USB-C
Connector
Status LED
USB Type-C Connector
for DC 5V power
Purple: Booting"
Purple Flash: Factory Reset mode"
Blue: Ready to Play"
Blue Flash (1s) : Transmitting"
Blue Flash (100ms): Setting mode"
Red: no HDMI source"
Red Flash (300ms): Checking receiver connection
Setting /
Transmit Button
Power Button
Battery
Indicator
Note: Please see the Battery
Charging information on page 19 for
different Status LED information

ZVconnect User Guide
Operating Guide
Receiver Installation
"
"
1. Connect ZVconnect Receiver to HDMI input of display"
2. Connect 5V/2A power to ZVconnect receiver"
3. Status light will turn blue. Wait for status light to flash. (About 30 seconds)"
4. Ready to Play"
"
Rev 20230215
Page of6 27

ZVconnect User Guide
Synchronization of Transmitter to a Receiver
You will need to Synchronize or “Pair” a Transmitter to a Receiver. This is done
by putting the Receiver into Pairing Mode and synchronizing it with desired
Transmitters."
Step 1: "
Connect the Receiver to the display’s HDMI input and then connect power
adapter (5V2A) to the USB-C port of the receiver."
"
Step 2:
LED of the Receiver center button will turn blue for a few seconds and flash for
about 30 seconds. The “Ready to play” message will appear in the bottom left
corner of the display."
Rev 20230215
Page of7 27

ZVconnect User Guide
Step 3:
Press Receiver’s center button for 3 seconds. After initialization the “Ready to
pair” message will be shown on the lower left corner of the display. The
Receiver is now in pairing mode."
"
"
"
Rev 20230215
Page of8 27

ZVconnect User Guide
Step 4:
With no source connected to the Transmitter; press the Transmitter’s power
button for 3 seconds to power on Transmitter. LED will turn purple while
booting."
Important: Do not connect a source to the Transmitter during this
synchronization procedure."
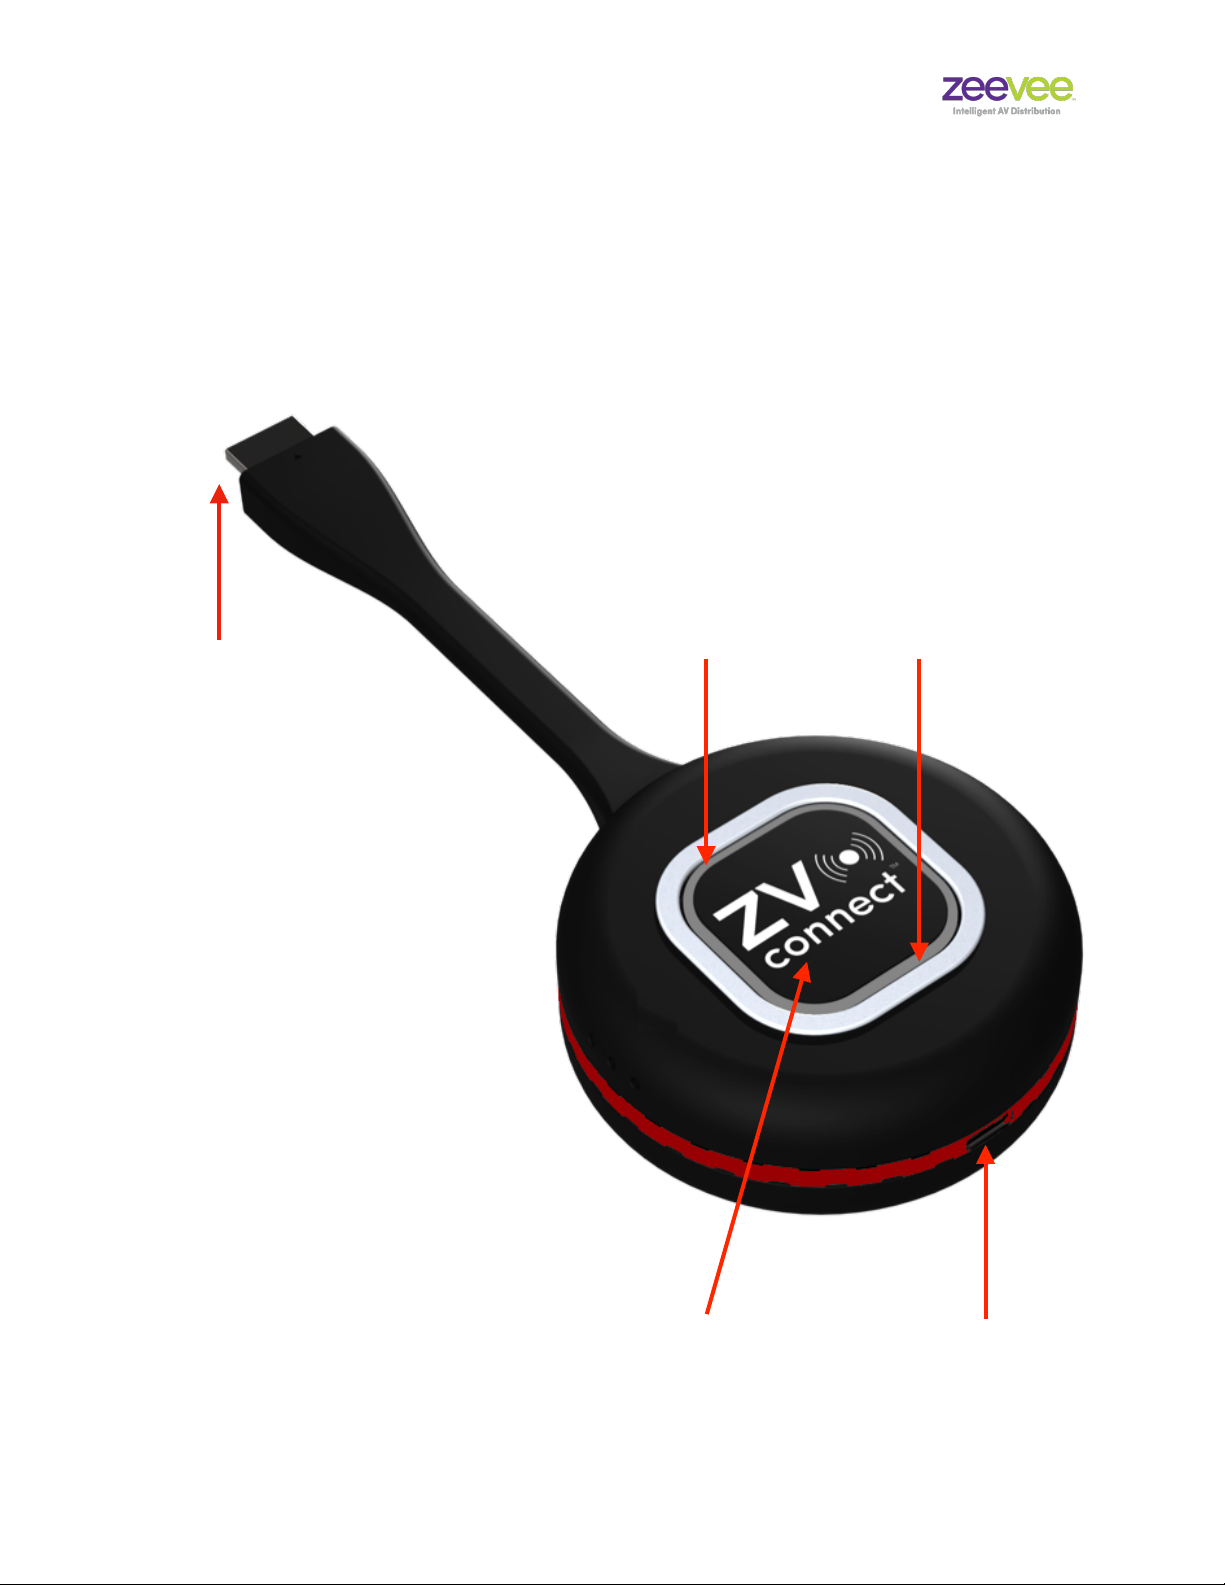
While LED is still purple; press and hold the center button until the LED
becomes flashing blue and then release it. (LED will flash red before it starts
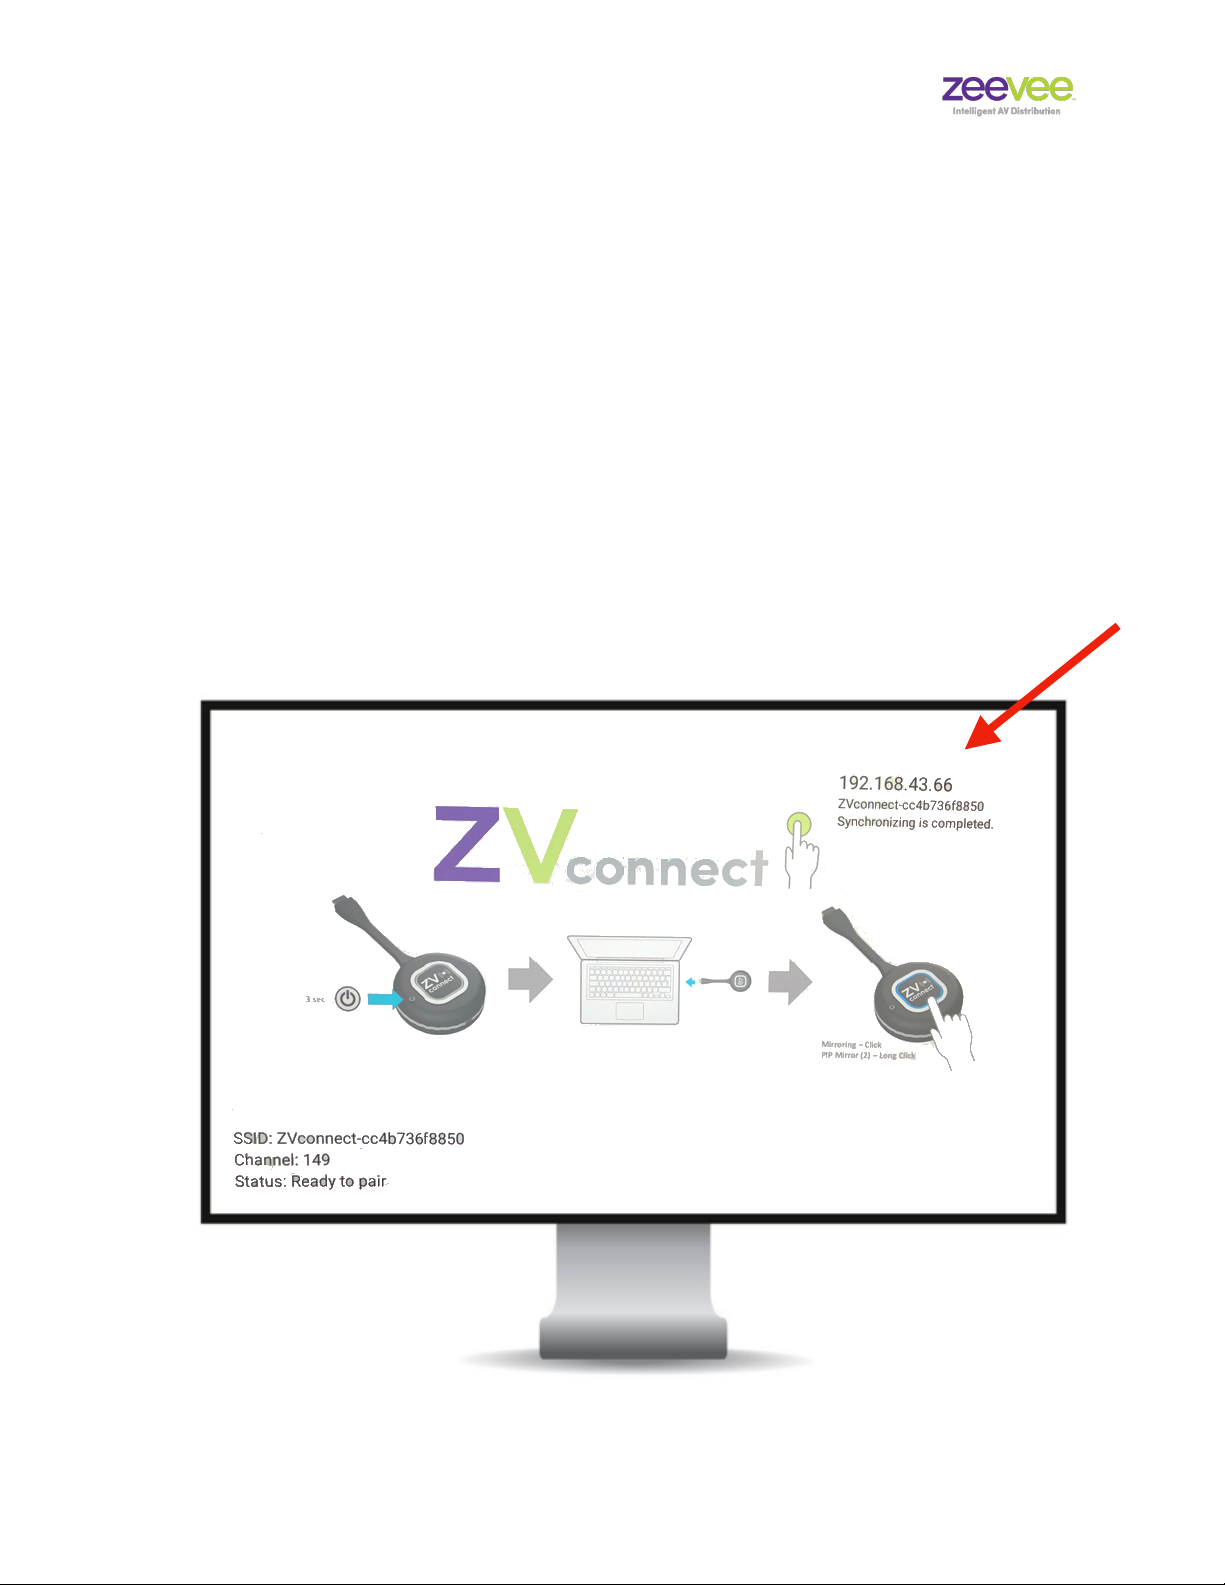
flashing blue) The Transmitter will now pair with the Receiver. When the pairing
is successful, a “Synchronizing is completed” message will appear in the upper
right corner of the display. The LED on the Transmitter will turn flashing red after
this process. Transmitter is now ready, but you must complete step 5 below."
Rev 20230215
Page of9 27

ZVconnect User Guide
You can synchronize up to 254 transmitters with a single receiver. Example
below shows screen after 3 Transmitters have been synchronized consecutively."
"
Note: The Transmitter will stay synchronized to the specific Receiver after power
down. In fact, the Transmitter will stay synchronized to the Receiver until
manually paired with another receiver."
Rev 20230215
Page of10 27

ZVconnect User Guide
Step 5:
Once pairing is completed, press and hold the Receiver’s center button until you
see “Initializing” in the status field to exit pairing mode. After a few moments of
“Channel scanning” this will return to “Ready to play”. "
Important: You will not be able to transmit video from a Transmitter to Receiver
until the Receiver is taken out of pairing mode. It must be “Ready to play”."
Rev 20230215
Page of11 27

ZVconnect User Guide
Screen Mirroring (One source to receiver)
"
Once the receiver has completed
the boot process the screen
shown to the left will appear on
the display. The status should be
“Ready to play”"
Connect either an HDMI or USB-C transmitter to a source."
Power on the transmitter"
Wait for the status LED to turn blue"
Press the settings/transmit button once."
The display will indicate that the transmitter is connecting."
Transmitter status button will flash blue to indicate it is actively transmitting to
receiver."
Rev 20230215
Page of12 27

ZVconnect User Guide
Dual Screen Mirroring (Two sources to receiver)
It is possible to connect two transmitters to a single receiver simultaneously and
display the images side by side on the display. This process requires at least
two transmitters that are synced to the same receiver."
"
"
"
Rev 20230215
Page of13 27

ZVconnect User Guide
Dual Screen Mirroring Details (Long click button for Dual Screen mode)#
Rev 20230215
Page of14 27
A
A
A B
A B
A B
A B
ALong click
Device Aenters Dual
Screen mode
AB
BLong click
Device Benters Dual Screenmode
-> Screen B appears on the
right side of screen A
CLong click
Device Cdoes not enter Dual
Screen mode.
Only 2 devices are available.
ABC
Type to enter text
Color rainbow screen is normal

ZVconnect User Guide
Screen Switching in Dual Screen Mode "
Long Click -> Device Exits Dual Screen "
Short Click -> Device turns to full screen mode"
"
"
"
Rev 20230215
Page of15 27
A
A B
A B
B
A B
BLong click
Device A is full screen, and long click Device B
-> Both devices enter Dual Screen mode.
Device Aon the left side, and Device B on the right side.
A B
ALong click
Device A exits from Dual
Screen mode
A B
A or B
AB
Aor BShort click
Split screen switches to full screen and cancels
Dualscreen mode.
Color rainbow screen is normal

ZVconnect User Guide
"
"
Dual Screen Mode from 3rd Device"
"
"
"
"
Rev 20230215
Page of16 27
A B
C
CShort click
Switch to full screen of Device C.
Dual Screen mode for Device A
and Device B is cancelled.
A B C
A B
A
B
A B
A or B Long click
Choose Device A or Device B and end
Dual Screenmode
C
Color rainbow screen is normal

ZVconnect User Guide
Color rainbow screen is normal"
Rev 20230215
Page of17 27
B
A
AC
CB
AB C
CLong click
Device Centers Dual Screenmode
Color rainbow screen is normal

ZVconnect User Guide
Transmitter Factory Reset
To factory reset the transmitter, please follow these steps.
1. Ensure Transmitter is not connected to a Source.
2. Power on the Transmitter. LED will cycle from solid purple while booting
to flashing red.
3. Press and hold the center button until the LED flashes blue.(About 2-3
seconds)
4. Now press and hold the center button until the LED turns off. Unit powers
itself off.
5. Power on the Transmitter. LED will cycle from solid purple to slow flashing
purple.
6. Unit is now reset and in standby mode.
If there is an active Receiver unit in range, the Transmitter will now automatically
pair/sync to that Receiver. Flashing purple will turn to solid red when this
procedure completes.
If there is no active Receiver unit in range, the Transmitter will continue to slowly
flash purple unit it eventually self powers off. The next time a Receiver unit is in
range, it will automatically pair/sync to that unit.
Rev 20230215
Page of18 27

ZVconnect User Guide
Battery Status
The transmitter units have an integrated rechargeable battery. The status of the
battery is indicated by a series of LED lights on the side of the unit."
"
Rev 20230215
Page of19 27
Battery Status Lights
Two green plus One orange = Battery Charge 80% - 100%"
One green plus One orange = Battery Charge 20% - 80%"
One orange = Battery Charge less than 20%"
Note: Battery status lights are not illuminated when the
transmitter is turned off.

ZVconnect User Guide
Battery Charging
To charge transmitter units follow the procedure below:"
1. Power offthe transmitter"
2. Plug the USB-C charging cable into the transmitter"
3. Connect other end of charging cable to appropriate USB charging block and
power"
4. The Status LED will turn Red while the transmitter is charging"
5. The Status LED will turn offwhen the transmitter is fully charged"
"
"
Rev 20230215
Page of20 27
Charging
Fully Charged
Other manuals for ZVconnect
1
This manual suits for next models
3
Table of contents
Other ZeeVee Projector Accessories manuals
Popular Projector Accessories manuals by other brands

Remaco
Remaco ECO-1515 Installation guide & manual

Sony
Sony VPLL-ZM31 operating instructions

CHIEF
CHIEF Universal Smart Lift Bracket installation instructions

Panasonic
Panasonic ET-DLE030 Operating instruction

Dynamic Projection
Dynamic Projection Mirror Head MH14 manual

Luxor/H.Wilson
Luxor/H.Wilson WPS5C Assembly instructions