ZeeVee ZVconnect User manual

ZVconnectTM
WIRELESS PRESENTATION SYSTEM
User Guide
Updated October 2020

ZVconnect User Guide
Table of Contents
System Description!3"
Features!4"
Receiver Unit!4"
Transmitter Unit!5"
Operating Guide!6"
Receiver Installation!6"
Transmitter Installation!7"
Full Screen Mirroring!9"
Dual Screen Mirroring!10"
Synchronization to specific Receiver!11"
Battery Status!15"
Battery Charging!16"
Optional Charging Stand!17"
Specifications!18"
Transmitters!18"
Receiver!19"
Certifications and Warranty!19"
Part Numbers!20"
Disclaimers!21
Rev 20201020
Page of2 21

ZVconnect User Guide
System Description
The ZVconnect provides a simple, robust conference room video solution. The
transmitter plugs directly into your laptop’s video output, and the receiver into the
HDMI video input of your display. No drivers or software to install. No USB
limitations. No WiFi network required. Just plug the transmitter into the source
and you are ready to go.
A minimal system consists of:
•Video Source (Up to 1080p)
•ZVconnect transmitter
device
•Display with HDMI input
•ZVconnect receiver device!
!
Rev 20201020
Page of3 21

ZVconnect User Guide
Features
Receiver Unit
!
Rev 20201020
Page of4 21
HDMI Connector
Power LED
Status LED
USB Type-C Connector
for DC 5V power
Blue Flash (1s) : Ready to Play"
Blue Flash (100ms) : Setting mode
Setting Button

ZVconnect User Guide
Transmitter Unit
#
Rev 20201020
Page of5 21
HDMI or USB-C
Connector
Status LED
USB Type-C Connector
for DC 5V power
Purple: Booting"
Purple Flash: Factory Reset mode"
Blue: Ready to Play"
Blue Flash (1s) : Transmitting"
Blue Flash (100ms): Setting mode"
Red: no HDMI source"
Red Flash (300ms): Checking receiver connection
Setting /
Transmit Button
Power Button
Battery
Indicator
Note: Please see the Battery
Charging information on page 15 for
different Status LED information

ZVconnect User Guide
Operating Guide
Receiver Installation
"
"
1. Connect ZVconnect Receiver to HDMI input of display"
2. Connect 5V/2A power to ZVconnect receiver"
3. Status light will turn blue. Wait for status light to flash. (About 30 seconds)"
4. Ready to Play"
"
Rev 20201020
Page of6 21

ZVconnect User Guide
Transmitter Installation
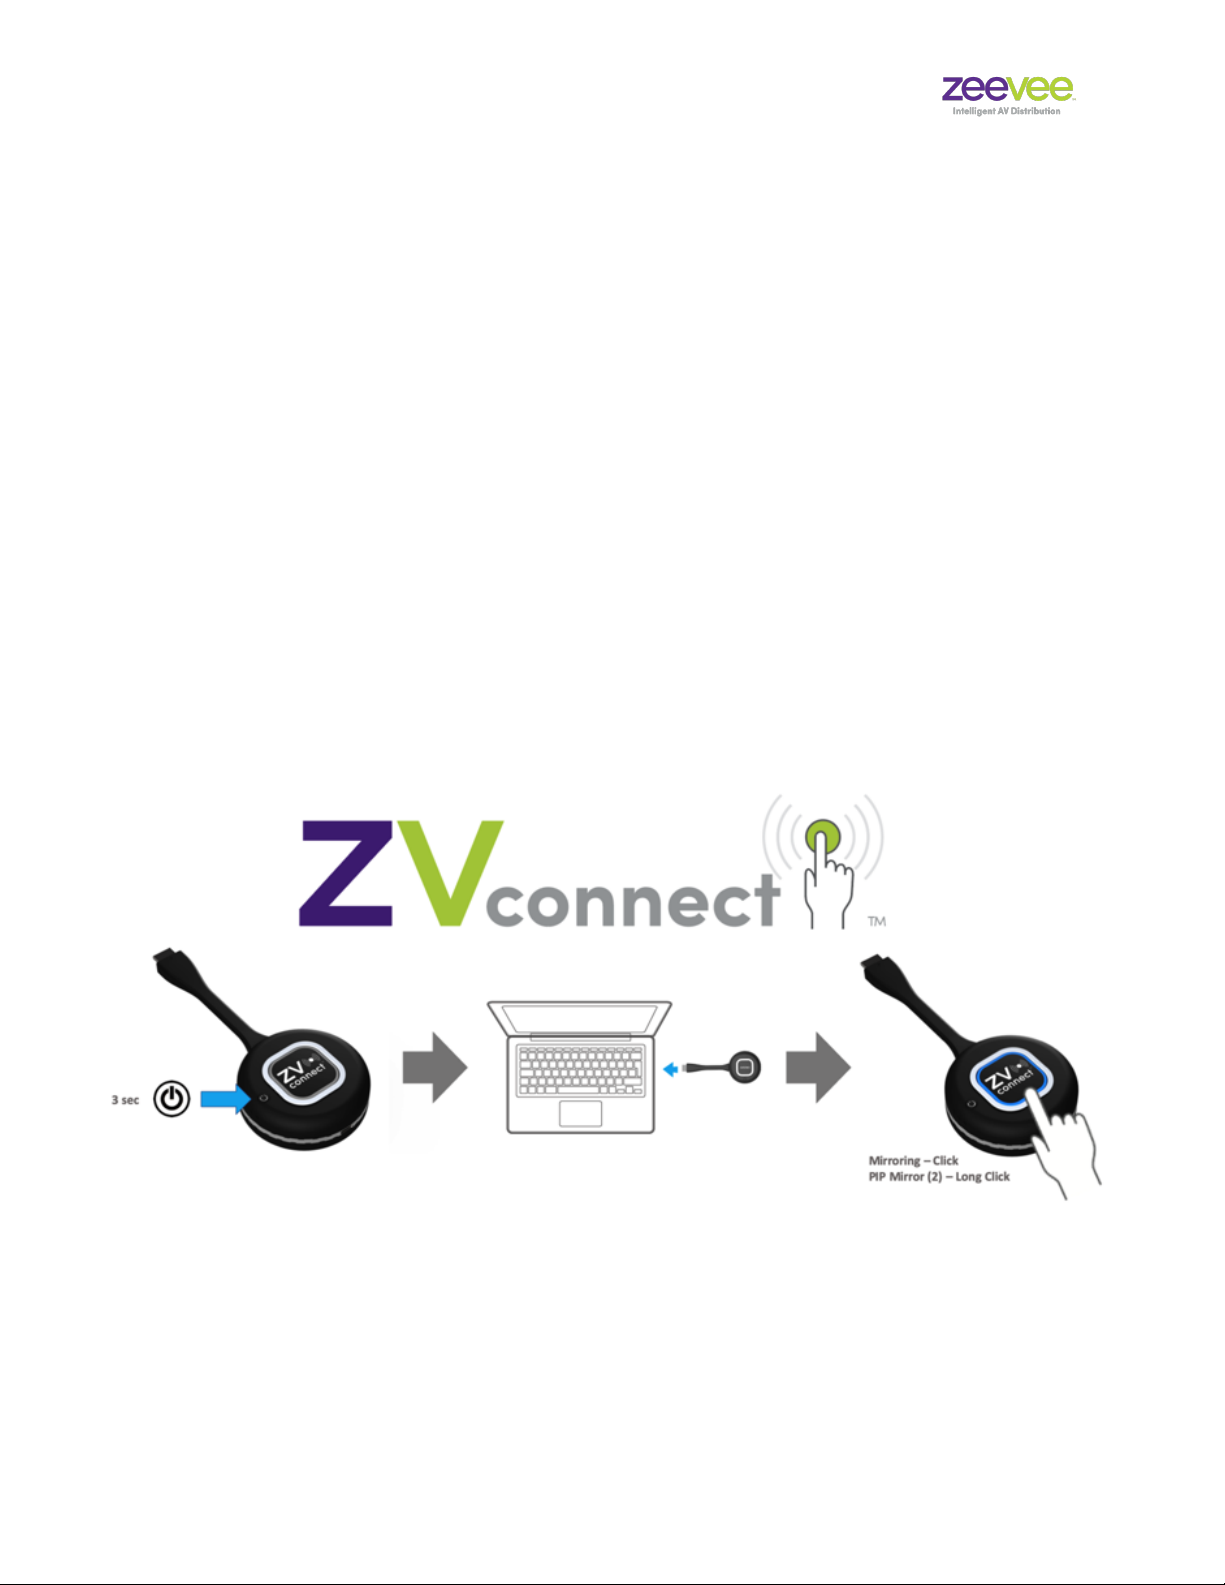
1. Disconnect transmitter from any source
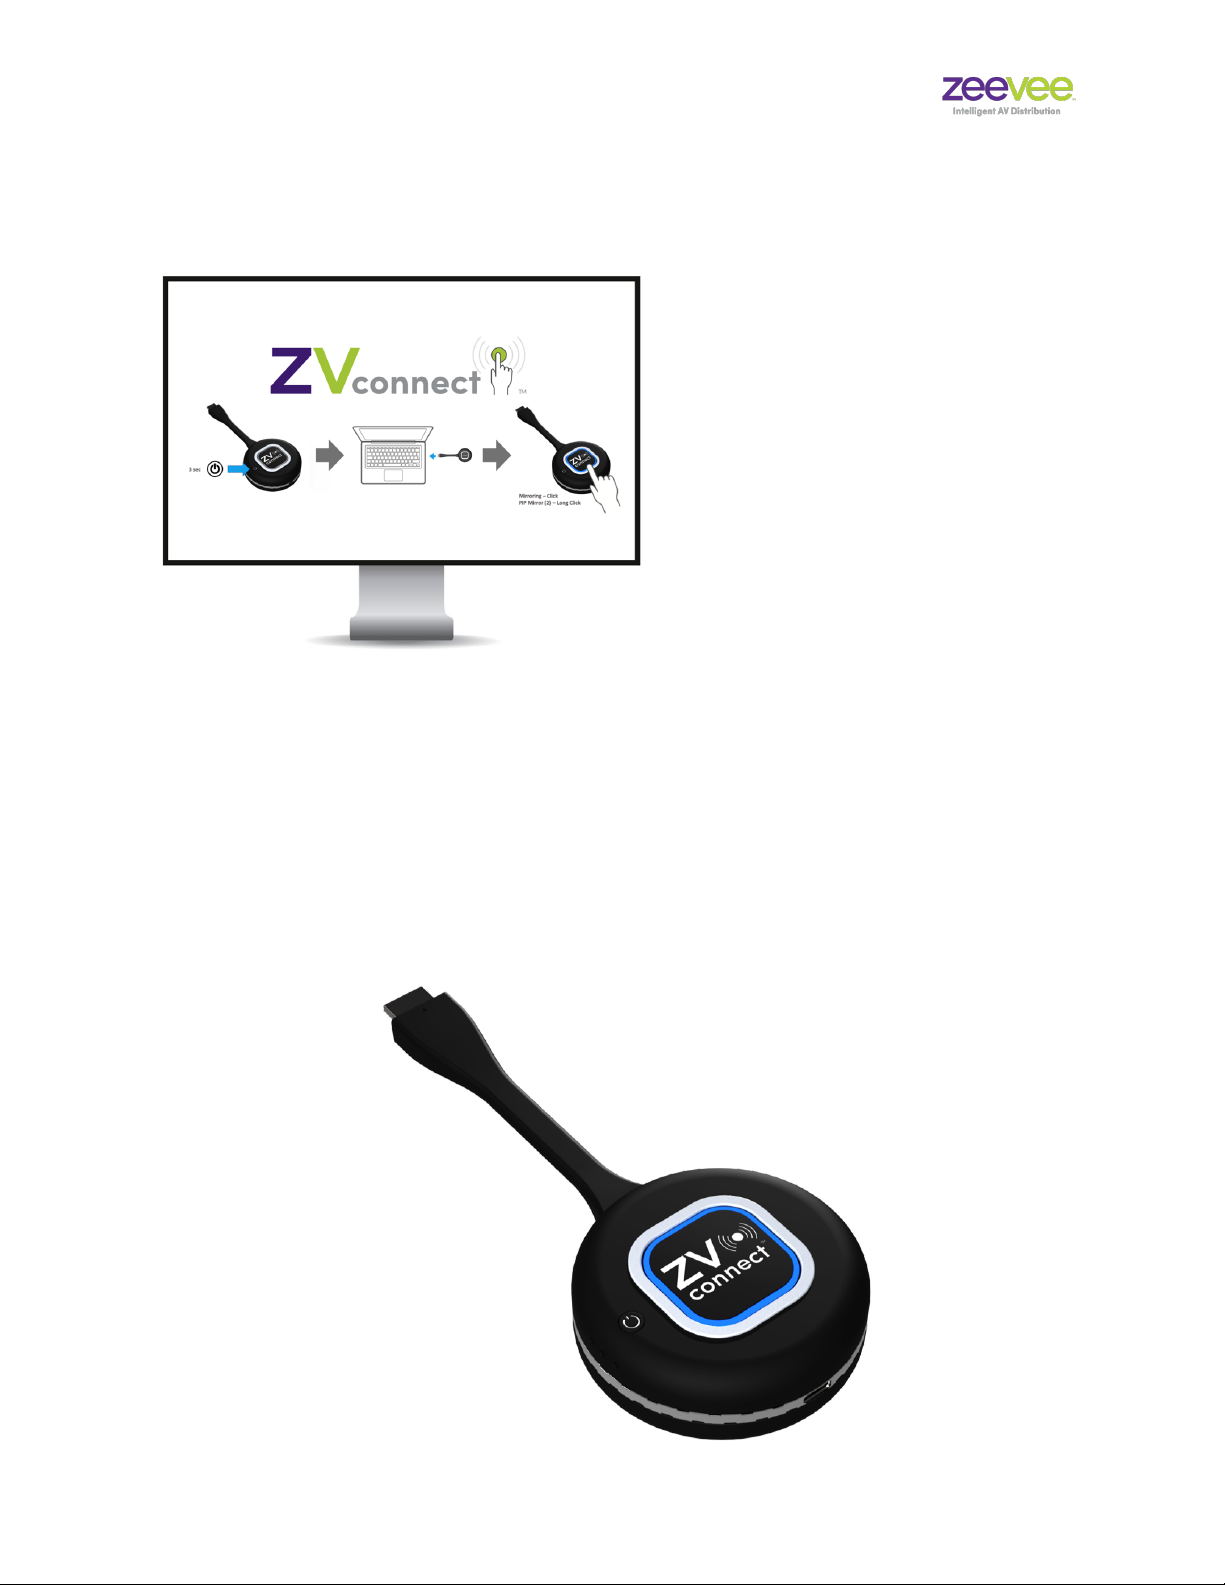
2. Power the transmitter on by holding power button for about 3 seconds
3. Wait for transmitter to complete booting and LED to turn Red.
4. Press and hold the center button until Blue LED flashes (About 3 seconds)
5. Release the center button and then press and hold the center button again
until Blue LED turns off. (Transmitter turns off)
6. Power the transmitter back on. This will cause the transmitter to sync to
receiver.
Note: This process will enable the transmitter to sync to different receiver units.
Example:
Transmitter is synced to Receiver #1.
Follow process above and the Transmitter will sync to Receiver #2.
Repeat the process to switch back to Receiver #1.
(This assumes more than one Receiver in range of the transmitter)
Transmitters will stay synced to the same Receiver thru power cycles.
Factory Reset:
To factory reset the transmitter: Starting with transmitter powered off, hold the
center button in first, now hold the power button in and hold both buttons until
you see the LED flash purple. (About 15 seconds) Once LED flashes Purple the
Rev 20201020
Page of7 21

ZVconnect User Guide
unit has been factory reset. Unit will now auto synchronize to any RX currently in
range. If there is no RX unit in range, the transmitter LED will continue to flash
purple. To exit Reset Mode, follow the instructions for Synchronizing to a specific
receiver starting on page 11 of this document. Perform step #4 from the flashing
purple LED status. Hold the setting button until it flashes blue.
Rev 20201020
Page of8 21

ZVconnect User Guide
Full Screen Mirroring
"
Once the receiver has completed
the boot process the screen
shown to the left will appear on
the display."
Connect either an HDMI or USB-C transmitter to a source."
Power on the transmitter"
Wait for the status LED to turn blue"
Press the settings/transmit button once."
The display will indicate that the transmitter is connecting."
Transmitter status button will flash blue to indicate it is actively transmitting to
receiver."
Rev 20201020
Page of9 21

ZVconnect User Guide
Dual Screen Mirroring
It is possible to connect two transmitters to a single receiver simultaneously and
display the images side by side on the display. This process requires at least
two transmitters that are synced to the same receiver."
"
To enter dual screen mode, press and hold the settings/transmit button on one
transmitter for approximately 3 seconds. This will join the video from 2
transmitters and display them side by side. To change one of the windows if
more than 2 transmitters are present, press and hold the settings/transmit
button on the other desired transmitter for approximately 3 seconds."
Rev 20201020
Page of10 21

ZVconnect User Guide
Synchronization to specific Receiver
In cases where there are multiple Receiver units in range, you will want to
Synchronize or Pair a Transmitter to a specific Receiver. This is done by putting
the Receiver into Pairing Mode and synchronizing it with desired Transmitters."
Step 1: "
Connect the Receiver to the display’s HDMI input and then connect power
adapter (5V2A) to the USB-C port of the receiver."
"
Step 2:
LED of the Receiver center button will turn blue for a few seconds and flash for
about 30 seconds. The “Ready to play” message will appear in the bottom left
corner of the display."
Rev 20201020
Page of11 21

ZVconnect User Guide
Step 3:
Press Receiver’s center button for 3 seconds. After initialization the “Ready to
pair” message will be shown on the lower left corner of the display. The
Receiver is now in pairing mode."
"
"
Rev 20201020
Page of12 21

ZVconnect User Guide
Step 4:
Press the Transmitter’s power button for 3 seconds and wait until the LED of the
center button becomes flashing red."
Press and hold the center button until the LED become flashing blue and then
release it. The Transmitter will now pair with the Receiver. When the pairing
process is successfully completed, “Synchronizing is completed” message will
appear in the upper right corner of the display."
#
Rev 20201020
Page of13 21

ZVconnect User Guide
Step 5:
Once pairing is completed, press the Receiver’s center button until you see the
“initialization” in the status field to exit pairing mode. "
Important: You will not be able to transmit video from a Transmitter to Receiver
until the Receiver is taken out of pairing mode."
Transmitter Factory Reset:
To factory reset the transmitter: Starting with transmitter powered off, hold the
center button in first, now hold the power button in and hold both buttons in for
about 15 seconds. Once LED flashes Purple the unit has been factory reset.
Unit will now auto synchronize to any RX currently in range. If there is no RX unit
in range, the transmitter LED will continue to flash purple. To exit Reset Mode,
follow the instructions for Synchronizing to a specific receiver starting on page 11
of this document. Perform step #4 from the flashing purple LED status. Hold
the setting button until it flashes blue. Be sure to perform step #5 to take the
Receiver out of Pairing mode
Rev 20201020
Page of14 21

ZVconnect User Guide
Battery Status
The transmitter units have an integrated rechargeable battery. The status of the
battery is indicated by a series of LED lights on the side of the unit."
"
Rev 20201020
Page of15 21
Battery Status Lights
Two green plus One orange = Battery Charge 80% - 100%"
One green plus One orange = Battery Charge 20% - 80%"
One orange = Battery Charge less than 20%"
Note: Battery status lights are not illuminated when the
transmitter is turned off.

ZVconnect User Guide
Battery Charging
To charge transmitter units follow the procedure below:"
1. Power offthe transmitter"
2. Plug the USB-C charging cable into the transmitter"
3. Connect other end of charging cable to appropriate USB charging block and
power"
4. The Status LED will turn Red while the transmitter is charging"
5. The Status LED will turn offwhen the transmitter is fully charged"
"
"
Rev 20201020
Page of16 21
Charging
Fully Charged

ZVconnect User Guide
Optional Charging Stand
There is an optional charging stand available for the transmitter devices (Part # ZVCCHARGE)
that can hold and charge up to 4 ZVconnect transmitters at one time.
Note that the ZVconnect transmitter LED will remain red while
the unit is actively charging and will turn off when the unit is
fully charged. The Charging Stand also has indicator
lights. Purple to indicate the ZVconnect transmitter is
charging and Blue to indicate the ZVconnect transmitter
is fully charged.!
Rev 20201020
Page of17 21
ZVconnect is charging
ZVconnect is fully charged

ZVconnect User Guide
Specifications
Transmitters
*Input Resolution reduced to 30Hz for transmission. Scaled back to 60Hz at Receiver
Model Number
ZVCTXHDMI
ZVCTXUSBC
Description/Interface
Wireless transmitter with HDMI
interface
Wireless transmitter with USB-C
interface
In the box
Transmitter, USB cable, 2A USB
power block
Transmitter, USB cable, 2A USB
power block
Video Codec
H.265
H.265
Resolution Support
Up to 1920 x 1080 @60Hz input*
Up to 1920 x1080 @60Hz input*
WLAN
IEEE802.11a/b/g/n/ac
5 Ghz (5.150 ~ 5.850 Ghz)
IEEE802.11a/b/g/n/ac
5 Ghz (5.150 ~ 5.850 Ghz)
Security
WPA2 AES-CCMP
WPA2-AES-CCMP
Audio
2-channel stereo
2-channel stereo
Power
Battery or DC Adapter 5V/1A
Latency
< 200ms
< 200ms
Transmission
Distance
40+ feet
40+ feet
Battery life
6 hours
6 hours
Battery charging time
4 hours
4 hours
Dimensions
6.7in x 2.8in x 1.2in
Weight
0.27 lbs
0.26 lbs
Rev 20201020
Page of18 21

ZVconnect User Guide
Receiver
*Input Resolution reduced to 30Hz for transmission. Scaled back to 60Hz at Receiver
Certifications and Warranty
Model Number
ZVCRXHDMI
Description/Interface
Wireless receiver with HDMI interface
In the box
Receiver, USB cable, 2A USB power block
Video Codec
H.265
Resolution
3840 x 2160 @60Hz*, 1920 x 1080 @60Hz*,
1920 x 1200 @60Hz*
WLAN
IEEE802.11a/b/g/n/ac
5 Ghz (5.150 ~ 5.850 Ghz)
Security
WPA2 AES-CCMP
Audio
2-channel stereo
Power
DC Adapter 5V/2A
Latency
< 200ms
Dimensions
6.7in x 2.8in x 1.2in
Weight
0.13 lbs
Standard
CE
Yes
RoHS
Yes
FCC
Yes
Warranty
1 year
Rev 20201020
Page of19 21

ZVconnect User Guide
Part Numbers
Part Number
Short Description
Long Description
ZVCRXHDMI
ZVconnect wireless receiver
with HDMI interface
ZVconnect wireless receiver with HDMI output.
Includes receiver unit, USB cable and 2A USB power
block.
ZVCTXHDMI
ZVconnect wireless
transmitter with HDMI
interface
ZVconnect wireless transmitter with HDMI input.
Includes transmitter unit, USB cable and 2A USB
power block.
ZVCTXUSBC
ZVconnect wireless
transmitter with USBC
interface
ZVconnect wireless transmitter with USB-C input.
Includes transmitter unit, USB cable and 2A USB
power block.
ZVCCHARGE
ZVconnect charging stand/
cradle for up to 4 ZVconnect
transmitters
Charging cradle unit to simultaneously charge up to 4
ZVconnect transmitter units. Includes cradle and
power supply/cable.
ZVCKITH
ZVconnect wireless system
room kit with HDMI
transmitters
ZVconnect wireless room kit with HDMI transmitters.
Includes 1 receiver unit and 2 transmitter units with
HDMI inputs. Also includes 3 USB cables, 3 2A USB
power blocks
ZVCKITM
ZVconnect wireless system
room kit with HDMI and
USB-C transmitter
ZVconnect wireless room kit with HDMI transmitters.
Includes 1 receiver unit, 1 transmitter unit with USB-
C input and 1 transmitter unit with HDMI input. Also
includes 3 USB cables, 3 2A USB power blocks.
ZVCKITU
ZVconnect wireless system
room kit with USB-C
transmitters
ZVconnect wireless room kit with HDMI transmitters.
Includes 1 receiver unit and 2 transmitter units with
USB-C inputs. Also includes 3 USB cables, 3 2A
USB power blocks.
Rev 20201020
Page of20 21
Other manuals for ZVconnect
1
Table of contents
Other ZeeVee Projector Accessories manuals
Popular Projector Accessories manuals by other brands

Screen Innovations
Screen Innovations 5 Motorized Series quick start guide

GDC
GDC SX-4000 installation manual

Huawei
Huawei TP3106 user guide

Panasonic
Panasonic ET-LAV200C operating instructions

Polycom
Polycom RealPresence Capture Station Pro Administrator's guide

Wunderbars
Wunderbars Corner Frames Assembly instructions