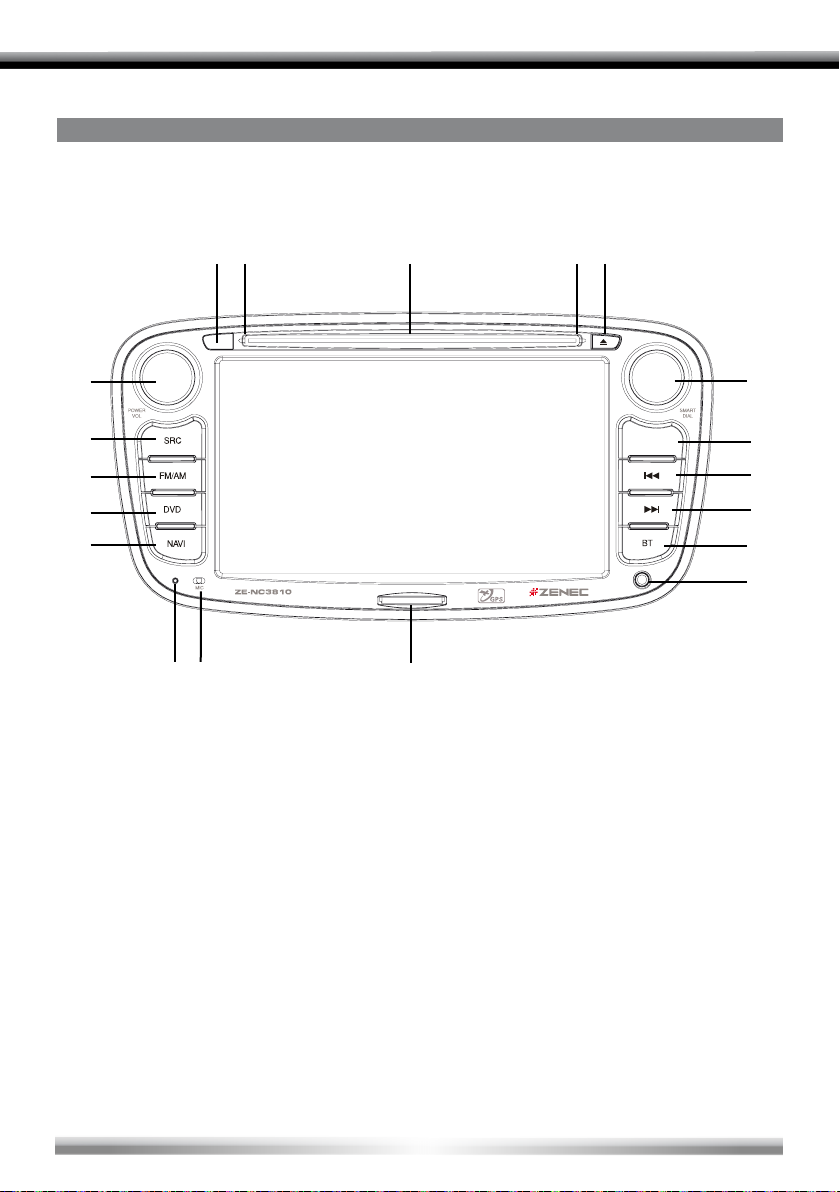
ZENEC ZE-NE3810 User manual

INSTRUCTION MANUAL
1 CH DVB-T TUNER
ZE-DVBT1 0
MODEL NO:
CAR SPECIFIC NAVICEIVER FOR FORd CARS
MOdEL N0:

40
AbOUT THIS INSTRUCTION MANUAL
The instruction manual contains important information and warnings about the operation of
this unit. Please add this instruction manual to the log book of your vehicle to have access
to it any time.
NOTE:
■ Text passages with this symbol indicate particular information, which are very important for
correct operation.
CONTENTS
SAFETY INSTRUCTIONS...................................................................................................41
FRONT PANEL BUTTONS ........................................................................................... 42-43
REMOTE CONTROL BUTTONS .................................................................................. 44-47
BASIC OPERATION...................................................................................................... 48-49
MAIN MENU AND SETTINGS ...................................................................................... 50-57
RADIO MODE ............................................................................................................... 58-60
CD/DVD MODE ...................................................................................................................61
CD/MP3/WMA MODE .........................................................................................................62
SD/USB MODE ...................................................................................................................63
IPOD MODE........................................................................................................................64
BLUETOOTH MODE..................................................................................................... 65-71
NAVIGATION MODE...........................................................................................................72
EXTERNAL PLAYING SOURCES......................................................................................73
GENERAL INFORMATION .................................................................................................74
TROUBLESHOOTING ...................................................................................................75-76
SPECIFICATIONS...............................................................................................................77
WARRANTY.................................................................................................................. 78-79

ENGLISH
41
SAFETY INSTRUCTIONS
1. This unit is designed to be used in a vehicle with a 12V battery and negative ground.
2. Do not operate the unit in any other way than described in this manual. Failure to follow
the instructions within this manual will void your warranty.
3. Do not disassemble or alter the unit in any way, because it can cause a defect and your
warranty claim will be rejected. Do not attempt to repair or to service the unit yourself, but
contact an authorized ZENEC dealer instead.
4. Use only original accessories which are designed and manufactured for the unit,
otherwise you will risk to damage it. Install the unit according to the mounting manual and
use only the supplied mounting accessories.The forces of acceleration for accidents are
sometimes huge. Incorrect mounted units are a big risk for the driver and the passengers
of the car, during an accident.
5. Protect the unit from water and other liquids, which can enter the casing.A short circuit or
even re could be the result.
6. Before you replace a defect fuse, try to nd the cause for the short circuit. Please pay
attention to the cables of the power supply! If the short circuit doesn't result from a failure
of the power supply or wiring, you can replace the defective fuse with a new one (same
values). If the short-circuit is still existing, please contact an authorized ZENEC dealer.
7. Be careful not to drain the car battery while using the unit when the car engine is turned
off. Because the unit uses a considerable amount of energy and the battery will be
charged only while the engine is running, it's possible that the battery will discharge to a
point it's not longer possible to start the engine.
8. According to the law in different European countries, driving with monitors in use in the
viewing range of the driver is not allowed, because the driver might be distracted from the
traffic. Please respect the traffic regulations of your country, or you might face penalties
in case of an accident or even loose insurance cover. Please pay attention to the volume
inside your vehicle, because you have to notice exterior sounds like a police siren.
9. Don't expose the unit to hard impacts.A mechanical or electrical damage of the unit could
be the result.

42
FRONT PANEL bUTTONS
MAIN UNIT
PIC
AV-1
1
2
3
4
5
6
bp
bo
bn
bm
bl
bt br bs br bq
78
9

ENGLISH
43
1. PWR/VOL
■ Press the PWR/VOL-rotary knob to turn
on the unit.
■ Press and hold the PWR/VOL-rotary
knob to turn off the unit.
■ Use the PWR/VOL-rotary knob to adjust
the volume.
■ Press the PWR/VOL-rotary knob to mute
the audio output and press the button
again, to go back to the last volume level.
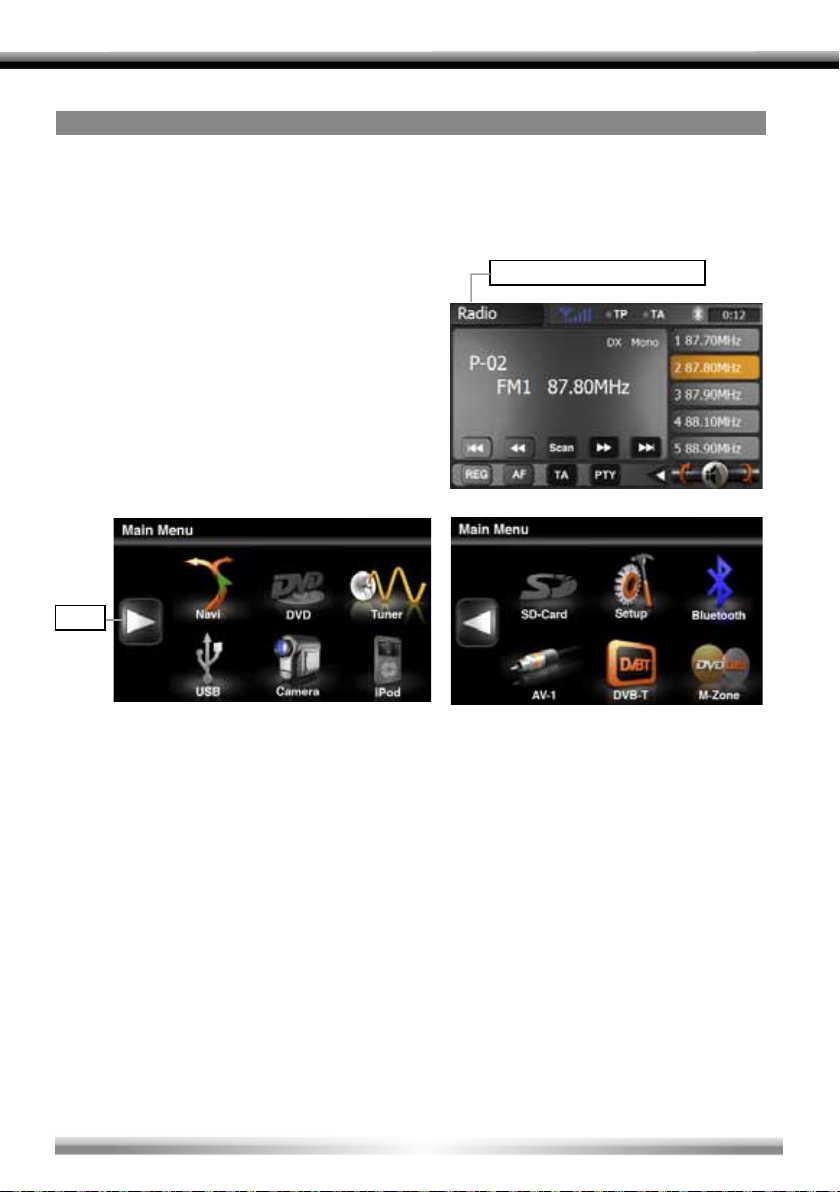
2. SRC
■Press and hold the SRC-button to enter
the main menu.
■Press the SRC-button to change bet-
ween the following playing modes:
RADIO ➞ Disc ➞ NAVI ➞ AV IN ➞
DVBT ➞ SD CARD ➞ iPod ➞ USB ➞
CAMERA
The selected playing mode will be
displayed on the screen.
3. FM/AM
■Press the FM/AM-button to enter the
radio mode.
■ Press the FM/AM-button in the radio
mode to choose between the following
radio bands: FM-1, FM-2, FM-3, AM-1,
AM-2.
4. DVD
■Press the DVD-button to enter the DVD/
CD mode.
5. NAV
■Press the NAV-button to enter the
navigation mode.The audio output of the
last playing mode will be played back.
■Press the NAV-button in navigation mode
to change between the navigation mode
and the last playing mode.
6. RESET
■Press the RESET-button to make a
hardware reset.
7. Internal microphone for Bluetooth
mode
8. SD-card slot
9. AV-1
■Connectivity for an external A/V source.
10. BT
■Press the BT-button to enter the Bluetooth
mode.
■Press the BT-button in Bluetooth mode
to change between the Bluetooth mode
and the last playing mode.
11. NEXT
■Press the NEXT-button to choose the
next track/chapter.
■Press the NEXT-button in radio mode to
auto search up.
12. PREVIOUS
■Press the PREVIOUS-button to choose
the previous track/chapter.
■Press the PREVIOUS-button in radio
mode to auto search down.
13. PIC
■Press the PIC-button to enter the video
setup.
■Press and hold the WIDE PIC-button
to change the brightness of the panel
directly.
14. SMART DIAL
■Turn the SMART DIAL rotary knob to
choose a preset station or a track etc.,
which is stored on a media. Press the
SMART DIAL rotary knob to conrm your
selection.
■Press the SMART DIAL rotary knob in
the DVD mode to pause the playback
and press it again to restart the playback.
■Press and hold the SMART DIAL rotary
knob to enter the audio control menu.
15. EJECT
■Press the EJECT-button to insert or eject
a disc.
16. Disc indicator
■Disc inside: red.
■ No disc inside: white.
17. DVD/CD slot
■Insert a disc with the label on the top
side into the DVD/CD slot until it will be
drawn-in automatically.
18. Receiver for IR-remote control

44
REMOTE CONTROL bUTTONS
FRONT REMOTE CONTROL
2
1
6
7
8
bl
bm
bo
bp
bq
bu
cl
co
cp
cs
ct
3
4
5
9
bn
br
bs
bt
cm
cn
cq
cr

ENGLISH
45
1. POWER
■Press the POWER/MUTE-button to turn
on the unit.
2. EJECT
■Press the EJECT-button to insert or eject
a disc.
3. MUTE
■Press the MUTE-button to mute the audio
output.
4. SRC
■Press the SRC-button to change bet-
ween the following playing modes:
RADIO ➞ Disc ➞ NAVI ➞ AV IN ➞
DVBT ➞ SD CARD ➞ iPod ➞ USB ➞
CAMERA
The selected playing mode will be
displayed on the screen.
5. NUMERIC KEYPAD
■Directly access to track/chapter or preset
station.
6. VOL UP
■Increase the volume.
7. VOL DOWN
■Decrease the volume.
8. INFO
■Display the available disc information.
9. GOTO SEARCH
■Position search function for CD/DVD
mode.
10. STOP/BAND
■Change in radio mode between the
following radio bands: FM-1, FM-2, FM-
3, AM-1, AM-2
■Stop playback in other playing modes.
11. SELECT
■Enter the equalizer menu.
12. NO FUNCTION
13. MAIN MENU
■Enter the main menu.
14. BRIGHTNESS ADJUSTMENT
15. REPEAT A-->B
■Set start point A and end point B to
repeat continually.
16. OK
■Start or pause the playback.
■Conrm the selected adjustment.
17. DIRECTION BUTTONS
■Up/Down/Left/Right to select an item to
adjust.
18. TITLE
■Enter the title menu of the DVD.
19. ROOT
■Enter the main menu of the DVD.
■Turn on PBC while playing VCD.
20. REPEAT
■Press the REPEAT-button to repeat the
track/folder/chapter/disc playback.
21. NEXT
■Press the NEXT-button to choose the
next track/chapter.
■Press the NEXT-button in radio mode to
auto search up.
22. PREVIOUS
■Press the PREVIOUS-button to choose
the previous track/chapter.
■Press the PREVIOUS-button in radio
mode to auto search down.
23. FAST REVERSE
■Fast reverse the disc content ("2X", "4X",
"8X", "16X").
24. FAST FORWARD
■Fast forward the disc content (2X", "4X",
"8X", "16X").
25. AUDIO
■Change the audio language for DVD
playback (if available).
26. ZOOM
■Zooming in/out an image ("+1", "+2",
"+3", "OFF")
27. ANGLE
■Change between different angles for a
scene (if available).
28. SUB-T
■ Language selection for DVD subtitle (if
available).

46
REAR REMOTE CONTROL (M-ZONE)
EPG
TV/RADIO P P
DTV MENU
ROOT
1
3
4
6
8
bl
bo
br
bs
cm
cl
2
5
7
bn
bm
bq
bp
bt
bu
9

ENGLISH
47
1. R-SRC
■ After you have activated M-Zone in the
main menu, press the R-SRC-button to
choose the playing mode for the rear
zone.
2. NUMERIC KEYPAD
■ No function.
3. MUTE
■ Press the MUTE-button to mute the audio
output.
4. GOTO SEARCH
■ No function.
5. TITLE
■ Enter the title menu of the DVD.
■ Scan function for CD mode. Each track
will be played back for 10 seconds.
6. ROOT
■ Enter the main menu of the DVD.
■ Turn on PBC while playing VCD.
7. OK
■ Start or pause the playback.
■ Conrm the selected adjustment.
8. DIRECTION BUTTONS
■ Up/Down/Left/Right to select an item to
adjust.
9. PREVIOUS
■ Press the PREVIOUS-button to choose
the previous track/chapter.
10. NEXT
■ Press the NEXT-button to choose the
next track/chapter.
11. STOP
■ Stop playback.
12. PLAY/PAUSE
■ Start or pause the playback.
13. ZOOM
■ Zooming in/out an image ("+1", "+2",
"+3", "OFF").
14. FAST REVERSE
■ Fast reverse the disc content ("2X", "4X",
"8X", "16X").
15. FAST FORWARD
■ Fast forward the disc content ("2X", "4X",
"8X", "16X").
16. SLOWER PLAY
■ Activate the slow-motion function.
17. REPEAT
■ Press the REPEAT-button to repeat the
track/folder/chapter/disc playback.
18. AUDIO
■ Change the audio language for DVD
playback (if available).
19. SUB-T
■ Language selection for DVD subtitle (if
available).
20. ANGLE
■ Change between different angles for a
scene (if available).
21. REPEAT A -> B
■ Set start point A and end point B to
repeat continually.

48
bASIC OPERATION
POWER ON/OFF
■Press the PWR/VOL rotary knob on the front panel to turn on the unit. Press and hold
the rotary knob for 2 seconds to turn off the unit.
■It's also possible to turn on and off the unit with the ignition, but this depends on the last
state, before the unit was turned off.
Arrow
Current playing mode
SELECT A PLAYING SOURCE
■After you have turned on the unit, touch the
icon with the current playing mode in the
upper left corner of the screen to go back to
the main menu.
■ After entering the main menu, you have
access to each playing mode and setting.
■Touch the arrow to choose between the two
pages of the main menu.
NOTE:
■ If a medium is not inserted or the external unit is not connected, the respective icon is greyed
out.
REAR VIEW CAMERA
■ The rear view camera mode will be activated automatically, if a camera is connected to
the camera input and you shift to the reverse gear.
M-ZONE
■ If you have installed monitors for example to the headrests of your car and they are
connected to the M-Zone A/V outputs of the unit, the passenger can operate the unit with
the rear remote control. To choose a playing mode directly (only DVB-T and DVD) at the
unit, touch the M-Zone icon in the main menu. The playing mode DVD is not available,
if you have selected the playing mode SD card or USB for the front zone. The volume of
the M-Zone components can only be altered using the with the volume adjustment of an
external unit (e.g. IR headphones).

ENGLISH
49
MUTE FUNCTION
■ Manually: Press the PWR/VOL rotary knob on the front panel to mute the audio output.
Press the button again to deactivate the mute function.
■Automatically: The audio output will be muted, if you make a phone call.
AUDIO CONTROL MENU
■The audio control menu allows you to adjust your audio system to meet your requirements
and the acoustical characteristics of the vehicle. The menu item "SW" is only relevant, if
you have a subwoofer connected to the respective sub pre-out of the unit.
■Press and hold the SMART DIAL rotary knob
to enter the audio control menu.
■ Touch the icon with the current playing mode
in the upper left corner of the screen to leave
the menu.
■After 15 seconds without any operation,
the audio menu exits back to current audio
source automatically.
NOTE:
■Bass and treble settings are only adjustable in "User"-mode.
VIDEO PLAYBACK DISABLED
■The video playback on the display of the unit is disabled when the car is in motion due to
safety reasons. It's necessary to engage the handbrake to enable the video playback or
the speed of the vehicle doesn't break 3 km/h.
■ The rear camera mode and the M-Zone remain unaffected.
SYSTEM RESET
■If the unit does not work correctly, you should rst try to reset the unit by pressing the
RESET-button on the bottom-right corner of the front panel to reset the processor. The
last adjustments will always be saved.

50
SETUP
SETUP MENU
■ Touch the [ ]-Icon in the main menu to enter the setup menu.
■ Touch the desired menu item directly on the display to open the submenu and to change
the selected adjustment.
■ The icons [ ] and [ ] indicate that there are more options available on the next page
of the setup menu.
■ Touch the "SETUP" icon in the upper right corner to exit the setup menu.
■ After 15 seconds without any operation, the audio menu returns you to the current audio
source automatically.

ENGLISH
51
GENERAL
Settings Options Function
Clock (HH:MM) Adjusts the clock appearing in the top right corner
of the TFT screen.
AM/PM AM Choose AM or PM mode (only for 12 Hr mode).
PM
Clock Mode 12Hr Clock displays 12 hour time using AM and PM.
24Hr Clock displays 24 hour time up to 23:59.
Beep On Select to activate/deactivate the beeper
function.
Off
Camera Switch Off Deactivate or activate the camera input
Camera
Camera Image Normal The output of camera image is in normal mode.
Mirror The output of camera image is in inverted mode.
Bluetooth On Select to activate/deactivate the Bluetooth
function.
Off
CAN Brightness On Activate or deactivate the display brightness,
coupled or decoupled from the car lights.
Off
CAN Backlight -10 Adjusts the brightness, when the car lights are on.
+10
Radio Field
USA
Choose your country or region for best radio
reception.
LATIN
EUROPE
AV-1 Rear Activates the rear A/V-input.
Front Activates the front A/V-input.
Version Current software version.
DivX Registration Displays the DivX registration code.

52
VIDEO
Settings Options Function
TV Shape cinema Widescreen picture scaling (16:9).
normal Normal picture scaling (4:3).
Aux IN
Auto The video output is switched automatically based on
the current disc.
PAL The video output is in the standard PAL format.
NTSC The video output is in the standard NTSC format.
Brightness -10 to +10 Adjusts the brightness of the screen.
Monitor Off Turns the monitor off.
ASP (AUDIO SIGNAL PROCESSING) SETUP MENU
■ The ASP conguration menu allows you to make some ner audio adjustments.
Settings Options Function
Bass Freq
60 Hz
Select the bass center frequency to achieve the best
bass effect.
80 Hz
100 Hz
200 Hz
Treble Freq
10 kHz Select the treble center frequency to achieve the best
treble effect.
12.5 kHz
15 kHz
17.5 kHz
Sub Filter
80 Hz Selecting a crossover frequency sets a cut-off
frequency of the subwoofer’s LPF (low-pass lter)
and the speaker's HPF (high-pass lter).
120 Hz
160 Hz
Bass Q-Factor
1.0 When the bass center frequency is selected,
adjusting the bass Q-factor alters the perceived
"weight" of the bass output.
1.25
1.5
2.0

ENGLISH
53
Settings Options Function
Down Mix Down Mix 2-channel stereo mode.
Full 6 CH 6-channel mode.
Front Speakers Large Recommended for speakers > 5.25".
Small Recommended for speakers < 5.25".
Center Speakers
Large Recommended for speakers > 5.25".
Small Recommended for speakers < 5.25".
None No speaker present.
Sur Speakers
Large Recommended for speakers > 5.25".
Small Recommended for speakers < 5.25".
None No speaker present.
Sub Woofer None No speaker present.
Present Existing and connected.
Center Delay
No Delay Deactivates time alignment.
0.3 m Delay of the center speaker to the front
speakers is 0.3 m.
0.6 m Delay of the center speaker to the front
speakers is 0.6 m.
1.0 m Delay of the center speaker to the front
speakers is 1 m.
Down Sampling Off Normal audio playback.
On Audio playback in 48 kHz.
Surr Delay
No Delay Deactivate time alignment.
1 m Delay of the surround speaker to the front
speakers is 1 m.
2 m Delay of the surround speaker to the front
speakers is 2 m.
3 m Delay of the surround speaker to the front
speakers is 3 m.
4 m Delay of the surround speaker to the front
speakers is 4 m.
5.1 m Delay of the surround speaker to the front
speakers is 5.1 m.
Playing mode
(iPod, radio, etc.) -7 to +7 Loudness adjustment for the different playing
modes.
NOTES:
■ Choose "Large", if you want to use your speaker system in full range mode.
■ Choose "Small", if you want to use your speaker system in high pass mode. The high pass
mode is activated automatically, if you select "Small". The high pass frequency is identical with
the subwoofer's low pass frequency.

54
LANGUAGES
Settings Function
DVD Menu Select the language for the DVD menu.
Subtitle Select the language for the subtitle.
Audio Select the language for the soundtrack.
OSD Select the language for the OSD menu.
VOLUME
Settings Options Function
Start Volume
Adjusts The unit starts with the volume, which was
adjusted with the menu item"start vol adjust".
Last The unit starts with the volume, which was
adjusted before it was turned off.
Start Vol Adjust 0 to 10 Adjusts the start volume, when the start volume
is enabled.
TA Volume 0 to 10 Adjust the volume of the TA function (traffic
announcement).
Volume Bar Off Displays the volume bar while adjusting the
volume.
On

ENGLISH
55
MISC SETUP MENU
Settings Options Function
TS Calibrate No Touch "Yes" to enter the touch screen calibration mode.
Then follow instructions on the screen.
Yes
Set Password Locked Enter your password to unlock the parental lock.
Parental control
1. Kid Safe Kid safe: A movie rating that is appropriate for children.
2. G G: A movie rating that allows admission to persons of all
ages.
3. PG PG: A movie rating that allows admission of persons of
all ages but suggests parental guidance in the case of
children.
4. PG-13
PG-13: A movie rating that allows admission of persons
of all ages but suggests parental guidance in the case of
children under the age of 13.
5. PG-R PG-R: PG-related.
6. R R: A movie rating that allows admission only to persons
of a certain age, usually 17, unless accompanied by a
parent or guardian.
7. NC-17 NC-17: A movie rating that allows admission to no one
under the age of 17.
8. ADULT Adult: A movie rating that is appropriate for adults only.
Anti CODE Locked Enter the code for the anti-theft function.
Anti Theft SW On Deactivate or activate the anti-theft function.
Off
Load Factory No Restore the factory default settings.
Yes
Software Update No Touch "Yes" to update the operating software of the unit.
Yes
Navi Update No Touch "Yes" to update the navigation software of the unit.
Yes
CAN-bus Update No Touch "Yes" to update the CAN-bus software of the unit.
Yes
NOTE:
■ The DVD system has a built-in parental lock feature to prevent unauthorized persons from
viewing restricted disc content. By default, the parental control system is unlocked. Once setup,
the parental lock is released only by entering the correct password. Once the password is
entered, parental control is available.

56
ANTI-THEFT CODE
■ To secure the unit from theft and later use, it’s possible to enter a four-digit anti-theft code.
If the anti-theft code is activated and the unit will be disconnected from the power supply
and reconnected again, it’s necessary to enter the anti-theft code to start up the unit.
Otherwise it’s not possible to restart it.
NOTE:
■ The delivery status for the input of the anti-theft code is deactivated, so it’s not necessary
to enter the anti-theft code, when the unit was disconnected from the power supply.
1. Touch the Anti theft icon and activate the anti-theft function.
2. Touch the anti-theft code icon and use the keypad, which appears on the screen, to enter
the four-digit anti-theft code and conrm your input by entering the same code a second
time.
NOTE:
■ The delivery status of the anti-theft code, with the freshly unpacked unit is deactivated and you
must activate it manually.
■ Please write down the anti-theft code and keep it stored in a safe place. If the anti-theft code
is falsely entered wrong three times, it’s necessary to enter the super code to unlock the unit
again. To unlock the unit with the super code, it’s inevitable to send it back to an authorized
ZENEC-dealer.This service is not free of charge.
■ If you want to change or deactivate the anti-theft code, you must enter a valid code rst.

ENGLISH
57
NOTE:
■ There will be new software updates appearing for download at irregular intervals on www.
zenec.com. Please follow the instruction notes of the software update, to install the update
properly.
INSTALLATION OF SOFTWARE UPDATES

58
bu
cl
7 8 9 bl bm bn bo bp bq
cm
1 2 3 4 65
cn co
cp cq cr cs ct
cu
br bs bt
RAdIO MOdE
Table of contents
Other ZENEC Car Receiver manuals

ZENEC
ZENEC ZE-ME194 User manual

ZENEC
ZENEC ZE-050DVD User manual

ZENEC
ZENEC ZE-NC3810 User manual

ZENEC
ZENEC ZE-200DVD User manual

ZENEC
ZENEC ZE-MC2000 - BT COMPATIBILITY LIST V1.9 User manual

ZENEC
ZENEC ZE-NC2010 User manual

ZENEC
ZENEC ZE-MU703 User manual

ZENEC
ZENEC ZE-MC192 User manual

ZENEC
ZENEC PRIME Application guide

ZENEC
ZENEC Z-E6150 User manual

ZENEC
ZENEC ZE-MC170 User manual

ZENEC
ZENEC ZE-MC192 User manual

ZENEC
ZENEC Z-E2060 User manual

ZENEC
ZENEC ZE-NA2000 - User manual

ZENEC
ZENEC ZE-NC3811D User manual

ZENEC
ZENEC ZE-NC3810 User manual

ZENEC
ZENEC DVD & MP3 User manual

ZENEC
ZENEC ZE-30MP3 User manual

ZENEC
ZENEC ZE-MC172 User manual

ZENEC
ZENEC ZE-NC2010 User manual