Zicplay VIZIO User manual

Zicplay VIZIO MANUAL

2
【Language】
I. English……………………………………………….....3
II. French………………………………………………....25
III. German………………………………………………..49
IV. Spanish………………………………………………..71
V. Portuguese……………………………………………93
VI. Italian…………………………………………………116
VII. Dutch…………………………………………………139

3
【Manual】
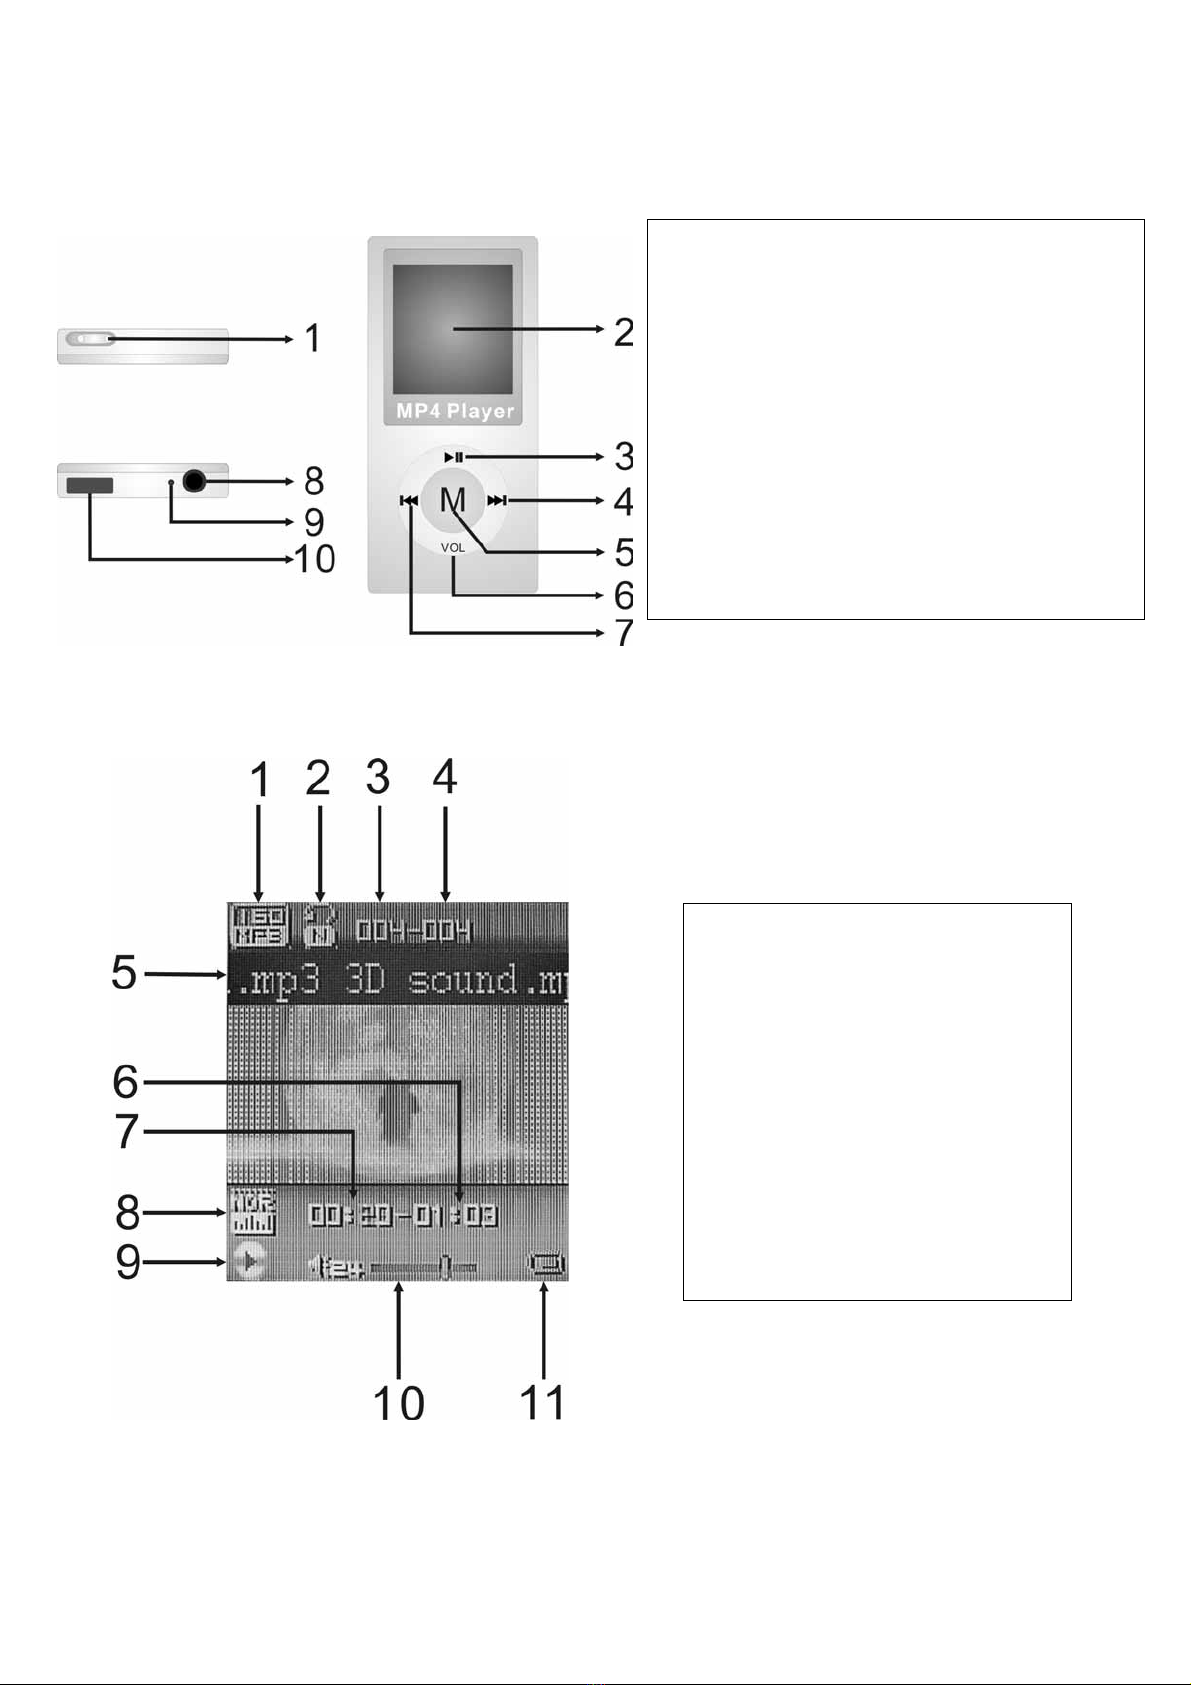
I. APPEARANCE LAYOUT .........................................................................................4
II. BASIC FUNCTION...................................................................................................5
III. PLAY MOVIE FILES.................................................................................................6
A. OPERATION ..........................................................................................................6
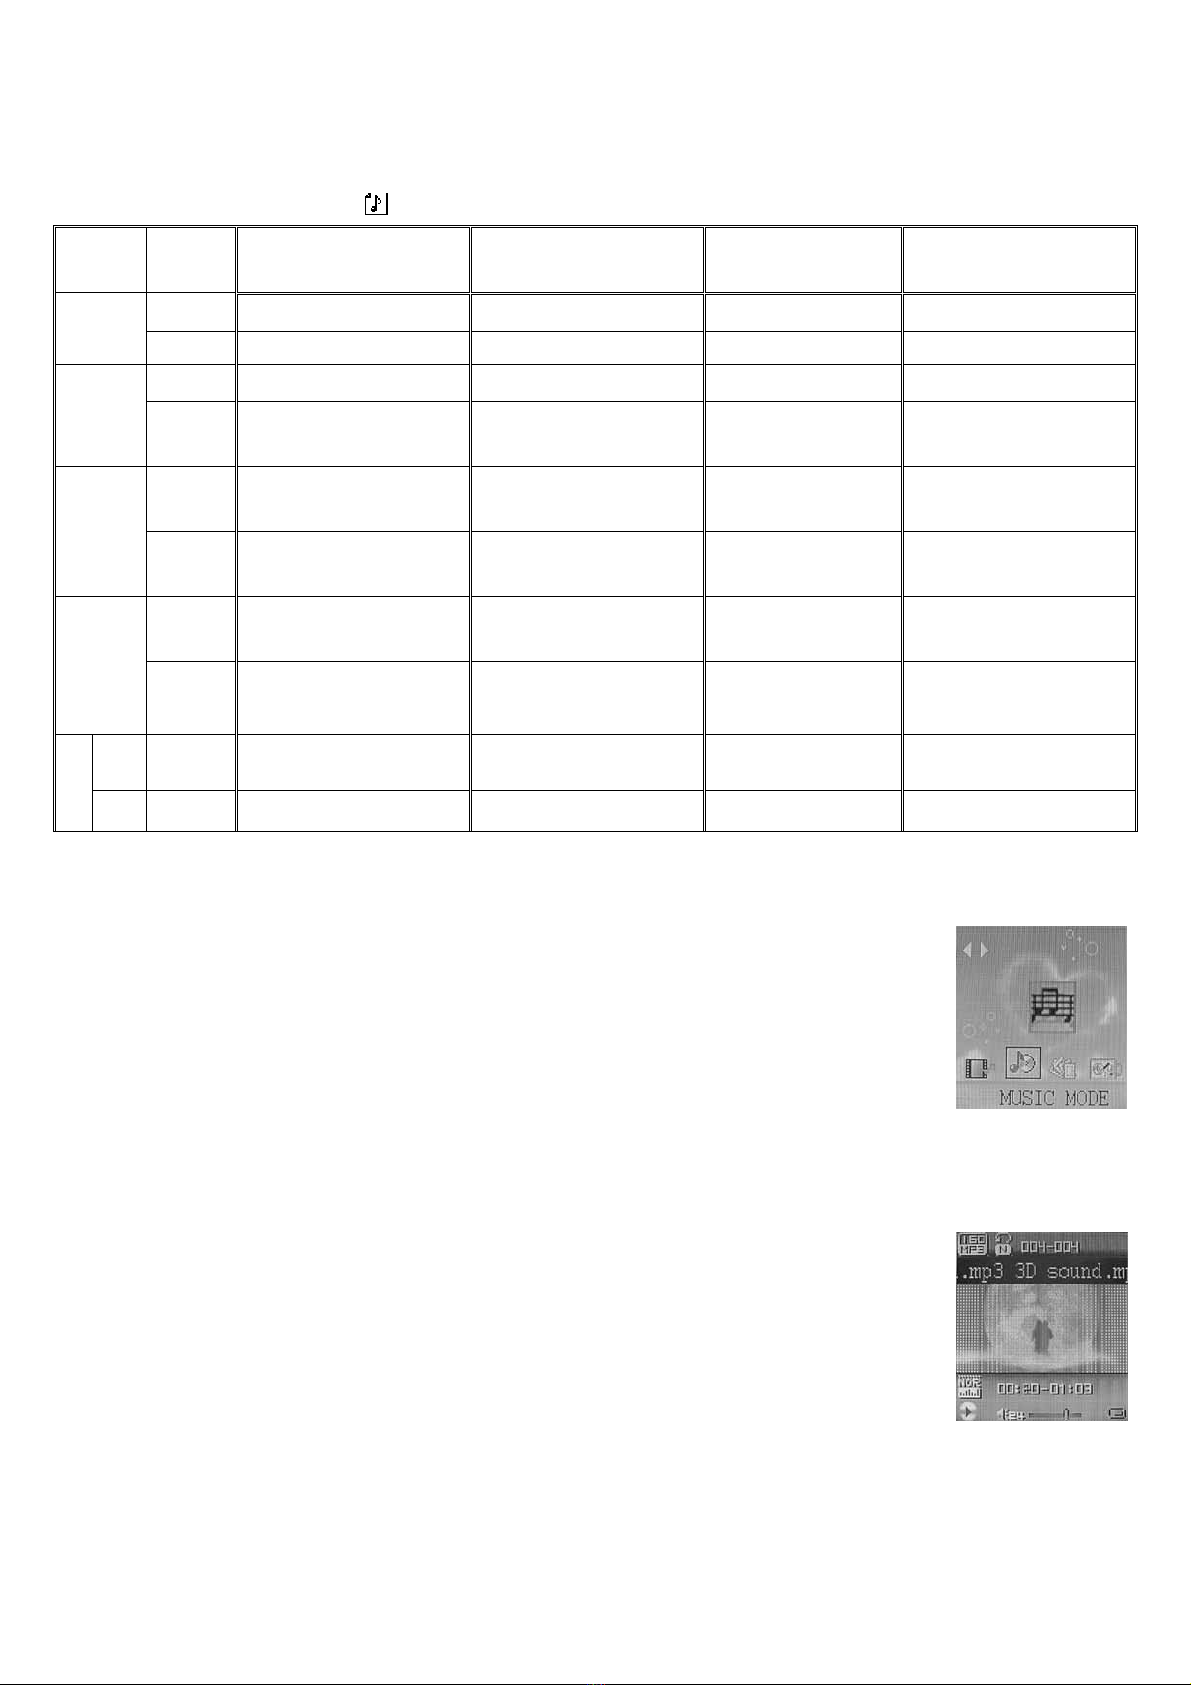
IV. MUSIC MODE..........................................................................................................7
A. KEYS OPERATION .................................................................................................7
B. INSTRUCTION .......................................................................................................7
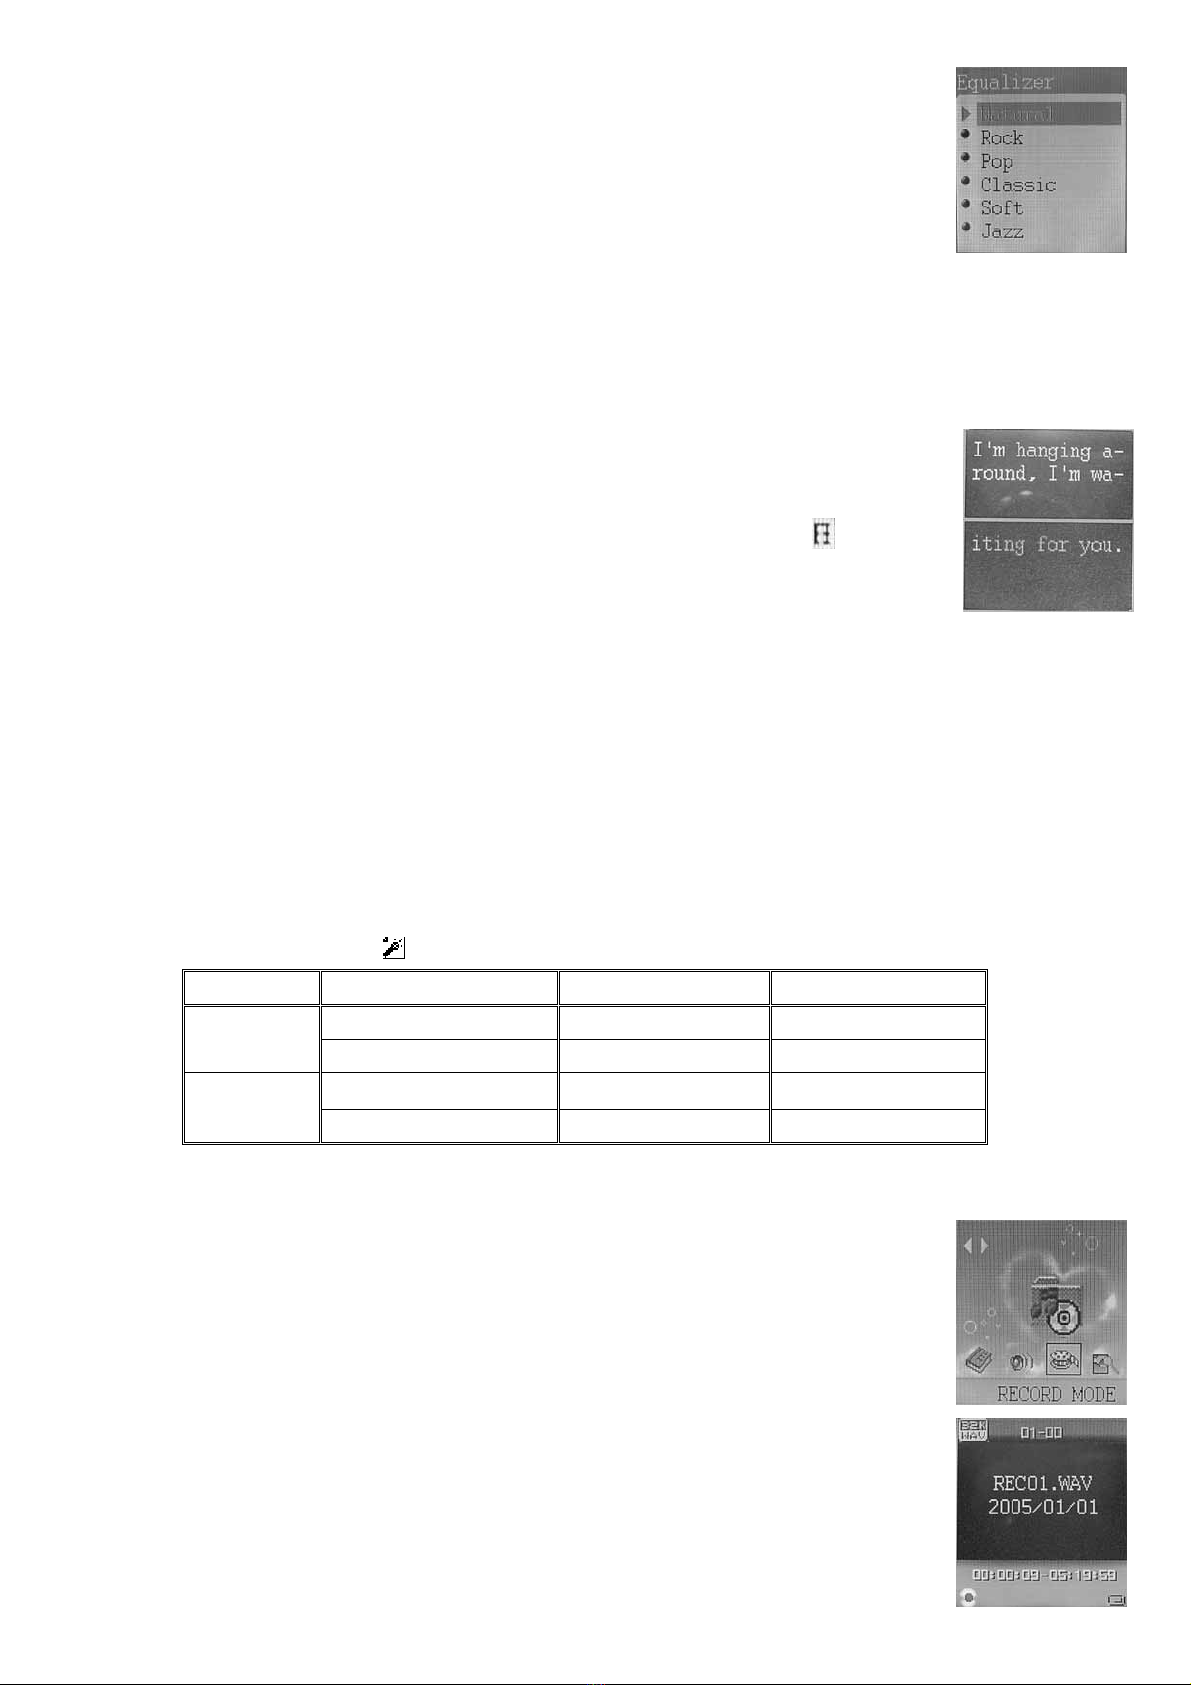
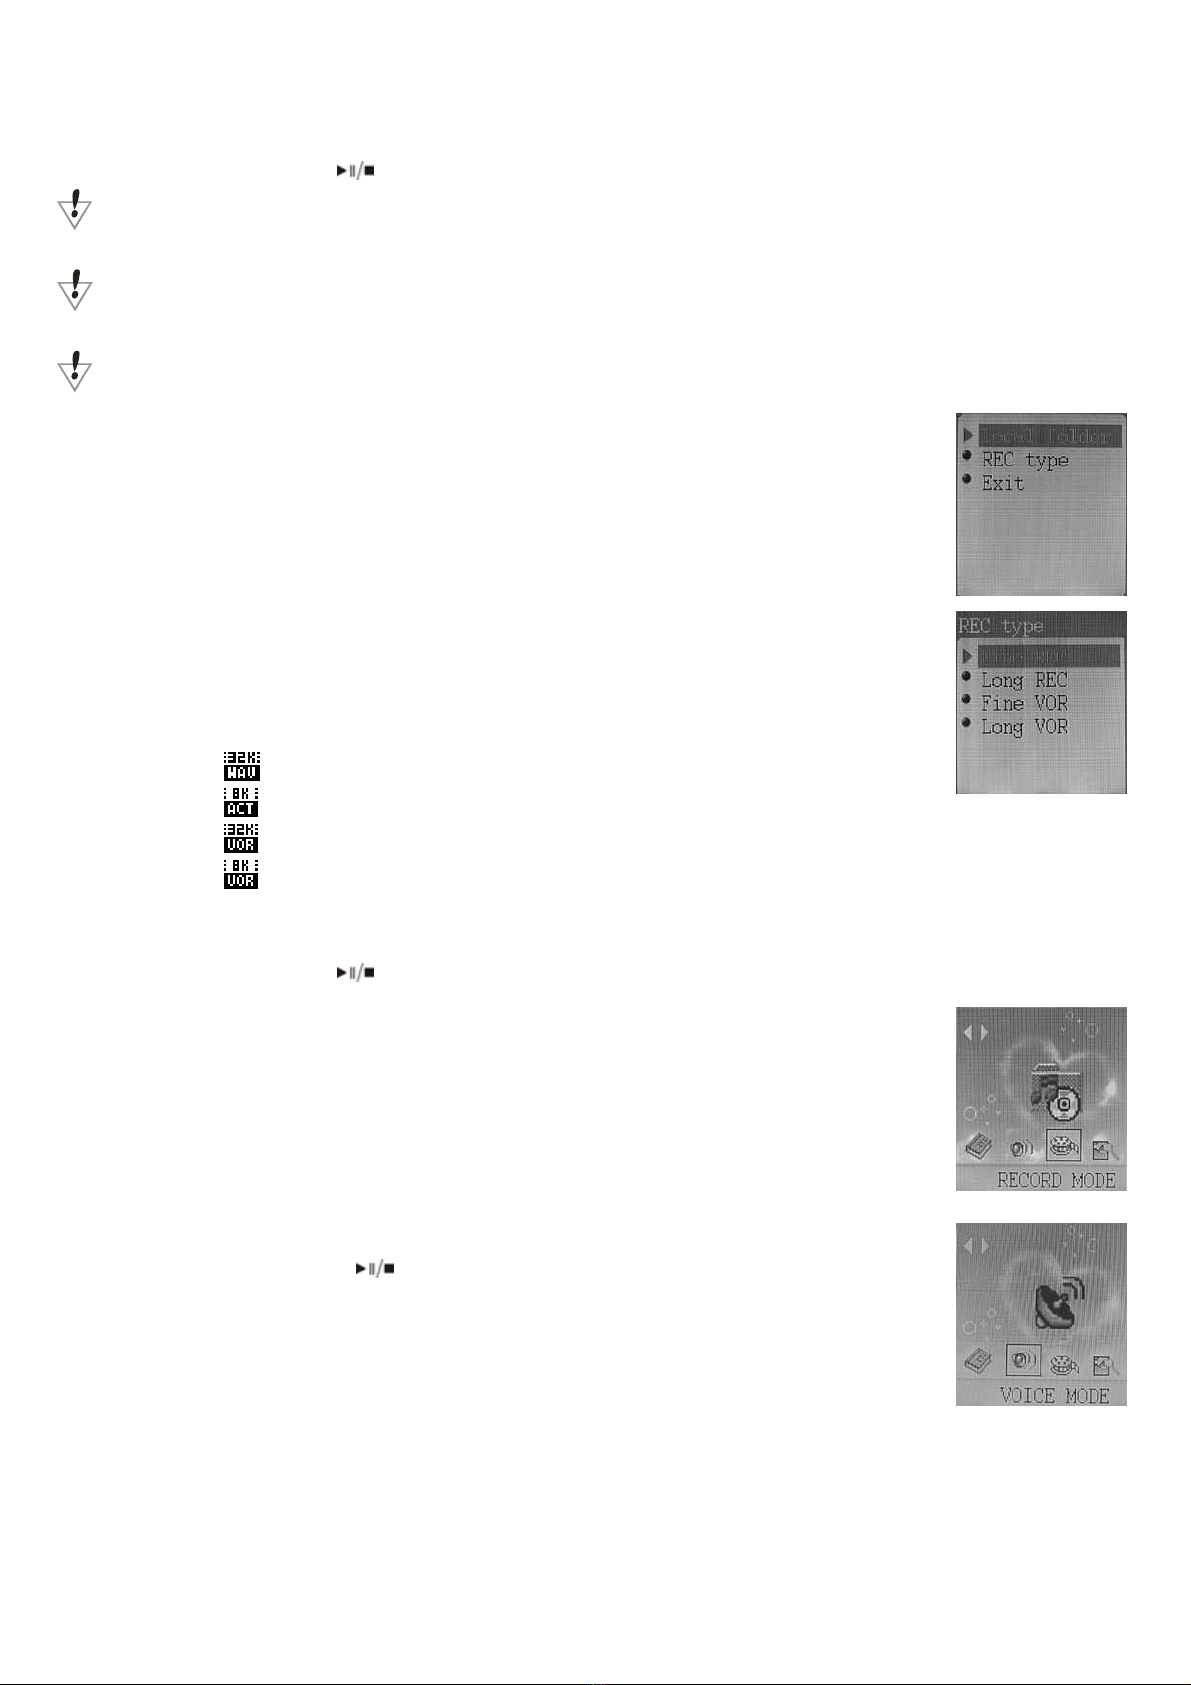
V. VOICE RECORD .....................................................................................................8
A. BUTTON OPERATION .............................................................................................8
B. INSTRUCTION .......................................................................................................8
VI. PLAY VOICE FILES .................................................................................................9
VII. FM MODE ..............................................................................................................10
A. BUTTON OPERATION ...........................................................................................10
B. INSTRUCTION .....................................................................................................10
VIII. JPG VIWER ..................................................................................................... 11
A. INSTRUCTION ..................................................................................................... 11
B. ENTER THE FILE SELECTION ................................................................................. 11
C. SUBMENU .......................................................................................................... 11
IX. TEXT READ ...........................................................................................................12
A. INSTRUCTION .....................................................................................................12
B. CAUTION............................................................................................................12
X. SYSTEM SETTING................................................................................................13
A. ICON..................................................................................................................13
B. INSTRUCTION .....................................................................................................13
XI. OTHER FUNCTION...............................................................................................15
A. USE DIFFERENT FOLDER (STOP TO USE SUB-MENU)................................................15
B. FILES DELETE INDICATION ...................................................................................15
C. REPEAT OPERATION ............................................................................................15
D. TEMPO RATE ADJUSTMENT ..................................................................................16
E. REPLAY FUNCTION ..............................................................................................16
XII. FLASH DISK ..........................................................................................................17
A. CONNECT TO PC ................................................................................................17
B. FLASH DISK FUNCTION/DOWNLOAD MP3 FILES ....................................................18
C. TRANSFORM ACT FILES TO WAV FILES ................................................................19
D. CONVERT VIDEO FILES INTO AMV ........................................................................19
XIII. PRIVACY FUNCTION......................................................................................21
XIV. FIRMWARE UPGRADE...................................................................................23
XV. TROUBLE SHOOTING..........................................................................................24
XVI. TECHNICAL SPECIFICATIONS ......................................................................24

4
I. Appearance Layout
zName of the parts
Picture1 The UFD Picture
zName of the LCD
Picture2 The LCD Picture
1 .Power Switch Power On / Off
2 .LCD Screen
3 .Play / Pause / Power On (Switch on)
4 .FF Next Track / Fast Forward
5 .Menu Enter into main menu in play
Enter into sub menu in stop
6 .VOL Go to volume function
7 .REW Back Track / Fast Backward
8 .Earphone Jack for headset
9 .Mic Build-in microphone
10 .USB USB connector
1 .File format/Bitrates
2 .Repeat Indicate
3. Songs order
4. Total songs
5. File name
6. The total time of playing song
7. The played time of playing song
8. EQ Mode
9. Play/Pause/Stop state
10.Volume Indicate
11.Battery Indicate

5
zBattery
There are 9 levels of battery control
When the battery indicates is full. It will slowly decrease according to
the battery storage.
When the battery storage is nearly used up, it will indicate empty.
Please recharge the battery.
II. Basic Function
(a) Enter the Main Menu
Make use of key MENU to select the different functions. There is main function menu
(long press key MENU when it is in stop status), sub menu when in play status (press key
MENU to enter), and sub-menu when in stop status (press key MENU to enter).
(b) Preview operation
A. Press key or for music selection.
B. When songs are playing, press key VOL to enter adjust volume
mode; and press key or for adjust volume increase or
decrease.
(c) Enter different modes
You can enter different menu from the main function’s menu
zMain Menu: (Long press key MENU to enter)
Music Mode Record Mode Voice Mode Radio Mode

6
JPG View System SET Reader Mode Video
III.Play movie files
A. Operation
(a) Simple Operation
zWell connect the earphone to the earphone jack.
zMake sure the key Power is on.
zLong press key fand the player will enter to last
mode.
zPress key MENU to main menu.
zPress key or to select Movie Mode, and press key MENU to enter
Music Menu.
zMusic selection: Press key or to select movie files.
zPress key fto play movie file.
zVolume adjustment: Press key VOL to enter adjust volume mode, then
press key /to adjust volume.
zCautions: The player will turn off automatically when it is not in play status.
zPress key or to select the AMV files.
zCaution: In playing AMV file, you can’t choose any others functions. (For
example adjust volume, go to the submenu.
zIf the screen is show ‘Format error!’ it says that the player is not support
this AMV files. Please check the file.

7
IV. Music Mode
A. Keys Operation
Music Mode
Keys Press Stop Status Play Status Submenu of
play status Submenu of
stop status
Long Power off Power off Power off Power off
Play Short Play Stop Exit menu Exit Menu
Long Enter Menu Go to lyrics mode Enter Menu Enter Menu
Menu Short Enter the submenu
of stop status
Enter the submenu
of play status
Confirmation or
enter
Confirmation or
enter
Long Next Fast forward Move the
submenu
Move the submenu
Short Next Next and Play Move the
submenu
Move the submenu
Long Previous Fast backward Move the
submenu.
Move the submenu
Short Previous Previous and Play Move the
submenu
Move the submenu
Short Increase volume Increase volume X X
V
o
l Short Decrease volume Decrease volume X X
Note: Short: press the key for 1 second
Long: press the key for 3 seconds
B. Instruction
(a) Simple Operation
zWell connect the earphone to the earphone jack.
zMake sure the key Power is on.
zLong press key fand the player will enter to last mode.
zPress key or to select Music Mode, and press key MENU to enter
Music Menu.
zMusic selection: Press key or to select the songs.
zVolume adjustment: Press key VOL to enter adjust volume
mode, then press key /to adjust volume.
zCautions: The player will turn off automatically when it is
not in play status.
(b) Equalizer

8
zWhen music is play:
zPress key MENU to enter the submenu of play status
zPress key /to select Equalizer.
zShort press key MENU to confirm.
zThen press key /for EQ selection: Natural, Rock, Pop,
Classic, Soft, Jazz and DBB
(c) Lyrics’ Switch
This player supports *.LRC files. If there is lyrics file under the same folder
of the MP3 with the same name; the player will play MP3
and lyrics synchrony.
If there is a lyric for the song, the LCD will display .
zIf there is a lyric, the lyrics indicate light will show green.
zLong press key MENU to enter Lyrics interface
zLyrics will display on the screen.
zPress key MENU will return title interface:
V. Voice Record
A. Button Operation
Record Mode
Make sure that the player has enough battery storage before you record.
The player supports 99 files for each folder.
B. Instruction
(a) Record Mode
zEnter the main menu:
zPress key /to select Record:
Keys Press Stop Status Record Status
Long Power off Stop Recording
Play Short Start Recording Pause Recording
Long Enter Main Menu X
Menu Short Enter submenu X

9
zPress key MENU to enter:
zPress key to start record.
The recorded voice will be saved in the root folder in the submenu of record stop
status/main menu.
If the LCD displays “Memory Full”, there is no memory storage for new records.
Please delete some of the files for memory release.
If the LCD displays “Folders full”, there are already 99 files in the folder. Please
change another folder.
(b) Types of Record Format
zEnter the stop record status interface:
zPress key MENU to enter the submenu of record mode:
zPress key /to select Record Type:
zPress key MENU to enter:
zPress key /for selection.
: Fine REC, wav format, good voice quality.
: Long REC, act format, normal voice quality.
: Fine VOR, wav format (voice record control, pause when with no voice).
: Long VOR, act format.
zPress key MENU for confirmation
zPress key to start record.
VI. Play Voice files
zEnter the main menu:
And the Key Operation is the same with Music Mode.
1. Press key to select Voice Mode:
2. Press key MENU to enter play voice interface:
3. Press key to start playing voice.
4. Voice selection: Press key or to select the voice.
5. Volume Adjustment: Press key VOL to enter adjust
volume mode, then press key /to adjust volume.

10
VII. FM Mode
A. Button Operation
FM Mode
Keys Press Stop Status Record Status
Long Power Off Power Off
Play Short Have saved channels:Next
No saved channel:X EXIT
Long Enter Main Menu Enter Main Menu
Menu Short Enter submenu Confirmation or enter
Short Increase the frequency of 100KHz Move the submenu
Long Increase the frequency of 100KHz
continuously Continue to move forward
Short Decrease the frequency of 100KHz Move the submenu
Long Decrease the frequency of 100KHz
continuously Continue to move backward
B. Instruction
(a) Enter to the Main Menu
(b) Press key to select FM
(c) Short press key MENU to enter the FM
(d) Auto detect
Press key / for hold 2 second. The UFD will Increase / Decrease
the frequency of 100KHz continuously , and will stop in searched
station;If you want stop search, Press Key / will stop search.
(e) Fine-tune
zPress Key :Decrease the frequency of 100KHz
zPress Key :Increase the frequency of 100KHz
(f) Save the searched radio channel
zPress key MENU to enter the submenu of FM mode
zAnd short press key Menu one time to save the station
(g) Choose the saved radio channels
zPress key Play can change radio channels which you
saved.
(h) Volume Adjustment:

11
zPress key VOL to enter adjust volume mode, then press key /to
adjust the volume.
Caution:
You can choose `Normal Band` (FM 87 - 108MHz)and `Japan Band`(FM 76 –
90MHz),In the different countries(Press key Menu go to the FM submenu,press key
/ to choose)
zIf the radio channel is use by stereo , the LCD will show the sign.
:“Normal Band” and “Japan Band” can saved twenty radio channels by it`s self.
VIII. JPG Viwer
A. Instruction
(a) Enter to the Main Menu
(b) Press key to select Picture
(c) Short press key MENU to enter the Picture
B. Enter the file selection
(a) Press key “Play” to browse JPEG.
(b) Press key “/” to select the next/last file.
(c) Press the “MENU” button, enter the stop submenu.
C. Submenu
There are four modes in following points.
(a) Local folder: select the folder to play pictures.
(b) Play set: manual play and auto play
(c) Delete file.
(d) Exit
Press the “/” button to play the next/last picture
Long press the “menu” button to enter pervious menu

12
IX. Text Read
Use the E-Book function. The function is only support text files, so when
you copy the txt files into this player. You can read the file in this player.
A. Instruction
(a) Enter to the Main Menu
(b) Press key to select Text Read function. And press
key MENU again to get into the function.
(c) Dir Select:
zPress key or to select folder.
zAnd press key MENU to confirm.
(d) File Select:
zPress key or to select text file.
zAnd press key MENU to confirm.
(e) Text Reader:
zPress key or to next/back page.
zPress key MENU to exit text reader.
B. Caution
zIf you want to read the txt file in folder, you must select folder at first step.
zSecond step, select text file.
zThird step, read text file.
zIf LCD screen shows ‘No Files!’ please check the step.

13
X. System Setting
zEnter the main menu:
zPress key to select Setting:
zShort press key MENU to enter:
A. Icon
System clock Setting date and time when saving recorded file
LCD set Set the screen off
Language Choosing different languages
Power off Set off time or sleep time
ScrSav Set Setting the screen saver
Replay mode Setting repeat status
Online mode Set the disk show on the PC when connecting the PC via USB
Memory info. Check memory space and usage status
Restore Restore the player to factory default setting
Firmware version Version of player’s firmware
Firmware upgrade Use for upgrade firmware
Exit Exit from Setting interface
Picture3 System icon
B. Instruction
zSystem Clock Enter the system interface and then select Record Time:
9Press key MENU to enter:
9Press key from year to start setting, the
display year will flicks
9Press key will increase the number (will
decrease)
9Press key MENU when finish and exit.
zLCD set
9Brightness: Set the LCD brightness value.
9Black: Set the time about LCD screen to be
closed LCD backlight.

14
zLanguage
Make use of key /to select the language you
want in the Language mode.
zPower off
9Enter the system interface and then rotate key MENU to select
Power off.
9Press key MENU to enter. There will be 2 selections:
I. Off time: the player will
automatically at a certain time
without any key is pressed in stop
status.
II. Sleep time. The player will shut
down automatically at a certain time without any key
is pressed in any status.
zScrSav Set
9There are three options can select.
9Set the screen saver On or Off.
9You can set three kinds of screen saver
pictures.
9You also can setup screen saver time.
zReplay mode
9Operation is the same as “Language”.
9Manual Replay: Replay by manually
9Auto Replay: Replay automatically.
zOnline Mode Operation is as “Language”.
9Some operating systems do not support 2
UFD, and so you can set it as “Normal
Only/Encrypted Only”.
zRestore

15
Set the player settings go to all factory default value.
zMemory Info
Display the total memory storage, and the percentage
used up.
zFirmware version
Display the firmware version.
zFirmware upgrade
Use to upgrade the firmware; the firmware must
be first transfer to the player for upgrade.
Note: Press key MENU after system are set and then
press key Play for exit.
XI. Other Function
A. Use different folder (stop to use sub-menu)
User can separate different types of files into different folders (created
from the PC) for convenient use. The player supports 9 submenus.
(a) Go to stop (pause) status (of any mode)
(b) Press key MENU to enter the submenu:
(c) Press key MENU to enter the folder interface:
(d) Press key or to select the folder you want:
(e) Press key MENU to confirm.
Caution: The submenu of Music, Record and Voice mode are individually. That is,
each mode has a different folder.
B. Files Delete indication
You can delete files in music or voice mode
(a) In stop status, press key MENU to enter the submenu
(b) Press key or to select Delete file/ Delete all.
(c) Press key MENU to delete file.
Caution: “Delete all” will delete all the files in that mode. (Once files are deleted
cannot be recovered)。
C. Repeat operation
You can select different play mode in music or voice mode.
(a) Press key Play to start playing music
(b) Press key MENU to enter and select “Repeat”.

16
(c) Then press key MENU again to enter. There are various selections,
such as
zREPEAT
Normal Playing music files in sequence until the
end of folder
Repeat One Repeat single music file
Folder Play all music files in folder
Repeat Folder Repeat all music files in folder
Repeat All Repeat all music files
zSHUFFLE
Random Play music files in folder randomly
zINTRO
Intro Play the 10s of each music files in
sequence
D. Tempo Rate adjustment
You can select different playing speed while playing music (MP3 only)
without any change to the voice quality.
(a) Press key MENU while playing music
(b) Press key or to select “Tempo rate”
(c) Press key MENU again to enter.
(d) Press key or to adjust the speed.
Caution: Once you adjust the rate, all songs will be played as set.
E. Replay function
zA-B Repeater
(a) Press key MENU while playing music
(b) Press key or to select “Replay”
(c) Press key MENU again to enter. The LCD will display with “A”
blinking.
(d) Press key to confirm the start point “A”. The LCD will display
with “B” blinking.
(e) Press key to confirm the end point “B”. The LCD will display
stable and the player will play repeatedly from A to B
You can rotate key to reset point A and B.

17
You can press key to set the tempo rate in Replay mode.
zFollow Reading
(a) In A-B repeater status, press key to enter follow reading function.
(b) The LCD will display instead of , and the player will start to
record, the record time length as the length of A-B repeater.
(c) The player will play the original voice, the LCD will display . You can
press key to enter compare reading.
In this status, press key will return to A-B repeater status.
zCompare Reading
(a) In contrast reading, the LCD will display and the player will play the
original voice.
(b) When finished, the LCD will display and the player will play the
recorded follow reading voice.
(c) The player will repeat playing the original voice and the recorded voice
continuously until key MENU is pressed.
In this status, press key will return to follow reading mode.
In the above 3 status, press key MENU will quit Replay mode.
zRepeat times
9Operation is as “Backlight”.
9The numbers of times in repeating A-B repeat and then exit.
zReplay Gap
9Operation is as “Backlight”.
9This is to determine the time (in seconds) of pausing after
playing each song.
XII. Flash Disk
This device does not need to install any driver system for Win ME/2000/XP, except
for Win 98, format or recovery. It also support Windows 2K or above, Mac OS 10.3,
Linux Redhat 8.0 or above.
The player also support Suspend mode
A. Connect to PC
After connected to the PC, the player will display 3 different pictures
according to its status:

18
(a) Waiting Mode
(b) Downloading files
(c) Uploading files
B. Flash Disk Function/ download MP3 files
Our product do not need to install any actuate system (except WIN98), you
can immediately download any format of files by plug-in the USB hub to your
PC.
(a) Once you switch on our product, the UFD would connect to the PC
through the USB port. The system would detect a new hardware, follow
the steps shown for installation. (WinMe/Win2000/XP can
automatically finish installation). If the volume of the UFD is too large
and cannot be connected to the USB port, you can use our extended
USB line attached.
(b) After installation, the LCD would display『USB MUSIC DISK』and on
『MY COMPUTER』and 『FILE MANAGER』would appear
「REMOVABLE DISK.」
(c) Drag or Copy the files you need to the『Removable Disk』to start
downloading. Downloaded MP3 files can put into the main menu while
others in the submenu. You can make use “FILE SELECTION” to play
the files which is in the submenu.
(d) While downloading, the LCD would display the animation as shown,
you are required to wait until the animation disappeared and
furthermore five seconds before you can plug out the UFD.

19
C. Transform ACT files to WAV files
You can make use of the attached software disk to transform WAV files.
(a) Run “Sound Converter” and then click “Open”.
(b) Select the act files for transform:
(c) Click “Transform” to start files transform to wav files
You can also transform WAV files to MP3 files.
D. Convert Video files into AMV
This program is used to convert video files into AMV format, currently only WMV format is supported.
(a) Run “AMV Convert Tools”, click to choose the folder where to
save the AMV files, then click to select the folder where the
original files are 。

20
(b) Click to start converting。
(c) After convert, the AMV files will be played automatically.
Table of contents
Languages: