zinetic TN 2210 User manual

Toner that doesn’t cost the earth
Printed on recycled paper, using refilled cartridges
© Zinetic.co.uk. All Rights Reserved
INSTRUCTIONS FOR REFILLING BROTHER TN 2210 & TN2220 (EURO E)
BROTHER DC -7060D, DC -7065DN, DC -7070DW, HL-2230, HL-2240, HL-2240D, HL2242, HL-
2270 DW, HL 2280DW HL2250, HL2250DN, MFC-7360N,MFC-7460 DN, MFC-7860DW.
When to refill: The Brother machine lets you know when you are low on toner using a series of LED lights
on the printer. You can force the printer to continue to print and use up as much toner as possible by selecting
the ONTINUE MODE.
lease read instructions from start to finish, before you start your refill.
TONER LOW - The Toner LED will turn on for 2 seconds and off for 3 seconds -
ignore message - Keep printing
In “Stop mode” you would be required to empty and refill at this point.
However you can use the ONTINUE MODE to override this default setting and
print for longer see below.
How to select Continue mode:
To force the machine to continue printing after the LEDs indicate REPLA E TONER, press Go seven times to
enter ontinue mode (all the LEDs flash twice, and then the Ready LED turns on).
The machine will then continue printing until the LEDs indicate TONER ENDED
MFC / DC version of the machine : To enable ontinue Mode, please follow the steps below:
1. Press MENU and choose General Setup => Replace Toner.
2. Use the U OR DOWN ARROW key to choose Continue and then press OK.
3. Press STO /EXIT
(To return to the default setting (Stop mode), press Go seven times (all the LEDs flash once).
Replace toner ( ONTINUE MODE) – the toner light is on but you can continue to
print.
ONTINUE MODE - Toner Light on continuously with error light lit - machine will
not print – Empty it and Refill it (TONER ENDED)
You must now empty and refill.

Toner that doesn’t cost the earth
Printed on recycled paper, using refilled cartridges
© Zinetic.co.uk. All Rights Reserved
1 Switch printer off. 2 Remove cartridge from printer. Place printer
cartridge on several sheets of newspaper.
3 Locate the hopper
cap on your
cartridge. Normally
hidden behind the
label
4 Remove the
hopper cap using
needle nose pliers,
or a flat blade
screwdriver to lever
out the hopper cap.
5 WARNING: You must ensure all toner is
dumped from your cartridge before refilling with
the new toner. You must do this every refill.
Brother cartridges can leave as much as 25 grams of
waste toner in the cartridge, while reporting toner
empty/refusing to print. Important - mixing new and
old toner will cause print defects to occur.
Empty in an area
that can tolerate a
toner spill i.e. your
garage.
Toner can be very
messy - empty the
old toner directly
into a large bin bag.
6 Shake your bottle
of new toner
vigorously for 30
seconds BEFORE
removing the cap.
Remove the cap and
seal from the bottle
7 Fit the toner
pouring spout
securely to the
bottle.
Spouts are
reusable.
8 Insert the spout
into the hole. The
toner will flow out
like water, so take
care not to spill it.
9. With the spout
inserted – carefully
“Upend” the
cartridge and allow
the toner to slowly
pour into the
cartridge.
10 Replace the cap
in your toner
cartridge, using the
new plug provided.
11 Gently rock the cartridge from side to side to
distribute the toner in the cartridge. Wipe away any
excess toner from around the plug.
Reset the cartridge using the instruction on the
following page. When successfully reset - replace the
cartridge and print some test pages to remove any
excess toner.

Toner that doesn’t cost the earth
Printed on recycled paper, using refilled cartridges
© Zinetic.co.uk. All Rights Reserved
INSTRUCTIONS FOR RESETTING BROTHER TN 2210 & TN2220
Brother has introduced a small flag gear in its cartridges that resets the printer. You will need to reset the flag
gear in order to reset the cartridge, after refilling. Follow instructions below.
Starter cartridges
*Please note that the starter cartridges (ship with
new printers) do not have the reset gear included.
You will need to purchase a reset gear.
Starter cartridge shown above.
Remove the 2 screws as shown opposite.
Very carefully remove the end cover plate to reveal
the reset gear and various cogs.
We do not want to dislodge any cogs or gears so
be careful!
Remove only the white reset gear. Set the reset gear
spring as shown
Toner that doesn’t cost the earth
Printed on recycled paper, using refilled cartridges
© Zinetic.co.uk. All Rights Reserved
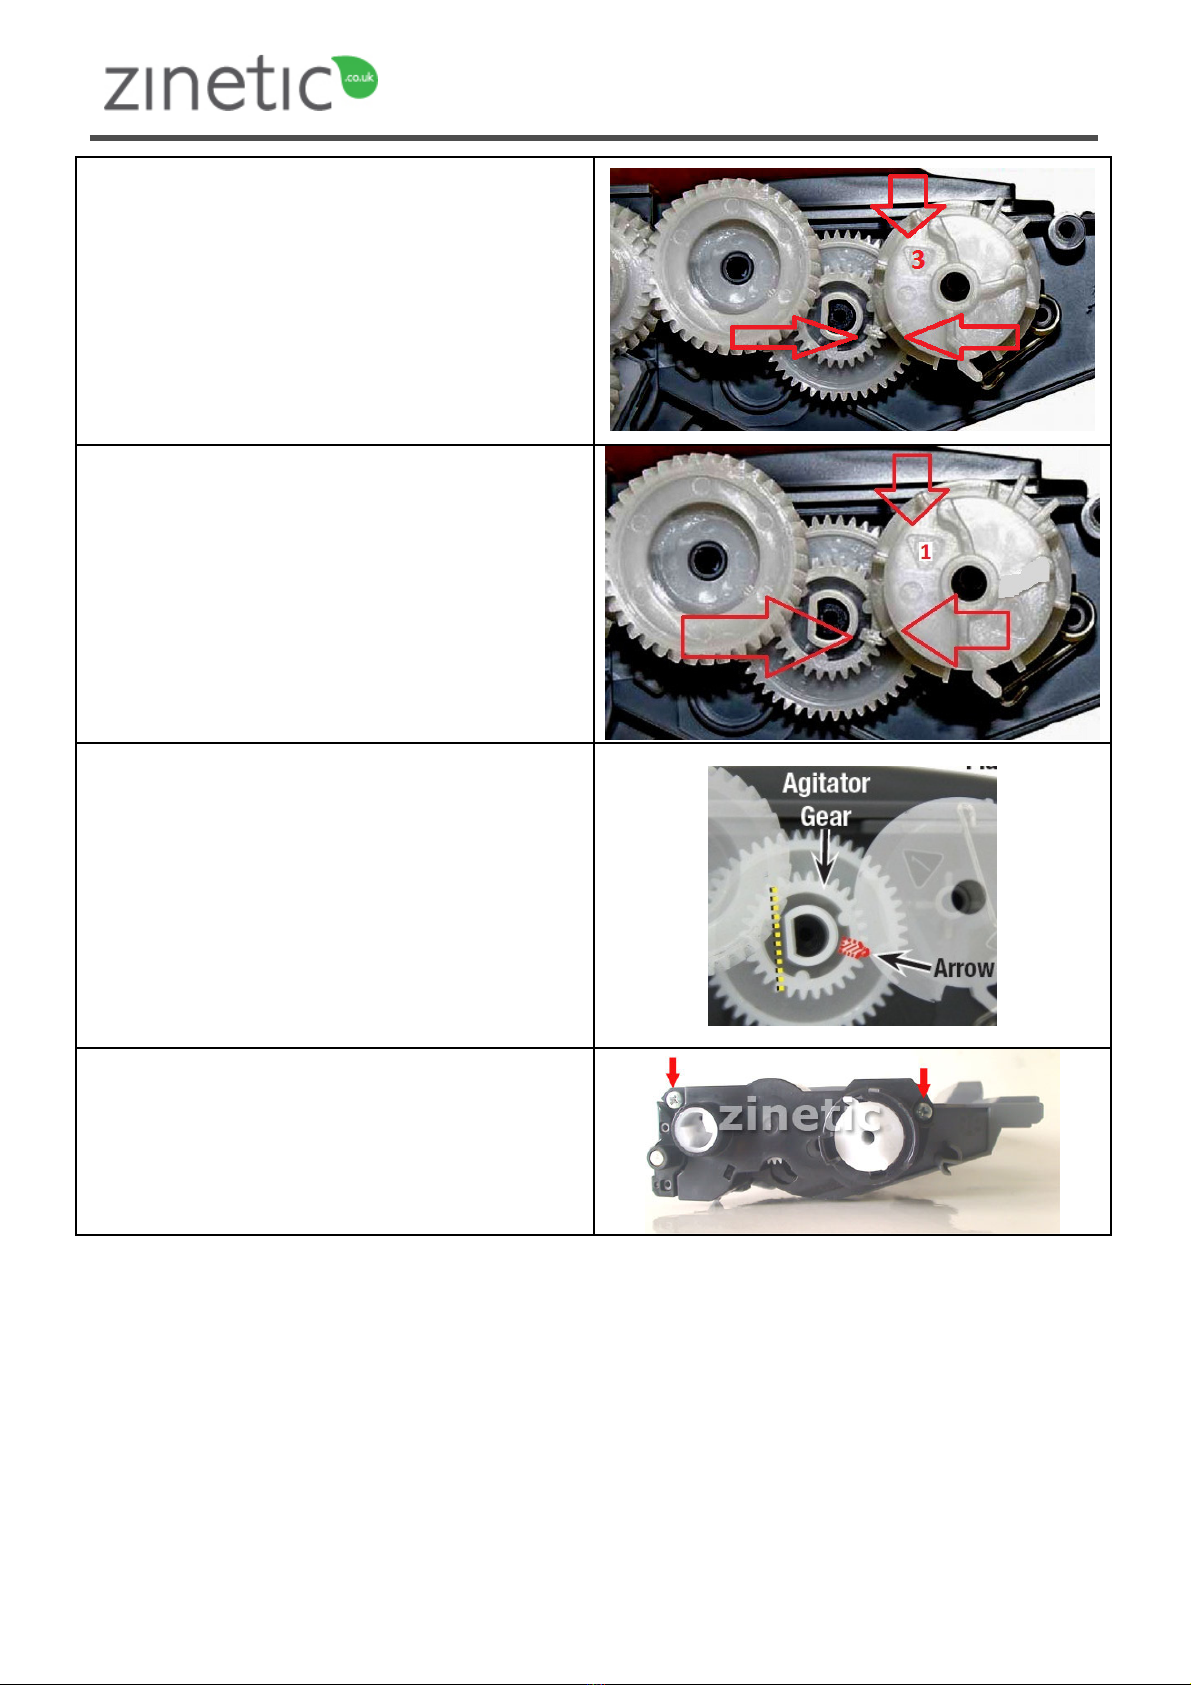
Low Yield gear (TN2210) replace as shown opposite.
The arrow with the number 3 should be pointing
in the direction shown
Note that the gear teeth are not meshed when set,
which is how it should be. The gear is spring loaded
and will turn when driven by the printer
HIGH Yield gear TN2220 replace the gear as shown
opposite.
The arrow with the number 1 should be pointing
in the direction shown
Note that the gear teeth are not meshed when set,
which is how it should be. The gear is spring loaded
and will turn when driven by the printer
Both gears: Note the position of the straight edge
(shown in yellow) of the agitator gear.
This position is required to properly reset the printer.
With the gear set in the correct position, re-install the
gear cover plate and replace the two screws as shown
opposite.

Toner that doesn’t cost the earth
Printed on recycled paper, using refilled cartridges
© Zinetic.co.uk. All Rights Reserved
Low Yield Correct reset osition
Make sure the black arrow on the cover is aligned with
the white arrow marked #3 on the TN2210 (low)
gear.
High Yield Correct osition
Make sure the black arrow on the cover is aligned
with the white arrow marked #1 on the TN2220
(high) gear
Safety information: Toner powder should be treated as a nuisance dust. Not to be used by children. Avoid
inhalation. Avoid eye & skin contact. Do not ingest. Inhalation: slight irritation of respiratory tract. onsult a
doctor. Eye contact: Dust may cause irritation by mechanical abrasion. onsult a doctor. Skin contact: wash
with soap and cold running water. Ingestion: No known hazard. arcinogenicity: N/A, Mutagenicity: AMES test
negative.
All safety information is given to help facilitate the safe use of this product and is based on information
obtained from the manufacturer. This information is believed to be correct, but does not purport to be all
inclusive and should be used only as a guide. Zinetic makes no warranty, express or Implied as to the
accuracy or completeness of this information. It is the users responsibility to determine the suitability of this
information for the adoption of necessary safety precautions and or compliance with local laws/regulations.
Zinetic is not associated with or endorsed by any of the cartridge / printer manufacturers referred to in any of
our published works. Names of manufacturers, machines and part numbers are given as an aid to
identification only. Names of manufacturers, machines and part numbers may be trade marks of the
respective manufacturer. All Trade Marks hereby expressly acknowledged.
This manual suits for next models
15
Other zinetic Printer Accessories manuals


