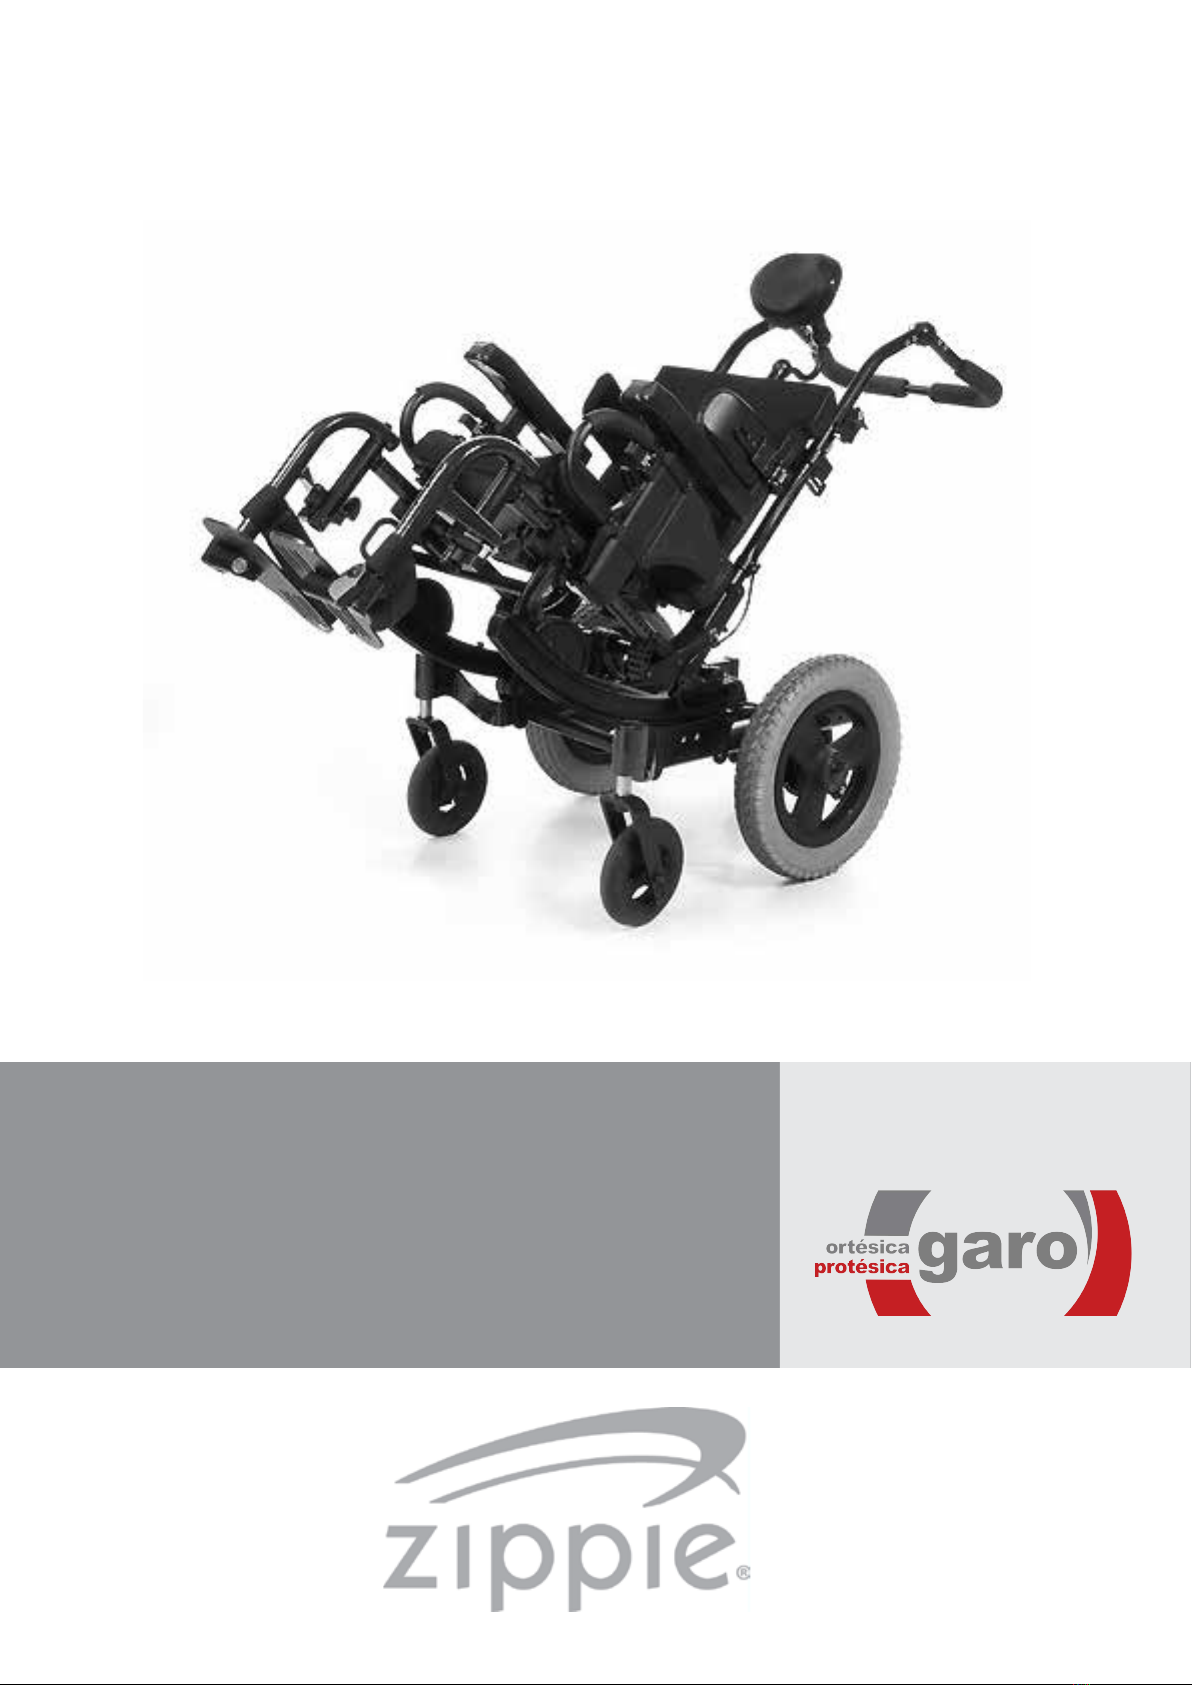
Zippie IRIS User manual

Owner's Manual
Manual de usuario
Instruções Para Utilização
Zippie IRIS
Manual Wheelchair
Silla de ruedas manual
Cadeira de Rodas Manual

ENGLISH
2ZIPPIE IRIS
IF YOU ARE VISUALLY IMPAIRED, THIS DOCUMENT CAN BE VIEWED IN PDF
FORMAT AT WWW.SUNRISEMEDICAL.CO.UK
SI TIENE DIFICULTADES VISUALES, PUEDE ENCONTRAR ESTE DOCUMENTO
EN FORMATO PDF VISITANDO WWW.SUNRISEMEDICAL.ES
SE TIVER PROBLEMAS VISUAIS, ESTE DOCUMENTO PODE SER VISUALIZADO
EM FORMATO NA WWW.SUNRISE MEDICAL.ES

ENGLISH
3
ZIPPIE IRIS
Wheelchair Parts:
1. Backpost
2. Height Adjustable Armrest
3. Wheel Locks
4. Aluminium Foot Plate
5. Push Handle
6. Tilt in Space Release Lever
7. 12 inch Rear Wheel
8. Carriage
9. Castor Fork
10. Castor Tyre
11. Tilt Indicator
12. Adjustable Seat Pan
13. Rocker Arm
14. Hanger Receiver
15. Seat Rail
16. Adjustable Stroller Handle Hinge
Componentes de sillas de ruedas:
1. Tubos del respaldo
2. Reposabrazos ajustable en altura
3. Frenos
4. Plataformas de reposapiés
5. Empuñadura
6. Palanca de desenclavamiento de
basculación de asiento
7. Rueda trasera 12"
8. Carril de basculación
9. Horquilla
10. Cubierta de la rueda delantera
11. Indicador de basculación
12. Base de asiento regulable
13. Carril de basculación
14. Soporte para el reposapiés
15. Guía del asiento
16. Manilla regulable por el
acompañante
Peças da cadeira de rodas:
1. Barra traseira
2. Apoio de braços de altura ajustável
3. Dispositivos de bloqueio das rodas
4. Apoio de pés de alumínio
5. Manípulo de Empurrar
6. Alavanca de desbloqueio de inclinação
no espaço
7. Roda traseira de 12 polegadas
8. Carro
9. Forqueta giratória
10. Pneus da Roda Giratória
11. Indicador de inclinação
12. Fundo do assento ajustável
13. Braço oscilante
14. Recetor do hanger
15. Carril do assento
16. Dobradiça do manípulo ajustável
do carro

ENGLISH
4ZIPPIE IRIS
----
705
553
1131
737
521
356
559
356
610
135
5°
-35°
80°
70°
610
381
508
356
75
----
17,7
----
+76
-76
MAX
MIN
mm 0kg
MAX
MIN
MAX
MIN
MAX
MIN

ENGLISH
5
ZIPPIE IRIS
Table of Contents
3.1 Denitions of words used in this manual
Word Definition
DANGER! Advice to the user of Potential Risk of
serious injury or death if the advice is
not followed
WARNING! Advice to the user of a potential risk of
injury if the advice is not followed
CAUTION! Advice to user that potential damage to
equipment may occur if the advice is not
followed
NOTE: General advice or best practice
Reference To Additional Documentation
NOTE:
Please keep a note of your local service agent’s address and
telephone number in the space provided.
In the event of a breakdown, contact them and try to give all
relevant details so they can help you quickly.
Dealer signature and stamp
Definitions
NOTE:
The wheelchairs shown and described in this user guide may
not correspond in every detail exactly to your own model.
However, all instructions are completely relevant, regardless of
possible detail differences.
The manufacturer reserves the right to alter without notice any
weights, measurements or other technical data shown in this
manual. All figures, measurements and capacities shown in this
manual are approximate, and do not constitute specifications.
Table of Contents 5
Denitions 5
Foreword 6
Use 6
Area of Application. 6
General safety notes, warnings and driving restrictions 7
General Warnings 8
Warnings: Falls and Tip-Overs 9
Warnings: Safe Use (Attendants) 12
Warnings: Components and Options 13
Set-up and Adjustment 16
Battery Tray 27
Positioning Belt 29
Transportability 30
Troubleshooting 32
Maintenance and care 33
Name Plate 34
Warranty 35
Disposal / recycling of materials 35

ENGLISH
6ZIPPIE IRIS
Foreword
Dear Customer,
We are very pleased that you have decided in favour of a
high-quality SUNRISE MEDICAL product.
This Owner’s manual will provide numerous tips and ideas so
that your new wheelchair can become a trustworthy and reliable
partner in your life.
Maintaining close ties to our customers means a lot to us at
Sunrise Medical. We like to keep you up-to-date about new and
current developments at our company. Keeping close to our
customers means: fast service, as little red tape as possible,
working closely with customers. When you need replacement
parts or accessories, or if you just have a question about your
wheelchair – we are there for you.
We want you to be satisfied with our products and service. At
Sunrise Medical we are constantly working to develop our pro-
ducts further. For this reason, changes can occur in our palette
of products with regard to form, technology, and equipment.
Consequently, no claims can be construed from the data or
pictures contained in this owner’s manual.
The management system of SUNRISE MEDICAL is certified
to DIN EN ISO 9001, ISO 13485 and ISO 14001.
As the manufacturer, SUNRISE MEDICAL,
declares that the lightweight wheelchairs con-
form to the 93/42/EEC guideline.
Please contact your local, authorised SUNRISE MEDICAL dea-
ler if you have any questions regarding the use, maintenance or
safety of your wheelchair.
In case there is no authorised dealer in your area, or you have
any questions, contact Sunrise Medical either in writing or by
telephone.
Sunrise Medical
Thorns Road
Brierley Hill
West Midlands
DY5 2LD
England
Phone: 0845 605 66 88
Fax: 0845 605 66 89
www.SunriseMedical.com
IMPORTANT:
DO NOT USE YOUR WHEELCHAIR UNTIL THIS
MANUAL HAS BEEN READ AND UNDERSTOOD.
Use
Wheelchairs are exclusively for a user who is unable to walk
or has limited mobility, for their own personal use, when
self-propelling and being moved by a third party (pushed by
attendant) within the home and outdoors.
The maximum weight limit (includes both the user and any
weight of accessories fitted to the wheelchair) is marked on
the serial number label, which is affixed to the cross-brace
or the stabilising bar under the seat.
Warranty can only be issued if the product is used under the
specified conditions and for the intended purpose.
The expected life of the wheelchair is 5 years.
NO NON-STANDARD PARTS are to be fitted, other than those
officially approved by Sunrise Medical.
Area of Application.
The variety of options as well as the modular design means that
it can be used by those who cannot walk or have limited mobili-
ty because of:
• Paralysis
• Loss of extremity (leg amputation)
• Extremity defect/deformity
• Joint contractures/joint injuries
• Illnesses such as heart and circulation deficiencies,
disturbance of equilibrium or cachexia as well as for
elderly people who still have strength in the upper body.
When considering provision, please also note the body size,
weight, physical and psychological constitution, the age of the
person, living conditions and environment.

ENGLISH
7
ZIPPIE IRIS
General safety notes, warnings and driving restrictions
The engineering and construction of this wheelchair has
been designed to provide maximum safety. International
safety standards currently in force have either been fulfilled or
exceeded in parts. Nevertheless, users may put themselves at
risk by improperly using their wheelchairs. For your own safety,
the following rules must be strictly observed.
Unprofessional or erroneous changes or adjustments
increase the risk of accident. As a wheelchair user, you are
also part of the daily traffic on streets and pavements, just
like anyone else. We would like to remind you that you are
therefore also subject to any and all traffic laws.
Be careful during your first ride in this wheelchair. Get to know
your wheelchair.
Before each use, the following should be checked:
• Quick-release axles on the rear wheels
• Velcro on seats and backrests
• Tyres, tyre pressure and wheel locks.
Before changing any of the adjustments of this wheelchair, it
is important to read the corresponding section of the user’s
manual.
It is possible that potholes or uneven ground could
cause this wheelchair to tip over, especially when riding uphill or
downhill. When riding over a step or up an incline frontally, the
body should be leaning forward.
CHOOSE THE RIGHT CHAIR & SAFETY OPTIONS
• Sunrise provides a choice of many wheelchair styles to meet
the needs of the wheelchair
• rider. However, final selection of the type of wheelchair,
options and adjustments rests
• solely with you and your health care advisor. Choosing the
best chair and set-up for your safety depends on such things
as:
1. Your disability, strength, balance and coordination.
2. The types of hazards you must overcome in daily use (where you
live and work, and other places you are likely to use your chair).
3. The need for options for your safety and comfort (such as anti-tip
tubes, positioning belts, or special seating systems).
REVIEW THIS MANUAL OFTEN
Before using this chair you, and each person who
may assist you, should read this enTyre manual and
make sure to follow all instructions. Review the
warnings often, until they are second nature to you
WARNINGS GROUPS
The word “WARNING” refers to a hazard or unsafe practice that
may cause severe injury or
death to you or to other persons. The “Warnings” are in four
main sections, as follows:
GENERAL WARNINGS
Here you will find a safety checklist and a summary of risks you
need to be aware of before you ride this chair.
WARNINGS– FALLS & TIP-OVERS
Here you will learn how to avoid a fall or tip-over while you
perform daily activities in your chair.
WARNINGS– FOR SAFE USE
Here you will learn about practices for the safe use of your
chair.
WARNINGS– COMPONENTS & OPTIONS
Here you will learn about the components of your chair and
options you can select for safety. Consult your authorized
supplier and your health care advisor to help you choose the
best set-up and options for safe use.
NOTE: Where they apply, you will also find “Warnings” in other
sections of this manual. Heed all warnings in this section. If
you fail to do so a fall, tip-over or loss of control may occur and
cause severe injury to the rider or others

ENGLISH
8ZIPPIE IRIS
General Warnings
WARNINGS!
WEIGHT LIMIT
NEVER exceed the weight limit of 75kg, (165.5 lbs.) for the
Zippie IRIS, for combined weight of rider and items carried. If
you do exceed the limit, damage to your chair, a fall, tip-over or
loss of control may occur and cause severe injury to the rider or
others.
WEIGHT TRAINING
NEVER use this chair for weight training if total weight (rider
plus equipment) exceeds 68kg, (150 lbs.) If you do exceed the
limit, damage to your chair, a fall, tipover or loss of control may
occur and cause severe injury to the rider or others.
GETTING TO KNOW YOUR CHAIR
Every wheelchair is different. Take the time to learn the feel
of this chair before you begin riding. Start slowly, with easy,
smooth strokes. If you are used to a different chair, you may
use too much force and tip over. If you use too much force,
damage to your chair, a fall, tip-over or loss of control may
occur and cause severe injury to the rider or others.
TO REDUCE THE RISK OF AN ACCIDENT
1. BEFORE riding, you should be trained in the safe use of this
chair by your health care advisor.
2. Practice bending, reaching and transfers until you know the
limit of your ability. Have someone help you until you know
what can cause a fall or tip-over and how to avoid doing so.
3. Be aware that you must develop your own methods for safe
use best suited to your level of function and ability.
4. NEVER try a new maneuver on your own until you are sure
you can do it safely.
5. Get to know the areas where you plan to use your chair.
Look for hazards and learn how to avoid them.
6. Use anti-tip tubes unless you are a skilled rider of this chair
and are sure you are not at risk to tip over. If you fail to heed
these warnings damage to your chair, a fall, tip-over or loss
of control may occur and cause severe injury to the rider or
others.
SAFETY CHECKLIST
Before Each Use Of Your Chair:
1. Make sure the chair rolls easily and that all parts work
smoothly. Check for noise, vibration, or a change in ease of
use. (They may indicate low Tyre pressure, loose fasteners,
or damage to your chair).
2. Repair any problem. Your authorized supplier can help you
find and correct the problem.
3. Check to see that both quick-release rear axles are locked.
When locked, the axle button will “pop out” fully. If not locked,
the wheel may come off and cause you to fall.
4. If your chair has anti-tip tubes, lock them in place.
NOTE: See “Anti-Tip Tubes” (Section VIII) for times you should
not use them.
DANGER!
If you fail to heed these warnings damage to your chair, a fall,
tip-over or loss of control may occur and cause severe injury to
the rider or others.
CHANGES & ADJUSTMENTS
1. If you modify or adjust this chair, it may increase the risk of a
tip-over UNLESS you make other changes as well.
2. Consult your authorized supplier BEFORE you modify or
adjust your chair.
3. We recommend that you use anti-tip tubes until you adapt to
the change, and are sure you are not at risk to tip over.
4. Unauthorized modifications or use of parts not supplied or
approved by Sunrise may change the chair structure. This
will void the warranty and may cause a safety hazard.
If you fail to heed these warnings damage to your chair, a fall,
tip-over or loss of control may occur and
cause severe injury to the rider or others.
ENVIRONMENTAL CONDITIONS
1. Use extra care if you must ride your chair on a wet or slick
surface. If you are in doubt, ask for help.
2. Contact with water or excess moisture may cause your chair
to rust or corrode. This could cause your chair to fail.
a. Do not use your chair in a shower, pool or other body of
water. The chair tubing and parts are not water-tight and may
rust or corrode from the inside.
b. Avoid excess moisture (for example, do not leave your chair
in a damp bathroom while taking a shower).
c. Dry your chair as soon as you can if it gets wet, or if you use
water to clean it.
If you fail to heed these warnings damage to your chair, a fall,
tip-over or loss of control may occur
and cause severe injury to the rider or others.
TERRAIN
1. Your chair is designed for use on firm, even surfaces such as
concrete, asphalt and indoor floors and carpeting.
2. Do not operate your chair in sand, loose soil or over rough
terrain. This may damage wheels or axles, or loosen
fasteners of your chair.
If you fail to heed these warnings damage to your chair, a fall,
tip-over or loss of control may occur and
cause severe injury to the rider or others.
STREET USE
In most states, wheelchairs are not legal for use on public
roads. Be alert to the
danger of motor vehicles on roads or in parking lots.
1. At night, or when lighting is poor, use reflective tape on your
chair and clothing.
2. Due to your low position, it may be hard for drivers to see
you. Make eye contact with drivers before you go forward.
When in doubt, yield until you are sure it is safe.
If you fail to heed these warnings damage to your chair, a fall,
tip-over or loss of control may occur and cause severe injury to
the rider or others.
General Warnings

ENGLISH
9
ZIPPIE IRIS
General Warnings
MOTOR VEHICLE SAFETY
As indicated on the front cover of this user manual, identify
whether your chair has been manufactured with the Transit
Option installed.
WARNING!
If your chair is not equipped with Transit Option, this
wheelchair does not meet federal standards for motor
vehicle seating.
1. NEVER let anyone sit in this chair while in a moving vehicle.
2. ALWAYS secure the rider with proper motor vehicle
restraints. In an accident or sudden stop the rider may be
thrown from the chair. Wheelchair seat belts will not prevent
this, and further injury may result from the belts or straps.
3. NEVER transport this chair in the front seat of a vehicle. It
may shift and interfere with the driver.
4. ALWAYS secure this chair so that it cannot roll or shift.
5. Do not use any chair that has been involved in a motor
vehicle accident.
If your chair is equipped with the Transit Option:
See section VIII, Part N: Transit Option and section VII, Part
G: Transit Use.
If you fail to heed these warnings damage to your chair, a fall,
tip-over or loss of control may occur
and cause severe injury to the rider or others.
WHEN YOU NEED HELP
For The Rider:
Make sure that each person who helps you reads and follows
all warnings and instructions that apply.
For Attendants:
1. Work with the rider’s doctor, nurse or therapist to learn safe
methods best suited to your abilities and those of the rider.
2. Tell the rider what you plan to do, and explain what you
expect the rider to do. This will put the rider at ease and
reduce the risk of an accident.
3. Make sure the chair has push handles. They provide secure
points for you to hold the rear of the chair to prevent a fall or
tip-over. Check to make sure push handle grips will not rotate
or slip off.
4. To prevent injury to your back, use good posture and proper
body mechanics. When you lift or support the rider or tilt the
chair, bend your knees slightly and keep your back as upright
and straight as you can.
5. Remind the rider to lean back when you tilt the chair
backward.
6. When you descend a curb or single step, slowly lower the
chair in one easy movement. Do not let the chair drop the
last few inches to the ground. This may damage the chair or
injure the rider.
7. To avoid tripping, unlock and rotate anti-tip tubes up, out
of the way. ALWAYS lock the rear wheels and lock anti-tip
tubes in place if you must leave the rider alone, even for
a moment. This will reduce the risk of a tip over or loss of
control of the chair.
If you fail to heed these warnings damage to your chair, a fall,
tip-over or loss of control may occur
and cause severe injury to the rider or others.
Warnings: Falls and Tip-Overs
WARNINGS!
CENTER OF GRAVITY
The point where this chair will tip forward, back, or to the side
depends on its center of gravity and stability. How your chair is
set up, the options you select and the changes you make may
affect the risk of a fall or tip-over.
1. The Most Important Adjustments Are:
a. The position of the rear wheels. The more you move the
rear wheels forward, the more likely your chair will tip over
backward.
b. The position of the carriage.
2. The Center Of Gravity Is Also Affected By:
a. A change in the set-up of your chair, including:
• The seat height and seat angle.
• Backrest angle.
b. A change in your body position, posture or weight
distribution.
c. Riding your chair on a ramp or slope.
d. The use of a back pack or other options, and the amount of
added weight.
3. To Reduce The Risk Of An Accident:
a. Consult your doctor, nurse or therapist to find out what axle
and caster position is best for you.
b. Consult your authorized supplier BEFORE you modify or
adjust this chair. Be aware that you may need to make other
changes to correct the center of balance.
c. Have someone help you until you know the balance points of
your chair and how to avoid a tip-over.
d. Use anti-tip tubes.
e. Never allow the presence of a second occupant climbing or
standing on a component of the chair.
If you fail to heed these warnings damage to your chair, a fall,
tip-over or loss of control may occur and cause severe injury to
the rider or others.
DRESSING OR CHANGING CLOTHES
Your weight may shift if you dress or change clothes while
seated in this chair.
To reduce the risk of a fall or tip-over:
1. Rotate the front casters until they are as far forward as
possible. This makes the chair more stable.
2. Lock anti-tip tubes in place. (If your chair does not have
anti-tip tubes, back it up against a wall and lock both rear
wheels).
If you fail to heed these warnings damage to your chair, a fall,
tip-over or loss of control may occur and cause severe injury to
the rider or others.
WHEELIES
Because of the ability to adjust the center of gravity and
changes in center of gravity that will result from operating the
tilt in space feature of this chair, as a user, do not perform
wheelies in the IRIS wheelchair. Doing a “wheelie” means:
balancing on the rear wheels of your chair, while the front
casters are in the air. It is dangerous to do a “wheelie” as a fall
or tip-over may occur.
If you fail to heed these warnings damage to your chair, a fall,
tip-over or loss of control may occur and cause severe injury to
the rider or others.

ENGLISH
10 ZIPPIE IRIS
Warnings: Falls and Tip-Overs
WARNINGS!
OBSTACLES
Obstacles and road hazards (such as potholes and broken
pavement) can damage your chair and may cause a fall, tip-
over or loss of control.
To avoid these risks:
1. Keep a lookout for danger – scan the area well ahead of
your chair as you ride.
2. Make sure the floor areas where you live and work are level
and free of obstacles.
3. Remove or cover threshold strips between rooms.
4. Install a ramp at entry or exit doors. Make sure there is not
a drop off at the bottom of the ramp.
5. To Help Correct Your Center Of Balance:
a. Lean your upper body FORWARD slightly as you go UP
over an obstacle.
b. Press your upper body BACKWARD as you go DOWN from
a higher to a lower level.
6. If your chair has anti-tip tubes, lock them in place before you
go UP over an obstacle.
7. Keep both of your hands on the handrims as you go over an
obstacle.
8. Never push or pull on an object (such as furniture or a
doorjamb) to propel your chair.
If you fail to heed these warnings damage to your chair, a fall,
tip-over or loss of control may occur
and cause severe injury to the rider or others.
REACHING OR LEANING
If you reach or lean it will affect the center of balance of your
chair. This may cause you to fall or tip over. When in doubt,
ask for help or use a device to extend your reach.
1. NEVER reach or lean if you must shift your weight sideways
or rise up off the seat.
2. NEVER reach or lean if you must move forward in your
seat to do so. Always keep your buttocks in contact with the
backrest.
3. NEVER reach with both hands (you may not be able to
catch yourself to prevent a fall if the chair tips).
4. NEVER reach or lean to the rear unless your chair has anti-
tip tubes locked in place.
5. DO NOT reach or lean over the top of the seat back. This
may damage one or both backrest tubes and cause you to
fall.
6. If You Must Reach Or Lean:
a. Do not lock the rear wheels. This creates a tip point and
makes a fall or tip-over more likely.
b. Do not put pressure on the footrests.
NOTE: Leaning forward puts pressure on the footrests and
may cause the chair to tip if you lean too far.
c. Move your chair as close as you can to the object you wish
to reach.
d. Do not try to pick up an object from the floor by reaching
down between your knees. You are less likely to tip if you
reach to the side of your chair.
e. Rotate the front casters until they are as far forward as
possible. This makes the chair more stable.
NOTE: To do this: Move your chair past the object you want
to reach, then back up alongside it. Backing up will rotate the
casters forward.
f. Firmly grasp a rear wheel or an armrest with one hand. This
will help to prevent a fall if the chair tips.
If you fail to heed these warnings damage to your chair, a fall,
tip-over or loss of control may occur
and cause severe injury to the rider or others.
Warnings: Falls and Tip-Overs
WARNINGS!
MOVING BACKWARD
Use extra care when you move your chair backward. Your chair
is most stable when you propel yourself forward. You may lose
control or tip over if one of the rear wheels hits an object and
stops rolling.
1. Propel your chair slowly and smoothly.
2. If your chair has anti-tip tubes, make sure to lock them in
place.
3. Stop often and check to be sure your path is clear.
If you fail to heed these warnings damage to your chair, a fall,
tip-over or loss of control may occur and cause severe injury to
the rider or others.
RAMPS, SLOPES & SIDEHILLS
Riding on a slope, which includes a ramp or sidehill, will change
the center of balance of your chair. Your chair is less stable
when it is at an angle. Anti-tip tubes may not prevent a fall or
tip-over.
1. Do not use your chair on a slope steeper than 10%. (A 10%
slope means: one foot in elevation for every ten feet of slope
length.)
2. Always go as straight up and as straight down as you can.
(Do not “cut the corner” on a slope or ramp.)
3. Do not turn or change direction on a slope.
4. Always stay in the CENTER of the ramp. Make sure ramp
is wide enough that you are not at risk that a wheel may fall
over the edge.
5. Do not stop on a steep slope. If you stop, you may lose
control of your chair.
6. NEVER use rear wheel locks to try to slow or stop your chair.
This is likely to cause your chair to veer out of control.
7. Beware Of:
a. Wet or slippery surfaces.
b. A change in grade on a slope (or a lip, bump or depression).
These may cause a fall or tip-over.
c. A drop-off at the bottom of a slope. A drop-off of as small as
3/4 inch can stop a front caster and cause the chair to tip
forward.
8. To Reduce The Risk Of A Fall Or Tip-Over:
a. Lean or press your body UPHILL. This will help adjust for
the change in the center of balance caused by the slope or
sidehill.
b. Keep pressure on the handrims to control your speed on a
down slope. If you go too fast you may lose control.
c. Ask for help any time you are in doubt.
9. Ramps At Home & Work - For your safety, ramps at home
and work must meet all legal requirements for your area. We
recommend:
a. Width: At least four feet wide.
b. Guardrails: To reduce the risk of a fall, sides of ramp must
have guardrails (or raised borders at least three inches high).
c. Slope: Not more than a 10% grade.
d. Surface: Flat and even, with a thin carpet or other non-skid
material. (Make sure there is no lip, bump or depression.)
e. Bracing: Ramps must be STURDY. You may need bracing
so ramps do not “bow” when you ride on them.
f. Avoid A Drop Off: You may need a section at the top or
bottom to smooth out the transition.
If you fail to heed these warnings damage to your chair, a fall,
tip-over or loss of control may occur and cause severe injury to
the rider or others.

ENGLISH
11
ZIPPIE IRIS
Warnings: Falls and Tip-Overs
WARNINGS!
TRANSFER
It is dangerous to transfer on your own. It requires good
balance and agility. Be aware that there is a point during every
transfer when the wheelchair seat is not below you.
To Avoid A Fall:
1. Work with your health care advisor to learn safe methods.
a. Learn how to position your body and how to support yourself
during a transfer.
b. Have someone help you until you know how to do a safe
transfer on your own.
2. Lock the rear wheels before you transfer. This keeps the rear
wheels from rolling.
NOTE: This will NOT keep your chair from sliding away from
you or tipping.
3. Make sure to keep pneumatic Tyres properly inflated. Low
Tyre pressure may allow the rear wheel locks to slip.
4. Move your chair as close as you can to the seat you are
transferring to. If possible, use a transfer board.
5. Rotate the front casters until they are as far forward as
possible.
6. If you can, remove or swing footrests out of the way.
a. Make sure your feet do not catch in the space between the
footrests.
b. Avoid putting weight on the footrests as this may cause the
chair to tip.
7. Make sure armrests are out of the way and do not interfere.
8. Transfer as far back onto the seat surface as you can. This
will reduce the risk that the chair will tip or move away from
you.
If you fail to heed these warnings damage to your chair, a fall,
tip-over or loss of control may occur and cause severe injury to
the rider or others.
CURBS & STEPS
1. Each person who helps you should read and follow the
warnings “For Safe Use” (Section VII) and “For Attendants”
(Section V, Part K).
2. Do not try to climb or descend a curb or step alone.
3. Unlock and rotate anti-tip tubes up, out of the way, so they
do not interfere.
4. Do not try to climb a high curb or step UNLESS you have
help. Doing so may cause your chair to exceed its balance
point and tip over.
5. Go straight up and straight down a curb or step. If you climb
or descend at an angle, a fall or tip-over is likely.
6. Be aware that the impact of dropping down from a curb or
step can damage your chair or loosen fasteners.
If you fail to heed these warnings damage to your chair, a fall,
tip-over or loss of control may occur and cause severe injury to
the rider or others.
Warnings: Falls and Tip-Overs
WARNINGS!
STAIRS
1. NEVER use this chair on stairs UNLESS you have someone
to help you. Doing so is
likely to cause a fall or tip-over.
2. Persons who help you should read and follow the warnings
“For Attendants” (Section V, Part K), and “For Safe Use”
(Section VII).
If you fail to heed these warnings damage to your chair, a fall,
tip-over or loss of control may occur and cause severe injury to
the rider or others.
ESCALATORS
NEVER use this chair on an escalator, even with an attendant.
If you do, a fall or tip-over is likely.
If you fail to heed these warnings damage to your chair, a fall,
tip-over or loss of control may occur
and cause severe injury to the rider or others.

ENGLISH
12 ZIPPIE IRIS
Warnings: Safe Use (Attendants)
WARNINGS!
Before you assist a rider, be sure to read the warnings “For
Attendants” in Section V, Part K and follow all instructions that
apply. Be aware that you will need to learn safe methods best
suited to your abilities.
TILT USE
In preparation to operate the tilt:
• Always verify that the arms of the rider are stable on the
armrests or within the armrests.
• Always verify that the legs of the rider are stable on the
footrest/legrest.
• Never place hands, feet or foreign objects into the tilt
mechanism.
• Never push or propel the chair with the seat tilted in a forward
position.
• Never add chair accessories that are not specifically
designed for Zippie IRIS.
• Never exceed a tilted position that aligns the backrest parallel
to the ground.
DESCENDING A CURB OR SINGLE STEP
Follow these steps to help a rider descend a curb or single
step going BACKWARD:
1. Stay at the rear of the chair.
2. Several feet before your reach the edge of the curb or step,
turn the chair around and pull it backward.
3. While looking over your shoulder, carefully step back until
you are off the curb or stair and standing on the lower level.
4. Pull the chair toward you until the rear wheels reach the
edge of the curb or step. Then allow the rear wheels to
slowly roll down onto the lower level.
5. When the rear wheels are safely on the lower level, tilt the
chair back to its balance point. This will lift the front casters
off the curb or step.
6. Keep the chair in balance and take small steps backward.
Turn the chair around and gently lower front casters to the
ground.
If you fail to heed these warnings damage to your chair, a fall,
tip-over or loss of control may occur and cause severe injury to
the rider or others.
CLIMBING A CURB OR SINGLE STEP
Follow these steps to help the rider climb a curb or single step
going FORWARD:
1. Stay behind the chair.
2. Face the curb and tilt the chair up on the rear wheels so that
the front casters clear the curb or step.
3. Move forward, placing the front casters on the upper level
as soon as you are sure they are past the edge.
4. Continue forward until the rear wheels contact the face of
the curb or step. Lift and roll the rear wheels to the upper
level.
If you fail to heed these warnings damage to your chair, a fall,
tip-over or loss of control may occur and cause severe injury to
the rider or others.
Warnings: Safe Use (Attendants)
WARNINGS!
CLIMBING STAIRS
1. Use at least two attendants to move a chair and rider up
stairs.
2. Move the chair and rider BACKWARD up the stairs.
3. The person at the rear is in control. He or she tilts the chair
back to its balance point.
4. A second attendant at the front should firmly grasp the hanger
receiver or frontmost part of the seat rail and lift the chair up
and over one stair at a time.
5. The attendants move to the next stair up. Repeat for each
stair, until you reach the landing.
If you fail to heed these warnings damage to your chair, a fall,
tip-over or loss of control may occur and cause severe injury to
the rider or others.
DESCENDING STAIRS
1. Use at least two attendants to move a chair and rider down
stairs.
2. Move the chair and rider FORWARD down the stairs.
3. The person at the rear is in control. He or she tilts the chair to
the balance point of the rear wheels and rolls it to the edge of
the top step.
4. A second attendant stands on the third step from the top and
grasps the hanger receiver or frontmost part of the seat rail.
He or she lowers the chair one step at a time by letting the
rear wheels roll over the stair edge.
5. The attendants move to the next stair down. Repeat for each
stair, until you reach the landing.
If you fail to heed these warnings damage to your chair, a fall,
tip-over or loss of control may occur and cause severe injury to
the rider or others.
MAINTENANCE
1. Inspect and maintain this chair strictly per chart in section XI.
Maintenance.
2. If you detect a problem, make sure to service or repair the
chair before use.
3. At least once a year, have a complete inspection, safety
check and service of your chair made by an authorized
supplier.
If you fail to heed these warnings damage to your chair, a fall,
tip-over or loss of control may occur and cause severe injury to
the rider or others. For additional maintenance information see
Section XI: Maintenance.

ENGLISH
13
ZIPPIE IRIS
Warnings: Safe Use (Attendants)
WARNINGS!
TRANSIT USE
Refer also to section VIII, part N and section V, part J for
additional transit option and motor vehicle warnings.
1. If possible and feasible, the rider should transfer to the
Original Equipment Manufacturer vehicle seat and use the
vehicle restraint.
2. If the wheelchair is used for transport, it must be used in a
forward-facing seating position.
3. The rider must not weigh more than 150 lbs.
4. The figure to the right shows the locations of the wheelchair
securement points, front (A) and back (B).
5. Use only with Wheelchair Tie down and Occupant Restraint
Systems (WTORS) that have been installed in accordance
with the manufacturer’s instructions and SAE J2249.
6. Attach WTORS to securement points in accordance with the
manufacturer’s instructions and SAE J2249.
7. Attach occupant restraints in accordance with the
manufacturer’s instructions and SAE J2249.
USER WEIGHT LESS THAN 22 kg (48 lb 8.0 oz)
When the user being transported is a child, less than 22Kg
mass and the vehicle involved has less than eight (8) seated
passengers it is recommended that they be transferred to an
UNCE Regulation 44 compliant child restraint system (CRS).
This type of restraint system provides a more effective
occupant restraint system than the conventional 3 point
occupant restraint system and some CRS systems also include
additional postural supports to assist in maintaining the position
of the child when seated.
Parents or care providers may consider the option, in some
circumstances, for their child is to remain in their wheelchair
whilst in transport due to the level of posture control and
comfort provided by the set up in the wheelchair.
We would recommend in such circumstances that a risk
assessment be carried out by your healthcare professional and
relevant competent persons.
Warnings: Components and Options
ANTI-TIP TUBES (OPTIONAL)
Anti-tip tubes can help keep your chair from tipping over
backward in most normal conditions.
1. Sunrise Recommends Use Of Anti-Tip Tubes:
a. UNLESS you are a skilled rider of this chair and are sure you
are not at risk to tip over.
b. Each time you modify or adjust your chair. The change may
make it easier to tip backward. Use anti-tip tubes until you
adapt to the change, and are sure you are not at risk to tip
over.
2. When locked in place (in the “down” position) anti-tip tubes
should be BETWEEN 1 1/2 to 2 inches off the ground.
a. If set too HIGH, they may not prevent a tip-over.
b. If set too LOW, they may “hang up” on obstacles you can
expect in normal use. If this occurs, you may fall or your chair
may tip over.
3. Keep Anti-Tip Tubes Locked In Place UNLESS:
a. You have an attendant, or
b. You have to climb or descend a curb, or overcome an
obstacle, and can safely do so without them. At these times,
make sure anti-tip tubes are up, out of the way.
If you fail to heed these warnings damage to your chair, a fall,
tip-over or loss of control may occur and cause severe injury to
the rider or others.
ARMRESTS
Armrests will not bear the weight of this chair.
1. NEVER lift this chair by its armrests. They may come loose
or break.
2. Lift this chair only by non-detachable parts of the main frame.
If you fail to heed these warnings damage to your chair, a fall,
tip-over or loss of control may occur and cause severe injury to
the rider or others.
STROLLER HANDLE
1. Always keep hands away from the locking mechanism
located at the bottom of the back canes when folding the
back down or pulling it back up.
2. Always keep fingers away from the interior of the hinge when
readjusting the adjustable stroller handle.
FASTENERS
Many of the screws, bolts and nuts on this chair are special
high-strength fasteners. Use of improper fasteners may cause
your chair to fail.
1. ONLY use fasteners provided by an authorized supplier (or
ones of the same type and strength, as indicated by the
markings on the heads).
2. Over- or under-tightened fasteners may fail or cause damage
to chair parts.
3. If bolts or screws become loose, tighten them as soon as you
can.
4. CHOKING HAZARD – This mobility aid uses small parts
which under certain circumstances may present a choking
hazard to young children.
If you fail to heed these warnings damage to your chair, a fall,
tip-over or loss of control may occur and cause severe injury to
the rider or others.

ENGLISH
14 ZIPPIE IRIS
Warnings: Components and Options
WARNINGS!
FOOTRESTS
Footrests will not bear the weight of this chair
1. At the lowest point, footrests should be AT LEAST 2 1/2
INCHES off the ground. If set too LOW, they may “hang up”
on obstacles you can expect to find in normal use. This
may cause the chair to stop suddenly and tip forward.
2. To Avoid A Trip Or Fall When You Transfer:
a. Make sure your feet do not “hang up” or get caught in the
space between the footrests.
b. Avoid putting weight on the footrests, as the chair may tip
forward.
3. NEVER lift this chair by the footrests. Footrests detach and
will not bear the weight of this chair. Lift this chair only by
non-detachable parts of the main frame.
If you fail to heed these warnings damage to your chair, a fall,
tip-over or loss of control may occur
and cause severe injury to the rider or others.
PNEUMATIC TyreS
Proper inflation extends the life of your Tyres and makes your
chair easier to use.
1. Do not use this chair if any of the Tyres is under- or over-
inflated. Check weekly for proper inflation level, as listed on
the Tyre sidewall.
2. Low pressure in a rear Tyre may cause the wheel lock on
that side to slip and allow the wheel to turn when you do not
expect it.
3. Low pressure in any of the Tyres may cause the chair to veer
to one side and result in a loss of control.
4. Over-inflated Tyres may burst.
If you fail to heed these warnings damage to your chair, a fall,
tip-over or loss of control may occur
and cause severe injury to the rider or others.
POSITIONING BELTS (OPTIONAL)
Use positioning belts ONLY to help support the rider’s posture.
Improper use of these belts may cause severe injury to or death
of the rider.
1. Make sure the rider can not slide down in the wheelchair
seat. If this occurs, the rider may suffer chest compression or
suffocate due to pressure from the belts.
2. The belts must be snug, but must not be so tight that they
interfere with breathing. You should be able to slide your
open hand, flat, between the belt and the rider.
3. A pelvic wedge or a similar device can help keep the rider
from sliding down in the seat. Consult with the rider’s doctor,
nurse or therapist to find out if the rider needs such a device.
4. Use positioning belts only with a rider who can cooperate.
Make sure the rider can easily remove the belts in an
emergency.
5. NEVER Use Positioning Belts:
a. As a patient restraint. A restraint requires a doctor’s order.
b. On a rider who is comatose or agitated.
c. As a motor vehicle restraint. In an accident or sudden stop
the rider may be thrown from the chair. Wheelchair seat belts
will not prevent this, and further injury may result from the
belts or straps.
If you fail to heed these warnings damage to your chair, a fall,
tip-over or loss of control may occur and
cause severe injury to the rider or others.
Warnings: Components and Options
WARNINGS!
POWER DRIVE
Do not install a power drive on any Zippie wheelchair. If you do:
1. It will affect the center of balance of your chair and may
cause a fall or tip-over.
2. It will alter the frame and void the warranty.
If you fail to heed these warnings damage to your chair, a fall,
tip-over or loss of control may occur and cause severe injury to
the rider or others.
PUSH HANDLES
When you have a attendant, make sure that this chair has push
handles.
1. Push handles provide secure points for an attendant to hold
the rear of this chair, to prevent a fall or tip-over. Make sure
to use push handles when you have an attendant.
2. Check to make sure push handle grips will not rotate or slip
off.
If you fail to heed these warnings damage to your chair, a fall,
tip-over or loss of control may occur and cause severe injury to
the rider or others.
QUICK-RELEASE AXLES
1. Do not use this chair UNLESS you are sure that both quick-
release rear axles are locked. An unlocked axle may come
off during use and cause a fall.
2. An axle is not locked until the quick-release button pops out
fully. An unlocked axle may come off during use, resulting in
a fall, tip-over or loss of control and cause severe injury to
the rider or others.
If you fail to heed these warnings damage to your chair, a fall,
tip-over or loss of control may occur and cause severe injury to
the rider or others.
REAR AXLES
A change in set-up of the rear wheels will affect the center of
balance of your chair.
1. The farther you move the rear axles FORWARD, the more
likely it is that your chair will tip over backward.
2. Consult your doctor, nurse or therapist to find the best rear
axle set-up for your chair. Do not change the set-up UNLESS
you are sure you are not at risk to tip over.
3. Adjust the rear wheel locks after you make any change to the
rear axles.
a. If you fail to do so, the locks may not work.
b. Make sure lock arms embed in Tyres at least 1/8 inch when
locked.
If you fail to heed these warnings damage to your chair, a fall,
tip-over or loss of control may occur and cause severe injury to
the rider or others.

ENGLISH
15
ZIPPIE IRIS
Warnings: Components and Options
WARNINGS!
REAR WHEEL LOCKS
Rear wheel locks are NOT designed to slow or stop a moving
wheelchair. Use them only to keep the rear wheels from
rolling when your chair is at a complete stop.
1. NEVER use rear wheel locks to try to slow or stop your
chair when it is moving. Doing so may cause you to veer
out of control.
2. To keep the rear wheels from rolling, always set both rear
wheel locks when you transfer to or from your chair.
3. Low pressure in a rear Tyre may cause the wheel lock on
that side to slip and may allow the wheel to turn when you
do not expect it.
4. Make sure lock arms embed in Tyres at least 1/8 inch when
locked. If you fail to do so, the locks may not work.
If you fail to heed these warnings damage to your chair, a fall,
tip-over or loss of control may occur and cause severe injury
to the rider or others.
MODIFIED SEAT SYSTEMS
Use of a seat system not approved by Sunrise may alter the
center of balance of this chair. This may cause the chair to tip
over.
1. Do not change the seat system of your chair UNLESS you
consult your authorized supplier first.
2. Use of a non-validated system (wheelchair base and
seating), as a seat in a motor vehicle could result in
increased risk of severe injury or death in a vehicular
mishap.
• Only a complete system (wheelchair base and seating) can
be validated for use as a seat in a motor vehicle.
• The seating provided may or may not be appropriate for
use as a seat in a motor vehicle in combination with this
wheelchair base.
• Before using this system as a seat in a motor vehicle, you
should verify that the seating manufacturer has validated the
seating in combination with this wheelchair base.
• Before using this system as a seat in a motor vehicle, you
should read and comply with all instructions for use provided
by both Sunrise Medical and the seating manufacturer as
well as the instructions for use of any other component or
accessory manufacturer.
If you fail to heed these warnings damage to your chair, a fall,
tip-over or loss of control may occur and cause severe injury
to the rider or others.
Warnings: Components and Options
WARNINGS!
TRANSIT OPTION
1. Use only Wheelchair Tiedown and Occupant Restraint
Systems (WTORS) which meet the requirements of SAE
J2249 Recommended Practice - Wheelchair Tiedown and
Occupant Restraint Systems For Use in Motor Vehicles. Do
not use WTORS designed to rely on the wheelchair structure
to transfer occupant restraint loads to the vehicle.
2. The wheelchair has been dynamically tested in a forward-
facing mode for a 30 mph frontal impact test. The wheelchair
must be forward-facing during transport.
3. In order to reduce the potential of injury to vehicle occupants,
wheelchair-mounted accessories, such as trays and
respiratory equipment, should be removed and secured
separately.
4. Postural supports and positioning devices should not be
relied on for occupant restraint.
5. Do not alter or substitute wheelchair frame parts,
components or seating.
6. Sudden stops or impacts can structurally damage your chair.
Chairs involved in such incidents should be replaced.
7. When the user being transported is a child, less than
22Kg mass and the vehicle involved has less than eight
(8) seated passengers it is recommended that they be
transferred to an UNCE Regulation 44 compliant child
restraint system (CRS).This type of restraint system
provides a more effective occupant restraint system than the
conventional 3 point occupant restraint system and some
CRS systems also include additional postural supports to
assist in maintaining the position of the child when seated.
Parents or care providers may consider the option, in some
circumstances, for their child is to remain in their wheelchair
whilst in transport due to the level of posture control and
comfort provided by the set up in the wheelchair. We would
recommend in such circumstances that a risk assessment
be carried out by your healthcare professional and relevant
competent persons.
If you fail to heed these warnings damage to your chair, a fall,
tip-over or loss of control may occur
and cause severe injury to the rider or others.

ENGLISH
16 ZIPPIE IRIS
Set-up and Adjustment
NOTE: Setting the wheelchair on a table or on a flat surface,
such as a workbench, helps make these procedures easier.
NOTE ON TORQUE SETTING: A torque setting is the optimum
tightening which should be made on a particular fastener. A
torque wrench which measures in./lbs. should be used when
tightening fasteners on Zippie wheelchairs. Unless otherwise
noted, use a torque setting of 60 in./lbs. When setting up this
wheelchair.
SWING-AWAY HANGERS AND FOOTRESTS 60°, 70°, 70°V,
80°, OR 90°
1. Installation
a. Place swing-away pivot saddle (A) into the receiver (B) on
front frame tube with the footrest facing outward from frame.
b. Rotate the footrest inward until it locks into place on locking
bolt (C).
2. Removal
a. To remove footrest, push release latch (D) toward the frame.
b. Rotate footrest outward and lift.
3. Height Adjustment with Extension Tube
a. Remove both bolts (E) in the hanger frame tube.
b. Reposition footrest height.
c. Re-tighten all bolts (E).
4. Height Adjustment, Front Mount
a. Loosen and remove the retaining bolt (F) in the frame tube.
b. Position footplate upward or downward in predrilled holes on
hanger tube.
c. Reinsert bolt (F) and tighten.
HEAVY-DUTY, LIFT-OFF FOOTRESTS (OPTIONAL): 70°,
80°, 90°
1. Installation:
Slide pivot saddle (A) into receiver (B) on front frame tube
until it locks into place.
2. Removal:
To remove footrest, push release latch (C) while lifting up
footrest from receiver.
3. Height-Adjustment, Front Mount
a. Loosen and remove the retaining bolt (D) in the footrest
mounting bracket.
b. Position footplate upward or downward in predrilled holes on
hanger tube.
c. Reinsert bolt and tighten.
CONTRACTURE FOOTREST (OPTIONAL)
1. Lateral Mount:
Can be mounted laterally as shown in illustration (E).
2. Center Mount:
Can be mounted in the center as shown in illustration (F).

ENGLISH
17
ZIPPIE IRIS
Set-up and Adjustment
HEIGHT ADJUSTMENT
a. Loosen and remove the retaining bolt (G) in the footrest
mounting bracket.
b. Slide the lower tube upward or downward to the desired
position until predrilled holes on hanger tubes are aligned.
c. Reinsert bolt and tighten.
4. Footrest Angle Adjustment
a. Loosen the retaining bolt (H) in the adjustment locking joint.
b. Position footrest forward or rearward in desired angle.
c. Retighten the bolt.
5. Footplate Angle Adjustment
a. Loosen the retaining bolt (I) in the footplate locking joint.
b. Position footplate upward or downward in desired angle.
c. Retighten the bolt.
ARTICULATING LEGREST (OPTIONAL)
1. Installation or Removal
To install or remove Articulating Legrest (ALR) see
instructions for Swing-away Footrest installation.
2. Elevation Adjustment
a. To raise legrest, lift to desired position. Legrest will
automatically lock in place.
b. To lower legrest, while seated in chair, press release lever
(A) down and lower legrest to desired position. Legrest will
automatically lock in place.
3. Height Adjustment of the Calf Pad
a. Rotate the tube clamp (B) towards the outside.
b. Slide it up or down.
c. Rotate it back in the desired indented position.
4. Height Adjustment with Extension Tube
a. Remove the bolt (C) in the hanger frame tube.
b. Reposition footrest height.
c. Align the tube clamp with the selected bolt.
d. Re-tighten the bolt (C).
ELEVATING LEGREST (OPTIONAL)
1. Installation or Removal
To install or remove Elevating Legrest (ELR) see instructions
for Swing-away Footrest installation.
2. Elevation Adjustment
a. To raise legrest, lift to desired position. Legrest will
automatically lock in place.
b. To lower legrest, while seated in chair, press release lever
(D) down and lower legrest to desired position. Legrest will
automatically lock in place.
3. Height Adjustment of the Calf Pad.
a. Loosen the retaining nut (E) located at the back of the calf
pad bracket assembly.
b. Slide the calf pad bracket assembly up or down.
c. Tighten it in the desired position.
4. Height Adjustment with Extension Tube
a. Loosen both bolts (F) in the hanger frame tube.
b. Reposition footrest height.
c. Re-tighten all bolts (F).

ENGLISH
18 ZIPPIE IRIS
Set-up and Adjustment
CASTER/FORKS ASSEMBLY
1. Installation
a. Remove dust cover (A) from caster housing. Pry dust cover
off using a back and forth motion.
b. Caster assembly holds one nut (B) and one washer
(immediately below the nut). Remove nut and washer.
c. Insert caster stem (C) into caster housing (D) and place
washer on stem.
d. Replace nut (B) on caster stem and tighten until all play is
removed; then loosen approximately 1/8 turn, yet still allowing
for free rotation.
e. Replace dust cover to caster housing.
2. Caster Angle Adjustment
For optimum performance, the caster housing should always be
at a 90° angle to the floor (perpendicular to the ground). This
adjustment is made with an eccentric (offset) attachment
bolt mechanism.
a. To change the angle, place the chair on a flat surface (such
as a table).
b. Remove the bolt nuts (G) from the back side of the caster
plate. The caster plate is slotted at the top and bottom for
adjustment.
c. Place a large right triangle against the table surface and the
front surface of the caster bearing housing to align the caster
stem rotational axis perpendicular to the floor surface.
d. Rotate the eccentric washers (E) independently until they fall
into position.
e. When the alignment is correct, retighten the two retaining
bolts.
f. Repeat the process for the other caster.
NOTE: Use a torque setting of 100 in.-lbs. when setting-up
caster plate.
3. Height Adjustment
a. Loosen and remove bolt (F).
b. Set axle at desired height using pre-set holes in the fork.
c. Replace and tighten bolt.
d. Repeat on other side.
NOTE: The frame must be kept horizontal when height is
adjusted. Refer to matrix in the ordering guide for proper setting.
DUAL-POST ARMRESTS
1. Installation or Removal
a. The assembly is held securely in place when the securing
levers (A, B) are facing outside.
b. Pull securing levers forward to release.
c. Insert or remove armrest.
d. Return securing levers to locked position.
2. Height-Adjustment (optional)
a. Release the upper securing lever (C).
b. Set armrest at desired height.
c. Return securing lever to locked position.
d. Move armrest up or down to allow armrest to snap into place.
3. Flip Back (optional)
a. Release the front securing lever only (A).
b. Flip the armrest back, it remains attached to the rear receiver.
c. Move armrest down into place.
d. Return securing lever to locked position.
Dual Post Armrest
A. Front release latch
B. Rear release latch
C. Upper securing lever
D. Armrest panel
E. Rear receiver
F. Front receiver
G. Armrest pad

ENGLISH
19
ZIPPIE IRIS
Set-up and Adjustment
SINGLE-POST HEIGHT ADJUSTABLE ARMRESTS
1. Fitting
a. Push the outer armrest rails down into the receiver which is
mounted on the wheelchair frame.
b. The armrest will automatically lock into place.
2. Height adjustment
a. Turn the release lever for height adjustment (2) to the second
stop point.
b. Push the armpad up or down to reach the desired height.
c. Set the lever back to the interlocked position against the
armrest rails.
d. Push the armpad (4) until the rails click into place securely.
3. Remove the armrest
a. Operate the lever 3 and lift the whole arm.
4. Insert armrest
a. Put the armrest back in the receiver, until the arm clicks into
place.
MOUNTING COMPONENTS FOR THE ARMREST RECEIVER
Adjusting the armrest receiver
To tighten or loosen the fit of the outer armrest rails in the
receiver:
1. Loosen the four set screws for the receiver (D) on the sides of
the receiver.
2. Leave the armrest in the receiver (E) and push the receiver
together, until the desired adjustment is achieved.
3. Tighten the four screws (D). (144 in-lbs, 16.3 Nm)
Position adjustment
1. Loosen the two clamp screws (10) until the clamp is loose.
2. Push the armrest receiver to the desired position.
3. Tighten.
(Fig.38, 39, 40 and 41).
1. Outer armrest rails
2. Height adjustment of the locking lever
3. Locking lever
4. Armrest pad
5. Transfer bar
6. Side-guard
7. Receiver
8. Adjustment clamp
9. Parts to adjust the receiver
10. Clamp screws
1
E
1
2
36
4
5
9
7

ENGLISH
20 ZIPPIE IRIS
Set-up and Adjustment
ANTI-TIP TUBES- REAR
Anti-tip tubes are recommended for all wheelchairs.
NOTE: Use a torque setting of 96 in.-lbs. when setting-up anti-tip
tubes.
1. Inserting Anti-Tip Tubes Into Receivers
a. Press the rear anti-tip release pin (A) on the anti-tip tube so
that both release pins are drawn inside.
b. Insert the anti-tip tube into the receiver (B).
c. Turn the anti-tip tube down until release pin protrudes through
the receiver mounting hole.
d. Insert second anti-tip tube the same way.
2. Turning Anti-Tip Tubes Up
Turn anti-tip tubes up when being pushed by attendant,
overcoming obstacles or climbing curbs.
a. Press the rear anti-tip tube release pin (A).
b. Hold pin in and turn anti-tip tube up (C).
c. Release pin.
d. Repeat with second anti-tip tube.
e. Remember to return anti-tip tubes to down position after
completing maneuver.
3. Adjusting Anti-Tip Tube Wheel
The anti-tip tube wheels may have to be raised or lowered to
achieve proper ground clearance (1-1/2” to 2”).
a. Press the anti-tip wheel release pin (D) so that the release pin
is drawn inside.
b. Raise or lower to one of the three or four pre-drilled holes.
c. Release pin (D).
d. Adjust the second anti-tip tube wheel the same way. Both
wheels should be at exactly the same height.
4. Height adjustment of the receivers
a. Remove anti-tip tubes (E) from anti-tip receivers (B).
b. Remove bolts (F) from anti-tip tube receiver.
c. Reposition bracket to desired height. The receiver can be
positioned up or down as needed.
d. Reinsert bolts (F) and tighten.
e. Repeat with second anti-tip tube receiver. Both brackets
should be at exactly the same height.
f. Replace anti-tip tubes.
ANTI-TIP TUBES- FRONT
NOTE: Use a torque setting of 100 in.-lbs. when setting-up anti-
tip tubes.
1. Inserting Anti-Tip Tubes Into Receivers
a. Press the front anti-tip release pin (A) on the anti-tip tube so
that both release pins are drawn inside.
b. Insert into the anti-tip tube receiver (B).
c. Turn the anti-tip tube down until release pin is through the
receiver mounting hole.
d. Insert second anti-tip tube the same way.
2. Turning Anti-Tip Tubes Up
See Turning Anti-tip Tubes Up section J-2.
3. Adjusting Anti-Tip Tube Wheel
See adjusting Anti-Tip Tube Wheel section J-3.
Other manuals for IRIS
2
Table of contents
Languages:
Other Zippie Wheelchair manuals

Zippie
Zippie YOUNGSTER 3 Manual

Zippie
Zippie Simba Manual

Zippie
Zippie ZM-310 User manual

Zippie
Zippie Pluton 1 Manual

Zippie
Zippie RS User manual

Zippie
Zippie IRIS Installation and operation manual

Zippie
Zippie X’CAPE WC-19 User manual

Zippie
Zippie ZONE User manual

Zippie
Zippie Salsa M Manual

Zippie
Zippie Neptune 2 Manual

Zippie
Zippie IRIS User manual

Zippie
Zippie Neptune Manual

Zippie
Zippie RS User manual

Zippie
Zippie Salsa R2 User manual

Zippie
Zippie X'CAPE User manual

Zippie
Zippie VOYAGE User manual

Zippie
Zippie Zippie Z-Bop User manual

Zippie
Zippie ZONE User manual

Zippie
Zippie X'CAPE User manual

Zippie
Zippie Kid Kart Xpress User manual