Zippity HAMPTON ZP19009 User manual

WWW.ZIPPITY-OUTDOOR.COM
1
ASSEMBLY
INSTRUCTIONS ZP19009
WWW.ZIPPITY-OUTDOOR.COM
VER. 051121
ASSEMBLY
INSTRUCTIONS
ZP19009
HAMPTON
OUTDOOR VINYL
SHOWER KIT
6 HOURS
Approximate assembly and installaon me
Want to see a video on how to
assemble this product?
Scan the QR code

WWW.ZIPPITY-OUTDOOR.COM
2
ASSEMBLY
INSTRUCTIONS
ZP19009
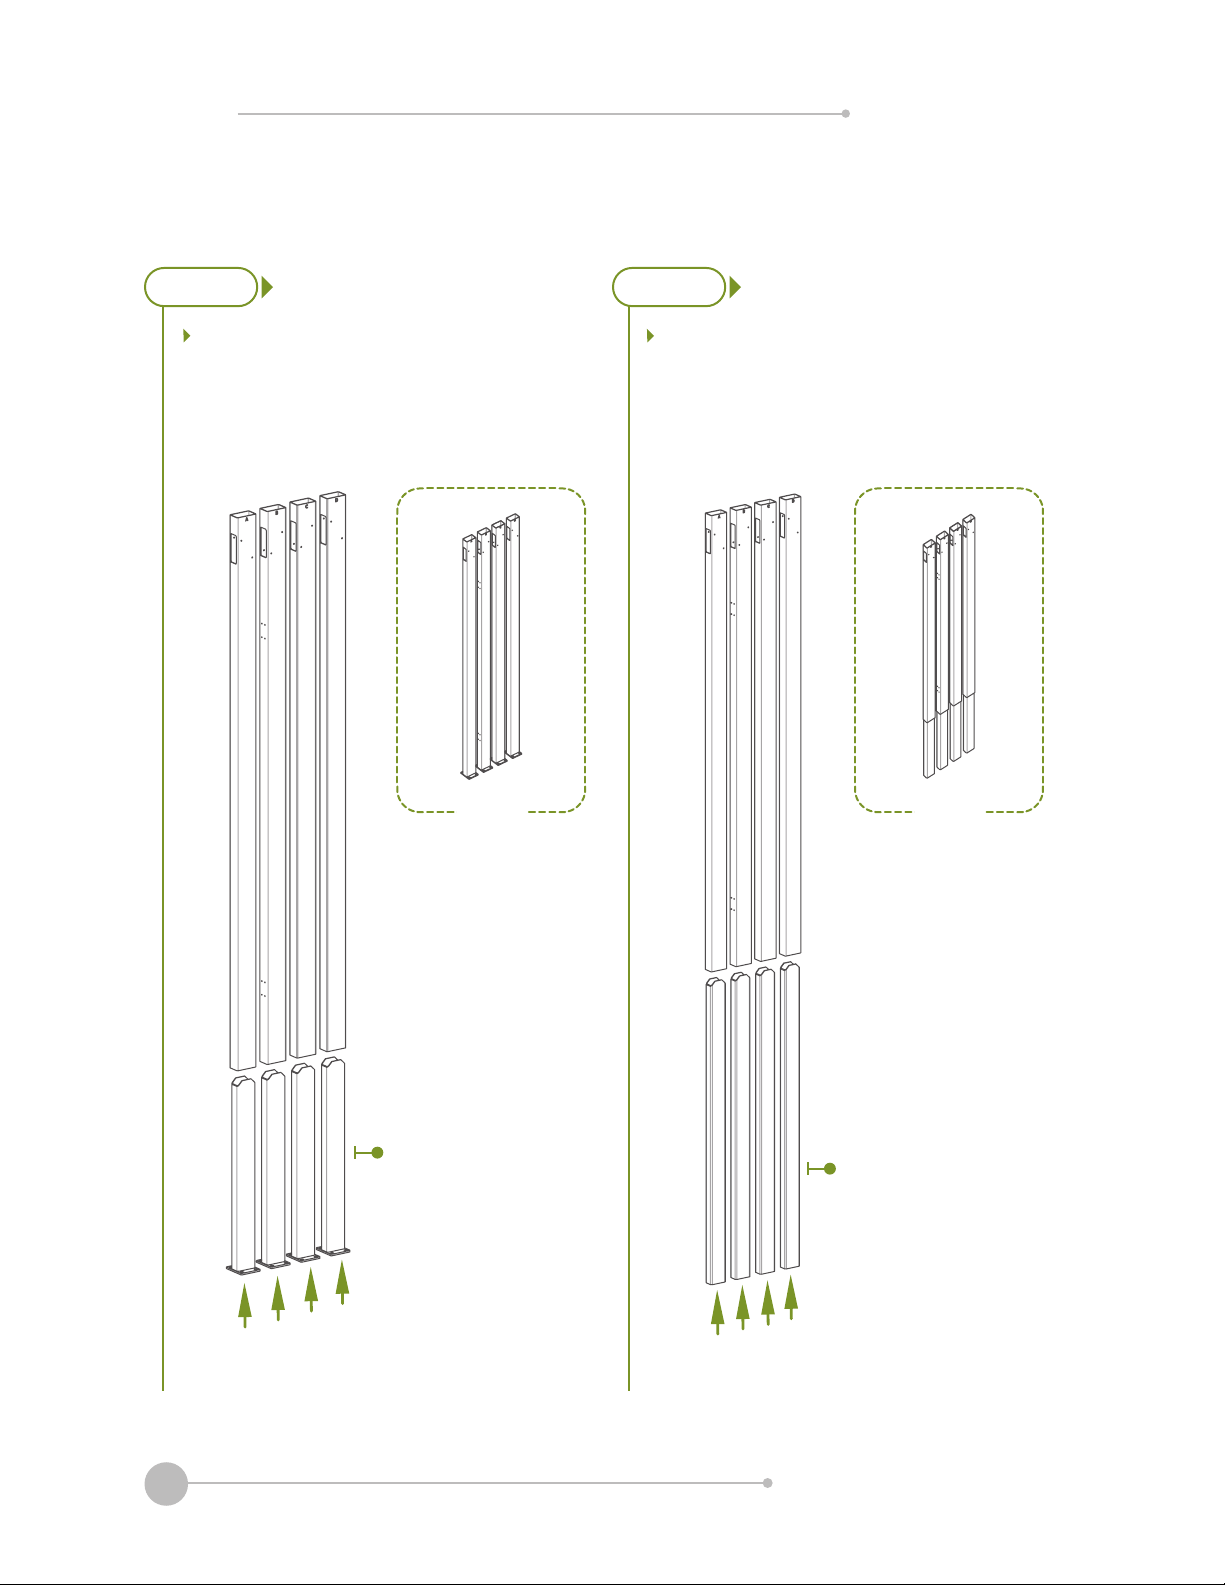
kCheck the inside of the larger pieces in your box for other
materials packed inside.
kWhen assembling components, place on a non-abrasive
surface (i.e. shipping box) to avoid scratching.
k
unobstructed assembling.
kYou should not need to use excessive force when assembling
components.
VISIT OUR WEBSITE FIRST,
SO WE CAN HELP YOU RIGHT AWAY!
Although great care has been taken to ensure proper packaging
and handling of this product, occasionally problems occur. If you
our website to order replacement parts. If you experience any
further trouble with your product, please contact our customer
service department.
parts.nychbrands.com
support@zippity-outdoor.com
704-892-5222 /877-234-6196
Customer service agents are available to take calls weekdays from 9am-
5pm EST. If you call outside of business hours, please leave a voicemail.
To help you quickly and accurately, please have reference item
number ZP19009
lot which is a stamped number on the inside of the box.
this product, we are happy to assist you with the process, so
please give us a call at 704-892-5222 / 877-234-6196.
If for some reason you need to return this product, please
return the product,
GENERAL
INFORMATION
MISSING
OR
DAMAGED
PARTS?
NEED
ASSEMBLY
HELP?
NEED TO
RETURN?
IMPORTANT

WWW.ZIPPITY-OUTDOOR.COM
3
ASSEMBLY
INSTRUCTIONS ZP19009
46 1/2 in
39 in
35 in
70 in
10 in
42 in
35 in
10 in
88 3/4 in
79 3/4 in
62 1/4 in
1/2 in
1/2 in
1 in
37 in

WWW.ZIPPITY-OUTDOOR.COM
4
ASSEMBLY
INSTRUCTIONS
ZP19009
Stainless Steel
1
(1)
(1)
(1)
(11)
STEP 1:
LAY OUT MATERIALS
O
P
Q
N
MA B
Rail
IJK L
C D
Post A (1)
FE G H

WWW.ZIPPITY-OUTDOOR.COM
5
ASSEMBLY
INSTRUCTIONS ZP19009
Zippity
Post Extension
(1)
Mix
UR S
(1)
(1)Hinge
T
(1)
Y
W
Rail
XV
WITH PURCHASE
Sold Separately Sold Separately
For in-ground
For wood or
concrete surface
Only needed
if installed on
concrete
Only needed if
installed on wood
Only needed if
installed in ground

WWW.ZIPPITY-OUTDOOR.COM
6
ASSEMBLY
INSTRUCTIONS
ZP19009
STEP 2:
MOUNTING ACCESSORIES
STEP 2.1a STEP 2.1b
Concrete or Wood Surface Mounng:
mount will be secured in the next step.
In-Ground Installaon:
extensions will be secured in the next step.
Preview Preview
Note: Surface mounts sold separately Note: Post extensions sold separately

WWW.ZIPPITY-OUTDOOR.COM
7
ASSEMBLY
INSTRUCTIONS ZP19009
1. Place Post A (A)
Brackets (M) so that the pre-drilled holes in the bracket
align with the pre-drilled holes in the post as shown
below.
2. (P) into
the aligned holes, securing the brackets to post A.
STEP 3:
BRACKETS
STEP 3.1
STEP 3.2
Preview
B (B), Post C (C), and Post
D (D)
brackets will need to be
installed on the side face
of both post B and post
D. Align the brackets with
the pre-drilled holes in
the sides of these posts
and secure the brackets
stainless steel screws.
A
M
Align
12
P
ABCD
Preview
2
1
Align

WWW.ZIPPITY-OUTDOOR.COM
8
ASSEMBLY
INSTRUCTIONS
ZP19009
STEP 4:
STEP 4.2
1.
U-Channel (L)
between the two
brackets. Ensure the
open groove of the
U-channel is centered
with the brackets.
2.
Self-Drilling Stainless
Steel Screws (N)
through the pre-drilled
holes in the U-channel.
STEP 4.1
Install the U-channels
between the brackets
in the same manner as
U-channels on each post.
ABCD
L
A
Preview
N
N
N
1
2

WWW.ZIPPITY-OUTDOOR.COM
9
ASSEMBLY
INSTRUCTIONS ZP19009
1.
A and post B as
shown.
2. Slide (1)
Horizontal Rail
(K) into the rail
brackets.
3.
drilling stainless
steel screws into
the pre-drilled
holes in the rail
brackets.
STEP 5.2
STEP 5:
SIDE PANELS
STEP 5.1
1
Top View
Preview
Preview
BA
23
1. Insert (1) Privacy Board (I)
board, insert it into the U-channel as shown.
2. Insert (1) privacy board on the other end of the rail as shown.
3. Slide (1) privacy board down the middle of the boards
12
I3
K

WWW.ZIPPITY-OUTDOOR.COM
10
ASSEMBLY
INSTRUCTIONS
ZP19009
1. Slide (1) horizontal
rail down over the
at one end of the
boards as shown.
Ensure that the rail is
inserted fully over the
boards and rests inside
the rail brackets.
2.
drilling stainless steel
screws through the
pre-drilled holes in the
front and back of the
rail brackets.
STEP 5.4
STEP 5.3
Preview
Preview
1. Orient post C and post
D as shown below.
2.
for these posts to create
the second shower wall.
12
Top View
DC
2
1

WWW.ZIPPITY-OUTDOOR.COM
11
ASSEMBLY
INSTRUCTIONS ZP19009
Preview
STEP 6:
THE BACK PANEL
STEP 6.1
STEP 6.2
1. Insert (1) privacy board
board, insert it into the U-channel as shown.
2. Insert (1) privacy board on the other end of the rail as shown.
3. Slide (1) privacy board down the middle of the boards
1.
shown below.
2. Slide (1) horizontal rail into
the rail brackets.
3.
stainless steel screws into
the rail brackets.
Top View
C
D
A
B
Preview
123
123

WWW.ZIPPITY-OUTDOOR.COM
12
ASSEMBLY
INSTRUCTIONS
ZP19009
1. (G) over the top of the posts.
2.
in the posts as shown.
STEP 7:
BEAMS AND TRIM PIECES
STEP 7.1
1. Slide (1) horizontal
rail into the upper rail
brackets.
2.
drilling stainless steel
screws into the upper
rail brackets.
STEP 6.3
12
G
12
Preview
Preview

WWW.ZIPPITY-OUTDOOR.COM
13
ASSEMBLY
INSTRUCTIONS ZP19009
STEP 7.2
STEP 7.3
1. Slide the Beams (J) into the routed holes in the posts.
2. Ensure that there is equal length of beam on each side of the shower.
3.
1. Apply a small amount of Vinyl Glue (Q) to the inside rim of
(F).
2.
3. (E) over the post.
Preview
Preview
J
E
Q
F
1
23
==
N
12
3

WWW.ZIPPITY-OUTDOOR.COM
14
ASSEMBLY
INSTRUCTIONS
ZP19009
STEP 8:
SQUARE AND SECURE POSTS
STEP 8.1
STEP 8.2a STEP 8.2b
Visually square the unit in the space where you plan to install your shower. The
diagonal distance between your posts must be equal for your unit to be square.
Note: X and Y measurements must be equal for unit to be square
X
Y
A hammer drill will be
needed for this step.
Surface Mount Install:
1.
mounts.
2.
(not included) to secure the surface
mounts or similar size lag screw if
Post Extension Install:
1.
2.
the holes with concrete (not included).
Use support blocks to support the unit
while the concrete cures.
Note: If your concrete is
not level, insert galvanized
steel washers under the
lower side of the surface
mount unl it is level.
Next, secure the surface
mounts with wedge
anchors.

WWW.ZIPPITY-OUTDOOR.COM
15
ASSEMBLY
INSTRUCTIONS ZP19009
STEP 9:
PRIVACY STRIPS
STEP 9.1
1. Place (1) Privacy Strip (S) against the inside of post C as
below the horizontal rail.
2.
through the pre-drilled holes in the privacy strip.
3. Repeat this process for post A.
S
A
C
S
12
3
Preview

WWW.ZIPPITY-OUTDOOR.COM
16
ASSEMBLY
INSTRUCTIONS
ZP19009
STEP 10:
SHOWER DOOR
STEP 10.1
STEP 10.2
1. Insert (1) privacy board
groove of the door horizontal rail.
2. Insert the Privacy Board-Narrow (R)
rail.
3.
T
UV
Insert fully unl rail hits back walls
1
2
R
Preview
Preview
123
1. Insert (1) Door Horizontal Rail (T)
Corner Brackets (U)
2. (V) into the
the horizontal rail.

WWW.ZIPPITY-OUTDOOR.COM
17
ASSEMBLY
INSTRUCTIONS ZP19009
STEP 10.3
1. Assemble the top of the door
the door frame.
2. Slide the top of the door frame
3. Secure the corner brackets to
drilling stainless steel screws as
shown.
Insert fully unl rail hits back walls
1
2
Note: Ensure measurements
1 and 2 are equal
Top of door
Hinge side
(no screws)
Leave a screw o
here for future latch
installaon.
Leave screws
o here for
future hinge
installaon
W
12
3
Preview
STEP 10.4
1. Assemble the Door Brace (W) by sliding the smaller door
brace.
2. Ensure that the door is square as shown below.
3.
with the brace.
Preview
12
3
Leave screws
o here for
future hinge
installaon

WWW.ZIPPITY-OUTDOOR.COM
18
ASSEMBLY
INSTRUCTIONS
ZP19009
STEP 11:
SHOWER DOOR
STEP 11.1
STEP 11.2
1.
drilling stainless steel screws.
2.
screws through the pre-drilled holes on the inside of the hinges.
1. (X)
Drilling Stainless Steel Screws (O) included with the hinge.
2. Fasten the Latch (Y)
self-drilling stainless steel screws included with the latch.
3. Use temporary spacers to hold the door at the correct height
Y
X
1
23
A
Preview
Preview
12

WWW.ZIPPITY-OUTDOOR.COM
19
ASSEMBLY
INSTRUCTIONS ZP19009
1. Fasten (1) 1
stainless steel screw through the
pre-drilled hole on both ends of the
Shade Slat (H).
2. Place the screws in the shade
slat on the top of the beams and
fasten them into the pre-drilled
holes on top of the beams.
3. Repeat this process with the
remaining shade slats.
Preview
Preview
STEP 12:
SHADE SLATS
STEP 12.1
1. Mark where the
latch bolt meets the
post on post C.
2.
receive the latch bolt.
STEP 11.3
H
Drive screw
here
1
23
12

WWW.ZIPPITY-OUTDOOR.COM
20
ASSEMBLY
INSTRUCTIONS
ZP19009
WWW.ZIPPITY-OUTDOOR.COM
704-892-5222
877-234-6196
support@zippity-outdoor.com
6935 Reames Rd. Ste. K.
Charloe, NC 28216
Other Zippity Bathroom Fixture manuals
Popular Bathroom Fixture manuals by other brands

Glacier bay
Glacier bay ARAGON HD67090W-6B10H Installation and care guide

GoodHome
GoodHome Blyth 3663602300120 manual

Tramontina
Tramontina senseday instruction manual

Moen
Moen ANNEX TS3661NH installation guide

noken
noken SOTTO 100237665-N350798853 manual

Haws
Haws 8164 Installation, operation & maintenance instructions