ZKTeco Tripod Turnstile User manual

Maintenance MANUAL
Tripod Turnstile
Version:2.0
Date:December, 2017

- 1 -
1. Introduction
Thank you for purchasing the tripod turnstile product manufactured by ZKTeco. This product is
manufactured in strict accordance with quality control standards. To protect the device from
component abrasion and ensure long-term stable operation, it is recommended to perform
periodic maintenance on the device.
2. Housing Cleaning and Interior Dust Removal
Check for dirt such as smudges and stains on the tripod turnstile housing on a periodic basis.
Use cleaning agents to remove dirt, wipe the surface with soft cloth, and then apply a layer of
rust preventive oil. Should accidental scratches occur, ask a qualified repair service to smooth
out the patterns.
Note: It is recommended the housing be cleaned once every two weeks.
3. Periodic Maintenance of Internal Components
Usage
Times
(Millio
n)
Mechanism Electronic
D50 D30 Position
recover
spring
Block
arm
Hook on
the block
arm
Wire 24 V
power
supply
Control
board
Indicator
light
Proximity
switch
0.5+ ○○○○○○○○○○
1.0+ ○●○●●○○○○○
1.5+ ○○○○○○○○○○
2.0+ ○●○●●○○○○○
2.5+ ○○○○○○○○○○
3.0+
○
●
○
●
●
○
○
○
○
○
Remarks: ●indicates Replace; ○indicates Check.

- 2 -
@0.5Million Maintenance record
Maintenance In good condition after checking (√) Clean after checking (C)
Fasten after checking (F) Replace after checking (R)
Mandatory items Housing cleaning and interior dust removal
Mechanism oiling
Check items
D50 D30 Block arm
Position
recover spring
Hook on the
block arm
24 V power
supply
Proximity
switch
Control board Indicator light
Wire
@1.0Million Maintenance record
Maintenance In good condition after checking (√) Clean after checking (C)
Fasten after checking (F) Replace after checking (R)
Mandatory items Housing cleaning and interior dust removal
Mechanism oiling
Check items
D50 D30 Block arm
Position
recover spring
Hook on the
block arm
24 V power
supply
Proximity
switch
Control board Indicator light
Wire
@1.5Million Maintenance record
Maintenance In good condition after checking (√) Clean after checking (C)
Fasten after checking (F) Replace after checking (R)
Mandatory items Housing cleaning and interior dust removal
Mechanism oiling
Check items
D50 D30 Block arm
Position
recover spring
Hook on the
block arm
24 V power
supply
Proximity
switch
Control board Indicator light
Wire

- 3 -
2.0Million Maintenance record
Maintenance In good condition after checking (√) Clean after checking (C)
Fasten after checking (F) Replace after checking (R)
Mandatory items Housing cleaning and interior dust removal
Mechanism oiling
Check items
D50 D30 Block arm
Position
recover spring
Hook on the
block arm
24 V power
supply
Proximity
switch
Control board Indicator light
Wire
2.5Million Maintenance record
Maintenance In good condition after checking (√) Clean after checking (C)
Fasten after checking (F) Replace after checking (R)
Mandatory items Housing cleaning and interior dust removal
Mechanism oiling
Check items
D50 D30 Block arm
Position
recover spring
Hook on the
block arm
24 V power
supply
Proximity
switch
Control board Indicator light
Wire
3.0Million Maintenance record
Maintenance In good condition after checking (√) Clean after checking (C)
Fasten after checking (F) Replace after checking (R)
Mandatory items Housing cleaning and interior dust removal
Mechanism oiling
Check items
D50 D30 Block arm
Position
recover spring
Hook on the
block arm
24 V power
supply
Proximity
switch
Control board Indicator light
Wire
- 4 -
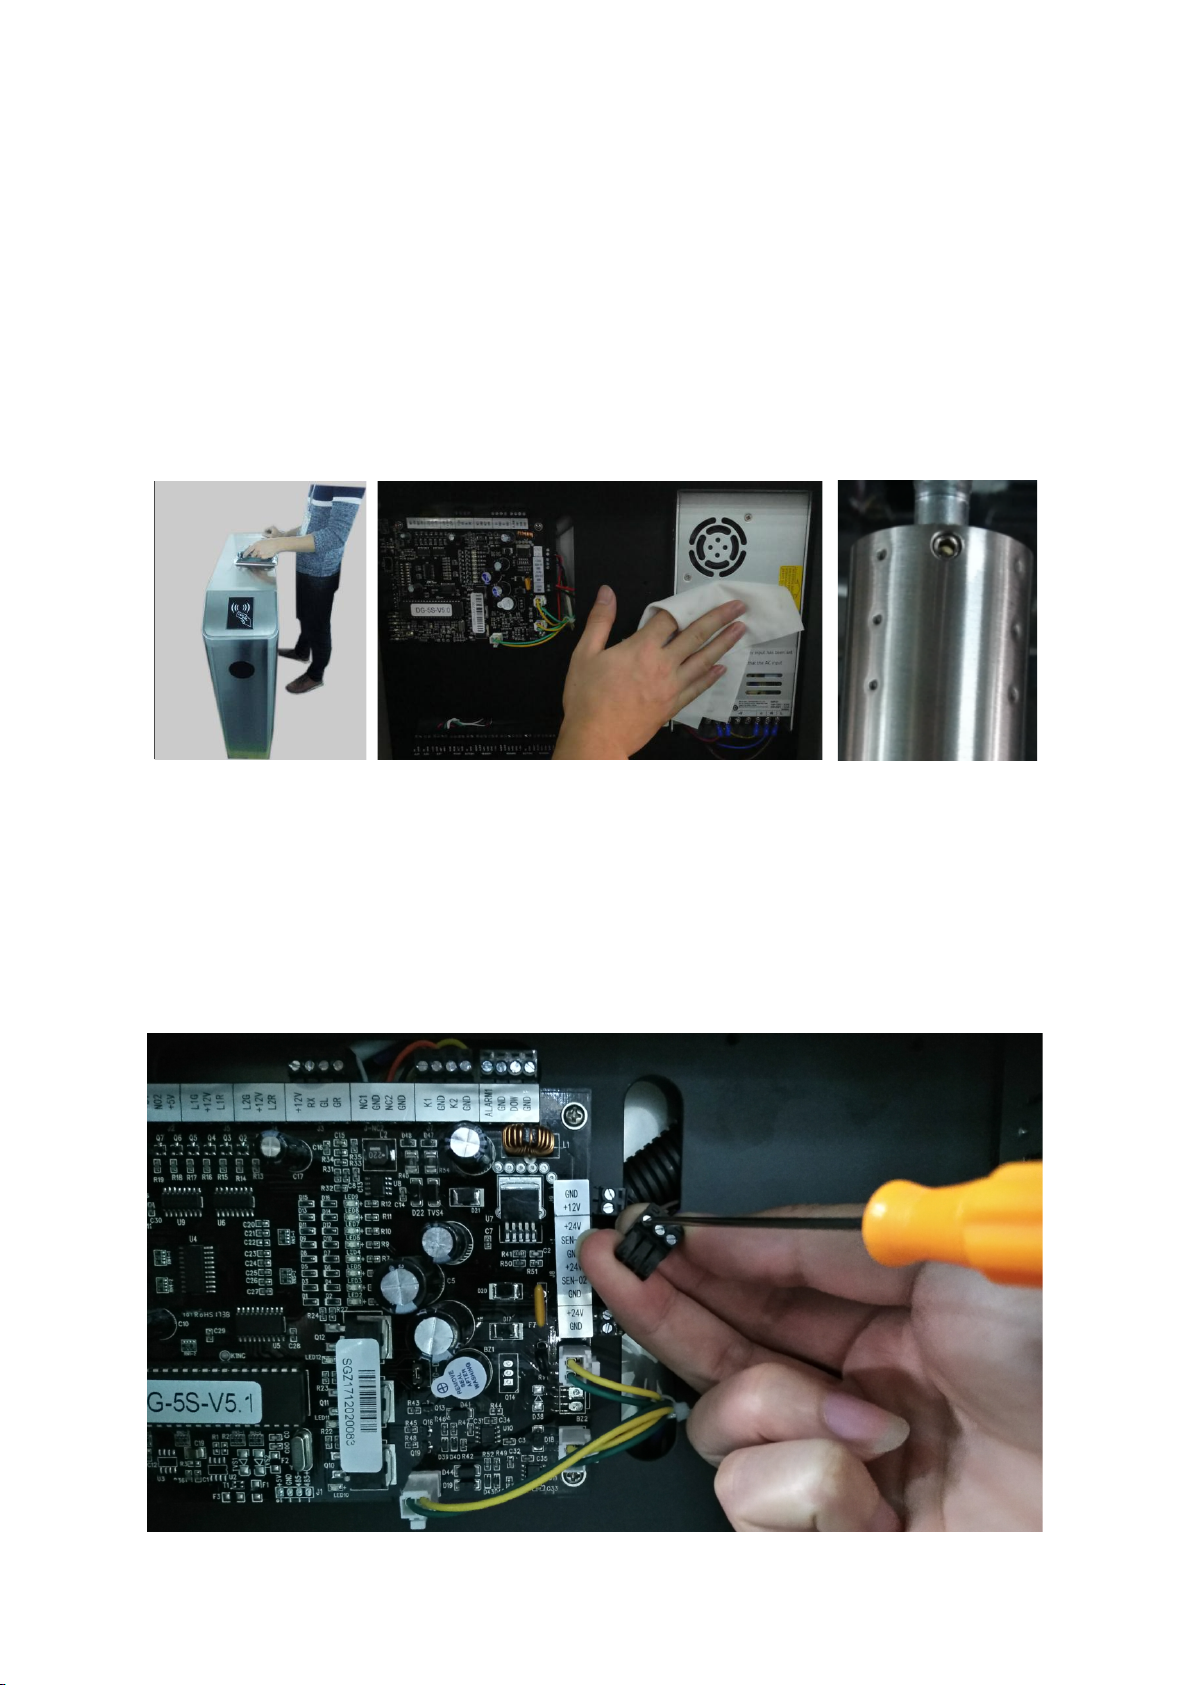
4. Appendix (Method and Tool)
4.1 Housing Maintenance and Interior Dust Removal
Use cleaning cloth soaked with industrial alcohol to wipe the housing. Then apply a layer
of rust preventive oil.
If the arm for drop arm device is loose, tighten it clockwise, and use an Allen key to fasten
the set screws.
Remove dust on the internal PCB.
4.2 Wire Checking
Check that all terminal posts are in good contact and free from exposed copper. Re-insert
loose terminal posts if any. If exposed copper exists on a conducting wire, remove the
terminal from the PCB, use a flat-head screwdriver to loosen the screws on the terminal,
re-insert and tighten the wire into the terminal, and then re-insert the terminal. After that,
check related components.
Table of contents
Other ZKTeco Industrial Equipment manuals


