ZRide PUMA 100ah 2018 User manual

Page 1of 20 User Manual ZRide LTD v.2018, Copyright © 2018 –All reprint strictly prohibited upon
authorization of ZRide LTD. VIN No: __________________
Owner’s Manual
Model: PUMA 80ah, 100ah

Page 2of 20 User Manual ZRide LTD v.2018, Copyright © 2018 –All reprint strictly prohibited upon
authorization of ZRide LTD. VIN No: __________________

Page 3of 20 User Manual ZRide LTD v.2018, Copyright © 2018 –All reprint strictly prohibited upon
authorization of ZRide LTD. VIN No: __________________
Dealer stamp:

Page 4of 20 User Manual ZRide LTD v.2018, Copyright © 2018 –All reprint strictly prohibited upon
authorization of ZRide LTD. VIN No: __________________
---------
Table of contents
1) General information
1.1. Safety Information and precautions before driving the vehicle
1.2. Vehicle identification number (VIN)
1.3. General information about this vehicle
2) Commands and instruments
2.1. 5V USB Port
2.2. Main Switch/Steering lock
2.3. Multi-function display
2.4. Handlebar switches
2.5. Electric system and battery
2.6. Other important components
2.7. Storage Spaces
3) How to use the vehicle?
3.1. Controls to conduct before driving
3.2. Maximum loading capacity
3.3. How to start the vehicle
3.4. Driving the vehicle
3.5. Brake system and parking the vehicle
3.6. Charging and Maintenance of the battery
4) General Maintenance and Cleaning
4.1. Battery
4.2. Cleaning
4.3. Brake Inspection
4.4. Charger Inspection
4.5. Motor and Controller Maintenance
4.6. Troubleshooting, Diagnostics
4.7. During long terms of non-use
5) Other important information
5.1. Warranty
5.2. Technical Data sheet
6) Maintenance booklet
6.1. Periodic Maintenance guidance

Page 5of 20 User Manual ZRide LTD v.2018, Copyright © 2018 –All reprint strictly prohibited upon
authorization of ZRide LTD. VIN No: __________________
1) General information
Thank you for your purchase of your new ZRide PUMA Scooter!
We welcome you to the universe of electric vehicle technology, which does not only
provide a new experience in driving a two-wheel scooter but also is respectful to the
environment and nature.
The ZRide PUMA models are the result of an intense 10 year’s effort to develop reliable
and powerful ecological scooters.
You will surely appreciate the experience of driving this new quiet like a sailing boat,
non-polluting and highly performant machine.
In order to benefit from all the exciting possibilities when driving your ZRide Puma
Scooter, you will need to carefully and attentively read this manual. This Owner’s
Manual not only contains information about how to use the vehicle, but also safety
information and information relative to the maintenance of this vehicle, which are all
important to read and understand for safety purposes and to avoid accidents.
ZRide wishes you great pleasure and maximum security when driving, both which should
be at the heart of every good motorcyclist!
ZRide tries to do its maximum to improve the concept and the quality of these scooter
models. As a result of this, it is possible that some parts of this manual may not include
recent changes or adaptations of the function of this vehicle which may have been
necessary in the meantime to fit new technical or legal requirements.
If you have any questions in relation to your vehicle or the maintenance of your vehicle,
please contact us or your local dealer where you purchased your ZRide PUMA.
This Owner’s manual is integral part of the scooter and has to be passed on completely
to any new owner of this vehicle.
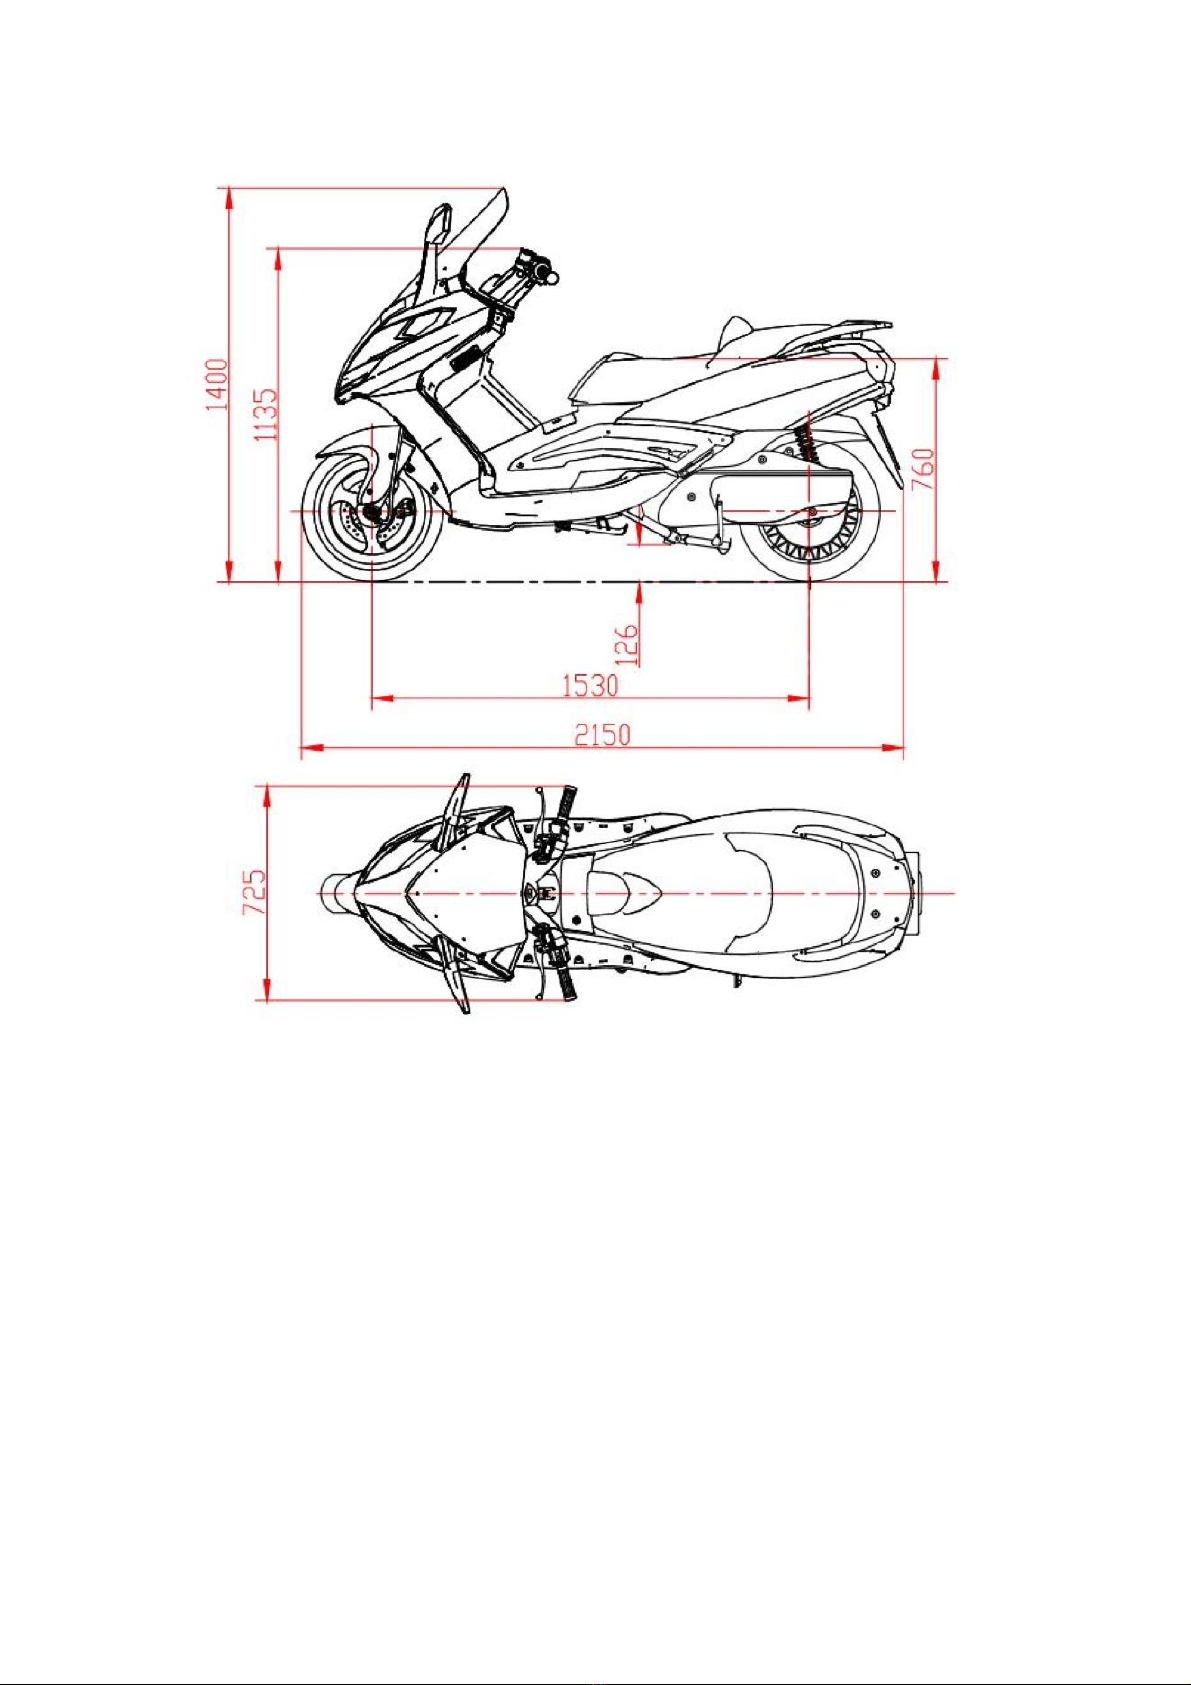
Specification:
Max weight: 2 People max 150kg,
Total max. weight: ZRide PUMA 100ah : 342kg,
Operating temperature: -15°C à +40°C.
Never leave the scooter/batteries exposed to direct sunlight to
avoid overheating! Never leave in rain or humid/corrosive
environments! Never immerse the scooter in water!
Type of driving license required for the UK: A, A1, A2 & CBT

Page 6of 20 User Manual ZRide LTD v.2018, Copyright © 2018 –All reprint strictly prohibited upon
authorization of ZRide LTD. VIN No: __________________
1.1. Safety Information and precautions before driving the vehicle
This manual contains important safety instructions. Please take the responsibility to review
this information and make sure you understand all cautions, warnings and safety topics.
Always check and obey laws and regulations that are effective in the locations where the
scooter is used. Failure to use common sense and respect safety warnings increases the risk
of injury. Use with appropriate caution.
For a good working condition of your vehicle please keep your scooter well
maintained and follow the rules and recommendations below:
You have to carry your driving license and your insurance certificate with you.
Do not exceed the weight limit.
Wear approved safety equipment such as safety helmet if legally required by local law.
Long-sleeve jacket, long pants, gloves and athletic shoes are recommended.
Before each departure check the tires (pressure and profile depth), the brakes (brake
liquid level, good working order), the lights and the level of charge of the battery.
Familiarize yourself with all the scooter’s features and practice using brakes, lights and
horn.
When driving, obey road traffic rules.
Do not weave between lanes or change lanes suddenly. When you need to change
direction, always check your mirrors, use signals to tell other road users your intentions
and then give a quick over the shoulder glance as a final safety check.
Watch out for potential obstacles that could enter your path and make you lose control
over vehicle.
Never use cell phone or headphones while driving.
Never drive under the influence of alcohol or medications that affect your driving skills.
Drive according to weather conditions, take extra care on wet or icy road. Remember
that on slippery surface your braking distance increases 4 times.
Keep comfortable distance from other vehicles and objects.

Page 7of 20 User Manual ZRide LTD v.2018, Copyright © 2018 –All reprint strictly prohibited upon
authorization of ZRide LTD. VIN No: __________________
At night, make sure that lights are on as per manufacturer set up; wear light reflective
clothing.
Secure the scooter:
Choose a place to leave your scooter parked with caution. If you are leaving it at a public
place, look for security cameras and leave the scooter in the line of their site or at a well-
lit area. Make sure the scooter is locked.
CAUTION: Modification is illegal. A modified vehicle will affect its structure or
performance, which will result in shortening the life of the vehicle. Modified
vehicles will not be covered by the warranty. It is necessary to buy original spare parts from
authorized dealers. No guarantee can be provided either for quality or durability when
buying non-original spare parts from the market.
WARNING: Once you have completed the initial charge you are ready to ride. You
must be aware of all local laws and ordinances that govern and/or restrict the use
of the electric bike. The laws and ordinances vary greatly in different countries. It is your
responsibility to know and abide by your local restrictions.
1.2. Vehicle identification number (VIN)
The Vehicle identification number (VIN) can be
found on the bottom of the right side of the
scooter.
On this label you find the name of the factory, the
homologation number and the VIN number which
is specific to each scooter (like a serial number).
These numbers are also mentioned on the
COC document (EC Certificate of
conformity), that has been provided when
buying the scooter. The COC is required for
the registration of the vehicle.

Page 8of 20 User Manual ZRide LTD v.2018, Copyright © 2018 –All reprint strictly prohibited upon
authorization of ZRide LTD. VIN No: __________________
1.3. General information about this vehicle
1)Windshield
2)Rearview mirror
3)Head light (low beam)
4)Turn light (left direction)
5)Front wheel
6)Front shock absorber
7)Saddle (seat)
8)Side stand
9)Center stand (Kid stand)
10)Swing arm cover
11)Rear wheel with motor
12)Seat lock

Page 9of 20 User Manual ZRide LTD v.2018, Copyright © 2018 –All reprint strictly prohibited upon
authorization of ZRide LTD. VIN No: __________________
1. Alarm blink unit button
2. Trip and voltage reset button
3. Ignition key
4. Reverse button (Push it when you grip the
throttle)
5. Kill switch (regenerative brake & recharging
battery when go down slope)
6. Horn
7. Low/high beam switch
8. Throttle
9. VIN number here
10. Square reflector
11. License plate lamp
12. Round reflector
13. Rear shock absorber
14. Rear brake (caliper)
15. Brake disc
16. Rear pedal
17. Rear light assembly
18. Rear carrier

Page 10 of 20 User Manual ZRide LTD v.2018, Copyright © 2018 –All reprint strictly prohibited
upon authorization of ZRide LTD. VIN No: __________________
2. Commands and instruments
2.1. 5V USB Port
This scooter has 2 USB ports for Smart Phones.
2.2. Main Switch/Steering lock
Puma is delivered with 2 main keys to start the scooter, but also to open the driver seat.
2.3. Multi-function display
The dashboard includes three major controls. On the left side there is the blue screen to
show the level of functional independence that is available, the total miles/travelled miles
since the last reset and the voltage of the battery. You can navigate between the red and
blue signs with the help of buttons.
In the middle speed and the control of beam are shown. On the right side there is the
screen indicating if the battery is functional (observing this voltage meter is very important
during riding), and if tension is transferred to the engine.

Page 11 of 20 User Manual ZRide LTD v.2018, Copyright © 2018 –All reprint strictly prohibited
upon authorization of ZRide LTD. VIN No: __________________

Page 12 of 20 User Manual ZRide LTD v.2018, Copyright © 2018 –All reprint strictly prohibited
upon authorization of ZRide LTD. VIN No: __________________
2.4. Handlebar switches
Left handlebar
Right handlebar

Page 13 of 20 User Manual ZRide LTD v.2018, Copyright © 2018 –All reprint strictly prohibited
upon authorization of ZRide LTD. VIN No: __________________
2.5. Electric system and battery

Page 14 of 20 User Manual ZRide LTD v.2018, Copyright © 2018 –All reprint strictly prohibited
upon authorization of ZRide LTD. VIN No: __________________
2.6. Other important components
2.7 Storage Spaces
1 helmet storage: Under the seat space for helmet storage.
3. How to use the vehicle
3.1. Controls to conduct before driving
Check the tire condition for any worn-out areas or breakage, check tire pressure
Check the transmission system condition
Check the bugle and rear reflector condition
Check all the standard spare parts such as nuts and screws and ensure they are well
tightened
Check if the brake cable lanyard functions in smooth condition
Charge the battery when the scooter is not driven regularly. To prolong the battery life,
charging
should be carried out 15 days during each summer and 30 days during each winter
Check all the turning parts frequently such as the handle bar. Add lubricant when
needed
Check the light.
3.2. Maximum loading capacity
This is a 2 rider’s vehicle, max 150kgs total weight.
3.3. How to start the vehicle
Fold up the kickstand and hold onto the handle bars with both hands. Assume a well-
balanced position on the scooter and push off with your foot. Turn power on (by turning
the key from” ”to” ”). Wait for READY signal flash. When Ready is ON
you can grip throttle and start to ride.

Page 15 of 20 User Manual ZRide LTD v.2018, Copyright © 2018 –All reprint strictly prohibited
upon authorization of ZRide LTD. VIN No: __________________
3.4. Driving the vehicle
Your right hand will control the accelerator. Twist the accelerator slowly to avoid a
sudden rush of speed forward. The speed of the bike will increase as you twist the
accelerator further. You will control the speed of the scooter by using both the
accelerator and the brakes.
3.5. Brake system and parking the vehicle
Release the accelerator and apply the brakes to stop your scooter. Squeezing the
brake handle cuts the power to the accelerator.
3.6. Charging and Maintenance of the battery
Before riding the electric scooter for the first time, you
must charge the batteries for 6-9 hours using the supplied
charger.
PUMA models have 1800W on board charger, you may
charge it at home or any street charger. It could charge in 2
hours 80% "Express charging".
Charger could be left all night, as the charger has a cut off
switch when battery reaches 100% full.
IMPORTANT CHARGING INSTRUCTION:
The Power Switch Lock must be in the off position when the electric scooter is being
charged.
The scooter uses a 72V lithium battery. You should charge your electric scooter after
each ride. You must re-charge your electric scooter if it has not been used for 30 days or
more. Recharging time is between 6-9 hours.
A. Locating the Charging Socket: Turn key to “SEAT OPEN” position located under seat,
then press and open the seat buck. Remove the charger from inside and connect the
plug to the battery charging point carefully, located undewr the seat.
B. Charging the Scooter. Turn the scooter off by pointing the key to . Insert
the output plug in the charging socket of the scooter and connect the input plug
220V/110V to the wall socket (please refer to the illustration on page 7). The battery is
fully charged when the charger indicator shows green. We suggest allowing an extra 1-2

Page 16 of 20 User Manual ZRide LTD v.2018, Copyright © 2018 –All reprint strictly prohibited
upon authorization of ZRide LTD. VIN No: __________________
hours charging time to achieve better battery condition. When the battery is fully
charged, remove the charger input plug followed by the output plug.
Do not place the battery near a heat source or fire. Do not expose the charger to water.
Do not cover the charger with anything whilst charging.
Please use the authorized charger to charge the battery otherwise the warranty will
become void. Please follow the charging instructions above.
When there are two battery boxes, the battery packs must be charged and discharged at
the same time.
Before connecting the battery, raise it approximately 10cm to connect easily.
4. General Maintenance and Cleaning
4.1. Battery:
To prolong battery life, store the scooter indoors or in a garage to prevent low temperatures
which affect the battery performance.
1. Do not dismantle or disperse the battery cells.
2. Keep the battery away from children.
3. Do not connect cathode and anode of the charger during charging and discharge process.
It is prohibited to use any conductor to connect both cathode and anode. This will cause a
short circuit.
4. Do not dip the battery in water.
5. Do not place the battery in a temperature over 60°C or next to a high-temperature heat
source.
6. Do not knock on, throw or trample the battery.
7. Do not use edge tools or nails to lacerate or cut through the
battery.
8. If a leak occurs and electrolyte comes in contact with the eyes, please do not rub. Wash
immediately with plenty of water.
9. If the battery produces smell, heat or smoke, or if it changes color, becomes distorted or
shown
abnormality, stop using the battery and dispense with it immediately.
4.2. Cleaning:
Never use high water pressure to wash the scooter. Soaked electrical parts and wiring will
affect the performance.
Never apply lubricant to the drum brake and the tire.
Only use lubricant to clean the metal parts of the scooter.
Use standard detergent to clean surface of the painted plastic parts and wipe up remainder
with cloth.

Page 17 of 20 User Manual ZRide LTD v.2018, Copyright © 2018 –All reprint strictly prohibited
upon authorization of ZRide LTD. VIN No: __________________
4.3 Brake Inspection:
Front and Rear Hub Brake Main Checking Points:
Press the lever (1). While holding the lever adjust the nut (3), so that you can achieve a
comfortable distance for your grip, normally a 1/3-1/2 of maximum gap. The best distance
for brake shoes and hub tray is 1.5mm.
Replace brake shoes when the usage surface has reached 1⁄2.
4.4. Charger Inspection:
Use only the authorized charger. Different countries may use different chargers. Do not mix-
up 220V and 110V charger.
The power switch lock must be in position when the electric bike is being charged.
Do not turn the battery box upside down during charging.
Check that the welding work in the charger socket is still in good condition.
4.5. Motor and Controller Maintenance:
During rainy season, do not let the water go over the motor center line. This is to protect
the motor from burning or other malfunction.
Do not press both the brake lever and accelerator at the same time when starting the motor
to prevent damaging other parts.
Slow down the scooter when the road condition is not good. High vibrations may interrupt
the electrical parts connection.
4.5. Troubleshooting, Diagnostics
Problem
Cause
Solution
The power indicator illuminates
but scooter still does not work
The accelerator is not
operating properly.
The single kick stand is
not folded up properly.
Replace the accelerator.
Call Customer Service to
order a new accelerator.
Fold up the single kick
stand.
The power indicator does not
work when power is on.
The fuse or fuse socket
has blown.
The battery box is not
place properly.
Replace the special fuse
or fuse socket.
Adjust the battery box in
the proper way.
Distance per charge is less than
normal
Not enough air pressure
in the tires.
Not enough charging or
the battery is defective.
Stopping and starting up
frequently.
Riding uphill or against
strong wind.
Inflate the tires.
Recharge battery or
replace battery. Call
Customer Service to
order a new battery.
Ride on even roads with
regular speed and in

Page 18 of 20 User Manual ZRide LTD v.2018, Copyright © 2018 –All reprint strictly prohibited
upon authorization of ZRide LTD. VIN No: __________________
good weather
conditions.
Electric scooter is losing speed
Low battery charge.
Battery is defective.
Recharge your battery
for 6-9 hours.
Replace battery. Call
Customer Service to
order a new battery
pack.
Accelerator not working
The brake cables are not
in position and are
causing circuit cut off.
Adjust and reposition
the brake cables.
LED signals
4.6 During long term of non-usage
For months non-usage, remember to charge battery to 40%-50% and cut off the circuit breaker.
Keep checking battery voltage every month.
5. Other important information
5.1 Warranty
3 years’ warranty on chassis, motor & controller, 5 years or 50000 kms’warranty on battery
pack.

Page 19 of 20 User Manual ZRide LTD v.2018, Copyright © 2018 –All reprint strictly prohibited
upon authorization of ZRide LTD. VIN No: __________________
5.2. Technical Data sheet
Model
Puma
L*W*H
2150 mm * 725 mm * 1220 mm
Standard Load
75 kg
Battery
100 Ah
Rated Speed
120 km/h
Inflatable Pressure
250 kPa
Wheel base
1530 mm
Braking
Fr: Disc/Rr.: Disc
Battery type
100 Ah 72 V Li
Rating export distance force
140 mm
Charger import
Range
134 km
Max speed
120 km/h
Net weight
Tyre (front/rear)
130/60-13
Motor type
Lack pressure protect
Charging time
6-8 h
6. Periodic Maintenance guidance
KILOMETERS
400
1,000
2,000
3,000
4,000
5,000
6,000
BATTERY
C
C
CHARGER
C
C
TIRE PRESSURE
C
C
C
C
C
C
C
TIRE WEAR
C
C
C
BRAKE SYSTEM
C
C
C
BRAKE PAD
A
C
A
C
NUTS AND BOLTS
T
T
T
T
T
T
KILOMETERS
7,000
8,000
9,000
10,000
11,000
12,000
BATTERY
C
C
CHARGER
C
C
C
TIRE PRESSURE
C
C
C
C
C
C
TIRE WEAR
C
C
C
BRAKE SYSTEM
C
C
BRAKE PAD
A
A
A
A
A
NUTS AND BOLTS
T
T
T
T
T
A –adjust; C –check, refill, repair, or replace; T –tighten
Table of contents
Other ZRide Scooter manuals
Popular Scooter manuals by other brands

KYMCO
KYMCO 125 MOVIE S INJECTION Technical specifications

Golden
Golden Companion Service manual

Yukon Trail
Yukon Trail SolarWing 350 Assembly manual

Vermeiren
Vermeiren Mercurius 4 LTD instruction manual

Allstate
Allstate 788.94370 Operating instructions and parts list

ELECTRIC WHEELS
ELECTRIC WHEELS EW-280 owner's manual