1 BY ONE BEAUTURAL 1-JU12UK01 User manual

1byone Products Inc.
1230 E Belmont Street, Ontario, CA, USA 91761
Customer Service: +1 909-391-3888
www.1byonebros.com
Vacuum Powered Window Cleaner
Instruction Manual/ Bedienungsanleitung/ Manuel d'instructions/
Manual de instrucciones/ Manuale di istruzioni

EN
DE
FR
ES
IT
1
Introduction
Thank you for purchasing BEAUTURAL Vacuum Powered Window Cleaner.
This instruction manual contains important information about safety, usage
and disposal. Use the product as described and keep this manual for future
reference. If you sell this window cleaner or pass it on, also give this manual to
the new owner.
Safety Instructions
When using electrical products (especially when children are present), basic
safety precautions should always be followed.
• Read this manual carefully before using the Window Vacuum Cleaner. Save
these instructions for future reference.
• Use the window cleaner only as described in this manual.
• Do not plug the window cleaner into a voltage system that is different
from the voltage system specified on the window cleaner and the charger.
Connecting to improper voltage will damage the product.
• Always connect the charger to a grounded socket.
• Regularly check the window cleaner for damage. Do not use this window
cleaner if it has a damaged cord or plug, if it is not working properly, if it has
been dropped or damaged, or if it has been dropped into water. Contact
customer service or get it serviced and repaired by a qualified technician.
• Do not attempt to repair the window cleaner yourself.
• This window cleaner is not intended for use by persons (including children)
with reduced physical, sensory or mental capabilities, or lack of experience
and knowledge, unless they have been given supervision or instruction
concerning the use of the product by a person responsible for their safety.
• Never allow children to play with packaging as there is risk of suffocation.
• Always disconnect the window cleaner from the adapter when filling,
emptying or cleaning the window cleaner.
• Never pull the power cord to disconnect the adapter from the outlet.
Instead, hold the adapter and gently disconnect it.

EN
DE
FR
ES
IT
EN
DE
FR
ES
IT
2 3
• Do not use the window cleaner with an extension cord unless the extension
cord has been checked and tested by a qualified technician.
• Keep the window cleaner and charger away from flames and hot surfaces.
• Do not use attachments which are not recommended by the manufacturer,
in particular accessories which are not supplied with the product.
• Never use the window cleaner in areas where certain vapors may be present
(paint thinner, flammable material, oil based paint and varnish, flammable
liquids and gases) for risk of an explosion.
• Never immerse the window cleaner and/or the charger in water or other
liquids.
• Do not touch the charger with wet hands.
• Never attempt to grasp and pick up an electric device that has fallen into
water or other liquids.
• Use the vacuum function only to vacuum liquids used during the cleaning
process.
• Only use the window cleaner on smooth, solid, flat surfaces that are suitable
for withstanding moisture.
• Never block the window cleaner’s air outlet as this may cause overheating
and result in malfunction.
• Only use the supplied charger with this window vacuum cleaner.
• Store the window cleaner indoors.
• This window cleaner’s manufacturer warranty does not cover product
damages caused by improper use and any use not specified in this
instruction manual.
• This product is only authorized for domestic use and not for commercial or
industrial purposes.
Warning: Use the vacuum function only to vacuum liquids used during the
cleaning process.
Product Description
1
2
3
4
5
6
7
8
10
11
12
13
1415
16
AB
C
9
1
Vacuum Attachment
2
Top Nozzle
3
Waste Container
4
Bottom Nozzle
5
Indicator Light
6
Power Button
7
Cleaner Body
8
Charging Socket
9
(back) Container Release Button
10
Wiping Attachment
11
Spray Nozzle
12
Positioning Ring
13
Spray Bottle
14
Power Cord Jack
15
Power Adapter
16
Microfibre Cover

EN
DE
FR
ES
IT
EN
DE
FR
ES
IT
4 5
Included Items
1 x Window Vacuum Cleaner
1 x Power Adapter
1 x Spray Bottle
2 x Microfibre Covers
1 x Instruction Manual
Before using the Window Vacuum Cleaner for the first time, check the package
contents to ensure all parts are free of visible damage.
Preparing for Use
1. Remove all packaging materials, stickers and labels.
2. Connect the vacuum attachment
1
onto the cleaner body.
3. Charge the cleaner.
Note: The cleaner batteries are not charged on delivery. Before using the
cleaner for the first time, the batteries must be charged for about 3 hours.
Charging the Cleaner
1. To charge the cleaner, connect the power adapter to a power socket and
insert the power cord jack into the charging socket
8
on the cleaner body.
The indicator light
5
will turn red when charging. When the cleaner is fully
charged, the indicator light
5
will turn blue.
2. It is recommended to unplug the power adapter when the window cleaner
is fully charged.
Note: Only recharge the batteries when the suction power of the cleaner
is noticeably weaker and the indicator light
5
is flashing red.
Operating Instructions
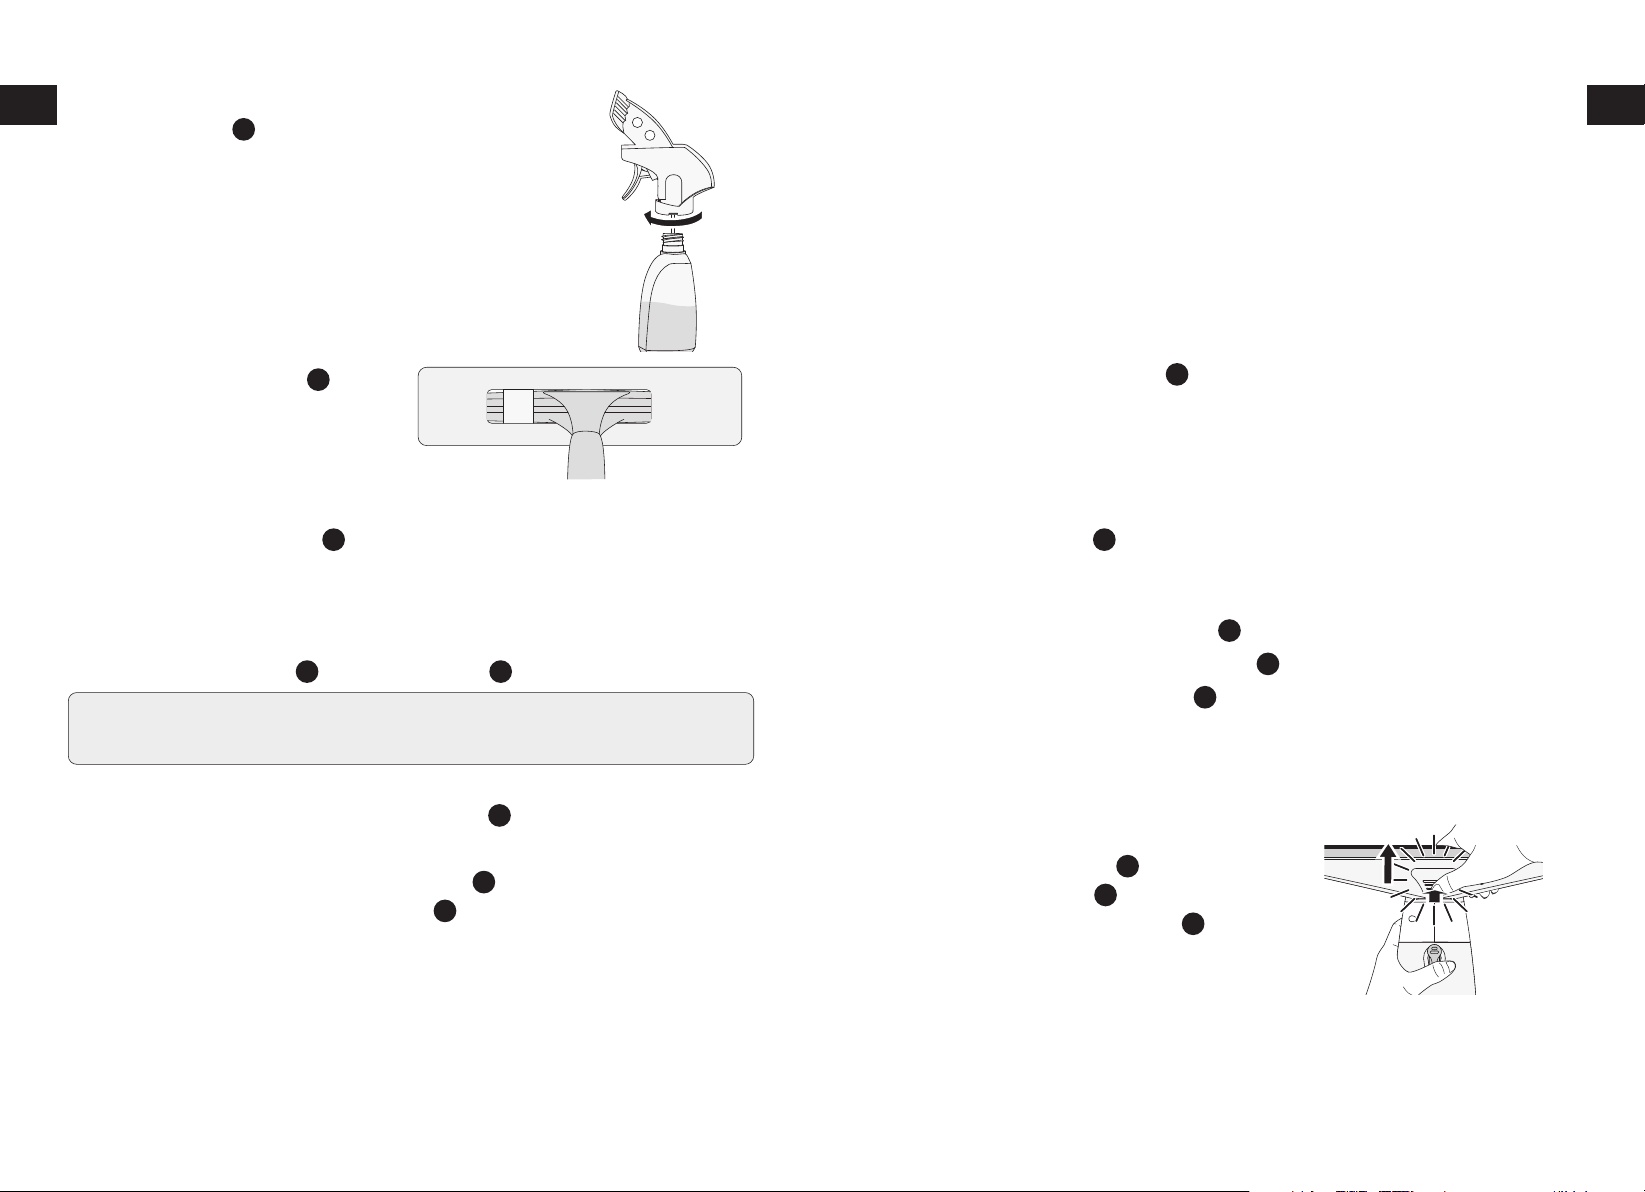
Clean the Window First Using the Spray Bottle
1. Turn the spray nozzle
11
from“OFF”to
STREAM (jet) or SPRAY (fine mist) as
desired.
2. Insert the wiping attachment
10
onto the spray
nozzle
11
. Make sure the two sticks click securely
into the positioning ring
12
. The spray nozzle
11
should now be inclosed within the wiping
attachment 10 and the positioning ring
12
.
3. Fill the spray bottle with water and, if desired,
with a cleaning agent suitable for window
cleaning.
EN
DE
FR
ES
IT
EN
DE
FR
ES
IT
6 7
4. Screw the spray nozzle with fitted attachments onto
the spray bottle
13
.
5. Pull the microfibre cover
16
over
the wiper attachment and secure it
using the velcro fastener.
6. Spray the window surface you wish to clean.
7. Using the microfibre cover
16
, wipe over the sprayed area to loosen dirt and
debris.
Vacuuming Using the Vacuum Cleaner
1. Press the power button
6
. The indicator light
5
will light up blue.
Note: If the indicator light flashes red during use, this indicates the
cleaner needs to be charged (see section on "Charging the Cleaner").
2. Move the vacuum head slowly from top to bottom across the wet surface.
Water will be sucked into the waste container
3
.
3. After you have finished a section, always start again at the top.
4. Once the MAX mark on the waste container
3
is reached, switch off the
cleaner and empty the waste container
3
.
5. Pull out the rubber plug on the front of the waste container and pour out
the dirty water. After, close the plug and start vacuuming again.
6. Once the entire surface is dry, press the power button again to turn the
cleaner off. The indicator light will switch off.
7. If necessary, dry off any streaks or remaining moisture on the surface with a
dry cloth.
Maintenance and Care
• Prior to cleaning, disconnect the cleaner from the power adapter to avoid
risk of electric shock!
• Do not use abrasive or aggressive cleaning materials. These can damage the
surface of the cleaner!
Cleaning the Spray Bottle
1. Open the spray bottle and empty its contents.
2. Remove the microfibre cover
16
.
3. Wipe the components of the spray bottle with a damp cloth; if necessary,
use a little mild detergent on the cloth.
Washing the Microfibre Cover
• The microfibre cover
16
can be machinewashed at 60°C. Do not use any
fabric conditioner as this significantly reduces the cleaning power of the
microfibre.
• Do not bleach the microfibre cover
16
!
• Do not tumble dry the microfibre cover
16
!
• Do not iron the microfibre cover
16
!
Cleaning the Window Cleaner
For thorough cleaning, disassemble the cleaner.
1. Press the ridged area on the underside
of vacuum attachment
1
and pull the
vacuum attachment
1
off the cleaner.
Clean the vacuum attachment
1
with
a damp cloth. If required, use some mild
detergent on the cloth.
This manual suits for next models
1
Table of contents
Languages:
Popular Cleaning Equipment manuals by other brands


Suevia
Suevia 130.5011 EASYCLEANER Mounting instructions

i-MO
i-MO Öko 2000 user guide

unGer
unGer Hydro Power Ultra UNP01 operating instructions

Black & Decker
Black & Decker BHPC130 Original instructions

Uni-ram
Uni-ram UG5000E operating manual

Axi
Axi MTC HC-300 Installation, operating and maintenance manual