Sealey VMA913 User manual

INSTRUCTIONS FOR:
AUTO VALET MACHINE
MODEL No: VMA913
1. SAFETY INSTRUCTIONS
IMPORTANT: PLEASE READ THESE INSTRUCTIONS CAREFULLY. NOTE THE SAFE OPERATIONAL REQUIREMENTS, WARNINGS & CAUTIONS.
USE THE PRODUCT CORRECTLY AND WITH CARE FOR THE PURPOSE FOR WHICH IT IS INTENDED. FAILURE TO DOSOMAY CAUSE
DAMAGE AND/OR PERSONAL INJURY AND WILL INVALIDATE THE WARRANTY. PLEASE KEEP INSTRUCTIONS SAFEFOR FUTURE USE.
1.2 GENERAL SAFETY
Disconnect the machine from mains power supply before servicing, changing accessories, or performing any maintenance.
Use genuine accessories and parts only (unauthorised accessories and parts may be dangerous, and will invalidate your warranty).
Maintain the Valet machine in good condition. Use authorised agent for servicing. Keep machine clean, but DO NOT use solvents.
Ensure the correct filter is firmly in place before operating the Auto Valet. Wrong filters will invalidate your warranty.
Wear protective clothing and gloves.
DO NOT allow children or untrained persons to operate the unit.
DO NOT place attachments close to your face (especially eyes, ears, etc). Do not point the hose end at other persons or animals.
WARNING! DO NOT get detergent on flesh. If contact is made wash immediately. NEVER allow detergent near eyes, or mouth. If contact
is made, thoroughly rinse and seek medical advice. If swallowed, seek immediate medical advice. Follow instructions on the detergent container
DANGER! DO NOT vacuum hot, or glowing ash, cigarette ends, inflammable, explosive, corrosive or dangerous liquids, solids or dusts.
DO NOT operate the unit without the correct filter for the type of job. Make sure the filter is firmly in place.
DO NOT operate the pump switch when there is no liquid in the detergent tank. The vacuum motor runs independently of the pump.
DO NOT leave machine running unattended. Turn power supply OFF, and DO NOT leave the vicinity until motor has come to a complete stop.
DO NOT operate the Auto Valet while under the influence of drugs, alcohol or impairing medication, or if you are fatigued.
DO NOT force the Auto Valet to achieve a task it is not designed to perform.
DO NOT clean the filters with solvents. When not in use store the valet machine in a safe, dry, childproof location.
Thank you for purchasing a Sealey product. Manufactured to a high standard this product will, if used according to these instructions and
properly maintained, give you years of trouble free performance
1.1. ELECTRICAL SAFETY
WARNING! It is the responsibility of the owner and the operator to read, understand and comply with the following:
You must check all electrical products, before use, to ensure that they are safe. You must inspect power cables, plugs, sockets and any other
connectors for wear or damage. You must ensure that the risk of electric shock is minimised by the installation of appropriate safety devices. A
Residual Current Circuit Breaker (RCCB) should be incorporated in the main distribution board. We also recommend that a Residual Current
Device (RCD) is used. It is particularly important to use an RCD with portable products that are plugged into a supply which is not protected
by an RCCB. If in any doubt consult a qualified electrician. You may obtain a Residual Current Device by contacting your Sealey dealer.
You must also read and understand the following instructions concerning electrical safety.
1.1.1. The Electricity at Work Act 1989 requires that all portable electrical appliances, if used on business premises, are tested by a
qualified electrician, using a Portable Appliance Tester (PAT), at least once a year.
1.1.2. The Health & Safety at Work Act 1974 makes owners of electrical appliances responsible for the safe condition of those appliances
and the safety of the appliance operators. If in any doubt about electrical safety, contact a qualified electrician.
1.1.3. Ensure that the insulation on all cables and on the appliance is safe before connecting it to the power supply. See 1.1.1. and 1.1.2.
and use a Portable Appliance Tester.
1.1.4. Ensure that cables are always protected against short circuit and overload.
1.1.5. Regularly inspect power supply cables and plugs for wear or damage and check all
connections to ensure that none is loose.
1.1.6. Important: Ensure that the voltage marked on the appliance matches the power supply
to be used and that the plug is fitted with the correct fuse - see fuse rating at right.
1.1.7. DO NOT pull or carry the appliance by the power cable.
1.1.8. DO NOT pull the plug from the socket by the cable.
1.1.9. DO NOT use worn or damaged cables, plugs or connectors. Immediately have any faulty
item repaired or replaced by a qualified electrician. When a BS 1363/A UK 3 pin plug is
damaged, cut the cable just above the plug and dispose of the plug safely.
Fit a new plug according to the following instructions (UK only).
a) Connect the GREEN/YELLOW earth wire to the earth terminal ‘E’.
b) Connect the BROWN live wire to the live terminal ‘L’.
c) Connect the BLUE neutral wire to the neutral terminal ‘N’.
d) After wiring, check that there are no bare wires, that all wires have been correctly
connected, that the cable outer insulation extends beyond the cable restraint and
that the restraint is tight.
Double insulated products, which are always marked with this symbol , are fitted with live (brown) and neutral (blue) wires only.
To rewire, connect the wires as indicated above - DO NOT connect either wire to the earth terminal.
1.1.10. If an extension reel is used it should be fully unwound before connection. A reel with an RCD fitted is preferred since any appliance
plugged into it will be protected. The cable core section is important and should be at least 1.5mm², but to be absolutely sure that the
capacity of the reel is suitable for this product and for others which may be used in the other output sockets, we recommend the use
of 2.5mm² section cable.
FUSE RATING 13 AMP
Blue
Neutral
Wire
Yellow & Green
Earth Wire
Cable
Restraint
Brown
Live
Wire
Original Language Version VMA913 Issue: 2 - 18/01/10

2. PACKAGE CONTENTS & ASSEMBLY
Item Description
No
69 Detergent & Funnel
70 Vertical Paper collection Bag
71 Narrow pick up nozzle
72 Upholstery tool
73 Small Nozzle
2.1. Carton Content
2.1.1. Carefully unpack the carton content and view the main body of the vacuum cleaner.
2.1.2. Locate the two side clips which hold the motor head in place (fig 1).
2.1.3. Undo the clips, remove the motor head and take out the contents of the tank.
2.1.4. Check and identify each component as listed below. If anything is missing or damaged please contact your supplier immediately.
3. DRY VACUUM CLEANING
2.2. Assembly
2.2.1. Fit the trolley handle to the trolley by pressing in the spring lugs and pushing the handle into the
base upright until the spring lugs automatically locate themselves in the upright’s sides holes.
2.2.2. Place the vacuum cleaner onto the trolley base with the vacuum hose
outlet pointing outward (fig 2).
2.2.3. Locate the vacuum trolley clip at the back of the main drum and push
it onto the 2nd cross bar of the trolley. Check to ensure the drum can
lift and swing freely on this bar (fig 2).
2.2.4. Take the wire basket and hook it onto the two cross bars at the rear
of the trolley (fig 3).
2.2.5. Seat the detergent tank in the larger of the basket areas.
fig 6fig 4 fig 5
fig 1.
fig 7
WARNING! Ensure you read, understand and apply chapter 1 “Safety Instructions”. Reminder: DO NOT vacuum hazardous dust
or other substances. Use of an incorrect filter will invalidate your warranty. The green pump switch will operate independently of the
vacuum motor. Only press this switch if using the machine as a WET vacuum cleaner (see chapter 4).
To use the machine as a “DRY” car fabric cleaner, (no liquids involved), proceed as follows:
3.1. Ensure the machine is unplugged from the mains power supply.
3.2. Remove the vacuum’s motor head, and fit the correct cartridge filter (figs 4, 5, 6).
3.3. Fit the paper dust bag onto the inside of the vacuum intake pipe (see fitting instructions on side of bag).
3.4. Reposition the head onto the drum body ensuring that the switches face forward, and clip in place.
3.5. Connect flexible hose to the front inlet on the tank.
3.6. Attach the appropriate end nozzle: Flat or Tapered Nozzles.
3.7. Plug in to power supply, and PRESS THE BLACK MOTOR “ON” SWITCH ONLY. DO NOT TOUCH THE GREEN PUMP SWITCH (fig 7).
You are now ready to use the Auto Valet machine as an ordinary vacuum cleaner for vacuuming car interiors.
3.8. When you have completed vacuuming, switch the BLACK MOTOR SWITCH “OFF”, and unplug from the mains.
3.9. Regularly check the dust bag and remove when it is 2/3 full. Seal bag opening with the cap attached and dispose of the bag.
The bag is manufactured so that air, not dust, will filter through the paper and as such the dust bag must not be reused.
3.10. If you wish to use the machine for a wet application and the dust bag is less than 2/3 full, carefully remove the bag, store
for future use, and wipe the tank clean.
LIST OF CONTENTS.
(Item numbers correspond to the spare parts list).
Item Description
No
A Detergent pick up (Parts list items 5/8/61/62/63)
41 Main body (incorp Motor head & Tank)
48 Trolley handle
54 Trolley base
60 Wire basket
Item Description
No
61 Detergent tank
64 Cartridge Filter
65 Foam Filter
66 Clips x 6
67 Pistol System, (trigger & tube)
68 Flexible Hose
fig 3 fig 2
Original Language Version VMA913 Issue: 2 - 18/01/10

IMPORTANT: The water pump in this unit incorporates a thermal cut-out. Should the
unit overheat, this will be tripped and the pump will temporarily stop working.
In this event, leave unit to cool for approx. 10 minutes (depending on conditions) for
the cut-out to reset and then restart the pump.
4. 1. Ensure the machine is unplugged from the mains power supply.
4. 2. Make sure the tank is clean and free from dust and dirt.
4. 3. Remove cartridge filter and dust bag if fitted (see 3.9 & 3.10).
4. 4. Fit the blue foam filter in place (fig 8).
4. 5. Replace the head onto the drum body.
4. 6. To the same flexible hose as used in dry cleaning fit the Flat, or Tapered Nozzle.
4. 7. Ensure the BLACK Motor Switch is in the “OFF” position before plugging in.
4. 8. Plug the cleaner into the mains power socket.
4. 9. Press the BLACK MOTOR SWITCH “ON” ONLY. DO NOT SWITCH THE PUMP ON.
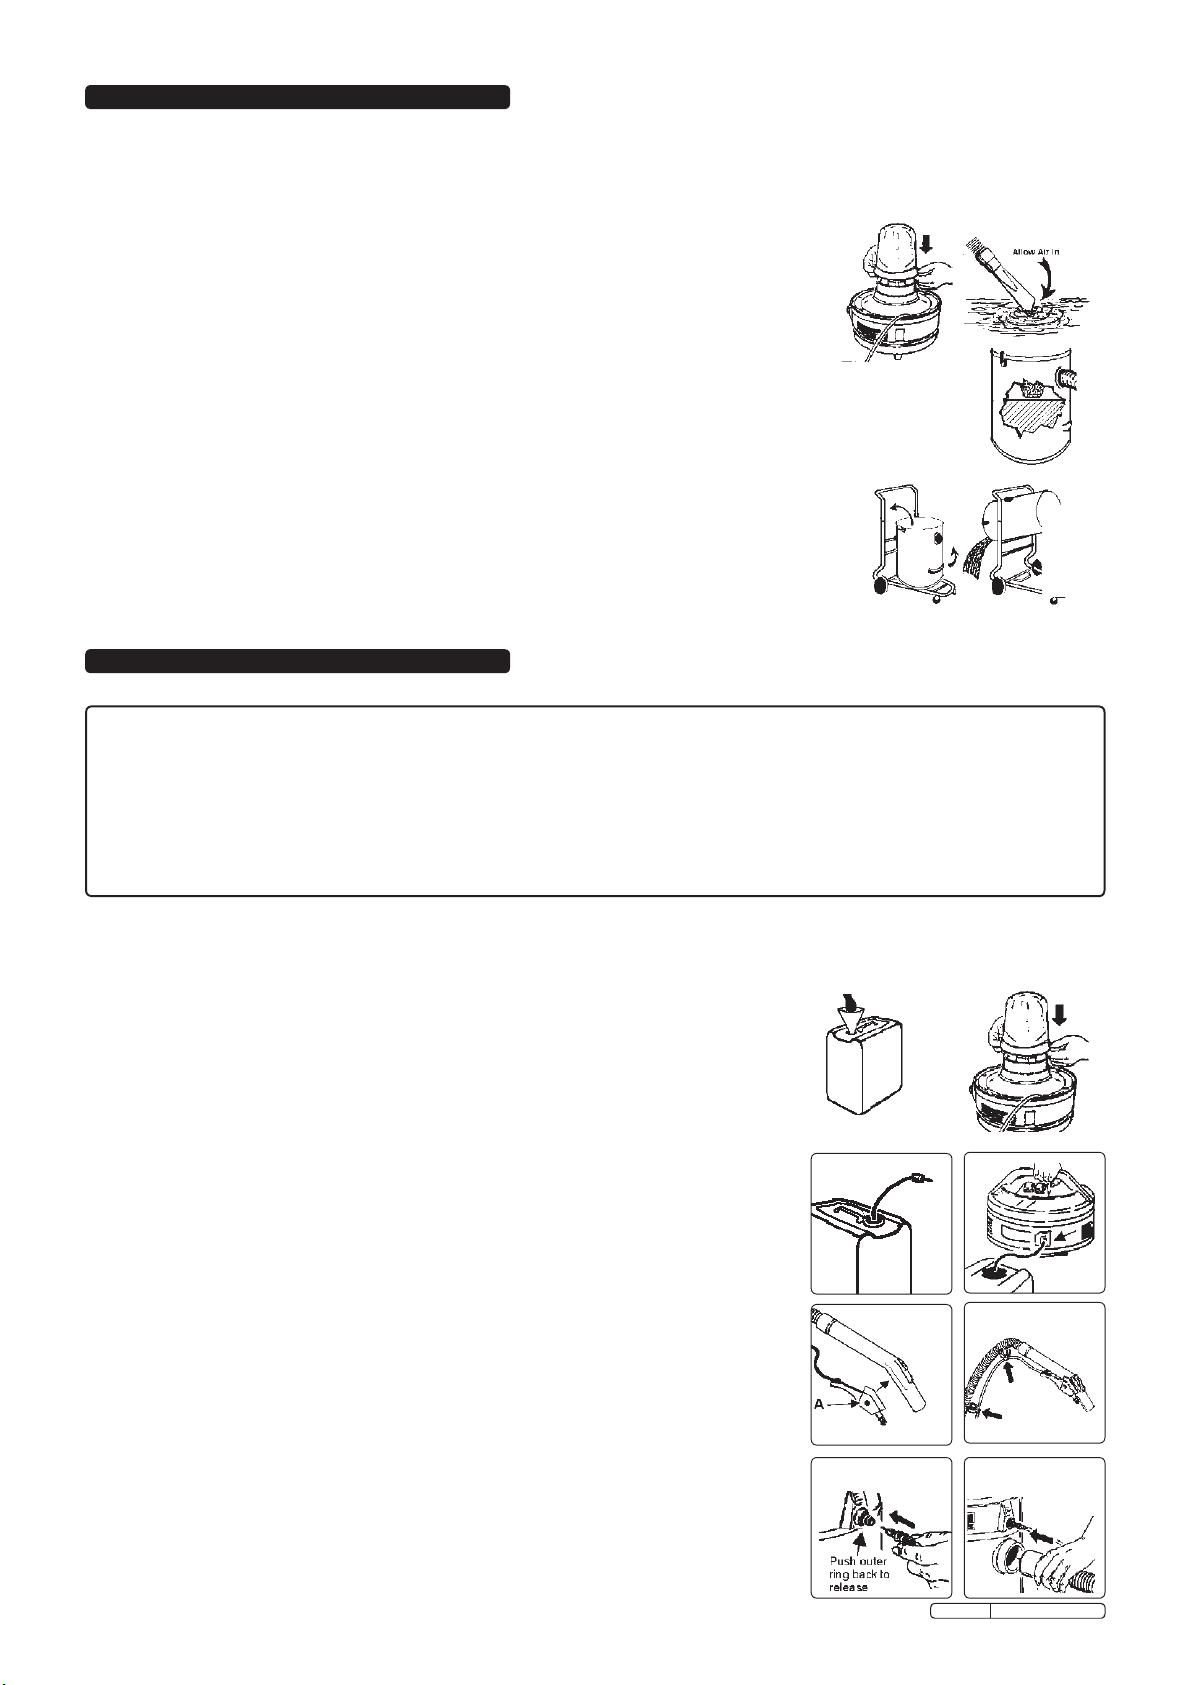
4. 10. To vacuum large quantities of liquid, i.e from a sink, or tank, etc; do not immerse the nozzle
completely in the liquid, leave a gap at one end of the nozzle to allow a partial air inflow. (fig 9).
4. 11. The machine is fitted with a FLOAT VALVE which stops the suction action when the tank has
reached its maximum capacity. The user will also be aware of increased motor speed.
When this happens, turn the machine off, disconnect from mains, remove the head from
tank. Take care to maintain balance and not let trolley slip, and empty liquid out of the tank into
an appropriate receptacle or drain (figs 10, 11). To continue vacuuming reverse the process and
proceed.
4.12. After WET vacuuming turn the machine off and remove the plug from mains power supply.
4.13. Empty the tank, then clean and dry the inside before storage.
fig 8
4. WET VACUUM CLEANING For the vacuuming of liquids only
WARNING! Ensure you read, understand and apply chapter 1 “Safety Instructions”. Reminder: Remove plug from mains power
supply before opening unit. DO NOT vacuum solvents, explosives, inflammable or hazardous liquids, petrol, oil, spirit, paint, thinner
and/or chemicals. The use of incorrect filter will invalidate your warranty.
5. USE AS VALETING MACHINE
FOLLOWING INSTRUCTIONS REFER TO USE AS AN AUTOMOTIVE/INDUSTRIAL, FABRIC & UPHOLSTERY CLEANER.
WARNING! USE THE CORRECT DETERGENT: THE ONLY DETERGENT SUITABLE FOR THIS MACHINE IS SEALEY “VMR” or THE
DETERGENT SUPPLIED WITHTHE MACHINE. CONTACT YOUR SEALEY DEALER FOR SUPPLIES. DO NOT (UNDER ANY CIRCUMSTANCES)
USE DOMESTIC DETERGENT OR ANY OTHER GENERAL PURPOSE CARPET CLEANER, CAR WASH, CLEANING OR UPHOLSTERY DETERGENT.
OTHER DETERGENTS PRODUCE EXCESSIVE FOAM WHICH IS UNDESIRABLE FOR THE CLEANING PROCESS AND CAN DAMAGE THE WORKING
PARTS OF YOUR MACHINE. IF, WHEN USING THE RECOMMENDED DETERGENT, YOU FIND EXCESSIVE FOAM BEING PRODUCED,
THE CARPET OR FABRIC HAS BEEN PREVIOUSLY CLEANED WITHA FOAMING DETERGENT. SHOULD THIS HAPPEN, ADD 10cl OF ANTI-FOAMING
AGENT (SEALEY PART NO VMR922) TO THE MAIN WASTE WATER TANK.
WARNING! ENSURE YOU READ, UNDERSTAND AND APPLY CHAPTER 1 “SAFETY INSTRUCTIONS”. THE USE OF AN INCORRECT FILTER
OR DETERGENT, WILL INVALIDATE THE WARRANTY. ALWAYS TEST MATERIALS FOR COLOUR FASTNESS BEFORE USING THE AUTO VALET.
5.1. FABRIC PREPARATION & DETERGENT
5.1.1. If the condition of the vehicle fabric, or item of upholstery requires dry vacuuming first, you may prefer to use an alternative vacuum
cleaner, keeping your Auto Valet on standby ready for the wet clean.
5.1.2. Should you wish to use the Auto Valet for the preliminary dry clean, then set the machine up as in chapter 3.
5.1.3. To commence with the wet clean ensure you use the correct detergent as described in 5.1.
5.1.4. Remember to add ‘Anti-foaming agent VMR922’ to the waste tank if necessary.
5.1.5. Fill the plastic detergent tank with COLD water up to the “MAX” level indicator number 9,
or according to the amount you wish to use (fig 12).
5.1.6. Add 20cl of SEALEY “VMR” or Supplied detergent (Note: 20cl is about half a coffee mug).
5.1.7. DO NOT USE ANY OTHER DETERGENT.
5.1.8. DO NOT increase the strength of detergent mix beyond 80 -1.
5.1.9. If part of the fabric is badly soiled, rub in by gloved hand a mix of 80-1 detergent and leave
for 2-3 minutes before valeting.
5.2. SETTING UP THE AUTO VALET
How to prepare, and assemble your valet machine ready for wet cleaning.
5.2.1. Ensure you unplug the machine from the main supply.
5.2.2. Having filled the detergent tank, place it in the trolley basket.
5.2.3. Remove the vacuum motor head and fit the blue foam filter (fig 13).
Remove the cartridge filter and paper dust bag if fitted as they are
for dry cleaning only.
5.2.4. Replace the motor head and secure with the side clips.
5.2.5. Insert the filter end of the detergent pick up pipe into the detergent tank, and seal by
screwing (finger tight) the attached tank cap (fig 14).
5.2.6. Insert the other end of the pick up pipe to the rear of the motor head (fig 15).
5.2.7. Loosen the thumb screw on the pistol head (fig 16 A), and clip the pistol over the end
of the vacuum hose (fig 16). Finger tighten the thumb screw and check that the pistol
is adequately attached to the hose. Connect the detergent delivery tube to the main
vacuum hose with clips provided (fig 17).
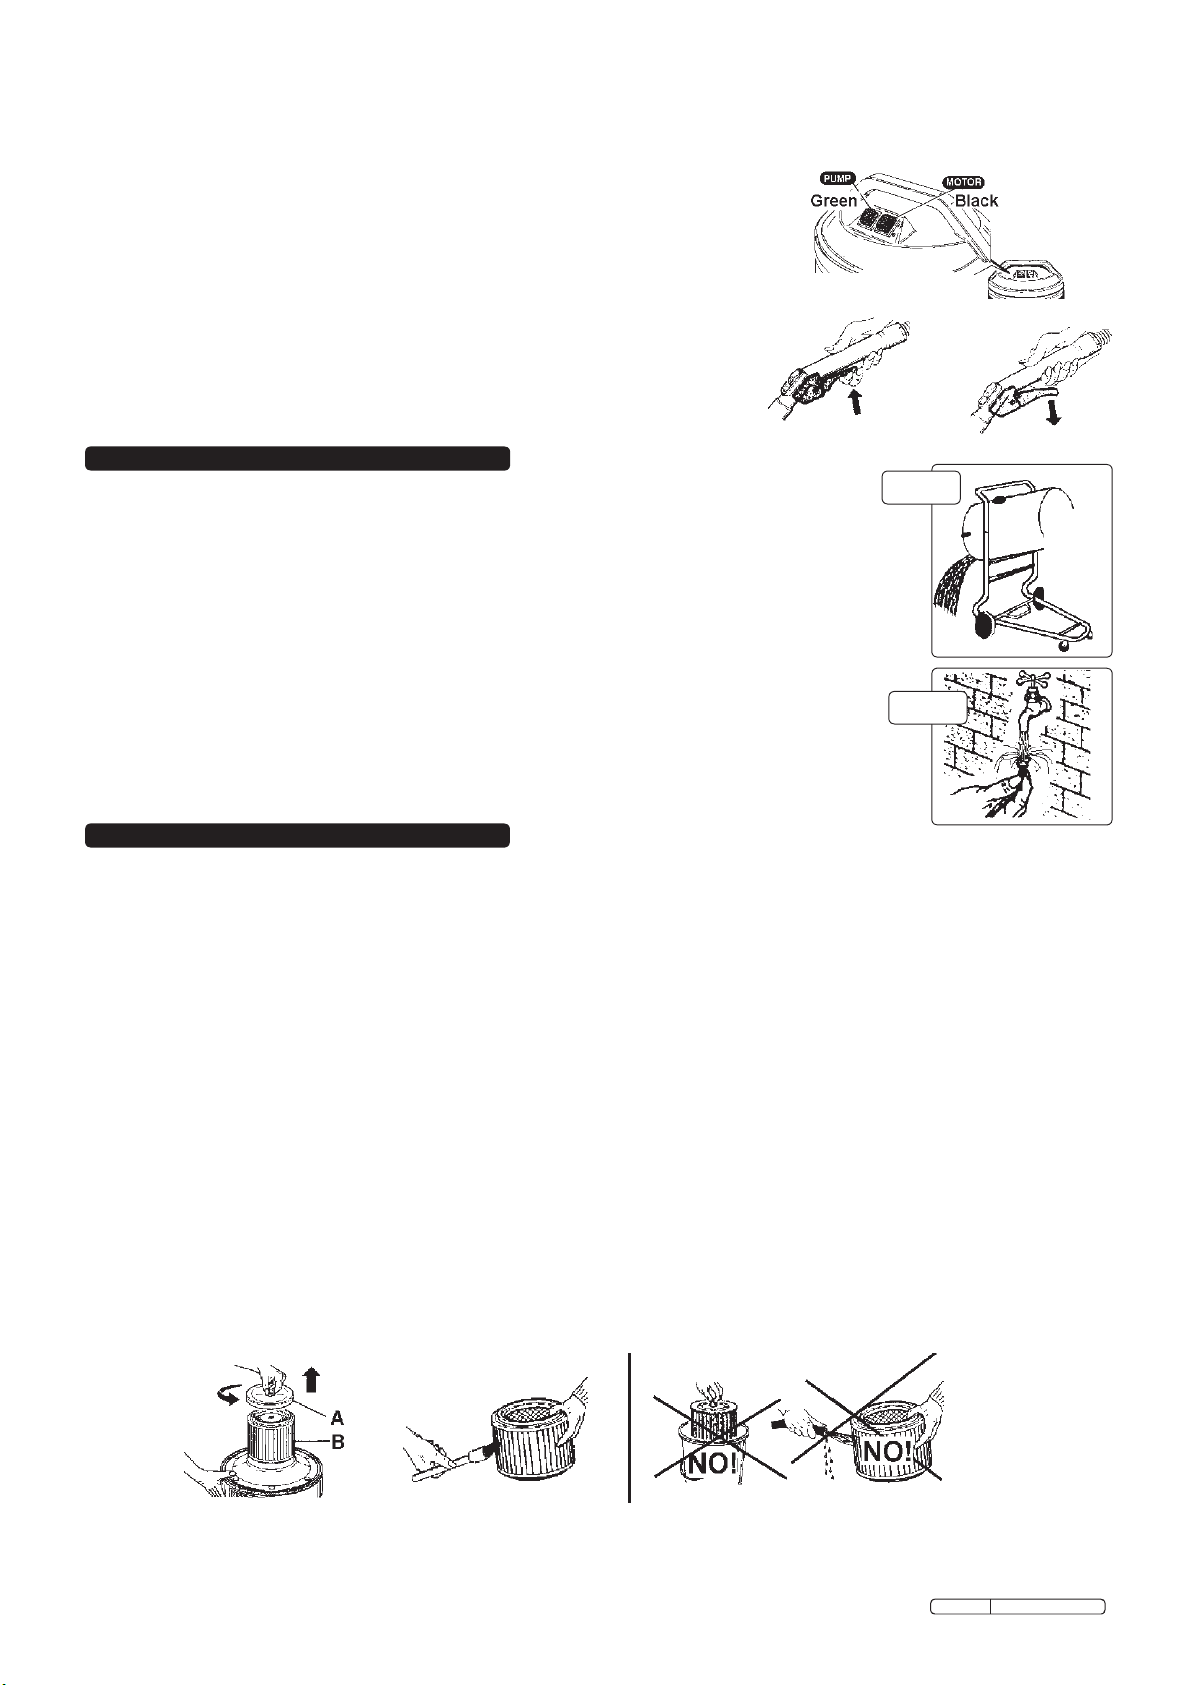
5.2.8. Push the other end of the delivery tube into the outlet located in the front
of the motor head above the main hose outlet (fig 18). When disconnecting this tube,
push the inlet ring back to release the delivery tube. DO NOT PULL THE TUBE.
5.2.9. The flexible vacuum hose should be fitted to the machine as normal (fig 19).
5.2.10. Attach the valeting tool head to the hose and detergent dispenser tube.
fig 9
fig 10
fig 11
fig 13
fig 14
fig 12
fig 15
fig 16
fig 18 fig 19
fig 17
Steady
the
trolley
whilst
lifting
tank
Original Language Version VMA913 Issue: 2 - 18/01/10

5.3. OPERATING THE AUTO VALET MACHINE
WARNING! Test materials for colour fastness, test on an area not normally noticed (i.e. under a car seat).
5.3.1. Plug the machine into the mains power supply.
5.3.2. Switch the BLACK MOTOR SWITCH “ON” to start the vacuum (fig 20).
DO NOT PRESS THE PISTOL TRIGGER AT THIS STAGE.
5.3.3. Place the cleaning head on the material to be cleaned and press the
GREEN PUMP SWITCH “ON” (fig 20).
5.3.4. Press the trigger (fig 21) and move the tool slowly across the material by drawing
the head towards you. Work in small areas at a time. The pump produces pressure which
forces detergent into the fabric pile. During this first pass approximately 60% of the
dirty fluid will be sucked back up into the waste tank.
5.3.5. Make a second pass WITHOUT pressing the trigger (fig 22). This will extract
the remainder of the fluid from the material, leaving the fabric almost dry.
5.3.6. Allow the fabric, or upholstery to dry completely before walking, or sitting on it.
fig 20
fig. 21 fig. 22
6.1. Remove the plug from the mains.
6.2. Remove the motor head.
6.3. Empty tank of dirty liquid by steadying the trolley and lifting the tank to empty content into a suitable waste
receptacle or drain (fig 23). Take care to maintain balance and not let the trolley slip.
6.4. Empty and rinse out the detergent tank.
6.5. Fill the detergent tank with clean water, and flush the system by operating into a bucket, or drain.
Continue to flush until all the dirty fluid has been expelled.
6.6. Rinse the tank clean.
6.7. Wipe the tank and fittings and leave to dry.
6.8. Check the filter at the end of the detergent pick-up pipe to ensure it is not clogged.
If it is, remove and rinse under running water (fig 24).
6.9. Remove the main motor head filter and clean as in chapter 7.
NOTE: Before next use, check that the correct filter is fitted for the job you are going to perform.
Use of wrong filter will invalidate your warranty.
fig 23
fig 24
6. AFTER USE
WARNING ENSURE YOU DISCONNECT FROM THE MAINS POWER SUPPLY BEFORE OPENING THE UNIT, OR CARRYING OUT ANY MAINTENANCE.
7.1. General Machine Maintenance.
7.1.1. Remove plug from the mains power supply before carrying out service or maintenance.
7.1.2. Regularly check and clean the filter connected to the end of the detergent pick-up pipe by running under a cold water tap (fig 24).
7.1.3. After having used the appliance as a wet cleaner, empty the contents. Clean and dry the tank and accessories to avoid scaling.
7.1.4. Periodically check to ensure the valet machine and accessories are not blocked or damaged, and are in good working order.
Any damaged parts must be replaced immediately. Blocked hoses or tubes will impair performance and may damage the machine.
Such damaged motor units returned for repair will not be accepted under the warranty and may incur expensive repair bills.
7.2. Cleaning Filters.
For optimum performance, all types of filters should be cleaned regularly. Unclean, damaged, or wrongly fitted filters will impair your
machine’s performance and may damage it. Such damaged motor units returned for repair will not be accepted under the warranty,
and may incur expensive repair bills. Never use the machine without a filter. Dirt in motor will cause failure and will invalidate the
warranty.
7.2.1. CLEANING FOAM FILTER. Used for wet cleaning.
a) Wash the foam filter in a suitable container of lightly soapy water (DO NOT use solvents).
b) Allow to dry before use. Check to see if the filter is worn, in which case it must be replaced with a new one.
7.2.2. CARTRIDGE FILTER CLEANING. Used for dry cleaning.
a) Remove the filter cartridge from the motor head (fig 25).
b) Regularly clean the cartridge filter by dusting with a soft bristle brush (fig 26).
c) DO NOT get the filter wet or wash filter in water or any other cleaning liquids as the filter will disintegrate (fig 27).
NOTE: Inspect filters regularly, if large amounts of un-removable deposits are obvious, or if the filter is worn or damaged it must be replaced.
7. MAINTENANCE
Steady
the
trolley
whilst
lifting
tank
fig 25 fig 26 fig 27
Original Language Version VMA913 Issue: 2 - 18/01/10

8. TROUBLESHOOTING
Unit does not start. No current. The power cable, switch, Check the plug and fuse. Repair or
or motor faulty. Tank may be full of water. replace faulty part. Empty tank if full.
Water pump thermal cut-out has triggered. Wait approx. 10 minutes for cut-out to reset
Dust comes from the motor unit. Damaged filter, or filter incorrectly fitted. Reposition or replace the filter.
Take care, as warranty may be lost.
Low efficiency. Container is full. Filter obstructed. Empty container. Clean or replace the
Hose or accessory blocked. filter (Chapter 7). Unblock hose or accessory.
Filter problems. Outlet filter obstructed. Hose or tool blocked. Check, clean, or replace the filter (chapter 7).
Remove any obstruction from hose.
Motor speed increases
Container is full. Filter obstructed. Empty the container, clean, refit, or replace
or motor vibrates. Hose or accessory blocked. filter (Chapter 7). Unblock hose or accessory.
Foam comes out of the air filter.
Wrong detergent used, or used on carpet Add Sealey VMR922 Anti-foaming
or fabric previously cleaned with foaming agent to waste water tank (see 5.1).
detergent.
Detergent solution spray not Detergent filter clogged. Remove filter and clean (see 7.2.1) .
uniform. Pick up pipe clogged. Remove pick up pipe and clean filter (7.1.2).
CONSUMABLES
Part No VMR921 Detergent for Valet Machine ..............Packs of 12 x 1 Ltr Bottles.
Part No VMR925 Detergent for Valet Machine ..............Packs of 4 x 5 Ltr Containers.
Part No VMR922 Defoaming Agent .......................Packs of 12 x 1 Ltr Bottles.
7.2.3. AIR OUTLET FILTER.
Behind the side grilles in the motor head, two special filters are located (fig 28) which ensure the air returned to the environment is as
free as possible from impurities. The filters will require periodic changing, to do so use a coin (or similar) to gently lever off the grilles,
remove the filters and replace with new ones. When refitting the grilles ensure the arrow on the inner part of the grilles points upwards.
We recommended you keep a spare of each filter type.
Remove grilles
and replace filters
fig 28
NOTE: It is our policy to continually improve products and as such we reserve the right to alter data, specifications and component parts without prior notice.
IMPORTANT: No liability is accepted for incorrect use of this product.
WARRANTY: Guarantee is 12 months from purchase date, proof of which will be required for any claim.
INFORMATION: For a copy of our latest catalogue and promotions call us on 01284 757525 and leave your full name and address, including postcode.
01284 757500
01284 703534
sales@sealey.co.uk
Sole UK Distributor, Sealey Group,
Kempson Way, Suffolk Business Park,
Bury St. Edmunds, Suffolk,
IP32 7AR
www.sealey.co.uk
Web
email
Original Language Version VMA913 Issue: 2 - 18/01/10
Table of contents
Other Sealey Cleaning Equipment manuals

Sealey
Sealey SM22.V2 User manual

Sealey
Sealey PC310 User manual

Sealey
Sealey SM40D.V2 User manual

Sealey
Sealey APMS67 User manual

Sealey
Sealey DPF1 User manual

Sealey
Sealey SM21.V3 User manual

Sealey
Sealey POWER PRODUCTS SM221 User manual

Sealey
Sealey SCT03.V2 User manual

Sealey
Sealey SCT03 User manual

Sealey
Sealey SM40D.V2 User manual

Sealey
Sealey SM21.V4 User manual

Sealey
Sealey POWER PRODUCTS SM20.V3 User manual

Sealey
Sealey SM19.V2 User manual

Sealey
Sealey SM20.V2 User manual

Sealey
Sealey POWER PRODUCTS SM19.V2 User manual

Sealey
Sealey SM233 User manual

Sealey
Sealey SM28.V2 User manual

Sealey
Sealey SM20T User manual

Sealey
Sealey SM21.V4 Owner's manual

Sealey
Sealey SM28 User manual