manuals.online logo
Brands
  1. Home
  2. •
  3. Brands
  4. •
  5. 2SAN
  6. •
  7. DVR
  8. •
  9. 2SAN AVS-2704C User manual

2SAN AVS-2704C User manual

Manual
Version 1.2
4CH All-Around View System
AVS-2704C
Statement
The information of the product in this manual is subject to change without prior notice and
does not represent a commitment on the part of vendor, who assumes no liability or
responsibility for any errors that may appear in this manual.
This manual contains materials protected under International Copyright Laws. All rights
reserved. No part of this manual may be reproduced, transmitted or transcribed without the
written consent of the manufacturer.
AVS-2704C Panel and Pin Definitions
AVM Body appearance:
(1)Power
indicator
(2)Record
indicator
(3)Alarm
indicator
(4)SD
indicator (5)RESET (6)SD card slot
AVM pin definitions:
Note : AVM input voltage range: DC 10V ~ 26V, in order to prevent the abnormal
operation of AVM, please don't exceed this range.
1
1
1
11
11
112
2
2
22
22
223
3
3
33
33
334
4
4
44
44
445
5
5
55
55
55
Pin1
Pin1
Pin1
Pin1Pin1
Pin1Pin1
Pin1Pin1
Pin1
Pin1
Pin1
Pin1Pin1
Pin1Pin1
Pin1Pin1
Pin1
Pin1
Pin1
Pin1Pin1
Pin1Pin1
Pin1Pin1
Pin8
Pin8
Pin8
Pin8Pin8
Pin8Pin8
Pin8Pin8 Pin16
Pin16
Pin16
Pin16Pin16
Pin16Pin16
Pin16Pin16
Pin2
Pin2
Pin2
Pin2Pin2
Pin2Pin2
Pin2Pin2
Pin3
Pin3
Pin3
Pin3Pin3
Pin3Pin3
Pin3Pin3 Pin4
Pin4
Pin4
Pin4Pin4
Pin4Pin4
Pin4Pin4
6
6
6
66
66
66
Front
J1J3J4
AVS-2704C Accessory
(1)An infrared remote control
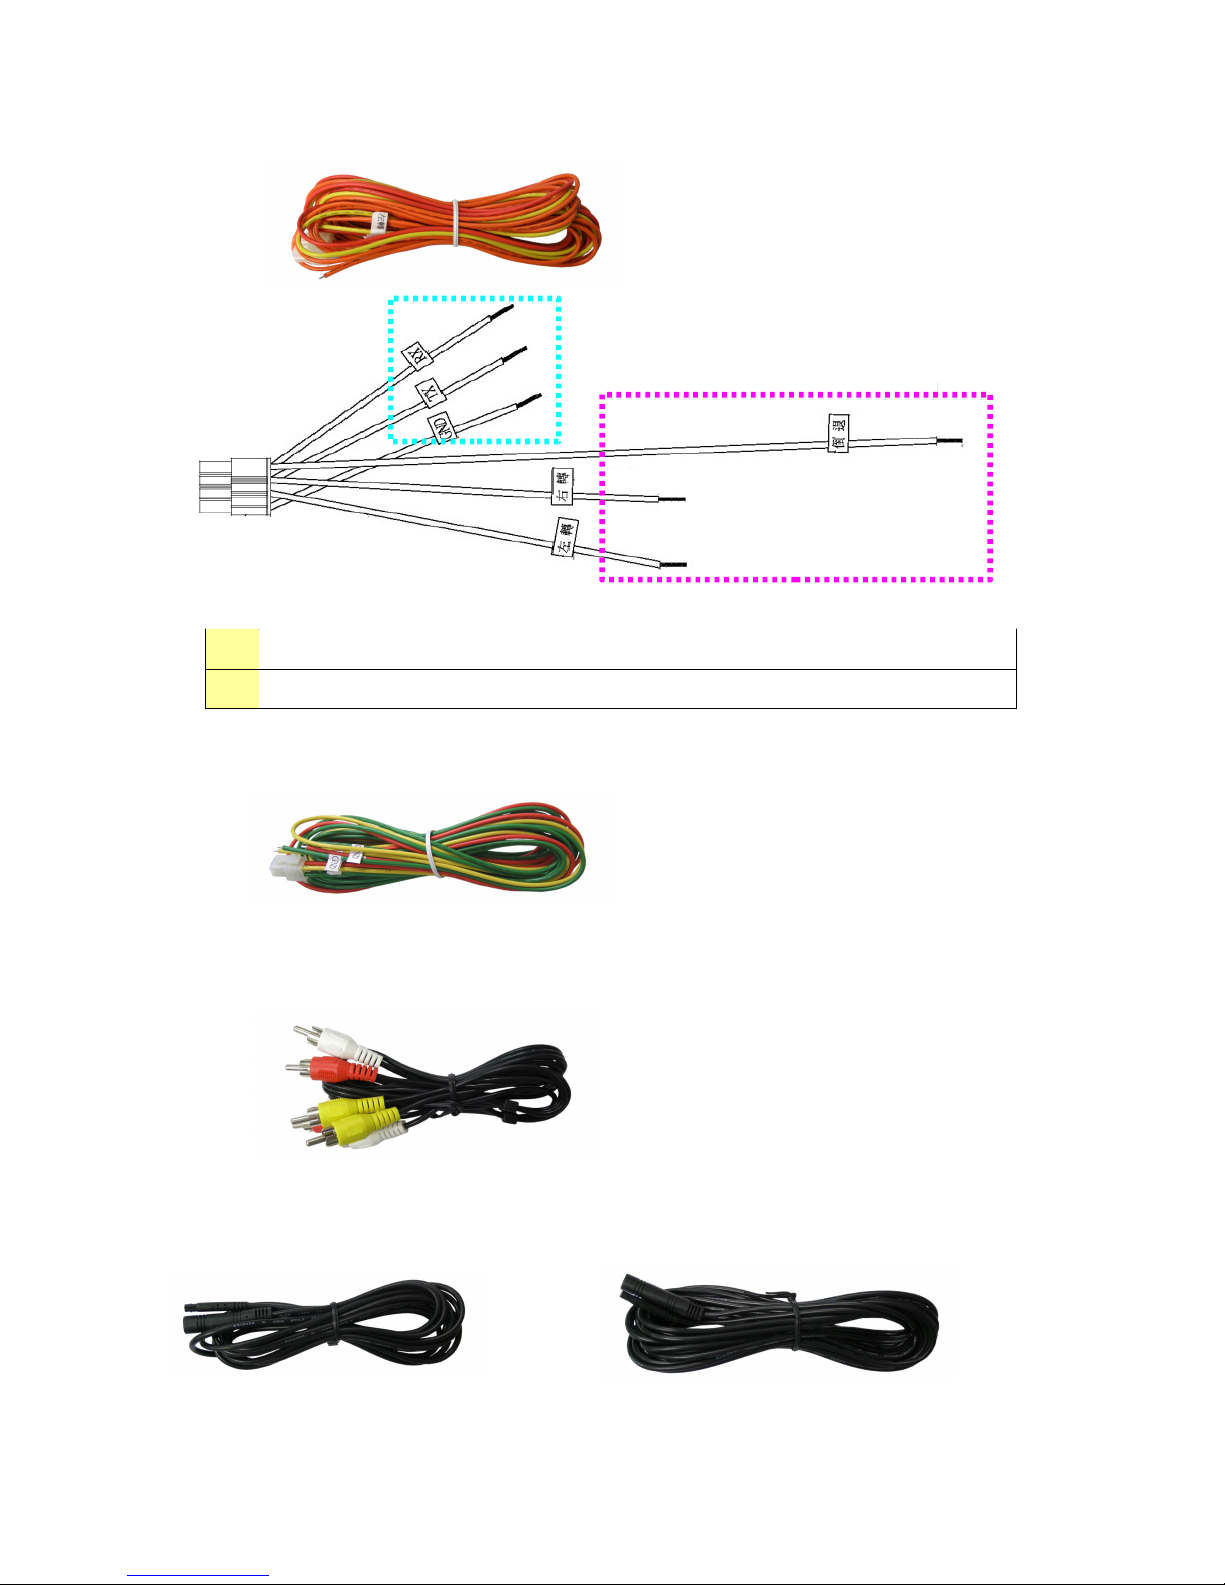
(2)A dedicated video audio composite cable, please connect it to the J3 position defined
on the AVM pin
1
1
1
11
11
11Dedicated video camera port; the cable is labeled with “Front / Left /
Right / Rear” positions respectively
2
2
2
22
22
22
Yellow RCA port: video output terminal
White RCA port: audio input terminal
Red RCA port: audio output terminal
3
3
3
33
33
33Infrared receiver port (2.5mm stereo female)
4
4
4
44
44
44Alarming (Sensor) port
1
1
1
11
11
11
2
2
2
22
22
22
3
3
3
33
33
33
4
4
4
44
44
44
J3
(3)Turn right/ Turn left/ Backward signal control for screen display switch ,please connect
it to the J4 position defined on the AVM pin
1
1
1
11
11
11TX/RX/GND, support touch screen controller
2
2
2
22
22
22Turn right/ Turn left/ Backward signal control for screen display switch
(4)Power cable, the cable is labeled with “ACC / BAT / GND” positions respectively
(5)AV Cable
(6)Video cable 2.8M x 3 & 6M x 1 for car camera cable extension
1
1
1
11
11
11
2
2
2
22
22
22
J4
AVS-2704C Quick Start
Main screen after powered on:
Left side of
main
screen :
(Green section) Right side of
main screen:
(Blue section)
CH1: Represents the
view in front of the car
(1) Display system time
CH2: Represents the
view to the left of the car
(2) Enlarged view of a
certain channel
CH3: Represents the
view behind the car
(3) REC icon, meaning
that it's recording
CH4: Represents the
view to the right of the
car
Operating method:
1. Press the number buttons (1~4) on the remote control to switch the
picture of the different channels on the right side.
2. Press ''PTZ'' button on the remote control to monitor full-screen video
images.
3. Press the “MENU” button on the remote control to enter the main
menu as shown in the figure below
Enter main menu:
1.Record Setting:
I. Auto Record : Automatic recording switch (ON / OFF)
II. FPS : Settings for the number of pages to record, in NTSC environment ( 30 / 15 / 10 /
7.5 / 6 / 5 / 3 / 2fps )
III.Record Size : Video record size (1/2 / 5 / 10 min)
2. Playback: (The video will pause recording during playback)
I. Select the time point to view from the list
II. Press the “ENTER” button to start playback
III. Functions such as “Playback/Pause/Fast Forward/Fast Rewind/Stop/Switch between
Split Screens”, etc., can be controlled through the remote control
Note: When the SD is without any video data inside, the message will be shown as below:
3.Time Setting:When the time adjustment is initiated, the video recording will be paused
then the system time can be adjusted.
(Note: The video will pause recording during time adjustment)
4.Advanced:
I. Format : Format SD card (Please note, all your data will be lost after formatting)
Note: The column will be gray and uselessness if the SD do not insert. As graphically
demonstrated in the picture below:
II. Power Off : Automatic shutdown or delayed shutdown ( 1 minute/ 3 minutes/ 5 minutes)
III. Language : Currently three languages are provided: Simplified Chinese / Traditional
Chinese / English
IV. Camera Setting : Detailed adjustments of “brightness/contrast/hue/saturation” for each
camera can be done individually
Entering this setting, long press "FUNC" button on remote control, the modified value can
be save to default, as follows:
Entering this setting, long press "SEARCH" button on remote control can load user
default, as follows:
V. AVM Display Adjustment : Adjust the front, back, left and right positions of each
camera’s display view individually through software functions to save time on manual
camera installation and adjustments.
It must input the authorized code for video angle modification. The default authorized code
is 1111.
The default authorized code (1111) is requested if it hopes to change. The cursor could be
moved down to the red button by the remote control. Then just click on the button to
change the default authorized code.
Operating method:
  (1) To adjust the Camera ID please use the remote control to select: FRONT/REAR/
LEFT/RIGHT
  (2) Zaxis rotation: Zaxis as the center, clockwise or anti-clockwise rotation,
Value: +32~-32, default:0
  (3) Yaxis rotation: Yaxis as the center, clockwise or anti-clockwise rotation,
Value: +32~-32, default:0
  (4) Xaxis rotation: Xaxis as the center, clockwise or anti-clockwise rotation,
Value:+32~-32, default:0
  (5) Image Scale: Zoom in or zoom out of the image range, Value:+64~-64, default:0
  (6) X Offset: Move left & right of the image range, Value:+64~-64, default:0
  (7) Y Offset: Move down & up of the image range, Value:+64~-64, default:0
Entering this setting, long press "FUNC" button on remote control, the modified
value can be save to default.
Entering this setting, long press "SEARCH" button on remote control can load user
default.

Other 2SAN DVR manuals

2SAN ADR-7008 User manual

2SAN

2SAN ADR-7008 User manual

2SAN ADR-7104 User manual

2SAN

2SAN ADR-7104 User manual

2SAN ADR-7616SW User manual

2SAN

2SAN ADR-7616SW User manual

2SAN ADR-7104 User manual

2SAN

2SAN ADR-7104 User manual

Popular DVR manuals by other brands

Maxtor 777 W V1.0 user manual

Maxtor

Maxtor 777 W V1.0 user manual

Mazi HDVR-0410H Quick operation guide

Mazi

Mazi HDVR-0410H Quick operation guide

Optiview 2.28.06/4.37 Remote client manual

Optiview

Optiview 2.28.06/4.37 Remote client manual

JVC LPT0923-001B instructions

JVC

JVC LPT0923-001B instructions

Vista MiniD400 Installation & user manual

Vista

Vista MiniD400 Installation & user manual

Gazer F117 user manual

Gazer

Gazer F117 user manual

EzCAP CVMK-K188 user manual

EzCAP

EzCAP CVMK-K188 user manual

Teleco Perfect View quick start guide

Teleco

Teleco Perfect View quick start guide

Philips VR820 TYPEBESCHRIJVING

Philips

Philips VR820 TYPEBESCHRIJVING

LevelOne NVR-1204 Administrator's manual

LevelOne

LevelOne NVR-1204 Administrator's manual

dallmeier DIS-2/M StreamerPro HDD Large UTP Installation and configuration

dallmeier

dallmeier DIS-2/M StreamerPro HDD Large UTP Installation and configuration

Eneo IER-38R320005A Quick installation guide

Eneo

Eneo IER-38R320005A Quick installation guide

Qvis Izeus hdcvi dvr user manual

Qvis

Qvis Izeus hdcvi dvr user manual

Lorex Edge LH300 Series Frequently asked questions

Lorex

Lorex Edge LH300 Series Frequently asked questions

Sanyo DSR-M800 instruction manual

Sanyo

Sanyo DSR-M800 instruction manual

Lorex ECO2 LH130 Series Quick setup guide

Lorex

Lorex ECO2 LH130 Series Quick setup guide

TiVo DVR Upgrade instructions

TiVo

TiVo DVR Upgrade instructions

Cascadia HDH4 user guide

Cascadia

Cascadia HDH4 user guide

manuals.online logo
manuals.online logoBrands
  • About & Mission
  • Contact us
  • Privacy Policy
  • Terms and Conditions

Copyright 2025 Manuals.Online. All Rights Reserved.