A.C.Ryan Playon!HD User manual

AC RyAn PlAyon!HD
QUICK INSTALL GUIDE
2
TABLE OF CONTENT
English 3
Nederlands 8
Deutsch 13
Svenska 18
Norsk 23
Dansk 28
Suomi 33
Français 38
Español 43
Čeština 48
Русский 53
ελληνικά 58
63
68
Bahasa Indonesia 73
ไทย 78

TV SYS
1
4
7
2
5
8
0
3
6
9
BROWSER COPY MUSIC
SETUP
INFO
PAUSE/STEP
INS REPLAY CM SKIP ZOOM IN ZOOM OUT
SLOW ANGLE
A-B
PLAY STOP
SELECT CONFIRM AUDIO SUBTITLE
HOME
REPEAT GOTO
RETURN
MENU
VOL
THANK YOU FOR PURCHASING OUR PRODUCT
AND WELCOME TO THE PLAYON! COMMUNITY!
THIS IS A QUICK INSTALLATION GUIDE TO GET
YOU STARTED WITH YOUR NEW PLAYON!HD.
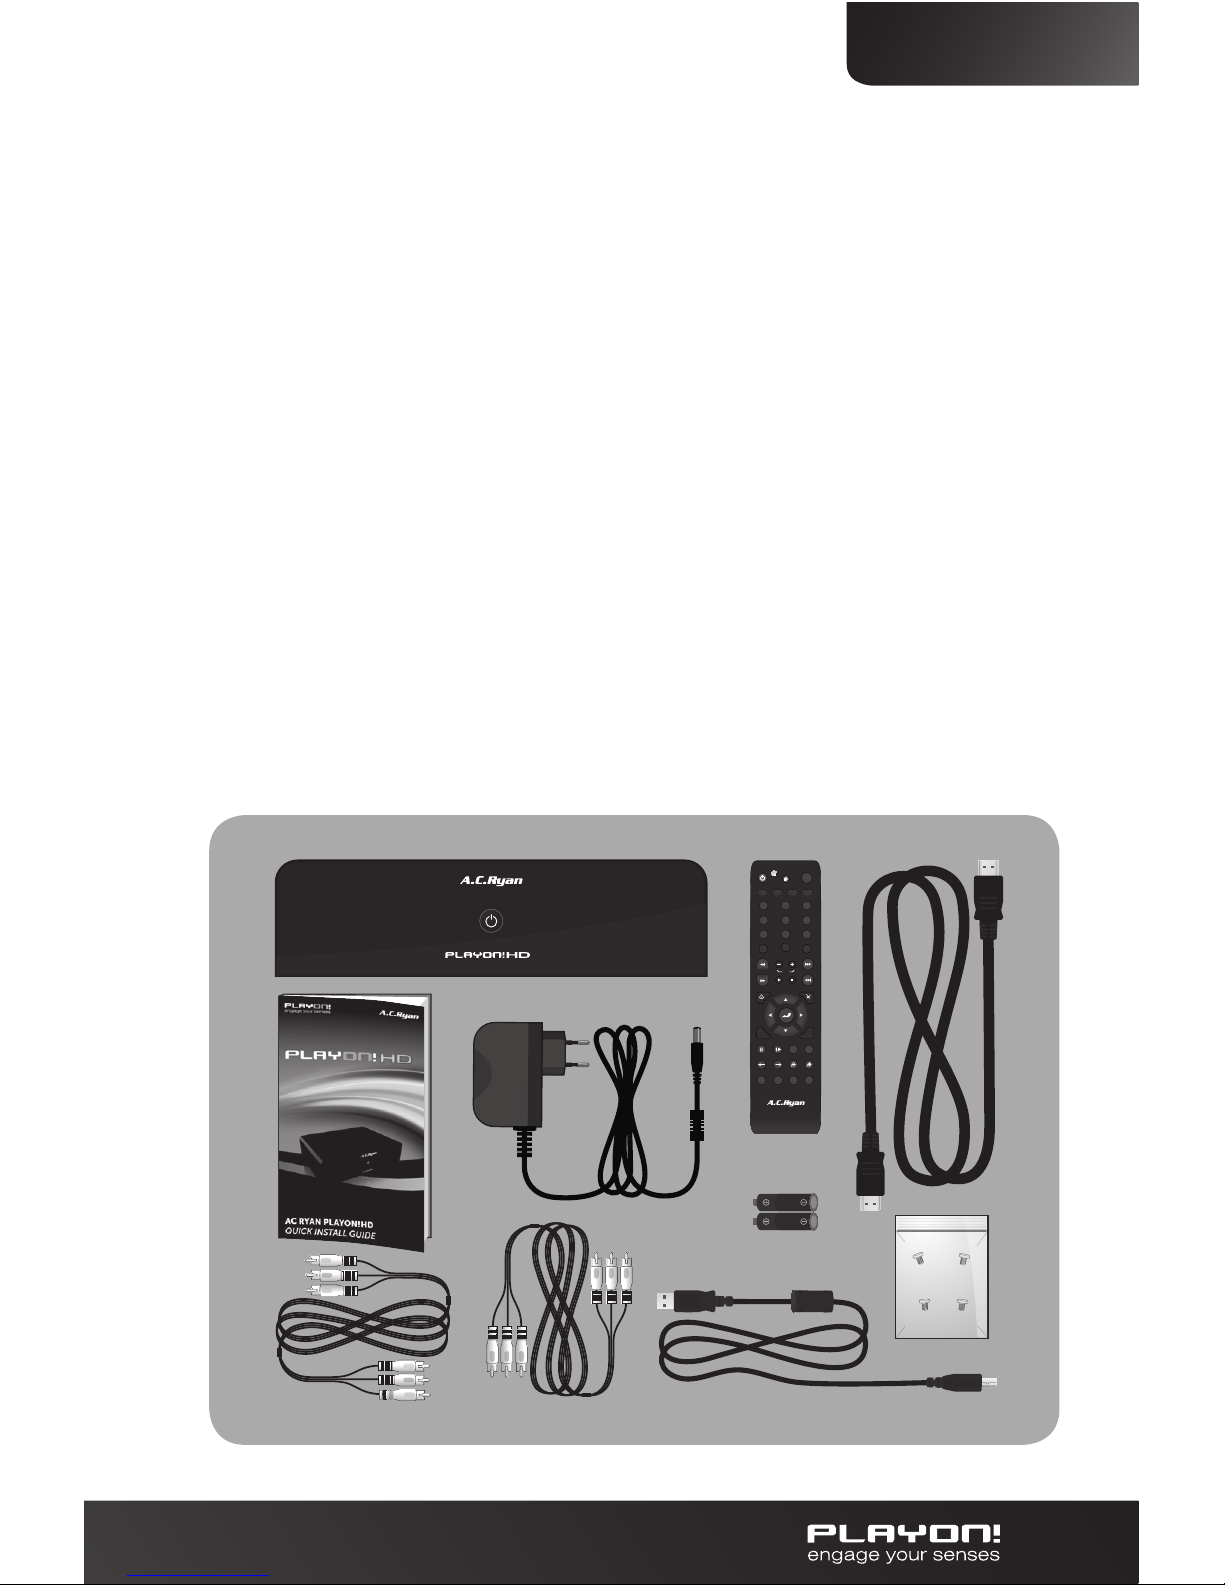
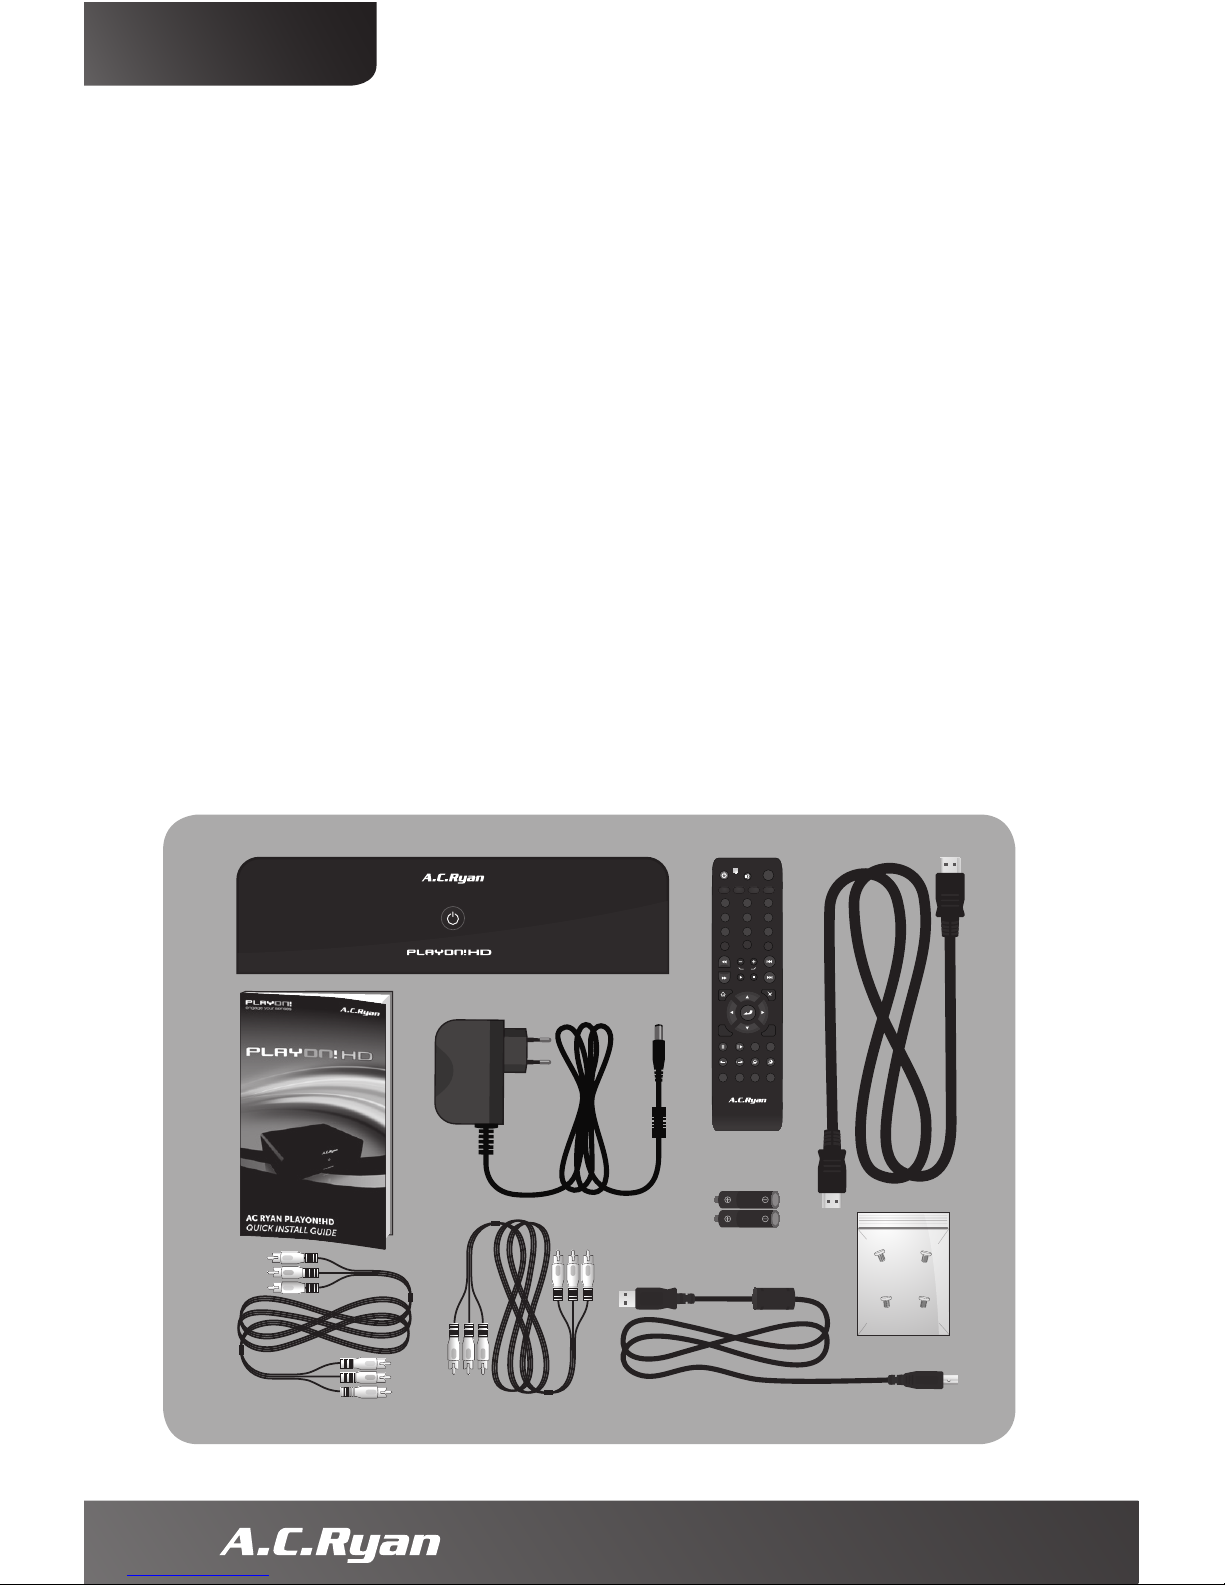
Included in this Playon!HD box:
1 x Playon!HD Full HD Network Media Player
1 x Quick install guide
1 x Remote control
2 x Batteries
1 x HDMI cable
1 x Pack of screws
1 x Composite cable (red/yellow/white)
1 x Component cable (red/blue/green)
1 x USB cable
1 x Power adapter
3
ENGLISH

X2
X4
X2
Getting started with your Playon!HD
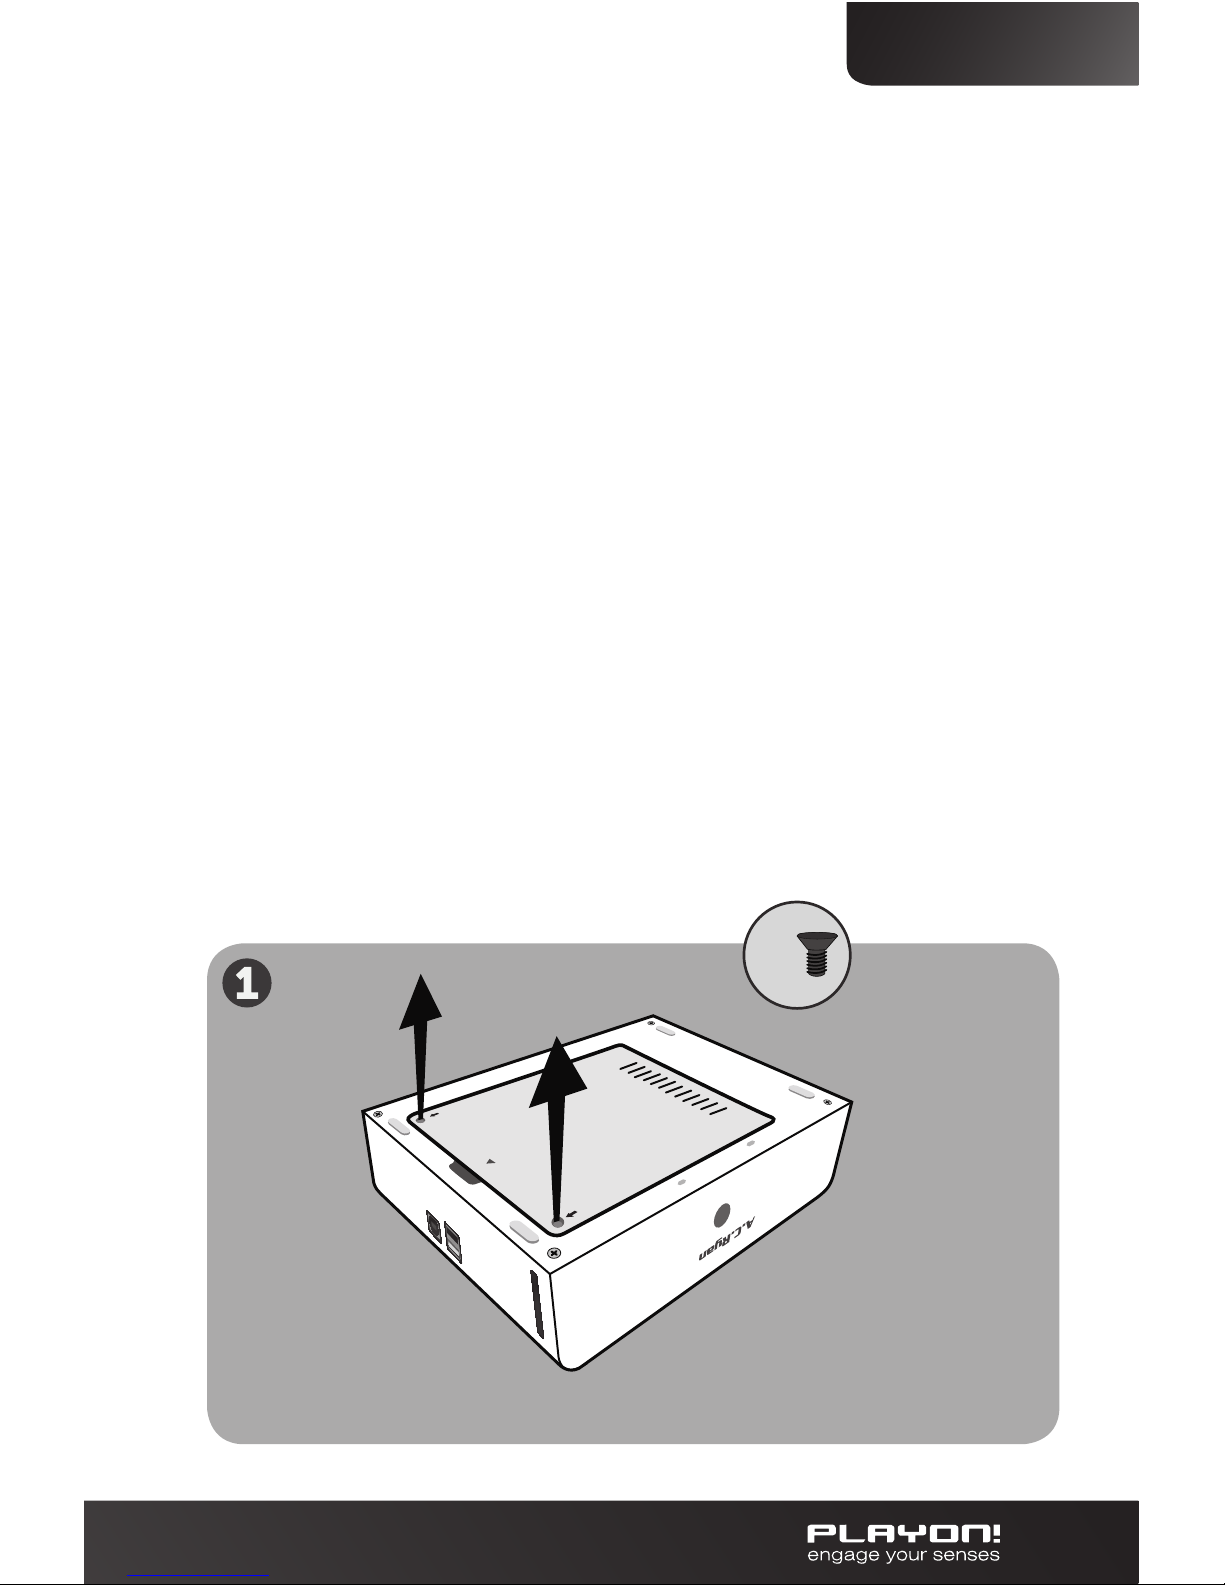
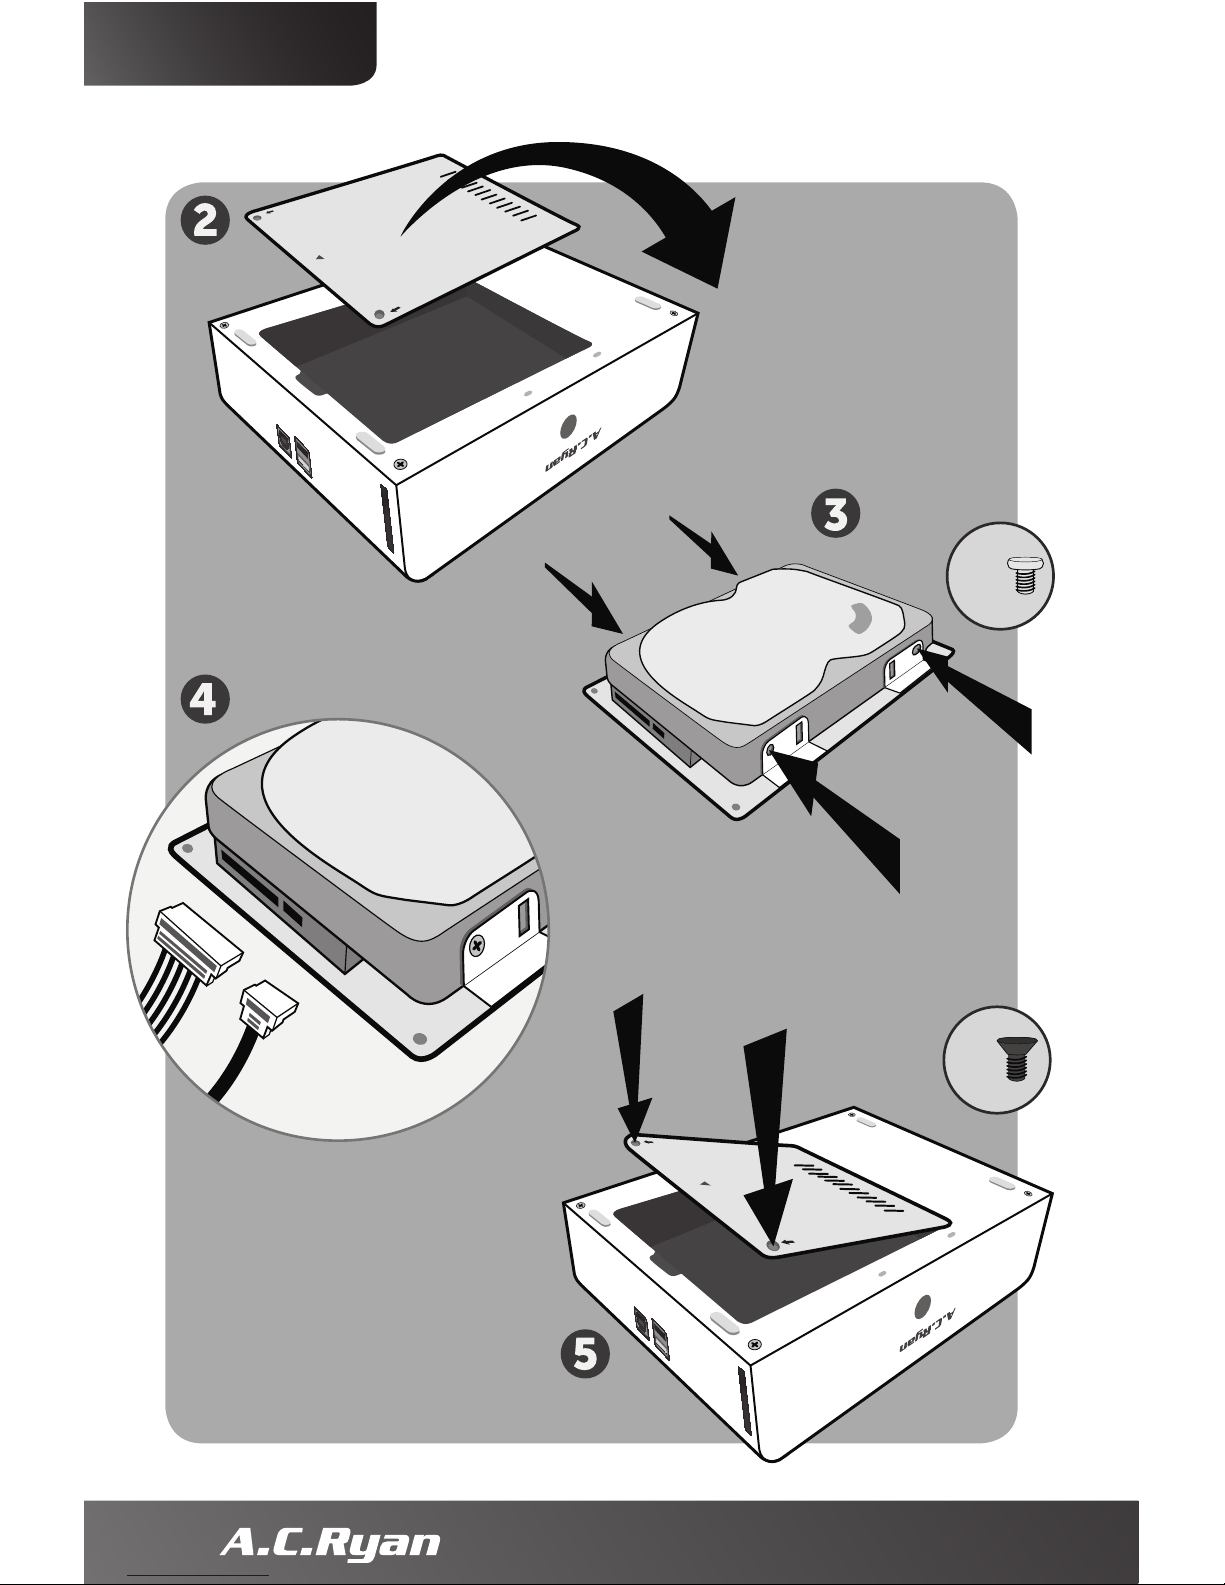
Installing your internal hard drive.
To start you will need to install your internal hard drive.
If you bought your Playon!HD with pre-assembled
internal hard drive you can skip this step.
If you want to add a hard drive of your
choice please follow these steps.
Please remove the 2 black screws and lift up the lid as shown
in the picture. Attach the hard drive to the metallic lid and then
attach the 4 included screws found in your Playon!HD box. Plug
in the power cable (black cable) and SATA connection cable (red
cable) into the hard drive. When this is done you can gently close
the lid and attach the 2 black outer screws to finish the job.
4
ENGLISH

X2
X4
X2
5
ENGLISH

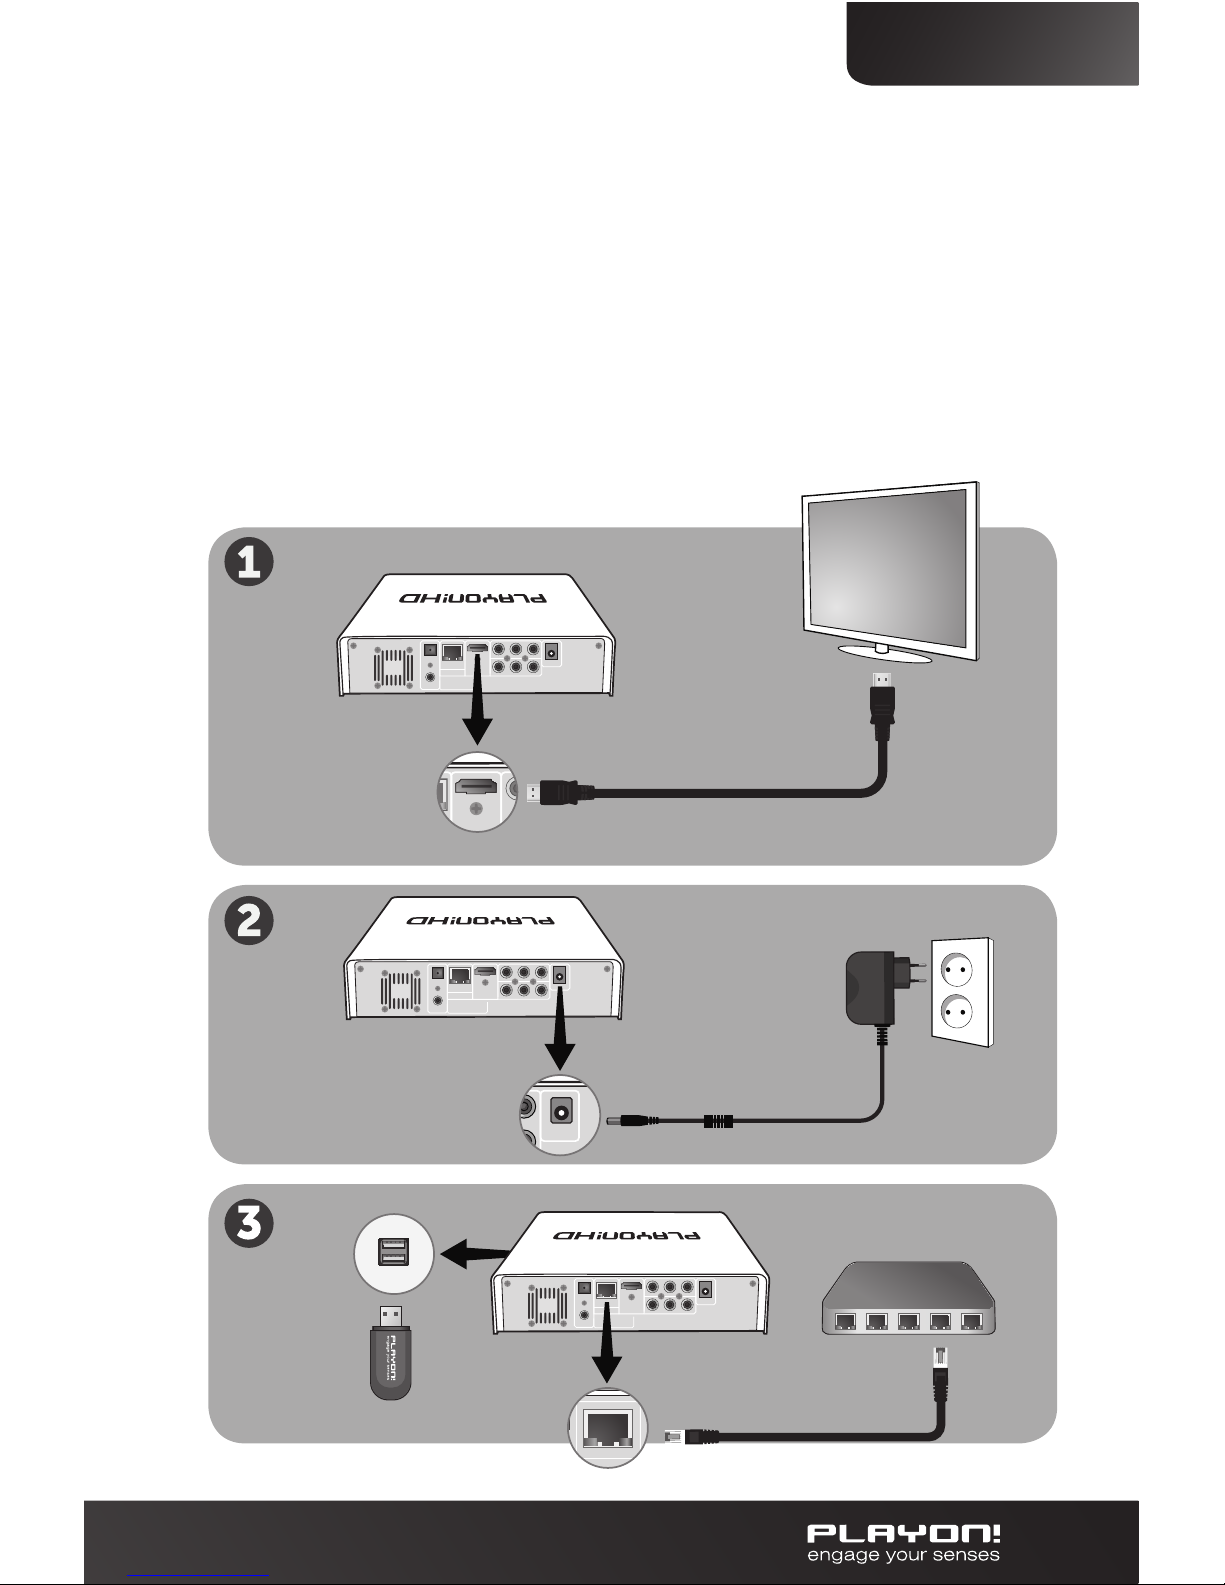
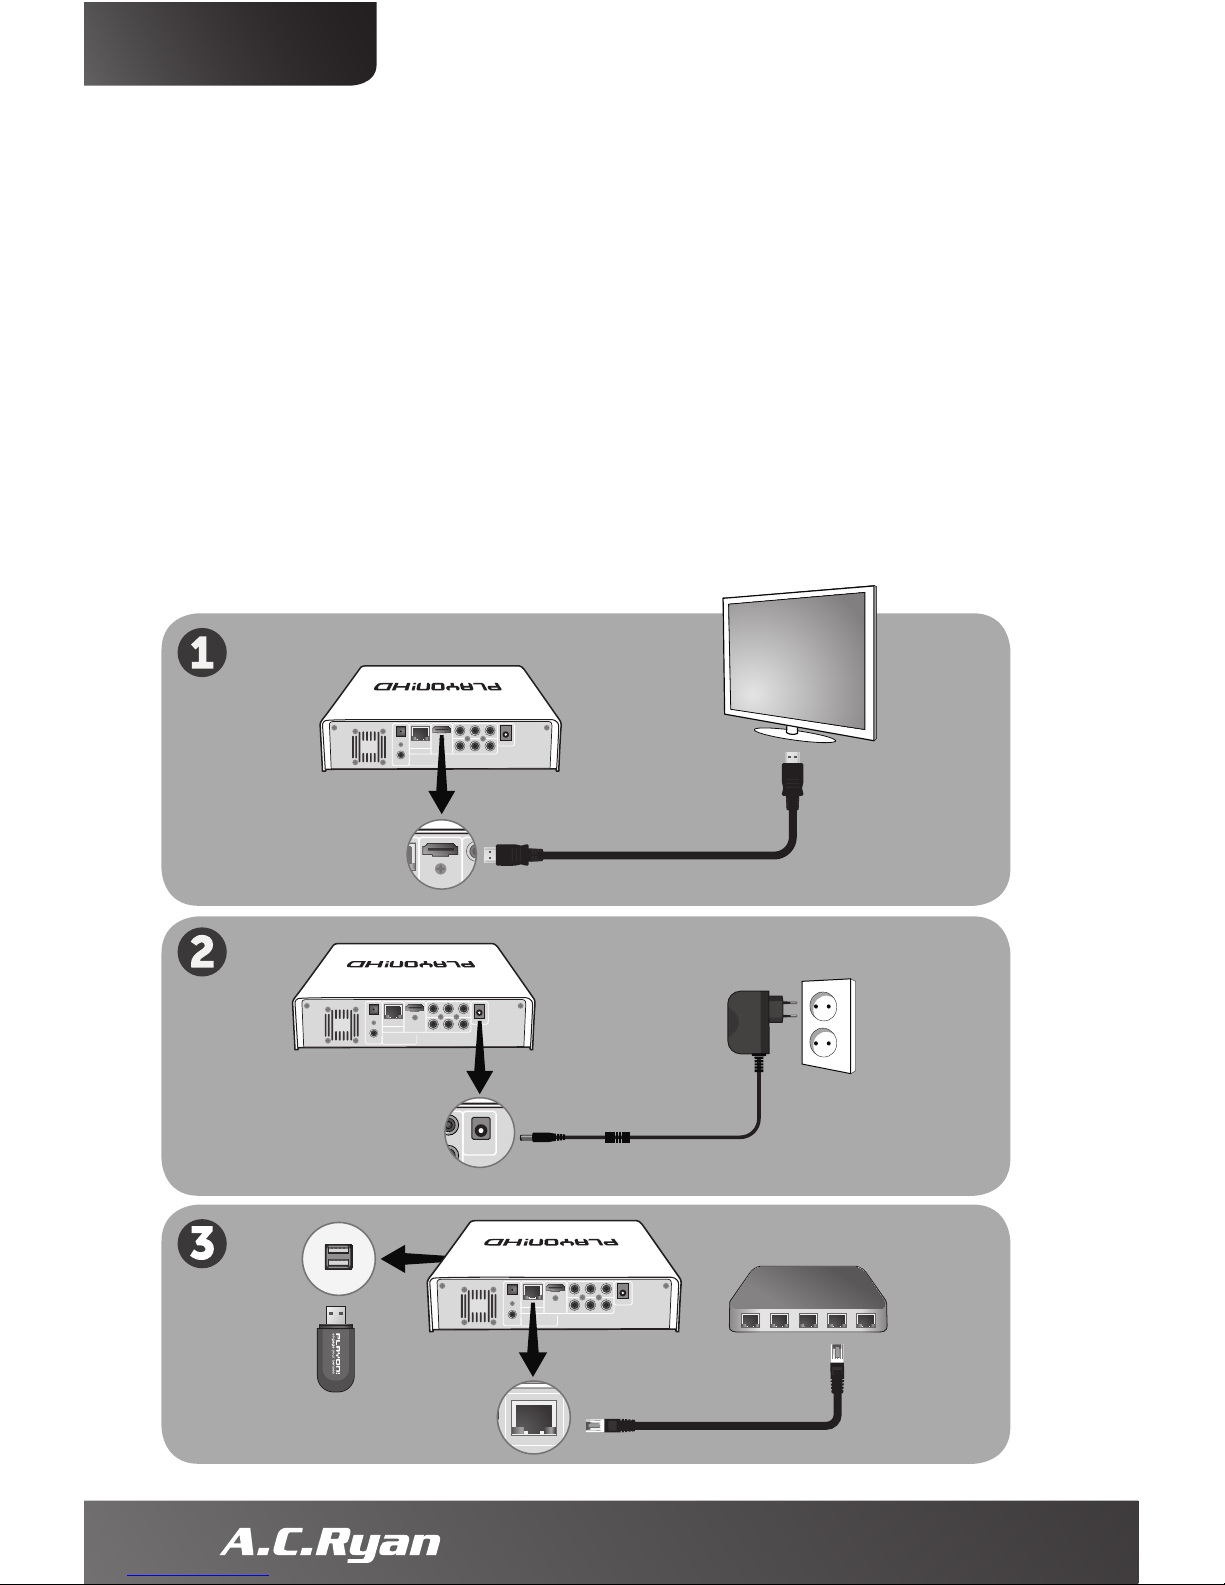
Connecting the hardware to your TV
1. Connect the included HDMI cable from the Playon!HD
to your TV for the highest quality video/audio.
2. Connect one end of the included power adapter jack to
your Playon!HD and the other end to your wall power socket.
3. To make the player part of your network you can connect
your player to your network by using a normal network cable
or optional Playon! Wireless dongle (both not included).
6
ENGLISH
Initial Setup
Choose your:
Menu language: Select the language you want to use.
Wired Setup: Choose automatic or fixed IP/DNS address if you have
a network cable attached. Follow the instructions on the screen.
If you don’t have a network cable attached you can skip this step.
If you have installed a new internal hard drive, or this is the first
time you use the player, it is recommended to format the internal
hard drive. The player will automatically detect this and ask you
to format. Follow the instructions on the screen to do so. If the
player does not ask for a format by itself you can format the drive
by going to Setup in the main menu, choose System and then select
HDD Format. Your player will require a reboot after the format and
then you are done with the basic setup of your Playon!HD.
Note: When you insert a hard drive with data on it, formatting
this hard drive will erase your data. Be sure to make a backup
of your data first before formatting your hard drive inside the
player. Copy your backup after the format back onto the hard
drive inside the player.
Please take your time to go through the Setup menu and
personalise the settings that you want to use, then you are
ready to use your Playon!HD. Playon! Engage your senses.
Alternative options: If your TV does not have a HDMI input,
you can use the included Composite cable for both video
and audio or the component cable (up to 1080i resolution)
for video and the composite cable (red/white) for audio.
If you have an Audio/Video Receiver you can connect your
audio/video signals through it to receive audio and video with
a HDMI, Composite, Component, SPDIF Coaxial or SPDIF
Optical TOSLINK cable.
***SPDIF Optical TOSLINK and SPDIF coaxial cables (not
included) supports up to 5.1 surround sound. For rich HD Audio
in 7.1 surround sound you need to use a HDMI cable.
7
ENGLISH

TV SYS
1
4
7
2
5
8
0
3
6
9
BROWSER COPY MUSIC
SETUP
INFO
PAUSE/STEP
INS REPLAY CM SKIP ZOOM IN ZOOM OUT
SLOW ANGLE
A-B
PLAY STOP
SELECT CONFIRM AUDIO SUBTITLE
HOME
REPEAT GOTO
RETURN
MENU
VOL
HARTELIJK DANK VOOR DE AANKOOP VAN
ONS PRODUCT EN WELKOM BIJ DE PLAYON!
COMMUNITY!
DIT IS EEN SNELLE INSTALLATIEGIDS OM U
TE HELPEN SNEL VAN START TE GAAN MET
UW NIEUWE PLAYON!HD.
Inhoud van de Playon!HD verpakking:
1 x Playon!HD Full HD Netwerk Mediaspeler
1 x Snelle installatiegids
1 x Afstandsbediening
2 x Batterijen
1 x HDMI kabel
1 x Zakje schroees
1 x Composiet kabel (rood/geel/wit)
1 x Component kabel (rood/blauw/groen)
1 x USB kabel
1 x Adapter
8
NEDERLANDS
X2
X4
X2
Van start met uw Playon!HD
Uw interne harde schijf installeren.
Om te beginnen dient u uw interne harde schijf te installeren.
Als u uw Playon!HD kocht met een voorgemonteerde harde
schijf, kunt u deze stap overslaan.
Wilt u een harde schijf naar keuze installeren,
volg dan deze stappen.
Verwijder de schroeven onder aan de kast en verwijder vervolgens
het klepje- zie afbeelding. Bevestig de harde schijf aan het metalen
deksel en bevestig vervolgens de 4 schroeven die met uw Playon!HD
zijn meegeleverd. Sluit de voedingskabel (zwart) en de SATA-
verbindingskabel (rood) aan op de harde schijf. Daarna kunt u
voorzichtig de onderkant sluiten en de schroeven aan de
buitenkant weer bevestigen.
9
NEDERLANDS

X2
X4
X2
10
NEDERLANDS
De Playon!HD op uw TV aansluiten:
1. Sluit de meegeleverde HDMI kabel van de Playon!HD
aan op uw TV voor de hoogste audio en video kwaliteit.
2. Steek de stekker van de meegeleverde adapter aan de ene
kant in uw Playon!HD en aan de andere kant in het stopcontact.
3. Om de speler aan te sluiten op het netwerk kunt u een
standard netwerkkabel of de optionele Playon! Wireless
dongle gebruiken (beiden los verkrijgbaar)
11
NEDERLANDS

Alternatieve opties: Als uw TV geen HDMI input heeft kunt u de
bijgeleverde composiet kabel gebruiken voor beeld en geluid of de
component kabel (tot en met 1080i resolutie) voor beeld en de rood/
witte composiet kabel voor geluid.
Als u een audio-/video-receiver hebt, kunt u uw audio-/videosignalen
via deze receiver laten lopen om audio en video te ontvangen met
een HDMI-, composiet-, component-, SPDIF coax- of SPDIF optische
TOSLINK-kabel.
***SPDIF Optical TOSLINK- en SPDIF coax-kabels (niet meegeleverd)
bieden tot 5.1 surround sound. Voor rijke HD audio in 7.1 surround
sound moet u een HDMI-kabel gebruiken.
Initiële Instellingen:
Kies uw:
Menutaal: Selecteer de taal die u wilt gebruiken.
Bekabelde Setup: Kies automatisch of vast IP/DNS adres als een
netwerkkabel aangesloten is. Volg de instructies op het scherm.
Als er geen netwerkkabel is aangesloten kunt u deze stap overslaan.
Als u een nieuwe interne harde schijf hebt geïnstalleerd, kunt u deze als
volgt formatteren: Ga naar Setup, kies System en selecteer HDD Format.
Uw speler moet na formatteren opnieuw gestart worden. Als u een
nieuwe hardeschijf heeft geïnstalleerd of het is de eerste keer dat u de
speler gebruikt is aan te raden om eerst de interne hardeschijf te format-
teren. De speler zal dit automatisch detecteren en vragen om te format-
teren. Volg de instructies op het scherm. Als de speler niet automatisch
vraagt om te formatteren kunt u dit doen door naar Instellingen te gaan
in het hoofdmenu, daar voor Systeem te kiezen en dan HDD formatteren
te kiezen. Na het formatteren moet de speler opnieuw worden opgestart
waarna u klaar bent met de initiële instellingenen van de Playon!HD.
Opmerking: Als u een harde schijf plaatst waar al gegevens op staan,
worden deze door het formatteren gewist. Zorg ervoor dat u een back-
up van uw gegevens heeft vóórdat u uw harde schijf in de speler format-
teert. U kunt na het formatteren de back-up weer op de harde schijf in
de speler kopiëren.
Neem uw tijd om door het Setup-menu te lopen en de gewenste
instellingen te personaliseren. Daarna bent u helemaal klaar om
optimaal van uw Playon!HD te genieten. Playon! Engage your senses.
12
NEDERLANDS
13
DEUTSCH
VIELEN DANK, DASS SIE SICH FÜR UNSER
PRODUKT ENTSCHIEDEN HABEN UND HER
ZLICH WILLKOMMEN ZUR PLAYON!COMMUNITY!
DIESE SCHNELLSTARTANLEITUNG HILFT
IHNEN BEI DER INSTALLATION IHRES NEUEN
PLAYON!HD
Im Lieferumfang dieses Playon!HD ist Folgendes enthalten:
1 x Playon!HD Full HD Network Media Player
1 x Schnellstartanleitung
1 x Fernbedienung
2 x Batterien
1 x HDMI-Kabel
1 x Packung mit Schrauben
1 x Verbundkabel (rot/gelb/weiß),
1 x Komponentenkabel (rot/blau/grün)
1 x USB-Kabel
1 x Stromadapter
TV SYS
1
4
7
2
5
8
0
3
6
9
BROWSER COPY MUSIC
SETUP
INFO
PAUSE/STEP
INS REPLAY CM SKIP ZOOM IN ZOOM OUT
SLOW ANGLE
A-B
PLAY STOP
SELECT CONFIRM AUDIO SUBTITLE
HOME
REPEAT GOTO
RETURN
MENU
VOL

14
DEUTSCH
X2
X4
X2
Erste Schritte mit Ihrem Playon!HD
Die interne Festplatte installieren:
Bitte installieren Sie zuerst die interne Festplatte.
Wenn Sie Ihren Playon!HD mit einer vormontierten internen
Festplatte gekauft haben, können Sie diesen Arbeitsschritt
überspringen.
Wenn Sie eine Festplatte Ihrer Wahl installieren möchten,
folgen Sie bitte den nachstehenden Anweisungen.
Bitte entfernen Sie die zwei schwarzen Schrauben und heben
Sie den Deckel an wie in der Abbildung dargestellt. Bringen Sie
die Festplatte am Metalldeckel an, und bringen Sie dann die vier
in Ihrer Playon!HD-Box enthaltenen Schrauben an. Schließen
Sie das Stromkabel (schwarzes Kabel) und das SATA-Verbindung-
skabel (rotes Kabel) an die Festplatte an. Sobald Sie damit fertig
sind, schließen Sie vorsichtig den Deckel und bringen Sie die
zwei schwarzen Außenschrauben an.

15
DEUTSCH
X2
X4
X2
16
DEUTSCH
Die Hardware an Ihren Fernseher anschließen
1. Schließen Sie das im Lieferumfang enthaltene HDMI-Kabel
des Playon!HD an den Fernseher an, um die beste Audio-bzw.
Videosignalqualität zu erhalten.
2. Schließen Sie das eine Ende des im Lieferumfang enthaltenen
Stromadapters an Ihren Playon!HD an, und stecken Sie das
andere Ende in die Wandsteckdose.
3. Sie können Ihren Player mithilfe eines herkömmlichen Net-
zwerkkabels oder alternativ mithilfe des Playon! Wireless-Dongles
an Ihr Netzwerk anschließen (beides nicht im Lieferumfang
enthalten), um den Player in das Netzwerk zu integrieren.

17
DEUTSCH
Einrichtung
Wählen Sie Ihre:
Menüsprache: Wählen Sie die gewünschte Sprache aus.
Einrichtung bei angeschlossenem Kabel: Wählen Sie eine
automatische oder festgelegte IP-/DNS-Adresse, falls ein Netzwerkkabel
angeschlossen ist. Befolgen Sie die Anweisungen auf dem Bildschirm.
Falls kein Netwerkkabel angeschlossen ist, können Sie diesen Schritt
auslassen.
Wenn Sie eine neue interne Festplatte installiert haben oder diesen Player
zum ersten Mal in Betrieb nehmen, empfiehlt es sich, die interne Festplatte
zu formatieren. Der Player wird dies automatisch erfassen und Sie zum
Formatieren auordern. Befolgen Sie hierzu die Anweisungen auf dem
Bildschirm. Wenn das Gerät Sie nicht von selbst zum Formatieren
auordert, können Sie die Festplatte formatieren, indem Sie Setup im
Hauptmenü aufrufen, System wählen und anschließend HDD Format aus-
wählen. Nach der Formatierung muss Ihr Player neu gestartet werden.
Dann haben Sie die grundlegende Einrichtung Ihres Playon!HD abgeschlossen.
Hinweis: Wenn Sie eine Festplatte mit Daten installieren, werden durch
die Formatierung alle Daten von der Festplatte gelöscht. Nehmen Sie
daher unbedingt eine Datensicherung vor, bevor Sie die Festplatte im
Player formatieren. Kopieren Sie die gesicherten Daten nach der
Formatierung auf die Festplatte im Player.
Bitte nehmen Sie sich Zeit, um durch das Setup-Menü zu navigieren und
Ihre persönlichen Einstellungen vorzunehmen. Anschließend können Sie
Ihren Playon!HD verwenden. Playon! Engage your senses.
Alternative Optionen: Wenn Ihr TV-Gerät nicht mit einem HDMI-Eingang
ausgestattet ist, können Sie das im Lieferumfang enthaltene Verbundkabel
für Video und Audio verwenden oder das Komponentenkabel (Auflösung
bis zu 1080i) für Video und das Verbundkabel (rot/weiß) für Audio.
Wenn Sie über einen AV-Receiver verfügen, können Sie daran Ihre Audio-
und Videoausgänge anschließen, um Audio und Video mit einem HDMI-,
Verbund-, SPDIF-Optical-TOSLINK-Kabel oder einem SPDIF-Koaxialkabel
zu empfangen
***SPDIF-Optical-TOSLINK-Kabel und SPDIF-Koaxialkabel (nicht im Lief-
erumfang enthalten) eignen sich für Surround-Sound 5.1. Für ergiebiges
HD Audio in Surround-Sound 7.1 müssen Sie ein HDMI-Kabel verwenden.
TACK FÖR ATT DU HAR KÖPT VÅR PRODUKT
OCH VÄLKOMMEN TILL PLAYON!FAMILJEN.
DETTA ÄR EN SNABBINSTALLATIONSGUIDE
FÖR ATT DU SKA KOMMA IGÅNG MED DIN
NYA PLAYON!HD.
I boxen till Playon!HD finns:
1 x Playon!HD full-HD nätverksmediespelare
1 x Snabbinstallationsguide
1 x Fjärrkontroll
2 x Batterier
1 x HDMI-kabel
1 x Förpackning skruvar
1 x Kompositkabel (röd/gul/vit)
1 x Komponentkabel (röd/blå/grön)
1 x USB-kabel
1 x Strömkabel
TV SYS
1
4
7
2
5
8
0
3
6
9
BROWSER COPY MUSIC
SETUP
INFO
PAUSE/STEP
INS REPLAY CM SKIP ZOOM IN ZOOM OUT
SLOW ANGLE
A-B
PLAY STOP
SELECT CONFIRM AUDIO SUBTITLE
HOME
REPEAT GOTO
RETURN
MENU
VOL
18
SVENSKA

X2
X4
X2
Komma igång med din Playon!HD
Installera den interna hårddisken.
För att komma igång behöver du installera den interna
hårddisken. Om du köpt din Playon!HD med en förinstallerad
intern hårddisk kan du hoppa över det här steget.
Om du vill lägga till en valfri hårddisk
följer du dessa steg.
Skruva loss de två svarta skruvarna och lyft upp locket enligt
bilden. Fäst hårddisken vid metallocket och fäst sedan de fyra
medföljande skruvarna som fanns i lådan för din Playon!HD.
Anslut strömkabeln (svart kabel) och SATA-anslutningskabeln
(röd kabel) till hårddisken. Då du har gjort detta kan du stänga
locket försiktigt och fästa de två svarta skruvarna på utsidan
för att slutföra arbetet.
19
SVENSKA
X2
X4
X2
20
SVENSKA
Table of contents
Other A.C.Ryan Media Player manuals


