A&D BM-20 User manual

Analytical Balance
BM-20
BM-22
BM-252
BM-200
BM-300
BM-500
1WMPD4002195B

© 2013A&D Company Ltd.All rights reserved.
No part of this publication may be reproduced, transmitted, transcribed, or translated into any language in
any form by any means without the written permission ofA&D Company Ltd.
The contents of this manual and the specifications of the instrument covered by this manual are subject
to change for improvement without notice.
Windows, Word and Excel are registered trademarks of the Microsoft Corporation.

BM series 1
Contents
Basic Operation
1. Introduction..............................................................................................................................3
1.1. Features...............................................................................................................................4
1.2. Compliance..........................................................................................................................5
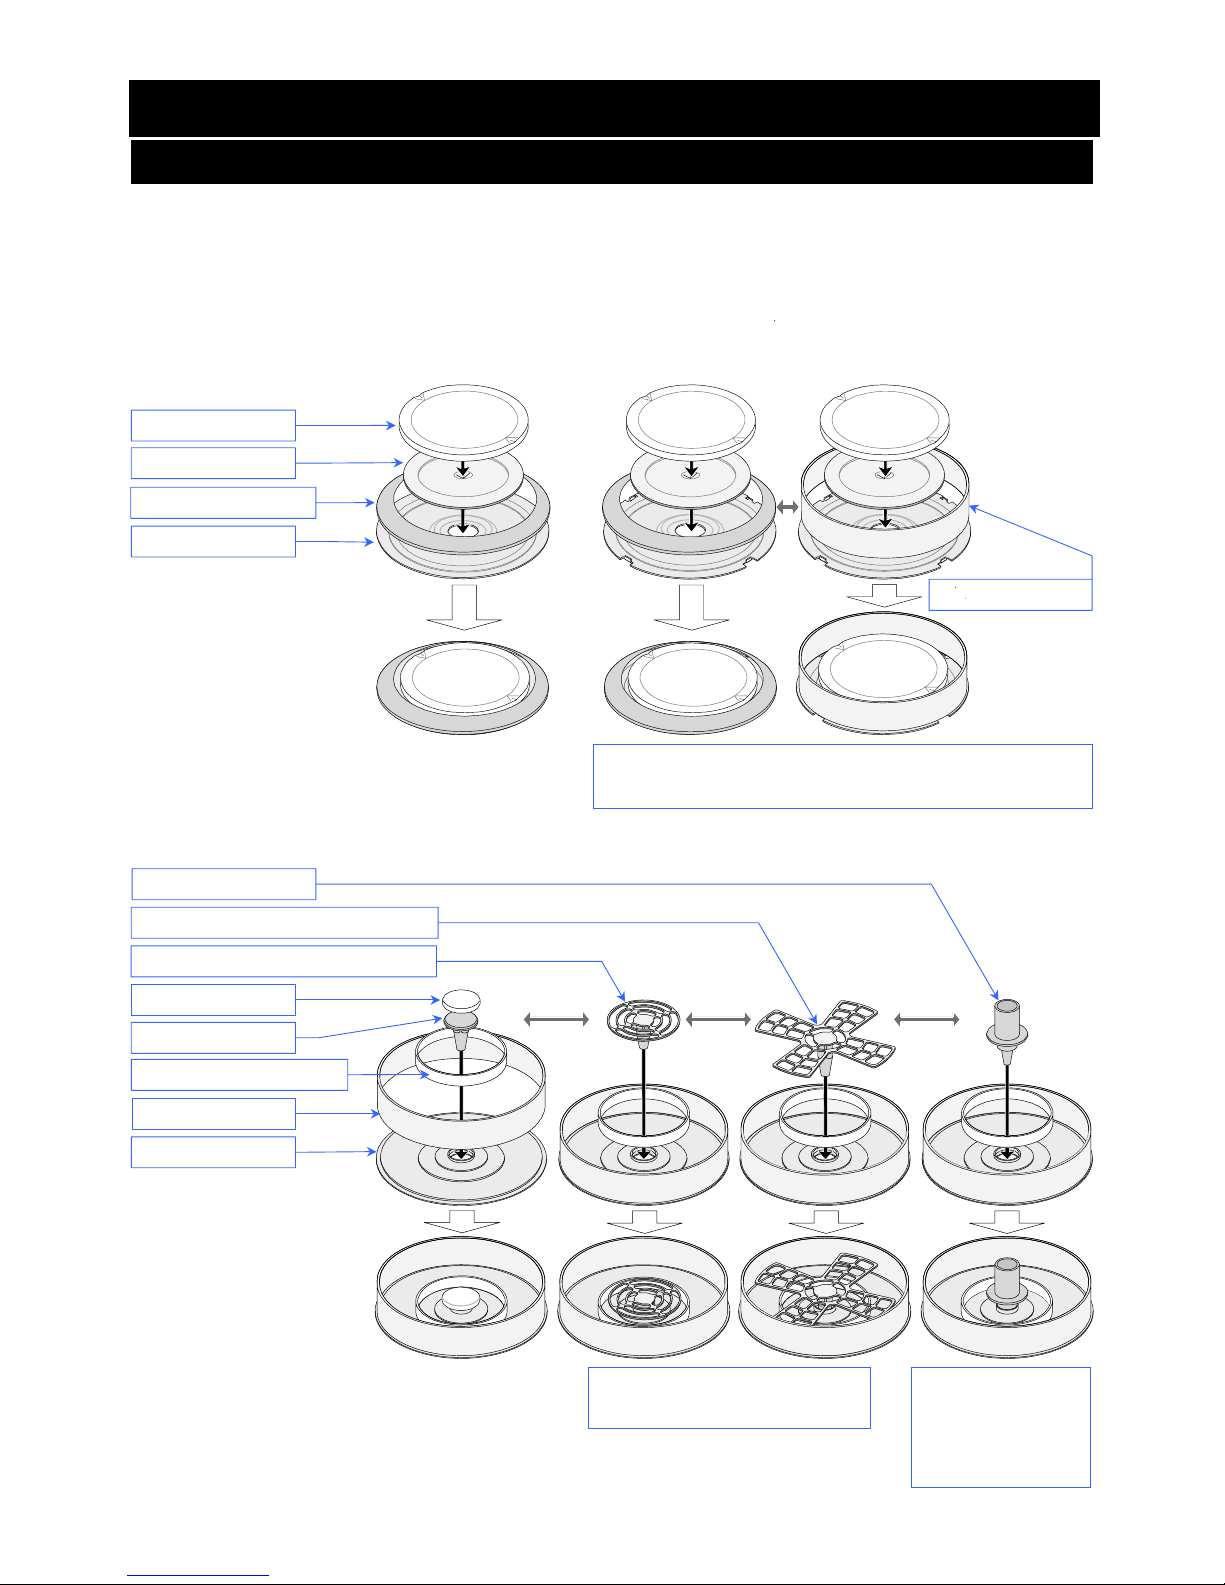
2. Unpacking The Balance..........................................................................................................6
3. Installing The BalanceAnd Precautions.................................................................................8
3.1. Installing The Balance .........................................................................................................8
3.2. Precautions Before Use (Environmental ConditionAnd Preparations)............................10
3.3. Cautions During Use (For Precision Weighing)................................................................ 11
3.4. CautionsAfter Use (Management Of The Balance) .........................................................12
3.5. Cautions For Power Supply...............................................................................................12
4. Display SymbolsAnd Key Operation....................................................................................13
5. Weighing Units......................................................................................................................14
5.1. Units...................................................................................................................................14
5.2. StoringActive Units............................................................................................................17
5.3. Selecting UnitAnd Weighing Mode...................................................................................18
6. Weighing................................................................................................................................20
6.1. Basic Operation (Gram Mode)..........................................................................................20
6.2. Smart Range For BM-22...................................................................................................21
6.3. Counting Mode (PC)..........................................................................................................22
6.4. Percent Mode (%)..............................................................................................................24
6.5. Built-in DC Static Eliminator (Neutralization Device).........................................................25
6.6. Monitoring Clock and Environmental Sensors..................................................................27
6.7. Repeatability Test...............................................................................................................28
Adapting To The Environment
7. ResponseAdjustment...........................................................................................................29
7.1. Automatic ResponseAdjustment......................................................................................29
7.2. Manual ResponseAdjustment ..........................................................................................30
8. Calibration (ToAdjust The Weighing Value)..........................................................................31
8.1. Calibration Group...............................................................................................................31
8.2. Automatic Self Calibration (For variation of ambient temperature)...................................32
8.3. One-Touch Calibration (For Common Use)......................................................................32
8.4. Calibration Test Using the Internal Mass...........................................................................33
8.5. Calibration UsingAn External Weight ...............................................................................34
8.6. Calibration Test UsingAn External Weight........................................................................35
8.7. Correcting The Internal Mass Value..................................................................................36
9. Function SwitchAnd Initialization..........................................................................................37
9.1. Permit Or Inhibit.................................................................................................................37
9.2. Initializing The Balance......................................................................................................38
Selecting Functions
10. Function Table.......................................................................................................................39
10.1. Setting The Function Table................................................................................................39
10.2. Details Of The Function Table...........................................................................................41

2 BM series
10.3. Description Of The Class "Environment, Display".............................................................43
10.4. Description Of The Item "Data Output Mode"...................................................................45
10.5. Description Of The Item "Data Format".............................................................................46
10.6. Data Format Examples......................................................................................................49
10.7. ClockAnd Calendar Function............................................................................................51
11. ID NumberAnd GLP Report.................................................................................................52
11.1. Setting The ID Number......................................................................................................52
11.2. GLP Report........................................................................................................................53
12. Data Memory.........................................................................................................................58
12.1. Notes On Using Data Memory..........................................................................................58
12.2. Data Memory For Weighing Data......................................................................................59
12.3. Data Memory For CalibrationAnd Calibration Test...........................................................62
13. Underhook.............................................................................................................................63
14. Density Measurement (Specific gravity)..............................................................................64
15. Password Function................................................................................................................67
15.1. Using Password Function..................................................................................................67
15.2. Changing Password..........................................................................................................68
15.3. Inputting Password When Turning On The Balance.........................................................69
15.4. Missing Password..............................................................................................................69
Interface And Communication
16. Standard InputAnd Output Interface.....................................................................................70
16.1. RS-232C Interface.............................................................................................................70
16.2. Connection To Peripheral Equipment................................................................................71
16.3. Commands........................................................................................................................74
Maintenance
17. Maintenance..........................................................................................................................79
17.1. Treatment Of The Balance................................................................................................79
17.2. Error Codes .......................................................................................................................79
17.3. Other Display.....................................................................................................................81
17.4. Checking The Balance PerformanceAnd Environment ...................................................82
17.5. Asking For Repair..............................................................................................................82
18. Specifications ........................................................................................................................83
18.1. External Dimensions..........................................................................................................84
18.2. OptionsAnd Peripheral Equipment...................................................................................85
19. Terms/Index...........................................................................................................................89
19.1. Terms.................................................................................................................................89
19.2. Index..................................................................................................................................90

BM series 3
1. Introduction
This manual describes how the BM series balances work and how to get the most out of them in
terms of performance. Read this manual thoroughly before using the balance and keep it at hand
for future reference.
About This Manual
This manual consists of the following five parts:
Basic operation .............................. Describes precautions, the balance's construction and basic
operation.
Adapting to the environment........... Describes response (and stability) adjustment to adapt to the
environment where there is vibration or drafts, the way to
maintain weighing precision in a variation of ambient
temperature, calibration and calibration test.
Selecting functions.......................... Describes functions of the balance.
Interface and communication.......... Describes the serial interface used for communicating with a
computer that requests weighing data and controls the
balance, and for use with a printer
Maintenance .................................. Describes maintenance, error codes, troubleshooting,
specifications and options.

4 BM series
1.1. Features
A built-in DC static eliminator can eliminate static electricity from the weighing sample before the
measurement, reducing weighing error.
Each electrode unit of the eliminator is designed to be removed, cleaned and replaced.
Automatic self calibration, using the internal mass, adapting to changes to temperature changes.
Response adjustment adapting to drafts and/or vibration automatically.
Memory function to store weighing data and calibration data.
When only weighing data is stored, a maximum of 200 data can be stored.
Interval mode to store the weighing data periodically.
Good laboratory practice (GLP) / Good manufacturing practice (GMP) data can be output using
the RS-232C serial interface.
A built-in clock and calendar that can add the time and date to the output data.
Underhook, for measuring density and weighing magnetic materials.
Multiple weighing units with most of the common units used around the world.
Gram, Milligram, Counting mode, Percent mode, Ounce (Avoir), Troy Ounce, Metric carat, Momme,
Pennyweight, Grain (UK), Tael (preset in the factory), Tola (India), Messghal, Density mode
BM-22 is equipped with a smart range function to weigh with the precision range (a higher
resolution) when zeroing a tare weight within the weighing capacity.
The test tube holder is included in the accessories of BM-20 and BM-22.
Density mode for calculating the density of a solid.
BM series balances are equipped with an RS-232C serial interface and a USB interface to
communicate with a computer. When printing data using the RS-232C interface, by using the USB
interface, the data can be transmitted to a computer at the same time. Communications between
the BM series balance using the RS-232C interface and a Windows computer using the Windows
communication tools software (WinCT) make building a system very easy.
Connecting the USB interface of the balance, by cable to a Windows computer, allows
transmission of the weighing data to Excel or Word.
When multiple balances have the BM-08 Ethernet interface installed in place of the USB interface
and connected to a LAN, data can be acquired from each of them using the WinCT-Plus software.
The weighing data can be stored by connecting the accessory data logger (AD-1688) directly,
when not using a computer.

BM series 5
1.2. Compliance
1.2.1. Compliance With FCC Rules
Please note that this equipment generates, uses and can radiate radio frequency energy. This
equipment has been tested and has been found to comply with the limits of a Class A computing
device pursuant to Subpart J of Part 15 of FCC rules. These rules are designed to provide
reasonable protection against interference when equipment is operated in a commercial
environment. If this unit is operated in a residential area, it may cause some interference and
under these circumstances the user would be required to take, at his own expense, whatever
measures are necessary to eliminate the interference.
(FCC = Federal Communications Commission in the U.S.A.)
1.2.2. Compliance With EMC Directives
This device features radio interference suppression and safety regulation in compliance
with the following Council Directives
Council directive 2004/108/EC EN61326 EMC directive
Council directive 2006/95/EC EN60950 Safety of Information Technology Equipment
The CE mark is an official mandatory European marking.
Please note that any electronic product must comply with local laws and regulations when sold or
used anywhere outside Europe.

6 BM series
2. Unpacking The Balance
Unpack the balance carefully. Keep the packing material to be used for transporting the balance
in the future. See the illustrations to confirm that everything is contained.
Parts For Each Products
BM-22, BM-20
BM-252
BM-500, BM-300,
BM-200
Small weighing Large weighing
pan for filter pan for filter
Weighing pan Pan support
Test tube holder
Small fine range ring
Fine range ring
Tweezers
Dust plate AX-MX-36
φ15, 0.8 φ12, 0.3 φ8, 0.05
Large Medium Small
Round aluminum analytical pans (
each 10 pieces
)
Weighing pan Pan support
Fine range ring
Breeze break ring
Dust plate
Weighing pan
Pan support
Breeze break ring
Dust plate
Common Parts
AC adapter AC adapter labels
Note Windows communication
software (WinCT)
Please confirm that the AC adapter type is
correct for your local voltage and receptacle type.
Data logger
AD-1688
The weighing data can be
stored when connecting
the data logger directly.
USB cable
Display cover
Separation plate
If unnecessary, remove it.
Tweezers
AD-1689
Tweezers for handling a weight.
Use it to avoid temperature changes
due to having your hand in the
weighing chamber, thus to perform
accurate calibration.
D-sub 9pins
Position of placing
AC adapter labels

BM series 7
Grounding terminal
Anti theft device
AC adaptor jack
USB interface
External key jack
Cap the terminal with accessory
rubber cap when it is not used.
Serial interface RS-232C
D-sub 9
p
ins
The DC Static eliminator
Electrode units of the
DC static eliminator
Separation plate
If unnecessary, remove it.
J
oint handle
When jointing the right (left) slide
door handle, the right (left) glass
door can be opened or closed
with the left (right) joint handle.
Bubble spirit level
Leveling foot
Glass door handle
The handle for the glass door.
The handle can be joined to the joint handle
Neutralization
area
Glass door handle
Display cover
LED of the static eliminator
Example of BM-20
Weighing
chamber
Display
Keys

8 BM series
3. Installing The Balance And Precautions
3.1. Installing The Balance
Step
1 Refer to "3.2. Precautions Before Use (Environmental Condition And Preparations)"
concerning the place to install the balance. Place the balance on a firm weighing table.
Step
2 Assemble the weighing pan and other parts in the weighing chamber, in accordance with the
product type and use.
BM-500, BM-300, BM-200 BM-252
BM-22, BM-20
Fine range ring
Weighing pan
Breeze break ring
Dust plate
Pan support
Use the fine range ring to avoid errors caused by drafts
when weighing with a minimum display of 0.01 mg.
Pan support
Weighing pan
Small fine range ring
Dust plate
Fine range ring
Large weighing pan for filter
Small weighing pan for filter
Choose the weighing pan to
adapt to the filter size.
Test tube holder
Use the holder for
micro tube or test
tube of φ12 mm
or less.

BM series 9
Step
3 If the separation plate is not necessary, remove
the screw and take it off. Refer to next page
"The Separation Plate".
Step
4 Adjust the level of the balance using the leveling feet.
Step
5 Confirm that the AC adaptor type is correct for your
local voltage and power receptacle type.
Step
6 Connect the specified AC adapter to the balance.
Warm up the balance for at least one hour with
nothing on the weighing pan.
Step
7 Confirm correct weighing. If necessary, calibrate
the balance. Refer to "8. Calibration".
Screw
Hoo
k
Separation plate
Bubble spirit level
Leveling foo
t
A
C adaptor jac
k
Grounding terminal
Example of outle
t
Note Please confirm that the AC adapter
type is correct for your local voltage
and receptacle type.
BM-200, BM-300, BM-252
BM-500, BM-252
BM-22, BM-20

10 BM series
The Separation Plate
Note: Take care that the separation plate is not broken when operating it.
Removing the Separation Plate
Step
1 Support the separation plate and
remove the screw from the plate.
Step
2 Lift the plate and remove hooks.
Step
3 Rotate the plate on the axis of the back edge.
Rotate the plate on the axis of the front edge.
Step
4 Remove the plate from the chamber.
Attaching the Separation Plate
Use the arrows in reverse to attach the plate.
Step
5 Insert the plate into the chamber. (Reversed
Step
4)
Step
6 Rotate the plate on the axis of the front edge.
Level the plate. (Reversed
Step
3)
Step
7 Insert hooks and hook the plate. (Reversed
Step
2)
Step
8 Install and fix the screw. (Reversed
Step
1)
3.2. Precautions Before Use (Environmental Condition And Preparations)
To ensure that you get the most from your balance, please try to follow these conditions as closely as
possible. Consider these conditions for BM-20 and BM-22 that are sensitive instrument specially.
The best operating temperature is about 20°C / 68°F at about 50% Relative Humidity.
The weighing room should be free of dust.
Clean the weighing chamber and its surroundings to prevent foreign matter from invading when
weighing a very small amount.
The weighing table should be solid and free from vibration, drafts (such as frequently opening
doors or windows) and as level as possible. We recommend to use the anti-vibration table
(AD-1671) and remote controller (AD-8922A) for BM-20 and BM-22.
Do not install the balance where it will be subject to vibration. Corners of rooms are best.
Do not install the balance near a heater, air conditioner, or in a breeze. The influence of breezes
can be reduced with the tabletop breeze break (AD-1672).
Do not install the balance in direct sunlight and excessive temperature changes.
Do not use the balance near other equipment which produces magnetic fields.
Adjust the level of the balance using the leveling feet.
Please warm-up the balance for at least one hour. Plug-in the AC adapter as usual.
Calibrate the balance before using and after moving it to another location.
Ensure a stable power source when using the AC adapter.
Do not place or use the balance where there is flammable or corrosive gas present.
Hoo
k
Screw
Step
1
Step
1
Step
2
Step
3
Step
3
Step
4
Hoo
k
Separation plate

BM series 11
3.3. Cautions During Use (For Precision Weighing)
Note the following items to get accurate weighing data.
Discharge static electricity from the weighing material. When
weighing sample (plastics, insulator, etc.) could have a static
charge, the weight value is influenced. Ground the balance, and
Eliminate the static electricity using the built-in static eliminator.
Try to keep the ambient humidity at or above 45%RH in the room.
Use a metal shield case.
Wipe a charged material (plastic sample etc.) with a damp cloth.
This balance uses a strong magnet as part of the balance assembly,
so please use caution when weighing magnetic materials. If there is
a problem, use the underhook (on the bottom of the balance) to
suspend the material away from the influence of the magnet.
Eliminate temperature differences between the weighed sample and
the environment. When a sample is warmer (cooler) than the ambient
temperature, the sample will appear lighter (heavier) than the true
mass. This error is due to the rising (falling) draft next the sample. If
you touch the sample, the same type error will occur. Do not touch the
sample directly with your hand. Use tweezers or other tools.
Do not drop things upon the weighing pan, or place a weight
beyond the range of the balance on the weighing pan.
Make each weighing gently and quickly to avoid errors due to
changes in the environmental conditions.
We recommend that the fine range ring and separation plate are
used to avoid weighing error caused by drafts when BM-252 displays
a weighing value in unit of 0.01 mg (minimum display: 0.01 mg).
We recommend that the small fine range ring, fine range ring
and separation plate are used to avoid weighing error caused by
drafts when BM-22 and BM-20 display a weighing value in unit of
0.01 mg and 0.001 mg (minimum display: 0.01 mg and 0.001 mg).
To reduce the influence of breezes, minimize operation of doors of
the weighing chamber.
The weighing value of BM-22 and BM-20 may change after the
stable indicator is displayed. We recommend that you set a
constant wait time (approx. 10 sec.) between displaying the stable
indicator and reading the value.
If the contamination may be a problem, do not use the weighing
chamber for the sampling operations to prevent the scattering of
matter.
Take into consideration the affect of air buoyancy on a sample
when more accuracy is required.
Do not use a sharp instrument (such as a pencil or ball point pen) to
press the keys, use your finger only.
Grounding
Metal case
Charged material
Magnet material
40°C20°C
Draft
Weighing pan
Fine range ring
BM-252
Shock
BM-20
BM-22
Fine range ring
Small fine range ring

12 BM series
Press the RE-ZERO key before each weighing to prevent possible
errors.
Avoid foreign matter (dust, liquid or metal fragments) that could get
inside the balance.
Operate your balance gently. Shorten the operation time as much
as possible (Opening and closing door, putting and removing
sample). Use a pair of tweezers to avoid temperature changes due
to heat from inserting your hand into the weighing chamber.
3.4. Cautions After Use (Management Of The Balance)
Avoid mechanical shock to your balance.
Do not disassemble the balance. Contact your local A&D dealer if your balance needs service
or repair.
Do not use solvents to clean the balance. For best cleaning, wipe with a dry lint free cloth or a
lint free cloth that is moistened with warm water and a mild detergent.
Avoid foreign matter (dust, liquid or metal fragments) that could get inside the balance.
3.5. Cautions For Power Supply
Do not remove the AC adapter while the internal mass is in motion, for example, right after the
AC adapter is connected, or during calibration using the internal mass.
If the AC adapter is removed under the conditions described above, the internal mass will be
left unsecured, that may cause mechanical damage when the balance is moved.
Before removing the AC adapter, confirm that zero is displayed in the weighing mode, then
press the ON:OFF key.
When the AC adapter is connected, the balance is in the standby mode if the standby indicator
is on. This is a normal state and does not harm the balance. For accurate weighing, we
recommend that you always plug in your balance so it can warm up.
Connect the AC adapter for BM-22 and BM-20 normally.

BM series 13
4. Display Symbols And Key Operation
Display
The interval memory function is used to store periodical weighing data. Refer to "12. Data Memory".
Key Operation
Press and release the key immediately or "Click the key" ..................................................................
Press and hold the key .......................................................................................................................
Key When pressed and released When pressed and held
The key to turn the display ON and OFF. The standby indicator is displayed when the
display is turned off. The weighing mode is enabled when the display is turned on.
When the display is turned on, the password input ( pa55 ) is displayed if the
password function is used. The weighing mode is enabled if the password function is not
used. Refer to "15.3. Inputting Password When Turning On The Balance".
This key is available anytime. Pressing the key during operation will interrupt the operation
and turn the display OFF.
Cancels the operation when performing
settings. Enters the calibration mode using
the internal mass. The key to display other items of the
calibration menu.
The key to switch the preset weighing units
stored in the function table.
Refer to "5. Weighing Units". The key to perform automatic response
adjustment.
In the weighing mode, the key to turn the
minimum weighing value ON and OFF.
In the counting or percent mode, the key
to enter the sampling mode.
The key to enter the function table mode or
repeatability test mode.
Refer to "10. Function Table" or "6.7.
Repeatability Test".
The key to outputs the weighing data to a
printer or personal computer (or store it in
memory) depending on the function table
settings. (Factory setting = output)
No function at factory setting.
By changing the function table:
"Title block" and "End block" for GLP /
GMP report are output.
The data memory menu is displayed.
The key to set the display to zero.
The key to turn the static eliminator ON and OFF.
The key to monitor the date and time, and the environmental sensors (temperature, humidity, air
pressure), for several seconds. Referto "6.6. Monitoring Clock and Environmental Sensors".
Response indicato
r
for app
r
ox. 30
seconds when weighing starts.
The amount of stored data with data memory function
Humidity (%)
Standby indicator of
interval memor
y
function
Indicator of static eliminato
r
Unit
s
.
Refer to
"
5. Wei
g
hin
g
Units".
A
ctive indicato
r
of
interval memor
y
function
Processing indicato
r
Weighing in liquid of density mode
P
rio
r
notice indicator of
automatic self calibration
Stabilization indicato
r
The curren
t
data numbe
r
Standby indicato
r
of power suppl
y
Blinking indicators
Weighing data or stored data
Weighing in ai
r
of density mode
Right and left glass door indicato
r
Air pressure(hPa)

14 BM series
5. Weighing Units
5.1. Units
The units and weighing modes can be selected and stored in the function table as described in
"5.2. Storing Active Units".
The sequence of displaying them can be arranged to fit the frequency of use.
They are stored and are maintained in non-volatile memory, even if the AC adapter is removed.
If the law in your area permits, you may use all of the units. You can disable the units that you
don't regularly use. And you are able to turn them back on.
If a weighing mode (or unit of mass) has been turned off, that mode or unit will be missing in the
sequence. Tael has four varieties, one of which can be selected and installed at the factory.
Press the MODE key to select a unit or mode for weighing.
For details about the units and modes, see the table below:
Name (unit, mode) Abbreviation Display unit Conversion factor
Gram g
1 g
Milligram mg
0.001 g
Counting mode PC -
Percent mode % -
Ounce (Avoir) oz 28.349523125 g
Troy Ounce ozt 31.1034768 g
Metric Carat ct 0.2 g
Momme mom 3.75 g
Pennyweight dwt 1.55517384 g
Grain (UK) GN 0.06479891 g
Tael (HK general, Singapore) 37.7994 g
Tael (HK jewelry) 37.429 g
Tael (Taiwan) 37.5 g
Tael (China)
tl
31.25 g
Tola (India) t 11.6638038 g
Messghal m 4.6875 g
Density mode DS Referto"14. Density Measurement"
Density mode
To use the density mode, it must be stored in the function table as described on page 17.
For details about this mode, refer to "14. Density Measurement".
To select this mode, press the MODE key until the processing indictor blinks with the unit
"g" displayed.

BM series 15
Capacity And Minimum Display For BM-252, BM-500, BM-300, BM-200
The tables below indicate the weighing capacity and the minimum display for each balance.
BM-500 BM-300 BM-200
Unit Capacity Minimum display
Gram 520 320 220 0.0001
Milligram 520000 320000 220000 0.1
Ounce (Avoir) 18.3 11.2 7.76 0.00001
Troy Ounce 16.7 10.2 7.07 0.00001
Metric Carat 2600 1600 1100 0.001
Momme 138 85.3 58.6 0.0001
Pennyweight 334 205 141 0.0001
Grain(UK) 8024 4938 3395 0.002
Tael (HK general, Singapore) 13.7 8.46 5.82 0.00001
Tael(HKjewelry) 13.8 8.54 5.87 0.00001
Tael(Taiwan) 13.8 8.53 5.86 0.00001
Tael(China) 16.6 10.2 7.04 0.00001
Tola(India) 44.5 27.4 18.8 0.00001
Messghal 110 68.2 46.9 0.0001
BM-252
Unit Capacity Minimum display
Gram 250 0.00001
Milligram 250000 0.01
Ounce (Avoir) 8.81 0.000001
Troy Ounce 8.03 0.000001
Metric Carat 1250 0.0001
Momme 66.6 0.00001
Pennyweight 160 0.00001
Grain(UK) 3858 0.0002
Tael (HK general, Singapore) 6.61 0.000001
Tael (HK jewelry) 6.67 0.000001
Tael (Taiwan) 6.66 0.000001
Tael (China) 8.00 0.000001
Tola (India) 21.4 0.000001
Messghal 53.3 0.00001

16 BM series
Capacity And Minimum Display For BM-22, BM-20
BM-22 is equipped the precision range and standard range of the smart range function.
BM-20
Precision range
Unit
Capacity Minimum display
Gram 22.0 0.000001
Milligram 22000 0.001
Ounce(Avoir) 0.776 0.0000001
TroyOunce 0.707 0.0000001
Metric Carat 110 0.00001
Momme 5.86 0.000001
Pennyweight 14.1 0.000001
Grain(UK) 339 0.00002
Tael(HKgeneral,Singapore) 0.582 0.0000001
Tael(HKjewelry) 0.588 0.0000001
Tael(Taiwan) 0.587 0.0000001
Tael(China) 0.704 0.0000001
Tola (India) 1.88 0.0000001
Messghal 4.69 0.000001
BM-22
Precision range Standard range
Unit
Capacity Minimum display Capacity Minimum display
Gram 5.10 0.000001 22.0 0.00001
Milligram 5100 0.001 22000 0.01
Ounce (Avoir) 0.179 0.0000001 0.776 0.000001
Troy Ounce 0.163 0.0000001 0.707 0.000001
Metric Carat 25.5 0.00001 110 0.0001
Momme 1.36 0.000001 5.86 0.00001
Pennyweight 3.27 0.000001 14.1 0.00001
Grain (UK) 78.7 0.00002 339 0.0002
Tael (HK general, Singapore) 0.134 0.0000001 0.582 0.000001
Tael (HK jewelry) 0.136 0.0000001 0.587 0.000001
Tael (Taiwan) 0.136 0.0000001 0.586 0.000001
Tael (China) 0.163 0.0000001 0.704 0.000001
Tola (India) 0.437 0.0000001 1.88 0.000001
Messghal 1.08 0.000001 4.69 0.00001

BM series 17
5.2. Storing Active Units
The units and modes can be selected and stored in the function table.
The sequence of displaying them can be arranged to fit the frequency of use.
The units stored are maintained in non-volatile memory, even if the AC adapter is removed.
1 Press and hold the RANGE key until ba5fnc of
the function table is displayed in the weighing mode,
then release the key.
2 Press the RANGE key several times to display Unit .
3 Press the PRINT key to enter the unit selection mode.
4 Specify a unit or mode in the order to be displayed
using the following keys.
RANGE key.........To display the units sequentially.
RE-ZERO key......To specify a unit or mode.
The indicator appears when
the displayed unit or mode is specified.
Examples Unit Display
Gram g
Milligram mg
Counting mode PC
Percent mode %
Density mode DS
5 Press the PRINT key to store the units or modes.
The balance displays end and then displays the next
menu item of the function table.
6 Press the CAL key to exit the function table.
Then the balance returns to the weighing mode with the
selected unit.
Specify the uni
t
Press and hold
Press
s
everal time
s
The indicato
r
is
displayed at the
units specified.
Store them
Selection ke
y
Example
s

18 BM series
5.3. Selecting Unit And Weighing Mode
Preset the sequence of displaying units and
weighing modes to fit the frequency of use.
Refer to "5.2 . Storing Active Units".
Pressing the MODE key in the weighing mode,
the unit and weighing mode can be displayed in
order.
BM-22 and BM-20 are preset units in the
factory. (Milligram), (Gram) is displayed
in order.
For BM-252, BM-500, BM-300 and BM-200
are preset units in the factory.
(Gram), (Milligram) is displayed in order.
Density mode
To use the density mode, it must be stored in
the function table as described on page 17.
Refer to "14. Density Measurement" for
details about the mode.
To select this mode, press the MODE key
until the processing indictor blinks with
the unit "g" displayed.
The unit sequence of the factory settings.
Turning on the display.
BM-252
BM-500
BM-20 BM-300
BM-22 BM-200
Counting mode
Percent mode
Ounce (Avoir)
Troy Ounce
Metric Cara
t
Momme
Pennyweigh
t
Grain (UK)
Tael
Tola (India)
Messghal
Density mode
This manual suits for next models
5
Table of contents
Other A&D Scale manuals