ABB AMXE250 User manual

—
MANUAL
Motors for heavy electrical vehicles
AMXE250

MOTORS FOR HEAVY ELECTRICAL VEHICLES
2
—
NOTICE
The information in this document is subject to change without further
notice and should not be used as a commitment by ABB. ABB
assumes no responsibility for any errors that may appear in this
document.
In no event shall ABB be liable for direct, indirect, special, incidental or
consequential damages of any kind arising from the use of this
document, nor shall ABB be liable for incidental or consequential
damages arising from the use of any software or hardware described
in this document.
This document and parts thereof must not be reproduced or copied
for use for other than that of the AMXE160 without ABB’s written
permission. The contents thereof must not be imparted to a third
party nor be used for any unauthorized purpose.
©Copyright 2022 ABB. All rights reserved.

3
1. Introduction .....................................................................................................................................................5
1.1. General.................................................................................................................................................5
1.2. Intended application.........................................................................................................................6
1.3. Warranty ..............................................................................................................................................6
1.4. Information on electromagnetic compatibility...........................................................................6
1.5. Required qualifications for personnel who handle the motor .................................................6
1.6. Manual and related documents ...................................................................................................... 7
1.7. Safety................................................................................................................................................... 7
1.8. Contraindications.............................................................................................................................. 7
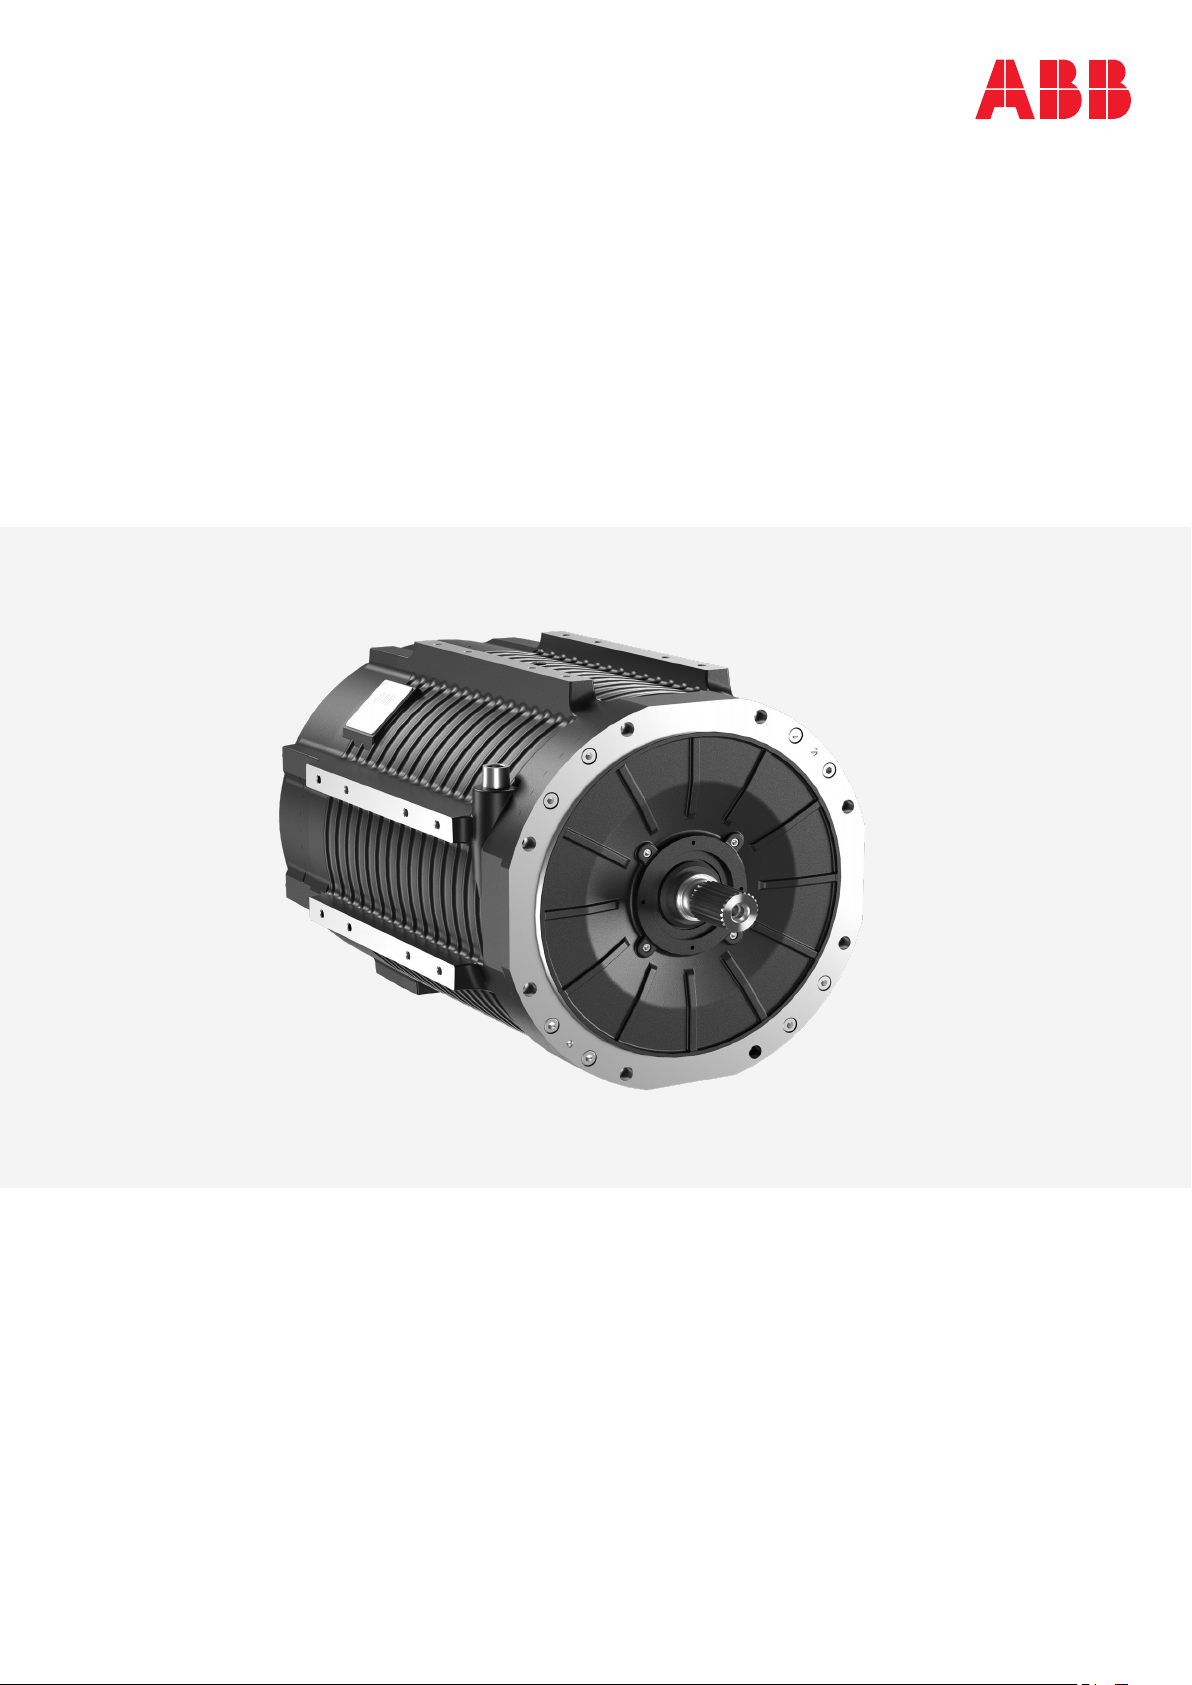
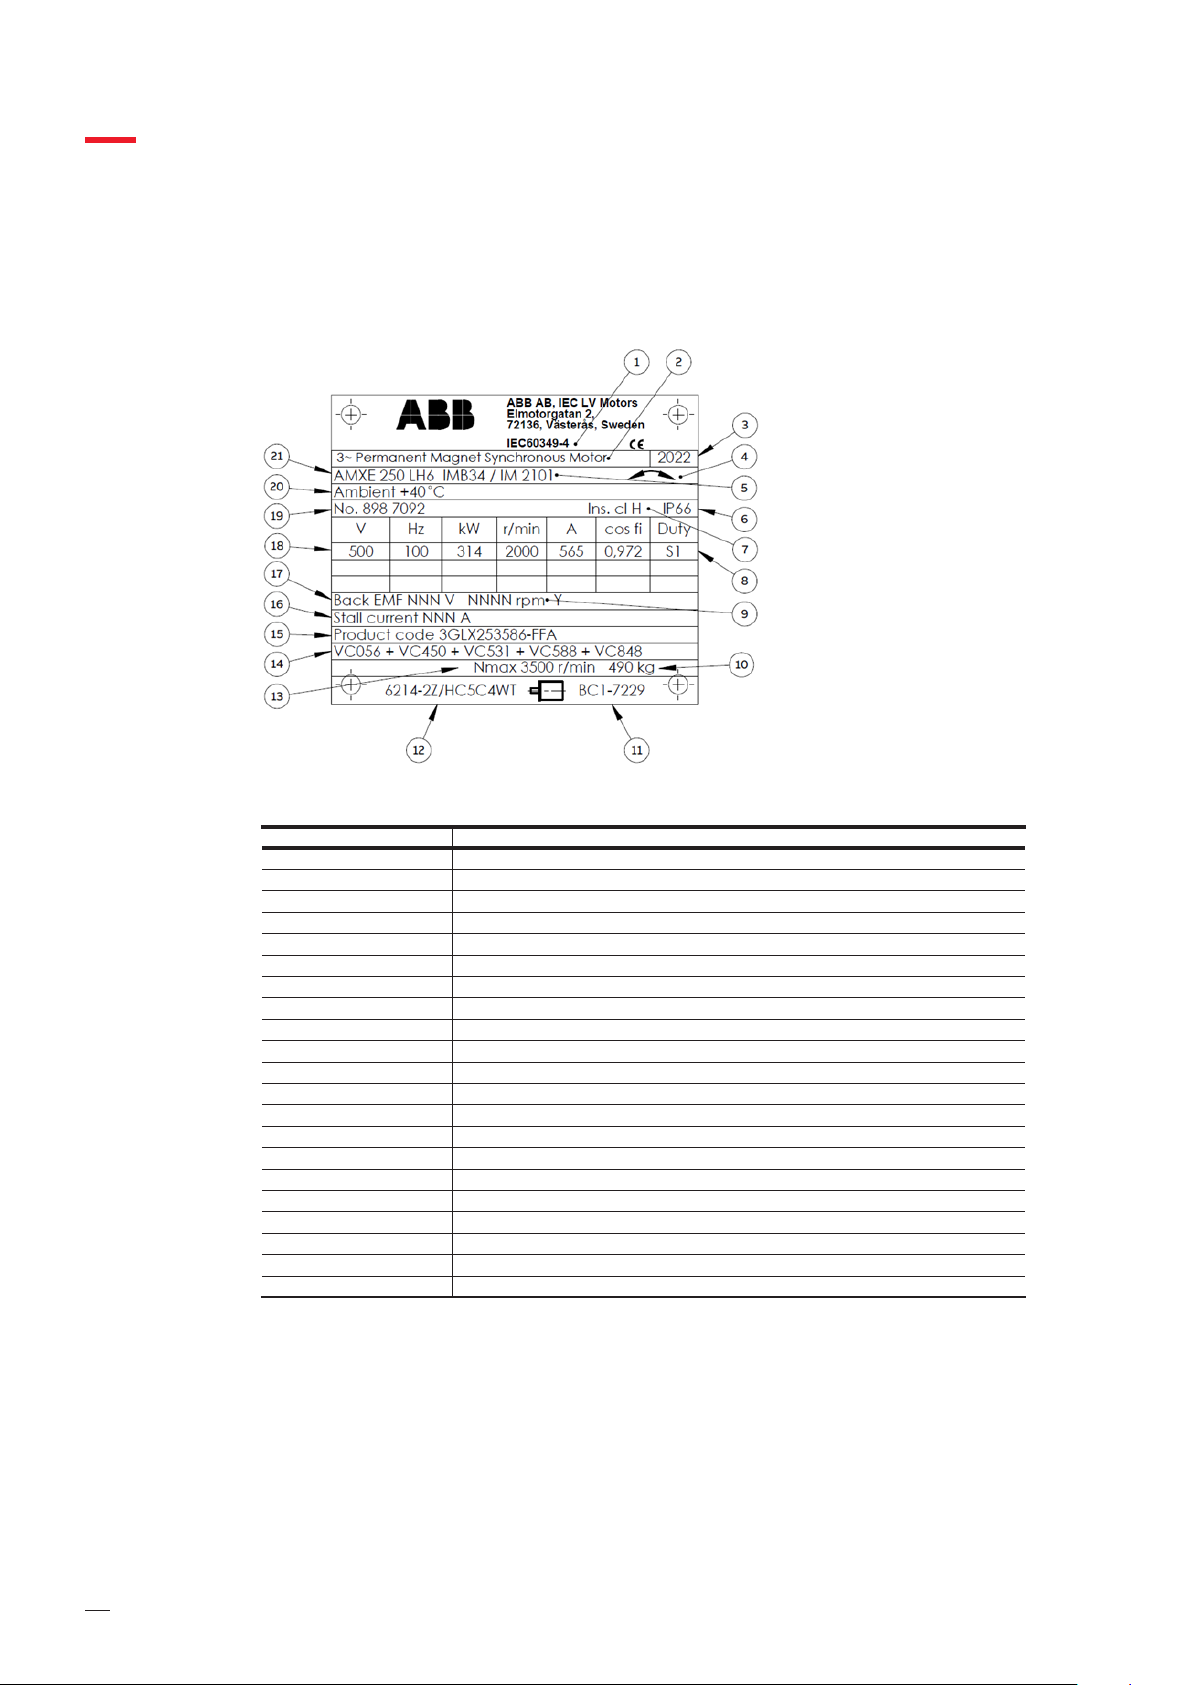
2. Product description .......................................................................................................................................8
2.1. Technical data .................................................................................................................................. 10
2.2. Expected lifetime..............................................................................................................................11
3. Transportation and Storage....................................................................................................................... 12
3.1. Transportation................................................................................................................................. 12
3.1.1. Delivery to customer ..................................................................................................... 12
3.1.2. Inspection of delivery..................................................................................................... 12
3.1.3. Lifting of motor .............................................................................................................. 13
3.2. Storage ............................................................................................................................................. 15
3.3. Removal of corrosion protection before commissioning........................................................ 15
3.4. Insulation resistance check ........................................................................................................... 15
4. Motor installation.......................................................................................................................................... 16
4.1. Preparation and lifting ................................................................................................................... 16
4.2. Installation of coupling .................................................................................................................. 16
4.3. Installation of motor........................................................................................................................17
4.3.1. Flange mount....................................................................................................................17
4.3.2. Side mounts......................................................................................................................17
4.4. Liquid cooling system installation ............................................................................................... 18
4.5. Electrical installation ...................................................................................................................... 19
4.5.1. Connection of power supply.........................................................................................20
4.5.2. Earth point ....................................................................................................................... 21
4.5.3. Auxiliary connection ....................................................................................................... 21
5. Operation........................................................................................................................................................22
5.1. Failure mode operation..................................................................................................................22
6. Inspection and maintenance ......................................................................................................................23
6.1. Inspection and maintenance intervals ........................................................................................24
6.2. Inspection and maintenance actions ..........................................................................................24
6.2.1. Visual inspection.............................................................................................................24
6.2.2. Detailed visual inspection.............................................................................................24
6.2.3. Bearings............................................................................................................................25
6.2.4. External shaft seal ..........................................................................................................25
6.2.5. Shaft spline ......................................................................................................................25
6.2.6. External cleaning.............................................................................................................25
6.2.7. Touch-up painting...........................................................................................................26
—
Table of contents

MOTORS FOR HEAVY ELECTRICAL VEHICLES
4
—
List of Figures
—
List of Tables
Table 1. Legend to exploded view....................................................................................................................9
Table 2. Explanation of data on rating plate................................................................................................ 10
Table 3. Recommended temperature limits .................................................................................................11
Table 4. Electrical connectors......................................................................................................................... 19
Table 5. Inspection and maintenance intervals ..........................................................................................24
Table 6. List of consumables............................................................................................................................ 27
Figure 1. Exploded view of the motor. ...............................................................................................................9
Figure 2. Rating plate example, not to scale. ................................................................................................. 10
Figure 3. Rotor shaft locking during transportation and storage. ............................................................ 12
Figure 4. Position of lifting eye bolts. ............................................................................................................. 13
Figure 5. Lifting of the motor. ...........................................................................................................................14
Figure 6. Removing the rotor shaft locking device........................................................................................ 16
Figure 7. Available installation interfaces seen from D-end. ........................................................................17
Figure 8. Position of liquid cooling inlet and outlet. ..................................................................................... 18
Figure 9. Motor electrical connection interfaces........................................................................................... 19
Figure 10. Example of typical cable arrangement............................................................................................20
Figure 11. Connecting the mating power connectors to the motor. ........................................................... 21
Figure 12. Auxiliary connectors, motor seen from N-end. ............................................................................. 21
7. Spare parts and consumables.................................................................................................................... 27
7.1. Spart parts........................................................................................................................................ 27
7.2. Consumables.................................................................................................................................... 27
8. Trouble shooting...........................................................................................................................................28
9. Waste disposal and recycling .....................................................................................................................30
10. Final comment ............................................................................................................................................... 31
Appendix....................................................................................................................................................................32

INTRODUCTION 5
1. Introduction
1.1. General
The purpose of this document is to describe general guidelines for installation, maintenance and
disposal of the AMXE250 motor.
• Actions shown in this manual are only to be performed by trained personnel authorized by ABB or
trained and skilled personnel authorized by the end user.
The actual appearance of the traction motor may vary from the illustrations in this manual, depending on
optional features of the product.
Abbreviations and nomenclature used in this manual:
• D-end or DE: that end of the machine which accommodates the shaft end. IEC 411-43-36.
• ND-end or NDE: that end of the machine opposite to the drive end. IEC 411-43-37.
• WARNING: signal word used to indicate a potentially hazardous situation which, if not avoided, could
result in death or serious injury.
Symbols used in this manual:
Warning; Electricity, to warn of electricity. Hazard of electric shock.
General warning sign, to signify a general warning. Potential personal injury hazard.
Motors for heavy electrical vehicles, type AMXE132
Introduction
3BSY600011-BCM 6 (34)
Chapter 1 Introduction
1.1 General
The purpose of this document is to describe general guidelines for the installation, maintenance
and disposal of the AMXE132 motor.
•Actions shown in this manual are only to be performed by trained personnel authorized by
ABB or authorized by the end user.
The actual appearance of the motor may vary from the illustrations in this manual, depending on
the final design.
Abbreviations and nomenclature used in this manual:
•D-end or DE: Drive side of motor.
•ND-end or NDE: Non drive side of motor.
•WARNING: signal word used to indicate a potentially hazardous situation which, if not
avoided, can result in death or serious injury.
Symbols used in this manual:
Caution, risk of electric shock.
Safety Alert Symbol, warns of a potential personal injury hazard.
Warning, magnetic field.
Prohibition, No access for people with active implanted cardiac devices
(pace maker)
Warning; Magnetic field, to warn of a magnetic field. Hazard for strong magnetic
field.
Warning; Hot surface, to warn of a hot surface. Hazard of hot surface(s).
Motors for heavy electrical vehicles, type AMXE132
Introduction
3BSY600011-BCM 6 (34)
Chapter 1 Introduction
1.1 General
The purpose of this document is to describe general guidelines for the installation, maintenance
and disposal of the AMXE132 motor.
•Actions shown in this manual are only to be performed by trained personnel authorized by
ABB or authorized by the end user.
The actual appearance of the motor may vary from the illustrations in this manual, depending on
the final design.
Abbreviations and nomenclature used in this manual:
•D-end or DE: Drive side of motor.
•ND-end or NDE: Non drive side of motor.
•WARNING: signal word used to indicate a potentially hazardous situation which, if not
avoided, can result in death or serious injury.
Symbols used in this manual:
Caution, risk of electric shock.
Safety Alert Symbol, warns of a potential personal injury hazard.
Warning, magnetic field.
Prohibition, No access for people with active implanted cardiac devices
(pace maker)
No access for people with active implanted cardiac devices, to prohibit people with
active implanted cardiac devices from entering a designated area. Hazard of
interference to the operation of or damage to active implanted cardiac devices from
equipment generating strong electromagnetic fields.

MOTORS FOR HEAVY ELECTRICAL VEHICLES
6
1.2. Intended application
The motor is primarily intended to be used for heavy electrical vehicle applications, as a traction motor,
generator or auxiliary motor. It also fits as propulsion or auxiliary unit in Marine segment. Due to the
nature of their electrical and mechanical operating conditions, improper installation or operation, as well
as insufficient maintenance, could introduce hazards which could lead to severe bodily injuries or
damages to property.
These instructions only consider those measures which must be observed when the motor is being
operated in its operative range and in its intended application. The applicable national, local and plant
regulations must also be taken into consideration.
1.3. Warranty
The warranty period is 12 months after commissioning but no later than 18 months from the date of
notification of being ready for shipment. An extended warranty can be offered on request.
1.4. Information on electromagnetic compatibility
The user must take the following precautions during installation and operation in order not to impair the
electromagnetic compatibility.
If it is necessary to replace any anti-interference components, filters or screened cables, the new parts
must be identical to the originals.
1.5. Required qualifications for personnel who
handle the motor
Installation, operation, maintenance and repair work may only be carried out by mechanically and
electrically skilled personnel qualified and properly trained for this work. These persons must be
conversant with the motor, that is, they must have completely read and fully understand the relevant
chapters of these operating instructions.

INTRODUCTION 7
1.6. Manual and related documents
• Data sheet, 8AMF500032
• Outline drawing, 3BSM625000-4
• Circuit diagram, 3BSM625000-10
1.7. Safety
The motor is manufactured and intended for use only as prescribed by this manual. Modification,
alteration, or lack of maintenance procedures as described in the service manual may adversely affect the
safety and efficiency of this device. The manufacturer is not responsible for malfunctions that comprise
safety as a result of alteration, use of non ABB replacements parts, neglect or misuse.
Should pre-owned ABB equipment be purchased and reconditioned, the equipment should not be used
until testing and analysis demonstrate that the equipment meets the original or upgraded specifications.
The use of solvents as cleaning agents and the use of lubricants can involve health and/or safety hazards.
The recommended precautions and procedures stated by manufacturers should be followed.
Non-authorized modifications as well as the use of tools, components and auxiliary components not
corresponding to the installation or maintenance instructions exclude any liability of the motor
manufacturer.
The traction motor has rotating parts and parts which may be moving even at rest, and possibly hot
surfaces.
1.8. Contraindications
The motor is not designed, sold or intended for any use except as indicated above. Furthermore, it is not
intended to be used outside of the motor specifications or limitations. The motor must be in good
working order without damages caused by improper handling or lack of maintenance according to
instructions in this document. .
If technical modifications are considered, they shall always be approved by ABB and be carried out by
qualified personnel.

MOTORS FOR HEAVY ELECTRICAL VEHICLES
8
2. Product description
The motor is an AC six (6) pole motor of synchronous type.
The motor features a tailored design, optimized for high energy efficiency and a competitive
performance/weight ratio.
The motor is actively cooled by a separate liquid cooling system which is connected to its integrated
cooling pipe via inlet and outlet connectors placed on the frame.
Special efforts have been made to decrease harmonic losses, noise and torque pulsations. The insulation
system contains corona resistant materials, has low water absorption properties and complies with
temperature class H.
Standard features (options are available)
• 3-phase permanent magnet synchronous motor
• Inverter adapted design of active material
• Class H insulation system
• Temperature sensors inside the stator winding
• Rotor balance grade G2.5 according to ISO 21940-11
• Operating ambient temperature between -20°C and +40°C
• Liquid cooled design
• Protection class for the motor, IP66
• Surface treatment, C3-M according to ISO12944-6
• RAL 9005
• Hazardous Voltage Interlock Loop (HVIL) function

PRODUCT DESCRIPTION 9
Figure 1. Exploded view of the motor.
Item no. Designation
External shaft seal
Flange D-end shield
Nameplate
Auxiliary connectors
Power supply connectors
N-end bearing
Side mounts
Shaft splines
D-end bearing
Table 1. Legend to exploded view, Figure 1.

MOTORS FOR HEAVY ELECTRICAL VEHICLES
10
2.1. Technical data
The exact type designation and identification data are shown on the rating plate located on the motor,
see Figure 1. An example of a name plate can be seen in Figure 2.
Figure 2. Rating plate example, not to scale.
Position Explanation
Applicable standard
Type of motor
Year of manufacture
Direction of rotation
Connection
Motor weight
N-end bearing
D-end bearing
Maximum rotational speed
Variant codes (options)
Product code
Stall current 1
Rated point
Serial number
Maximum ambient temperature
Type code
Table 2. Explanation of data on rating plate.
1 Only appliable for cUL certifed motors.

PRODUCT DESCRIPTION 11
2.2. Expected lifetime
The expected lifetime is very dependent on the motor winding and bearing temperatures. The lower the
temperature the longer expected lifetime. The insulation system for the motor is class H, which means
that the winding temperature should not exceed 180°C. If the winding temperature is kept below this
limit, the expected lifetime of the insulation system is at least 20 000 hours. The electrical performance
data on the nameplate, see Figure 2, is the continuous operation point (S1). Operating in this point will
not compromise the expected lifetime.
In a duty cycle, the rated torque and power on the rating plate could be exceeded short term (peak torque
and peak power) as long as the winding temperature does not exceed 180°C.
As mentioned in the product description, the motor is equipped with temperature sensors in the stator
winding. In most inverters, it is possible to set a warning limit and a shutdown limit for based on the
winding temperature. To not compromise the expected lifetime of the winding, the values in Table 3 are
recommended.
Temperature measured by Pt100 Action Comment
Warning Warning and/or derating of motor.
Shutdown
Table 3. Recommended temperature limits.
NOTE: The warning and shut down limits are only valid for short term operation. Prolonged
operation at high stator winding temperatures will significantly impact the bearing grease
lifetime.
The expected lifetime for bearings and external seals is not solely temperature dependent and needs to
be evaluated based on the duty cycle. Please contact your local ABB sales office for technical support.

MOTORS FOR HEAVY ELECTRICAL VEHICLES
12
3. Transportation and Storage
3.1. Transportation
3.1.1. Delivery to customer
The traction motor is transported fastened to a pallet. Leave the traction motor on the pallet until it is
time to place it in its working place i.e., chassis.
During short term storage, place the traction motor so that it is out of the way of any other goods
handling and on a flat, vibration-free surface.
NOTE: When the motor is delivered, the shaft is fixed and secured by a rotor locking device at the
D-end of the shaft. The rotor locking device should not be removed as long as the motor
remains in storage. Remove the rotor locking device prior to installation of the motor.
Figure 3. Rotor shaft locking during transportation and storage.
3.1.2. Inspection of delivery
Unpacking should be done carefully in order to avoid damage. The delivery should be checked against the
packing list.
NOTE: When the traction motor arrives at its destination, make sure to check the traction motor in
order to determine possible transport damage as quickly as possible. Any damage during
delivery or deviations from packing list should be entered in a report and the transport
company contacted.
If the traction motor has suffered damage during transport or installation, this must be rectified before
commissioning.

TRANSPORTATION AND STORAGE 13
3.1.3. Lifting of motor
Warning - Heavy Components
Risk of personal injury when lifting the motor. The total motor weight is approximately
490 kg. Only skilled and trained personnel should carry out dismantling.
NOTE: The lifting eye bolt are not included in delivery. These lifting components must be
dimensioned to handle the motor weight.
NOTE: Check that the used equipment for lifting and lifting hole in the motor are undamaged before
lifting. Damaged components must be replaced before lifting.
Lifting must be performed with great care and using appropriate equipment. When lifting the motor, it is
important to lift it in a way that does not affect any critical part such as bearings, shaft or connection
box.
There are two holes for each allowed lifting setup where the lifting eye bolts should be attached. The
positions are shown in Figure 4 below. Always use these holes when lifting the traction motor. See outline
drawing for further details.
Figure 4. Position of lifting eye bolts.

MOTORS FOR HEAVY ELECTRICAL VEHICLES
14
The angle between the lifting chains shall be maximum 60°, see Figure 5.
Figure 5. Lifting of the motor.

TRANSPORTATION AND STORAGE 15
3.2. Storage
Measures to be taken by the customer or other part:
• The traction motor should be left on the pallet.
• The pallet with the traction motor should preferably be stored indoors and shall be placed on a
vibration-free, flat and well-drained surface.
• The pallet with the traction motor should be kept dry, dust-free and protected from rain and moisture.
• The rotor locking device should not be removed as long as the traction motor remains in storage.
• All traction motors leave the factory with an anti-corrosion coating such as Tectyl 506 on the shaft
extension and mounting surfaces. The coating should be inspected by the customer and re-applied if
necessary.
3.3. Removal of corrosion protection before
commissioning
The corrosion protection coating, such as Tectyl 506, must be removed before commissioning. Ensure
that corrosion protection coating is removed for mating surfaces, e.g., shaft and flange surfaces. Tectyl
506 can be removed with Tectyl Biocleaner, Tectyl HPS solvent borne thinner, vapor degreasing, a hot
alkaline wash or low-pressure steam.
3.4. Insulation resistance check
Measure insulation resistance before commissioning, after long periods of standstill or storage when
winding dampness may be suspected.
Insulation resistance should be used as a trend indicator to determine changes in the insulation system.
insulation resistance is important to know the condition of the insulation system. Typically, the insulation
resistance value is not attained, the stator winding is too damp and must be oven dried. Please contact
your local ABB sales office for technical support.
NOTE: To avoid risk of electric shock, the motor frame must be grounded, and the windings should
be discharged against the frame immediately after each measurement.

MOTORS FOR HEAVY ELECTRICAL VEHICLES
16
4. Motor installation
4.1. Preparation and lifting
Remove the rotor locking devices (52, 16, 58, 59, 40) from the ends of the shaft, see Figure 6.
Remove the corrosion protective coating as per chapter 3.3.
Always use the holes for the lifting eye bolts when lifting the traction motor, see chapter 3.1.3 for further
details about lifting.
Figure 6. Removing the rotor shaft locking device.
4.2. Installation of coupling
To ensure low noise and vibration levels, the alignment between the motor shaft and the mating coupling
must be accurate. The higher the motor operating speed the higher accuracy is needed.
For side support mounting. Some type of flexible coupling shall be used, and the geometrical tolerance
demands can differ between type and supplier. See manual from the coupling supplier.
For dimensions involving the motor shaft, flange, and side mounts, see the outline drawing. The product
code is visible on the nameplate, see Figure 2.
NOTE: In applications with severe vibrations, only flange mounting is not recommended. Additional
side support may be needed. Please contact your local ABB sales office for technical support.
NOTE: Lubricate the splines with a suitable molybdenum disulfide grease prior assembly.

MOTOR INSTALLATION 17
4.3. Installation of motor
The motor is intended to only be installed in horizontal direction. For dimensions involving the motor
flange and side mount interfaces, see the outline drawing. Threaded holes are provided with thread
inserts to increase the mechanical properties. The motor can either be mounted by flange or using the
side mount interfaces.
Figure 7. Available installation interfaces seen from D-end.
NOTE: Please contact ABB sales office for technical support if any doubts regarding the installation
of the motor.
NOTE: It is advisable to apply thread locking (Loctite 243 or similar) when installing the motor.
4.3.1. Flange mount
The motor can be installed by using the flange provided at D-end. Threaded holes have insert Helicoil plus
free running 4130 016 0032 (M16). See outline drawing for further details.
4.3.2. Side mounts
For side mount interfaces, see Figure 7. There are threaded M12 holes along the sides of the motor at 3, 12
and 9 o´clock. The threaded holes have insert Helicoil plus free running 4130 012 0024 (M12). See outline
drawing for further details.
The alignment between the side support and the mating surfaces must be accurate in order to not
damage the structure of the motor and enable the screw joint for the mating to function as intended.
To ensure that the structure of the motor is not damaged and that screw joints is to function as
intended, the alignment between the side support and the mating surfaces must be accurate. Max
allowed gap between D-end and N-end for one side support is 0,1mm. Suitable shims can be applied to
achieve max allowed gap.
4.3.2.1. Side mounted
Both 3 o’clock and 9 o’clock side mount interfaces of the motor must be used if the motor is to be hung
by using side mounts.

MOTORS FOR HEAVY ELECTRICAL VEHICLES
18
4.3.2.2. Bottom mounted
The motor may be turned and mounted with the 12 o’clock side mount interface facing downward.
4.4. Liquid cooling system installation
Remove the protective covers from the cooling inlet and outlet threads (internal ISO 228 - G 1/2") and
install the mating cooling connectors, see Figure 8. To prevent leakage, it is advisable to use a mating
cooling connector equipped with an O-ring seal and apply thread sealant (Loctite 577 or similar) in the
internal thread.
Figure 8. Position of liquid cooling inlet and outlet.
Recommended coolants are ethylene glycol based such as Antifrogen® N from Clariant or propylene glycol
based mixed with water. The motor design is intended for a mixture of 50% / 50%. Max allowed pressure
is 4 bar at inlet connection.
NOTE: Coolants might be a toxic compound. Use correct personal safety equipment and avoid
exposure to the coolant.
NOTE: Ensure that the specified data on the separate rating plate, see Figure 3, is fulfilled before
operating the motor.

MOTOR INSTALLATION 19
4.5. Electrical installation
Warning – High Voltage
Touching a live motor connection causes serious injuries or death.
The motor needs an inverter to operate. The inverter must be able to supply 3 phase AC current and be
capable of controlling the motor. The motor has been tested and optimized together with the ABB
HES880 inverter. An inverter with a different control strategy, switching frequency and pulse pattern
might have an impact on the motor performance. For more information about the HES880 inverter,
please contact your local ABB sales office.
The motor is equipped with connectors. Types and quantities of the connectors is depending on
applicable options of the motor. Figure 9 shows an overview of the electrical connection interfaces and
additional details in Table 5. Please see circuit diagram 3BSM625000-10 for full details.
Figure 9. Motor electrical connection interfaces.
Connector description Type of connector Comment
Temperature sensor
Temperature sensor (spare)
Heater Optional variant code
Resolver
High Voltage Interlock Loop (HVIL)
Earth point
Table 4. Electrical connectors.

MOTORS FOR HEAVY ELECTRICAL VEHICLES
20
4.5.1. Connection of power supply
Make sure that the traction motor is disconnected from power supply prior to connection or
disconnecting the power supply connectors. Installing power voltage at U-V-W will rotate traction motor
clockwise, facing traction motor shaft from D-end.
Make sure that all cable connections are installed in appropriate way and suitable for high frequency
currents. There are three power connectors for each phase (U, V, W). All nine power connectors must be
connected to power cables when setting the power supply to ON. See “Power connectors”, “U”, “V” and
“W” in Figure 9.
NOTE: Ensure that the motor is disconnected from power supply prior to connecting or
disconnecting the high voltage power connectors.
NOTE: The power supply connectors within a phase are not unique and can be connected to any
matching phase on the inverter.
The type of mating power connectors can be straight or right-angled (90°), see Figure 10. It is
recommended that the power supply cables are supported by cable cleats or similar in order to reduce
the stress at the connectors.
Figure 10. Example of typical cable arrangement.
Table of contents
Other ABB Engine manuals
Popular Engine manuals by other brands

Briggs & Stratton
Briggs & Stratton 490000 Operator's manual

Siemens
Siemens SIMOTICS T-1FW4407-1KM81-1BC0-Z operating instructions

Tecumseh
Tecumseh TVT691 Operator's manual

BRP
BRP Rotax 125 MAX evo Installation instructions and operators manual

MTU
MTU 12V4000C Series operating instructions

Perkins
Perkins 2806C-E18TA Operation and maintenance manual