*Specications are subject to changes without notice. 9
SYSTEM OPERATIONS
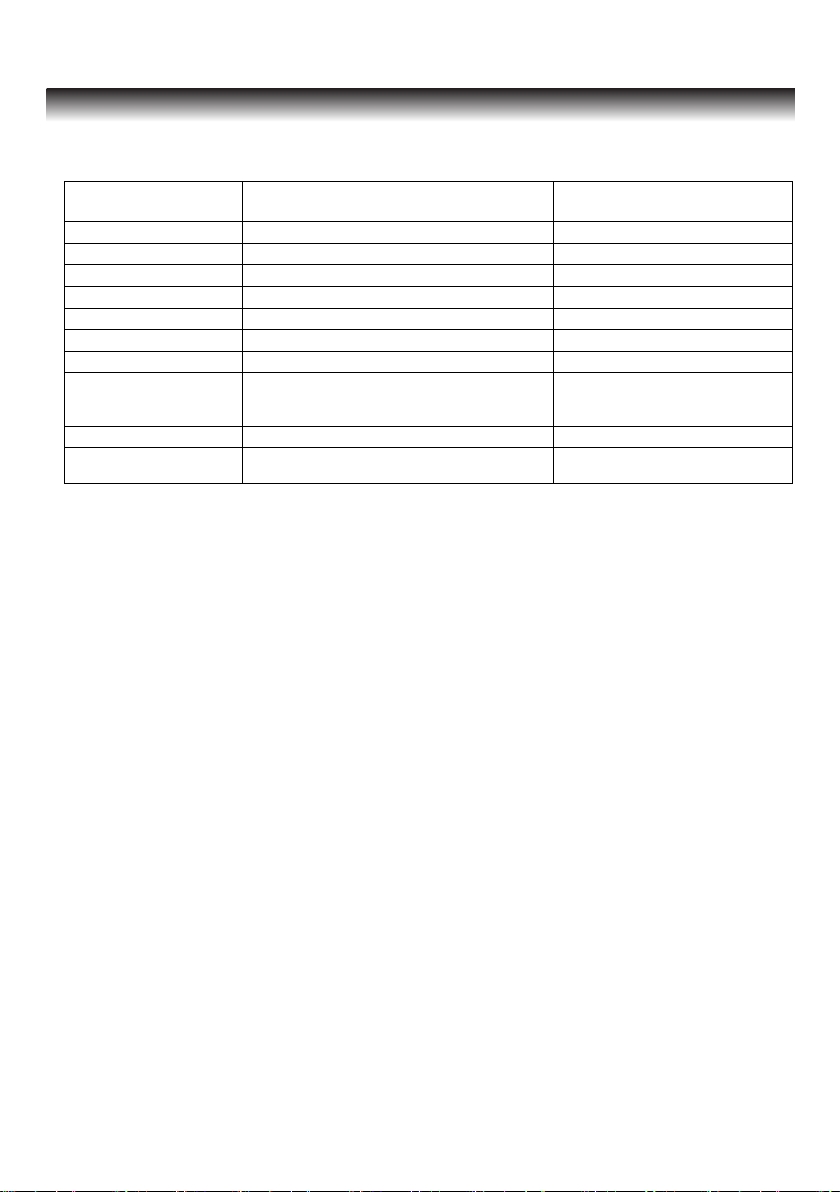
Command Example Description Command Feedback
s mode 4!
Setup output mode:(1:one image;2:two images
1;3:two images 2;
4:four images 1;5:four images 2;6:four images
3;7:four ima
es 4;8:nine ima
es
set display mode 4:Four split screen
1
r mode! read the output mode display mode 5:Four
split screen 2
s {x} v {y}! Switch x input to y output Switch x input to y output
s output 2!
Setup output resolution at 3840x2160@30Hz
(1:3840x2160@30Hz,2:1920x1080@60Hz,
3:1920x1080i@60Hz,4:1280x720@60Hz,
5.1360x768@60Hz,6.1024x768@60Hz,
7.Out dis
la
EDID native resolution
set resolution 2:1920x1080@60Hz
r output! read the output resolution resolution 2:1920x1080@60Hz
r contrast! Read picture contrast status set picture contrast 0
s contrast 0! Setup picture contrast 0(range:0-100) picture contrast 0
r brightness! Read picture brightness status picture brightness 0
s brightness 0! Setup picture brightness 0(range:0-100) set picture brightness 0
r hue! Read picture hue status picture hue 0
s hue 0! Setup picture hue 0(range:0-100) set picture hue 0
r saturation! Read picture saturation status picture saturation 0
s saturation 0! Setup picture saturation 0(range:0-100) set picture saturation 0
r aspect ratio! Read current input source output picture aspect ratio 1: 4:3
s aspect ratio 1!
Setup current input source output picture
aspect ratio at 16:9
2: 16:9 , 1: 4:3
set aspect ratio 1: 4:3
r h size! Read current input source output horizontal
overscan value h size -10
s h size X!
Set output horizontal overscan to
(100+X)%(the default X value is 0 and the
range is -10~10,the value is set for current
in
ut source.
set h size -10
r v size! Read current input source output vertical
overscan value v size -10
s v size X!
Set output vertical overscan to (100+X)%(the
default X value is 0 and the range is -
10~10,the value is set for current input source.)
set v size -10
r edid! Read switcher input port EDID status edid mode 1: EDID1.4
s edid 1! Setup input port EDID at HDMI1.4 standard
1: EDID1.4,2: EDID cop
HDMI out
set edid mode 1: EDID1.4
Video Control Commands