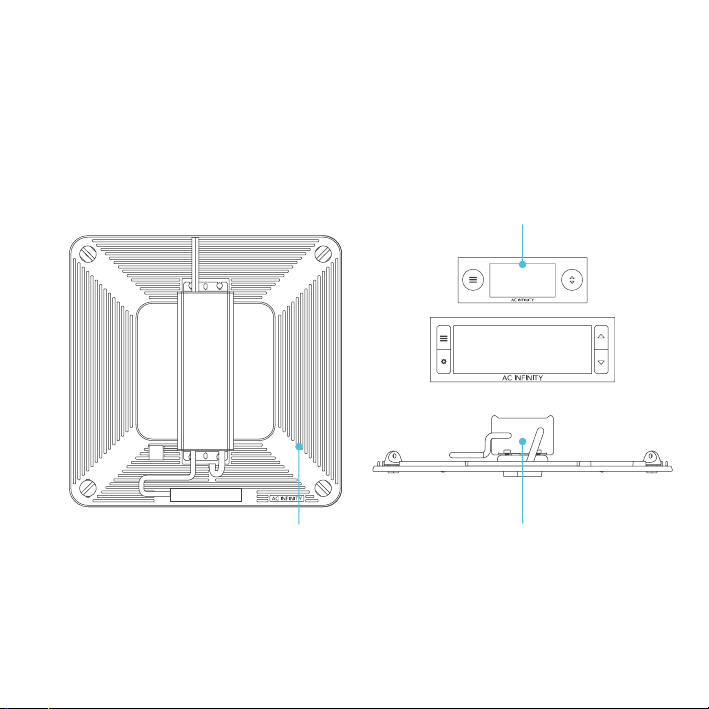
AC Infinity ONGRID Series User manual

1
IONGRID SERIES
USER MANUAL
GROW LIGHT SYSTEM

2

3
WELCOME
Thank you for choosing AC Infinity. We are committed to product quality and friendly customer service.
If you have any questions or suggestions, please don’t hesitate to contact us. Visit www.acinfinity.com
and click contact for our contact information.
EMAIL
support@acinfinity.com
WEB
www.acinfinity.com
LOCATION
Los Angeles, CA

4
PRODUCT MODEL UPC-A
MANUAL CODE IG2108X2
AC-IGS22
AC-IGS24
AC-IGS33
AC-IGS44
AC-IGT22
AC-IGT24
AC-IGT33
AC-IGT44
IONGRID S22
IONGRID S24
IONGRID S33
IONGRID S44
IONGRID T22
IONGRID T24
IONGRID T33
IONGRID T44
819137021921
819137022157
819137022119
819137022171
819137021914
819137022164
819137022126
819137022188

5
MANUAL INDEX
Manual Index .................................................................................
Key Features .................................................................................
Product Contents ...........................................................................
Installation .....................................................................................
Power and Setup ...........................................................................
Adding More Lights ........................................................................
Starter Guide .................................................................................
Programming .................................................................................
Other AC Infinity Products .............................................................
Warranty ........................................................................................
Page 5
Page 6
Page 7
Page 8
Page 10
Page 12
Page 13
Page 14
Page 27
Page 28

6
KEY FEATURES
SMART CONTROLLER
Features 0-100% dimming
and various time-based
programming. UIS™ ports
enable daisy chaining.
SAMSUNG LED DIODES
Built with genuine Samsung
LM301H full spectrum LEDs
running at 100W & 2.7 μmol/j
for high efficiency lighting.
IP-67 PROTECTION
Sealed to Ingress Protection 67
standards against liquids and
dust for excellent performance
in grow tent environments.
EVEN COVERAGE
Unique halo form factor provides
wider light spread, maximizing
usable growing space while
eliminating hot spots.
CUSTOM LED DRIVER
Designed to reliably deliver
high-wattage power and
enables PWM control of its
power output.
THERMALLY OPTIMIZED
Aluminum frame with thermal
compound offers no-noise heat
dissipation to keep the grow
light cool over extended use.

7
ROPE
CLIP
(x1)
WOOD SCREWS
(WALL MOUNT)
(x2)
PRODUCT CONTENTS
IONGRID S-Series
Included in both S-Series and T-Series
GROW
LIGHT
(x1)
CONTROLLER
77
(x1)
IONGRID T-Series
GROW
LIGHT
(x1)
CONTROLLER
78
(x1)
STAINLESS STEEL
WIRE HANGER
(x1)
WIRE
TIE SET
(x1)
EXTENSION
CORD
(x1)
VELCRO
TIE SET
(x4)

8
INSTALLATION
STEP 1
Clip the lanyard hooks onto the four anchors
located at the corners of the grow light.
STEP 2 - SINGLE WIRE HANGER
Clip the carabiner onto your grow tent's roof
support beams.
You may also use a rope clip hanger to hang
the grow light lower.

9
INSTALLATION
STEP 3 - SPLIT WIRE HANGER
Release two of the hanger's cords from
the carabiner and clip them into a separate
carabiner (not included).
STEP 4 - SPLIT WIRE HANGER
Clip the two carabiners onto your grow tent's
roof support beams.
You may also use rope clip hangers to hang
the grow light lower.

10
STEP 1
Plug the LED driver's cable into one of the
controller's ports.
*Remove rubber cap
POWERING AND SETUP
STEP 2
Plug the power cord into an AC power outlet to
power the grow light and controller.

11
POWERING AND SETUP
STEP 1
Unplug the connector and unscrew the bolts on
the underside to remove the controller from the
grow light.
Connect the extension cord in between the
driver's cord and the controller.
This extension cord is intended for use with AC
Infinity products only.
STEP 2
Drill holes into your surface and insert the wood
screws to hang the controller.
RELOCATING THE CONTROLLER
The magnet will be located under
the controller's label.
The controller (CONTROLLER 78 only) will also
magnetically mount onto the CLOUDLAB series
advance grow tent's controller mounting plate
(sold separately).

12
ADDING MORE LIGHTS
The controller can program light intensity levels and scheduled activations of all grow lights plugged
into its UIS™ ports. S-Series controllers are equipped with two ports while T-Series controllers are
equipped with four ports.
An expansion dongle (sold separately) will allow you to daisy-chain additional grow lights past the
number of units your controller can support.
Your IONGRID controller is equipped with multiple
ports to add more grow lights and share the same
programming. Refer to the diagram below to learn
how to connect additional units.
Multi-Light Connection
EXPANSION DONGLE
The expansion dongle will allow you to connect 2 or 4 more devices and can be daisy-chained to
create more expansion ports (up to 64 units supported with the use of 20 dongles). Intended for
exclusive use with AC Infinity controllers built with UIS™ ports.
*sold separately

13
STARTER GUIDE
The charts below offer suggested mounting heights and light intensities for each stage in the
growing process of your preferred method. These factors will vary based on the plant you are
growing. Height refers to distance from the canopy (tip of the plant).
HEIGHT
ADJUSTMENT
Seedling
Stage
Vegetative
Stage
Flowering
Stage
Intensity 100% 100% 100%
Height 3 ft. 2 ft. 1.5 ft.
Intensity 30% 70% 100%
LIGHT
ADJUSTMENT
Seedling
Stage
Vegetative
Stage
Flowering
Stage
Height 1.5 ft. 1.5 ft. 1.5 ft.

14
PROGRAMMING
1. MODE BUTTON
Cycles through each of the controller
modes: OFF, ON, TIMER TO ON, TIMER
TO OFF, and CYCLE (ON and OFF).
3. USER SETTING
Displays the grow light's intensity
level as well as countdown timers of
the TIMER TO ON, TIMER TO OFF
and CYCLE (ON and OFF) modes.
4. CONTROLLER MODE
Displays the controller's current
mode. Pressing the mode button
cycles through the available modes.
2. UP/DOWN BUTTON
Adjusts the setting of your current
mode. Holding this button will lock
the controller; pressing this button
afterwards will turn off the display.
12
4
3
S-SERIES

15
PROGRAMMING
CONTROLLER MODES
Pressing the mode button will cycle through the controller’s available programming modes and
settings: OFF, ON, TIMER TO ON, TIMER TO OFF, and CYCLE.
OFF MODE
Your grow light will not activate while in this
mode. The intensity level set here establishes the
minimum intensity level in the other modes. When
the light is triggered to turn off in all other modes,
it will instead shine at the level set here.
ON MODE
Your grow light will activate to the intensity level
set here. The ON mode also serves as the
maximum intensity level setting the other modes
will shine in.
TIMER TO ON MODE
Use the up/down button to set a countdown to
trigger ON mode. Once the timer ends, the grow
light will shine at the intensity level set in ON
mode. If there is a level set in OFF mode greater
than 0, the grow light will shine at that level
during the countdown.
The countdown will begin if no buttons are
pressed for 5 seconds. Leaving the TIMER mode
while the countdown is running will pause it until
you return to this mode.
The grow light will shine at the
intensity level set in OFF mode while
it is deactivated.
S-SERIES

16
TIMER TO OFF MODE
Use the up/down button to set a countdown to
trigger OFF mode. The grow light will shine at the
intensity level set in ON mode until the countdown
ends. If there is a level set in OFF mode greater
than 0, the grow light will shine at that level at the
end of the countdown.
The countdown will begin if no buttons are pressed
for 5 seconds. Leaving the TIMER mode while the
countdown is running will pause it until you return
to this mode.
CYCLE MODE (ON & OFF)
Sets an on duration and an off duration for the grow
light to cycle through continuously. Use the up/down
button to first set a duration for the grow light to be
on, then press the mode button and set a duration
for the grow light to be off.
While the grow light is activated, it will shine at the
level set in ON mode. While the grow light is deacti-
vated, it will shine at the level set in OFF mode.
The countdown will begin if no buttons are pressed
for 5 seconds. Leaving the CYCLE mode while the
countdown is running will pause it until you return
to this mode.
The grow light will shine at the
intensity level set in OFF mode while
it is deactivated.
The grow light will shine at the
intensity level set in OFF mode while
it is deactivated.
PROGRAMMING
S-SERIES

17
DISPLAY SETTING
Adjusts the display brightness and auto-dimming.
Press the mode and up/down buttons together to
cycle through levels 1, 2, 3, A2 and A3; 3 being the
highest brightness setting, while 1 is the lowest.
In settings 1, 2 and 3, the display will stay at that
brightness level and will not automatically dim the
display.
A2 and A3 will set the brightness level at 2 and 3,
respectively, and will dim the brightness level down
to 1 when the controller is not being used after 30
seconds.
PROGRAMMING
S-SERIES
PRESS +
HOLD +
TOGGLING THE DISPLAY
Lock the controller by holding the up/down button.
Press the up/down button to turn the display off.
Pressing the up/down button again will turn the
display back on.
Programs will still run in the background while the
LCD screen is off.

18
OTHER SETTINGS
S-SERIES
JUMP TO OFF MODE
Holding the mode button for 3 seconds while in any mode or
setting will automatically jump to OFF Mode. This function is
disabled if the controller is locked.
HOLD +
CONTROLLER LOCK
Holding the up/down button will lock the controller in your
current mode. While your controller is locked, no parameters
may be adjusted nor will you be able to switch modes. Holding
the up/down button again will unlock the controller.
HOLD +
FACTORY RESET
Holding the mode and up/down buttons together for 5 seconds
will reset your controller and restore factory settings. This will
clear all user set parameters of each controller mode and
setting.
HOLD +
HIDE SCREEN
Lock the controller so no settings can be adjusted. See
above. Then press the up/down button to turn the display off.
Pressing the up/down button again will turn the display back
on. Programs will still run in the background while the LCD
screen is off.
PRESS +

19
PROGRAMMING
1. MODE BUTTON
Cycles through the controller modes:
OFF, ON, TIMER TO ON, TIMER
TO OFF, CYCLE (On and Off) and
SCHEDULE 1, 2, 1+2 (On and Off).
4. CURRENT TIME
Displays the current time. The internal
battery sustains the clock so it does
not default to 00:00 if power is cut off.
See page 24 to learn how to set the
clock time.
8. CONTROLLER MODE
Displays the controller's current
mode. Pressing the mode button
cycles through the available
modes.
6. USER SETTING
Displays the value of your current
mode. Use the up and down buttons
to adjust the value.
9. STATUS ICONS
Alerts you of the controller's status
notifications. Icons include TIMER
ALERT and DISPLAY LOCK.
7. COUNTDOWN
Displays the countdown of the TIMER
TO ON, TIMER TO OFF, CYCLE, or
SCHEDULE modes. TO ON shows
the amount of time left before the light
turns on. TO OFF shows the amount
of time left before the light turns off.
5. BRIGHTNESS
Displays the current intensity
level. Includes a trend indicator
that signals if the intensity level is
rising, falling, or holding steady.
3. UP/DOWN BUTTONS
Adjusts the setting of your current
mode. The up button increases and
down button decreases the setting.
Hold both to reset settings.
2. SETTING BUTTON
Cycles through each of the three
controller settings: DISPLAY,
CLOCK, and TRANSITION.
T-SERIES
1
24
5
9
8
67
3

20
T-SERIES
CONTROLLER MODES
Pressing the mode button will cycle through the controller’s available programming modes: OFF, ON,
TIMER TO ON, TIMER TO OFF, CYCLE, and SCHEDULE.
OFF MODE
Your grow light will not activate while in this
mode. The intensity level set here establishes the
minimum intensity level in the other modes. When
the light is triggered to turn off in all other modes,
it will instead shine at the level set here.
ON MODE
Your grow light will activate to the intensity level
set here. The ON mode also serves as the
maximum intensity level setting the other modes
will shine in.
TIMER TO ON MODE
Use the up and down buttons to set a countdown
to trigger ON mode. Once the timer ends, the
grow light will shine at the intensity level set in
ON mode. If there is a level set in OFF mode
greater than 0, the grow light will shine at that
level during the countdown.
The countdown will begin if no buttons are
pressed for 5 seconds. This is located at the
bottom left corner of the display. Leaving the
TIMER mode while the countdown is running will
pause it until you return to this mode.
The grow light will shine at the
intensity level set in OFF mode while
it is deactivated.
PROGRAMMING
Table of contents
Other AC Infinity Lighting Equipment manuals
Popular Lighting Equipment manuals by other brands

LSC
LSC Minim Operator's manual

Brightline
Brightline cMe3 Assembly and installation instructions

Robus
Robus RXZ255-PSU instruction manual

Party Light & Sound
Party Light & Sound ASTRO-MOBILE-SOUND quick start guide

Inspire
Inspire SLIM Assembly, Use, Maintenance Manual

Prilux
Prilux ecTUBE T8 Glass NR basic instruction manual