ACCU-CHECK LinkAssist User manual

INSERTION DEVICE
Made in Switzerland
Fabricado en Suiza
Fabriqué en Suisse
ACCU-CHEK, ACCU-CHEK FLEXLINK, ACCU-CHEK LINKASSIST and
ACCU-CHEK ULTRAFLEX are trademarks of Roche.
ACCU-CHEK, ACCU-CHEK FLEXLINK, ACCU-CHEK LINKASSIST y
ACCU-CHEK ULTRAFLEX son marcas registradas de Roche.
ACCU-CHEK, ACCU-CHEK FLEXLINK, ACCU-CHEK LINKASSIST et
ACCU-CHEK ULTRAFLEX sont des marques de Roche.
Distributed in USA by:
Distribuido en EE.UU. por:
Distribué aux États-Unis par :
Roche Health Solutions Inc.
Fishers, IN 46037, USA
Toll Free / Teléfono atención / Sans frais 1-800-280-7801
Roche Diagnostics GmbH
Sandhofer Strasse 116
68305 Mannheim, Germany
www.accu-chek.com
04818300001/E Status: 03-2013

12
65
4
78 9
3
4a
4a

en 4 Instructions for use
de 12 Gebrauchsanweisung
fr 20 Mode d’emploi
frCA 28 Mode d’emploi
it 36 Istruzioni per l’uso
es 44 Instrucciones de uso
nl 52 Gebruiksaanwijzing
pt 60 Instruções de utilização
cs 68 Návod k použití
pl 76 Instrukcja użytkowania
da 84 Brugsanvisning
sv 92 Bruksanvisning
no 100 Bruksanvisning
fi 108 Käyttöohje
el 116 Οδηγίες χρήσης
ru 124 Инструкции по использованию
sk 132 Návod na používanie
hu 140 Használati útmutató
et 150 Kasutusjuhised
he 158
hr 166 Upute za uporabu
lt 174 Naudojimo instrukcijos
lv 182 Lietošanas instrukcija
ro 190 Instrucţiuni de utilizare
sl 198 Navodila za uporabo
zh trad 206
zh simpl 214
ar 229
US 230 Warranty / Garantie / Garantía


en Instructions for use 4
de Gebrauchsanweisung 12
fr Mode d’emploi 20
frCA Mode d’emploi 28
it Istruzioni per l’uso 36
es Instrucciones de uso 44
nl Gebruiksaanwijzing 52
pt Instruções de utilização 60
cs Návod k použití 68
pl Instrukcja użytkowania 76
da Brugsanvisning 84
sv Bruksanvisning 92
no Bruksanvisning 100
fi Käyttöohje 108
el
Οδηγίες χρήσης 116
ru
Инструкции по использованию 124
sk Návod na používanie 132
hu Használati útmutató 140
3

4
Release button
Safety catch
Tensioning
element
Base with handle
en Instructions for use
Accu-Chek LinkAssist is an infusion set
insertion device, which is intended specifi-
cally for placement of the Accu-Chek FlexLink
(in USA/Canada: Accu-Chek Ultraflex) infusion
set. It permits an easy, quick and virtually
painless insertion of the cannula into the sub-
cutaneous fatty tissue for the subcutaneous
infusion of insulin.
INSERTION DE VICE

en
5
Accu-Chek FlexLink Infusion Set
(USA/Canada: Accu-Chek Ultraflex)
Blue holder cap
(detachable)
Introducer needle
handle
Side clips
Self-adhesive backing
Cannula housing
Self-adhesive
Soft cannula
Introducer needle
Protective cover

6
CONTRAINDICATIONS
• The Accu-Chek LinkAssist insertion
device is solely intended for use with
the Accu-Chek FlexLink (in USA/Canada:
Accu-Chek Ultraflex) infusion set.
A safe and smooth operation of the
Accu-Chek LinkAssist insertion device
cannot be guaranteed if any other type
of infusion set is used.
• The Accu-Chek LinkAssist insertion de-
vice is exclusively for use on one person.
It must not be used on several people.
WARNING
Carefully read these instructions for use
and the instructions for use for the
Accu-Chek FlexLink (in USA/Canada:
Accu-Chek Ultraflex) infusion set before
using the insertion device. The sequence
of the steps of application described in
these instructions must always be ob-
served. Failure to follow the instructions
for use may cause pain and injury.
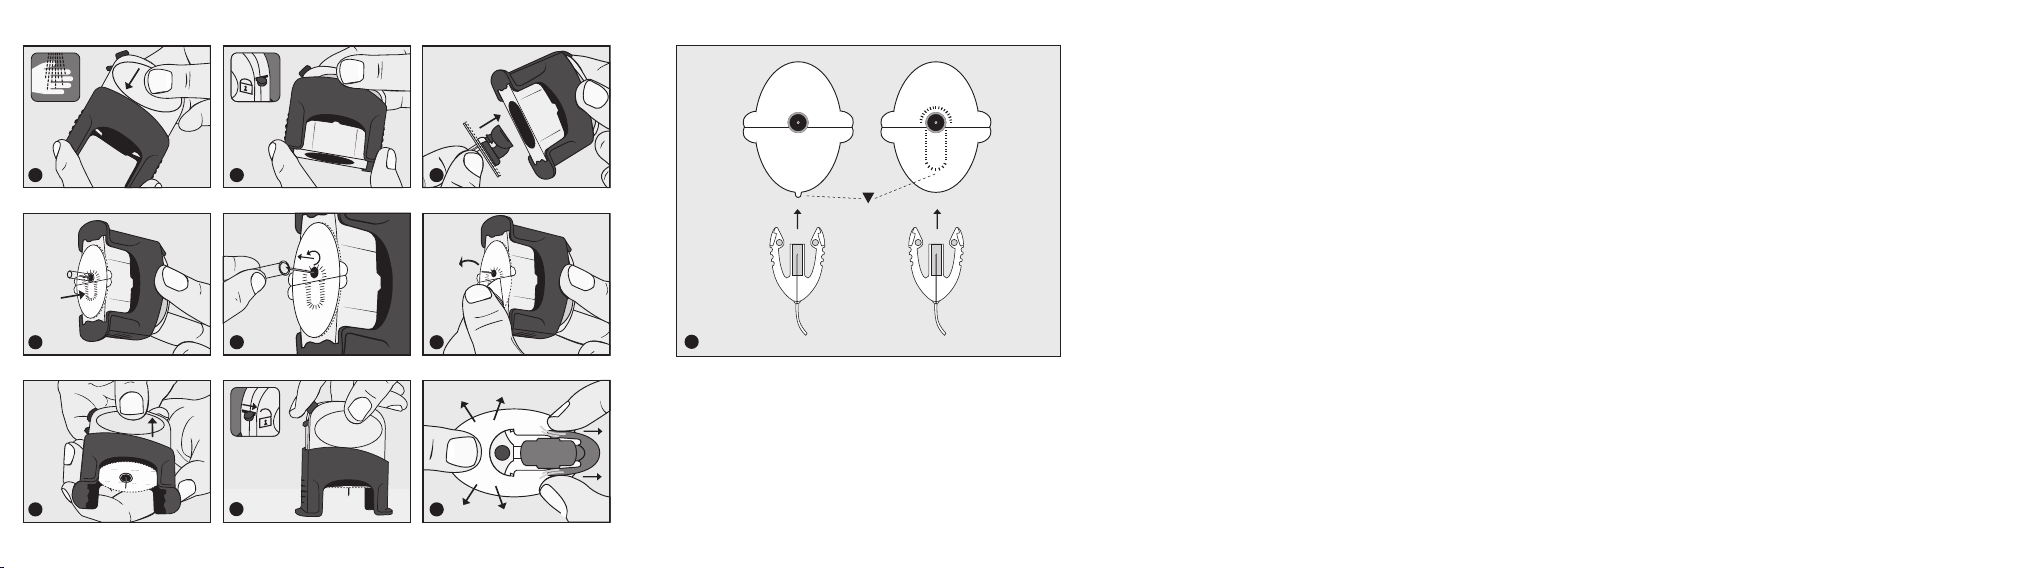
Preparation
• Before using the insertion device, care-
fully read the instructions for use for the
Accu-Chek FlexLink (in USA/Canada:
Accu-Chek Ultraflex).
• Please wash your hands before use.
Choose a site away from waistline, bones,
scar tissue, belly button and recent
infusion sites. Prepare site according to
the instructions from your health care
professional. Allow the infusion site to
dry before the soft cannula is inserted.
• Open the undamaged packaging of the
infusion set and remove the infusion set.
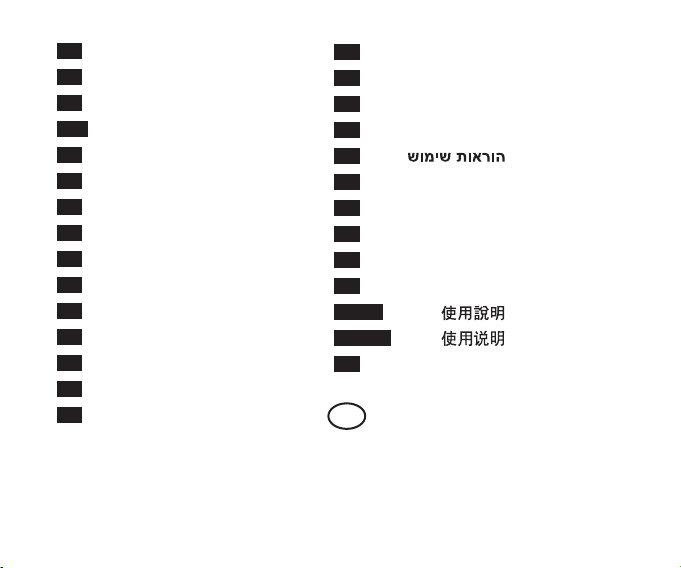
WARNINGS
• Do not use any infusion set if the intro-
ducer needle has been damaged or bent.
• The infusion set remains sterile until the
package is opened or damaged.
Do not use if the sterile package has
been opened or damaged.

en
7
How to use the Accu-Chek LinkAssist
insertion device to insert the
Accu-Chek FlexLink (in USA/Canada:
Accu-Chek Ultraflex) infusion set
Please also refer to the pictures on the
cover flap.
1 Push the tensioning element of the
insertion device into its base.
2 The insertion device is now pretensioned.
This step “locks” the safety catch in
place, and automatically makes the
insertion device secure.
3 Hold the infusion set by its protective
cover between the thumb and the forefin-
ger and with the blue holder cap pointing
upward, insert it from below into the
opening of the insertion device until you
feel it lock into place.
4 Correct placement of the infusion set.
Note: The marking on the self adhesive
backing directs you to the location of the
tube connection.
WARNING
If an infusion set is in the insertion
device, never look into the opening of
the device. Do not use the insertion
device near the face or eyes.
5 Carefully remove the transparent protec-
tive cover of the infusion set by turning
and pulling at the same time. Keep the
protective cover for later use in order to
safely dispose of the introducer needle.
6 Remove both pieces of the self-adhesive
backing from the infusion set self-adhe-
sive.
7 Hold the base of the insertion device
firmly in one hand and with the other
hand pull the tensioning element out and
up as far as it will go.

8
WARNING
Only release the insertion device once
it is positioned on the skin.
8 Holding the tensioning element, position
the insertion device onto the prepared
infusion site. Activate the insertion device
by sliding the safety catch out of the
“lock” position. Press the release button
to introduce the cannula into the skin.
The insertion device can now be removed
from the infusion site and set aside.
WARNING
In case the infusion set gets stuck in the
insertion device, carefully push the ten-
sioning element back into the base with-
out pointing the insertion device toward
any body part or sombody else.
Continue with step 7. Make sure not to
compress the base during application.
9 Check the correct position of the self-
adhesive and press this self-adhesive
layer smoothly and firmly onto the skin
in order to ensure secure positioning of
the infusion set.
WARNING
If the infusion set is incorrectly posi-
tioned, then a new infusion set must be
used.
• Hold the self-adhesive in place. Carefully
press the side clips of the blue holder cap
together and remove it from the cannula
housing.
• To remove the introducer needle, hold the
cannula housing firmly in place on the
body. Place one finger on the top of the
cannula housing and withdraw the intro-
ducer needle by its handle in a straight
line. Once removed, push the introducer
needle into its protective cover until it can
go no further and dispose of it safely
(needle container).

en
9
WARNING
Use caution when covering the steel
needle in order to minimize the risk of
an accidental stick. The introducer
needle and protective cover are made
to lock together.
Connection to pump
Connect the tubing to the cannula housing
and the insulin pump according to the ins-
tructions for use for the Accu-Chek FlexLink
(in USA/Canada: Accu-Chek Ultraflex) infusion
set and the instructions for use for the parti-
cular insulin pump.
WARNINGS
• Check blood glucose level 1 – 3 hours
after inserting your infusion set and in-
spect the infusion site on a regular basis.
Do not insert a new soft cannula just
prior to bedtime. Check blood glucose
frequen tly (check with physician).
• Ensure clean application throughout.
• If you dispose of the Accu-Chek
LinkAssist, please place device in trash
can or other suitable container.
• Dispose of used infusion sets safely.
• Never re-use an infusion set.
• The infusion set should only be intro-
duced into those sites of the body recom-
mended by your healthcare professional.
Cleaning and Care
• If needed, wipe the outside of the
Accu-Chek LinkAssist insertion device
with a cloth moistened beforehand with
water, a mild hand soap or a standard
disinfectant (e.g. 70 % ethyl alcohol).
• Do not dip the insertion device into the
cleaning fluid.
• Dry the insertion device thoroughly with a
soft, clean cloth.

10
Correct storage
• The insertion device should not be stored
in a pretensioned condition.
The tensioning element should be com-
pletely outside the base part and the re-
lease button triggered (see Figure 1).
• Do not store the insertion device in
extreme temperatures (for example in a
hot car).
Warranty
Your Accu-Chek LinkAssist is warranted
against defects in material and workmanship
for 18 months from the date of purchase.
US
For detailed warranty and service
information please refer to the Warranty
section at the end of this manual.
Distributed in USA by:
Roche Health Solutions Inc.
11800 Exit 5 Parkway, Suite 120
Fishers, IN 46037, USA
Toll Free 1-800-280-7801
www.accu-chek.com
Distributed in the United Kingdom by:
Roche Diagnostics Limited
Charles Avenue, Burgess Hill,
West Sussex, RH15 9RY, United Kingdom
Accu-Chek Pump Care Line:
UK Freephone number: 0800 731 22 91*
ROI Freephone number: 1800 88 23 51*
www.accu-chek.co.uk
www.accu-chek.ie
*Calls may be recorded for training purposes

en
11
Distributed in Australia by:
Roche Diagnostics Australia Pty. Ltd.
31 Victoria Avenue, Castle Hill,
NSW 2154, Australia
ABN 29 003 001 205
Phone: +61 1800 633 457 (Pump Hotline)
Phone: +61 1800 802 409 (Orders)
Fax: +61 1800 066 598 (Orders)
www.accu-chek.com.au
Distributed in New Zealand by:
Roche Diabetes Care NZ Ltd
15 Rakino Way, Mt. Wellington 1641
P O Box 62-089, Sylvia Park 1644
Auckland, New Zealand
Pump Hotline: +64 0800 696 696
Accu-Chek Enquiry Line: +64 0800 8022 99
www.accu-chek.co.nz
Distributed in South Africa by:
Roche Products (Pty) Ltd.
Diagnostics Division
P.O. Box 1927, Randburg 2125
9 Will Scarlet Road, Ferndale
Randburg, South Africa
Accu-Chek Customer Care Centre:
080-DIABETES (Dial 080-34-22-38-37)
www.diabetes.co.za
Distributed in Canada by:
Roche Diagnostics Canada
201 Armand-Frappier Blvd.
Laval, Quebec
Canada
H7V 4A2
Toll free: 1-800-280-7801
www.accu-chek.ca

12
de Gebrauchsanweisung
Accu-Chek LinkAssist ist eine Setzhilfe, die
speziell für das Setzen des Accu-Chek FlexLink
Infusionssets bestimmt ist. Sie ermöglicht ein
einfaches, schnelles und so gut wie schmerz-
freies Einführen der Kanüle in das subkutane
Fettgewebe für die subkutane Infusion von
Insulin.
Auslöseknopf
Sicherungshebel
Spannelement
Fußteil mit
Griffstück
SETZHILFE

de
13
Accu-Chek FlexLink Infusionsset
(USA/Kanada: Accu-Chek Ultraflex)
Blauer Adaptergriff
(abnehmbar)
Haltegriff der
Führungsnadel
Seitenclips
Schutzfolie der
selbsthaftenden Auflage
Kanülengehäuse
Selbsthaftende Auflage
Biegsame Kanüle
Führungsnadel
Schutzhülle

14
KONTRAINDIKATIONEN
• Die Accu-Chek LinkAssist Setzhilfe ist
ausschließlich für die Verwendung mit
dem Accu-Chek FlexLink Infusionsset
(in den USA/Kanada: Accu-Chek Ultraflex)
vorgesehen. Bei Verwendung anderer
Infusionssets kann die Sicherheit und
einwandfreie Funktion der Accu-Chek
LinkAssist Setzhilfe nicht garantiert
werden.
• Die Accu-Chek LinkAssist Setzhilfe ist
ausschließlich für die Verwendung an
einer Person bestimmt. Es darf nicht an
mehreren Personen verwendet werden.
WARNUNG
Lesen Sie diese Gebrauchsanweisung
und die Gebrauchsanweisung des
Accu-Chek FlexLink Infusionssets (in den
USA/Kanada: Accu-Chek Ultraflex) vor
Verwendung dieser Setzhilfe sorgfältig
durch. Die Reihenfolge der in diesen
Gebrauchsanweisungen beschriebenen
Anwendungsschritte ist unbedingt
einzuhalten. Das Nichtbefolgen der
Gebrauchsanweisung kann zu
Schmerzen oder Verletzungen führen.
Vorbereitung
• Lesen Sie diese Gebrauchsanweisung und
die Gebrauchsanweisung des Accu-Chek
FlexLink Infusionssets vor Verwendung
dieser Setzhilfe sorgfältig durch.
• Vor der Anwendung bitte Hände waschen.
Gemäß der ärztlichen Anweisung eine
geeignete Körperstelle auswählen, die
nicht auf Taillenhöhe, über Knochen, im
Bereich von Narbengewebe, Nabel oder
einer kürzlich zuvor benutzen Einführungs-
stelle liegt. Diese Stelle gemäß den
ärztlichen Anweisungen desinfizieren
und vor dem Einführen der Kanüle das
Desinfektionsmittel trocknen lassen.
• Die unbeschädigte Verpackung des
Infusionssets öffnen und das Infusionsset
herausnehmen.

de
15
WARNUNG
• Verwenden Sie kein Infusionsset, bei dem
die Führungsnadel bereits beschädigt
oder verbogen ist.
• Das Infusionsset ist nur bei ungeöffneter
und unbeschädigter Verpackung steril.
Nicht verwenden, falls die Verpackung
bereits geöffnet oder beschädigt ist.
So verwenden Sie die Accu-Chek
LinkAssist Setzhilfe zum Einführen des
Accu-Chek FlexLink Infusionssets (in den
USA/Kanada: Accu-Chek Ultraflex)
Beachten Sie auch die Abbildungen auf der
Umschlaginnenseite.
1 Das Spannelement der Setzhilfe in das
Fußteil hinein schieben.
2 Die Setzhilfe ist nun vorgespannt.
Bei diesem Handlingschritt wird der
Sicherungshebel arretiert und die
Setzhilfe automatisch gesichert.
3 Das Infusionsset mit Daumen und
Zeigefinger an der Schutzhülle halten
und mit dem blauen Adaptergriff voran,
von unten in die Öffnung der Setzhilfe
einsetzen, bis es spürbar einrastet.
4 Korrekt eingeführtes Infusionsset.
Hinweis: Die kleine Lasche an der
selbsthaftenden Auflage zeigt Ihnen an,
auf welcher Seite der Schlauch ange-
koppelt wird.
WARNUNG
Wenn sich ein Infusionsset in der Setz-
hilfe befindet, schauen Sie keinesfalls
von unten in die Öffnung der Setzhilfe.
Richten Sie niemals eine mit einem
Infusionsset bestückte Setzhilfe auf
andere Menschen, Kopfhöhe, Gesicht,
Augen.

16
5 Vorsichtig die transparente Schutzhülle
des Infusionssets durch gleichzeitiges
Drehen und Ziehen entfernen. Diese
Schutzhülle wird später noch benötigt,
um die Führungsnadel sicher zu
entsorgen.
6 Beide Teile der Schutzfolie von der
selbsthaftenden Auflage des Infusionssets
abziehen.
7 Mit einer Hand das Fußteil der Setzhilfe
festhalten und mit der anderen Hand
das Spannelement nach oben bis zum
spürbaren Anschlag herausziehen.
WARNUNG
Die Setzhilfe erst entsichern, wenn diese
auf der Haut aufgesetzt ist.
8 Das Spannelement halten und die
Setz hilfe auf die desinfizierte Haut auf-
setzen. Die Setzhilfe durch Umlegen
des Sicherungshebels aktivieren. Den
Auslöseknopf drücken, um die Kanüle in
die Haut einzuführen. Die Setzhilfe kann
nun von der Einführungsstelle entfernt
und beiseite gelegt werden.
WARNUNG
Falls das Infusionsset in der Setzhilfe
stecken bleibt, das Spannelement
vorsichtig zurück in das Fußteil schieben.
Die Setzhilfe darf dabei nicht auf einen
Körperteil oder eine andere Person
gerichtet sein.
Mit Schritt 7 fortfahren. Achten Sie
darauf, das Fußteil nicht zusammenzu-
drücken.
9 Überprüfen Sie den korrekten Sitz der
Auflage und drücken Sie diese selbst-
haftende Auflage fest auf die Haut, um
einen sicheren Sitz des Infusionssets
zu gewährleisten.

de
17
WARNUNG
Bei nicht korrektem Sitz des Infusions-
sets ist ein neues Infusionsset zu
verwenden.
• Die selbsthaftende Auflage festhalten.
Die Seitenclips des blauen Adaptergriffs
vorsichtig zusammendrücken und diesen
vom Kanülengehäuse entfernen.
• Zum Entfernen der Führungsnadel das
Kanülengehäuse am Körper festhalten.
Einen Finger auf das Kanülengehäuse
legen und die Führungsnadel an ihrem
Haltegriff gerade herausziehen. Die Füh-
rungsnadel in die Schutzhülle stecken,
bis sie spürbar einrastet und sicher
entsorgen (Nadelbehälter).
WARNUNG
Beim Zusammenstecken der Führungs-
nadel in die Schutzhülle vorsichtig vor-
gehen, um ein versehentliches Stechen
zu vermeiden.
Anschluss an der Insulinpumpe
Der Anschluss des Schlauchs an das
Kanülengehäuse und die Insulinpumpe
erfolgt gemäß der Gebrauchsanweisung des
Accu-Chek FlexLink Infusionssets (in den
USA/ Kanada: Accu-Chek Ultraflex) und
der Gebrauchs anweisung der jeweiligen
Insulinpumpe.
WARNUNG
• 1–3 Stunden nach Setzen des Infusions-
sets den Blutzuckerspiegel überprüfen
und die Einführungsstelle mehrmals
täglich auf den korrekten Sitz des Infu-
sionssets bzw. auf eine evtl. Rötung
der Haut kontrollieren.
• Achten Sie während der gesamten
Anwendung auf Sauberkeit.
• Bitte entsorgen Sie die Accu-Chek
LinkAssist Setzhilfe im Hausmüll.
• Entsorgen Sie ein gebrauchtes Infusions-
set auf eine sichere Art und Weise.

18
• Verwenden Sie niemals ein bereits
benutztes Infusionsset.
• Das Infusionsset sollte ausschließlich in
den vom Arzt empfohlenen Bereich des
Körpers eingeführt werden.
Pflege und Reinigung
• Bei Bedarf wischen Sie die Außenseite
der Accu-Chek LinkAssist Setzhilfe
mit einem Tuch ab, das Sie zuvor mit
Wasser, einem milden Handreinigungs-
mittel oder einem Standarddesinfektions-
mittel (z. B. 70%igem Ethylalkohol)
angefeuchtet haben.
• Tauchen Sie die Setzhilfe nicht in die
Reinigungsflüssigkeit ein.
• Lassen Sie die Setzhilfe anschließend
gründlich trocknen.
Sachgemäße Lagerung
• Die Lagerung der Setzhilfe sollte nicht im
gespannten Zustand erfolgen.
Das Spannelement sollte sich komplett
außerhalb des Fußteils befinden und der
Auslöseknopf sollte gedrückt sein (siehe
Abbildung 1).
• Lagern Sie die Setzhilfe nicht bei extre-
men Temperaturen (z.B. im heißen Auto).
Garantie
Für Accu-Chek LinkAssist gilt für 18 Monate
ab dem Kaufdatum eine Garantie gegen
Material- und Verarbeitungsfehler.
Table of contents
Languages:
Other ACCU-CHECK Medical Equipment manuals