How to use the device properly:
Do not turn the lens toward human eyes when in operation, to avoid
damaging the eyes caused by the high intensity light source.
Do not block the device ventilation to avoid damage to the internal
electronic devices due to overheating.
Do not use chemicals, cleaning agents or clean water to clean the
device, and prevent rain water, moisture and mineral-containing
liquids from corroding circuit boards.
Please keep the device and its parts and accessories out of reach of
children.
Please ensure that the device is operated in a dry and ventilated
environment.
Do not store the device in extreme hot or cold conditions. High and
low temperatures may shorten the lifespan of electronic devices. The
normal operating environment is between 5℃~35℃.
Do not put the device into any drying equipment (such as dryer,
microwave oven, etc.).
Do not squeeze or place heavy objects over the device to avoid
damage to the device.
Do not throw, knock or shake the device violently, which may
damage the internal circuit boards.
Do not attempt to disassemble the device without permission. If
there is any problem, please contact customer support.
Do not repair any product by yourself. If the device or any part does
not work properly, you should consult customer support or return the
device for repair.
As the device is a high intensity light source, do not stare or look directly at the lens
during operation, which may damage your eyes. This warning applies to children as
well.
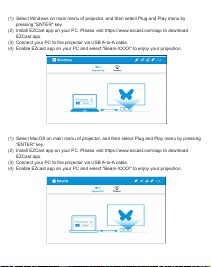
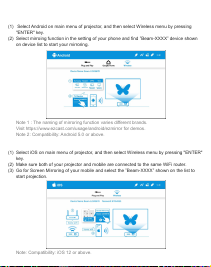
(1)
(2)
(3)
(4)
(5)
(6)
(7)
(8)
(9)
(10)
(11)
Precautions