Acer one 8 T2 Instruction manual

Acer one 8 T2
8 inch Android Tablet
Qucik User Guide

TABLE OF CONTENTS
Important
This manual contains proprietary information that is protected by copyright
laws.The information contained in this manual is subject to change without
notice.Images provided herein are for reference only and may contain
information or features that do not apply to your computer.Acer Group shall not
be liable for technical or editorial errors or omissions contained in this manual.
Acer one 8 T2 Information 1
General View.............................................1
........................................2
Home Page................................................3
Keys Function............................................3
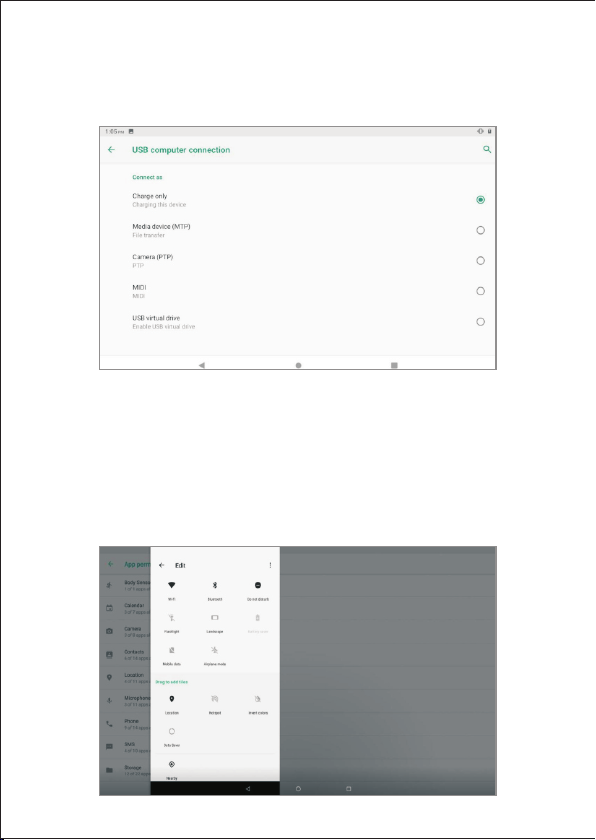
USB Connection........................................4
.....4
.............................................4
Basic Setting..............................................5
Bluetooth..................................................6
Notification...............................................7
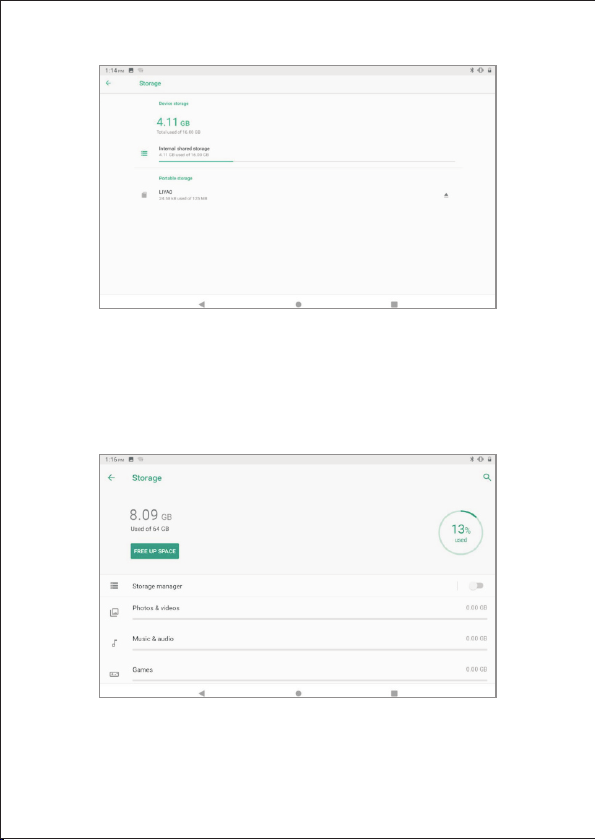
Storage......................................................8
Open setting function;click storage..........8
SD card......................................................9
Safely remove or format SD card..............9
Security&location.....................................9
Set unlocked picture.................................9
Click continue...........................................9
Set unlock password.................................9
Location service......................................10
Language and Input Method................. 10
Multi-Media 11
MUSIC.....................................................11
Photo Gallery...........................................11
View pictures...........................................11
Edit and set pictures................................11
Slide Show...............................................11
Troubleshooting
Quick Start Guide 3
Copy the document into memory card
Quick Setting
.
Crop.........................................................12
Edit..........................................................12
Camera....................................................12
Installation of Procedures 12
Installation...............................................12
Uninstall..................................................12
GOING ONLINE 13
Using the browser...................................13
Setting up the Email application.............14
Google services.......................................14
Setting up your Google email..................14
Composing an email................................14
Voice Search............................................14
Play Store................................................15
Using downloaded applications..............16
Uninstalling downloaded applications....16
WAR R ANT Y C ONDI T IONS...................16
FAILURE TO PACKING...............................17
OTHE R E X C L US IONS...........................17
PIX ELPOL ICY...........................................17
Dec laration of c onformity EU................17

Adapter Information
Input:AC 100-240V,50/60Hz,0.35A
Output:5V 1.5A
Model:Acer one 8 T2
Processor:MT8765V/WA 1.5GHZ
Operating System:Android 10.0
RAM:2GB DDR3
Storage:32GB,support Micro SD up to 64 GB
Screen:8.0 inch 1280 X 800
Display:IPS Screen and 10 points touch screen
Music:MP3,AAC,WAV,OGG,etc
Video:MP4,OGM,3GP,AVI.Etc
Picture:JPG,JPEG,PNG,etc.
Battery:4000mAh,3.7V
Adapter:DC 5V,1.5A
Camera:Front 0.3 MP,Rear 2.0 MP
Wi-Fi:IEEE 802.11 a/b/g/n,2.4Ghz
Bluetooth:BT 4.0
Others:GPS,FM
Ports:Micro TF/SDHC,Micro USB,3.5mm Headphone
Dimensions:L208.4mm x W124.5mm x H9.65mm
Weight:326g (tablet only)
Specifications and this manual are subject to change without prior notice.Conforms to AEEE directive.
This product complies with the European CE Directives 2014/53 /EU (Electromagnetic Compatibility Directive).
This device complies with the Directive on Control of Waste Electrical and Electronic Equipment.
Google,Android,Google Play and other brands Google Inc.is the trademark of the foundation.
Simplified Compliance Statement Acer declares that the radio equipment type plate is in compliance with the directive
2014/53 /EU.The full text of the EU declaration of conformity is available on the Internet at:
Acer one 8 T2 Information
In this user manual,the specifications given in the visuals and the parts indicated in the box contents may differ according to
the model.The images are representative
General View
1.Volume+/ Volume –
2.Power button
3.RESET
7.Micro USB
8.Speaker
9.Rear Camera
6.Micro SD&SIM Card
4.Front Camera
5.Headphone
1

If you detect an unusual condition on your device,you can try to solve the problem in the description of the table.
Troubleshooting
2

Main interface as below picture 2.2-1,long press the blank and it will popup windows to set wallpaper,folder,widgets,
and shortcut.
Home Page
Time Battery volume
R eturn
Home Display recently history
Disposal of your device in an environmentally friendly manner This symbol on the product or on its packaging
indicates that the product must not be treated as household waste. Instead of and delivered to the current collection
point which recycles electronic equipment.This product is correct, you will be able to prevent the potential negative
consequences of environment and human health arising from waste treatmentof the product. Recycling of materials
will help to conserve natural resources.For more information about recycling this product, please contact your local
municipality, the household waste disposal service or the shop where you purchased the product.Suggestions for
Energy SavingWhen you do not use it, turn off the device like wi-fi, blue tooth. If necessary,disable unnecessary
sounds such as application notification and key sound.Depending on what you need, reducing the brightness and
volume will enableyou to use energy efficiently.Proper Battery Disposal(For countries with separate collection
systems) The marking on the battery,the guide and the luggage compartment indicate that this pile of battery should
not be disposed with other household waste. Hg, Cd or Pb chemical symbols indicate that the battery contains mercury,
cadmium or lead above the reference values specified in EC Directive 2006/66. The battery supplied with this product
can not be changed by the user. For detailed information on replacement, please contact yourservice provider.
Do not try to remove the battery or throw it into the fire. Do not disassemble, crush or punch. If you intend to
dispose of the product, necessary measures will be taken in the field of waste
Quick Start Guide
Keys Function
Keys Function Description:
)
Power button Short press to sleep/wake up,long press to startup and
shutdown.
Volume +(up)increase the volume
Volume -(down)decrease the volume
C li ck it i n any interface will return to main interface.
Back button(back)click it in any interface will return to previous menu
Setting button display recently browsed history;double click this button,
you can switch between the last two applications
H O ME button(home
)
3

USB Connection
MID storage configuration
Before transmitting documents, you have to conduct storage configuration for your MID:
1.Connect the MID and computer by USB cable, the reminder column will show the remind information.
2.Open the reminder board; please view the MID status and reminder to learn how to open the board.
3.In the reminder board, click the “USB for file transfer ”, it will as below Picture 2.3-1, then click “File transfers”.
4.Now the USB is connected successfully.
Copy the document into memory card
1.Connect the MID to computer with USB cable.
2.As MID storage configuration, it is connected with computer successfully.
3.Open the “My computer” in your computer, check the items in “MTP devices”.
4.Copy the documents you need into “MTP devices”.
5.After copying finishes, unplug the USB can.
Quick Setting
Swipe-down gesture from the top of the screen, there are nine shortcuts icons, such as Wi-Fi, Bluetooth, Auto-rotate,
and so on. In the full Quick Settings list you can also tap the edit button at the bottom right torearrange the tiles or
replace them with others, as Picture 2.4-1. The optional extras list is pretty minimal: Just Hotspot, Data saver and
Invert colors.But
dable to create custom Quick S ettings tiles for their apps,which will definitely make things a lot more
interesting in the coming mouths.
4

Swipe-down gesture from the top of the screen,L ong press push message to see a switch,operate it
to open and close the future of this app so all notifications as Picture 2.4-2
Basic Setting
Network and Internet
R eset Wi-Fi、B luetooth
C lick
icon in right top of Picture ,select R eset Wi -Fi、B luetooth
5

Bluetooth
Bluetooth function operation
1.Click setting application in main menu interface
2.Click Bluetooth and open it.
3.If somebody open Bluetooth in your surroundings, click search device in right above, then MID will automatically
search the Bluetooth device nearby.
4.
Click the available Bluetooth device,it will popup request window,enter into related password,and match the device to
connect.
5.
After match successfully,choose the operation you want to,click
6
to enter
Apps & notification
APPS
Click setting application in Apps.2.Select application, after enter, you can manage and delete installed application.

Notification
Open settings; click Notification
7
Important
You should only remove programs if you are familiar with the Android operating
system.

Open setting function;click Storage
Internal storage
Internal storage is MID local NAND storage, as Picture 3.4-2, if you need to check the storage content, you can check it
in main menu.
Storage
8

C li ck SD card to check the storage content
SD card
Safely remove or format SD card
1.Click
2.Click Settings
3.After the above two steps you can choose what you want to do,remove or format TF card
Note:Removing TF card safely can protectTF card and increase its lifetime.
Security&location
Set locked screen
Lock the touch screen by unlock icon or password to protect your MID.
Note:After setting screen locked,you should enter the pass code each time when you startup or screen is locked
Set unlocked picture
1.Click setting application in main interface.
2.Click security.
3.Click screen lock.
4.Choose pattern in text setting area.
5.Click next following the remind message.
6.The unlocked pattern board pop up,there are nine touch spots,connect 4 points from vertical,horizontal or diagonal direction.
move your finger from the screen when finish.T he system will record yours new unlock pattern.
Click continue.
When you see the reminder,enter the unlock pattern,then click confirm.Set unlock PIN code
1.
Click setting application in main interface.
2.
Click security.
3.Click screen lock.
4.
Choose PIN in text setting area.
5.
Enter new PIN code(numbers)and click continue.
6.
Enter new PIN code again and click confirm.
Set unlock password
1.Click setting application in main interface.
2.Click safe.
3.
Click screen locked.
4.
Set password in text setting area.
5.
Set new password(letters and numbers)and then click continue.
6.Enter the password again and the click confirm.9

C li ck setting,select language and input method,choose language ,then click A dd alanguage,select the language
you want to add from the language list,as Picture 3.6-1.B ack to language preferences page ,you can drag the language
you want to set to the first to switch language.
System
Language and Input Method
Location ser vice
Click setting,select Location
10

When check the pictures in full screen mode,click menu key to display menu selection,you can choose the selection
you need to edit and setting pictures.
Edit and set pictures
Note:when you browse the pictures,slide left or right to view more pictures.
1.
Click gallery application in main interface.
2.
Enter into gallery,click the folder you want to view.
3.
Click the picture you want to view,the system will play it in full screen mode automatically.
will be zoom in)or double click the screen.
4.
The pictures can be zoom in and zoom out,put two fingers on the screen,the separate the fingers (gather up the fingers,
the picture
View pIctures
Photo gallery application can auto search photos and video files in S D card,and photo
gallery will classify these photos and videos in folder.Y ou can apply photo gallery to
view and edit photos,set the photos as wallpaper and watch the video.
Photo G allery
Click setting,choose language and input,choose GoogleTM keyboard setting,click input language
Music
E nter into musi c player:in menu or desktop click music icon to enter into music player,click the music you want to play,
Drag the progress bar to adjust play progress.Operation of music player button
Important
Back up your contacts before making any changes.Tap the Menu button
and select Import/Export.You may then Export your contact list to your
tablet’s internal memory,or other options depending on installed
applications.
1.
Open a picture,use virtual key to click menu key,display menu selection.
2.
Click slide show,it will auto loop play
Slide Show
11
Multi-Media

I nstallation
2.
Then click crop,click and drag related area to adjust the cropper.
3.
Click cropper and drag it inside and outside to adjust the image.
4.
After adjust the size you want,click crop.
5.
If you wish to give up to crop,click cancel to return to picture browse.
1.
Click menu key to display menu selection.
Crop
Edit
1.
Click menu key,display the menu selection.
2.
Click edit.
3.
Adjust the brightness,style,color,ant alias setting in selection.
4.
Click save.
5.
If you want to give up edit,click return key,click not to return to picture browse.
Camera
In the main interface or desktop,click camera application procedure ,enter into camera
Operation of camera ,Switch camera:choose Menu key,click switch front/back camera
I nstall the thir d par ty appl ication pr ocedur e
1.
Click
“file manager”application procedure;choose the application procedure you need to install.
2.
Hold the application procedure you need to install.
3.
It popup install,click install apk.
4.
Finish the installation as guide,it will operate.
Note:The third party procedure searched from internet to use on the system are all suffixed with .apk.
Important
Some applications may require payment before you can download them.You
will need to have a Google Wallet account in order to pay for these applications.
Uninstall application procedure
1.
Click setting icon in main interface.
2.
Click apps,list all the application procedures installed in the system.
3.
Click the APK you want to uninstall,click uninstall.
4.
Click confirm to finish uninstallation.
Uninstall
12
Installation of Procedures

Using the browser
To start browsing, tap the Chrome icon on
the Home screen, or tap APPS and then
Chrome. To enter a website address, tap
the address box at the top of the page.
Enter the address using the keyboard and
tap Go.
To navigate forward and backward in your
browser抯 history, tap the forward and
backward arrows next to the search bar.
To refresh the webpage tap the refresh
icon between the search bar and browser
history arrows. To view your bookmarks,
adjust browser settings, and perform other
tasks, tap the Menu icon.
GOING ONLINE
Managing Wi-Fi connections
If you did not connect to a Wi-Fi network when you first started your tablet, or
want to connect to a new network, tap SettingsAPPS > > Wi-Fi
to manage your
Wi-Fi ON switch and wait for your
connection settings. If Wi-Fi is not on, tap the
Tap the name of your network and enter
tablet to detect nearby networks.
by swiping
Alternatively, open Quick Settings
needed.
asecurity password, if
of the screen and tap the Wi-Fi button to toggle on and down from the top-right
In order to browse the internet
Browsing the internet
connection.
off the Wi-Fi
connected to a network with a connection to
with your tablet, you must be
the internet.
13
Chrome enables you to open multiple tabs. When a page is open, tap
the small New tab button. Simply tap one of the open tabs across the
top of the screen to switch pages.
Pinch to zoom in or out of pages. Tap and hold an item on a page to
open a contextual menu.
New tab

Setting up the Email application
Setting up your Google email
1.Make sure your tablet is connected to the internet.
2.Tap APPS and then Gmail .
The Email application enables you to access email from most popular
providers. Most accounts can be set up in two steps. Tap APPS and then tap
Email to start setting up your email access.Enter your email address and
password tap Manual setup to enter the parameters manually or simply
tap Next to finish the setup process.The combined inbox feature of
tablet allows you to view emails your from multiple accounts in a single
inbox.
Google services
Note
Applications may not be available in all countries and regions.
You must activate a Google account before using Google services. The first
time you access Google services, you must read and accept the Terms of
Service.
The contents and design of Google Play vary by region. For example, in
some regions, you can also browse for and purchase movies, books,
magazines, or music. Updates may add new categories or change how to
navigate Google Play at any time.
If you did not enter a Gmail account address and password when you first
Composing an email
1.Make sure your tablet is connected to the internet.
2.Tap APPS and then Gmail .
3.Tap .
4.Enter the recipient's email address, the subject and message.
5.When you are finished composing your message, tap .
started your tablet, follow the instructions.
Voice Search
Note
Voice Search is available only in selected regions.
14

With voice actions, you can send emails, find directions to locations,
search the In internet and even send a note to yourself using your voice.
Chrome, searches. tap the microphone icon in the address bar for voice
When the Speak now prompt displays, state your command or
then press the red microphone button. Your query command displays
in the search box. Tap on the keyboard to Go complete the command
or query.
Play Store
Tap Play Store from the home screen or APPS menu to open Google Play.
Here you can obtain a variety of add-on programs and applications
category or tap the search icon to search for a specific application.
to enhance the functionality of your tablet.You can browse Google Play by
15

For the best user experience, you are advised to not download apps that use
3D graphics.Once you have selected an application, tap the Install button to
download and install the application. You will be told which services (contact
information, wireless access, GPS, etc.) the application requires access
to function in order correctly. If none of these services seem unusual, tap
Accept & download to proceed with the installation.
You may keep track of the download progress from both the app's page
and the device's notification area.
Important
Some applications may require payment before you can download
them. You will need to have a Google Wallet account in order to pay for
these applications.
Using downloaded applications
Once you’ve downloaded and installed an application, you may find it in the
APPS or WIDGETS menus.
Certain applications provide both an app and widget, or only provide a widget
(with no application icon). See Personalizing the Home screen on page 15.
Uninstalling downloaded applications
Once you’ve downloaded and installed an application, you may
uninstall the application from APPS > Settings > Apps , then select the
app you wish to uninstall and tap Uninstall . Deleting an app icon from the
Home screen only deletes the shortcut.
16
Note
Pre-installed apps cannot be uninstalled.

FAILURE TO PACKING:
It it appeared,after unpackng the product or devce,a vice preventing the use of the product in its expected
contiguration, contact the customer service with in 72 hours worked.
D IS C L A IME R O F WA R R A N T Y
D IS C L A IME R O F WA R R A N T Y R E L A T E D T O T H E O R IG IN O F D A MA G E S
T he g ua ra ntee doe s not a pply in c a s e of a cc ide nta l phys ic al da ma ge,it does not
c ove r s uch da ma ge a nd fa ilu re s tha t res u lted:
●imprope r ins ta llation (of a ba d ins tallation)or a mis us e or poor ma intena nc e of the product.
●imprope r us e of the ma teria l o r not co mplyin g with the ins truc tion s in the us e r ma nua l.
●lightning ,flood,fire,po wer s urg e,s h ock,poor ventilation,a fall,dis c olora tion due to the ac tion of lig ht,burning,
humidity,ex ce s s ive he ating without hum id ifie r,or irregular ground or ins ects .
●repairs ma de and /or working on the ha rdware and /or opening of it by a n una uthoriz ed pe rs on by the ma nufa cturer.
●maintenance,re pa ir or repla c ement of pa rts due to n orma l us ury or failure to ma intain.
Important
This will erase all your personal information,any contacts stored on your tablet
and any programs you installed.
OPERATING MANAGEMENT:
Your product is guaranteed2 years.
Toreqvestsupport. contact the customer service at 0811 482 202.
You wlIthen be asked the detecive part and the original invoice stating the product regulatior.We may ask
you for photos of your appliance.
WA R R A N T Y C O NDI T I ONS
●modific ation of th e c ons truc tion a nd origina l fe atures of the g uara nte ed p rod uc t.
●c orros ion,oxidation,a bad c onnection nor an external power supply problem.
E X C L US IO N OF WA R R A NT IE S R E L AT IN G T O T H E
N AT U R E OF D A MA G E S (IND IR E C T S D A MA G E S )
T he guarantee c overs only the right to repair or replac e the guara nteed product.
C ons equ ently,the indirec t da ma g e res ulting from the fa ilure or da ma ge not
covered by warranty,including:
●C omm is s ioning c os ts,a djus ting ,cleaning;
●Damage of any kind res ulting from the unavaila bility of the product gua ranteed during the period between deteriora
tion a nd failure and re pair or the repla ce ment of the product gua ranteed.
O T HE R E X C L US IO NS
●Da ma ge an d fa ults unde r s pe cific ex clu s ions in the warranty ma nufa cture guaranteed produc t,as mentioned in
the produ ct ins truc tion s for us e ;
●T he a es thetic d am ag e;
●T he produc ts gua rantee tha t the c us tome r is n ot a ble to return or thos e who re turne d withou t the ir a c ces s ories .
PIX E L P O L IC Y
In accordance with the IS O 13406-2 norm,a produc t is c onsidered defective
when the number of dea d or lit pixels is over 3.
D ec laration of c onfo rm ity EU:
Mark et Ma ker B ra nd L ic ens ing ,hereby dec lares that this equipment,c onforms to the es s e ntia l re quire ments
a nd other rele va nt provis ions of D ire ctiv e 2 014/53/UE .T he dec laration of C onformity c an b e viewe d a t the
following a ddres s :
17

http://www.mms -s upport.net/OTA/E C D_MMB L _B D L 1064P R 00 1.pdf
G oog le,Android,G oog le P lay and other marks a re tradema rks of G oog le L L C ;Oreo is a
trademark of Mondelez International,Inc.g roup.
This device complies with part 15 of the FCC Rules. Operation is subject to the condition that (1) this device
may not cause harmful interference, and (2) this device must accept any interference received, including
interference that may cause undesired operation. Changes or modifications not expressly approved by the
party responsible for compliance could void the user's authority to operate the equipment.
NOTE: This equipment has been tested and found to comply with the limits for a Class B digital device,
pursuant to Part 15 of the FCC Rules. These limits are designed to provide reasonable protection against
harmful interference in a residential installation. This equipment generates, uses and can radiate radio
frequency energy and, if not installed and used in accordance with the instructions, may cause harmful
interference to radio communications. However, there is no guarantee that interference will not occur in a
particular installation.
If this equipment does cause harmful interference to radio or television reception,
which can be determined by turning the equipment off and on, the user is encouraged to try to correct the
interference by one or more of the following measures:
-- Reorient or relocate the receiving antenna.
-- Increase the separation between the equipment and receiver.
-- Connect the equipment into an outlet on a circuit different
from that to which the receiver is connected.
-- Consult the dealer or an experienced radio/TV technician for help.
The device has been evaluated to meet general RF exposure requirement. The device can be used in
portable exposure condition without restriction.
Specific absorption rate (SAR):
This Tablet meets the government's requirements for exposure to radio
waves. The guidelines are based on standards developed by independent scientific organizations through
periodic and thorough evaluation of scientific studies. The standards include a margin of
safety designed to ensure the safety of all people regardless of their age or health.
The FCC Statement of Exposure to RF and the SAR limit for the United States (FCC) is 1.6 W/kg
average for each gram of tissue. This device was tested for typical operations of use on the body,
with the back of the phone at 0mm from the body. To maintain compliance with FCC RF
exposure requirements, use accessories that maintain a distance of 0mm between the user's body
and the back of the phone. The use of belt clips, covers and similar accessories must not contain metallic
components in their assembly. The use of accessories that do not meet these requirements may not meet
FCC RF exposure requirements and should be avoided.Functioning in the body
This device was tested for typical operations of use in the body. To comply with RF exposure
requirements, a minimum separation distance of 0mm must be maintained between the user's
body and the telephone, including the antenna. Third-party accessories such as belt clips. covers
and similar accessories used with this device should not contain metallic components, accessories
that do not meet these RF exposure requirements and should be avoided from use on the body. Use only
the supplied antenna or an approved antenna.
Changes or modifications not expressly approved by the party responsible for compliance
could void the user's authority to operate the equipment.
Table of contents
Other Acer Tablet manuals

Acer
Acer Ducati 2 HD User manual

Acer
Acer A1-811 User manual

Acer
Acer B1-860 User manual

Acer
Acer ACTAB821 User manual

Acer
Acer B3-A40 Original instructions

Acer
Acer Iconia Tab User manual

Acer
Acer Iconia One 10 Original instructions

Acer
Acer TD070VA1 User manual

Acer
Acer Iconia One 7 User manual

Acer
Acer ICONIA Tab A100 8GB User manual

Acer
Acer Iconia W3 User manual

Acer
Acer Iconia TAB A510 User manual

Acer
Acer A1412 User manual

Acer
Acer A5001 User manual

Acer
Acer B1-730HD User manual

Acer
Acer ICONIA TAB A210 User manual

Acer
Acer ICONIA Tab A500 User manual

Acer
Acer Iconia A1 User manual

Acer
Acer Iconia One 7 User manual

Acer
Acer Iconia Tab A110 User manual