Acutus Medical AcQMap 800365-003 User manual

800365-003 AcQMap® Patient Electrode Kit Instructions for Use 1
800365-003 AcQMap® Patientenelektroden-Kit – Gebrauchsanweisung 3
Mode d’emploi du kit d’électrodes patient 800365-003 AcQMap® 5
800365-003 AcQMap® Gebruikshandleiding voor kit met patiëntenelektroden 7
800365-003 Kit di elettrodi paziente AcQMap® Istruzioni per l’uso 9
Modo de empleo del kit de electrodos para el paciente 800365-003 AcQMap® 11
800365-003 Návod k použití sady pacientských elektrod AcQMap® 13
Bruksanvisning for 800365-003 AcQMap®-pasientelektrodesett 15
800365-003 AcQMap® Brugsanvisning til patientelektrodesæt 17
800365-003 AcQMap® potilaselektrodisarjan käyttöohje 19
800365-003 AcQMap® Bruksanvisning för patientelektrodsats 21
800365-003 Kit de Elétrodos do Doente AcQMap® Instruções de Utilização 23
Explanation of Symbols 25
800365-003
AcQMap® is a registered trademark of Acutus Medical.
AcQMap® ist eine eingetragene Marke von Acutus Medical
AcQMap® est une marque déposée d’Acutus Medical
AcQMap® is een geregistreerd handelsmerk van Acutus Medical
AcQMap® è un marchio registrato di Acutus Medical
AcQMap® es una marca comercial registrada de Acutus Medical
AcQMap® je registrovaná ochranná známka společnosti Acutus Medical
AcQMap® er et registrert varemerke for Acutus Medical
AcQMap® er et registreret varemærke tilhørende Acutus Medical
AcQMap® on Acutus Medicalin rekisteröity tavaramerkki
AcQMap® är ett registrerat varumärke som ägs av Acutus Medical
AcQMap® é uma marca registada da Acutus Medical
Distributed by:
Vertrieb durch:
Distribué par:
Gedistribueerd door:
Distribuito da:
Distribuido por:
Distributor:
Produsert av:
Distribueret af:
Jakelija:
Återförsäljare:
Distribuído por:
Acutus Medical, Inc.
2210 Faraday Ave, Suite 100, Carlsbad, CA 92008 USA
Tel +1-442-232-6080 Fax +1-442-232-6081
www.acutusmedical.com
Copyright © Acutus Medical 2019.
HealthLink Europe Services BV
De Tweeling 20-22
5215 MC‘s-Hertogenbosch
The Netherlands
Tel Nr: +31.13.5479300
Fax Nr:+31.13.5479301
1
ENGLISH
800365-003 AcQMap® Patient
Electrode Kit Instructions for Use
The AcQMap Patient Electrode Kit is designed to be used
with the AcQMap High Resolution Imaging and Mapping
System 900100 to provide cardiac signals, catheter
localization and AcQMap System grounding.
The AcQMap Patient Electrode Kit, Model 800365-003,
includes the following components:
• Repositionable Monitoring Electrodes (15)
– 3M Red Dot™ 2670-5 (3)
• Patient Return Electrode (1)
– Covidien™ Valleylab™ E7507 (1)
• Localization Dispersive Electrodes with cables(6)
– Localization Dispersive Electrodes 1&2 (2)
ConMed® 440-2400
– Localization Dispersive Electrodes 3-6 (4)
ConMed® 425-2200
Caution: Federal law (USA) restricts this device to sale
by or on the order of a physician.
Warnings and Precautions
Patient Electrodes - To avoid patient injury, use care in
applying and removing Patient Electrodes (Repositionable
Monitoring, Localization Dispersive and Patient Return).
• To avoid patient injury, the Patient Return Electrode
must be the rst Patient Electrode connected to the
AcQMap Console at the beginning of the study and the
last Patient Electrode to be disconnected at the end of
the study. Remove the Patient Return Electrode from
the patient’s skin prior to disconnecting the electrode
lead-wire from the AcQMap Console.
• Ensure that all Patient Electrodes and connections are
not in contact with each other or any other surface
electrodes from other equipment (e.g., ablation return
electrodes, debrillation electrodes), electrical ground
or metallic objects.
• Do not warm the Repositionable Monitoring
Electrodes, Localization Dispersive Electrodes or
Patient Return Electrode prior to application to the
patient.
• Do not use any Patient Electrodes if the packaging seal is not intact, the conductive adhesive is dry, or the “Use By”
date has passed.
• Before applying Patient Electrodes, ensure the application site is hair-free, clean and dry.
• Re-use of disposable electrodes may result in degradation of performance of the AcQMap High Resolution
Imaging and Mapping System.
• Do not place electrodes on skin folds, dry or damaged skin.
• Do not modify electrodes prior to use.
• MRI compatibility for the electrodes contained in the AcQMap Patient Electrode Kit has not been tested by Acutus
Medical.
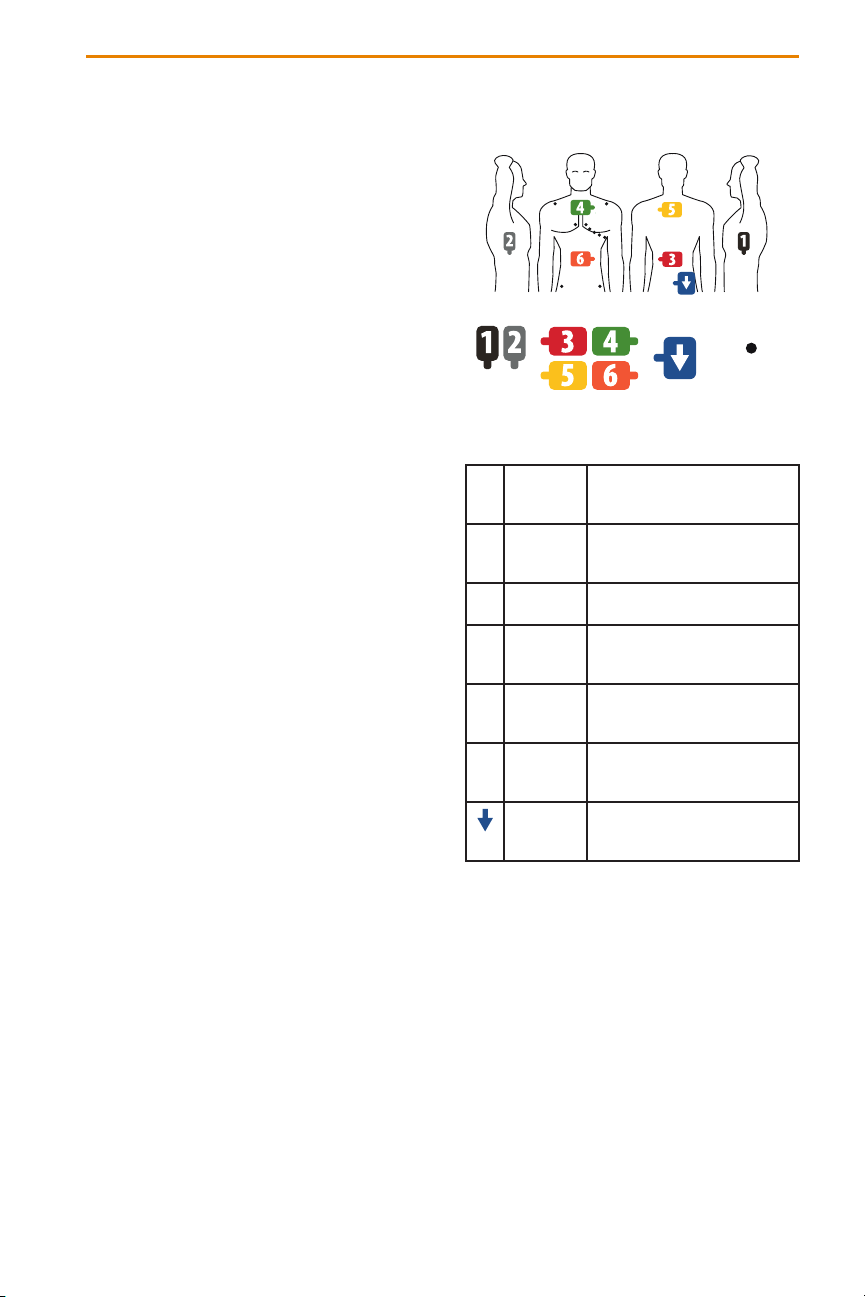
1 BLACK Upper left side torso mid-axillary
line at level of 4th intercostal
space
2 GRAY Upper ride side torso mid-
axillary line at level of 4th
intercostal space
3 RED Lower back, opposite 6 –
(Orange) on abdomen
4 GREEN Upper chest, top edge at level
of sternal notch, opposite 5
(Yellow) on upper back
5 YELLOW Upper back, top edge at level of
T3, opposite 4 (Green) on upper
chest
6 ORANGE Abdomen, midway between
xyphoid process and umbilicus,
opposite 3 (Red) on lower back
BLUE Lower back, rightward between
spine and 2 – (Gray) and below
level of 3 – (Red)
Covidien™
E7507
3M Red Dot™
2670-5
SIDES BACK FRONT MONITORING
RIGHT SIDE FRONT LEFT SIDEBACK
PATIENT
RETURN
ConMed®
440-2400
ConMed®
425-2200
Figure 1.1. Placement of Localization Dispersive,
Repositionable Monitoring and Patient Return Electrodes.
Not made with natural rubber latex.

2
Patient Electrode Identication
To connect all six (6) Localization Dispersive Electrodes and the Patient Return Electrode to the front panel of the
AcQMap Console, a set of colored, numbered stickers are provided to apply to the electrodes just prior to application
on the patient. Apply the stickers as follows:
a. Open a Localization Dispersive Electrode 1&2 and place the black colored sticker, with a“1”, in the center on
the non-patient contacting side of the electrode. Wrap the black sticker, with two“1”s, around the electrode
cable, near the connector so the“1”is visible from either direction.
b. Open the 2nd Localization Dispersive Electrode 1&2 and place the gray colored sticker, with a“2”, in the
center on the non-patient contacting side of the electrode. Wrap the other gray sticker around the electrode
cable, near the connector so the“2”is visible from either direction.
c. Open a Localization Dispersive Electrodes 3-6 and place the red colored sticker, with a“3”, in the center on
the non-patient contacting side of the electrode. Wrap the red sticker, with two“3”s, around the electrode
cable, near the connector so the“3”is visible from either direction.
d. Repeat Step c for all remaining Localization Dispersive Electrode 4-6 (Numbers 4 – 6).
e. Open the Patient Return Electrode and place the one blue colored sticker, with , in the center on the non-
patient contacting side of the electrode. Wrap the other blue sticker, with , around the electrode cable.
Patient Electrode Placement
Refer to Figure 1-1 for the correct placement of the Patient Electrodes. When placing the electrodes, ensure that the
cables are directed to the side of the table where the AcQMap Console is located. Start with the patient sitting upright
on the uoroscopy table.
a. Place the Patient Return Electrode on the lower right back. (Figure 1-1) Connect the Patient Return
Electrode to the front panel of the AcQMap Console.
b. Place Localization Dispersive Electrode 5 (yellow) on the patient’s back in a horizontal position with the
superior border of the patch at the level of T3. (Figure 1-1)
c. Place Localization Dispersive Electrode 3 (red) in a horizontal position across the lower back. (Figure 1-1) This
electrode will be parallel to #6. (see Step f)
d. Ensure that both Localization Dispersive Electrodes are at and have adequate adhesion to the patient’s skin.
Help the patient lay down and route the connector cables to the same side as the AcQMap Console.
e. Place Localization Dispersive Electrode 4 (green) in a horizontal position with the superior edge at the level
of the sternal notch. (Figure 1-1)
f. Place Localization Dispersive Electrode 6 (orange) in a horizontal position across the abdomen midway
between the xyphoid process and umbilicus. (Figure 1-1)
g. Place Localization Dispersive Electrode 2 (gray) in a vertical position across the right ribs. (Figure 1-1)
This electrode should be centered on the heart. Connect this electrode to the gray (#2) receptacle on the
AcQMap Console.
h. Place Localization Dispersive Electrode 1 (black) in a vertical position across the left ribs. (Figure 1-1) This
electrode should be centered on the heart. Connect this electrode to the black (#1) receptacle on the
AcQMap Console.
i. Connect all remaining cables to the color-coded receptacles on the front panel of the AcQMap Console.
j. Place the ten Repositionable Monitoring Electrodes as shown in Figure 1-1.
k. Connect the Repositionable Monitoring Electrodes to the AcQMap Console using the AcQMap ECG Input
Cable.
NOTE: If at any time during the study, the AcQMap Catheter appears at (i.e., 2 dimensional), the most likely cause is
a poorly attached or poorly located Localization Dispersive Electrodes. The Localization Dispersive Electrodes
should be inspected as soon as possible and replaced if necessary. After replacing any Localization Dispersive
Electrode, a new anatomy should be acquired.
NOTE: The AcQMap System does not require a right leg electrode.

3
DEUTSCH
800365-003 AcQMap®
Patientenelektroden-Kit –
Gebrauchsanweisung
Das AcQMap Patientenelektroden-Kit wurde
für die Verwendung mit dem hochauösenden
AcQMap Bildgebungs- und Kartierungssystem
900100 zur Übertragung kardialer Signale, zur
Katheterlokalisierung und zur Erdung des AcQMap
Systems entwickelt.
Das AcQMap Patientenelektroden-Kit, Modell
800365-003, enthält folgende Komponenten:
• Repositionierbare Überwachungselektroden (15)
– 3M Red Dot™ 2670-5 (3)
• Patientengegenelektrode (1)
– Covidien™ Valleylab™ E7507 (1)
• Lokalisierungs-/Dispersivelektroden mit Kabeln
– (6) Lokalisierungs-/Dispersivelektroden 1&2 (2)
ConMed® 440-2400
– Lokalisierungs-/Dispersivelektroden 3–6 (4)
ConMed® 425-2200
Vorsicht: Laut Bundesgesetz (USA) darf dieses
Gerät nur von einem Arzt oder auf seine
Anordnung verkauft werden
Warn- und Vorsichtshinweise
Patientenelektroden – Um Verletzungen des
Patienten zu vermeiden, sind die Patientenelektroden
(repositionierbare Überwachungselektroden,
Lokalisierungs-/Dispersivelektroden und
Patientengegenelektroden) mit Sorgfalt anzubringen
und zu entfernen.
• Um Verletzungen des Patienten zu vermeiden,
muss die Patientengegenelektrode zu Beginn der
Untersuchung als erste Patientenelektrode mit der
AcQMap Konsole verbunden werden und am Ende
der Untersuchung als letzte Patientenelektrode
von der Konsole getrennt werden. Die
Patientengegenelektrode von der Haut des
Patienten entfernen, bevor das Elektrodenkabel
von der AcQMap Konsole getrennt wird.
• Die Patientenelektroden und Verbindungen
dürfen nicht in Kontakt miteinander, mit
anderen Oberächenelektroden anderer
Geräte (z. B. Ablations-Gegenelektroden,
Debrillationselektroden), mit Erdung oder mit
Metallgegenständen kommen.
• Die repositionierbaren Überwachungselektroden,
die Lokalisierungs-/Dispersivelektroden bzw. die
Patientengegenelektroden vor dem Einsatz am
Patienten nicht erwärmen.
• Patientenelektroden nicht verwenden, wenn die Verpackungsversiegelung beschädigt, der leitfähige Kleber
eingetrocknet oder das Verfallsdatum abgelaufen ist.
• Vor dem Einsatz der Patientenelektroden muss sichergestellt werden, dass die Einsatzstelle frei von Haaren, sauber
und trocken ist.
• Das Wiederverwenden von Einwegelektroden kann zur Beeinträchtigung der Funktionen des hochauösenden
AcQMap Bildgebungs- und Kartierungssystems führen.
• Die Elektroden nicht auf Hautfalten, trockener oder verletzter Haut anbringen.
• Die Elektroden vor der Verwendung nicht modizieren.
• Die MRT-Kompatibilität für die im AcQMap Patientenelektroden-Kit enthaltenen Elektroden wurde von Acutus
Medical nicht getestet.
1 SCHWARZ Obere linke Seite des Rumpfes;
mittlere Axillarlinie, in Höhe des 4.
Interkostalraumes
2 GRAU Obere rechte Seite des Rumpfes;
mittlere Axillarlinie, in Höhe des 4.
Interkostalraumes
3 ROT Unterer Rückenbereich, gegenüber
der Elektrode 6 (orange) am
Abdomen
4 GRÜN Oberer Brustbereich, Oberkante in
Höhe der Drosselgrube, gegenüber
der Elektrode 5 (gelb) im oberen
Rückenbereich
5 GELB Oberer Rückenbereich, Oberkante
in Höhe von T3, gegenüber der
Elektrode 4 (grün) im oberen
Brustbereich
6 ORANGE Abdomen, in der Mitte zwischen
Schwertfortsatz und Nabel,
gegenüber der Elektrode 3 (rot) im
unteren Rückenbereich
BLAU Unterer Rückenbereich, nach rechts
zwischen der Wirbelsäule und
Elektrode 2 (grau) sowie unterhalb
von Elektrode 3 (rot)
Covidien™
E7507
3M Red Dot™
2670-5
SEITEN BRUSTRÜCKEN ÜBERWACHEN
RECHTE SEITE BRUST LINKE SEITERÜCKEN
PATIENTENGE-
GENELEKTRODEN
ConMed®
440-2400
ConMed®
425-2200
Abb. 1.1. Platzierung der Lokalisierungs-/Dispersivelektroden,
der repositionierbaren Überwachungselektroden und der
Patientengegenelektrode.
Nicht aus Naturkautschuklatex hergestellt.
Table of contents
Languages:
Other Acutus Medical Medical Equipment manuals


Popular Medical Equipment manuals by other brands


Getinge
Getinge Arjohuntleigh Nimbus 3 Professional Instructions for use

Mettler Electronics
Mettler Electronics Sonicator 730 Maintenance manual

Pressalit Care
Pressalit Care R1100 Mounting instruction

Denas MS
Denas MS DENAS-T operating manual

bort medical
bort medical ActiveColor quick guide

AccuVein
AccuVein AV400 user manual


