adafruit learning system Cupcade the Raspberry Pi Micro Arcade... User manual

Cupcade: the Raspberry Pi Micro Arcade Cabinet
Created by Phillip Burgess
Last updated on 2018-12-05 09:34:33 PM UTC

2
5
5
6
6
7
8
10
12
12
12
13
14
17
18
19
20
22
22
22
22
23
23
26
26
26
26
28
28
29
29
30
30
30
32
33
34
36
39
41
44
Guide Contents
Guide Contents
Overview
Current “Gen 3” Kit Contents:
Optional additions:
Prior “Gen 1” and “Gen 2” Kit Contents:
Optional additions:
Plan Ahead
Prep Work
Raspberry Pi Setup
SD Card Setup
First Boot
Enable WiFi (if needed)
Download and Install Cupcade Software
Additional Steps for GEN 3 KITS ONLY
Additional Steps for GEN 1 & 2 KITS ONLY
Last Steps for ALL Cupcade Versions
Gen 3 Kit
Assemble Components
Buttons
PiTFT Display
Joystick
Speaker
Arcade Bonnet
Dry Run
PiTFT Test
If the PiTFT doesn’t work…
Arcade Bonnet and Remaining Parts
If the PiTFT Doesn’t Work Now
If the PiTFT Does Work
If the Buttons/Joystick Don’t Work
If Sound Doesn’t Work
Cabinet Part 1
Why not just design a case that’s easier to asemble?
Buttons
Joystick
Speaker
Screen
Base
If using a Pi Zero…
Cabinet Part 2
Cabinet Part 3
© Adafruit Industries https://learn.adafruit.com/cupcade-raspberry-pi-micro-mini-arcade-game-cabinet Page 2 of 141

47
53
54
56
59
61
67
69
76
78
81
84
84
89
91
92
94
96
97
97
99
100
100
102
105
106
106
106
108
108
116
117
118
120
122
129
135
135
136
136
137
140
140
Okay, the Tricky Part…
Cabinet Part 4
My Cupcade rocks back and forth when stood up.
Configure Input
Gen 2 Kit
Interface Board
Gen 1 Kit
Beta Board Part 1
The circuit is 5 Volts but connects to the Raspberry Pi’s 3.3V GPIO pins. Won’t this fry the board?
Beta Board Part 2
Arts & Crafts Time!
Beta Board Part 3
Button Wires
Joystick Wires
Power Wires
Audio Wires
Soldering’s done!
Gen 1 & 2 Continued…
PiTFT Assembly & Test
Solder Time!
If there’s no response…
Now a Second Test…
Test ROM
Dry Run
If the Pi Does Not Boot
If the Pi Boots Successfully
Some of the buttons/joystick work but not all!
When You’re Done Testing
Cabinet Part 1
Why not just design a case that’s easier to asemble?
Cabinet Part 2
Joystick and Buttons
Screen and Audio
Cabinet Part 3
Okay, the Tricky Part
Cabinet Part 4
If the system does not boot…
My Cupcade rocks back and forth when stood up.
Installing ROMs
Some Free MAME (Arcade) ROMs
Moving ROMs Over the Network
Downloads
Custom Cabinet Art
© Adafruit Industries https://learn.adafruit.com/cupcade-raspberry-pi-micro-mini-arcade-game-cabinet Page 3 of 141


Overview
A Maker Faire exhibit of mine once incorporated a
Pac-Man
theme “for the old-timers.” It was a surprise then to see
young kids all recognized the characters too. How? Smartphones! Thanks to
emulation
— running old code byte-for-
byte on modern hardware — these classic games are still played and relevant a generation later.
Much of the mystique of the originals lied in the cabinets and controls.
Anyone
can load a game on a smartphone or
tablet…but the
physicality
of the arcade machine and its clicky buttons made them rare objects of desire back in the
day. We wanted to capture a small taste of that, using the tiny Raspberry Pi computer. The result is a DIY kit we call
Cupcade!
Cupcade isn’t the first, but it’s notable for using the Adafruit PiTFT display. The direct digital interface delivers a pixel-
perfect rendition of classic games with none of the blurriness you’d get with a composite screen.
Current “Gen 3” Kit Contents:
Adafruit PiTFT Plus 320x240 2.8" TFT screen (https://adafru.it/eZS)
Analog joystick with breakout board (http://adafru.it/512)
16mm Buttons (http://adafru.it/1445) (4)
Arcade Button Quick Connect Wires (http://adafru.it/1152) (4)
Female/female jumper wires (http://adafru.it/266) (strip of 4)
Adafruit Arcade Bonnet for Raspberry Pi (https://adafru.it/Bh-)
40-pin GPIO Ribbon Cable (https://adafru.it/Bi0)
GPIO Stacking Header (https://adafru.it/ejT)
There have been MULTIPLE RELEASES of the Cupcade kit. This guide covers ALL of them. Some sections are
common to all versions, others may be specific to one generation. The latest generation tends to be covered
first, with prior generations as a follow-up.
© Adafruit Industries https://learn.adafruit.com/cupcade-raspberry-pi-micro-mini-arcade-game-cabinet Page 5 of 141

Mono Enclosed Speaker — 3W 4 Ohm (https://adafru.it/uyB)
Acrylic case parts (16)
Nylon #4-40 screws and nuts (approx 25 each)
Blank microSD card
You will also need:
Raspberry Pi computer with 40-pin GPIO header,
except
for Pi 1 Model A+ or Pi 3 Model A+. Compatible boards
include:
Pi 3 Model B+ (https://adafru.it/Bi1) (using RetroPie 4.4 or later)
Pi 3 Model B (https://adafru.it/scY)
Pi 2 Model B (https://adafru.it/eCB)
Pi 1 Model B+ (https://adafru.it/dH0)
Pi Zero WH (https://adafru.it/Bi2)
Pi Zero W (https://adafru.it/vMD) (requires installing GPIO header pins)
Pi Zero (https://adafru.it/sTA) (requires installing GPIO header pins)
Soldering iron, solder and related paraphernalia
Masking tape
Tiny screwdrivers
For setup you will temporarily need a USB keyboard and HDMI monitor. Pi Zero boards will require adapters for
both of these.
Network connection to the Raspberry Pi board. Some models have WiFi built in, some can use Ethernet, others
require a USB WiFi adapter.
Game ROM files
Optional additions:
Wireless keyboard (http://adafru.it/1737)
USB Battery Pack (http://adafru.it/1566) for portable use
Hey! Don’t be fooled by the fun-and-games nature of this project. It’s a challenging build that draws on a broad range
of maker skills: fiddling with Linux commands, soldering, and even a bit of arts & crafts. Read through the whole guide
before starting, decide if you’re ready to tackle this and make sure you have everything you need.
Our original Retro Gaming with Raspberry Pi (https://adafru.it/dcs) guide is a little easier — same goal, fewer pieces,
using a regular computer monitor for the display. You might want to start there if this project looks a bit daunting.
If you have a current “Gen 3” kit, you can skip ahead to the next page.
Prior “Gen 1” and “Gen 2” Kit Contents:
Adafruit PiTFT Mini Kit (http://adafru.it/1601)
Analog joystick with breakout board (http://adafru.it/512)
16mm Buttons (http://adafru.it/1445) (4)
Arcade Button Quick Connect Wires (http://adafru.it/1152) (4)
Female/female jumper wires (http://adafru.it/266) (strip of 4)
Cupcade
Adapter PCB (https://adafru.it/eln)
26-pin GPIO ribbon cable (https://adafru.it/f74)
8 Ohm 1 Watt speaker (http://adafru.it/1313)
Right-angle 3.5mm audio plug to pigtail cable (http://adafru.it/1700)
Acrylic case parts (15)
© Adafruit Industries https://learn.adafruit.com/cupcade-raspberry-pi-micro-mini-arcade-game-cabinet Page 6 of 141

4-40 and 2-56 screws and nuts (15 and 3 ea., respectively)
Nylon board standoffs (2)
Piece of heat-shrink tubing
Blank 4GB SD card
USB charger/power supply (https://adafru.it/dfY)
USB A to micro B cable (http://adafru.it/1513)
Gen 1 kits had some additional parts not listed here; Gen 2 kits have these pre-assembled on the interface board.
You will also need:
Raspberry Pi Model B computer (http://adafru.it/998) — later model with mounting holes. The early “V1” boards
with no mounting holes will not work with this project. Model A (http://adafru.it/1344) also works, but with only half
the RAM this may impact performance.
Soldering iron, solder, stranded or solid core wire (24 or 22 gauge) and related paraphernalia
Masking tape
Tiny screwdrivers
For setup, you may temporarily need a keyboard and monitor
Game ROM files
Optional additions:
USB Miniature WiFi Module (http://adafru.it/814)
Wireless keyboard (http://adafru.it/1737)
USB Battery Pack (http://adafru.it/1566) for portable use
© Adafruit Industries https://learn.adafruit.com/cupcade-raspberry-pi-micro-mini-arcade-game-cabinet Page 7 of 141

Plan Ahead
This is a red pill / blue pill moment.
Think a bit about the “old school” games you like to play. Home console games — those that connect to your TV —
have a horizontal screen orientation. But in arcades, many games took advantage of a
vertical
screen.
Cupcade can use either a horizontal or vertical screen orientation, but this must be decided early on. It
can
be
changed later, but this is a non-trivial operation; you’ll need to dismantle and reassemble the whole thing.
There are also three different ways the controls can be arranged…but again, this is a commitment and a fair bit of work
to change later.
© Adafruit Industries https://learn.adafruit.com/cupcade-raspberry-pi-micro-mini-arcade-game-cabinet Page 8 of 141

Therefore: think ahead about which game(s) you’re most likely to play. Maybe test them out on the Raspberry Pi
before
assembling the whole kit around it. Determine which perform acceptably with the emulator and look good on the
screen…then choose a display and control combination that works well for the most (or most desirable) games from
your list. Others can still be played, they’re just less than optimal.
This basic joystick-and-two-buttons combo covers a vast number of classic arcade games. You can optionally plug in a
USB keyboard for anything more complex.
© Adafruit Industries https://learn.adafruit.com/cupcade-raspberry-pi-micro-mini-arcade-game-cabinet Page 9 of 141
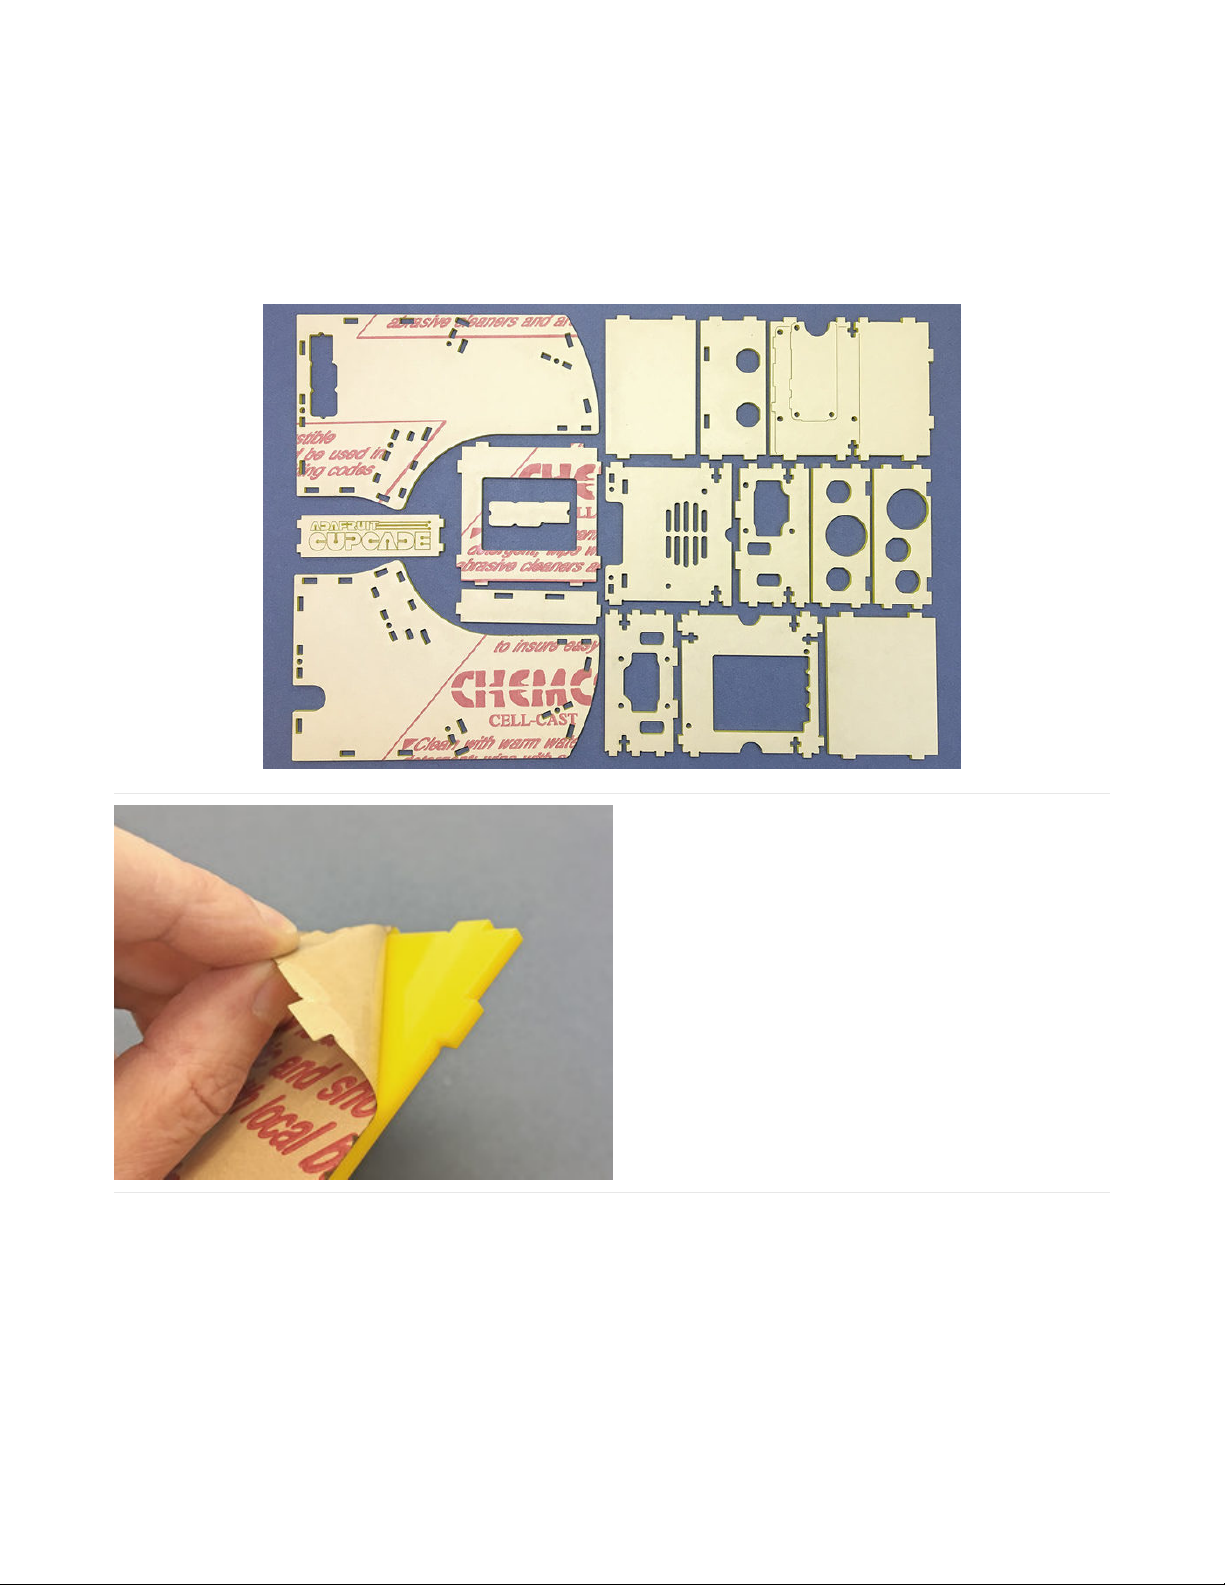
Prep Work
The Cupcade cabinet is comprised of 16 laser-cut acrylic parts (15 in Gen 1 & 2 kits). Count the pieces to make sure
everything’s there.
Depending on your game control layout and choice of Raspberry Pi board, two or three of these pieces won’t be used.
This is normal.
Peel the backing paper off both sides of all the laser-cut
parts. It’s easiest to start at a corner, catching the edge
of the paper with a fingernail.
The laser-cutting process can leave some paper soot at the edges. If you like, wash these off with soap and water, just
be absolutely certain that all the parts are completely dry before proceeding! That’s why we’re doing this first, to allow
extra drying time.
Use only soap and water when cleaning these parts. Some chemicals, including rubbing alcohol and alcohol wipes,
will damage the plastic!
© Adafruit Industries https://learn.adafruit.com/cupcade-raspberry-pi-micro-mini-arcade-game-cabinet Page 10 of 141

The cabinet marquee has a Cupcade logo etched into it.
Optionally, if you like this, you can make the design
“pop” by scribbling over it with a marker and then
buffing the surface with a tissue or paper towel. Do not
do this with a permanent marker, unless you also have a
dry-erase marker to follow up with (dry-erase markers
remove “permanent” ink).
If you don’t like the logo or want to add your own, just
flip this piece over when assembling the case later.
(This is a Gen 3 detail. The marquee in Gen 1 & 2 kits is
blank on both sides.)
© Adafruit Industries https://learn.adafruit.com/cupcade-raspberry-pi-micro-mini-arcade-game-cabinet Page 11 of 141

Raspberry Pi Setup
Before assembling anything, let’s get some software installed and tested on the Raspberry Pi board. Doing this early
(rather than when everything’s buried inside a case) makes troubleshooting easier.
SD Card Setup
Start by downloading an SD card image for
RetroPie,
a nice game emulation package. You’ll find this on the RetroPie
download page (https://adafru.it/rA3). Note there are two versions:
One version for single-core Raspberry Pi boards like the Pi Zero or Pi 1 B+.
Another for multi-core boards like the Pi 2 and 3.
Download the correct one for your chosen Cupcade hardware…they are not cross-compatible.
After downloading you’ll need to “burn” this software to a microSD card. We really like Etcher (https://adafru.it/sOe) for
this purpose.
While that’s downloading and burning, let’s get some things together…
During setup, the Raspberry Pi will be connected to an HDMI monitor. You’ll need a cable for that. Pi Zero boards
require a mini HDMI cable. Once everything’s working, the monitor and cable are no longer needed.
You will also need a USB keyboard during setup. Again the Pi Zero presents a special situation…you’ll probably
need an “on the go” adapter cable for this.
The Pi will need to be connected to the internet. This is easiest on the Pi 2 and 3 if you have an Ethernet drop.
Otherwise, WiFi is an option, though there are some gotchas. A Pi 2 or Pi 1 B+ needs a USB WiFi adapter. Pi 3
and Pi Zero W have built-in WiFi, but only for 2.4 GHz networks. Another Pi Zero option is called an “Ethernet
gadget” over USB, explained in this guide (https://adafru.it/tbT).
While you
can
type all the installation commands that will follow. It’s vastly easier if you have ssh enabled on the Pi and
a terminal program that handles ssh remote logins. Then you can copy-and-paste commands from this guide to the
terminal window.
Depending on your Etcher preferences, it may automatically unmount the SD card filesystem after writing, in which
case remove the card and re-insert it in the card reader.
You should see a small WIN32 filesystem called “boot”. Create a new file called “ssh” in the root level of this disk —
this can be created with a text editor, or just copy any small file there and rename it “ssh”. Then unmount the card and
insert it in the Pi.
First Boot
None of the extra parts (PiTFT, joystick, etc.) should be connected yet. Just the Pi, USB keyboard and HDMI monitor
(and a network adapter, if your Pi needs it).
When power is first connected, the Pi will go through a quick boot and re-boot as it expands the filesystem to make
use of the full SD card. Then you’ll see the RetroPie splash screen and after about a minute this welcome screen:
© Adafruit Industries https://learn.adafruit.com/cupcade-raspberry-pi-micro-mini-arcade-game-cabinet Page 12 of 141
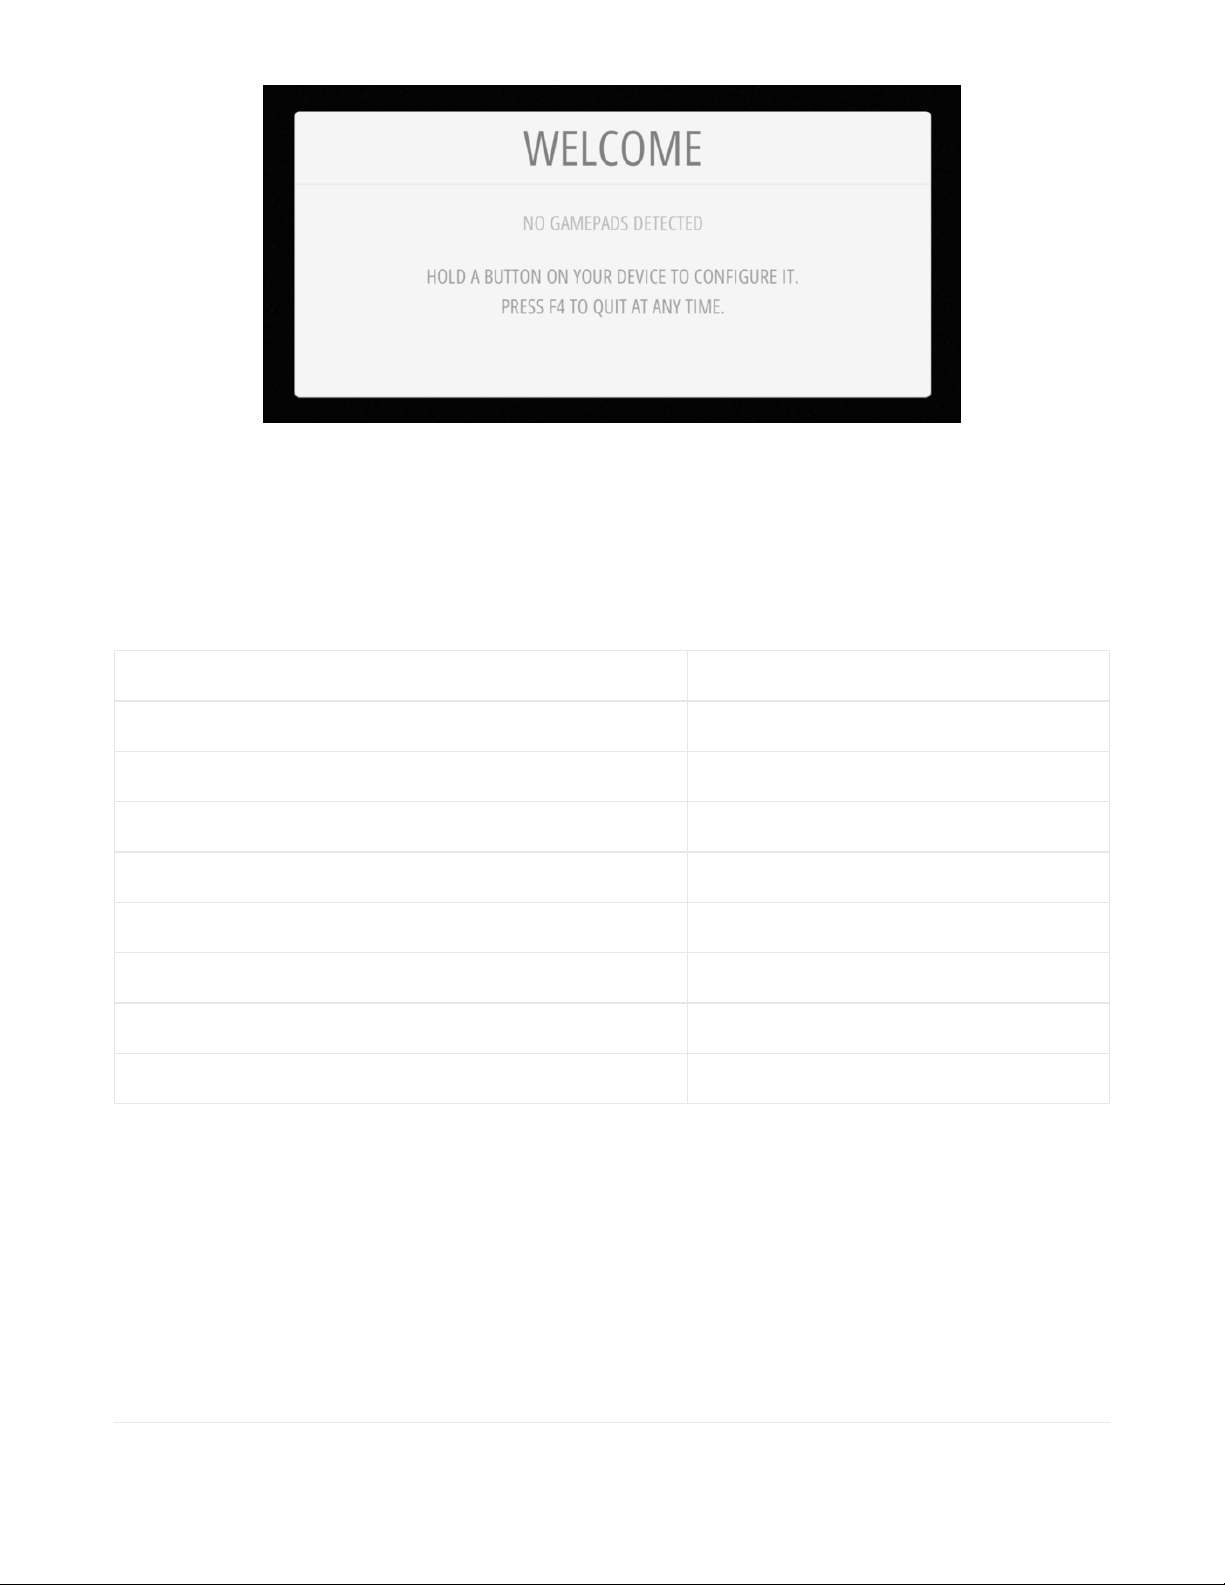
We need to set up the system to accept keyboard input for navigating the RetroPie menus. Later we’ll make this work
with the Cupcade controls, but for now we need keyboard control…
Hold down
any
key for a few seconds so the system acknowledges the keyboard for input, then you’ll get to a
configuration screen starting with the D-pad directions. Tap a key corresponding to the control that’s highlighted.
Here’s the recommended key mapping for Cupcade:
Keep track of what you set up here, because you’ll need to use these keys later for navigating menus.
You’ll be prompted for about a dozen more controls (“X” and “Y” buttons and so forth), but none of these are
necessary for navigating RetroPie menus nor does the Cupcade cabinet we’ll build later have enough buttons for all
these. So…for everything after the “B” button, just hold down any key on the keyboard for a couple seconds, until the
Configuration screen says “Not Defined” and skips ahead to the next item. Repeat this through the whole end of the
list. At the end you’ll be asked about an undefined hotkey enable button. Just select the default “Yes” here — meaning
you’ll press the Start+Select buttons together to exit a game and return to the RetroPie menus. (You click “Yes” by
pressing the “A” button you set up during this process — e.g. left Control key in the example key mapping above.)
Enable WiFi (if needed)
RetroPie Control/Button Key
D-pad Up Up arrow
D-pad Down Down arrow
D-pad Left Left arrow
D-pad Right Right arrow
Start 1
Select 5
“A” Button Left “Control” key
“B” Button Left “Alt” key
© Adafruit Industries https://learn.adafruit.com/cupcade-raspberry-pi-micro-mini-arcade-game-cabinet Page 13 of 141

Now that the controls are enabled, you can access RetroPie menus to set up WiFi (if using wired Ethernet, you can skip
ahead to “Download and Install…” below).
With no games installed on the card yet (more on that later), the only RetroPie menu option should be “Configuration.”
(If not, move left or right until that item’s active), then press your “A” button (e.g. left Control key) to select it.
Highlight the “WiFi” option at the bottom of this list and
press the A button again. This runs a WiFi configuration
utility, which is all text-based…so this works with the
keyboard’s arrow keys, tab and enter keys to select
menu items, and when asked for the network password
just use the keyboard as normal.
When finished, WiFi networking should be enabled. If
not, you might need a reboot. Press the B button (e.g.
left Alt key) to exit the Configuration menu, then from
the main RetroPie screen press the Start button (e.g. 1
key), navigate down to “Quit” and restart the system.
Gen 1 & 2 Cupcade users: there’s also an option in the RetroPie menu to run the
raspi-config
program, which includes
an option for overclocking…very helpful on these early Pi systems. Most can handle the “Medium” overclock setting
with no ill effects. Gen 3 Cupcades don’t require this…newer Pi boards already use dynamic overclocking
automatically.
Download and Install Cupcade Software
With networking enabled on the Pi (either WiFi or Ethernet), now we can install the extra software bits to support the
Cupcade hardware. There’s two ways to do this…
© Adafruit Industries https://learn.adafruit.com/cupcade-raspberry-pi-micro-mini-arcade-game-cabinet Page 14 of 141
One option is to type commands directly on the Pi. From
the RetroPie main screen, press “F4” to exit the GUI and
get a command line prompt. From here, you could test
the network connection by typing:
ping 8.8.8.8
(Press Control+C to exit)
Or, if you didn’t already set up ssh as explained in the
“SD Card Setup” section of this page, you could type:
sudo raspi-config
In the “Interfacing Options” menu you’ll find an option to
enable ssh, then use the second option…
Second option, generally better, is to log in remotely using an ssh-capable terminal program and copy-and-paste later
commands directly from this web page into the terminal window. Some of the commands are cryptic and
very
specific
about spelling, so this is best.
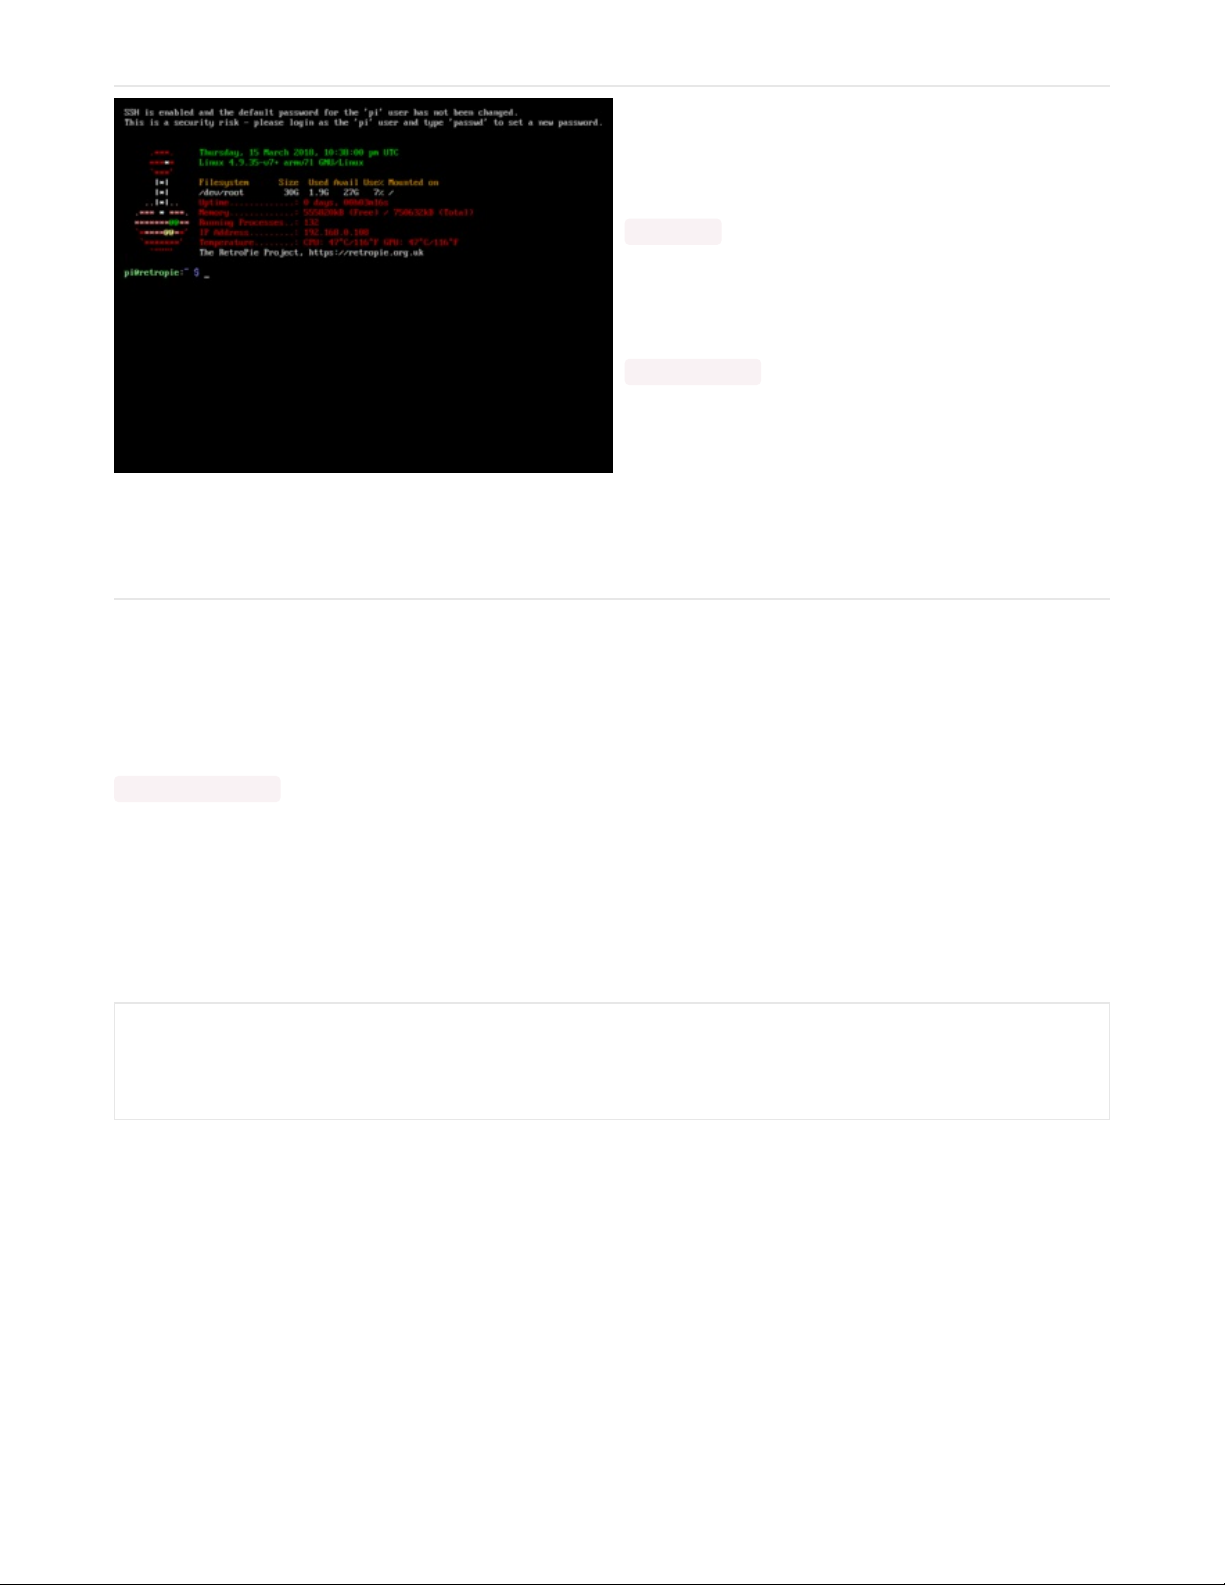
The Pi system should appear on your network as retropie.local, e.g. from Linux or a Mac Terminal window you’d type:
ssh pi@retropie.local
and enter the password for the pi user (“raspberry” by default).
If using a Windows system and it doesn’t recognize the “retropie.local” system on the network, you may need to install
the
Zeroconf
software as explained in this guide (https://adafru.it/lPE).
To install software for the PiTFT display, enter the following lines exactly:
cd ~
wget https://raw.githubusercontent.com/adafruit/Raspberry-Pi-Installer-Scripts/master/adafruit-pitft.sh
chmod +x adafruit-pitft.sh
sudo ./adafruit-pitft.sh
© Adafruit Industries https://learn.adafruit.com/cupcade-raspberry-pi-micro-mini-arcade-game-cabinet Page 15 of 141
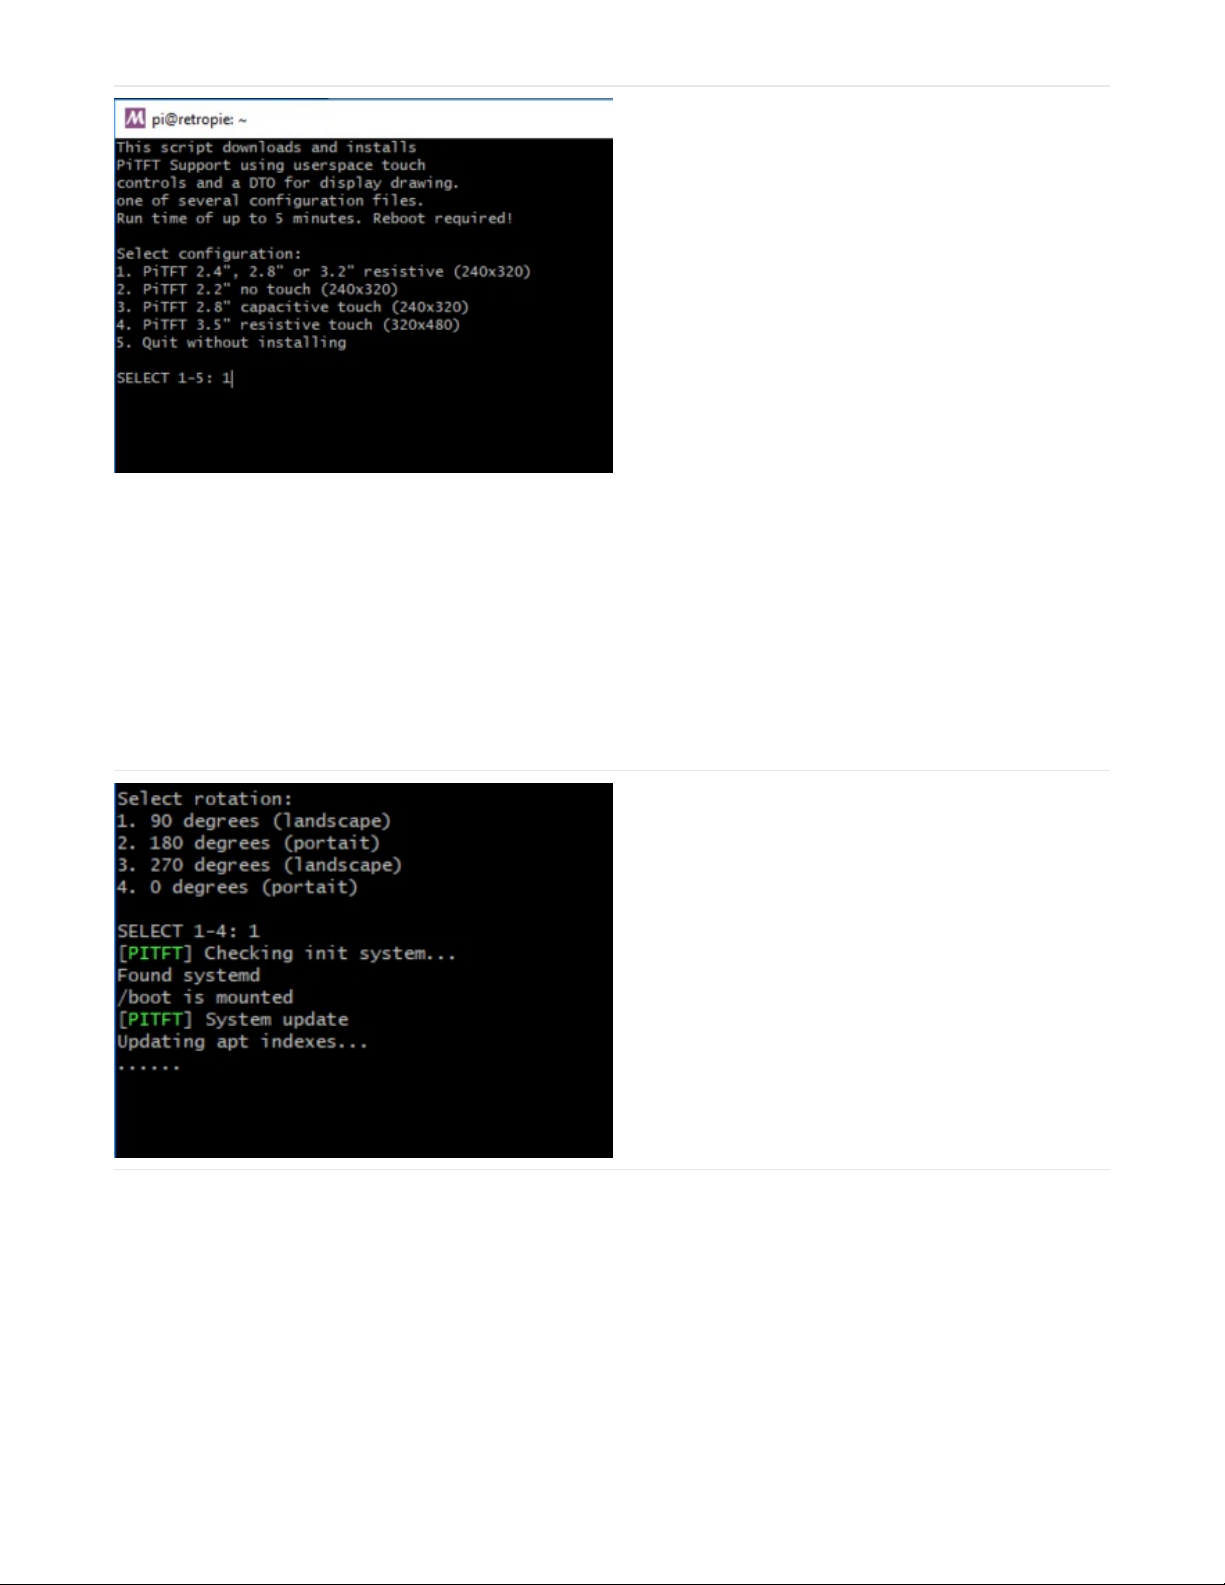
For the first question, select 1 (PiTFT 2.8 resistive)
If your cupcade display will be in horizontal (wider than
taller) mode, select rotation 1
If your cupcade display will be in vertical (wider than
taller) mode, select rotation 2
It will take several minutes to update your Pi software and install packages
© Adafruit Industries https://learn.adafruit.com/cupcade-raspberry-pi-micro-mini-arcade-game-cabinet Page 16 of 141

When asked if you want console to appear on PiTFT say
N
When asked if you want HDMI to be mirrored, say Y
After the script runs it will ask if you want to reboot. Since we have more things to install, select “no.”
Additional Steps for GEN 3 KITS ONLY
Skip these steps if building an earlier kit…different directions are provided below.
To install software for I2S audio used by Cupcade Gen 3, enter this line exactly:
When asked if you want /dev/zero playback, say
N(retropie does this already)
This script does its job quickly. At the end it will ask
whether to test the speaker, answer “no” since we
haven’t assembled any hardware yet.
Finally, to enable the Arcade Bonnet’s joystick and button features, enter:
curl -sS https://raw.githubusercontent.com/adafruit/Raspberry-Pi-Installer-Scripts/master/i2samp.sh | bash
© Adafruit Industries https://learn.adafruit.com/cupcade-raspberry-pi-micro-mini-arcade-game-cabinet Page 17 of 141

You’ll be asked if you want to disable overscan. Yes!
Disable overscan!
Install GPIO-halt utility? No.
This script takes a little longer to run. When it’s finished,
you’ll be asked whether to reboot. Answer “no” again
Additional Steps for GEN 1 & 2 KITS ONLY
Skip these steps if building a Gen 3 kit…use the directions above.
Audio in these Cupcades requires no extra software, but does need a little volume adjustment. Type:
Press the up arrow until the volume level is at the
maximum. Then press the Escape key to save and exit.
Joystick and button features rely on our
retrogame
software, installed with:
curl https://raw.githubusercontent.com/adafruit/Raspberry-Pi-Installer-Scripts/master/arcade-bonnet.sh >arcade-bonnet.sh
sudo bash arcade-bonnet.sh
alsamixer
© Adafruit Industries https://learn.adafruit.com/cupcade-raspberry-pi-micro-mini-arcade-game-cabinet Page 18 of 141

This script supports several Adafruit gaming projects, and you’ll see Cupcade among the listed options — select that
one.
After the script runs it will ask if you want to reboot. Select “no.”
Last Steps for ALL Cupcade Versions
Now shut the system down manually:
Give it about 20 seconds before disconnecting power (watch the status LED on the Pi board — when it makes a steady
blink a few times and then turns off, it’s safe to disconnect).
The software’s all ready to test now, but we need to solder up a few bits first…
curl https://raw.githubusercontent.com/adafruit/Raspberry-Pi-Installer-Scripts/master/retrogame.sh >retrogame.sh
sudo bash retrogame.sh
sudo shutdown -h now
© Adafruit Industries https://learn.adafruit.com/cupcade-raspberry-pi-micro-mini-arcade-game-cabinet Page 19 of 141

Gen 3 Kit
The directions on the next few pages relate only to the current third-generation (“Gen 3”) Cupcade kit. If you have a
first- or second-generation kit (Gen 1 or 2), skip ahead to the corresponding section.
If you bought your kit from Adafruit recently, it’s the current Generation 3 kit. There might still be some earlier kits
elsewhere out there in the pipeline. The differences are most easily spotted in the electronics…
Generation 3 (current) Cupcade kits include the Adafruit
Arcade Bonnet with the 40-pin GPIO header as used on
current Raspberry Pi boards.
Generation 2 kits used the Cupcade Adapter Board
with the 28-pin GPIO header as used on the Pi 1 Model
B.
© Adafruit Industries https://learn.adafruit.com/cupcade-raspberry-pi-micro-mini-arcade-game-cabinet Page 20 of 141
Table of contents
Other adafruit learning system Educational Equipment manuals


Popular Educational Equipment manuals by other brands


ClassMate
ClassMate BOLTX501 user guide

Pretorian
Pretorian Kinetic for SimplyWorks instructions

laerdal
laerdal Multi-Venous IV Training Arm Directions for use

Kyoto Kagaku
Kyoto Kagaku EAR II instruction manual

Enabling Devices
Enabling Devices Drummin' Billy 9350 user guide

SeaPerch
SeaPerch ROV Construction manual