ClassMate BOLTX501 User manual

BOLTX501
user guide // manual del usuario // manual do utilizador
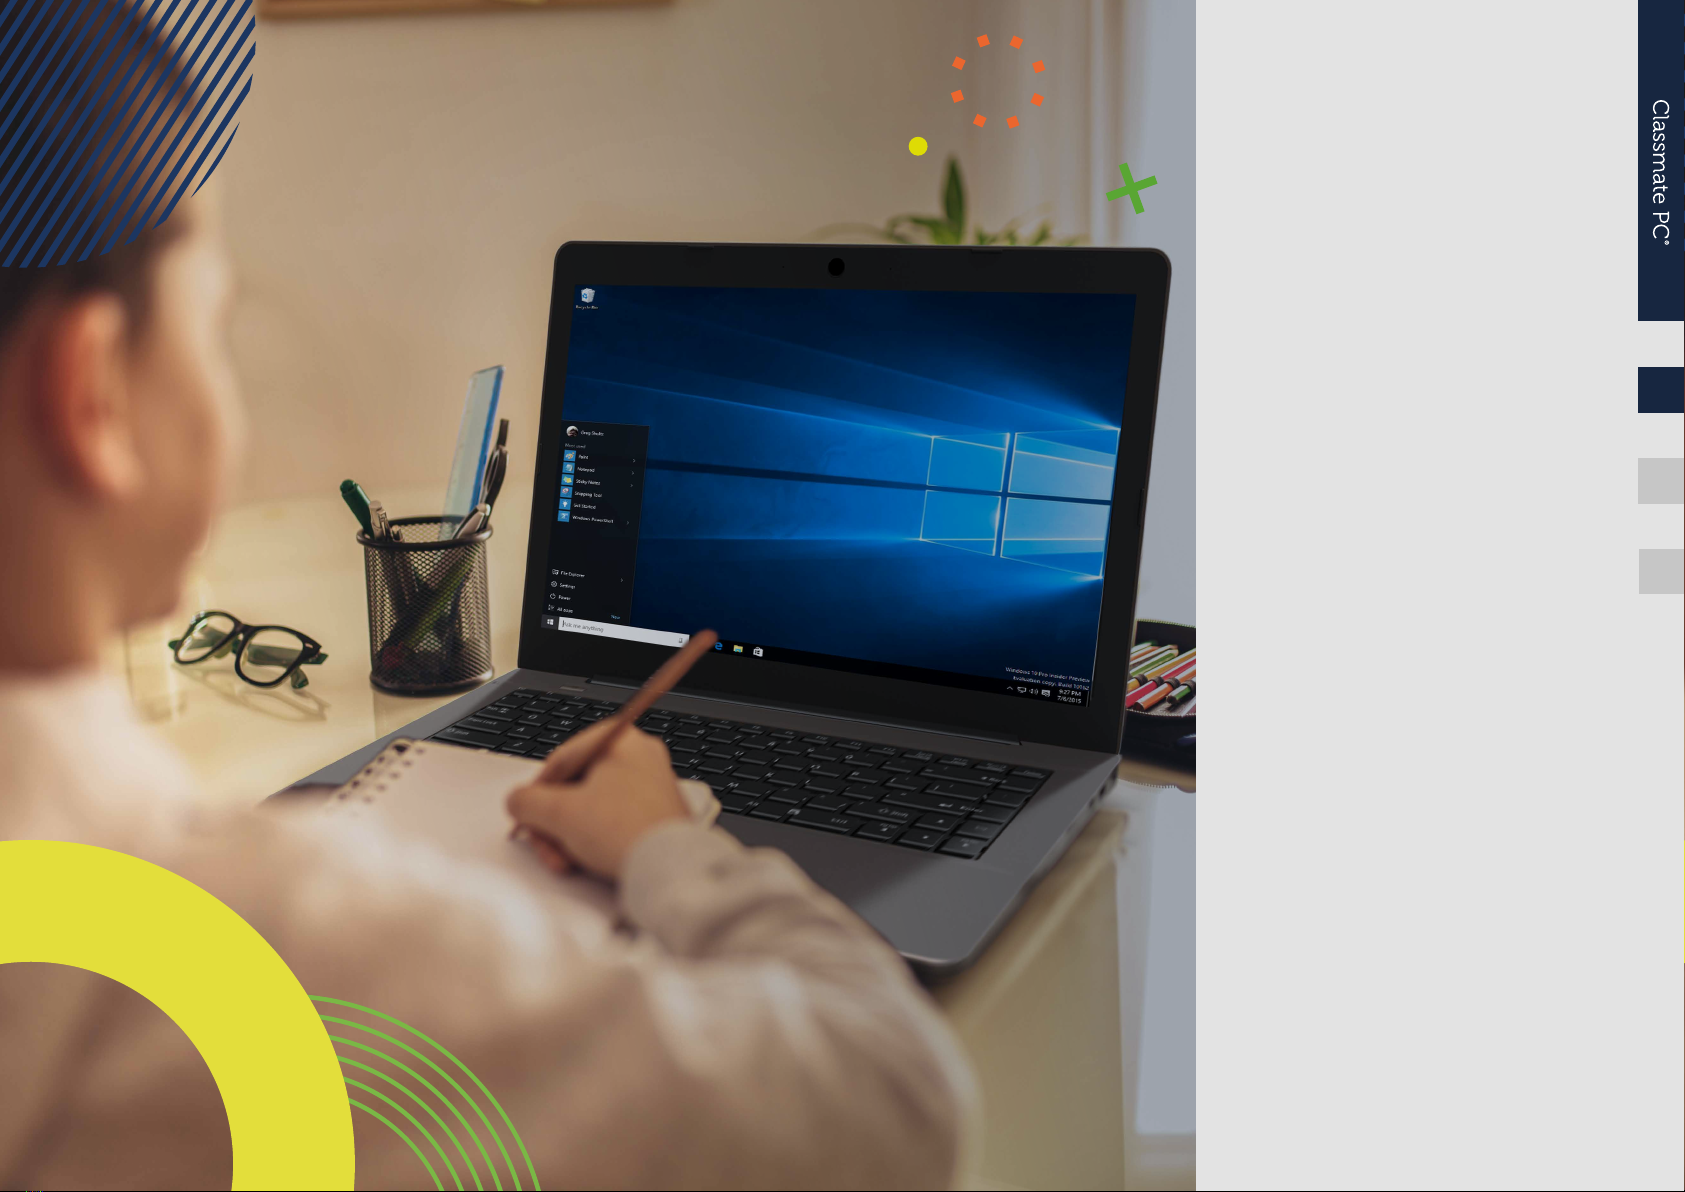
Learning everywhere.
EN
ES
PT
BOLTX501
user guide
Before you start using your device, make sure
you read the User Guide that explains how to
operate the equipment. This will ensure that
you use your device safely and correctly. This
user guide is for reference only and it is subject
to change without prior notice.
EN
ES
PT

4
4
4
5
5
5
5
6
7
7
7
7
7
8
8
8
8
9
9
9
9
10
11
11
11
12
12
12
12
13
13
14
14
14
14
14
14
15
15
15
EN USER GUIDE
3
index
INTRODUCTION
1 LIMITATION OF LIABILITY
2 SAFETY INFORMATION
2.1 AC Adapter Requirement
2.2 Warning Volume Level Headphones and Earphones
2.3 Radio Equipment Directive (RED)
3 PACKAGE CONTENTS
4 DEVICE OVERVIEW
4.1 Function keys
5 TURN ON/OFF YOUR DEVICE
5.1 Turn ON for the rst time
5.2 Turn OFF your device
5.3 Sleep mode
5.4 Waking up
6 CHARGING YOUR DEVICE
6.1 Battery charge status
6.2 Saving battery power
7 TOUCH OPERATIONS
7.1 Basic touchpad operations
8 WINDOWS 11 INTERFACE
8.1 Desktop
8.2 Taskbar
9 SETUP AND CONNECTIVITY OPTIONS
9.1 Screen Settings
9.2 Activate Windows
9.3 Set up of Microsoft account
9.4 Replacing Desktop with Start Screen
9.5 Pin and unpin your app
9.6 Wireless connection
9.7 Connecting a Memory Card
9.8 Connecting an External Device
10 HELP AND TROUBLESHOOTING
10.1 Troubleshooting
10.2 Display and screen problems
10.3 Sleep problems
10.4 Sound problems
10.5 Other problems
11 AGENCY REGULATORY NOTICES
11.1 Specic Absorption Rate (SAR) Certication Information
11.2 Elimination of Private Equipment by Users in the European Union

EN USER GUIDE
4
BACK TO INDEX
INTRODUCTION
This User Manual applies to the BOLT X501 product.
Any information must be requested to:
JP Sá Couto, S.A.
Rua da Guarda, 675
4455-466 Perata - Portugal
E-mail: [email protected]
For software information (ikES) please consult ikes.jpik.com.
Note:
Screen displays and illustrations may dier from those you see on the actual
product. jp.ik oers professional educational products, eligible to be purchased
by Educational institutions, Administrative oces and Boards of education, Pub-
lic libraries and Museums, to be used by administrators, teachers, or students in
school context.
1. LIMITATION OF LIABILITY
Despite reasonable eorts made to ensure the accuracy of this manual, the
manufacturer and distributor assume no liability resulting from errors or
omissions in this manual or the use of the information contained herein.
2. SAFETY INFORMATION
The battery[ies] in this product cannot be easily replaced by users themselves.
Caution:
• Failure to comply with safety warnings and regulations can cause property
damage, serious injury or death;
• Follow the warning and caution information to prevent injury to yourself or
others and to prevent damage to your device.
Make sure you comply with the following safety instructions:
• Care for and use your device properly;
• Never place the device near re or other sources of heat;
• Never place the device on or in heating appliances, such as microwave ovens,
stoves, or radiators. The device may explode when overheated. Follow all local
regulations when disposing of used devices;
• Do not leave the device plugged in or “on” when enclosed in a non-vented
container, such as school backpack, as overheating may occur;
• Do not place heavy objects or add heavy pressure on the device;
• The recommended storage temperature range for this device is from -20ºC to
60ºC;
• The recommended operation temperature range for this device is from 5ºC to
35ºC;
• If the device was subjected to temperatures outside its recommended operation
temperatures, but still inside its storage temperature range, please let it rest
at a temperature within its operation temperature range for at least 24 hours
before turning it on;
• Do not use your device or applications momentarily if the device is overheated;
• Do not use your device in a hospital, in an aircraft or in a vehicle as it can be
interfered with by radio frequency;
• Avoid using your device within a 15 cm range of a pacemaker, if possible,
as your device can interfere with the pacemaker. To minimize possible
interference with a pacemaker, use your device only on the side of your body
that is opposite the pacemaker;
• Turn o the device in potentially explosive environments;
• Always comply with regulations, instructions and signs in potentially explosive
environments;
• To prevent eye strain, take frequent breaks while using the device;
• Do not use the device if it is cracked or broken;
• Broken glass or acrylic could cause injury to your hands;
• If bent or deformed, your device may be damaged or parts may malfunction;
• Do not disassemble, modify, or repair your device. Any changes or modications
to your device can void your warranty. If your device needs maintenance, take
it to an approved Service Center;
• Allow only qualied personnel to service your device;
• When cleaning your device, do not use chemicals or detergents. Doing so may
discolor or corrode the outside of the device or may result in electric shock or
re;
• Do not use the device for anything other than its intended use;
• If your device has a camera ash or light, do not use it close to the eyes of people
or pets. Using a ash close to the eyes may cause temporary loss of vision or
damage to the eyes. Use caution when exposed to ashing lights;
• Protect your personal data and prevent leakage or misuse of sensitive information;
• While using your device, be sure to back up important data. jp.ik is not responsible
for the loss of any data;
EN USER GUIDE
5
BACK TO INDEX
• When disposing of your device, back up all data and then reset your device to
prevent misuse of your personal information;
• Carefully read the permissions screen when downloading applications. Be
particularly cautious with applications that have access to many functions or
to a signicant amount of your personal information;
• Check your accounts regularly for unapproved or suspicious use. If you nd
any sign of misuse of your personal information, contact your service provider
to delete or change your account information;
• In the event your device is lost or stolen, change the passwords on your accounts
to protect your personal information;
• Avoid using applications from unknown sources and lock your device with a
pattern, password, or PIN.
Do not distribute copyright-protected material without the permission of the
content owners. Doing this may violate copyright laws. The manufacturer is not
liable for any legal issues caused by the user’s illegal use of copyrighted material.
2.1 AC Adapter Requirement
The AC adapter should match the plug and voltage requirements for your local area.
Regulatory approval has been obtained using the AC adapter for the local area.
Never use a damaged charger, damaged power cords or loose electrical sockets.
Unsecured connections can cause electric shock or re.
Do not touch the power cord with wet hands or disconnect the charger by pulling
the cord. Doing so may result in electrocution.
Connecting the charger improperly may cause serious damage to the device.
Any damage caused by misuse is not covered by the warranty.
While charging, the device may heat up. This is normal and should not aect
the device’s lifespan or performance. If the battery gets hotter than usual, the
charger may stop charging.
Use only approved chargers, batteries, and cables. Generic unapproved chargers
may shorten the life of your device or cause it to malfunction. They may also
result in a re or cause the battery to explode.
When using unapproved accessories, batteries, or supplies, user's safety is not
guaranteed and is of his sole responsibility.
2.2 Warning Volume Level Headphones and Earphones
Listening to music at high volume levels and for extended periods of time can
damage hearing. To reduce the risk of hearing loss, lower the volume to a safe
and comfortable level as well as the amount of time listening at high levels.
For your own safety, before using headsets or earphones, always reset the
volume. The sound volume is louder on some headphones, although the volume
control settings are the same. Changing the default audio or equalizer settings
might lead to higher volume and should be done carefully. Exposure to loud
sounds while walking may distract your attention and cause an accident.
Do not use a headset while driving or riding. Doing so may distract your attention
and cause an accident or can be illegal depending on your region.
2.3 Radio Equipment Directive (RED)
EN Restricted to indoor use ES Limitado al uso en espacios interiores PT Limitado
a uso em espaços interiores
Caution:
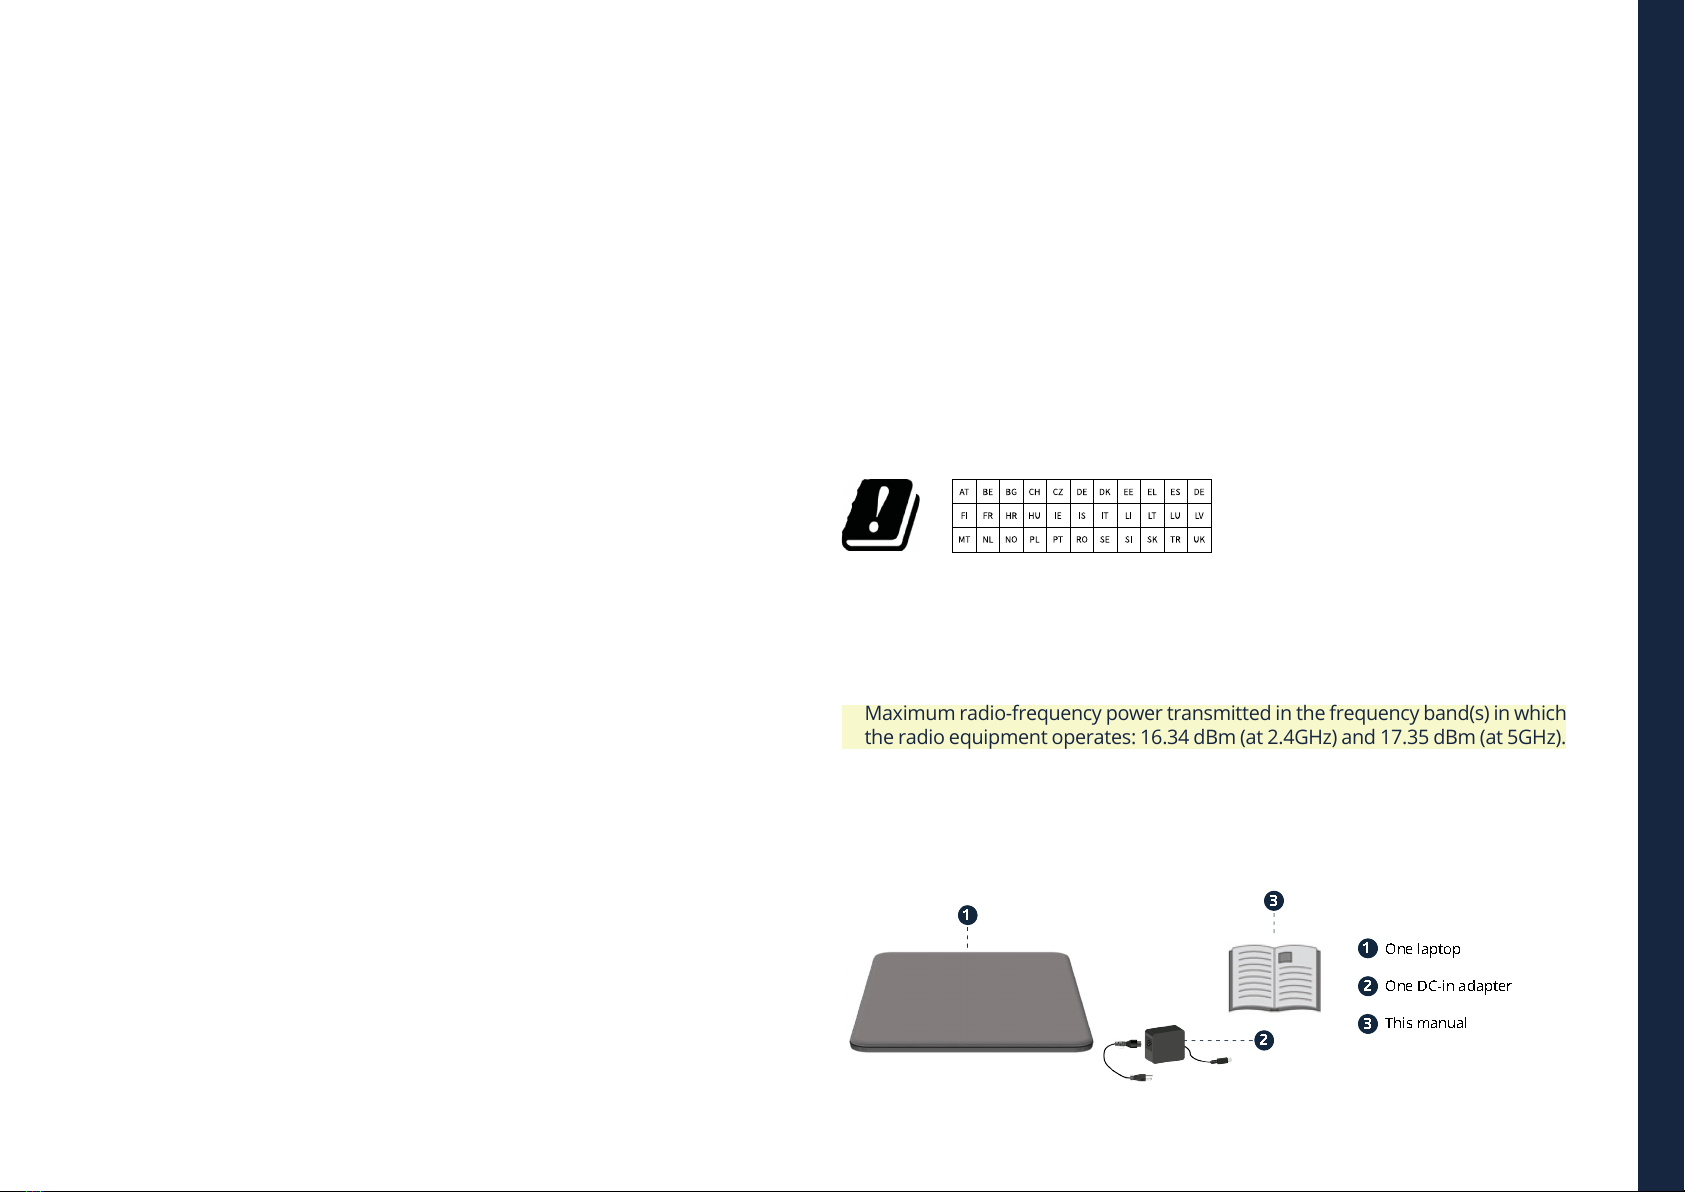
• Frequency band(s) in which the radio equipment operates: 2.4GHz and 5GHz;
• Maximum radio-frequency power transmitted in the frequency band(s) in which
the radio equipment operates: 16.34 dBm (at 2.4GHz) and 17.35 dBm (at 5GHz).
3. PACKAGE CONTENTS
Carefully unpack your box and take out the items listed as below.
One laptop
One DC-in adapter
This manual
11
1
2
2
3
3

EN USER GUIDE
6
BACK TO INDEX
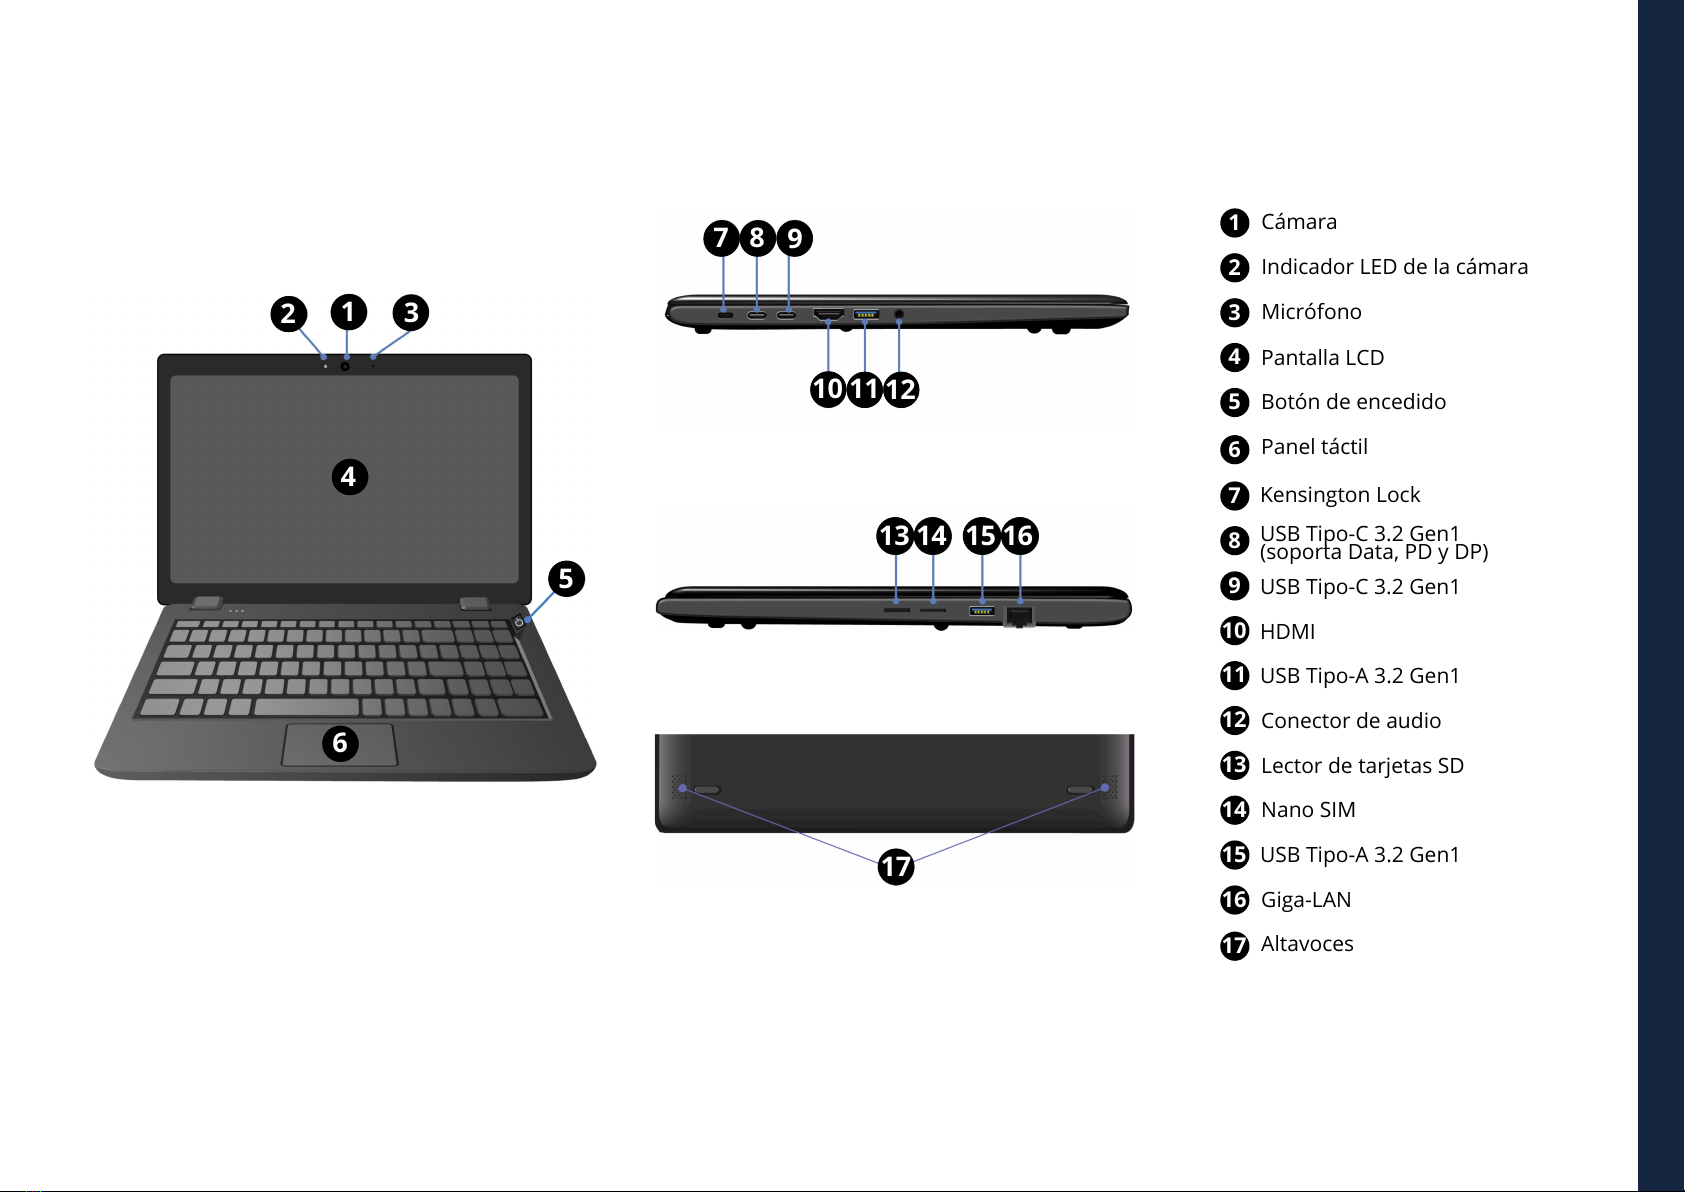
4. DEVICE OVERVIEW
Webcam
Webcam LED indicator
Microphone
LCD screen
Power button
Touchpad
Kensington lock slotsit
USB Type-C 3.2 Gen1
USB Type-A 3.2 Gen1
USB Type-A 3.2 Gen1
HDMI port
Audio jack
SD card slot
Nano SIM slot
Giga-LAN port
Speaker
USB Type-C 3.2 Gen1
(support Data, PD and DP)
21
1
2
3
4
5
6
7
8
9
10
11
12
13
14
15
16
17
3
4
5
6
7 8 9
10 11
13 14 15 16
17
12

EN USER GUIDE
7
BACK TO INDEX
4.1 Function keys
Press the following keys to perform the desired function.
Puts your computer
into sleep mode Decreases the
volume level
Decreases the display
brightness
Increases the volume
level
Increases the display
brightness
Disables or enables
the touchpad
Switches display
output between your
display, external
monitor (if connected)
and both
Turn the keyboard
backlight on/o or
adjusting brightness
Mutes/unmutes the
audio output.
Press this to play or
pause the media le
Note:
If your software uses some of the function keys to perform dedicated functions,
you can perform the function by pressing “Fn” plus the desired function key.
5. TURN ON/OFF YOUR DEVICE
If this is the rst time you turn this computer
on, connect the AC adapter and fully charge
the battery.
Press the power button (normally 1 to 2
seconds.). You shall see the power indicator
blinking and the screen will light up within 5
seconds.
5.1 Turn ON for the rst time
The laptop will require you to do the initial setup, which includes:
• Activate your Windows;
• Sign in to or create your Microsoft account;
• Setup a wireless connection and more.
Please follow the instructions to complete the initial setup.
5.2 Turn OFF your device
Before turning o your device save all your data. To turn o your device, follow
the next steps:
1 click here
2 click here
3 click here
• Click the Windows icon in the low-left corner of the Desktop.
Or, press on the Windows key in the keyboard;
• In the start menu click on the Power icon and select Shut
Down from the power option menu as shown in the image.
5.3 Sleep mode
While away from your device it is recommended to put it into sleep mode. To
put your device to sleep mode follow the below:
• Close the display panel;
• Press Fn + F2;
• Press the power button briey one time;
• Open the Start menu and click on Power and then Sleep.
It is recommended that you put your computer to sleep before you move it.
Especially, if your laptop comes with a traditional hard disk, instead of a
modern SSD. Moving your computer while the hard disk is spinning can
sometimes damage the hard disk, causing loss of data.
+
EN USER GUIDE
8
BACK TO INDEX
5.4 Waking up
When your laptop is in sleep mode, you can see the power indicator blinking in
blue. To wake the laptop, just press the power button briey one time.
6. CHARGING YOUR DEVICE
We strongly recommend that you fully charge the battery before you turn on
your device for the rst time.
1. Plug the power cable into the adapter and
plug the adapter into a wall-socket;
2. Plug the USB Type-C head of the adapter
into the USB Type-c port, which you can nd
on the left side of your laptop.
3. You shall see the battery indicator brinking
in blue to indicate the battery is being charged;
4. When the battery is fully charged, the
indicator will light in solid blue..
Note:
• Never use a damaged charger, damaged power cords or loose electrical sockets.
Unsecured connections can cause electric shock or re.
• Use only the power adapter that comes with your device. Using a dierent
power adapter may damage your device.
• Connecting the charger improperly may cause serious damage to the device.
Do not use the charger on other devices, such as tablets or cellphones, since
it can cause damage.
• If the remaining power in your battery capacity is 90% or above, plugging the
adapter will not fully charge your battery.
Only use the bundled power adapter. Unplug your device from the power supply
once it is fully charged. Theses devices are not designed to be left connected to the
power supply for long periods of time. Do not use the charger on other devices.
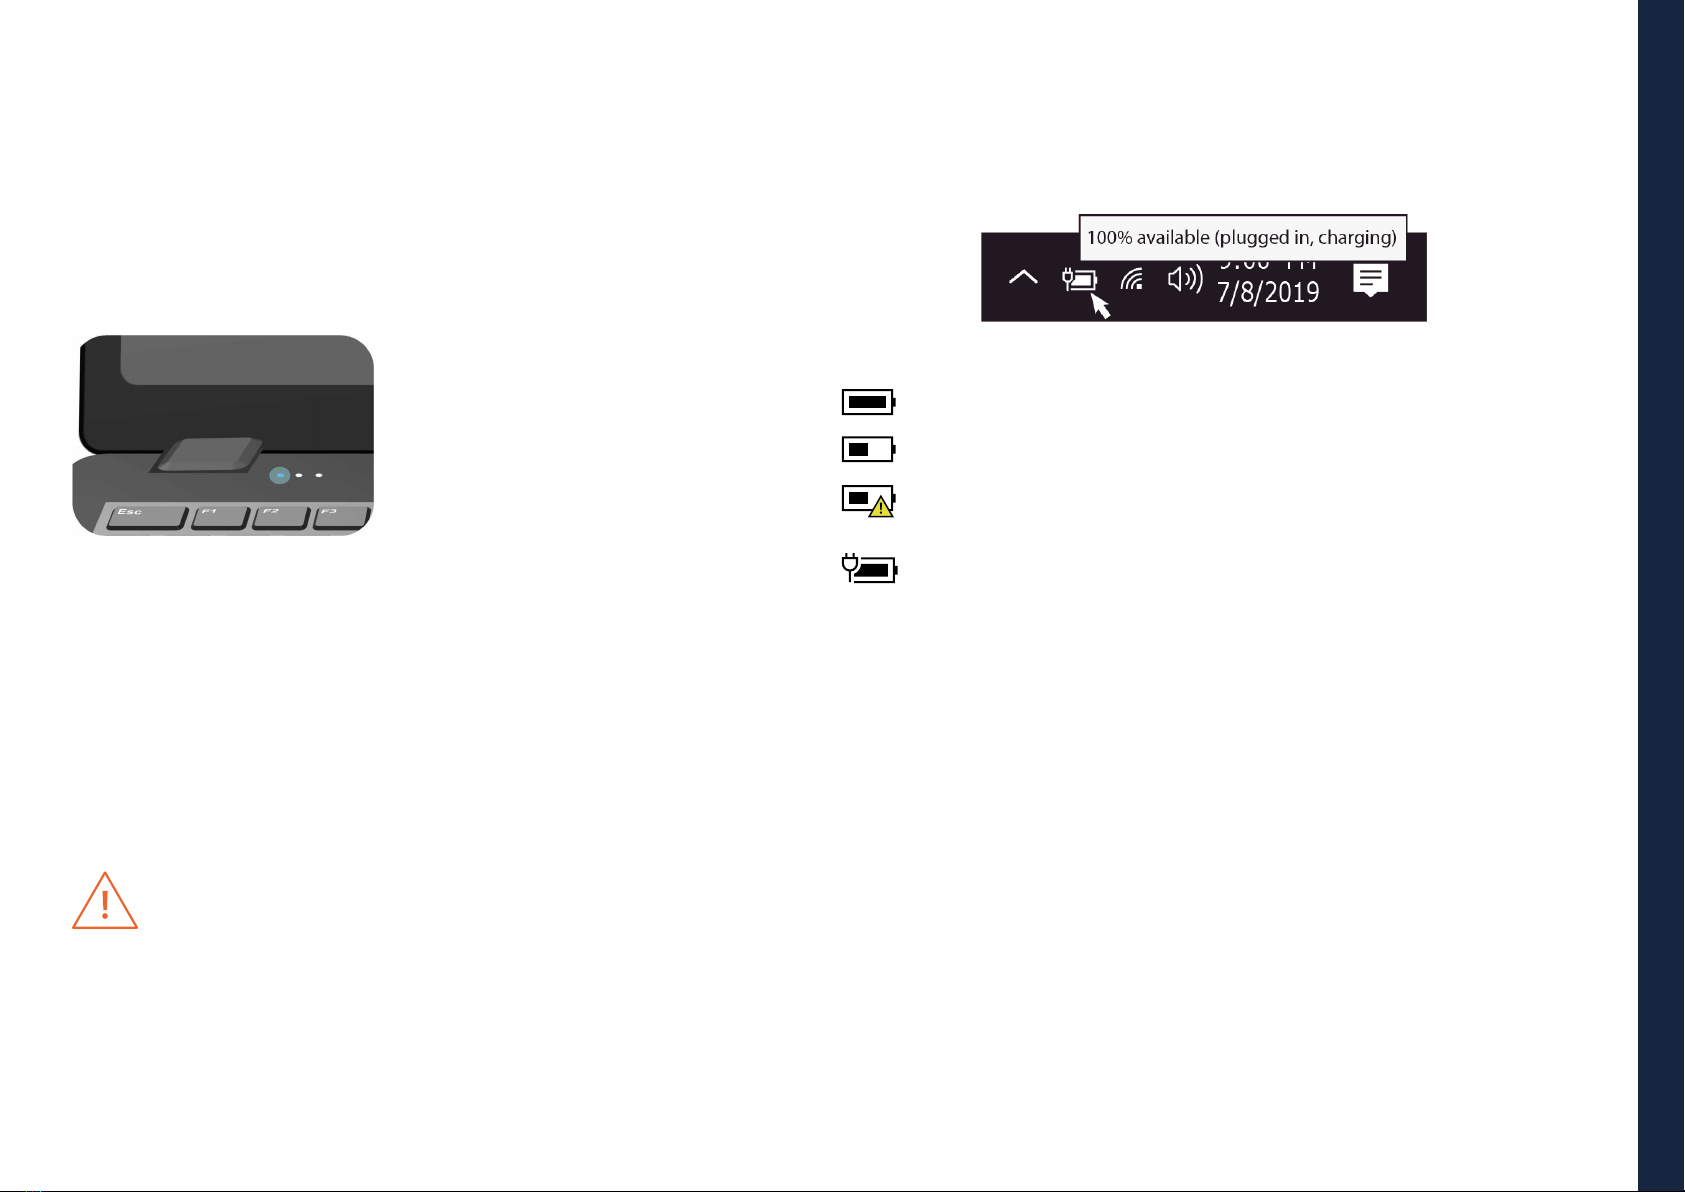
6.1 Battery charge status
By inspecting the taskbar:
In Desktop, move the cursor to the battery icon in the taskbar. A pop-up dialog
box appears and shows you the remaining battery percentage, as shown next.
The battery icon reveals the status of your battery, described as below:
Battery is fully charged.
Battery is starting to drain.
Battery is about to completely drain, and you should stop using your
computer and charge it at once.
Battery is being charged.
By inspecting the battery indicator:
When your laptop is not powered by the adapter, the color of the battery indicator
shows you the approximate status of your battery.
Battery low: Rapidly blinking in red
Battery being charged: Blinking in blue
6.2 Saving battery power
Our devices provide options that help you save battery power.
A battery is an expendable supply. Thus, when used over a long period, its
capacity is shortened. If the battery of your device is reduced to under a half
of its initial time, we recommend the purchase of a new battery. Exposures to
temperatures outside it's operation temperature range (5ºC to 35ºC) will cause
battery degradation.
When you don’t use the battery for a long time, you must store it after charging
(we recommend you to charge it at least until 30% or 40% of its capacity). This
will extend the battery life time of your device. Our batteries are designed to
keep 80% of their initial capacity after 300 to 500 cycles.

EN USER GUIDE
9
BACK TO INDEX
By customizing some options, you can use the device during longer periods of
time between charges:
• Close unnecessary applications;
• Deactivate the Bluetooth if not needed;
• Deactivate the Wi-Fi option if you are not using internet;
• Deactivate auto-syncing of applications;
• Decrease the backlight time;
• Decrease the brightness of your display.
7. TOUCH OPERATIONS
7.1 Basic touchpad operations
Left clicking (or Clicking) - Tap once on the touchpad surface or press
once on the lower left corner of the touchpad.
Right clicking - Press once on the lower right corner of the touchpad.
Dragging - Press and continue to hold down the lower left corner and
then move (drag) your nger across the touchpad surface.
Vertical scrolling - Drag two ngers up or down on the touchpad.
Horizontal scrolling - Drag two ngers left or right on the touchpad.
8. WINDOWS 11 INTERFACE
8.1 Desktop
Multiple desktops are great for keeping unrelated, ongoing projects organized, or
for quickly switching desktops before a meeting.
To create multiple desktops, do the following steps:
1. On the taskbar, select Task view > New desktop;
2. Open the apps you want to use on that desktop;
3. To switch between desktops, select Task view again.
You can also choose dierent backgrounds for each desktop.
To change a background:
4. Right-click on the desktop you want to change;
5. Select Choose background;
6. Select a solid color, picture, or slideshow.

EN USER GUIDE
10
BACK TO INDEX
8.2 Taskbar
Use the taskbar for more than seeing your apps and checking the time. You can
personalize it in many ways - change the color, pin your favorite apps to it, and
move or rearrange taskbar buttons. You can also check your battery status and
minimize all open programs momentarily so that you can look at your desktop.
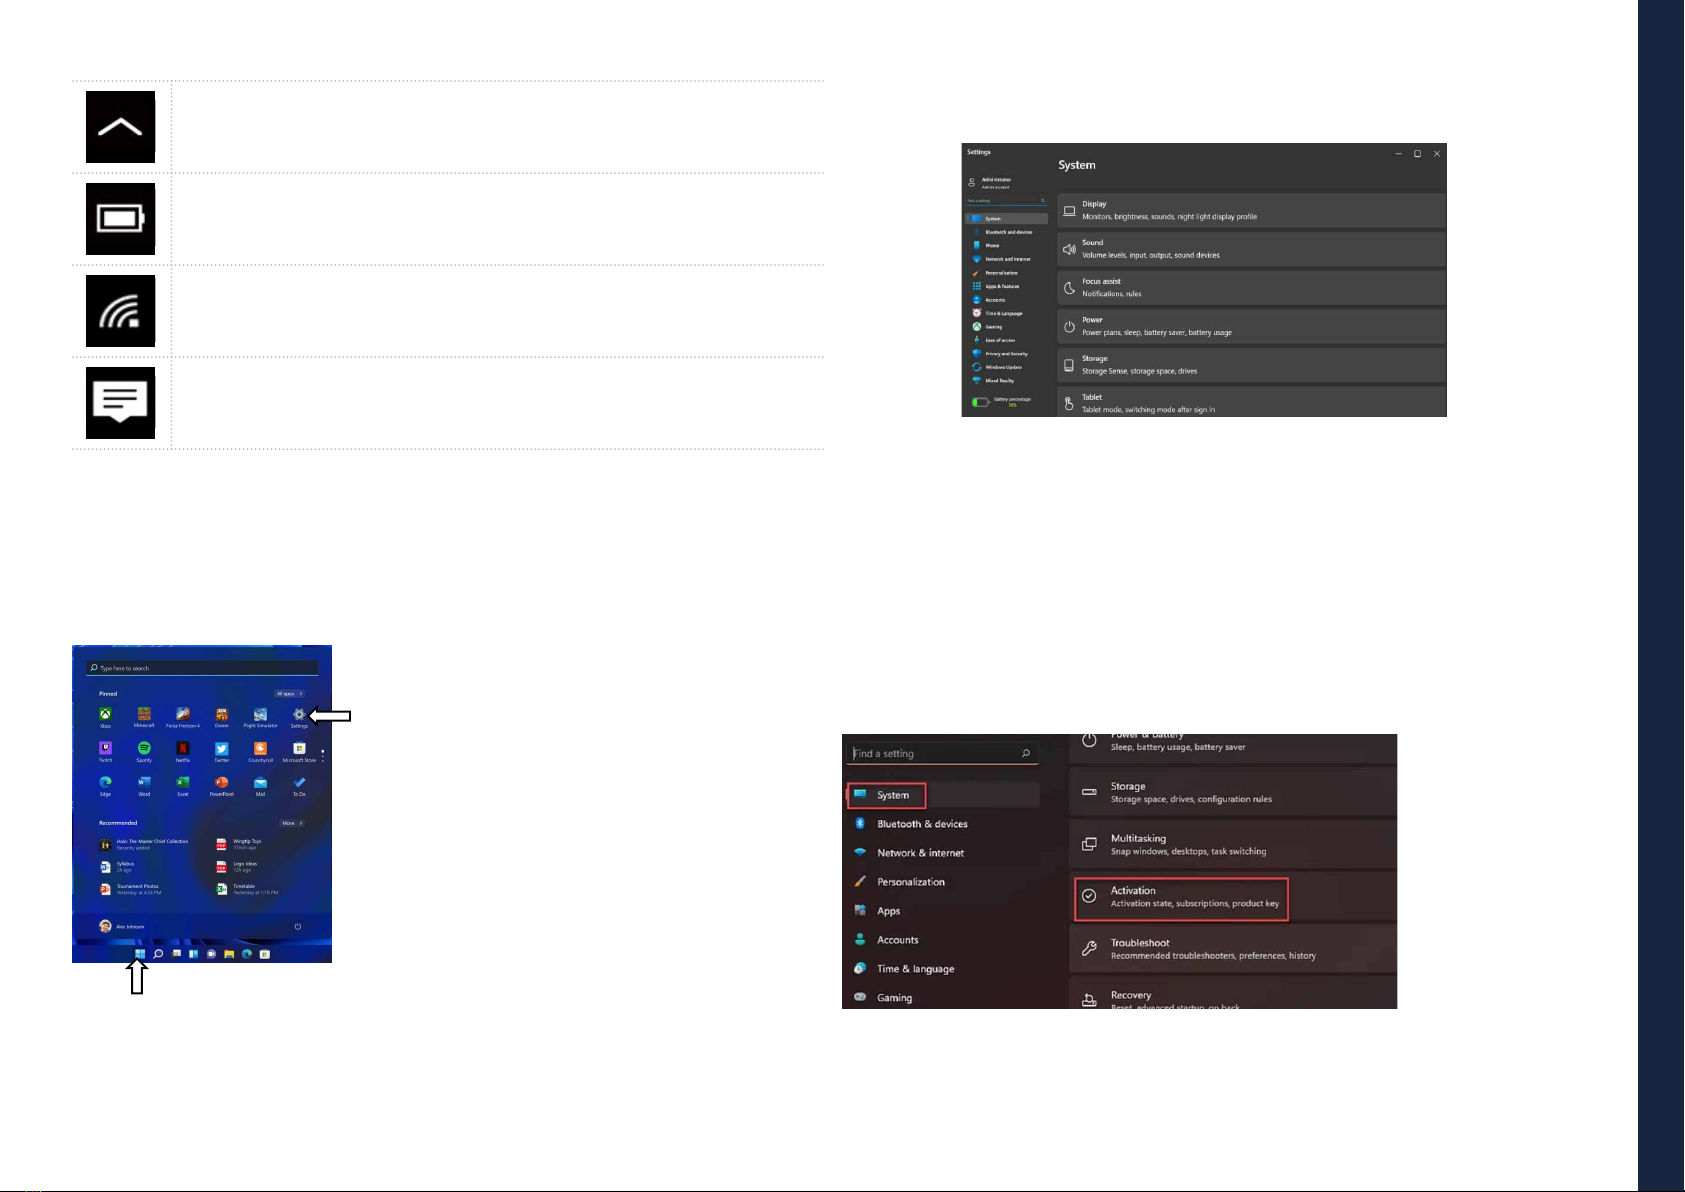
Start Menu
To open the Start menu, you can either click on the Windows icon (which
is also known as Start button) located at the left end of the taskbar or press
once on the windows key of the keyboard. Once opened a list of features will
be available.
Search Box – Cortana
Cortana is available on Windows 11 as an app. To access or open Cortana,
click on the Start button to bring up the search box. In the search box, type in
‘Cortana’. This should bring up the Cortana app screen.
After you setup the Cortana settings Windows will show a microphone icon in
the system tray indicating an assistant app is listening.
APP shortcuts area
This area lets you put the shortcuts of your frequently used apps.
Notication area
The right part of the taskbar holds several icons that show you the status of
your device, as shown in the image.
EN USER GUIDE
11
BACK TO INDEX
Click here to show more hidden status icons.
Shows the current battery status.
Shows the status of the wireless network connection.
Click here to see the system notications and several shortcuts.
9. SETUP AND CONNECTIVITY OPTIONS
9.1 Screen Settings
To access the settings screen follow the below steps:
Step 2: Click here
Step 1: Click here
1. Click the Windows icon in the center of the Desktop. Or, press on the Windows
key in the Keyboard;
2. Click the settings icon.
This will open the Settings screen, as shown below:
Next, the following sections will guide you through the basic setup of your
Windows system.
9.2 Activate Windows
To use all features of your Windows device, you may need to activate your
Windows system. Follow the following steps to register and activate your Windows.
1. Open the Start menu and click < Settings>;
2. Click < System>;
3. Select < Activation>;
4. Follow the instructions to activate your Windows.
EN USER GUIDE
12
BACK TO INDEX
9.3 Set up of Microsoft account
To share les or settings with other devices running Windows 11, you need to
setup a Microsoft Account. Furthermore, if you want to download or purchase
apps from the Microsoft Store, such Microsoft Account is required.
To setup your Microsoft account:
1. Open the Settings screen and select <Accounts> ;
2. Select < Your Info > ;
3. Select <Sign in with a Microsoft account instead>;
4. Follow the instruction to register your account
information.
9.4 Replacing Desktop with Start Screen
If you are more familiar with the interface similar to the Start screen introduced
in Windows 8 series, you can set your device to show the Start screen instead
of the Desktop every time when you power on your device. To do so, do the
following steps:
1. Open the Settings screen;
2. Select < Personalization> ;
3. In the Personalization screen, enable the option <Use
4. Start full screen>.
After these steps, you will see the Start screen every
time you turn on your device.
9.5 Pin and unpin your app
Pinning an App to Start menu or taskbar
1. Open the Start menu;
2. Right-click on the app that
you want to appear on your
Start menu or taskbar, and an
option menu appears;
3. Click <Pin to Start> or < Pin
to taskbar> to add the app to
your Start menu or taskbar.
Removing an App
1. Right click the app that you want to remove from your Start menu or
taskbar;
2. Click to remove it from your Start menu or taskbar.
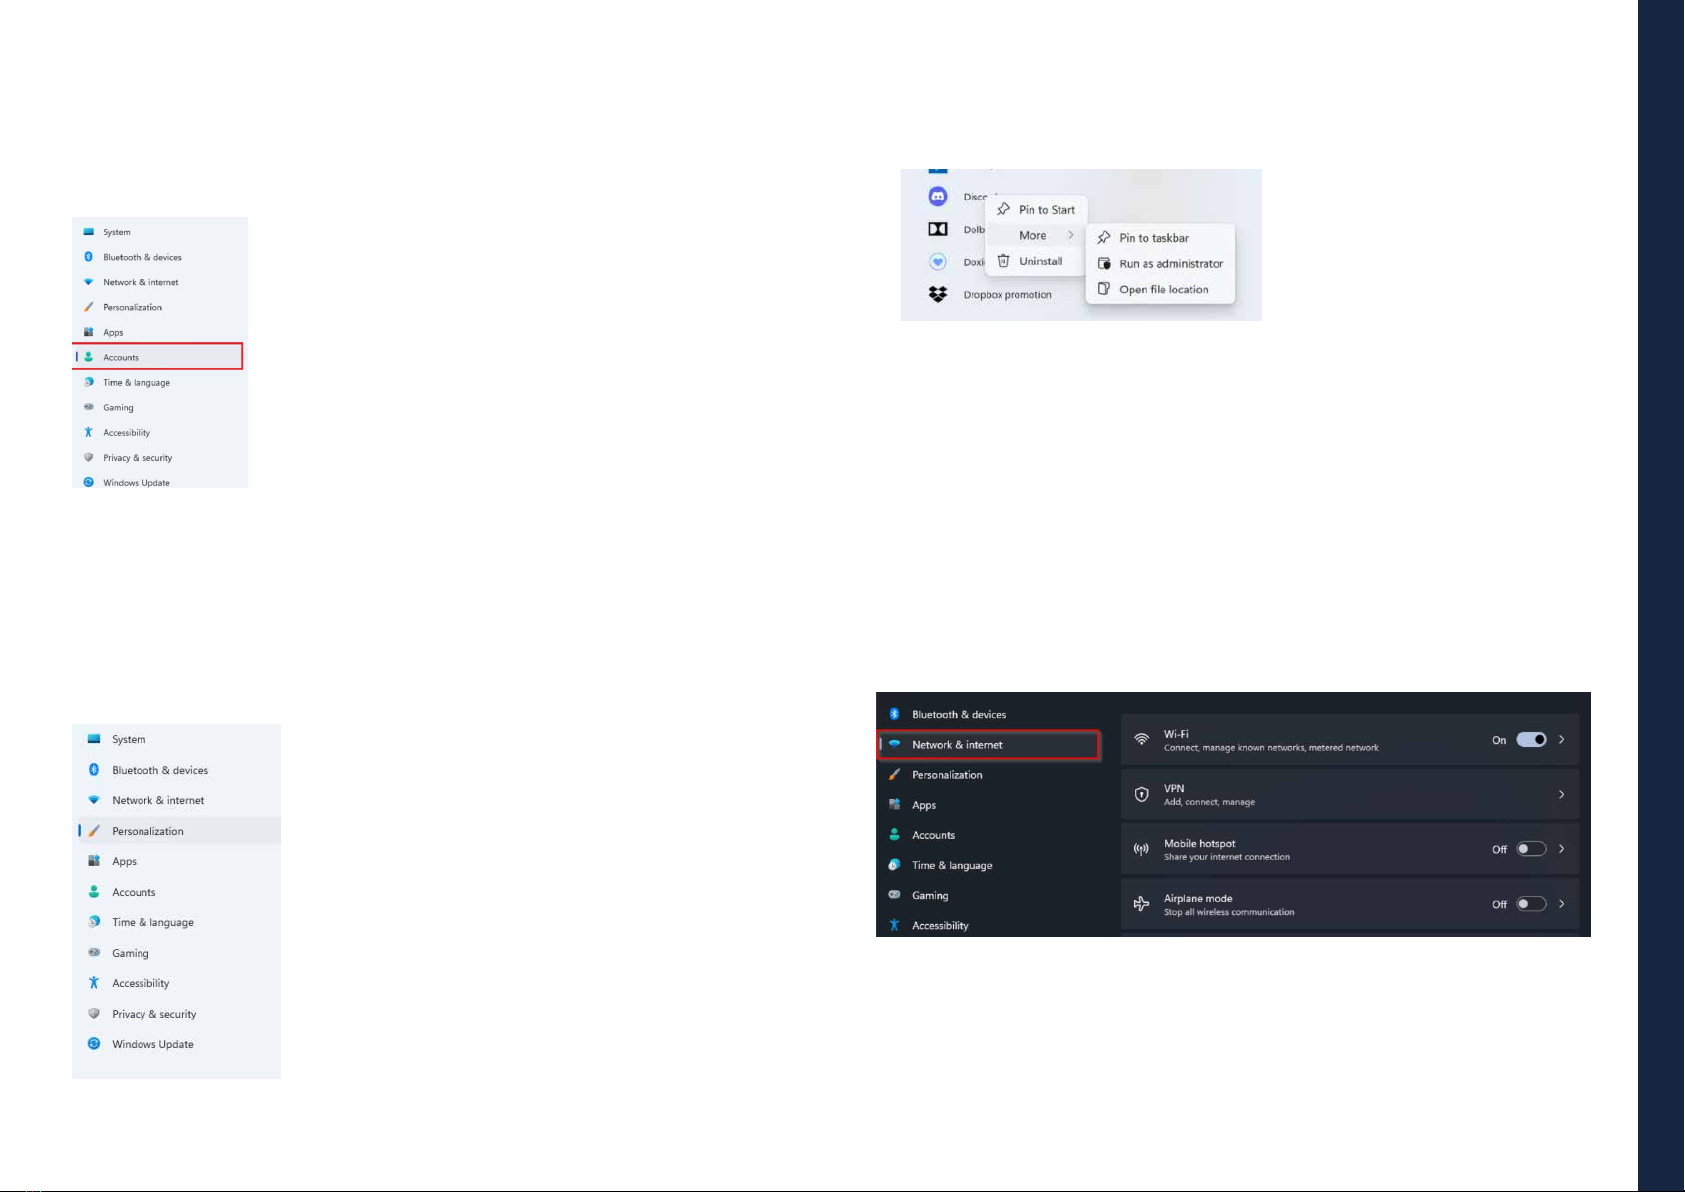
9.6 Wireless connection
Enabling wireless connection:
1. Open Settings menu and select <Network & Internet> ;
2. Select and set the function to ON, as shown below;
3. Click the option “Show available networks”, and a network list will appear
on the right part of your screen;
4. Click your desired network’s name in the list, and then click Connect.
Follow the instruction on the screen to establish the connection.

EN USER GUIDE
13
BACK TO INDEX
Note:
Some networks require a network security key or password for connection. If
necessary, ask the network administrator or the Internet service provider (ISP)
for the required information.
9.7 Connecting a Memory Card
You can utilize your micro SD cards as removable disks and conveniently exchange
data with digital devices such as a digital camera, digital camcorder, MP3, etc.
To insert the micro SD card follow the below steps:
• Insert the micro SD card as shown in the image;
• Follow the message on the screen, and choose to
open and view les;
• A Windows Explorer runs and shows all the folders and
les in the micro SD cards, and you can save, move and
delete data as you are handling a storage device.
To remove your memory card:
• Press the card and release. The card will pop up;
• Pull the card out by holding the end of the card.
9.8 Inserting a Nano SIM Card (optional)
1. Use an eject pin to open the SIM card tray
2. Remove the SIM card tray from the slot. When you remove it, keep
it face up.
3. Place the SIM card in the SIM card tray. The words or logo on the
SIM card should be facing up.
4. Slide the SIM card tray back into the SIM card slot until it clicks.
Don't force it in – the SIM card tray should slide in smoothly
Note:
- Do not touch the printed circuit on
the Nano SIM card
- Be sure to hold your computer
rmly before inserting the Nano
SIM card
- Do not damage the Nano SIM card
in any way, either by bending or
exerting pressure on the card.
Note:
If your USB device uses a power cord, connect the device to a power source before
connecting it.
9.9 Connecting an External Device
Connecting to the USB port
Once you plug a USB device into an USB port, Windows automatically loads a
driver for that device.
After the driver has been loaded one time, you can disconnect and reconnect
the same device without performing any additional steps.
Note:
If Windows requires you to install the driver before connecting, check the
documentation provided by the device’s manufacturer before connecting the device.
To disconnect a USB storage device, make sure you click the Safely Remove
Hardware icon in the notication area of the taskbar. As well make sure that
all data transfer has nished.
Finally, a notication will be displayed allowing you to remove the device.

EN USER GUIDE
14
BACK TO INDEX
10.1 Troubleshooting
This section describes some common problems and suggested solutions, as
well as ways to recover your equipment after a crash.
Be aware that the problems and solutions described here are meant only as a
guide. They are not denitive problem solving techniques. For certain
problems, you might need help from your reseller or your service provider.
When you observe a problem, stop the task immediately, because taking
further action might result in data loss or damage. Take a note of what the
system is doing and what actions you performed before the problem occurred.
Provide detailed information to your service provider for quicker problem
resolution.
For most problems, follow these steps:
• Restart your device;
• Check your Wi-Fi connection;
• Reset your Wi-Fi connection;
• Plug your device to a wall socket to charge it for at least one hour.
10.2 Display and screen problems
When I turn on the device, nothing appears on the screen.
If the screen is blank, make sure that:
• The AC adapter is connected to the device and the power cord is plugged into
a working electrical outlet;
• The device is turned on (press the power button again for conrmation for 6
seconds to force the turn o and on).
If these items are properly set, and the screen remains blank, the device needs
service.
The screen goes blank while the device is on.
If the screen turns black while the device is functioning, that means that it is in
the sleep mode. To turn it back on, press the power button.
The screen is unreadable or distorted.
Make sure that:
• The screen resolution and color quality are correctly set;
• The monitor type is correct.
Incorrect characters appear on the screen.
Are the operating system or programs installed correctly? If they are installed
and congured correctly, have the device serviced.
The screen is blank.
If the AC adapter is connected, or if the battery is used, and the battery status
indicator is on, press F4 to make the screen brighter.
Press the power button to resume from sleep mode.
If the problem persists, check if the screen resolution and color are correctly
set, or if the monitor type is correct.
10.3 Sleep problems
The critical low-battery error message appears, and the device turns o.
The battery power is getting low. Connect the AC adapter to the device.
The device enters sleep mode immediately after Power-on.
Make sure that the battery is charged. The operating temperature may also be
too hot. Move it to a cooler environment and try to wake the device.
The device does not return from sleep mode and the device does not work.
Connect the AC adapter, then press the power button. If your device is
powered-o, connect the AC adapter rst, and then press the power button
to resume operation.
10.4 Sound problems
1. Power o the external device;
2. Locate the HDMI port on your device;
3. Connect one end of your cable to the port, and the other end to the port on
the external device;
4. Power on the external device;
5. When connecting a TV, you may need to congure your TV to external device
mode;
6. Open the Settings screen, select <System>and then <Display>;
7. If your external monitor is detected, you will see the setting page similar to
the one as shown below;
8. Click <Multiple displays> to open the drop-down list;
9. From the list, select your desired monitor mode;
10. Click <Apply> and conrm your setting.

EN USER GUIDE
15
BACK TO INDEX
No sound can be heard from the speaker even when the volume is turned up.
Make sure that:
• The Mute function is o;
• The combo audio jack is not being used;
• Speakers are selected as the playback device.
10.5 Other problems
Your device does not respond.
To turn on your device, press and hold the power button for 6 seconds or more.
If the device still does not respond, remove the AC adapter.
Your device might lock when it enters sleep mode during a communication
operation. Disable the sleep timer when you are working on the network.
The connected external device does not work.
Do not connect or disconnect any external device cables other than USB while
the device power is on. Otherwise, you might damage your device.
When using a high power consumption external device such as an external
USB optical disk drive, use an external device power adapter. Otherwise, the
device may not be recognized, or the system may shut down as a result.
11. AGENCY REGULATORY NOTICES
11.1 Specic Absorption Rate (SAR) Certication Information
THIS DEVICE MEETS INTERNATIONAL GUIDELINES FOR EXPOSURE TO RADIO WAVES
Your device is a radio transmitter and receiver. It is designed not to exceed
the limits for exposure to radio waves (radio frequency electromagnetic elds)
recommended by international guidelines.
The guidelines were developed by an independent scientic organization (ICNIRP)
and include a substantial safety margin designed to assure the safety of all
persons, regardless of age and health.
The radio wave exposure guidelines use a unit of measurement known as the
Specic Absorption Rate, or SAR. The SAR limit set by FCC is 1.6 W/kg. Tests for SAR
are conducted using standard operating positions with the device transmitting
at its highest certied power level in all tested frequency bands.
During use, the actual SAR values for this device are usually well below the
values stated above.
This is because, for purposes of system eciency and to minimize interference
on the network, the operating power of your device is automatically decreased
when full power is not needed for the call. The lower the power output of the
device, the lower its SAR value.
Organizations such as the World Health Organization and the US Food and
Drug Administration have suggested that if people are concerned and want
to reduce their exposure, they could use a hands-free accessory to keep the
wireless device away from the head and body during use, or reduce the amount
of time spent using the device.
11.2 Elimination of Private Equipment by Users in the
European Union
This symbol on the product or on its packaging indicates that this product
must not be disposed of with other household waste. It is your responsibility
to dispose your used equipment at a collection point for recycling of electrical and
electronic equipment.The separate collection and recycling of disposed equipment
used will help to conserve natural resources and ensure that the equipment will
be recycled adequately to protect human health and the environment.
For more information about the locations where you can drop o your equipment
for recycling, please contact your local municipality, the local garbage collection
service or the point where you purchased the product.

BOLTX501
manual del usuario
Antes de empezar a usar su dispositivo,
asegúrese de leer el Manual del usuario
que explica cómo usar el dispositivo. Esto
garantizará que utilice su dispositivo de forma
segura y correcta. Este manual es solo para
referencia y puede cambiar sin previo aviso.
EN
ES
PT

ES MANUAL DEL USUARIO
17
VOLVER AL ÍNDICE
índice
INTRODUCCIÓN
1 LIMITACIÓN DE RESPONSABILIDAD
2 INFORMACION DE SEGURIDAD
2.1 Requisito de adaptador de CA
2.2 Nivel de volumen del auricular de advertencia
2.3 Directiva de equipos de radio (RED)
3 CONTENIDOS DEL PAQUETE
4 DESCRIPCIÓN GENERAL DEL DISPOSITIVO
4.1 Teclas de función
5 CONECTE / DESCONECTE SU EQUIPO
5.1 Encender por primera vez
5.2 Apagar su dispositivo
5.3 Modo de Suspensión
5.4 Modo Activo
6 CARGAR EL DISPOSITIVO
6.1 Estado de carga de la batería
6.2 Ahorrar batería
7 ACCIONES DE TOQUE
7.1 Operaciones básicas del panel táctil
8 INTERFAZ DE WINDOWS 11
8.1 Escritorio
8.2 Barra de Tareas
9 OPCIONES DE CONFIGURACIÓN Y CONECTIVIDAD
9.1 Ajustes de pantalla
9.2 Activación de Windows
9.3 Conguración de la cuenta de Microsof
9.4 Reemplazo del escritorio con la pantalla de inicio
9.5 Aplicaciones de anclar y soltar
9.6 Conexión inalámbrica
9.7 Conexión de una tarjeta de memoria
9.8 Conexión de un dispositivo externo
10 AYUDA Y SOLUCIÓN DE PROBLEMAS
10.1 Solución de problemas
10.2 Problemas con la pantalla
10.3 Problemas con el "modo de suspensión"
10.4 Problemas de sonido
10.5 Otros problemas
11 AVISOS REGULATÓRIOS DA AGÊNCIA
11.1 Información de certicación de la tasa de absorción especíca (SAR)
11.2 Eliminación de equipos privados por parte de usuarios en la Unión Europea
18
18
18
19
19
19
19
20
21
21
21
21
21
22
22
22
22
23
23
23
23
24
25
25
25
26
26
26
26
27
27
28
28
28
28
28
29
29
29
29

ES MANUAL DEL USUARIO
18
VOLVER AL ÍNDICE
INTRODUCCIÓN
Este manual de usuario se aplica al equipo BOLT X501.
Cualquier información debe ser solicitada a:
JP Sá Couto, S.A.
Rua da Guarda, 675
4455-466 Perata - Portugal
E-mail: [email protected]
Para obtener información sobre el software (ikES), consulte ikes.jpik.com.
Nota:
Las imágenes e ilustraciones de la pantalla pueden diferir de las que ve en el
producto.
jp.ik ofrece productos educativos para profesionales, elegibles para su compra
por instituciones educativas, ocinas y ayuntamientos escolares, bibliotecas pú-
blicas y museos. Estos productos son utilizados por administradores escolares,
profesores o estudiantes en el contexto educativo.
1. LIMITACIÓN DE RESPONSABILIDAD
Apesardelosesfuerzos realizadospara garantizarla precisióndela información
contenida en este manual, el fabricante y el distribuidor no asumen ninguna
responsabilidad derivada de errores u omisiones en este manual o del uso de
la información contenida en él.
2. INFORMACION DE SEGURIDAD
Las baterías no pueden ser reemplazadas fácilmente por los propios usuarios.
Precaución:
• El incumplimiento de las advertencias y regulaciones de seguridad puede causar
daños a la propiedad, lesiones graves o la muerte;
• Siga la información de advertencia y precaución para evitar lesiones a usted
mismo o a otras personas y para evitar daños a su dispositivo.
Asegúrese de seguir las siguientes instrucciones de seguridad:
• Cuide su equipo y utilícelo correctamente;
• Nunca coloque el equipo cerca del fuego u otras fuentes de calor;
• Nunca coloque el equipo sobre o dentro de dispositivos de calefacción, como
hornos, microondas, estufas o radiadores. El dispositivo puede explotar si
se sobrecalienta. Siga todas las regulaciones locales para la eliminación de
dispositivos usados;
• No deje el dispositivo conectado o "encendido" cuando esté cerrado en un
entorno sin ventilación, como una mochila escolar, ya que puede producirse
un sobrecalentamiento;
• No coloque objetos pesados, ya que ejercen una fuerte presión sobre el dispositivo;
• El rango de temperatura de almacenamiento recomendado para este dispositivo
es de -20ºC a 60ºC;
• El rango de temperatura de funcionamiento recomendado para este dispositivo
es de 5ºC a 35ºC;
• Si el dispositivo se sometió a temperaturas fuera de las temperaturas de
funcionamiento recomendadas, pero aún dentro de su rango de temperatura
de almacenamiento, déjelo reposar a una temperatura dentro de su rango de
temperatura de funcionamiento durante al menos 24 horas antes de encenderlo;
• No use su dispositivo si está sobrecalentado;
• No utilice su dispositivo en un hospital, avión o vehículo, ya que puede haber
interferencia de radiofrecuencia;
• Evite utilizar su dispositivo a menos de 15 cm de un marcapasos, ya que puede
interferir con su funcionamiento. Para minimizar la posible interferencia con
un marcapasos, use su dispositivo solo en el lado opuesto del cuerpo donde
se encuentra el marcapasos;
• Apague el dispositivo en entornos potencialmente explosivos;
• Siga siempre las reglamentaciones, instrucciones y señales en entornos
potencialmente explosivos;
• Para evitar la fatiga visual, tome descansos frecuentes mientras usa el dispositivo;
• No utilice el dispositivo si está rajado o roto;
• El vidrio o el acrílico roto pueden causar lesiones en las manos;
• Si se dobla o se coloca mal, el dispositivo puede dañarse y las piezas pueden
funcionar mal;
• No desmonte, modifique ni repare su dispositivo. Cualquier cambio o
modicación en su dispositivo puede anular la garantía. Si su dispositivo
necesita mantenimiento, llévelo a un centro de servicio aprobado;
• Permita que solo personal calicado realice el mantenimiento de su dispositivo;
• Cuando limpie su dispositivo, tenga en cuenta lo siguiente: no utilice productos
químicos ni detergentes. Si lo hace, puede decolorar o corroer el exterior del
dispositivo o puede provocar una descarga eléctrica o un incendio;
• No utilice el dispositivo para ningún otro n que no sea el previsto;
• Si su dispositivo tiene un ash o una luz para la cámara, no lo use cerca de
los ojos de personas o mascotas. El uso de un ash cerca de los ojos puede
provocar una pérdida temporal de la visión o daños en los ojos. Tenga cuidado

ES MANUAL DEL USUARIO
19
VOLVER AL ÍNDICE
cuando se exponga a luces intermitentes;
• Proteja sus datos personales y evite la ltración o el uso indebido de información
condencial;
• Cuando utilice su dispositivo, asegúrese de hacer una copia de seguridad de
los datos importantes. jp.ik no es responsable por pérdida de datos.
No distribuya material protegido por derechos de autor sin el permiso de los
propietarios del contenido. Esto puede violar las leyes de derechos de autor.
El fabricante no se hace responsable de los problemas legales causados por el
usuario o por el uso ilegal de material protegido por derechos de autor.
2.1 Requisito de adaptador de CA
El adaptador de CA debe coincidir con los requisitos del enchufe y el voltaje de
alimentación de su región. Se obtuvo la aprobación reglamentaria utilizando el
adaptador de CA para el área local. Nunca use un cargador dañado, cables de
alimentación dañados o enchufes eléctricos sueltos. Las conexiones inseguras
pueden provocar descargas eléctricas o incendios.
No toque el cable de alimentación con las manos mojadas ni desconecte el cargador
tirando del cable. Esto puede resultar en electrocución.
La conexión incorrecta del cargador puede causar daños graves al dispositivo.
Cualquier daño causado por un uso inadecuado no está cubierto por la garantía.
Durante la carga, el dispositivo puede calentarse. Esto es normal y no debería
afectar la vida útil ni el rendimiento del dispositivo. Si la batería se calienta más
de lo normal, es posible que el cargador deje de cargarse.
Utilice únicamente cargadores, baterías y cables aprobados. Los cargadores
genéricos no aprobados pueden acortar la vida útil de su dispositivo o provocar
un mal funcionamiento. También pueden provocar un incendio o hacer que la
batería explote.
Al utilizar accesorios, baterías o suministros no aprobados, la seguridad del usuario
no está garantizada y es su exclusiva responsabilidad.
2.2 Advertencia del nivel del volumen del auricular
Escuchar música a altos niveles de volumen y durante largos períodos de tiempo
puede dañar su audición. Para reducir el riesgo de daño auditivo, baje el volumen
a un nivel seguro y cómodo, así como la cantidad de tiempo que escucha a niveles
altos. Por su seguridad, antes de usar auriculares o audífonos, siempre reajuste
el volumen. El volumen del sonido es más alto en algunos auriculares, aunque
la conguración del control de volumen es la misma. Cambiar la conguración
predeterminada de audio o ecualizador puede aumentar el volumen y debe
hacerse con cuidado. La exposición a sonidos fuertes mientras camina puede
desviar su atención y provocar un accidente.
No utilice auriculares al conducir o montar en bicicleta. Esto puede desviar su
atención y provocar un accidente, o puede ser ilegal, según su región.
2.3 Directiva de equipos de radio (RED)
EN Restricted to indoor use ES Limitado al uso en espacios interiores PT Limitado
a uso em espaços interiores
Precaución:
• La (s) banda (s) de frecuencia en las que opera el equipo de radio: 2,4 GHz y 5 GHz;
• La potencia máxima de radiofrecuencia transmitida en la (s) banda (s) de
frecuencia en la que opera el equipo de radio: 16.34 dBm (a 2.4 GHz) y 17.35
dBm (a 5 GHz).
3. CONTENIDOS DEL PAQUETE
Desembale con cuidado su caja y retire los elementos que se enumeran a
continuación.
Un ordenador
Una DC-in adaptador
Una guia rápida
11
1
2
2
3
3
ES MANUAL DEL USUARIO
20
VOLVER AL ÍNDICE
4. DESCRIPCIÓN GENERAL DEL DISPOSITIVO
Cámara
Indicador LED de la cámara
Micrófono
Pantalla LCD
Botón de encedido
Panel táctil
Kensington Lock
USB Tipo-C 3.2 Gen1
USB Tipo-A 3.2 Gen1
USB Tipo-A 3.2 Gen1
HDMI
Conector de audio
Lector de tarjetas SD
Nano SIM
Giga-LAN
Altavoces
USB Tipo-C 3.2 Gen1
(soporta Data, PD y DP)
21
1
2
3
4
5
6
7
8
9
10
11
12
13
14
15
16
17
3
4
5
6
7 8 9
10 11
13 14 15 16
17
12
Table of contents
Languages:
Popular Educational Equipment manuals by other brands


Quanser
Quanser 6 DOF Hexapod Laboratory guide

Surefire
Surefire Flying Model Rocket Kit How to use

ACROME
ACROME myCONTROL STEWART PRO user manual

SmartMan
SmartMan Baby Manikin manual

Nasco
Nasco Life/form LF03840U instruction manual

Pitsco Education
Pitsco Education BUILDERSPACES SPACEPORT Assembly instructions