SeaPerch ROV Instructions for use
Version 2010-02
SeaPerch
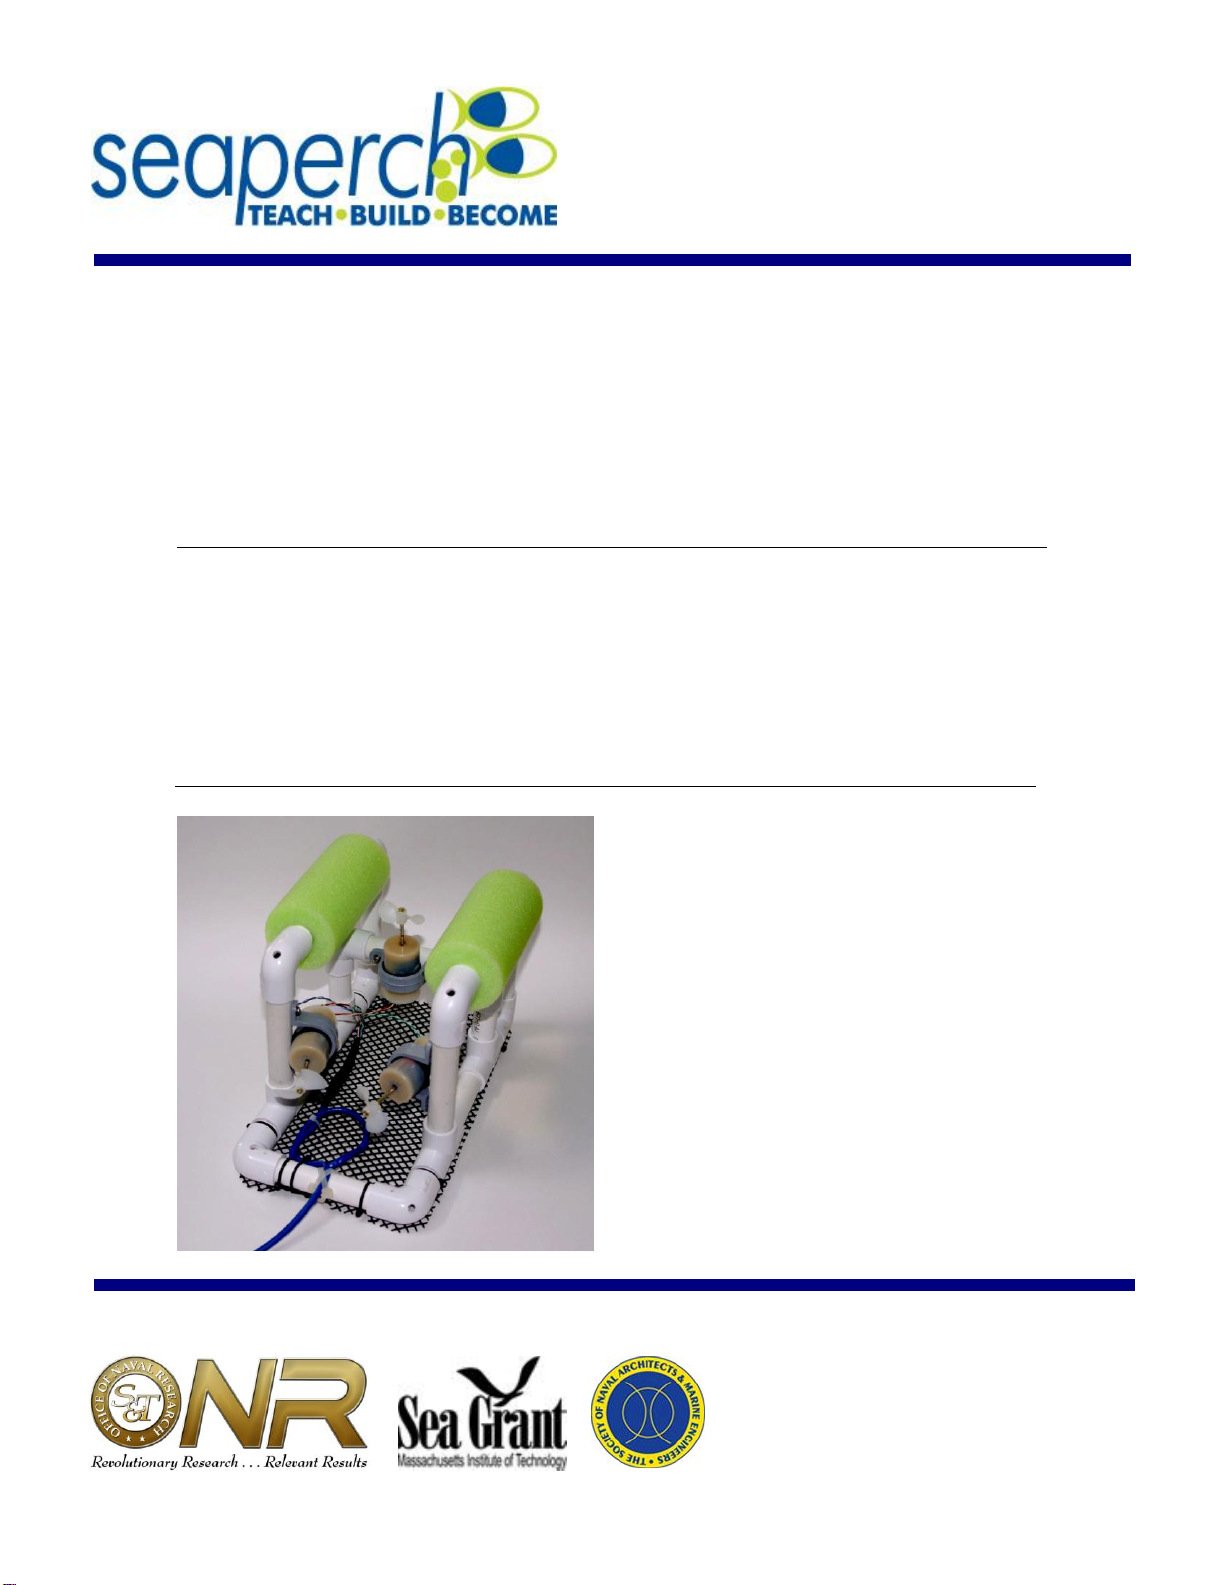
Remotely Operated Vehicle (ROV)
Construction Manual
Standard Assembly Procedures
December 2010
The SeaPerch educational program was created by Harry
Bohm and Vickie Jensen and published in their 1997 book
"Build Your Own Underwater Robot and Other Wet
Projects." The initial curriculum was developed by the
Massachusetts Institute of Technology, and this version of
the SeaPerch Construction Manual was provided under the
Office of Naval Research National Naval Responsibility for
Naval Engineering (NNRNE) Outreach initiative.


SeaPerch ROV Construction Manual –Version 2010-02
I
Table of Contents
Introduction ------------------------------------------------------------------------------------------ I-1
SeaPerch ROV Program Overview ------------------------------------------------------------ I-1
What is SeaPerch? ---------------------------------------------------------------------------- I-1
Program History --------------------------------------------------------------------------------- I-2
Original SeaPerch ROV Manual Development ----------------------------------------- I-2
Updated Information in this Manual ------------------------------------------------------------ I-2
Revised Standard SeaPerch Assembly Instructions ---------------------------------- I-2
Expanded Testing and Operating Information ------------------------------------------ I-3
Added Appendix Containing Troubleshooting Hints ----------------------------------- I-3
Added Supplement for Construction Options and Enhancements ---------------- 1-4
The SeaPerch Assembly Process -------------------------------------------------------------- I-5
Three Individual Building Units ------------------------------------------------------------- I-5
Recording Progress ---------------------------------------------------------------------------- I-5
Testing and Adjustments --------------------------------------------------------------------- I-5
Tools and Materials ---------------------------------------------------------------------------- 1-6
Manual Printing Considerations -------------------------------------------------------------1.6
Safety Overview -------------------------------------------------------------------------------- S-1
Protective Eyewear ------------------------------------------------------------------------------- S-1
Materials Handling Safety ---------------------------------------------------------------------- S-2
Safety While Using Hand Tools --------------------------------------------------------------- S-2
Safety While Drilling ------------------------------------------------------------------------------ S-3
Safety While Soldering -------------------------------------------------------------------------- S-4
Safety While Potting Motors for Thrusters -------------------------------------------------- S-4
Safety With Electricity and Batteries --------------------------------------------------------- S-5

SeaPerch ROV Construction Manual –Version 2010-02
II
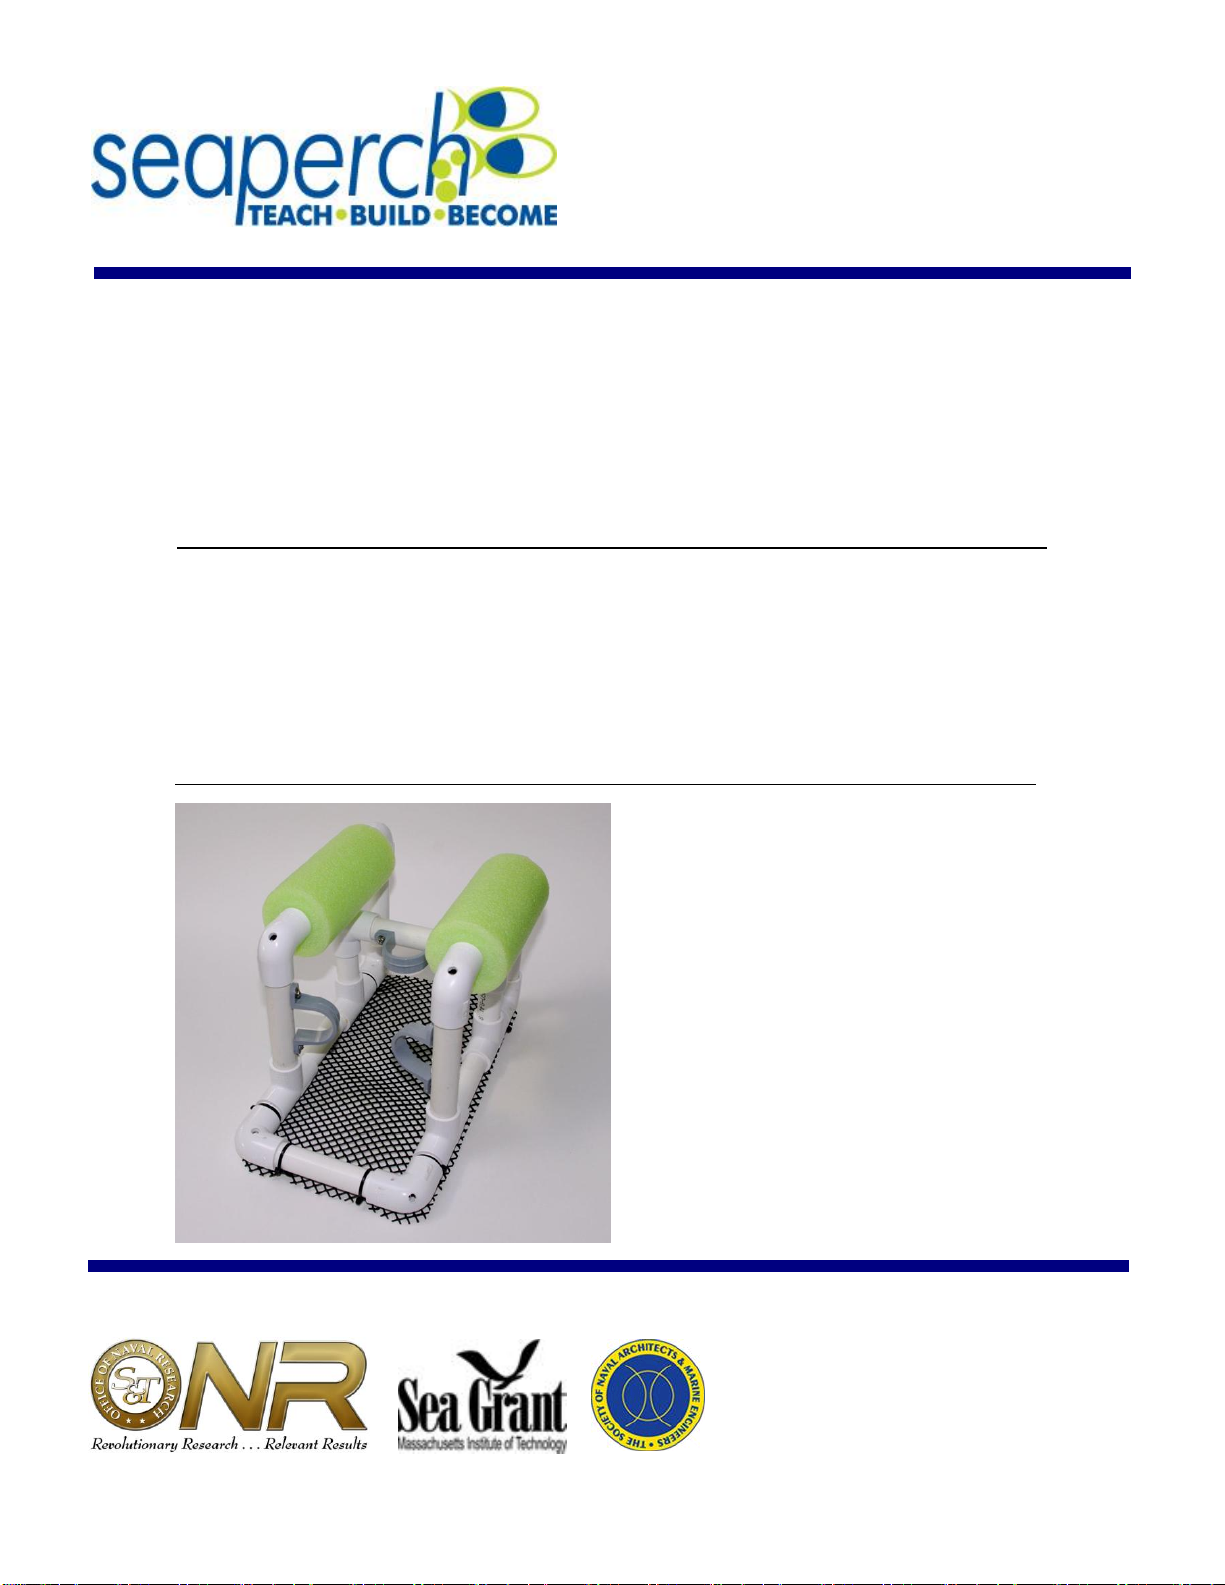
Unit 1 –Assembly of Subsystem One –The Vehicle Frame ----- 1.0-1
Tools and Materials Needed ------------------------------------------------------------------ 1.0-2
Time Needed to Complete Unit 1------------------------------------------------------------- 1.0-2
Procedure 1.1 –Cut the Frame Parts -------------------------------------------------------1.1-1
Procedure 1.2 –Drill the Drain Holes ------------------------------------------------------- 1.2-1
Procedure 1.3 –Assemble the Vehicle Frame ------------------------------------------- 1.3-1
Procedure 1.4 –Install the Floats and Tighten the Frame ---------------------------- 1.4-1
Procedure 1.5 –Attach the Thruster Mounts --------------------------------------------- 1.5-1
Procedure 1.6 –Attach the Payload Net --------------------------------------------------- 1.6-1
Unit 2 –Assembly of Subsystem Two –The Thrusters ------------- 2.0-1
Tools and Materials Needed ------------------------------------------------------------------ 2.0-2
Time Needed to Complete Unit 2 -------------------------------------------------------------2.0-2
Procedure 2.1 –Build a Motor Potting Holder (If Not Provided) ----------------------2.1-1
Procedure 2.2 –Test the Motors and Mark their Terminals' Polarity --------------- 2.2-1
Procedure 2.3 –Seal the Motors So That Wax Cannot Get Inside ----------------- 2.3-1
Procedure 2.4 –Drill Holes in the Thruster Housings --------------------------------- 2.4-1
Tips on Soldering –Safety and Techniques ---------------------------------------------- 2.5-1
Procedure 2.5 –Connect the Tether Cable Wires to the Motors -------------------- 2.5-2
Tips on Wax Melting –Safety and Techniques ------------------------------------------ 2.6-1
Procedure 2.6 –Pot (Waterproof) the Motors with Wax ------------------------------- 2.6-2
Procedure 2.7 –Mount the Propellers onto the Motors’ Shafts ---------------------- 2.7-1
Procedure 2.8 –Mount the Thrusters onto the Vehicle Frame --------------------- 2.8-1
Procedure 2.9 –Waterproof and Mount the Tether Cable ---------------------------- 2.9-1

SeaPerch ROV Construction Manual –Version 2010-02
III
Unit 3 –Assembly of Subsystem Three –The Control Box ------- 3.0-1
Tools and Materials Needed ------------------------------------------------------------------ 3.0-2
Time Needed to Complete Unit 3 ------------------------------------------------------------ 3.0-2
SeaPerch ROV Electrical Circuit Diagram ------------------------------------------------ 3.0-3
Procedure 3.1 –Gather the Parts for the Control Box Assembly ------------------- 3.1-1
Procedure 3.2 –Install the Tether Cable Connector Plug ---------------------------- 3.2-1
Procedure 3.3 –Assemble the Power Cord ---------------------------------------------- 3.3-1
Procedure 3.4 –Install the Printed Circuit Board Components ---------------------- 3.4-1
Procedure 3.5 –Connect the Power Cord ------------------------------------------------ 3.5-1
Procedure 3.6 –Finish the Control Box ---------------------------------------------------- 3.6-1
Testing and Ballasting the ROV
Time Needed to Complete Testing and Ballasting of the ROV ------------------------ T-1
Initial Electrical Testing --------------------------------------------------------------------------- T-1
Ballasting and Trimming the ROV -------------------------------------------------------------- T-2
Initial In-Water Testing in the Classroom, Lab, or Pool ----------------------------------- T-4
Using the SeaPerch ROV
Safety Precautions --------------------------------------------------------------------------------- U-1
Environments Suitable for Using a SeaPerch ROV --------------------------------------- U-1
Piloting the SeaPerch ROV ----------------------------------------------------------------------U-2
Post-Run Cleaning and Maintenance of the ROV System ------------------------------ U-3
Appendix A –Troubleshooting Your SeaPerch ROV
Things to Try Before Re-Wiring the ROV or Changing ROV Parts ------------------- A-1
Solving Directional Control Problems ---------------------------------------------------- A-1
Solving ROV Operational Problems ------------------------------------------------------ A-2
Solving Thruster Operational Problems ------------------------------------------------- A-2
Appendix B –Optional Construction Hints
Guidance to Provide to Students as Needed to Simplify the Build ------------------- B-1


SeaPerch ROV Construction Manual –Version 2010-02
I-1
Introduction
SeaPerch ROV Program Overview
What is SeaPerch?
SeaPerch is an educational tool –a fun, hands-on learning activity and a
curriculum that can be enjoyed by a wide range of students, ranging from late
elementaryschool through high schooland even introductorycollege programs.
The curriculum is designed to meet many of the national learning standards
identified by the United StatesGovernment. Often applied at the middle school
(or junior high school) level, SeaPerch is challenging, creative, and gets kids
excited about science and technology. The SeaPerch program is sponsored
through the National Naval Responsibility for Naval Engineering (NNRNE)
Outreach effort, with the goal of helping to inspire the next generation of naval
architects and marine, ocean, and naval engineers.
A SeaPerch is an underwater robot known as a “remotely operated vehicle,” or
“ROV.”Students learn best by doing, and during the SeaPerch project, they will
completely assemble an inexpensive, yet functional ROV, test it, and then
operate it underwater. The experience will enable them to explore science and
technology both in the classroom and in a pool, or, for some, in natural marine
environments.
The ROVs are built from kits comprised of low-cost, easily-obtained components.
Students often work in small teams to assemble their vehicles, usually over a
period of several weeks. From the classroom activities during SeaPerch
construction through in-water application of the ROV, they will have
opportunities to learn about various subjects including mathematics, robotics,
biology, oceanography, physics, and history, as well as valuable problem
solving and teamwork skills.
The SeaPerch program is structured to provide free training to help teachers
more effectively lead students through the variety of interdisciplinary activities
involved. Within one project, a number of concepts requiredfor their grade level
can be efficiently addressed, with the further benefit of exposing the students to
additional concepts that may not otherwise be easily covered in their standard
curriculum. Mentors from government and industry are often available to support
and reinforce the lessons as well as to assist with the SeaPerch construction and
application activities in the classroom.

SeaPerch ROV Construction Manual –Version 2010-02
I-2
Program History
The SeaPerch Remotely Operated Vehicle (ROV) educational program was
inspired by the 1997 book, Build Your Own Underwater Robot and Other Wet
Projects (ISBN 0-9681610-6), by Harry Bohm and Vickie Jensen. In 1997, Dr.
Tom Consi introduced SeaPerch to the Ocean Engineering program at the
Massachusetts Institute of Technology (MIT), in order to interest more students
in majoring in Ocean Engineering. Realizing the potential of SeaPerch to reach
younger students, the MIT Sea Grant (MITSG) College Program created the
SeaPerch initiative in 2003, sponsored by the Office of Naval Research. Dr.
Chryssostomos Chryssostomidis, MITSG Director, and Brandy Wilbur,
Educational Coordinator, were responsible for the effort at MIT Sea Grant.
In late 2007, Office of Naval Research (ONR) tasked the Society of Naval
Architects and Marine Engineers (SNAME) to research ways of expanding and
enhancing the SeaPerch initiative as part of the ONR National Naval
Responsibility for Naval Engineering Outreach effort.
Original SeaPerch ROV Manual Development
The SeaPerch Construction Manual was originally developed by MITSG, which
modified the instructions for building a SeaPerch from those found in Build
Your Own Underwater Robot and Other Wet Projects so that the ROV would
be simpler and cheaper to build in the classroom. MITSG created a three-unit
manual with detailed, step-by-step instructions and a complete list of needed
components and tools.
The MITSG SeaPerch manual has been revised several times in recent years
as new vehicle components or updated assembly methods were implemented
for the program.
Updated Information in This Version of the SeaPerch Manual
Revised Standard SeaPerch Assembly Instructions
This 2010 manual revision builds upon the extensive work of the MITSG
developers by utilizing the experience gained through years of SeaPerch
program use by educators around the country, incorporating the latest
recommended construction techniques, and providing additional information to
help teachers and students build and use SeaPerch ROVs. While much of this
revision’s technical content is aligned with the instructions found in previous
versions, its revised graphics and content adjustments are designed to provide
additional detail for the more complex construction techniques and to facilitate
high-quality reproduction in either monochrome or color. The addition of sign-
off boxes for the construction steps will better enable students, teachers, and
classroom volunteers to monitor completion progress.

SeaPerch ROV Construction Manual –Version 2010-02
I-3
The following summarizes the significant changes from previous manuals:
Consolidation of safety information and added program background
information at the front of the manual, to better enable a discussion of all
safety aspects of the project during a classroom session early in the project,
Revised graphics to clarify electrical wiring and to show recommended
construction techniques,
Minor changes to some recommended construction methods to avoid
occasional assembly difficulties that have been identified through
experience in a variety of classroom programs,
Revised numbering for major assembly procedures and for the document’s
pages to enable easy future substitution of optional or enhancement
procedures for standard SeaPerch procedures,
Addition of separate manual sections for initial testing and ballasting the
ROV as well as for use and cleaning of the vehicle,
Addition of an appendix with troubleshooting hints,
Addition of a separate construction manual supplement document offering a
variety of proven construction options and enhancements, and
Replacement of the previous Unit 3, for the hand-wired control box, with a
new Unit 3 for a printed-circuit-board-based control box. The previous Unit
3 is still available as an option, included in the supplement.
Expanded Testing and Operating Information
Because proper ballasting and pre-deployment testing are essential for
successful in-water operation of SeaPerch ROVs, the instructions and other
information and suggestions for these activities are now in a separate,
expanded section of this manual entitled “Testing and Ballasting the ROV.”
In addition, operational recommendations, some helpful hints, application
ideas, and post-run vehicle cleaning instructions have been placed in a new,
final, manual section entitled “Using the SeaPerch ROV.”
Added Appendix Containing Troubleshooting Hints
When the initial ROV testing process identifies a problem, it is best for students
to be allowed to try to solve it. However, when help is needed, and before
taking drastic steps to change ROV parts or re-wire a circuit, ROV builders
should refer to the Appendix, “Troubleshooting Your SeaPerch ROV,” which
suggests solutions to common problems. This appendix is not necessarily
intended to be included in the student copies of the construction manual;
rather, it is provided for the teacher’s reference and for classroom use at the
teacher’s option.

SeaPerch ROV Construction Manual –Version 2010-02
I-4
Added Supplement for Construction Options and Enhancements
Occasional challenges in obtaining recommended components, special technical
requirements, and local budget constraints have inspired creativity and
resourcefulness amongSeaPerch program implementers, many of whom have
found it useful or necessary to identify alternatives for various aspects of their
ROVs’ construction. In order to provide such needed flexibility while still
maintaining a standardized set of assembly instructions that can be fielded
nationwide, the manual’s format has been updated to enable easy substitution of
proven and approved procedures to implement construction "options," in place of
corresponding standard procedures, and addition of new procedures for
construction “enhancements” to add capabilities to the ROV. These optional and
enhancement proceduresare contained in a separate document, “SeaPerch ROV
Construction Manual Supplement –Options and Enhancements –Version
2010-02,” which maybe downloaded from the *SeaPerch website. It contains a
number of alternate and added procedures that have been found to be useful to
improve ROV performance, simplify the build process, and/or lower costs.
The supplement's construction options result in relatively minor changes to the
SeaPerch ROV, such as implementing different propellermounting techniques,
alternate flotation, or a different type of switch. Itsconstruction enhancements add
capabilities beyond those of the standard SeaPerch vehicle. Examples are
addition of a stiffener for the bottom payload net, a payload capture net, ora front
accessory attachment fixture. The added procedures for installing the construction
enhancements may involve changes to the standard vehicle build instructions, so
some will also provide substitute manual pages in addition to the page orpages
with the added procedures for installing the enhancements. Some enhancements
are also grouped together with options due to the nature of the improvements.
Each option orenhancement section in the supplement includes specific
instructions for substituting the changed pages into the construction manual prior
to reproduction for student use, to provide a technically consistent manual for use
in the classroom. The supplement's added or replacement pages are designed
for use only with this version of the manual, not previous or later versions. Users
of the supplement should always verify that its version number matches that of the
construction manual before inserting any of its procedures into the manual.
More options and enhancements will likely be developed from time to time as
clever students and theirteachers continue to invent and demonstrate newways
to build SeaPerch ROVs. Byusingthe supplement approach and the newpage
numbering scheme, future new procedures can easily be added to the supplement
document and then to individual classroom manuals when needed, without
impacting the content of the standard build manual.
Future new procedures will need to go through a short demonstration and
approval process before being added to the mastermanual supplement document
that is maintained at the *SeaPerch website for downloading as needed.
* SeaPerchWebsite: www.seaperch.org

SeaPerch ROV Construction Manual –Version 2010-02
I-5
The SeaPerch Assembly Process
Three Individual Building Units
This manual contains three building units, for the vehicle frame, the thrusters,
and the control box. They may be used as a single manual, as assembled
here, or they can be removed from this manual and placed into the SeaPerch
classroom integration manual at the separate locations indicated therein. In
either case, the three unit manuals should always be used in order.
Unit 1 is a good confidence-builder for the students who have had little
experience working with tools, and it gets the project going quickly. They will
measure, cut, and drill pipe and fittings and then assemble the parts with rapid
results, as the work in Unit 1 provides a recognizable ROV after just a fewclass
periods.
Unit 2 then introduces basic wiring and soldering skills through the work with the
motors for the thrusters. These skills are important for them to have when
building the control box in Unit 3.
Finally, Unit 3 involves the students in more advanced wiring and soldering
activities and provides an opportunity for them to work with a variety of tools and
components used in electrical and electronic technologies.
Recording Progress
The checklist-style boxes next to each numbered step in the manual are
intended for the students to write their initials confirming proper completion of
each step as they progress through the project. Multiple sign-off boxes are
provided whenever a step needs to be repeated, such as during assembly of the
three thrusters. Keeping track in this way is important to avoid accidentally
skipping steps, but it also greatly helps the teacher and classroom volunteers (as
well as other team members, if working in teams), to know how far the student or
team has progressed in the building process.
Testing and Adjustments
The last steps in the SeaPerch ROV construction process are to conduct
some basic electrical tests, prior to connecting the battery, and performing
some simple vehicle checks and adjustments prior to its first operational use.
The initial testing in the classroom or lab should help in finding any lingering
wiring or thruster-related issues, and the checks recommended before
operational use should help to ensure a successful operational experience for
all students.

SeaPerch ROV Construction Manual –Version 2010-02
I-6
Tools and Materials
Each procedure in this manual identifies the needed components and tools
only generically, rather than giving specific descriptions or specifications for
each item. Detailed parts, tools, and materials lists are maintained as
separate documents for use in procuring the items needed to build the ROVs.
This approach allows these assembly instructions to remain applicable even
when the specifics of individual components change, such as when a slightly
different “12-volt DC motor” is used or when a similar component must be
substituted due to availability or cost issues.
SeaPerch ROVs are often built by a team of two or three students. For
efficiency during the build process, each team should have its own set of
basic tools, including a screwdriver, flush-type wire cutter, needle-nose pliers,
wire stripper, and soldering iron. Tools such as standard pliers, cable jacket
strippers, pipe cutters, electric drills, and others that are not used on a daily
basis can be easily shared among a number of teams. A key aspect of
planning for classroom tools is to arrange to obtain enough to ensure that
students are not delayed during the build process waiting for availability of
needed tools.
Manual Printing Considerations
Please note that this manual is set up for double-sided (duplex) printing, with a
number of extra blank pages inserted to force all procedures to start on the front
side of a sheet. Besides some savings in paper,this approach allows any
individualprocedure from the supplement (ora future updated version of a
standard procedure)to be swapped into the manual asneeded without affecting
an adjacent procedure or the overall page numbering. To further conserve paper,
the Introduction section of the manual may be left out of the student copies;
however, the Safety Overview should always be included.
The intent, in providing the manual in double-sided format, is to enable easy
creation of double-sided student manuals, either by directly printing copies on a
duplex printer or byprintinga single-sided or double-sided master document to
use to reproduce student manuals on a two-sided photocopier (or bya production
printing service).
If single-sided reproduction is desired, simplyprint the manual on a single-sided
printer, pull out the blank sheets, and then use that master document to reproduce
the single-sided student manuals using a photocopier (or printing service).
Important: If you will be inserting any of the alternate procedures provided
in the supplement, you must print the reproduction master manual SINGLE-
SIDED, including the blank pages. Then it can be reproduced either double-
sided or single-sided using a photocopier as described above after inserting the
optional or enhancement procedures from the supplement.

SeaPerch ROV Construction Manual –Version 2010-02
S-1
Figure S-1. Wax Squirted onto a Student’s
Safety Glasses
Safety Overview
Protective Eyewear
Students, teachers, and classroom helpers should wear protective eyewear
at all times when building SeaPerch ROVs. Although some procedures do
not usually involve significant eye hazards, the students often work close to
others, who at any time may be performing more potentially hazardous
steps. Activities such as soldering, cutting, drilling, applying adhesives, and
potting thrusters can easily cause materials or parts of broken tools to fly
significant distances. Below are some examples.
Soldering: Solder contains rosin flux in its core to help clean the
electrical connections and help the solder to adhere to the metal
properly. Small amounts of flux can occasionally pop out of the
melting solder and sometimes travel far enough to reach the eye of the
person soldering, or even someone nearby. Protective eyewear is
essential for everyone in the area.
Potting Thrusters with Wax: Melting wax tends to stay in the melting
container or where it is poured. However, there is one step in the
potting process that can occasionally cause wax to fly a significant
distance, often reaching a ceiling, wall, or floor, and it therefore
presents a risk for nearby eyes (as well as skin and clothing). This
step is the one in which the lid is pushed onto the thruster housing. If
performed too quickly, it can result in wax squirting out of the hole in
the lid (where the
wires pass through).
Quick, hard pressing
of the lid is common,
as students may
excitedly put the lid in
place before the wax
hardens or spills.
Figure S-1 shows an
actual result (held by
a forever-committed
safety-glasses
wearer).

SeaPerchROV Construction Manual –Version 2010-02
S-2
Materials Handing Safety
Builders of SeaPerch ROVs should be made aware of a few potential
hazards related to some of the materials used. The following activities
require careful handling of materials.
Soldering: Many common types of solder contain lead along with tin
and sometimes other metals. Solder should never be placed in one’s
mouth, and hands should always be washed after working with solder.
Breathing the smoke from the melting flux (from inside the solder)
should be avoided.
Potting Wax: Bowl ring wax is made from “petrolatum” –basically the
same type of material that, when more refined, becomes common
petroleum jelly. It is safe to handle when cooled, but quite sticky, and
difficult to remove if it solidifieson clothing. Hands should be washed with
warm water and soap after handling the wax. Obviously, it must not be
ingested. Wearing eye protection, as noted earlier, is essential.
Adhesives: Adhesives, particularly two-part epoxy, “super glue” type
adhesives, and PVC primer and cement (some versions of SeaPerch
ROVs don't use all of these types) can present hazards to skin as well
as eyes. Wearing eye protection and gloves is recommended when
working with any adhesives, and hands should always be washed after
working with such materials.
Protection of Our Environment: All waste or scrap materials from the
SeaPerch ROV construction process should be disposed of properly, in
accordance with manufacturers’ recommendations and school policies.
Recycling of usable excess materials and disassembled vehicles is
encouraged for environmental protection and cost avoidance
considerations. Most of the ROV components can be re-used in
building future vehicles or as spare parts.
Safety While Using Hand Tools
Hand tools such as screwdrivers, pliers, and wire cutters can be used safely
when operated as intended. Examples of activities to avoid are below.
Screwdrivers: Screwdrivers should not be used to pry or make holes.
Care should be exercised while inserting or removing screws to avoid
having the screwdriver tip slip off of the screw head and poke into a
body part or damage a table top. The size of the screwdriver tip should
be appropriate for the size of the screw.

SeaPerchROV Construction Manual –Version 2010-02
S-3
Wire Cutters: Nothing should be cut with small wire cutters other than
copper wire or plastic tie wraps. Never cut pipe or metal fasteners,
which could ruin the cutting edges. Be careful when handling wire
cutters to avoid being cut or poked by their sharp cutting edges or tips.
Needle-Nose Pliers: Small, thin, needle-nose pliers should be used
only to help place wires onto motor terminals (or switch terminals, for
some options), as their jaws can bend or break if used for tightening tie
wraps or any prying activity. Large needle-nose pliers or standard club-
nose pliers are better for tightening tie wraps. Needle-nose pliers
should also not be used for tightening nuts, as the jaws are not parallel
like the edges of a nut, so they can easily slip off. Use club-nose pliers
or a small wrench instead to tighten the nuts on switches.
PVC Pipe Cutters: The blades on typical PVC pipe cutters can be
damaged easily if used to cut anything except PVC pipe, or if used
incorrectly. When squeezing the tool to cut pipe, work slowly so that the
blade has time to move through the material. Do not twist the tool, and
always keep fingers away from the sharp blade. Store the tool in its
closed position.
Safety While Drilling
Drilling is perhaps the most potentially hazardous activity involved in the
SeaPerch project. Some important safety considerations are as follows.
Get Permission to Use Power Tools: Always get the teacher’s
permission and adult supervision before using a drill or other power tool.
Installing and Removing Drill Bits: Install and remove drill bits from
the chuck of a drill motor or drill press manually, not by energizing the
drill motor to spin the chuck closed. Make sure that the bit is inserted
straight into the chuck and that it is tight in the chuck before use; spin it
briefly to check before drilling.
Holding Objects Being Drilled: Never try to hold an object being
drilled in your hand alone. Instead, it should be always be either held in
a vise (or clamp), firmly held down by hand onto a solid surface (if that
surface will not be subjected to possible damage during the drilling
process), or attached firmly to an object that can be safely held by hand.
This keeps the object steady, prevents it from spinning and hurting your
hand if the drill bit should bind, and keeps your fingers away from the bit
while drilling. Never place a body part in the path of a drill bit. Always
think about what is behind the object being drilled (particularly body
parts and tabletops!). If using a drill press, make sure that the object is
held firmly and fingers are not near the drill bit.

SeaPerchROV Construction Manual –Version 2010-02
S-4
Safety While Soldering
Soldering Uses High Heat: All soldering involves a very hot soldering
iron as well as temporarily-hot electrical connections, which take a few
moments to cool after soldering. Do not touch the tip area of a soldering
iron, even when it appears to be off or unplugged, as it does not look
different when it is hot compared to when it is cold, and it can remain hot
for 10 minutes or more after use. Connections should be allowed to cool
after soldering before they are moved or touched. As noted earlier,
always wear eye protection, even when just in the same area as
someone who is soldering.
Keep the Soldering Iron in Its Holder When Not in Use: Great care
should be taken to place the soldering iron back into its holder whenever
it is not in use for soldering. Never just set it down on a tabletop, where it
could burn anything it touches.
Safety While Potting Motors for Thrusters
SeaPerch ROV thrusters are assembled by potting small electric motors in
wax. The following safety issues should be reviewed with everyone involved in
the potting process.
Melting Wax: The standard SeaPerch wax-melting approach is to warm
“toilet bowl ring” wax in a heated pot or a metal container placed in a hot
water bath, usually employing an electric skillet to heat the water (and
wax). It is important to always monitor the temperature of the wax or use
a water bath (and NOT let all of the water evaporate - keep adding water
to maintain it at about ½” to 1” deep). Otherwise, the wax can get
EXTREMELY hot, even hot enough to melt the plastic thruster housings.
Fortunately, bowl ring wax has a relatively low melting temperature, but it
must still be heated to about 150 degrees Fahrenheit (F) for proper
pouring. Although its flash point is over 500 degrees F, the
manufacturers usually recommend not exceeding 200 degrees F, so you
should try to keep the waxat about 180 degrees F or below (using a
thermometer is best, as temperature control knob markings may be
inaccurate). Obviously, if the wax is allowed to get too hot, skin burns are
possible; more sensitive skin or large quantities of hot wax may cause
minor burns. In case of a burn, quickly rinse the area with plenty of cold
water and seek medical attention. Care should be taken to prevent
getting the hot wax onto skin or clothing. Wearing a protective smock or
apron and gloves is recommended. Pour the wax slowly and carefully to
avoid spills and potential burns.

SeaPerchROV Construction Manual –Version 2010-02
S-5
Watch Out for Squirting Wax: During the final step of thruster potting,
when the lid is placed onto the thruster housing, melted wax can squirt
out of the small hole in the lid where the wires pass through. If the lid is
pressed quickly into place, wax can even squirt as high as the ceiling or
onto nearby walls and people. Placing a paper towel over the lid and
pressing slowly is recommended to avoid the wax-squirting problem.
Protect nearby walls and floor areas with paper or tarps. Obviously,
everyone in the area should be wearing eye protection.
Safety With Electricity and Batteries
The low-voltage (12 volts, direct current (DC)) battery power source used with
SeaPerch ROVs is relatively safe and well-proven in students’ hands.
However, they should be cautioned about potential problems from short-
circuits as well as electrical safety issues in general.
Battery Short-Circuit Hazard: Although the battery can be used quite
safely when it is connected properly to the ROV, it can be damaged,
cause wires to melt, or even start a fire if its positive and negative
terminals are connected directly together. That is called a “short circuit,”
and it will allow the battery to essentially discharge all of its stored
energy at once. Besides resulting in sparks when such an improper
connection is made, the wire or metal object shorting across the terminal
will immediately become extremely hot and may even melt. That could
obviously cause burns or ignite an object in contact with the shorting
material. Never connect anything between the battery terminals except
an appropriate electrical “load” such as the ROV circuitry, through its
power cord (with a fuse in the circuit). Be careful to keep the battery
terminals covered or away from all wires and metal objects when not in
use. Do not connect the ROV circuitry or components to the battery
until instructed to do so.
Avoid Creating Other Short Circuits During ROV Construction:
When wiring circuits or conducting tests, take care to avoid unintended
connections or accidental short circuits. While handling partially or fully
completed circuits, ensure that wires do not move and touch together
where they should not. Always check the circuitry carefully and conduct
the recommended tests before connecting the battery.
General Electrical Safety: When working with electrical circuits with
power applied, do not allow any body parts to “become part of the
circuit.” In other words, do not touch both the positive and negative
terminals of a battery with your hands or touch a battery terminal with
one hand and part of the circuitry with the other. Make sure that all
switches are in their off positions while connecting or disconnecting the
battery, and connect just one power wire at a time.

1.0-1
SeaPerch Program Office
TheSocietyofNavalArchitectsandMarineEngineers
601PavoniaAvenue
JerseyCity,NewJersey07306
Version 2010-02
Unit 1
SeaPerch
Remotely Operated Vehicle (ROV)
Assembly of Subsystem One
The Vehicle Frame
December 2010
The SeaPerch educational program was created by Harry
Bohm and Vickie Jensen and published in their 1997 book
"Build Your Own Underwater Robot and Other Wet
Projects." The initial curriculum was developed by the
Massachusetts Institute of Technology, and this version of
the SeaPerch Construction Manual was provided under the
Office of Naval Research National Naval Responsibility for
Naval Engineering (NNRNE) Outreach initiative.

Other manuals for ROV
1
Table of contents
Other SeaPerch Educational Equipment manuals


Popular Educational Equipment manuals by other brands


Quanser
Quanser 6 DOF Hexapod Laboratory guide

Surefire
Surefire Flying Model Rocket Kit How to use

ACROME
ACROME myCONTROL STEWART PRO user manual

SmartMan
SmartMan Baby Manikin manual

Nasco
Nasco Life/form LF03840U instruction manual

Pitsco Education
Pitsco Education BUILDERSPACES SPACEPORT Assembly instructions