Adams ALPHA User manual

MANUAL
HANDBUCH
ALPHA VIBRAPHONE
APEX FRAME
ALPHA VIBRAPHON
APEX FRAME
4ZZZA000VB130

2
Thank you for choosing a new Adams Musical Instrument. We hope that you will
gain pleasure and enjoyment from your new instrument, and we are condent
that it will bring you many years of musical satisfaction. All Adams Musical
Instruments are cleverly designed to the smallest detail, and are constructed
with care and the highest levels of craftsmanship in Thorn, Holland.
Adams Musical Instruments are the choice of world-class soloists, orchestras,
educators, and composers because of the rm’s continued dedication to
producing the nest sounding instruments possible through innovation and
superior craftsmanship. Andre Adams, the company’s founder, began repairing
brass instruments in 1970, and gained experience as an instrument maker with
many well-known rms in Europe. Music was his hobby, engineering his passion.
The importance of scientic innovation in establishing production quality and
continuity, along with important relationships with top professional and amateur
musicians, has led the company to emerge as one of the world’s largest
percussion instrument manufacturers. Adams’ corporate vision is passion for
music: creating instruments by musicians, for musicians. Experience Adams—
Experience The Sound of Quality.
Vielen Dank dass Sie sich für ein neues Musikinstrumente von Adams
entschieden haben! Wir hoffen, dass Sie viel Vergnügen und Freude an Ihrem
neuen Musikinstrument haben werden. Doch wir können Ihnen jetzt schon
versprechen, dass Ihnen Ihr Instrument viele Jahre lang höchsten musikalischen
Klanggenuss bescheren wird! Alle Musikinstrumente von Adams wurden
sorgfältig, bis ins kleinste Detail entworfen, und werden auf höchstem
handwerklichem Niveau im niederländischen Thorn gefertigt.
Solisten, Komponisten, Orchester und Musikschulen von Weltrang entscheiden
sich für Musikinstrumente von Adams, da die Firma schon seit jeher nur die
bestklingendsten Instrumente, mit innovativen Verfahren und handwerklichem
Geschick produziert. 1970 begann Gründer André Adams mit der Reparatur von
Blasinstrumenten und erweiterte bei vielen renommierten Instrumentenbauern
Europas seine Erfahrungen als Instrumentenmacher. Wenn auch Musik schon
immer das Hobby von André Adams war, so ist die Konstruktion von
Musikinstrumenten seine Leidenschaft. Die Bedeutung, die Adams neben seinen
guten Kontakten zu Pro- und Amateurmusikern der Spitzenklasse,sowie den
technisch-wissenschaftlichen Innovationen als wesentlichen Beitrag zu einer
kontinuierlichen Produktqualität beimaß, ließen das Unternehmen zu einem der
weltgrößten Schlaginstrumentenhersteller werden. Die Unternehmensvision von
Adams lautet schlicht und einfach: Leidenschaft für Musik, sowie das Motto:
Musikinstrumente, die von Musikern für Musiker geschaffen werden! Erleben Sie
ein hochqualitatives Klangerlebnis – Erleben Sie Adams!
Nomenclature
Packing Contents 3.0 and 3.5
Assembly 3.0 and 3.5
Packing Contents 4.0
Assembly 4.0
Use and Care
Specications
Accessories
Warranty
Verzeichnis
Verpackungsinhalt 3.0 und 3.5
Zusammenbau 3.0 und 3.5
Verpackungsinhalt 4.0
Zusammenbau 4.0
Verwendung und Pege
Spezikationen
Zubehör
Garantie
3
4
6
18
20
25
26
27
28
Scan this QR code to check for
the latest version of this
manual, or visit:
www.adams.nl/manuals/
Scannen Sie diesen QR-Code
ein, um die neueste Ausgabe
dieses Handbuchs zu erhalten.
Oder besuchen Sie:
www.adams.nl/manuals/
PREFACE
Vorwort
CONTENTS
Inhalt
3
4
6
18
20
25
26
27
28
3
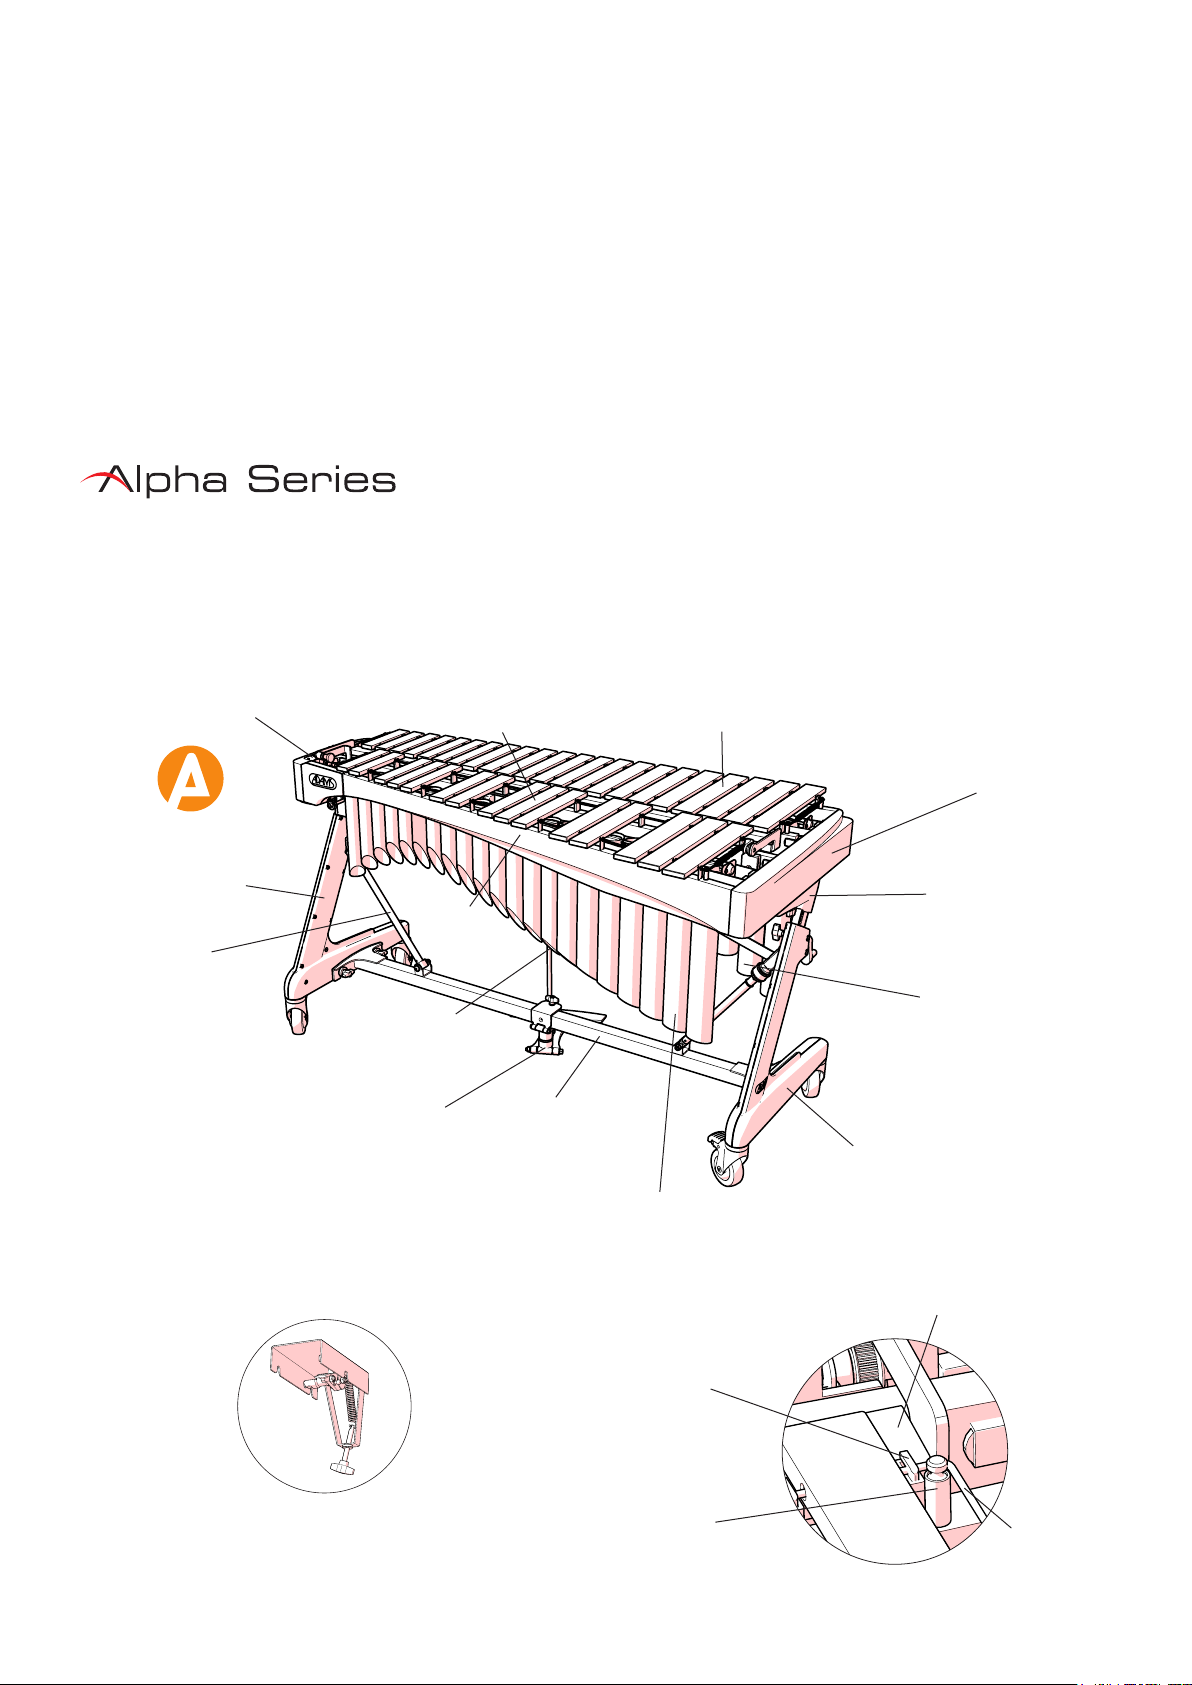
NOMENCLATURE
Nomenklatur
Vibraphone Alpha 3.0, 3.5 and 4.0
VAWA30 and VAWA40 are used for illustrative purposes in this manual.
VAWA35 will differ in appearance from the illustrations, but the assembly
process, use, and care are the same.
Vibraphon Alpha 3.0, 3.5 und 4.0
VAWA30 und VAWA40 werden nur zu Illustrationszwecken in diesem Manual
verwendet. Die Illustrationen entsprechen den VAWA35 nicht, aber das
Montageverfahren, der Gebrauch und die Pege sind dasselbe.
Small End Piece
Schmales Rahmenendstück
Natural Resonators
Ganzton-Resonatoren
Accidental Resonators
Halbton-Resonatoren
High End Side Piece
Höhes Seitenteil Gestell
Connection Rod
Querstange
Shore Brace
Stützhalterungen
Height Adjusting Bracket
Höhenverstellstrebe
Rail
Holm
Large End Piece
Breites Rahmenendstück
Natural Tone Bars
Ganzton-Klangplatten
Accidental Tone Bars
Halbton-Klangplatten
Bar Support
Klangplatten-Halterung
Corner Pin
Eckstift Cord
Schnur
Low End Side Piece
Tiefes Seitenteil Gestell
Dampening Bar
Dämpfungsleiste
Dampening Mechanism - 3.0 and 3.5
Dämpfungsmechanismus - 3.0 und 3.5
Pedal
Pedal
Pedal Pull Rod
Pedal Zugstange

4
Rail 1
Holm 1
Rail 2
Holm 2
Rail 3
Holm 3
Rail 4
Holm 4
Natural Tone Bars
Ganzton-Klangplatten
Accidental Tone Bars
Halbton-Klangplatten
Natural Resonators
Ganzton-Resonatoren
Small End Piece / Motor Control Panel
Schmales Rahmenendstück / Motor Control Panel
Dampening Mechanism
Dämpfungsmechanismus
Dampening Bar
Dämpfungsleiste
Pedal
Pedal
Threaded Connection Piece
Gewindestützen
Conrmation of packing contents
Vibraphone Alpha 3.0 and 3.5
The cartons of your new instrument contain the components
pictured below.
Überprüfung des Verpackungsinhalts
Vibraphone Alpha 3.0 und 3.5
Die Verpackung Ihres neuen Musikinstruments muss die
untenstehend abgebildeten Komponenten enthalten.
Accidental Resonators
Halbton-Resonatoren
Pedal Pull Rod
Pedal Zugstange
Large End Piece
Breites Rahmenendstück
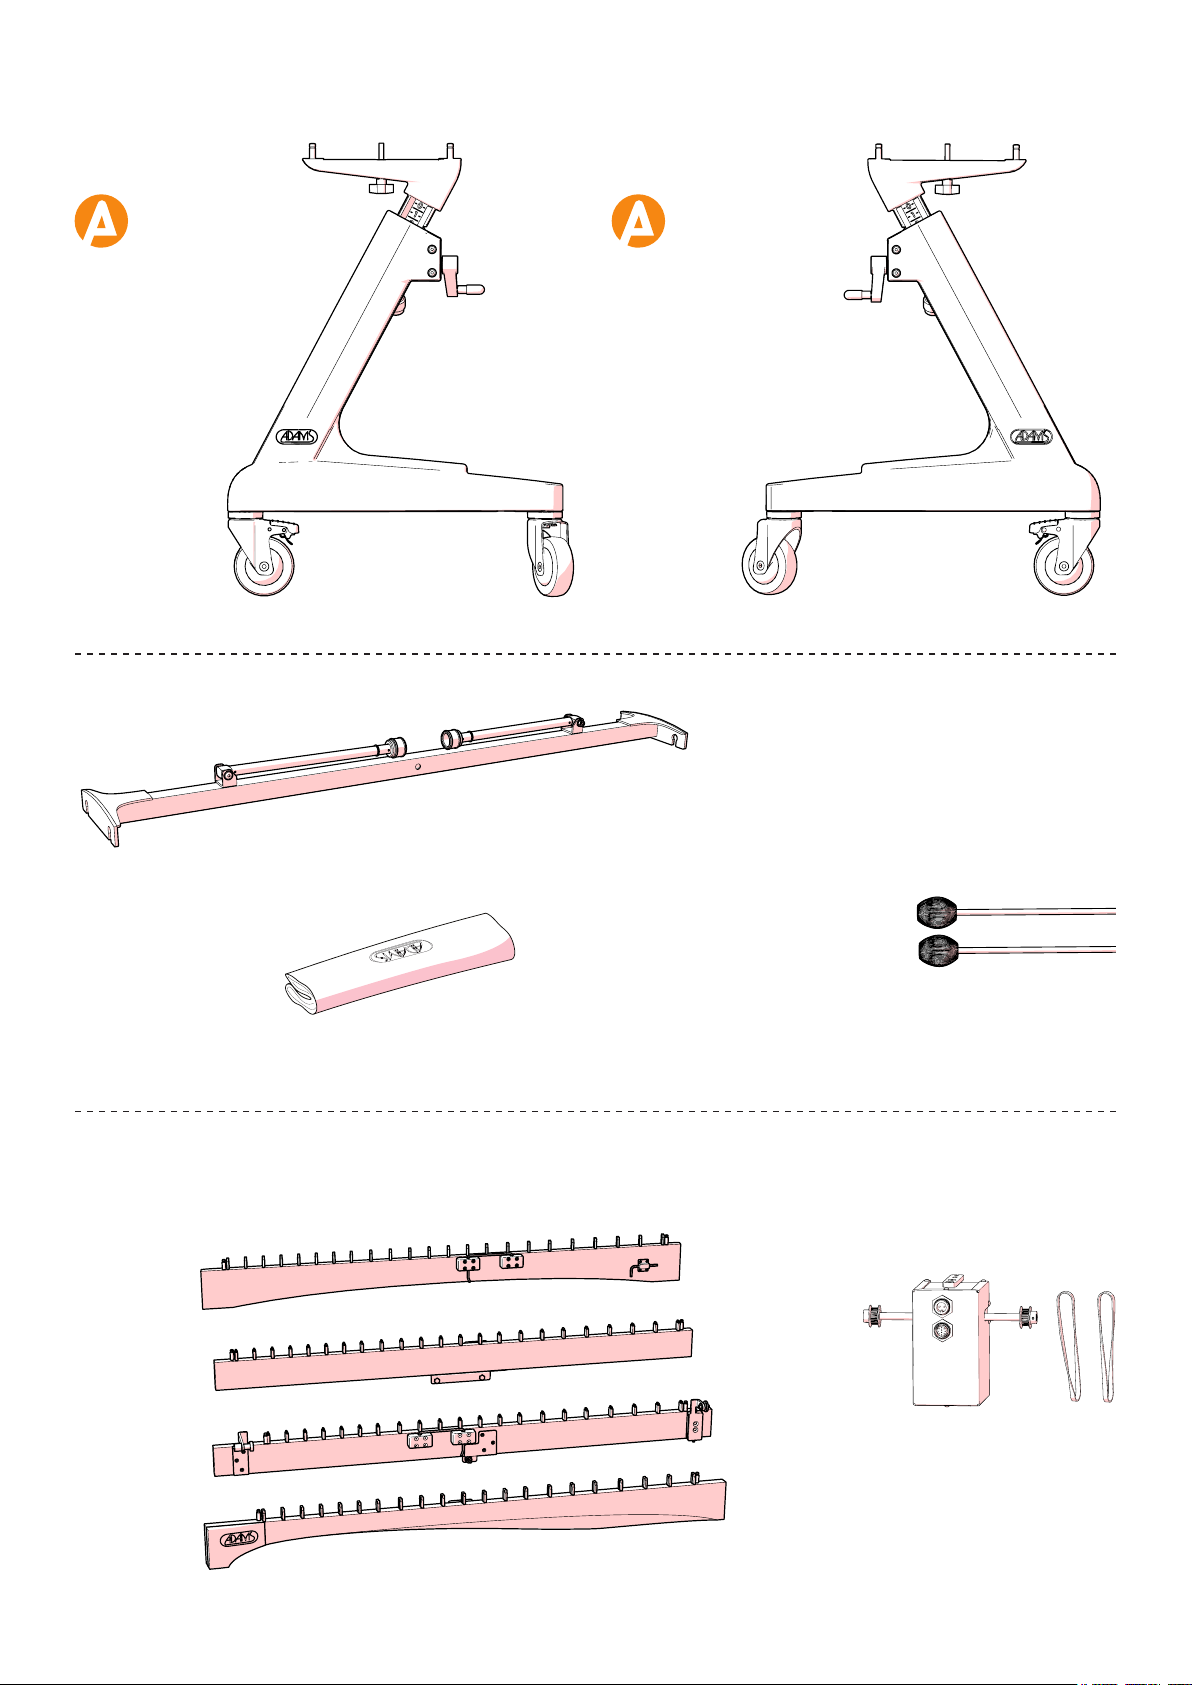
5
Rail 1
Holm 1
Rail 2
Holm 2
Rail 3
Holm 3
Rail 4
Holm 4
High End Side Piece
Höhes Seitenteil Gestell
Low End Side Piece
Tiefes Seitenteil Gestell
Motor / Timing belts and Adapter Kit
Motor / Zahnriemen und Adapter Kit
Cover
Hülle
Mallets for Vibraphone Instruments
Schlägel für Vibraphon Instrumente
Connection Rod
Querstange
6
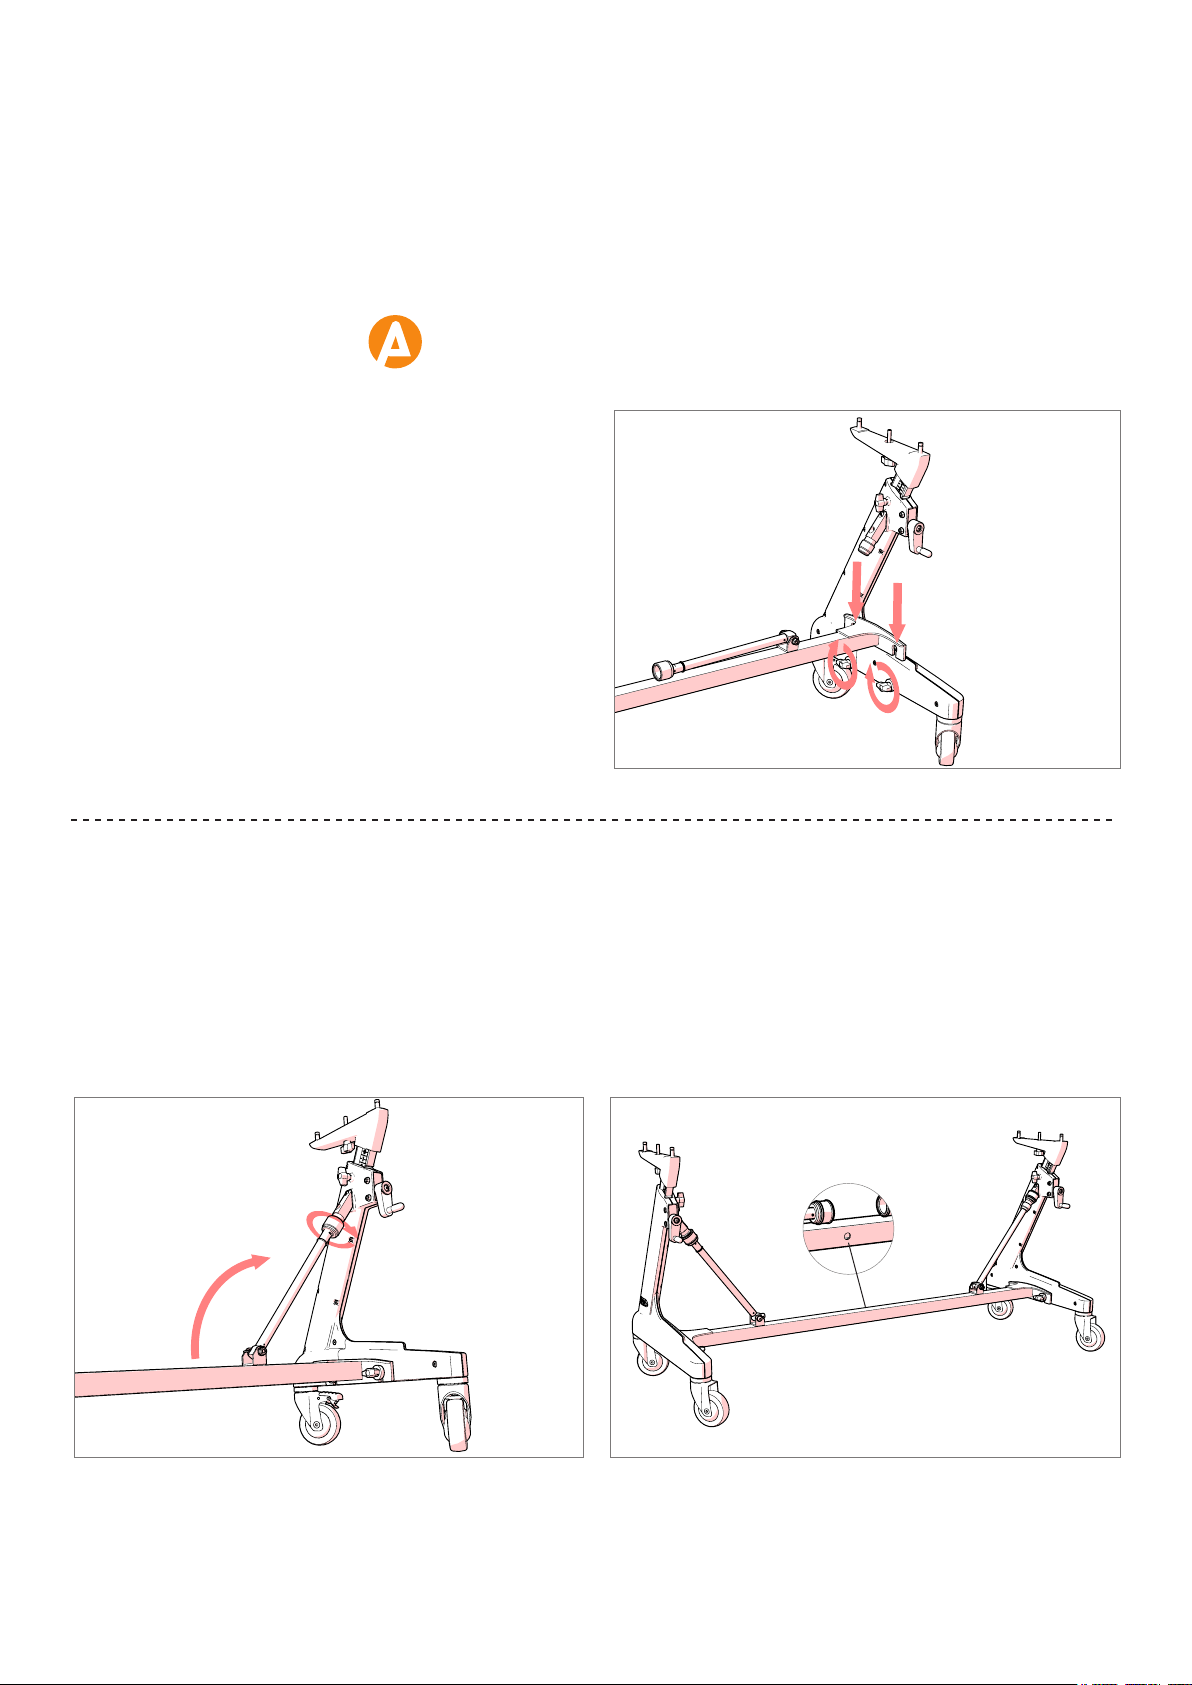
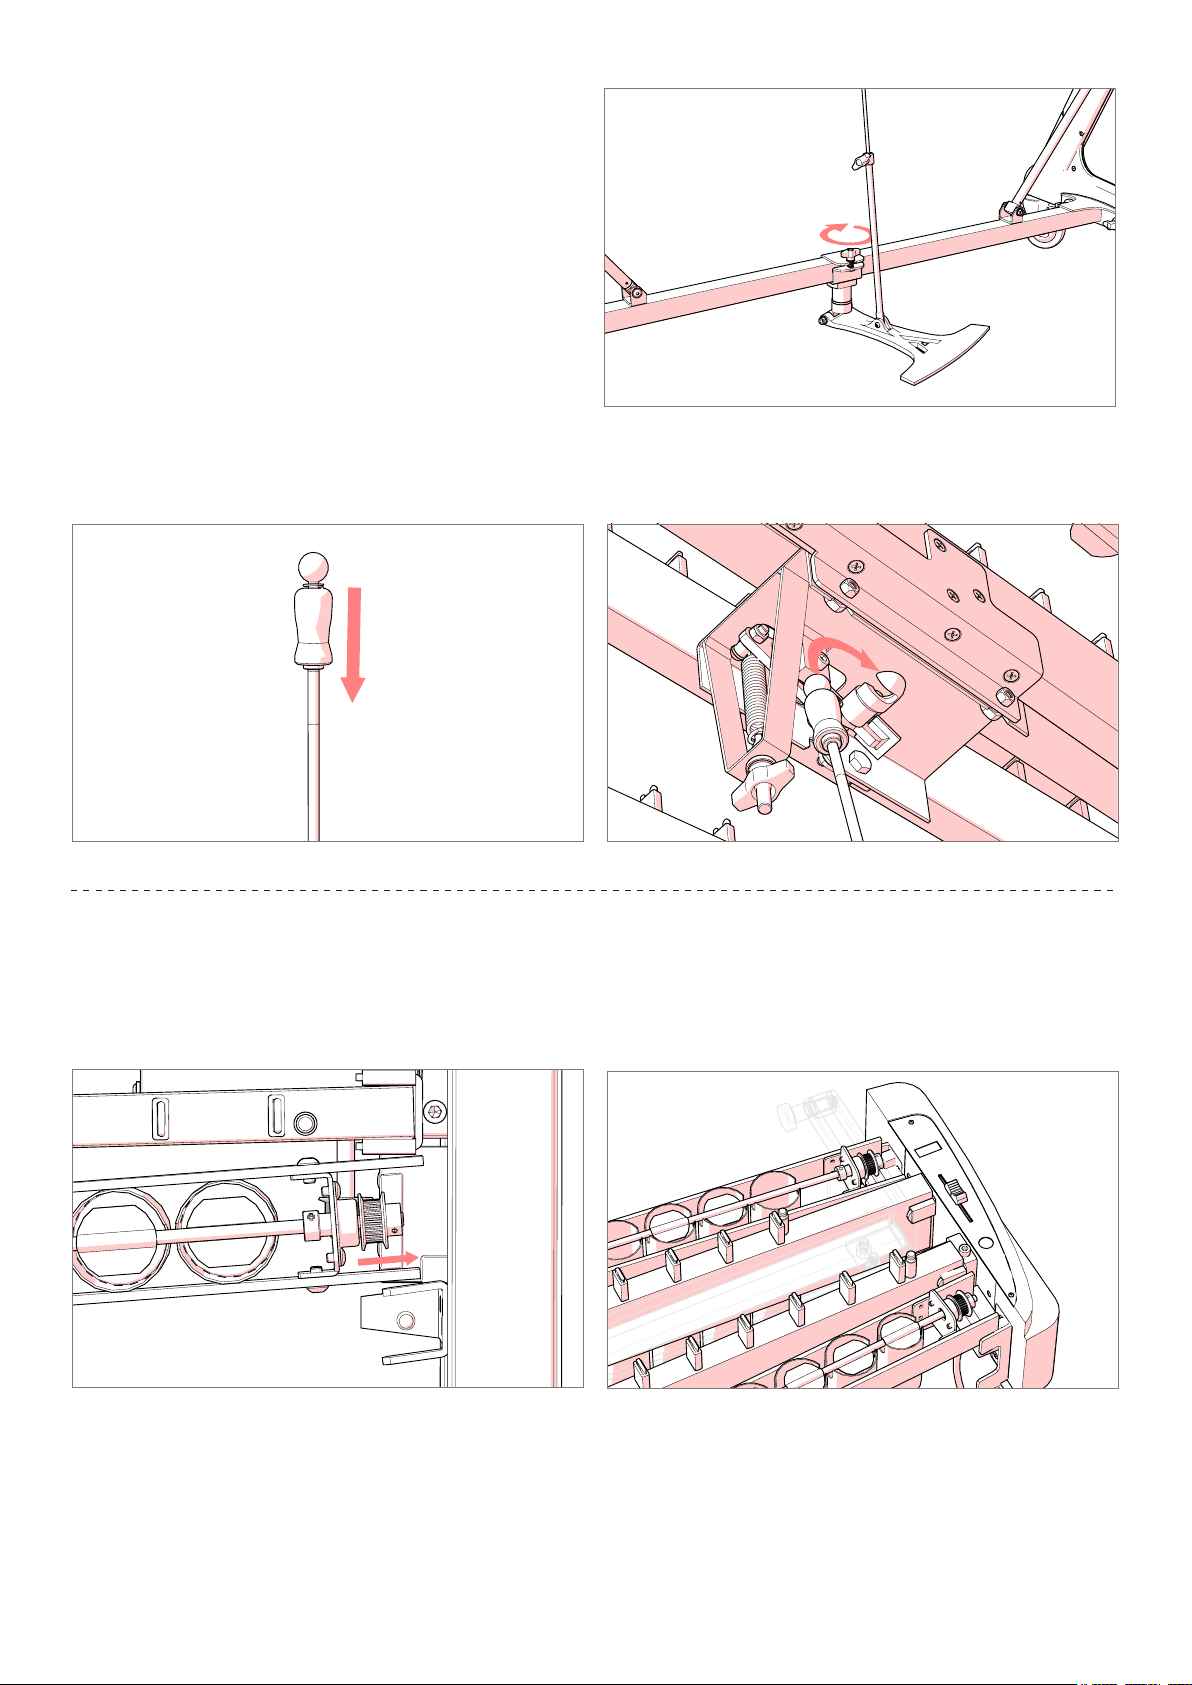
1.1
Attach the connection rod to the side pieces. Release the wing
screws and then insert the end of the rod between the washers
and the side piece. Tighten all wingscrews.
Befestigen Sie die Verbindungsstange an den Seitenteilen.
Lassen Sie das Ende der Stange zwischen die Unterlegscheibe
und das Seitenteil ein-fallen. Ziehen Sie alle Flügelschrauben
an.
Assemble Apex Frame
Das Apex Gestell montieren
1
ASSEMBLY AND ADJUSTMENT 3.0 AND 3.5
Zusammenbau und Instrumentenstimmung 3.0 und 3.5
1.2
Attach the integrated shore braces to the side pieces. Rotate the shore into position and tighten the screw tting.
Befestigen Sie die integrierte Stützhalterung an den Seitenteilen. Bringen Sie die Stützhalterung in die richtige Position und ziehen
Sie die Verschraubung fest.
The receiving hole in the connection rod faces the position of the audience.
Das Aufnahmeloch in der Querstange muss in Richtung Spielerposition weisen.
7
2.1
Attach motor to small end piece. Secure in place with thumb
screw.
Befestigen Sie den Motor am schmalen Rahmenendstück und
sichern Sie ihn mit der Rändelschraube.
2.2
Install large and small end pieces.
Montieren Sie das breite und das schmale Rahmenendstück.
Assemble Upper part
Montieren Sie das oberes Teil
2
2.3
Install rails 2 and 3.
Montieren Sie Holm 2 und 3.
2.4
Install dampener mechanism. Attach connection piece to
dampening lever. Slide the dampening mechanism onto the
mounting bolts on the rails.
Montieren Sie den Dämpfungsmechanismus. Befestigen Sie das
Verbindungsstück an dem Dämpfungshebel. Schieben Sie den
Dämpfungsmechanismus auf die Befestigungsschrauben an den
Holmen.
8
2.5
Install pedal: Attach the pedal mechanism to the connection rod
with the clamp. Insert the pedal rod into the holder.
Das Pedal installieren: Befestigen Sie mit der Klammer den
Pedalmechanismus an die Querstange. Führen Sie die
Pedalstange in die Halterung ein.
2.6
Install resonators on end piece supports.
Montieren Sie die Resonatoren an den Rahmenendstück-
Halterungen.
Attach pedal rod to dampening mechanism.
Befestigen Sie die Pedalstange an dem Dämpfungsmechanismus.
9
2.8
Install dampener bar. Attach dampening mechanism to dampener bar with connection piece.
Montieren Sie die Dämpfungsleiste. Befestigen Sie den Dämpfungsmechanismus mit dem Verbindungsstück an der
Dämpfungsleiste.
2.7
Install rails 1 and 4 and connect all rail spacers.
Montieren Sie Holm 1 sowie Holm 4 und verbinden Sie diese mit den Holme-Abstandshaltern.

10
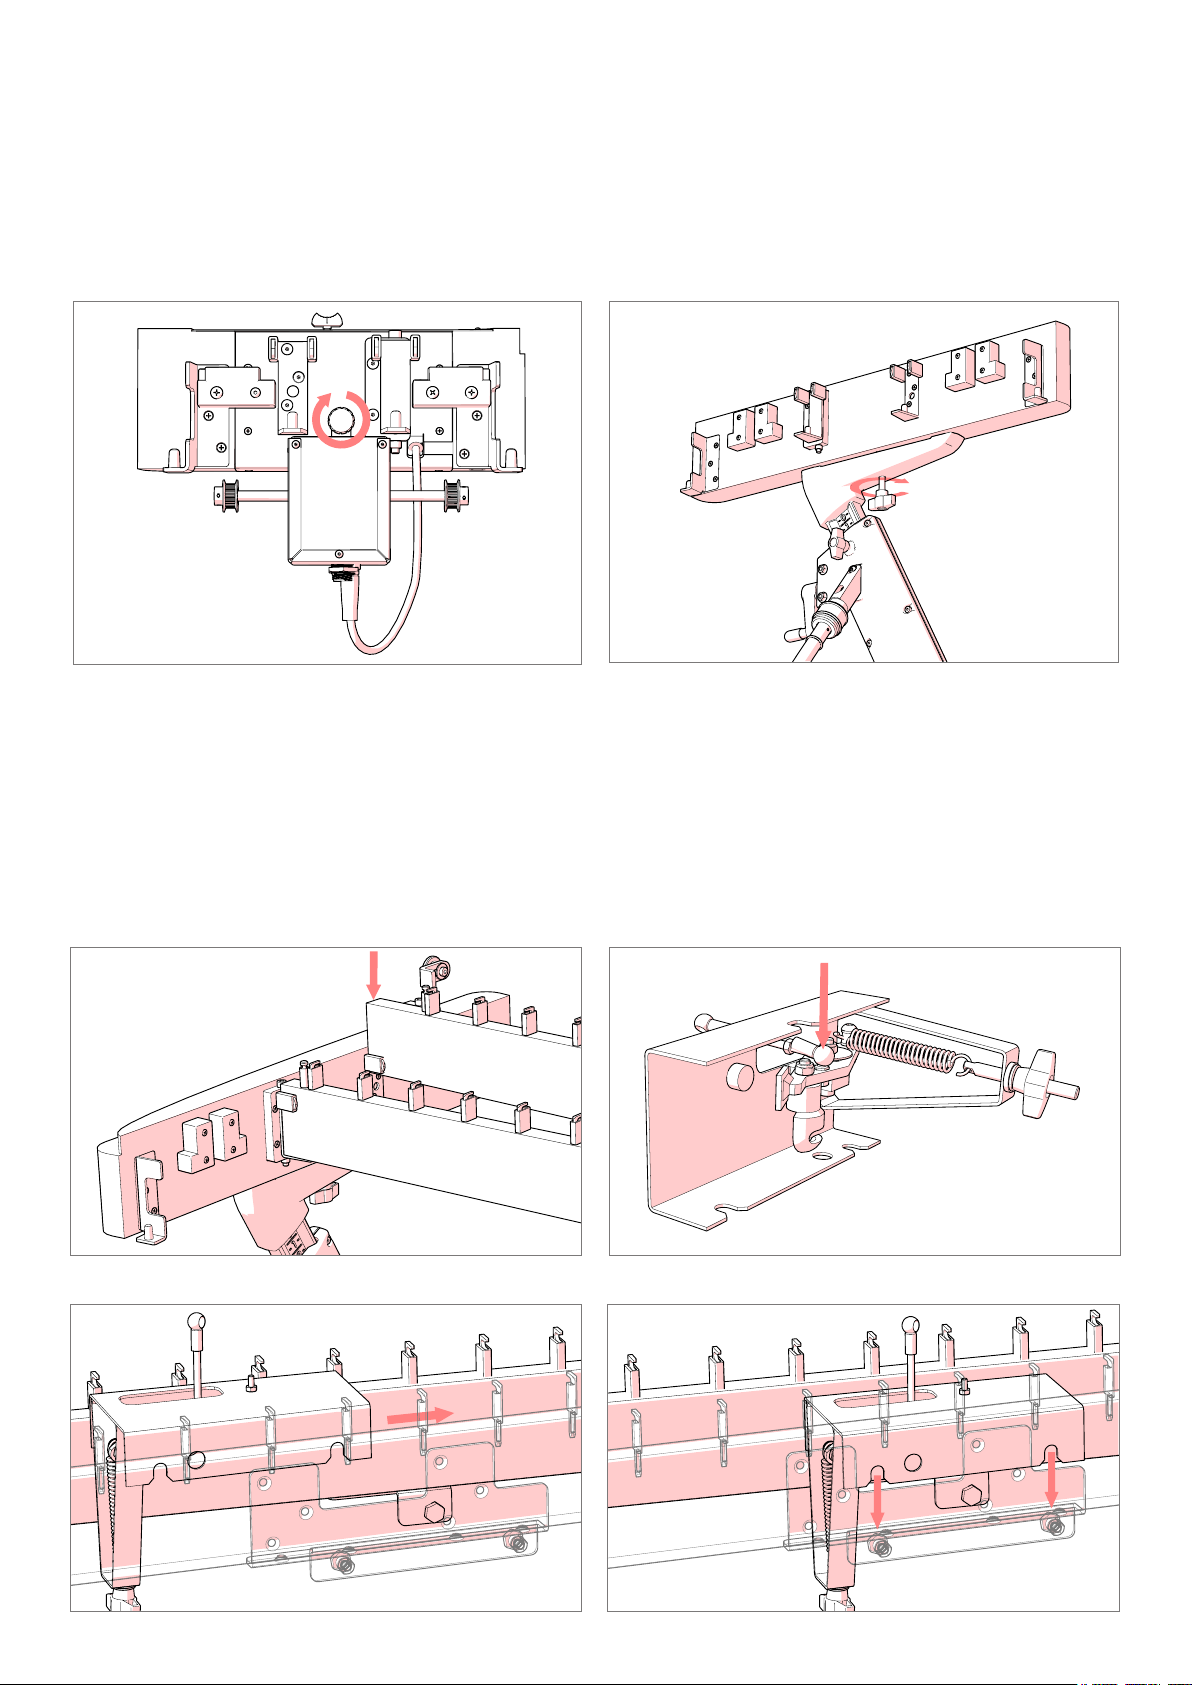
Connect motor drive and power.
Der Motorantrieb mit dem Strom verbinden.
3
2.9
Adjust pedal position: Loosen wing screw, adjust position,
and secure in place with wing screw.
Die Pedal Position einstellen: Lösen Sie die Flügelschraube,
passen Sie die Position an und drehen Sie die
Flügelschraube wieder fest.
2.10
Adjust pedal tension: Use the wing screw under the dampener mechanism to adjust the resistance in the pedal pressure. The spring
requires a minimum tension to function correctly. If there is not enough tension in the spring, the dampener bar will not apply
enough pressure against the bars. The pedal tension must be set before adjusting the dampener bar in Step 4.
Die Pedal Spannung einstellen: Verwenden Sie die Flügelschraube unter dem Dämpfungsmechanismus zur Einstellung des
Widerstands im Pedaldruck. Die Feder erfordert ein Minimum an Spannung für ein ordnungsgemäßes Funktionieren. Wenn die
Spannung nicht reicht, hat die Dämpfungsleiste zu wenig Druck gegen die Klangplatten. Die Pedal Spannung muss vor Einstellung
der Dämpfungsleiste in Schritt 4 eingestellt werden.
3.1
Attach timing belts to motor and fans. The belts must twist in
the same direction so that the fans turn in the same direction.
If necessary, lift the axle to place the belts in position.
Verbinden Sie die Zahnriemen mit dem Motor und den
Vibratowellen. Die Riemen müssen in gleicher Richtung
verdreht werden, um einen Gleichlauf der Vibratowellen zu
erhalten. Wenn nötig, heben Sie die Achse etwas an, um die
Riemen in Stellung zu bringen.

11
3.3
Connect control panel to the motor.
Verbinden Sie das Motor Control Panel mit dem Motor.
3.5
Calibrate motor electronics: For best results, calibrate the motor directly after connecting to power.
Kalibrieren des Motors: Für die beste Ergebnisse, kalibrieren Sie den Motor direkt nach Anschluss auf das Netz.
• Hold the power button down. When the display reads "CAL," release the power button.
• Halten Sie den Startknopf solange gedrückt, bis “CAL” auf dem Display erscheint. Danach lösen Sie den Knopf.
• The motor will run from slow to fast, eventually reaching maximum speed. When the motor reaches maximum speed, the motor
will stop and the display will return to the RPM value of the position of the slider. This process can take up to one minute to
complete.
• Der Motor läuft nun immer schneller und stoppt erst, wenn er das Maximum seiner Geschwindigkeit erreicht hat. Die Anzeige auf
dem Display läuft nun solange zurück, bis der, durch den Schieber xierte RPM-Wert erreicht wird. Dieser Vorgang kann bis zu
einer Minute dauern.
• Disconnect the motor from power.
• Ziehen Sie den Stecker aus das Stromnetz.
• Make sure that the valves are in the correct position and reconnect to power. The motor is now calibrated.
• Drehen Sie die Klappen der Vibratowelle in der gewünschten Position, und verbinden Sie den Motor wieder auf das Stromnetz.
Der motor ist jetzt kalibriert.
3.4
Select appropriate electrical plug and attach to the adapter.
Connect to power.
Wählen Sie den geeigneten elektrischen Stecker und
befestigen Sie diesen am Adapter. Stellen Sie nun die
Stromverbindung her.
Power
Strom
Motor Control Panel
Motor Control Panel
3.2
The timing belts will consistently stop the fans in the same position. Adjust the fans to either the open or closed position as desired.
Die Zahnriemen sorgen dafür, dass bei einem Stop die Vibratowellen in gleicher Position anhalten. Stellen Sie die Vibratowellen
entweder in offener oder geschlossener Position ein, je nach Wunsch.
12
Install bars and adjust dampening system.
Die Klangplatten installieren und das Dämpfungssystem einstellen.
4
4.1
Install the accidental bars. Pull the slack out of the cord and connect end springs.
Installieren Sie die Halbton-Klangplatten. Ziehen Sie die Schnur straff und verbinden Sie die Endfedern.
4.2
Level the dampener bar: Make G#3 and C#6 dampen at the same time.
Die Dämpfungsleiste richtig einstellen: G#3 mit C#6 übereinstimmen.
1
2
3
Press pedal down to allow the bars to ring.
Treten Sie das Pedal, um die Klangplatten klingen zu lassen.
Play G#3 and C#6 at the same time.
Spielen Sie G#3 und C#6 gleichzeitig.
Slowly release the pedal and listen to the tones dampen.
Lassen Sie das Pedal langsam hochkommen und hören Sie genau, wie die Töne gedämpft werden.
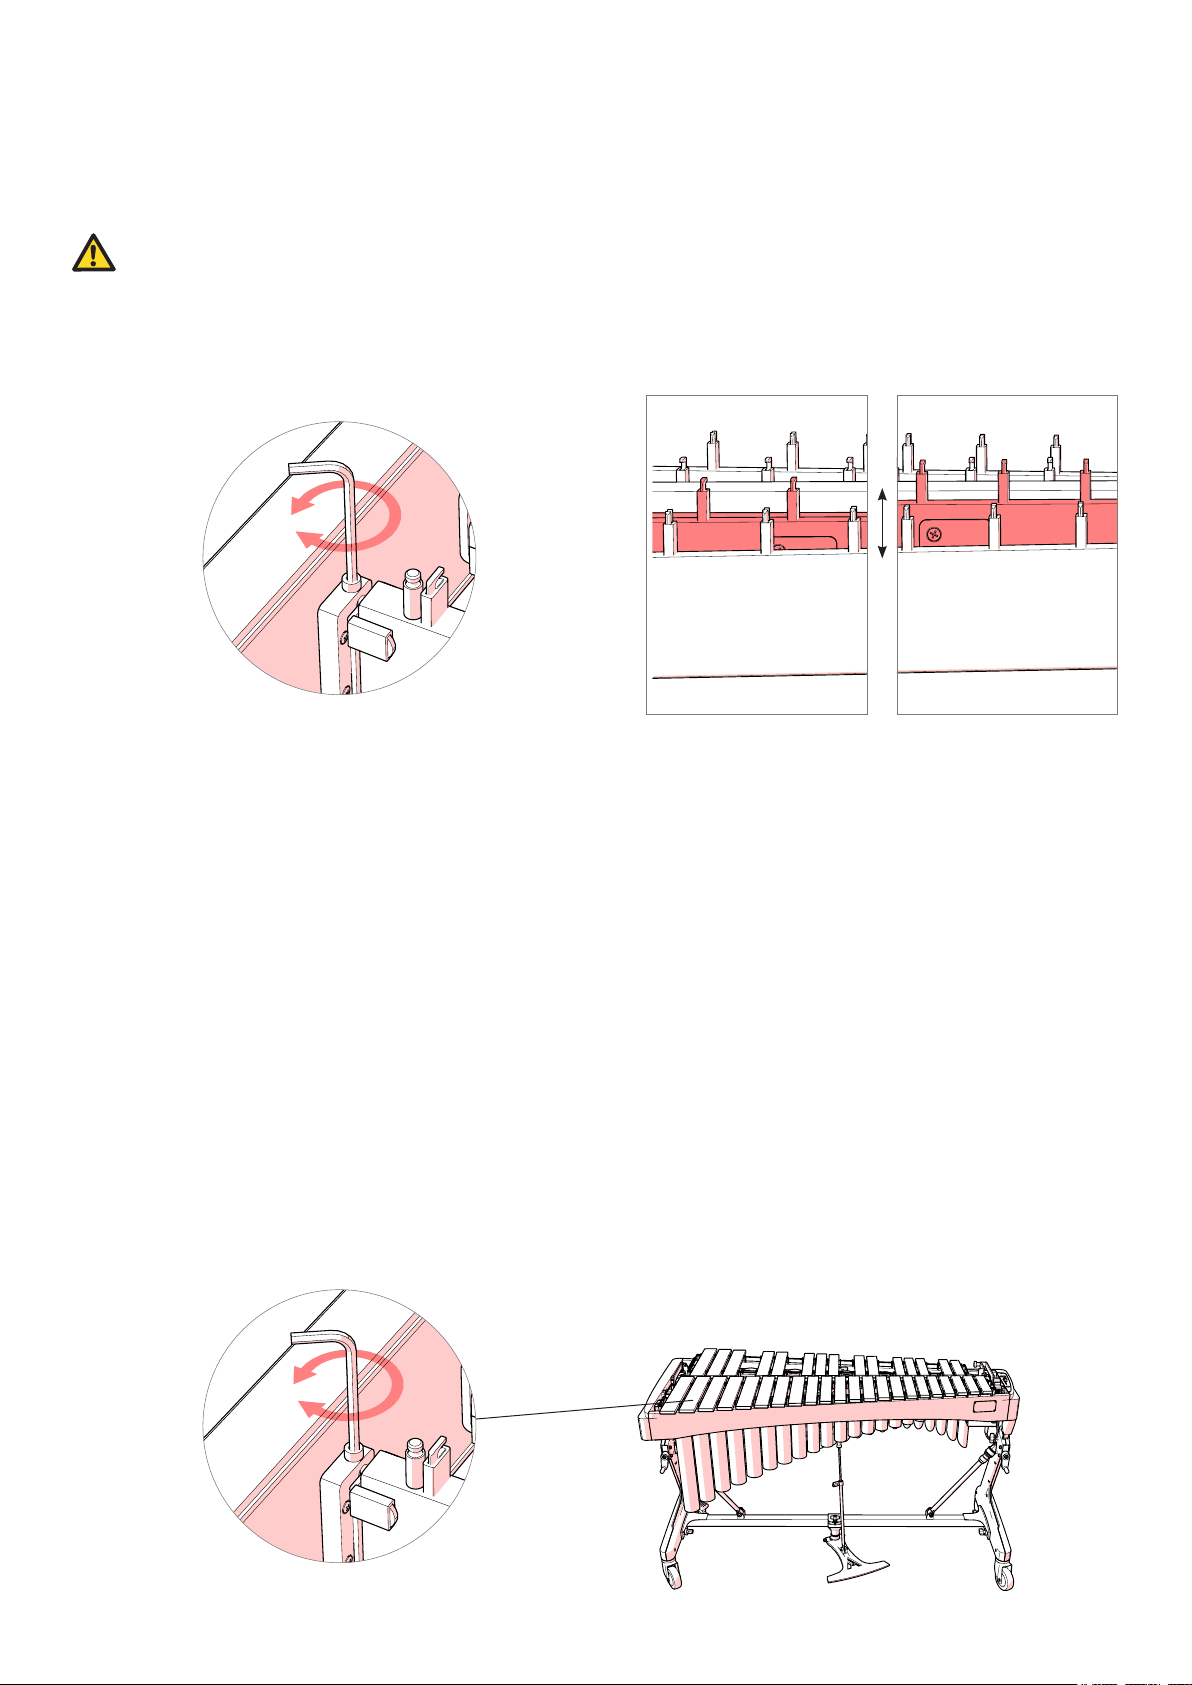
• If C#6 rings longer than G#3, turn the bolt on rail 3 to the left.
• Wenn C#6 länger ertönt als G#3, drehen Sie den Bolzen auf Holm 3 nach links.
• If G#3 rings longer than C#6, turn the bolt on rail 3 to the right.
• Wenn G#3 länger ertönt als C#6, drehen Sie den Bolzen auf Holm 3 nach rechts.
• Make a small adjustment of a half turn and evaluate the result. Adjust as necessary until the tones dampen at the same time.
• Machen Sie eine kleine Anpassung mit einer halben Drehung und beurteilen Sie das Ergebnis. Justieren Sie so lange, bis die
Töne gleichzeitig gedämpft werden.
Dampening Mechanism Overview
Adams Vibraphones feature a precision dampening system.
When adjusted correctly, the unique dampening system
dampens all bars on the instrument at precisely the same time.
The dampener bar, threaded connection rod, and rail 2 must be
adjusted during assembly. This process will take 10-15 minutes
to complete. Use the hex/allen wrench located on the inside of
Rail #1 to adjust rail positions.
Dämpfungsmechanismus: eine Übersicht
Die Adams Vibraphone verfügen über ein Präzisions-
Dämpfungssystem. Wenn richtig eingestellt, dämpft dieses
einzigartige Dämpfungssystem alle Klangplatten in genau dem
gleichen Moment.
Die Dämpfungsleiste, die Gewindeverbindung und Holm 2
müssen während der Montage eingestellt werden. Dieser
Vorgang dauert 10-15 Minuten. Verwenden Sie den
Inbusschlüssel, welcher an der Innenseite von Holm #1
angebracht ist, um die Positionen der Holme einzustellen.
13
4.3
Adjust the dampener bar position.
Die Dämpfungs-Position einstellen.
Play the accidental keys while dampened.
Spielen Sie Halbtöne gedämpft.
• For a shorter dampened sound, lengthen the connection piece.
• Für einen kürzeren gedämpften Ton, verlängern Sie die Verbindungsstange.
• For a longer dampened sound, shorten the connection piece.
• Für einen längeren gedämpften Ton, verkürzen Sie die Verbindungsstange.
• Make a small adjustment of a whole turn and evaluate the result. Make another adjustment if necessary.
• Machen Sie eine kleine Anpassung mit einer ganzen Drehung und beurteilen Sie das Ergebnis. Machen Sie gegebenenfalls
eine neue Anpassung.
Adjusting the connection piece will require removing the accidental bars.
Zur Einstellung der Verbindungsstange müssen die Halbton-Klangplatten für den Zugriff entfernt werden.
The threaded connection piece sets the dampener bar position.
This adjustment controls the length of the sound while
dampened.
Der Gewindestutzen bestimmt die Position der
Dämpfungsleiste. Diese Einstellung steuert die Länge des
gedämpften Tons.
4.4
Install the natural bars. Pull slack out of cord and
connect end springs.
Installieren Sie die Ganzton-Klangplatten. Ziehen Sie
die Schnur straff und verbinden Sie die Endfedern.
The default total length is
110mm from end to end.
Die Standardgesamtlänge ist
110 mm von Ende zu Ende.
The maximum total length is 115mm.
Die maximale Länge is 115mm.
14
4.5
Rail 2 is height adjustable. This adjustment matches the dampening of the natural bars to the dampening of the accidental bars.
This must only be adjusted after the dampener bar position is set.
Holm 2 ist höhenverstellbar. Diese Einstellung ermöglicht eine Übereinstimmung der Dämpfung der Ganzton-Klangplatten, mit der
Dämpfung der Halbton-Klangplatten. Diese soll nur eingestellt werden, nachdem die Position der Dämpfungsleiste festgelegt ist.
If the accidental keys ring freely after adjusting rail 2, then rail 2 has been positioned too low. The lowest position of rail 2
can push the dampener bar lower and move the dampener bar away from the accidental keys. Raise rail 2 and begin Step
4.5 or 4.6 again.
Wenn die Halbton-Klangplatten nachklingen nach Einstellung des Holm 2, dann ist die Position dieses Holm 2 zu tief. Die
unterste Position des Holm 2 kann die Dämpfungsleiste hinunter drücken und sie von den Halbton-Klangplatten weg
bewegen. Heben Sie den Holm 2 und wiederholen Sie die Schritte 4.5 und 4.6.
Adjust the low end of rail 2: Make G3 and G#3 dampen at the same time.
Die Seite der tiefen Tonlage von Holm 2 einstellen: G3 mit G#3 übereinstimmen.
1
2
3
Press the pedal down to allow the bars to ring.
Treten Sie das Pedal, um die Klangplatten klingen zu lassen.
Play G3 and G#3 at the same time.
Spielen Sie G3 und G#3 gleichzeitig.
Slowly release the pedal and listen to the tones dampen.
Lassen Sie das Pedal langsam hochkommen und hören Sie genau zu wie die Töne gedämpft werden.
• If G3 rings longer than G#3, turn the rail 2 low end bolt to the left.
• Wenn G3 länger klingt als G#3, drehen Sie den Bolzen an der Seite der tiefen Tonlage von Holm 2 nach links.
• If G#3 rings longer than G3, turn the rail 2 low end bolt to the right.
• Wenn G#3 länger klingt als G3, drehen Sie den Bolzen an der Seite der tiefen Tonlage von Holm 2 nach rechts.
• Make a small adjustment of a half turn and evaluate the result. Adjust as necessary until the tones dampen at the same time.
• Machen Sie eine kleine Anpassung mit einer halben Drehung und beurteilen Sie das Ergebnis. Justieren Sie so lange, bis die
Töne gleichzeitig gedämpft werden.

15
4.6
Adjust the high end of rail 2: Make E6 and G3 dampen at the same time.
Die Seite der hohen Tonlage von Holm 2 einstellen: E6 mit G3 übereinstimmen.
1
2
3
Press the pedal down to allow the bars to ring.
Treten Sie das Pedal um die Klangplatten klingen zu lassen.
Play G3 to E6 at the same time.
Spielen Sie G3 und E6 gleichzeitig.
Slowly release the pedal and listen to the tones dampen.
Lassen Sie das Pedal langsam hochkommen und hören Sie genau zu wie die Töne gedämpft werden.
• If E6 rings longer than G3, turn the rail 2 high end bolt to the left.
• Wenn E6 länger klingt als G3, drehen Sie den Bolzen an der Seite der hohen Tonlage von Holm 2 nach links.
• If G3 rings longer than E6, turn the rail 2 high end bolt to the right.
• Wenn G3 länger klingt als E6, drehen Sie den Bolzen an der Seite der hohen Tonlage von Holm 2 nach rechts.
• Make a small adjustment of a half turn and evaluate the result. Adjust as necessary until the tones dampen at the same time.
• Machen Sie eine kleine Anpassung mit einer halben Drehung und beurteilen Sie das Ergebnis. Justieren Sie so lange, bis die
Töne gleichzeitig gedämpft werden.

16
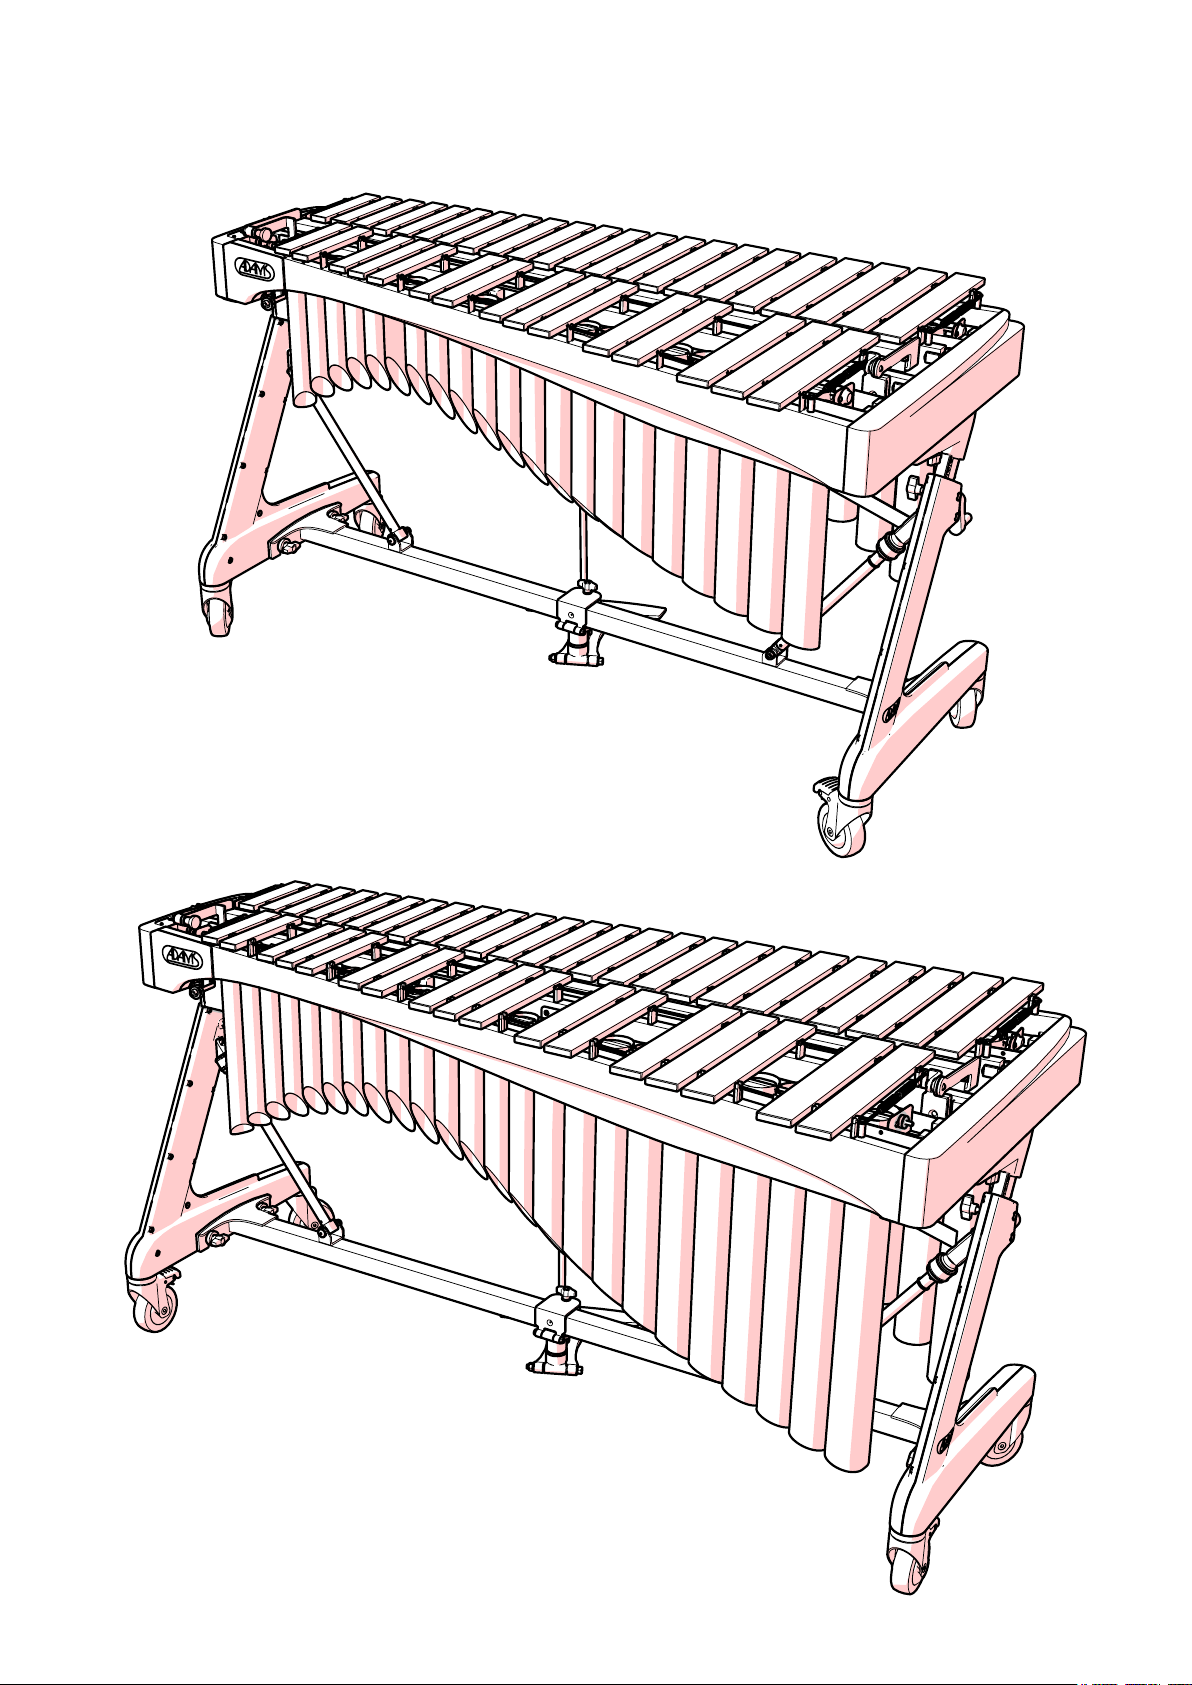
Loosen the wing screws, adjust to playing height, and secure in place again with the wing screws.
Lösen Sie die Flügelschrauben, stellen Sie die Spielhöhe ein und sichern Sie diese mit der Flügelschrauben.
The Apex Height Adjustment Mechanism allows for easy and
precise adjustment to the player’s height.
Do not adjust one side of the instrument more than 4 marks
at one time without equal adjustment on other side.
EXAMPLE: If adjusting from 0 to 8, adjust one side from 0 to 4,
the other side from 0 to 4, and then repeat the process from 4
to 8.
Der Apex-Höhenverstellung von Adams bietet eine einfache
und präzise Einstellung des Instruments auf die Körpergröße
des Spielers.
Verstellen Sie nicht einseitig die Instrumentenhöhe um mehr
als 4 Markierungen, ohne auch im gleichen Maße die andere
Instrumentenseite zu verstellen!
Beispiel: Wenn Sie die Höhe von Markierung 0 auf Markierung
8 verstellen möchten, müssen Sie erst die eine Seite und
anschließend die andere Seite von 0 auf 4 verstellen.
Wiederholen Sie das Verfahren für die Markierungen von 4 auf 8.
Height Adjustment
Höhenverstellung
5
17

18
Natural Tone Bars
Ganzton-Klangplatten
Accidental Tone Bars
Halbton-Klangplatten
Natural Resonators
Ganzton-Resonatoren
Pedal
Pedal
Frame with Dampening Assembly
Rahmen mit Dämpfungsmechanismus
Conrmation of packing contents
Vibraphone Alpha 4.0
The cartons of your new instrument contain the components
pictured below.
Überprüfung des Verpackungsinhalts
Vibraphone Alpha 4.0
Die Verpackung Ihres neuen Musikinstruments muss die
untenstehend abgebildeten Komponenten enthalten.
Accidental Resonators
Halbton-Resonatoren
Pedal Pull Rod
Pedal Zugstange

19
High End Side Piece
Höhes Seitenteil Gestell
Low End Side Piece
Tiefes Seitenteil Gestell
Motor / Timing belts
Motor / Zahnriemen
Cover
Hülle
Mallets for Vibraphone Instruments
Schlägel für Vibraphon Instrumente
Connection Rod
Querstange
Motor Control Panel & Adapter Kit
Motor Control Panel & Adapter Kit

20
1.1
Attach the connection rod to the side pieces. Release the wing
screws and then insert the end of the rod between the washers
and the side piece. Tighten all wingscrews.
Befestigen Sie die Verbindungsstange an den Seitenteilen.
Lassen Sie das Ende der Stange zwischen die Unterlegscheibe
und das Seitenteil ein-fallen. Ziehen Sie alle Flügelschrauben
an.
Assemble Apex Frame
Das Apex Gestell montieren
1
ASSEMBLY AND ADJUSTMENT 4.0
Zusammenbau und Instrumentenstimmung 4.0
1.2
Attach the integrated shore braces to the side pieces. Rotate the shore into position and tighten the screw tting.
Befestigen Sie die integrierte Stützhalterung an den Seitenteilen. Bringen Sie die Stützhalterung in die richtige Position und ziehen
Sie die Verschraubung fest.
The receiving hole in the connection rod faces the position of the audience.
Das Aufnahmeloch in der Querstange muss in Richtung Spielerposition weisen.
This manual suits for next models
4
Other Adams Musical Instrument manuals

Adams
Adams Alpha Series User manual

Adams
Adams Revolution Timpani User manual

Adams
Adams GAT33 User manual

Adams
Adams Concert 4.3 User manual

Adams
Adams MCHV43 User manual

Adams
Adams Alpha 5.0 User manual

Adams
Adams Alpha Xylophone User manual

Adams
Adams Universal Timpani User manual

Adams
Adams BK5003S User manual

Adams
Adams SAXOPHONE PLAYING STAND User manual


