Donner DDP-300 User manual

Digital Piano Owner’s Manual
DDP-300


CONTENTS
PianoAssembly.............................................................................................................................01~03
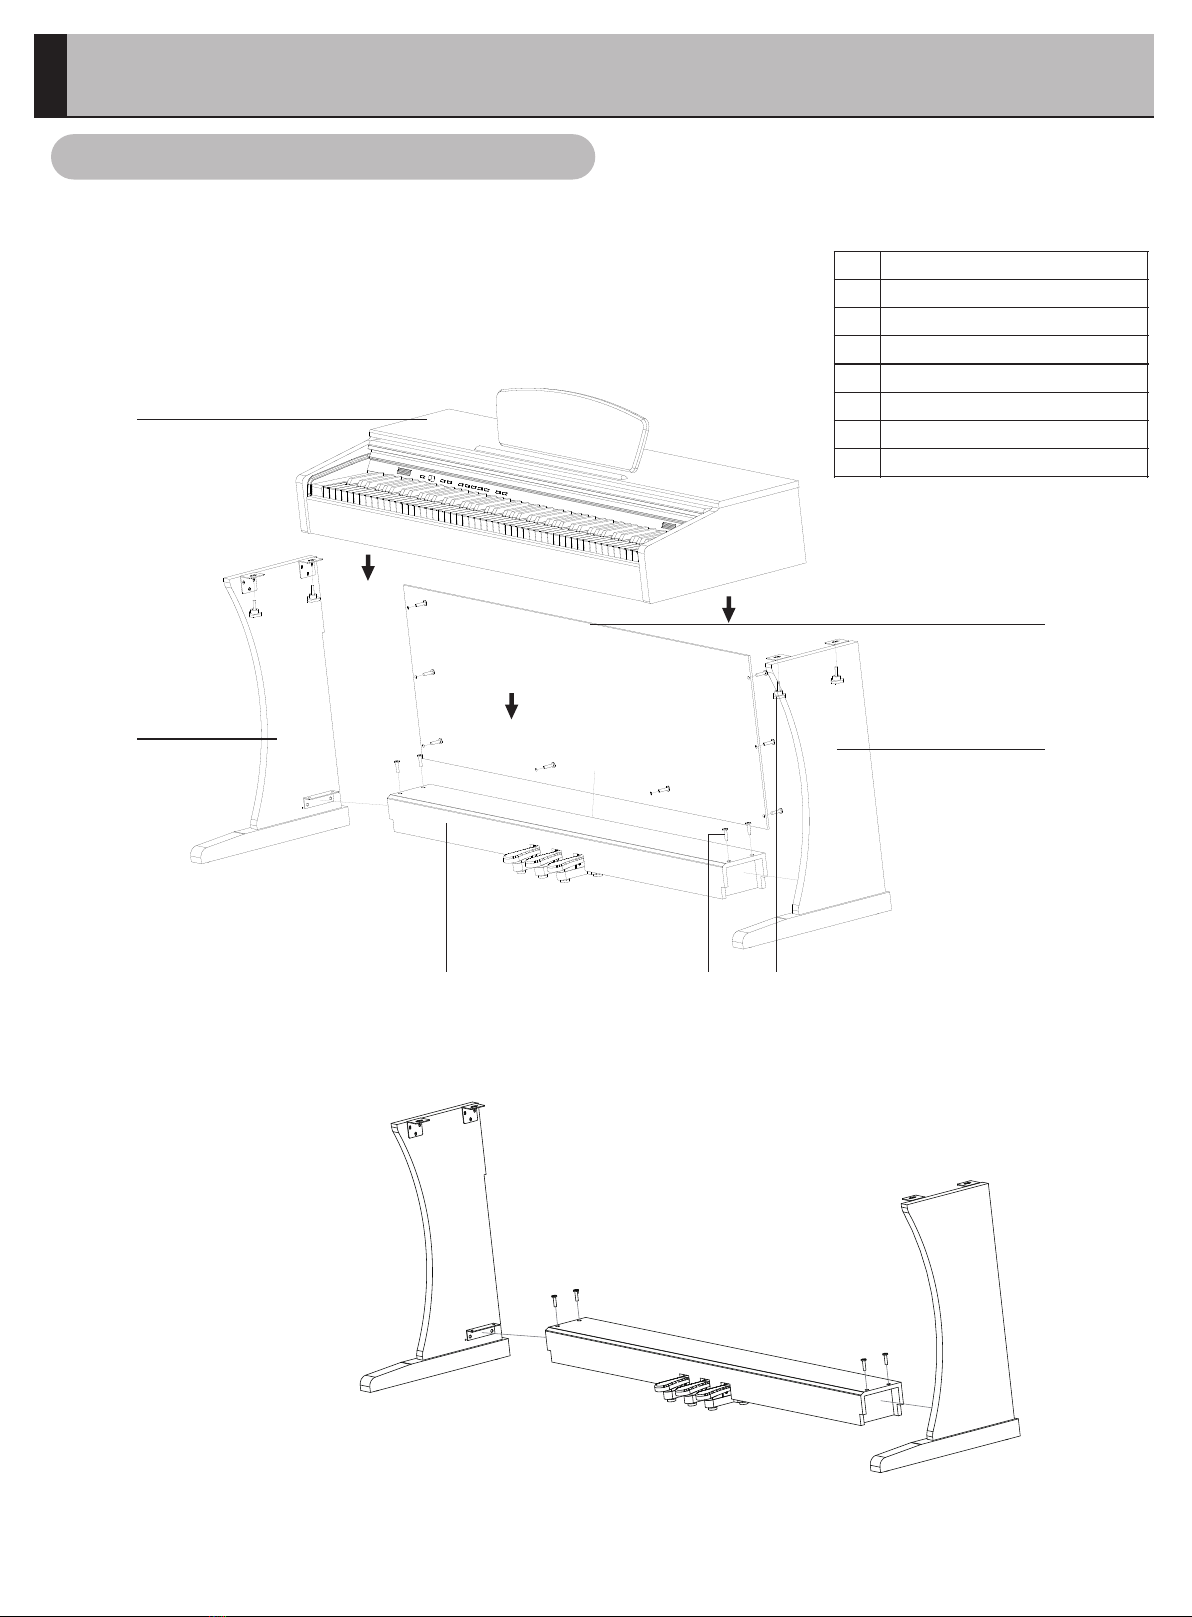
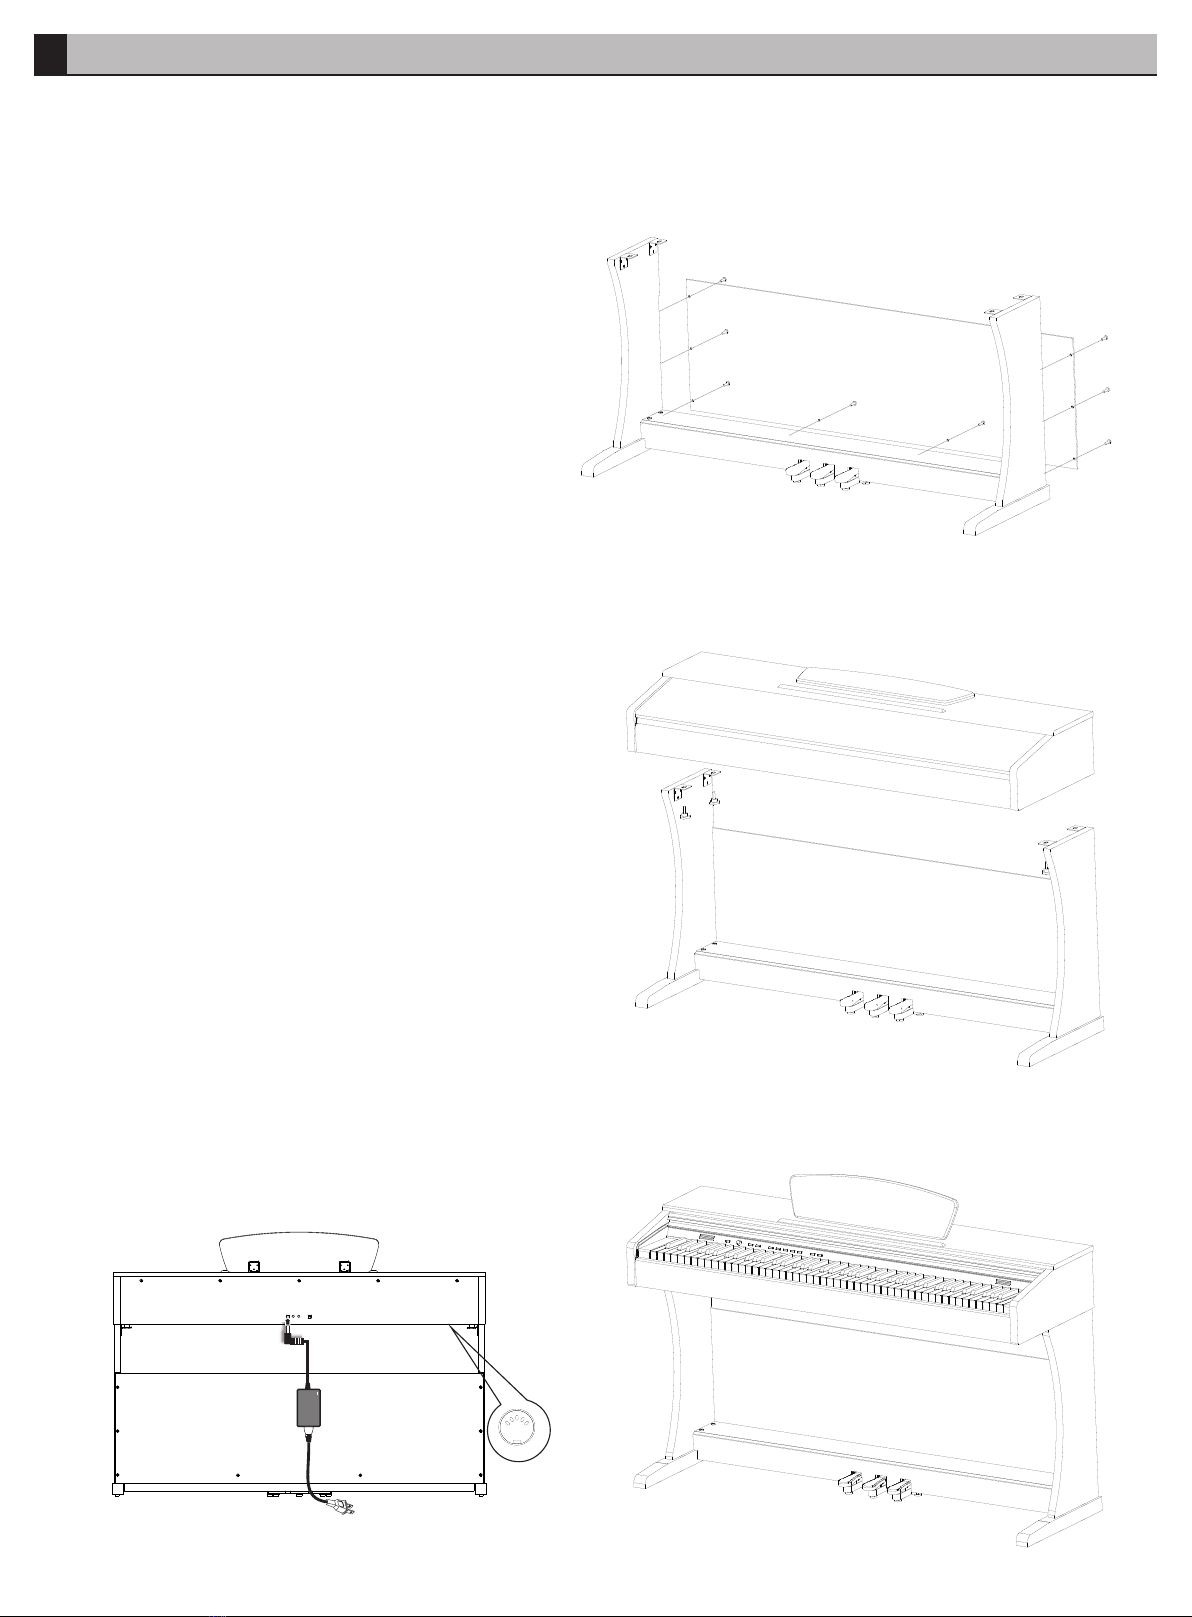
ElectricalPianoOverallAssembly ..................................................................................................................01~02
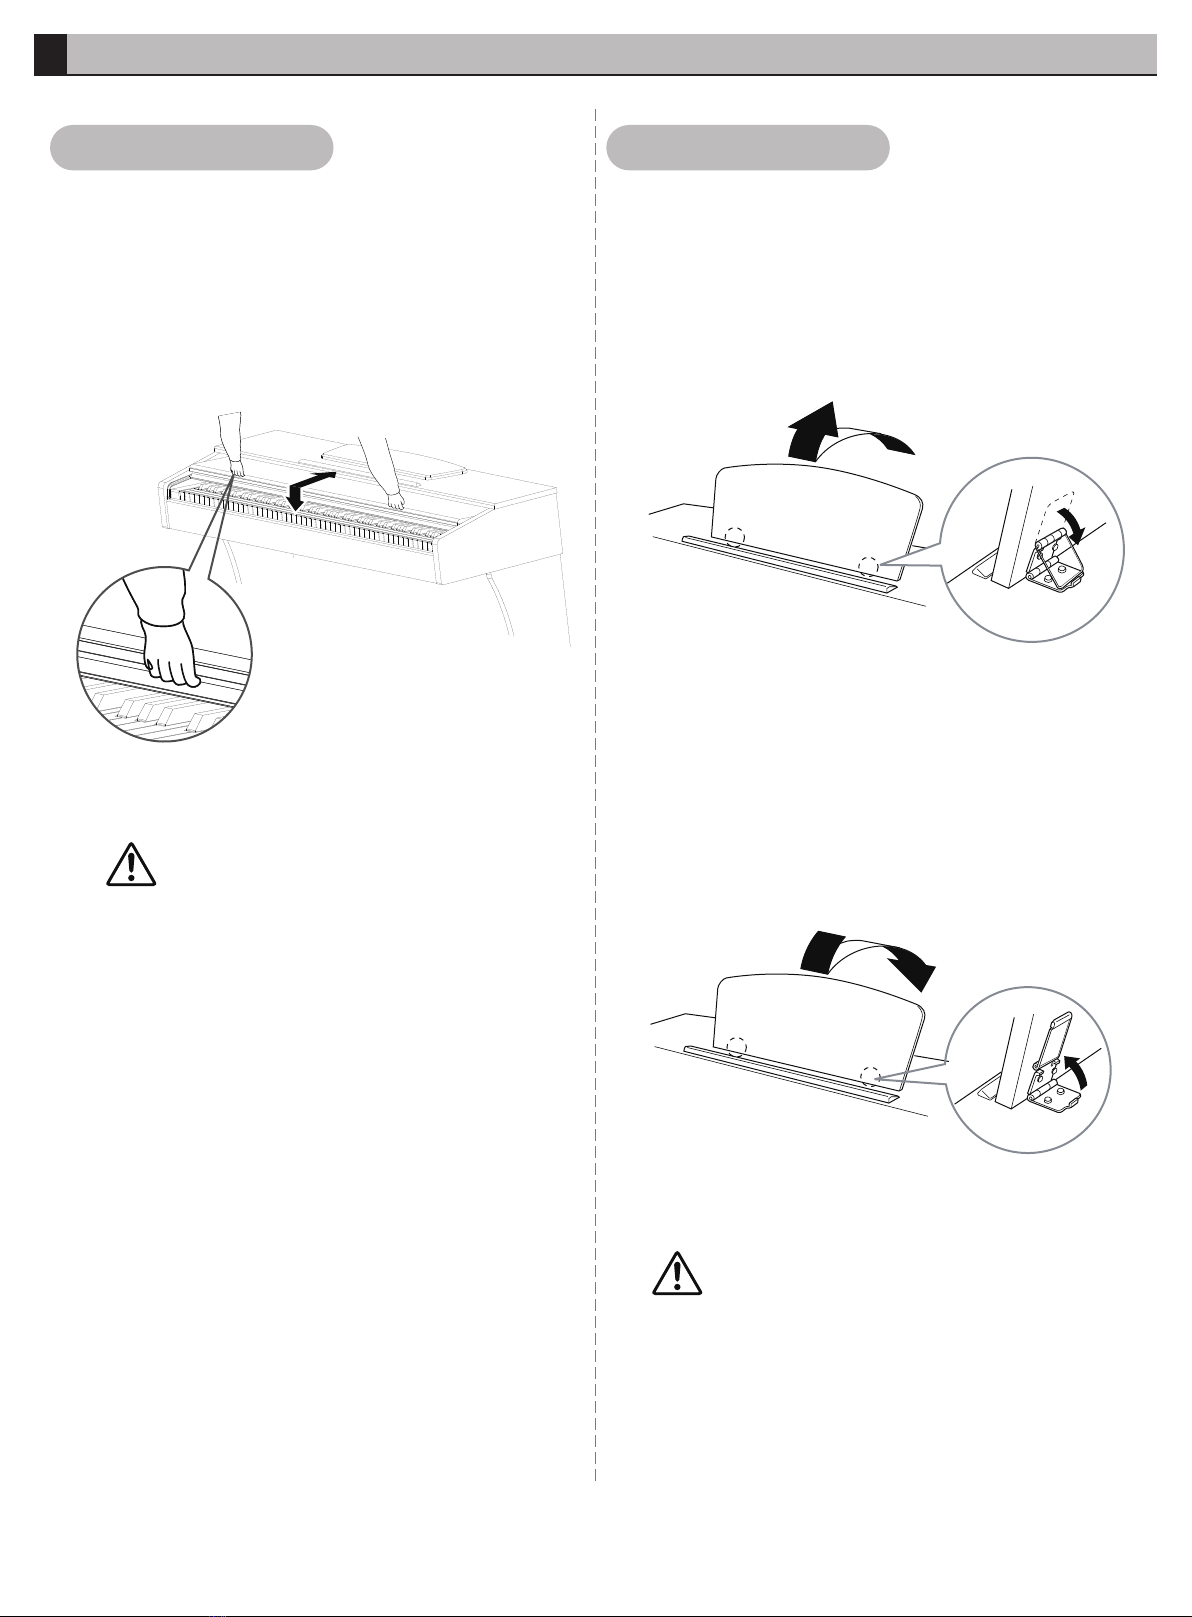
KeyCoverOpen-and-Close.............................................................................................................................03
ElevatingMusicStand.....................................................................................................................................03
PanelInstruction...........................................................................................................................04
ControlPanel ..................................................................................................................................................04
BackPanel .....................................................................................................................................................04
BasePlate .......................................................................................................................................................04
ExternalConnection ....................................................................................................................05
PowerCordConnecting..................................................................................................................................05
PedalConnecting ...........................................................................................................................................05
HeadphoneConnecting..................................................................................................................................05
AudioDeviceConnecting................................................................................................................................05
ComputerConnecting ....................................................................................................................................05
FunctionIntroduction.................................................................................................................06~11
OperationGuide .............................................................................................................................................06
TurnOnthePower .........................................................................................................................................07
MasterVolumeSetting....................................................................................................................................07
AutoPowerOff ...............................................................................................................................................07
KeySoundSetting ..........................................................................................................................................07
DoubleKeyboardSetting................................................................................................................................07
Select&PlaytheTimbre ................................................................................................................................08
TimbreDemo..................................................................................................................................................08
SplitTimbre ....................................................................................................................................................08
PianoDemo....................................................................................................................................................09
ReverbEffect/ReverbDepth ...........................................................................................................................09
ToneSetting....................................................................................................................................................09
TranspositionSetting......................................................................................................................................10
MetronomeSwitch/MetronomeType/MetronomeSpeed .............................................................................10
TouchCurve...................................................................................................................................................10
MIDIRecordSetting ........................................................................................................................................11
BluetoothMIDI................................................................................................................................................11
ProductSpecifications ...............................................................................................................12~13
ProductParameters........................................................................................................................................12
ProductList ....................................................................................................................................................13
Appendix-TimbreSheet .............................................................................................................13
Appendix-PianoDemo................................................................................................................13
PianoMaintenance ......................................................................................................................14
SecurityConsideration...............................................................................................................15~18
Troubleshooting............................................................................................................................19
After-SaleService..........................................................................................................................20~22


NO.
1
2
3
4
5
6
7
①
②
④
③
⑤ ⑥ ⑦
PARTS
Piano Body
Left stand board
Right stand board
Back plate
Pedal box
Screws M6 x 24(12PCS)
Thumb screw M6 x24(4PCS)
Piano Assembly
Electrical Piano Overall Assembly
Before you are ready to assemble the piano, please check if
all parts are included in the package box.
A. Use screws to fix the pedal box onto the left and right stand boards.
(Make sure the direction is correct before installation.)
01

B. Use screws to fix back plate onto the body leg which is finished in Step A.
C. Place the body on the installation step (B), and use the screws to lock the
body from the bottom of the body to the holes.
D. After basic assembly, insert pedal cord intothebottom
socketofthebody and power cord to the back corresponding
holes and power it on, then you can switch on the piano.
Piano Assembly
02
PEDAL
SOCKET

Key Cover
Piano Assembly
CAUTION:
ŸWhen opening or closing the key cover, be
careful to move the gap between the part
and the panel to avoid your fingers getting
caught.
ŸPlease do not put metal plate or paper on
the key cover because small items may slip
into the piano when the cover is opening. It
may be difficult to get it out and lead to
electric shock, short circuit, fire or terrible
damage to the instrument.
ŸIf you need to remove the piano, please be
sure the key cover is closed.
ŸPlease do not stress the music stand when
using.
Music Stand
Erect the Music Stand:
1. Pull out the stand completely towards the
front of the piano.
2. Turn down two metal supports on each side
of the rear of the stand.
3. Lean the music stand against the metal
supports.
1
3
2
Put Down the Music Stand:
1. Pull out the stand completely towards the
front of the piano.
2. Flick the metal supports (on the back of the
music stand).
3. Put the stand down lightly.
1
2
3
Do not erect the stand vertically
without certain incline degree.
When put down the stand, please do
not let go of your hands before the
stand is set flat.
1. Open the Key Cover:
Lift the key cover lightly, and push forward
to make it slide to the end.
2. Close the Key Cover:
Pull the cover back in your direction, and put
it down lightly above the keys.
03
CAUTION:

Panel Instruction
Control Panel
①
⑬
1.POWER
2.VOLUME
3.FUNCTION
4.METRONOME
5.SPLIT
6.PIANO
7.E.PIANO
8.ROCKORGAN
② ③ ④
⑤
⑥ ⑦ ⑧ ⑨ ⑩ ⑪ ⑫
9.STRINGS
10.BASS
11.DEMO PLAY / STOP
12.DEMONEXT SONG
13.REC
Back Panel
⑭ ⑮ ⑯ ⑰
DC AUXOUTSUSTAIN USB-MIDI
⑲
Base Plate
PHONES ⑱
04
PEDALSOCKET

External Connection
1.Connect the power cord when using. Insert one end of the cord into the
power socket behind the piano, and plug the other end of power adapter into
the 100V-220V domestic power socket.
2.Please unplug the power cord and save it in an appropriate way when it is
not used for a long time.
Power Cord Connecting
Single Sustain Pedal:
Use specified pedal plug & insert the sustain pedal socket to turn on or off
sustain effect.
Three Pedals:
ŸSoft Pedal: Depressing this pedal softens the sound so that it can
reduce its volume.
ŸSostenuto Pedal: Depressing this pedal sustains the sound that have
been played.
ŸSustain Pedal: Depressing this pedal sustains the sound after one’s
hands have been lifted from the keyboard.
The USB socket of this piano is MIDI Jack that can be connected directly to the
computer.
Insert one end of the connecting line of USB to this piano, and insert the other
end to the USB socket of the computer to achieve two-way transmission of
signals so that you can play the MIDI of the computer on this piano.
Note:
ŸWhen setting the software of the computer, do not set the USB audio
device to Input & Output at the same time, or else the sound would
overlap when you play.
ŸWhen using connecting line of USB, do not use USB hub.
The input / output socket on the back panel can be used in connecting to stereo
audio system, mixer, recorder or other audio devices.
Note:
Please be sure the power supply of all the equipment have been turned off
before connecting or disconnecting other devices. Meanwhile, turn down the
volume of all devices to a minimum before turn on the power of devices.
AC
power adapter AC power socket
DC
When you need to practice alone or play at the midnight, you can insert
the stereo headphones into the headphones output socket on the bottom
of the piano.
Note:
Please avoid to wear headphones for a longtime in high volume,
preventing hearing damage.
AUXOUT
STEREOSYSTEM
USB
Pedal Connecting
Soft Sostenuto Sustain
Headphones Connecting
Audio Devices Connecting
Computer Connecting
05

DEMO 1
DEMO 2
DEMO 4 DEMO 3
DEMO 5
DEMO
-1
+1
一0.2Hz
-1
+1 -1
+1
Atthesametimeasthe
[FUNCTION]buttonabove,
clickthecorrespondingkey
tosetthefunctionofthis
piano.
OperationGuide
Function Introduction
06
Pad
Brite Piano Harpsichord
Church Organ Guitar
Auto Power Off Key Sound Setting
Double Keyboard
Timbre
Timbre Demo
Change the previous demo Change the next demo
Play/Stop the timbre demo
Reverb Effect
OFF/ON
HALL 1
STAGE 1 HALL 2
STAGE 2
Recovery Standard
Recovery Standard
Recovery Standard
Reverb Depth
Tone
+0.2Hz
Recovery Standard
Recovery Standard
Transposition
Transposition -
Transposition +
Metronome Type
Metronome Speed
Touch Curve
Soft
Hard
Medium
Fixed
A2B2C1D1E1F1G1A1B1C D E F G A B cdefgab1
c1
d1
e1
f1
g1
a1
b2
c2
d2
e2
f2
g2
a2
b3
c3
d3
e3
f3
g3
a3
b4
c4
d4
e4
f4
g4
a4
b5
c
#A2#C1#D1#F1#G1#A1#C #D #F #G #A #c #d #f #g #a 1
#c 1
#d 1
#f 1
#g 1
#a 2
#c 2
#d 2
#f 2
#g 2
#a 3
#c 3
#d 3
#f 3
#g 3
#a 4
#c 4
#d 4
#f 4
#g 4
#a

1. First, check if the power switch of the piano is turning off . If
not, please turn off the power.
2. Connect the power, insert the plug into the power socket behind the
piano first, and then plug the opposite end of power adapter into
the power socket.
3. Before turning on the power, turn down the volume controller to the
minimum first.Press the switch button and when the power button
lights up, it indicates this piano is started.
4. Before turning off the power of digital piano, turn down the volume
controller to the minimum first, and press the button to turn it off.
Note:
Be sure the supply voltage is 12V, too high or too low will damage the piano.
Do not unplug the power cord from the power socket under the state of electrification.
Adjust the volume knob on the control panel to turn up & down the volume.
1. Turn the knob right to increase the overall volume.
2. Turn the knob left to decrease the overall volume.
lIn standby mode, this piano will shut down automatically with no
operation for 30 minutes. This capability can be enabled or disabled
as needed.
lPress the [FUNCTION] and [ A ], switch on/off the Auto Power Off
function.
A2
lWhen double keyboard is turned on, the system automatically takes e¹ key as
separation point & separates the keyboard into two same sections in pitch &
tone.
lBy this state, you can achieve one-to-one teaching & practicing.
lPress the [FUNCTION] and [ B ] simultaneously to turn on or off the piano duet
mode.
FUNCTION
VOLUME
lThe default of the key sound is on.
lPress the [FUNCTION] and [ #A ] simultaneously to turn on or off the key sound.
#A2
FUNCTION
B2
FUNCTION
1
e
Function Introduction
Turn On the Power
NOTE
When not using the piano or thunder
Please unplug the power plug.
Backside of
Piano Body
100V-220V
ACSocket
Master Volume Setting
Auto Power Off
Key Sound Setting
Double Keyboard Setting
07

lThis piano has 10 pre-set authentic tones. (See Appendix for details-
Timbre Sheet)
lIn standby mode, press [FUNCTION] and [ C-E ] simultaneously to
select the timbre.
lPress the direct selection buttons [PIANO], [E. PIANO], [ROCK
ORGAN], [STRINGS], [BASS] on control panel.
lPress the desired timbre button, play & enjoy the pleasant music.
FUNCTION
C1E1
PIANO E.PIANO ROCK
ORGAN STRINGS BASS
NO.
1
2
3
4
5
Key to Choose TimbreTimbre
Grand Piano
Electric Piano
Rock Organ
Strings
Bass
Key
C
#C
D
#D
E
Timbre
Brite Piano
Harpsichord
Church Organ
Guitar
Pad
PIANO
E.PIANO
ROCK ORGAN
STRINGS
BASS
NO.
6
7
8
9
10
lWhen the timbre is enabled, conduct related operation on Timbre Demo.
lPress the [FUNCTION] and [ F ] simultaneously to play the previous timbre demo.
lPress the [FUNCTION] and [ #F ] simultaneously to play the next timbre demo.
lPress the [FUNCTION] and [ G ] simultaneously to play/stop the timbre demo.
G1
F1
Key
F
#F
G
FUNCTION
Description
Change the previous demo
Change the next demo
Play/Stop the Timbre demo
lWhen this function is turned on, the keyboard can be separated into two individual playing segments that have
different tones.
lIn standby mode, press the [FUNCTION] and [METRONOME] simultaneously to turn on or off the split timbre.
lPress the desired timbre with direct selection buttons.
lTaking #f as split point, you can hear different effects of timbre on the left & right section.
lWhen it is turned on, press the [FUNCTION] and [METRONOME] simultaneously to turn off the split timbre.
lThe main timbre is turned on by default and cannot be turned off. Split timbre can be turned on and off at will.
#f
FUNCTION METRONOME
SPLIT
lSplit Point: The position that separates the Keyboard to left & right hand segment called split point. The default
split point is #f (34).
lWhen split timbre is turned on, press the [METRONOME] and any key simultaneously to change the split point.
lWhen it is enabled, the left keyboard is 8 key higher than usual.
Function Introduction
Selecting & Playing Timbre Key to Choose Timbre
Timbre Demo
08
Split Timbre

lThe piano is built-in 5 beautiful piano demos. (See Appendix for details-
Piano Demo.)
lPress DEMO【 】 button firstly. Play/Pause the piano demo. At this
time, it will loop all the demos.
lPress【 】 to cyclically switch demos.
lPress [FUNCTION] while press [ #G-C ] key to enter/exit the state of playing
the corresponding demos. At this time, it will loop the current demo.
DEMO
#G1
C
FUNCTION
lThe piano has 4 reverb Effect. Through adjusting reverb effects, it can achieve the effect of
playing in different occasions.
lThe default setting of reverb Effect is Hall 1.
lPress [FUNCTION] and [ #C ], to turn OFF/ON Reverb Effect.
lPress [FUNCTION] and [ D-F ], to choose Reverb Effect.
Key
#C
D
#D
E
F
lAdjust reverb depth, range: 0~127.
lPress [FUNCTION] and [ #F ], reverb depth value -1.
lPress [FUNCTION] and [ #G ], reverb depth value +1.
lPress [FUNCTION] and [ G ], return to reverb depth default value
(depend on reverb types).
F
FUNCTION
#C
FUNCTION
#F(-1)
#G(+1)
G
(RecoveryStandard)
lSlightly adjust the standard tone of the whole keyboard to
match other music equipment.
lAdjustable range: 415.3Hz~466.2Hz. Default value: 440Hz.
lPress [FUNCTION] and [ A ], tone -, decrease the overall pitch in
0.2Hz.
lPress [FUNCTION] and [ B ], tone +, increase the overall
pitch in 0.2Hz.
lPress [FUNCTION] and [ #A ], return to tone default value.
FUNCTION
A(-)
#A
(RecoveryStandard)
B(+)
Function Introduction
Piano Demo
Reverb Effect
Reverb Effect
OFF/ON
HALL 1
HALL 2
STAGE 1
STAGE 2
Reverb Depth
Tone Setting
09

lThe function of transposition is to adjust the overall pitch
upward or downward in semitone.
lMaximum range: ±12 semitones . Transposition default
value: 00.
lPress [FUNCTION] and [ c ], transposition -, decrease the
overall pitch in semitone.
lPress [FUNCTION] and [ d ], transposition +, increase the
overall pitch in semitone.
lPress [FUNCTION] and [ #c ], return to transposition default value.
c
c(-)
FUNCTION
#c
d(+)
lIf you are not sure about the beat, use this metronome and get tips about specific beat.
lPress the [METRONOME] key to turn on the metronome, and the beat sounds;
lPress the [METRONOME] key again to turn off the metronome, and the beat will stop.
lNotes:
During MIDI recording, you can turn on the metronome, but it will not be recorded as recording data.
METRONOME
lAdjust the beat speed according to needs.
lAdjustment range: 30~280, the default value: 120.
lPress [FUNCTION] and [ #f ], the metronome speed -1.
lPress [FUNCTION] and [ #g ], the metronome speed +1.
lPress [FUNCTION] and [ g ], return to the default value.
lPress [METRONOME] and switch on metronome switch.
lAdjustment range: 1~9, the default value: 4.
lPress [FUNCTION] and [ #d ], the metronome type -1.
lPress [FUNCTION] and [ f ], the metronome type +1.
lPress [FUNCTION] and [ e ], return to the default value.
f
e
FUNCTION
#d(-1)
f(+1)
g
FUNCTION
#(f-1)
#f
#g(+1)
lThe selection of the degree curve type can change the performance of the
keyboard. The default is: Medium.
lPress [FUNCTION] and a~c¹ to adjust the touch curve.
FUNCTION
a
a1
c
KEY
a
#a
Touch Curve Type
Fixed
Medium
KEY
b
c¹
Touch Curve Type
Soft
Hard
Function Introduction
Transposition Setting
Metronome Switch
Metronome Type
Metronome Speed
Touch Curve
10

lThe recorder function allows performances to be recorded and stored in the
piano’s internal memory.
lOnly one song can be stored in this piano.
Before Recording
lBefore recording, specifications e.g. tone and transposition need to be set.
lPress 【 】+ 【 】 and begin to record. At this time, these two indicator lights are on.
Record Start
lPlay and start to record.
Record Stop
lDuring recording, press【 】+ 【 】 to stop the recording which can be stored
automatically. These two indicator lights are off.
lDuring recording, if the memory is full, the recording will stop and be stored automatically.
Two indicator lights are off.
Record Playback
lWhentherecordingisstopped,press【 】toplaytherecordedsong.
lThe default state of Bluetooth MIDI function is on.
lYou can select the Bluetooth name of this piano in the MIDI setting interface of the external
device or software compatible with this piano to complete the connection.
lThe Bluetooth name of this piano: BTMIDI.
Instructions to use Bluetooth MIDI:
lInstructions for use of blue MIDI: Any app that can connect to Bluetooth MIDI and use the
MIDI standard protocol for playback can be used.
lIt is both compatible with IOS and Android devices.
REC
NO.
1
2
3
4
5
6
7
8
NAME
Garageband
Piano Diary
Cubasis LE 2
Flowkey
Simply Piano
Piano Maestro
Dust Buster 2
Music School
IOS
Yes
Yes
Yes
Yes
Yes
Yes
Yes
Yes
Android
No
No
No
Yes
No
No
No
No
Description
Connect Bluetooth
Connect Bluetooth
Connect Bluetooth
No need to connect Bluetooth
Function Introduction
MIDI Record Setting
Bluetooth MIDI
11

Product Size
Product Size
Package Size
Package Weight
Keyboard
Pedal
Key Cover Type
Music Stand
Polyphony
Sound Resource
Pre-setting
Metronome
Double Keyboard
Transposition
Tone
SplitTimbre
Effects
Automatic Shutdown
Record Function
Bluetooth
Power Socket
Headphone Socket
AUX OUT Socket
USB-MIDI Socket
Pedal Socket
Amplifier
Low-pitch Speaker
High-pitch Speaker
136x42x81.5 cm
39 KG
143x53.5x35 cm
43.8 KG
88 key full-weighted keyboard
Hard/Medium/Soft/Fixed
3
Sustain/Sostenuto/Soft
Sliding Cover Type
YES
128
Donner D1-DSP DAC-3817B
10
10
5
9
30 ~ 280
Support
-12 ~ 0~+12
415.3Hz~ 466.2Hz
Support
Reverb(4 types, switchable &
adjustable)
30 minutes
Non-tracking function
Built-in Bluetooth MIDI
DC 12V 3A
2 x headphone sockets
YES
YES
Single sustain pedal sockets
20W x 2
20Wx 2
10W x 2
Size/Weight
Keys
Touch Response
Quantity
Function
Polyphonies (Max)
Timbre
Timbre Demo Song
Piano Demo Song
Type
Beat Speed
Performance
Control
Body
Function
Connecting
Sockets
Sound
System
Product Name DDP-300
Wireless
Product Specifications
Product Parameters
12

Name Quantity
Power Adapter
Piano Body
Pedal Box
Left Stand Board
Right Stand Board
Big Back Plate
Screw M6x20
Thumb screw M6x20
Manual
1PC
1PC
1PC
1PC
1PC
1PC
12PCS
4PCS
1PC
NO.
1
2
3
4
5
Name
Chopin op.25 no.1
Hungarian Dance No.5
Rondo Espressivo
Minute Op64 No1
BWV 848
Product Specifications
Product List
Appendix
Appendix-Timbre Sheet Appendix-Piano Demo
NO.
1
2
3
4
5
Timbre
Grand Piano
Brite Piano
Electric Piano
Harpsichord
Rock Organ
Timbre
Church Organ
Strings
Guitar
Bass
Pad
NO.
6
7
8
9
10
13

Piano Maintenance
The product should not be exposed excessively to the direct sunlight, placed
near the air conditioner or extremely hot places.
3.Don’t use paint, diluent or similar chemicals to clean it.
Wet a soft towel with weak solution and detergent and wring it out until it dries.
Clean the product with this towel.
4.No shaking and collision.
The product should be moved carefully. Violent shake and collision are
prohibited to avoid damaging the shell or internal electronic components.
This product may cause video or audio interference to the reception of TV and
radio. If this happens, it should be removed from the radio or TV products.
2.No use near Tv or radio.
1.Avoid heat, dampness, or direct sunlight.
Conscientiously do a good job in the maintenance and protection of this product.
It plays an important role in prolonging the service life and reducing faults.
14

PowerSupply
Socket
Power
Adapter
DC
PowerAdapter
Sign
Warning
Attention
This sign indicates that, if you ignore the flag and the wrong operation of this product, there is
a potential risk of injury or other financial damage caused by personnel.
Logo example
This product can be supplied by standard indoor wall socket. Please use only the power cord
specified by this product. When you do not use, please be sure to turn off the power supply. If
you do not use it for a long time, please pull out the power cord and keep it properly.
In order to ensure that you use this product safely and correctly, prevent damage to the user
and other people and the financial issue. The specification and the product are marked with a
series of safety signs. All kinds of signs and their meaning are as follows:
This triangle mark indicates that the user should pay attention to the matters.( Left case
shows “Be careful electric shock.”)
The circular sign painting a slash said prohibited matters.The logo shows the specific
content of the ban. (Left case shows “No Disassemble”.)
Black dots indicate matters must be complied with. Icon in this sign indicates the
specific content that must be followed. (Left case shows “The power plug must be
pulled out of the socket.”)
This sign indicates that, if you ignore the flag and error operation of this product, there is a fire
hazard or serious injury to personnel.
Security Consideration
15

Security Consideration
Warning
Smoke, odor, overheating
When the product is smoking,
emitting odors or overheating, continue
use may lead to the danger of fire and
electric shock. In the event of such a
situation, the following operations shall
be carried out immediately.
ŸTurn off the power supply.
ŸPull the plug from the power
outlet.
ŸContact your agency.
Improper use of power supply leads
to danger of fire and electric shock
must observe the following
precautions.
ŸSpecial power lines specified for
this product must be used.
ŸAn AC power source with output
voltage within the household
rated voltage must be used.
ŸIt is not allowed to overload the
power socket and the power
extension line.
Improper handling of power lines
may result in damage or rupture, which
may cause the danger of fire and
electric shock. The following
precautions must be observed:
ŸDo not place heavy objects on the
power line or make them heated.
Ÿ Do not attempt to transform the
power cord or bend it too much.
Ÿ Do not twist or pull the power
cord.
ŸIf the power cord or plug is
damaged, replace the power cord
of the same type.
Do not use wet hands to touch the
power cord and plug, otherwise there
is a risk of electric shock.
ŸPlease use the power lines in the
place where the water will not be
spilled. Water has the risk of fire
and electric shock.
ŸNever put a vase or any other
container with water on this
product. Water has the risk of fire
and electric shock.
ŸDo not let the minors contact
plug and power line or a
connecting plate. The minors
have less knowledge of
electricity safety which may
cause danger of electric shock.
Improper use of power lines has the
risk of fire and electric shock hazard.
The following precautions must be
observed.
ŸDo not place the power cord near
the furnace or other heat sources.
ŸUnplug the power cord from the
power outlet. The plug body must
be grasped.
ŸPlug the power cord into the
power socket.
ŸBefore connecting or cutting off
the power cord, make sure that
the power is off.
ŸThe power cord should be
removed from the electrical outlet
of the wall before a thunderstorm
occurs or traveling or before other
long leave.
ŸAt least once a year, unplug the
power cord from the wall outlet
and clean the dust around the
plug.
Power line
Warning
16
Table of contents
Other Donner Musical Instrument manuals