ADENDORFF MAC AFRIC SWRENC-001 User manual


GENERAL POWER TOOL SAFETY WARNINGS
(For All Power Tools)
WARNING! Read and understand all instructions.
Failure to follow all
instructions listed below may result in electric shock, fire and/or serious
personal injury.
Save all warnings and instructions for future reference.
The term “power tool” in the warnings refers to your mains-operated (corded) power tool or
battery-operated (cordless) power tool.
Work Area Safety
1. Keep work area clean and well lit.
Cluttered or dark areas invite accidents.
2. Do not operate power tools in explosive atmospheres, such as in the presence of
flammable liquids, gases, or dust.
Power tools create sparks which may ignite the dust or
fumes.
3. Keep children and bystanders away while operating a power tool.
Distractions can cause
you to lose control.
Electrical Safety
4. Power tool plugs must match the outlet. Never modify the plug in anyway. Do not use any
adapter plugs with earthed (grounded) power tools.
Unmodified plugs and matching
outlets will reduce risk of electric shock.
5. Avoid body contact with earthed or grounded surfaces, such as pipes, radiators, ranges
and refrigerators.
There is an increased risk o electric shock if your body is earthed or
grounded.
6. Do not expose power tools to rain or wet conditions.
Water entering a power tool will
increase the risk of electric shock.
7. Do not abuse the cord. Never use the cord for carrying, pulling or unplugging the power
tool. Keep cord away from heat, oil, sharp edges or moving parts.
Damaged or entangled
cords increase the risk of electric shock.
8. When operating a power tool outdoors, use an extension cord suitable for outdoor use.
Use of a cord suitable for outdoor use reduces the risk of electric shock.
9. If operating a power in a damp location is unavoidable, use a residual current device (RCD)
protected supply.
Use of an RCD reduces the risk of electric shock.
Personal Safety
10. Stay alert, watch what you are doing and use common sense when operating a power tool.
Do not use a power tool while you are tired or under the influence of drugs, alcohol, or
medication.
A moment of inattention while operating power tools may result in serious
personal injury.
11. Use personal protective equipment. Always wear eye protection.
Protective equipment such
as dust mask, non-skid safety shoes, hard hat, or hearing protection used for appropriate
conditions will reduce personal injuries.
12. Prevent unintentional starting. Ensure the switch is in the off-position before connecting to
power source and /or battery pack, picking up or carrying the tool.
Carrying power tools with
your finger on the switch or energising power tools that have the switch on invites
accidents.
13. Remove any adjusting key or wrench before turning the tool on.
A wrench or a key left
attached to a rotating part of the power tool may result in personal injury.
14. Do not overreach. Keep proper footing and balance at all times.
This enables better control of
the power tool in unexpected situations.
15. Dress properly. Do not wear loose clothing or jewellery. Keep your hair, clothing, and gloves
away from moving parts.
Loose clothes, jewellery or long hair can be caught in moving
parts.
Power Tool Use and Care
16. Do not force the power tool. Use the correct power tool for your application.
The correct
power tool will do the job better and safer at the rate for which it was designed.
17. If devices are provided for the connection of dust extraction and collection facilities,
ensure these are connected and properly used.
Use of dust collection can reduce
dust-related hazards.
18. Do not use tool if switch does not turn it on or off.
Any power tool that cannot be

controlled with the switch is dangerous and must be repaired.
19. Disconnect the plug from the power source and/or the battery pack from the power tool
before making any adjustments, changing accessories, or storing power tools.
Such
preventive safety measures reduce the risk of starting the power tool accidentally.
20. Store idle power tools out of the reach of children and do not allow persons unfamiliar
with the power tool or these instructions to operate the power tool.
Power tools are
dangerous in the hands of untrained users.
21. Maintain power tools. Check for misalignment or binding of moving parts, breakage of
parts and any other condition that may affect the power tool’s operation. If damaged,
have the power tool repaired before use.
Many accidents are caused by poorly
maintained power tools.
22. Keep cutting tools sharp and clean.
Properly maintained cutting tools with sharp cutting
edges are less likely to bind and are easier to control.
23. Use the power tool, accessories and tool bits etc. in accordance with these instructions,
taking into account the working conditions and the work to be performed.
Use of the
power tool for operations different from those intended could result in a hazardous
situation.
Battery Tool Use and Care
24. Recharge only with the charger specified by the manufacturer.
A charger that is suitable
for one type of battery pack may create a risk of fire when used with another battery
pack.
25. Use power tools only with specifically designated battery packs.
Use of any other
battery packs may create a risk of injury and fire.
26. When battery is not in use, keep it away from other metal objects like: paper clips, coins,
keys, nails, screws, or other small metal objects that can make a connection from one
terminal to another.
Shorting the battery terminals together may cause sparks, burns, or a
fire.
27. Under abusive conditions, liquid may be ejected from the battery; avoid contact. If contact
accidentally occurs, flush with water. If liquid contacts eyes, additionally seek medical help.
Liquid ejected from the battery may cause irritation or burns.
Service
28. Have your power tool serviced by a qualified repair person using only identical replacement
parts.
This will ensure that the safety of the power tool is maintained.
SPECIFICATIONS
Model SWRENC-001
Power (DC) 18 V
Square Drive 12.7 mm
Bolt Size M12-M18
Battery Type Li-ion
Capacitor 4.0Ah 5.0Ah
No Load Speed 0-2000/0-2400 rpm
Impacts per Minute
0-2900/0-3200 ipm
Torque
Step L
240 N·m
Step H/ Smart-loosen Step
300 N·m
Full Charging Time
4.0Ah
≈90mins
5.0Ah
≈100mins
Weight (Inc. Battery) 1.8 kg
※Due to the continuing program of research and development, the specifications herein are
subject to change without prior notice.
ADDITIONAL SAFETY RULES
1. To be safe, disabled, retarded, untrained people or people disable to operate
independently, including young children, are discouraged to operate the tool without
supervision. Young children should be supervised to ensure that they do not play with the
tool.
2. Check the tool and battery carefully before putting it into use. Stop operation immediately
when malfunctions be found and send the tool to be repaired by qualified serviceman. Do
not open the tool yourself.
3. Use only original MAC AFRIC SBATTR-002/004 type rechargeable Li-Ion battery for this
tool and recharge only with the MAC AFRIC SBATTR-002/004 type charger supplied with
the tool. Use of other type of battery or charger, e.g. imitated, modified or with other

brand, may result in a risk of battery burst causing personal injury and property damage.
4. Be sure that the battery is installed correctly and tightly before operating the tool.
5. Always wear protective devices to avoid personal injury.
6. Hold tool by insulated gripping surfaces when performing an operation on wall and floor
where the cutting tool may contact hidden wiring. Contact with a “live” wire will also
make exposed metal parts of the tool “live” and shock the operator.
7. Use appropriate detectors to determine if utility lines, such as electric lines, gas lines and
water lines, are hidden in the work area before screwing or drilling on the wall, floor or
ceiling.
8. Keep working area well ventilated. Non-specified or damaged battery may produce
poisonous gases causing personal injury.
9. Always be sure to have a firm footing and hold the tool firmly.
10. Be sure no one is below when using the tool in high locations.
11. Keep hands away from rotating parts.
12. Switch off the tool immediately once the drill bit is blocked as the motor or the battery
maybe damaged because of overloaded. Free the drill bit by reversing the rotation of the
drill bit which can be controlled by the switch.
13. Do not leave the tool running. Operate the tool only when hand-held.
14. Do not touch the drill bit or the workpiece immediately after operation; they may be
extremely hot and could burn your skin.
15. Do not overload the tool; it may result in a risk of overheating.
16. Some material contains chemicals which may be toxic. Take caution to prevent working dust
inhalation and skin contact. Follow material supplier safety data.
17. Always disconnect the battery from the tool before making any work on the tool.
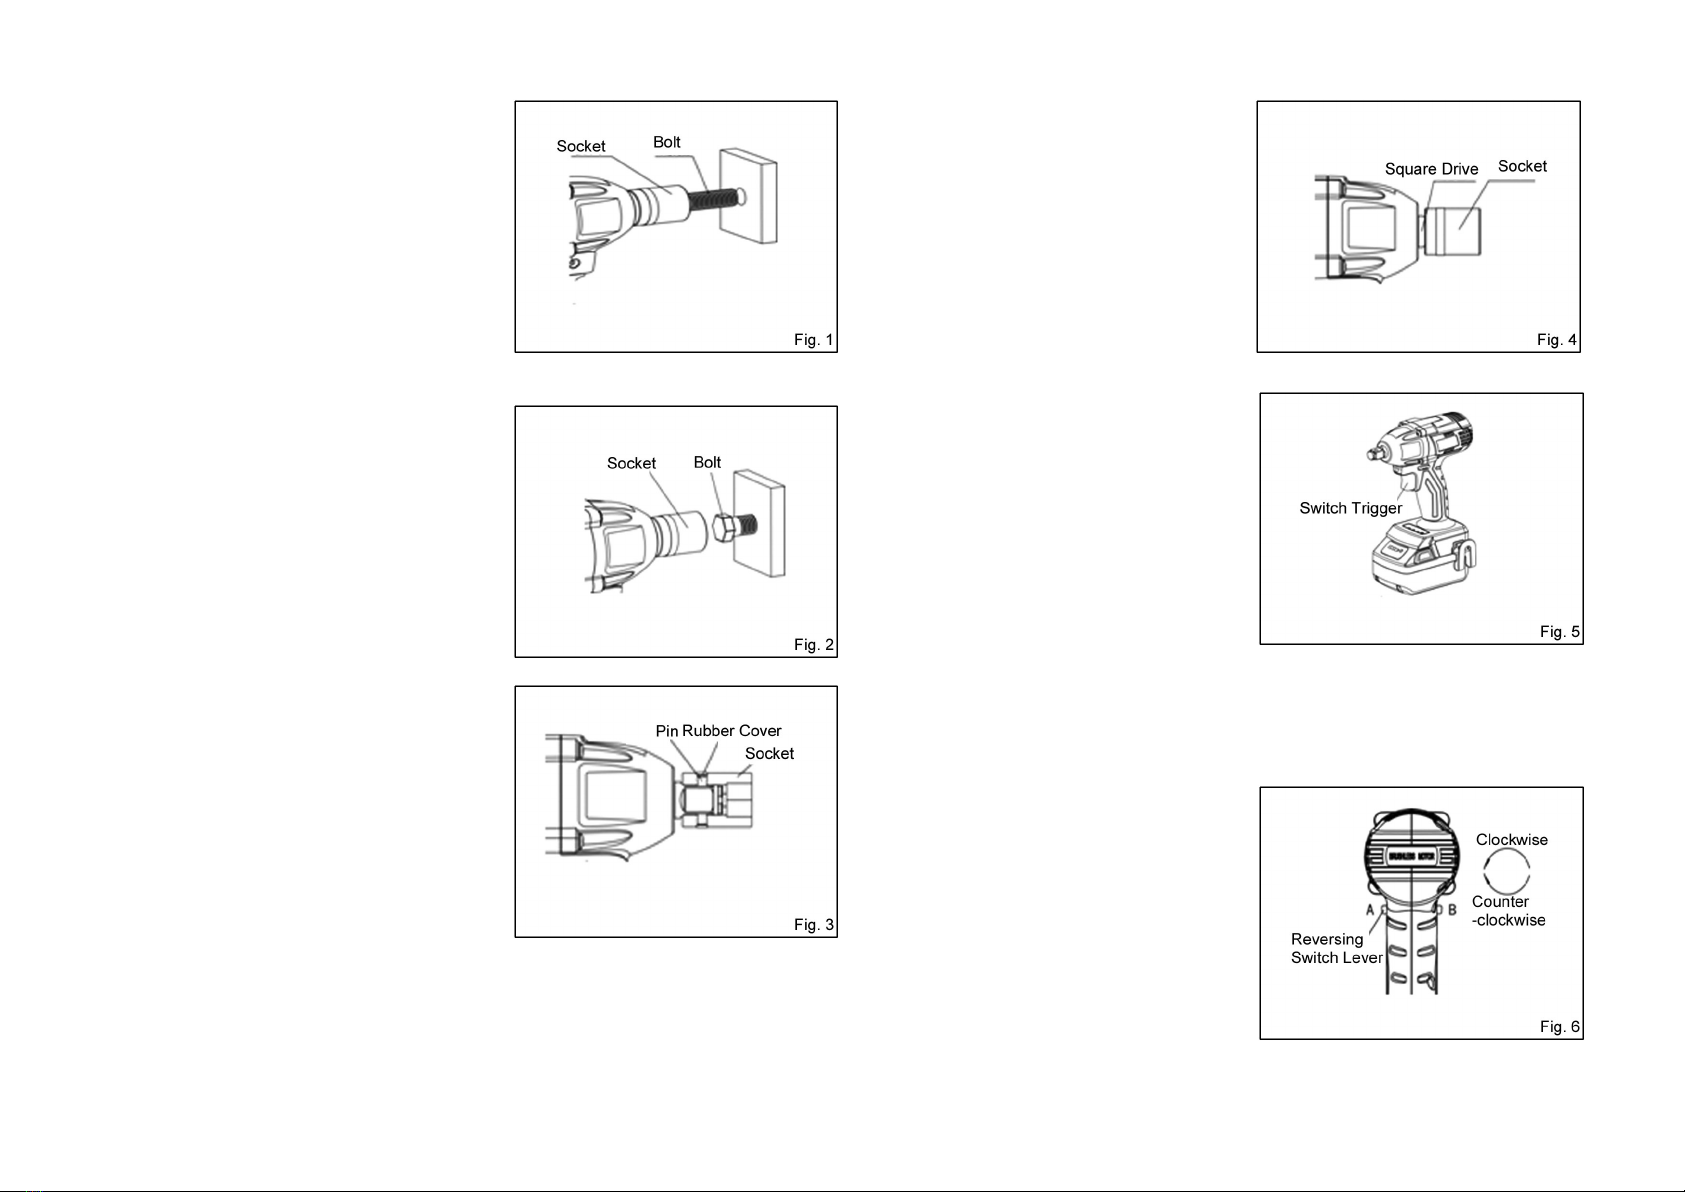
18. Before performing any kind of work on the tool (e.g. maintenance, bit change, etc.) as well as
when transporting and storing it, always set the reversing switch lever to the center position.
Unintentional activation of the On/Off switch may result in personal injury.
19. Only use soft and dry cloth to wipe the body of the tool. Do not clean the tool with wet cloth,
thinner, gasoline or other volatile solvents.
20. The damaged tools, accessories and waste packaging should be sorted for environmentally
friendly recycling and in accordance with local laws.
SAVE THESE INSTRUCTIONS.
WARNING! MISUSE or failure to follow the safety rules stated in this instruction manual may
cause serious personal injury.
IMPORTANT INSTRUCTIONS FOR BATTERY & CHARGER
1. Do not overdischarge the battery. Stop operating the tool when it’s run out of normal power.
2. Do not charge for damaged battery.
3. Wait till the battery cools down before charging.
4. It’s normal that the battery and charger will become warmer while in charging.
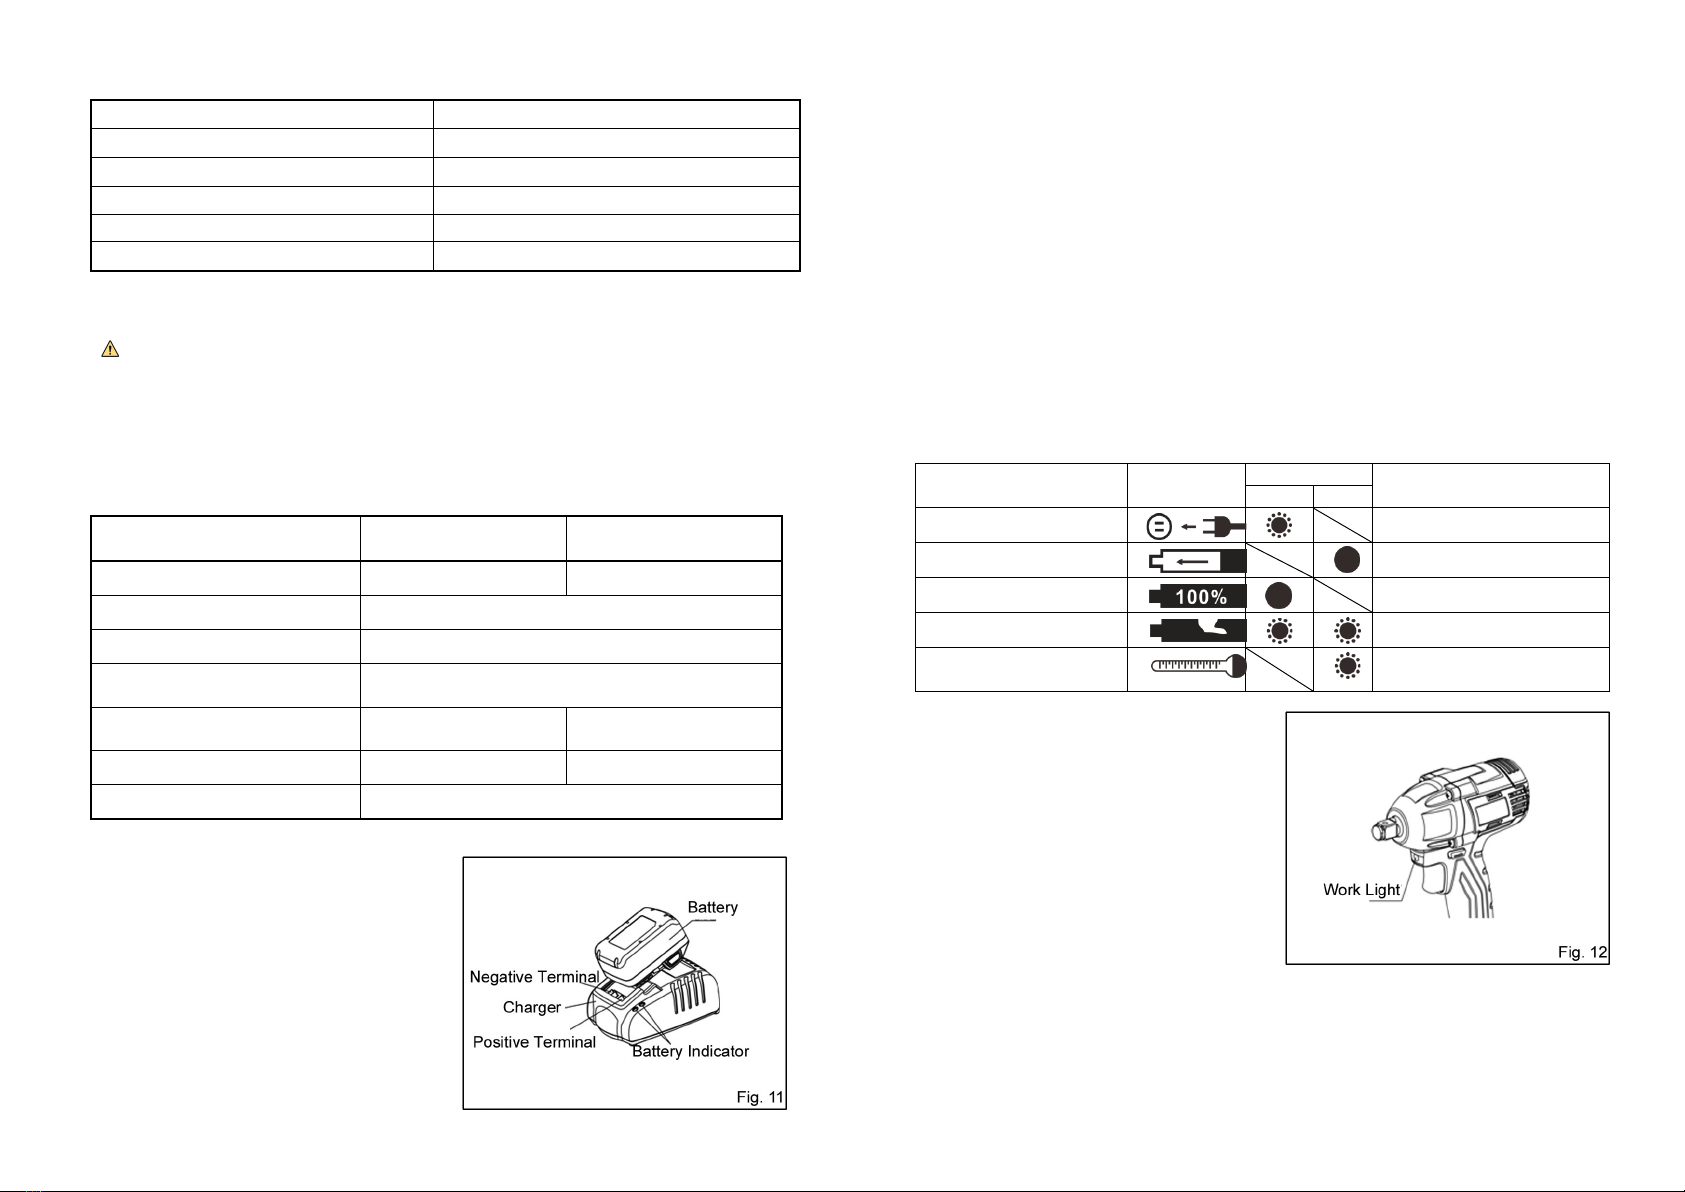
5. When charging finished, unplug the charger firstly and then remove the battery from the
charger. Do not leave the battery in the charger for long time.
6. Do not put the battery in the charger when the tool is not in use.
7. Keep battery far from fire and high temperature, THERE IS A DANGER OF EXPLOSION!
Never place battery on radiator or expose it under continuous sun irradiation, it may be
damaged by overheated.
8. Avoid overheating the battery by overloading or exposing it under continuous sun
irradiation. Avoid putting the battery in a cold area, which will cause the temperature of
the battery too low and damage the battery.
9. Be careful not to drop, shake or strike the battery. Never try to use the battery cartridge
as a hammer. Striking on the battery may cause unexpected short-circuit and results in a
risk of fire or explosion.
10. Do not short-circuit the battery:
a)Do not touch the terminals with any conductive material.
b) Avoid storing battery in a container with other metal objects such as nails, coins, etc.
c)Never expose battery to water, rain or snow.
11. If operating time with a battery has become excessively shorter after charging, stop
operating immediately and replace with a new one. Continuous using of a worn out
battery may result in a risk of overheating, possible burns and even an explosion.
12. Overheating or overusing of the battery may cause liquid escape and come into contact

with the adjacent components. Clean such parts or replace them, if required. If electrolyte
contacts with your skin, wash the contacted area with soap firstly and then wash with
lemon juice and vinegar. If electrolyte gets into your eyes, rinse them out with clear water
and seek medical attention right away.
13. Always cover the battery terminals when it is not used. Battery short caused by battery
terminals contacting with metals may result in a risk of fire.
14. A battery that has not been used for a longer period (e.g. 3 months) should be activated to
its full capacity by a full charging/discharging cycle. Otherwise the service life of the
battery may be shortened.
15. Store battery in a moistureproof and antifrost area.
16.Store battery properly:
a)Store the battery when it’s run of power but not overdischarged.
b) Store the battery only within a temperature range between 0℃and 45℃. Too hot or too
cold may damage the battery.
c)Avoid storing battery nearside paper clips, coins, keys, nails, screws, or other small metal
objects that can make a connection from one terminal to another. Shorting the battery
terminals together may cause sparks, burns, or a fire.
17. Do not incinerate the battery; it can explode in a fire.
18. Do not dispose of damaged or worn out battery into household waste, fire or water. The battery
can explode in fire. Damaged or worn out battery packs/batteries should be collected, recycled
or disposed of in an environmental-friendly manner.
19. Recharge only with the specified charger for the battery. Never use the charger for other
manufacturer’s batteries and never use other manufacturer’s charger for the battery of this
tool.
20. Do not expose charger to rain, snow or wet conditions.
21. If the cord or plug of the charger has been damaged, replace them immediately. Do not use the
charger with damaged cord or plug. Take it to a qualified serviceman to replace the cord and
plug.
22. Do not allow anything to cover or clog the charger vents.
23. Do not charge inside a box or container of any kind. The battery must be placed in a well
ventilated area during charging.
24. To reduce risk of damage to electric plug and cord, pull by plug rather than cord when
disconnecting charger.
25. Always unplug the charger before performing any kind of work on it (e.g. maintenance,
cleaning, etc.).
26. Do not disassemble charger or battery; take it to a qualified serviceman when service or repair
is required, incorrect reassembly may result in a risk of electric shock or fire.
SAVE THESE INSTRUCTIONS.
GENERAL DESCRIPTIONS
1. Square Drive 6. Button
2. Light 7. Battery
3. Switch Trigger 8. Belt Buckle
4. Torque Setting Panel 9. Reversing Switch Lever
5. Battery Indicator

INSTRUCTIONS FOR OPERATION
Tightening Bolt
CAUTION:
Point the bolt to threaded hole as vertically as
possible.
Place the socket in the bolt head and apply
pressure to the tool. Start the tool slowly and then
increase the speed gradually. Release the switch trigger when the bolt fixed tightly. (Fig. 1)
Removing Bolt
CAUTION:
Set reversing switch lever for counterclockwise
rotation when removing the bolt.
Place the socket in the bolt head and start the tool to
its full speed. After bolt was removed completely,
release the switch trigger slowly. (Fig. 2)
Installing or Removing Socket
CAUTION:
Before installing or removing the socket, always
disconnect the battery from the tool or set the
reversing switch lever to the center position.
After installing, pull the socket in reverse direction
to make sure it is tightly installed on the square
drive, or it may fall which may cause personal
injuries.
To install the socket, insert it to the end of square drive. Insert the pin and cover it with a rubber
ring. (Fig. 3)
To remove the socket, uncover the rubber
ring and pill out the pin. Then pull the socket
as the direction of arrow.
(Fig. 4)
Switch Action
CAUTION:
Before inserting the battery into the tool,
always check to see that the switch trigger
actuates properly and returns to the “OFF”
position when released. (Fig. 5)
Do not run the toll at low speed for a long
tome, or the tool will be overheated.
To start the tool, simply pull the switch
trigger and keep it pressed
Tool speed can be variably adjusted
depending on how far the switch trigger is
pressed. Light pressure on the switch trigger results in a low rotation speed and further pressure
results in an increase in speed.
Release the switch trigger to switch off the tool.
Reversing Switch Action
CAUTION:
Always check the direction of rotation
before operation. (Fig. 6)
Operate the reversing switch only after
the tool comes to a complete stop. Changing
the direction of rotation before the tool stops
may damage the tool.

When not operating the tool, always set the reversing switch lever to the center
position.
Never force to pull the switch trigger while the reversing switch lever is set at the
center position.
The reversing switch changes the directional rotation of the tool. When the reversing
switch lever is in the center position, the switch trigger cannot be pulled.
Right/Clockwise Rotation
For drilling and driving in screws, push the reversing switch lever from side B to side A for
right/clockwise rotation (viewed from the rear of the tool).
Left/Counterclockwise Rotation
For loosening or unscrewing screws, push the reversing switch lever from side A to side B for
left/counterclockwise rotation (viewed from the rear of the tool).
Setting Torque
The fastening torque can be adjusted in 3 steps. Press
the button on the panel to set the torque among
step L, H and Smart-loosen. (Fig. 7)
Smart-loosen Step
Under this special smart-loosen step, setting the
reversing switch lever to counterclockwise position,
the tool can stop working once the screw is loosened
no matter if the trigger is released.
Step L
Press the trigger and run the tool at low speed. The maximum torque can reach 240 N·m in
average.
Step H
Press the trigger and run the tool at high speed. The maximum torque can reach 300 N·m in
average.
Installing/Removing the Battery
CAUTION:
Use specified battery only. Or there will be the danger
of explosion which may cause personal injuries.
To install/remove the battery, first set the reversing
switch lever to the center position to lock the trigger
switch.
To install, insert the battery all the way until it securely locks in place. Do not force the
battery in and hammer it in with other objects. (Fig. 8)
To remove the battery, press the unlocking buttons
as direction ①and pull out the battery as
direction ②. Do not exert any force. (Fig. 9)
Battery Indicator
CAUTION:
If overheat or overload occurs, the four lights will
flick. Re-switch on the tool after the temperature
return to normal or overload is removed.
Recent power of the battery will be indicated by the
battery indicator when pressing the switch trigger.
Four red LED lights are set to indicate the battery
power which can be referred to the following table.
(Fig. 10)
②
①

Battery Charging
CAUTION:
Make sure that the AC voltage of the power source meets the requirement specified on the
nameplate of the charger.
Plug the battery charger(FFCL18-01)into the proper AC power source. The charging indicator
light will flicker in green color and the charger operates in standby mode.
Charging Operation
1. Plug the battery charger into the proper AC
power source. The charging indicator light
will flicker in green color and the charger
operates in standby mode.
2. Insert the battery pack fully into the battery charger and the charger starts charging.
The battery charger can detect some sort of failure caused by the battery and indicates by the
statuses of the red and green indicator lights.
When a failure occurs, remove the battery and then insert it into the charger again. If the failure
continues, change with a new battery. If the new battery can be charged, then the old battery
maybe damaged. If the charging indicator lights indicate same failure as before while changing
with a new battery, then the charger maybe damaged, take the charger to be repaired by qualified
serviceman. (Fig. 11)
The following chart lists the relations between the statuses of charging and charging indicator
lights.
Work Light
The white LED work light will be lit when pull the
switch trigger, allows for illumination of the work
area under unfavorable lighting conditions. (Fig.
12)
Continuous Use
If the tool is operated continuously until the battery cartridge has discharged, allow the tool to rest
for 15minutes before proceeding with a fresh battery.
Status of RED LED Lights Approx. Battery Power Left
4 lights lit ≥3/4
3 lights lit ≥1/2
2 lights lit ≥1/4
1 light lit <1/4
1 light extinguished after 5 times flash Low level
Battery Charger Model
FFCL18-01
FFCL18-03
SCHARG-001
(FFCL18-04)
Charging Voltage
220-240V
110V-240V
Charging Current
3.0A
Charging Frequency
50-60Hz
Applicable Battery Pack Voltage
(DC)
14.4-18V
Applicable Battery Cartridge
Capacity
4.0Ah 5.0Ah
Full Charging Time (Approx.) 90mins 100mins
Insulation Class Double Insulation
Charge State Icon
Light Icon
Indicator State
Green
Red
Charger Into The Power Sour
Green Flick, Red off
Charging
Green off, Red on
After Charging
Green on, Red off
Battery Abnormal
Green Red Flick
Battery Temperature Below
0℃or Over 45℃
Green off, Red Flick
-15-

USE CASE
CAUTION:
Accessories mentioned in the following figure and user manual are not offered with tool.
For those threads that have special demand for torque, use torque wrench to check the
real torque. If the tool cannot meet the demand, do not use or there will be the danger of
personal injuries.
Dust caused during operation may contain poisonous material. Operate the tool in a
well-ventilated working environment and always wear protective devices to reduce harm
to operator.
For different operating demands, many accessories can be installed on the tool. Refer to
following figure for choosing accessories:
MAINTENANCE
CAUTION:
Always be sure that the tool is switched off and the battery is removed before attempting to
perform inspection or maintenance.
Cleaning Ventilation Slots
For safe and proper working, always keep the power tool and its ventilation slots clean. Use a soft,
clean and dry brush to clean the ventilation slots regularly or when they’re clogged.
Inspecting the Mounting Screws
Regularly inspect all mounting screws and ensure that they are properly tightened. Should any of
the screws be loose, retighten them immediately. Failure to do so could result in serious hazard.
Cleaning
Only use soft and dry cloth to wipe the body of the tool. Do not clean the tool with wet cloth,
thinner, gasoline or other volatile solvents.
Lubricating
Add lubricating grease to the inner gear housing and drive spindle for slower wear and better
performance of the tool.
Cleaning Charger Base
Cut off power supply and pull out the battery before cleaning. Use dry cloth to clear dirty and
grease on the charger base. Do not wash it with water or detergent.
※To maintain product SAFETY and RELIABILITY, repairs, any other maintenance or adjustment
should be performed by authorized service centers, always using original replacement parts.

EXPLANATION OF GENERAL VIEW
1
Pan Head Tapping Screw 31 Ball Bearing
2
Spring Washer 32 Stator Assembly
3
Mechanical Output Assembly 33 Pan Head Tapping Screw
4
Front Cover for Gear Housing 34 Hall Plate
5
Spindle Sleeve 35 Stator
6
Circlip 36 LED Light Shade
7
Washer 37 Torque Setting
8
Baffle Ring 38 Reversing Switch Lever
9
Seal 39 Left-half Motor Housing
10
Square Drive 40 Right-half Motor Housing
1
1 Impact Assembly 41 Pan Head Tapping Screw
1
2 Steel Ball 42 Lock Nut M4
1
3 Impact Block 43 Belt Buckle
1
4 Steel Ball 44 Machine Screw
1
5 Washer 45 Electronic Components
1
6 Spring 46 Switch
1
7 Washer 47 Switch Trigger
1
8 Spindle 48 Terminal Block
19
Planet Gear 49 PCB Assembly
2
0 Pin 50 Nameplate
2
1 Washer 51 Label
2
2 Seal 52 Label
2
3 Roundwire Snap Ring 53 Charger
2
4 Inner Gear Ring 54 Battery
2
5 Ball Bearing 55 Pin
26 Gear Housing 56 Rubber Cover
27 Armature Assembly 57 Socket
28 Motor 58 Rubber Particle
29 Ball Bearing
30 Armature
Table of contents
Other ADENDORFF Power Tools manuals