advidia P-3360-OD User manual

Before attempting to connect or operate this product,
please read these instructions carefully and save this manual for future use.
The model number is abbreviated in some descriptions in this manual.
Installation Guide
Included Installation Instructions
Network Camera
Model No.
P-3360-OD

2
NOTE: This equipment has been tested and
found to comply with the limits for a Class A digi-
tal device, pursuant to Part 15 of the FCC Rules.
These limits are designed to provide reasonable
protection against harmful interference when the
equipment is operated in a commercial environ-
ment. This equipment generates, uses, and can
radiate radio frequency energy and, if not
installed and used in accordance with the
instruction manual, may cause harmful interfer-
ence to radio communications.
Operation of this equipment in a residential area
is likely to cause harmful interference in which
case the user will be required to correct the inter-
ference at his own expense.
FCC Caution: To assure continued compliance,
(example - use only shielded interface cables
when connecting to computer or peripheral
devices). Any changes or modifications not
expressly approved by the party responsible for
compliance could void the user’s authority to
operate this equipment.
For U.S.A
The model number and serial number of this
product may be found on the surface of the
unit.
You should note the model number and serial
number of this unit in the space provided and
retain this book as a permanent record of your
purchase to aid identification in the event of
theft.
Model No.
Serial No.
For U.S.A
CAN ICES-3(A)/NMB-3(A)
For Canada
WARNING:
• To prevent injury, this apparatus must be
securely attached to the wall/ceiling in
accordance with the installation instructions.
•
All work related to the installation of this prod-
uct should be made by qualified service per-
sonnel or system installers.
• The installation shall be carried out in accor-
dance with all applicable installation rules.
• The connections should comply with local
electrical code.
•
Batteries (battery pack or batteries installed)
shall not be exposed to excessive heat such
as sunlight, fire or the like.
CAUTION:
•
Any changes or modifications not expressly
approved by the party responsible for compli-
ance could void the user’s authority to operate
the equipment.
• Before attempting to connect or operate this
product, please read the label on the bottom.
• The network camera is only intended for a con-
nection to an ethernet or PoE network without
routing to the outside plant.

3
Contents
* SDXC/SDHC/SD memory card is described as SD memory card.
Important safety instructions......................................................................................................... 4
Limitation of liability....................................................................................................................... 5
Disclaimer of warranty................................................................................................................... 5
Preface .......................................................................................................................................... 5
Main functions............................................................................................................................... 6
About the user manuals ................................................................................................................ 6
System requirements for a PC ...................................................................................................... 7
Trademarks and registered trademarks......................................................................................... 8
Copyright....................................................................................................................................... 8
Network security ........................................................................................................................... 8
Precautions ................................................................................................................................... 9
Precautions for installation.......................................................................................................... 13
Major operating controls ............................................................................................................. 15
Preparations ................................................................................................................................ 17
Insert/remove an SD memory card* ............................................................................................ 23
Connection .................................................................................................................................. 24
Installation ................................................................................................................................... 29
Configure the network settings ................................................................................................... 33
Troubleshooting........................................................................................................................... 35
Specifications.............................................................................................................................. 36
Standard accessories.................................................................................................................. 40

4
Important safety instructions
1) Read these instructions.
2) Keep these instructions.
3) Heed all warnings.
4) Follow all instructions.
5) Do not install near any heat sources such as radiators, heat registers, stoves, or other appara-
tus (including amplifiers) that produce heat.
6) Only use attachments/accessories specified by the manufacturer.
7) Use only with the cart, stand, tripod, bracket, or table specified by the manufacturer, or sold
with the apparatus. When a cart is used, use caution when moving the cart/apparatus combi-
nation to avoid injury from tip-over.
S3125A
8) Unplug this apparatus during lightning storms or when unused for long periods of time.

5
Limitation of liability
THIS PUBLICATION IS PROVIDED “AS IS” WITHOUT WARRANTY OF ANY KIND, EITHER
EXPRESS OR IMPLIED, INCLUDING BUT NOT LIMITED TO, THE IMPLIED WARRANTIES OF
MERCHANTABILITY, FITNESS FOR ANY PARTICULAR PURPOSE, OR NON-INFRINGEMENT OF
THE THIRD PARTY'S RIGHT.
THIS PUBLICATION COULD INCLUDE TECHNICAL INACCURACIES OR TYPOGRAPHICAL
ERRORS. CHANGES ARE ADDED TO THE INFORMATION HEREIN, AT ANY TIME, FOR THE
IMPROVEMENTS OF THIS PUBLICATION AND/OR THE CORRESPONDING PRODUCT (S).
Disclaimer of warranty
IN NO EVENT SHALL advidia BE LIABLE TO ANY PARTY OR ANY PERSON, EXCEPT FOR
REPLACEMENT OR REASONABLE MAINTENANCE OF THE PRODUCT, FOR THE CASES,
INCLUDING BUT NOT LIMITED TO BELOW:
(1) ANY LOSS OR DAMAGE, INCLUDING WITHOUT LIMITATION, DIRECT OR INDIRECT,
SPECIAL, CONSEQUENTIAL OR EXEMPLARY, ARISING OUT OF OR RELATING TO THE
PRODUCT;
(2) ANY INCONVENIENCE, LOSS, OR DAMAGE CAUSED BY INAPPROPRIATE USE OR
NEGLIGENT OPERATION OF THE USER;
(3) ALL MALFUNCTIONS OR TROUBLES FROM UNAUTHORIZED DISASSEMBLE, REPAIR OR
MODIFICATION OF THE PRODUCT BY THE USER, REGARDLESS OF THE CAUSE OF THE
MALFUNCTION OR TROUBLE;
(4) INCONVENIENCE OR ANY LOSS ARISING WHEN IMAGES ARE NOT DISPLAYED, DUE TO
ANY REASON OR CAUSE INCLUDING ANY FAILURE OR PROBLEM OF THE PRODUCT;
(5) ANY PROBLEM, CONSEQUENTIAL INCONVENIENCE, OR LOSS OR DAMAGE, ARISING
OUT OF THE SYSTEM COMBINED BY THE DEVICES OF THIRD PARTY;
(6) ANY CLAIM OR ACTION FOR DAMAGES, BROUGHT BY ANY PERSON OR ORGANIZATION
BEING A PHOTOGENIC SUBJECT, DUE TO VIOLATION OF PRIVACY WITH THE RESULT OF
THAT SURVEILLANCE-CAMERA'S PICTURE, INCLUDING SAVED DATA, FOR SOME
REASON, BECOMES PUBLIC OR IS USED FOR ANY PURPOSE;
(7) LOSS OF REGISTERED DATA CAUSED BY ANY FAILURE.
Preface
The network camera P-3360-OD is designed to operate using a PC on a network (10BASE-
T/100BASE-TX), and can be installed under eaves (sheltered outdoor).
By connecting to a network (LAN) or the Internet, images and audio from the camera can be moni-
tored on a PC via a network.
Note:
•
It is necessary to configure the network settings of the PC and its network environment to moni-
tor images from the camera on the PC. It is also necessary to install a web browser on the PC
.

6
360° monitoring with a wide variety of transmission modes
With the super-wide-angle fisheye lens, 360° monitoring is possible with a single camera. The 360°
camera includes a wide variety of image capture modes that perform distortion correction:
Panorama, Double Panorama, Quad PTZ, Single PTZ, and Quad streams (H.264/VGA).
H.264 and JPEG triple encoding
H.264 dual stream output and JPEG output can be simultaneously provided.
* However, the image capture size of streams depends on the settings of the image capture
mode.
VIQS function (Variable Image Quality on Specified area)
It is possible to provide specified areas with high quality image without changing the overall size of
the data. Up to 2 areas can be specified.
* VIQS can be used when the image capture mode is Fisheye, Panorama, or Double Panorama.
SDXC/SDHC/SD memory card slot equipped
It is possible to save H.264 videos and JPEG images on the SDXC/SDHC/SD memory card manu-
ally at an alarm occurrence, during the period of the schedule, or on a web browser. It is also possi-
ble to save JPEG images at a network failure occurrence. (Download is possible.)
(Recommended SDXC/SDHC/SD memory card ☞page 39)
Super Dynamic
(☞Operating Instructions (included in the CD-ROM))
Super Dynamic compensates brightness on a pixel-to-pixel basis so that it produces clearer imag-
es even if objects have various illumination intensities.
The camera conforms to the IP66*1and Type 4X (UL50)*2, is compliant with NEMA 4X*3
ratings, and provides high dust resistance and waterproof performance.
Waterproofing treatment is not required for the camera body (waterproofing treatment is required
for cable connections).
*1 IP66 rating: The applicable product has "Dust tight (6)" protection against foreign solids and has
"Powerful water jets (6)" against water (IEC60529).
*2 Type 4X (UL50): "4X" is a grade of the waterproofing standard of UL.
*3 NEMA: Dust resistance and waterproof performance standards set by National Electrical
Manufacturers Association (United States).
About the user manuals
There are 2 sets of operating instructions for the P-3360-OD as follows.
• InstallationGuide:Explainshowtoinstallandconnectdevices.
• Operating Instructions (included in the CD-ROM): Explains how to perform the settings and
how to operate this camera.
Adobe®Reader®is required to read these operating instructions on the provided CD-ROM.
When the Adobe Reader is not installed on the PC, download the latest Adobe Reader from the
Adobe web site and install it.
The external appearance and other parts shown in this manual may differ from the actual product
within the scope that will not interfere with normal use due to improvement of the product.
English screens are used in these operating instructions and leaflets.
Main functions

7
System requirements for a PC
CPU: Intel®CoreTM 2 Duo 2.4 GHz or faster recommended
Memory: A minimum of 1 GB or more (for 32-bit OSs), 2 GB or more (for 64-bit OSs)
memory is required when using Microsoft®Windows®8.1,
Microsoft® Windows®8, Microsoft® Windows®7.
A minimum of 1 GB or more memory is required when using
Microsoft® Windows Vista®.)
Network interface: 10BASE-T/100BASE-TX 1 port
Audio interface: Sound card (when using the audio function)
Monitor: Image capture size: 1024 x 768 pixels or more
Color: 24-bit True color or better
OS: Microsoft®Windows®8.1
Microsoft®Windows®8
Microsoft®Windows®7
Microsoft®Windows Vista®
Web browser: Windows®Internet Explorer®11 (32-bit)
Windows®Internet Explorer®10 (32-bit)
Windows®Internet Explorer®9 (32-bit)
Microsoft®Internet Explorer®8 SP3
Microsoft®Internet Explorer®7 SP3
Others: CD-ROM drive
(It is necessary to read the operating instructions and use the software on
the provided CD-ROM.)
DirectX®9.0c or later
Adobe®Reader®
(It is necessary to view the PDF file on the provided CD-ROM.)
IMPORTANT:
• For information on the operation verification of the supported operating systems and web
browsers, refer to our website at http://advidia.com/cameras/.
• When using a PC that does not meet the above requirements, displaying of images may
become slower or the web browser may become inoperable.
• Audio may not be heard if a sound card is not installed on a PC. Audio may be interrupted
depending on the network environment.
• MicrosoftWindowsRT,MicrosoftWindows7StarterandMicrosoftWindowsVistaStarterare
not supported.
• WhenusingMicrosoftWindows8.1,MicrosoftWindows8,useitinthedesktop.Thesoftware
cannot be used in the Modern UI design.
Note:
• ForfurtherinformationaboutPCsystemrequirementsandprecautionsforwhenusing
Microsoft Windows 8.1, Microsoft Windows 8, Microsoft Windows 7, Microsoft Windows
Vista, or Windows Internet Explorer, click “Manual” - “Open” from the supplied CD-ROM and
refer to “Notes on Windows®/ Internet Explorer®versions”.

8
Trademarks and registered trademarks
• Microsoft,Windows,WindowsVista,WindowsMedia,InternetExplorer,andActiveXareeither
registered trademarks or trademarks of Microsoft Corporation in the United States and/or other
countries.
• Microsoftproductscreenshot(s)reprintedwithpermissionfromMicrosoftCorporation.
• IntelandIntelCorearetrademarksofIntelCorporationintheU.S.andothercountries.
• Adobe,AcrobatReader,andReaderareeitherregisteredtrademarksortrademarksofAdobe
Systems Incorporated in the United States and/or other countries.
• SDXCLogoisatrademarkofSD-3C,LLC.
• iPad, iPhone, and iPod touch are trademarks of Apple Inc., registered in the U.S. and other
countries.
• AndroidisatrademarkofGoogleInc.
• Allothertrademarksidentifiedhereinarethepropertyoftheirrespectiveowners.
Copyright
Distributing, copying, disassembling, reverse compiling and reverse engineering of the software
provided with this product are all expressly prohibited. In addition, exporting any software provided
with this product violating export laws is prohibited.
Network security
As you will use this unit connected to a network, your attention is called to the following security
risks.
①Leakage or theft of information through this unit
②Use of this unit for illegal operations by persons with malicious intent
③Interference with or stoppage of this unit by persons with malicious intent
It is your responsibility to take precautions such as those described below to protect yourself
against the above network security risks.
• Usethisunitinanetworksecuredbyafirewall,etc.
• If this unit is connected to a network that includes PCs, make sure that the system is not
infected by computer viruses or other malicious entities (using a regularly updated anti-virus
program, anti-spyware program, etc.).
• Protectyournetworkagainstunauthorizedaccessbyrestrictinguserstothosewhologinwith
an authorized user name and password.
• Applymeasuressuchasuserauthenticationtoprotectyournetworkagainstleakageortheftof
information, including image data, authentication information (user names and passwords),
alarm mail information, FTP server information and DDNS server information.
• Aftertheunitisaccessedbytheadministrator,makesuretoclosethebrowser.
• Changetheadministratorpasswordperiodically.
• Do not install the camera in locations where the camera or the cables can be destroyed or
damaged by persons with malicious intent.

9
Precautions
Refer installation work to the dealer.
Installation work requires technique and experi-
ences. Failure to observe this may cause fire,
electric shock, injury, or damage to this prod-
uct.
Be sure to consult the dealer.
Stop the operation immediately when
something is wrong with this product.
When smoke goes up from the product, the
smell of smoke comes from the product, or the
exterior of the product has deteriorated, con-
tinued use will cause a fire or fall of the product
resulting in injury, or damage to the product.
In this case, turn the power off immediately
and contact qualified service personnel for ser-
vice.
Do not attempt to disassemble or modify
this product.
Failure to observe this may cause fire or elec-
tric shock.
Consult the dealer for the repair or inspections.
Do not insert any foreign objects.
Fire or electrical shock may be caused if water
or any foreign objects, such as metal objects,
enter inside the unit.
Turn the power off immediately and contact
qualified service personnel for service.
Select an installation area that can sup-
port the total weight.
Selecting an inappropriate installation surface
may cause this product to fall down or topple
over, resulting in injury or accidents.
Installation work shall be started after sufficient
reinforcement.
Periodic inspections shall be conducted.
Rust on the metal parts or screws may cause a
fall of the product resulting in injury or acci-
dents.
Consult the dealer for the inspections.
Do not use this product in an inflammable
atmosphere.
Failure to observe this may cause an explosion
resulting in injury.
Avoid installing this product in the loca-
tions where salt damage occurs or corro-
sive gas is produced.
Otherwise, the mounting portions will deterio-
rate and accidents such as a fall of the product
may occur.
The exclusively designed base bracket
shall be used.
Failure to observe this may cause a drop
resulting in injury or accidents.
Use the exclusively designed base bracket for
installation.
The screws and bolts must be tightened to
the specified torque.
Failure to observe this may cause a drop
resulting in injury or accidents.
Install this product in a location high
enough to avoid people and objects from
bumping the product.
Failure to observe this may cause injury.
Turn the power off when do wiring of this
product.
Failure to observe this may cause electric
shock. In addition, short circuit or wrong wiring
may cause fire.
Do not strike or give a strong shock to this
product.
Failure to observe this may cause fire or injury.
Do not rub the edges of metal parts with
your hand.
Failure to observe this may cause injury.
Do not install or clean the camera, or
touch this product, the power cable or the
connected cables during thunder storms.
Failure to observe this may cause electric shock.
Keep SDXC/SDHC/SD memory cards
away from infants and children.
Otherwise, they may swallow the cards by mis-
take.
In this case, consult a doctor immediately.

10
Do not damage the power cable.
Do not damage, fabricate, twist, stretch, bun-
dle, or forcibly bend the power cable. Do not
place heavy objects on it, and keep it away
from heat sources..
Use of the damaged power cable may cause
electric shock, short circuit, or fire.
Consult the dealer for repair.
Correctly perform all wiring
Short circuits in the wiring or incorrect wiring
may cause fire or electrical shock.
Do not hang down from this product or
use this product as a pedestal.
Failure to observe this may cause a drop
resulting in accidents.
Turn the power off when cleaning this
product.
Failure to observe this may cause injury.
[Precautions for use]
This product has no power switch.
When turning off the power, disconnect the
power supply from the 12 V DC power supply
or the PoE device. (When using both the
12 V DC power supply and the PoE device for
power supply, disconnect both the connec-
tions.)
To keep on using with stable performance
Do not use this camera in hot and humid con-
ditions for a long time. Failure to observe this
causes component degradation resulting in life
shortening of this product.
Do not expose this product to direct heat
sources such as a heater.
Do not touch the dome cover with your
bare hands.
A dirty dome cover may cause deterioration of
picture quality.
Handle this product with care.
Do not drop this product, nor apply shock or
vibration to the product. Failure to observe this
may cause trouble. If a strong shock or vibra-
tion is applied to the enclosure, it may cause
damage or allow water to enter this product.
About the battery
A battery is installed inside the camera. Do not
leave the battery exposed in environments of
excessive heat as a result of sunlight or fire.
About the PC monitor
When displaying the same image on the
monitor for a long time, the monitor may be
damaged. It is recommended to use a screen-
saver.
When an error is detected, this product
will restart automatically.
This product will be inoperable for around
2 minutes after the restart just as when the
power is turned on.
About the automatic status detection
function
When this product malfunctions due to
exogenous noise, etc. for 30 seconds or more,
the product will automatically reset and will
return to normal state. When the product is
reset, initialization will be carried out as when
the power of the product is turned on. When
the product repeatedly resets, exogenous
noise level around the product may be high
and that may cause malfunction. Contact your
dealer for instructions.
Product disposal/transfer
Data saved on this product or a storage device
used with this product may lead to personal
information leakage. When it is necessary to
dispose or give this product to someone, even
when for repair, make sure that there is no data
on this product.
Cleaning this product body
Be sure to turn off the power before cleaning.
Failure to observe this may cause injury. Do not
use strong abrasive detergent when cleaning this
product. Otherwise, it may cause discoloration.
When using a chemical cloth for cleaning, read
the caution provided with the chemical cloth
product.
Transmission interval
Image transmission interval may become slow
depending on the network environment, PC
performance, shooting subject, access num-
ber, etc.

11
Periodically images on the screen appear
to be distorted
When the camera is installed in a location
where it is subject to small vibrations (for
example, when it is installed near devices that
vibrate), images may appear distorted and
stretched lengthways. This phenomenon is a
characteristic of image pickup devices that use
CMOS sensors and is caused by the relation-
ship between the periodic movements of the
camera and the timing that the image sensor
reads images. This is not a problem with the
camera. To reduce the possibility of this phe-
nomenon occurring, install the camera in a
secure location.
About SD memory card
• BeforeremovingtheSDmemorycardfrom
the camera, it is necessary to select “Not
use” for “SD memory card” first. The
recorded data may be corrupted if the SD
memory card is removed when “Use” is
selected for “SD memory card”. Refer to
page 23 for descriptions of how to insert/
remove an SD memory card.
• WhenusinganSDmemorycard,formatit
using this product. Recorded data on the
SD memory card will be deleted when for-
matted. If an unformatted SD memory card
or an SD memory card formatted with
other devices is used, this product may
not work properly or performance deterio-
ration may be caused. Refer to the
Operating Instructions on the provided
CD-ROM for how to format an SD memory
card.
• When some SD memory cards are used
with this product, the product may not
work properly or performance deterioration
may be caused. Use the SD memory
cards recommended in page 39.
• WhenusinganSDmemorycardsupport-
ing Class 10 of the speed class, use a
UHS-I (Ultra High Speed-I) compliant card.
Code label
The code labels (accessory) are required at
inquiry for trouble. Use caution not to lose
these labels. It is recommended to paste one
of the labels onto the CD-ROM case.
About the MOS image sensor
•
When continuously shooting a bright light
source such as a spotlight, the color filter of
the MOS image sensor may have deteriorat-
ed and it may cause discoloration. Even
when changing the fixed shooting direction
after continuously shooting a spotlight for a
certain period, the discoloration may remain.
• When shooting fast-moving subjects or
performing panning/tilting operations,
objects crossing the shooting area may
look to be bending askew.
Equipment classification and power
source indication label
Refer to the indication label on the back of this
product for the equipment classification and
power source, etc.
: Direct current symbol
What to do if “WARMING UP-PLEASE
WAIT” appears on the display.
This message indicates that the temperature
inside the camera has become extremely low.
In such a case, wait until the temperature
inside the camera goes up (around 2 hours or
more in low temperatures below -20 ºC
{-4 ºF}), and then turn on the power again.
Base bracket (accessory)
Do not use the mount bracket (accessory)
when mounting the camera on a vehicle.
AVC Patent Portfolio License
THIS PRODUCT IS LICENSED UNDER THE
AVC PATENT PORTFOLIO LICENSE FOR THE
PERSONAL USE OF A CONSUMER OR
OTHER USES IN WHICH IT DOES NOT
RECEIVE REMUNERATION TO (i) ENCODE
VIDEO IN COMPLIANCE WITH THE AVC
STANDARD (“AVC VIDEO”) AND/OR (ii)
DECODE AVC VIDEO THAT WAS ENCODED
BY A CONSUMER ENGAGED IN A
PERSONAL ACTIVITY AND/OR WAS
OBTAINED FROM A VIDEO PROVIDER
LICENSED TO PROVIDE AVC VIDEO. NO
LICENSE IS GRANTED OR SHALL BE
IMPLIED FOR ANY OTHER USE. ADDITIONAL
INFORMATION MAY BE OBTAINED FROM
MPEG LA, L.L.C.
SEE HTTP://WWW.MPEGLA.COM

12
About the dehumidifying device
• This product has dehumidifying device to
keep the inside at low moisture level, pre-
venting condensation and quickly dissipat-
ing dew if produced.
•
Dew may be produced depending on the
conditions of temperature, humidity, winds,
and rain, and it may take time to dehumidify.
• Neversealthesurfacesofthedehumidify-
ing device.
Dehumidifying device

13
Precautions for installation
This product is designed to be installed
under eaves.
IInstall the product in areas that do not receive
direct sunlight.
Power supply
This product has no power switch.
When turning off the power, turn off a power
supply or remove a power cable. When the
power cable of the product is connected to the
power supply device, the power will be sup-
plied to the product.
Before cleaning the product, make sure that
the power cable is not connected to the main
power supply.
Installation area for this product
Select an appropriate place for the installation-
area (such as a strong wall or ceiling) in your-
particular environment.
• Make sure that the installation area is
strong enough to hold this product, such
as a concrete ceiling.
• Installthecamerainthefoundationareaof
the architecture or where sufficient
strength is assured.
• Do not mount the product on a plaster
board or a wooden section because they
are too weak. If the product is unavoidably
mounted on such a section, the section
shall be sufficiently reinforced.
Do not place this product in the following
places:
• Locationswhereachemicalagentisused
such as a swimming pool
• Locationssubjecttomoistureoroilsmoke
such as a kitchen
• Locationsthathaveaspecificenvironment
that is subject to an inflammable atmo-
sphere or solvents
• Locations where a radiation, an X-ray, a
strong radio wave or a strong magnetic
field is generated
• Locations where corrosive gas is pro-
duced, locations where it may be dam-
aged by briny air such as seashores
• Locations where the temperature is not
within the specified range (page 36)
• Locationssubjecttovibrationsthatexceed
the railway specifications (EN50155)
Check before installation
Compatibility of devices is restricted. Before
installation, check the ratings and dimensions
of the devices to be used.
Contact your dealer for details.
Do not install this product in a humid or
dust-laden environment.
Otherwise, lifetime of the internal parts may be
shortened.
Make sure to remove this product if it will
no longer be used.
Protection from lightning
When cables are used outdoors, there is a
chance that they may be affected by lightning.
In such a case, install a lightning arrestor close
to the camera, and make the length of the
network cable between the camera and
lightning arrestor as short as possible to
prevent the camera from being damaged by
lightning.
Screw tightening
• Thescrewsandboltsmustbetightened
with an appropriate tightening torque
according to the material and strength of
the installation area.
• Donotuseanimpactdriver.Useofan
impact driver may damage the screws or
cause tightening excessively.
• Tightenscrewsatarightangletothe
surface. After tightening screws, perform
checks to ensure that the tightening is
sufficient enough so that there is no
movement or looseness.
Advidia assumes no responsibility for injuries or property damage resulting from failures
arising out of improper installation or operation inconsistent with this documentation.
14
Procure fixing screws separately.
The screws that secure this product are not
supplied. Prepare them according to the mate-
rial and strength of the area where the product
is to be installed.
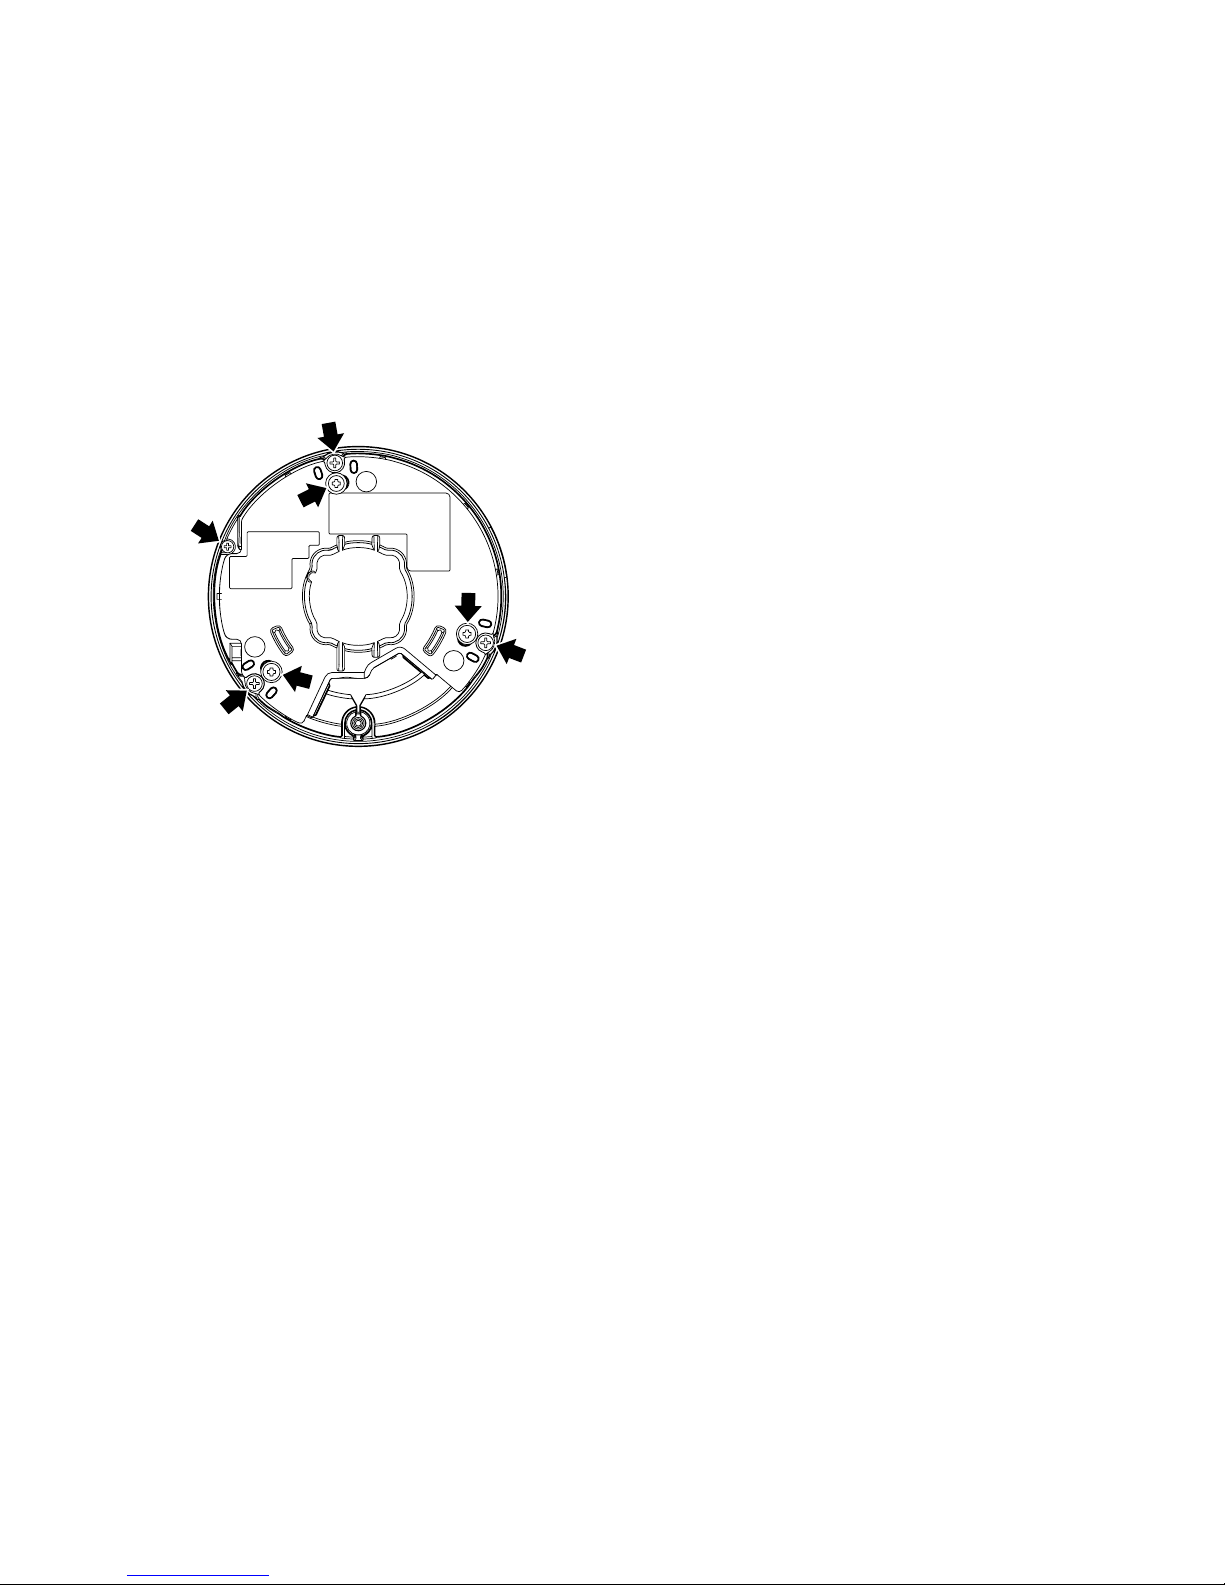
Do not remove or loosen the screws on
the rear of this product.
If the screws (7 pcs.) are loosened, water
exposure may cause damage or malfunction of
the product, or dropping may result in injury.
Radio disturbance
When this product is used near TV/radio anten-
na, strong electric field or magnetic field (near a
motor, a transformer or a power line), images
may be distorted and noise sound may be pro-
duced.
Installing in low temperature environments
This product can be used in low temperature
outdoor environments that get as cold as
-40°C{-40°F}.However,whenthisproductis
used in temperatures below -10 °C {14 °F},
snow and frost on the dome cover may not
come off. Also when this product is installed
and operated in temperatures below -20 °C
{-4 °F}, normal images may not be obtained
immediately after startup. In such a case, con-
nectthepowerandwaitapprox.2hours,and
then connect the power again.
PoE (Power over Ethernet)
Use a PoE hub/device that is compliant with
IEEE802.3af standard.
Router
When connecting this product to the Internet,
use a broadband router with the port forward-
ing function (NAT, IP masquerade).
Refer to the Operating Instructions on the pro-
vided CD-ROM for further information about
the port forwarding function.
Time & date setting
It is necessary to set the time & date before
putting this product into operation. Refer to the
Operating Instructions on the provided
CD-ROM for descriptions of how to perform
the settings.
Influence on images and their quality
This product has no wiper unit. Under the fol-
lowing conditions, image quality may deterio-
rate or images may not be viewed properly.
• Affectsofrainfall
Due to the wind that accompanies rainfall,
raindrops may fall on the dome cover. That
may make images less viewable.
• Affectsofsnowfall
Due to the wind that accompanies snow-
fall, snow may fall on the dome cover. That
may partially make surveillance images
inviewable. (The extent of inviewability may
vary depending on the amount of snowfall
and the quality of snow.)
• Affects of dust in the air or gas emission
from vehicles
Depending on the installation environment,
dome cover may be dirty due to dust in
the air or gas emission from vehicles. That
may degrade the quality of images.
• Affectsofstronglight
When the camera is facing toward a spot
light or other bright lights and light reflect-
ing objects, ghost images (a phenomenon
where objects that do not actually exist
appear in images) may appear. In particu-
lar, ghost images may be more noticeable
when the camera is facing toward an LED
light.

15
Major operating controls
Dome cover
* Do not touch the dome cover with your bare hands.
Enclosure
Camera fixing screw SD memory card slot cover
Network cable
RJ45 connector (female)
Alarm input/output cable
Power cable (12 V DC)
Microphone/line input cable (white)
Audio output cable (black)
Direction marker for installation
Attachment plate (accessory)
Attachment plate
position marker
Base bracket (accessory)
Cap for the female thread
for the conduit
Base cover (accessory)
16
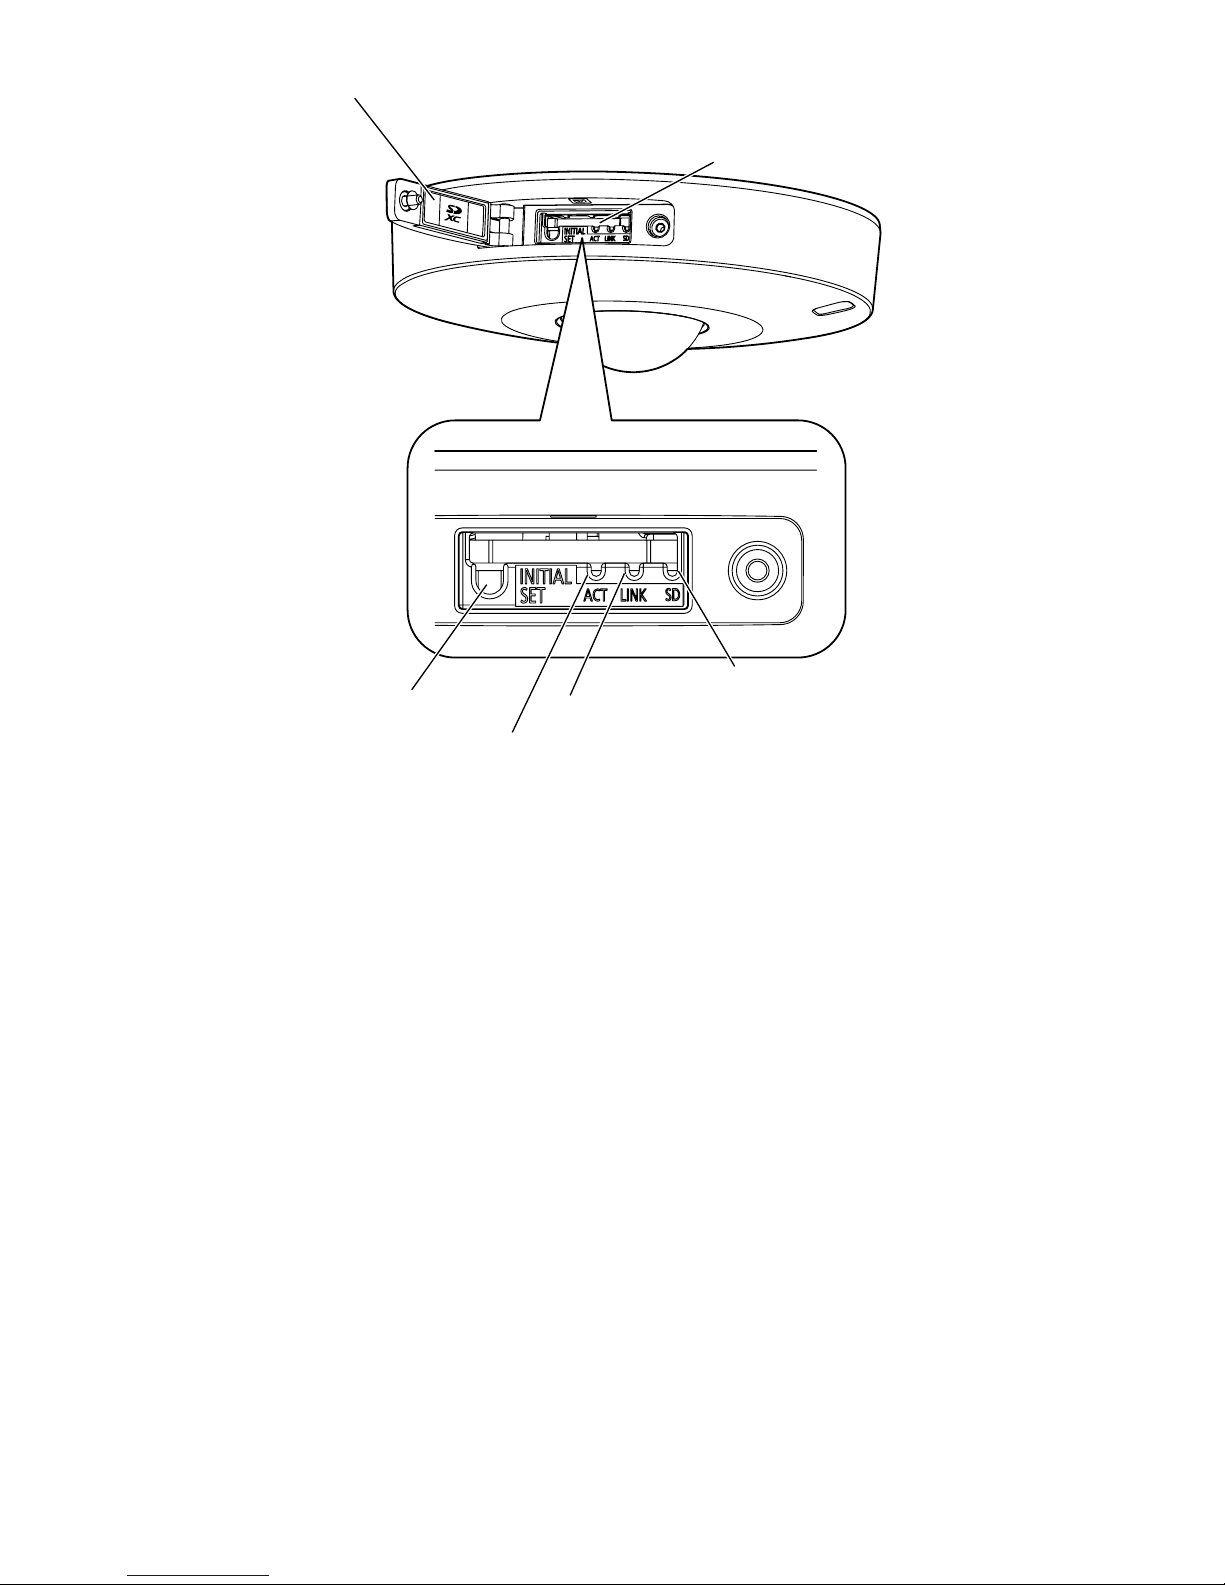
About the [INITIAL SET] button
After turning off the power of the camera, turn on the power of the camera while holding down this
button, and wait for about 5 seconds or more without releasing the button. Wait about 2 minutes
after releasing the button. The camera will start up and the settings including the network settings
will be initialized. Do not turn off the power of the camera during the process of initialization.
Before initializing the settings, it is recommended to copy down the settings in advance.
About the indicators inside the SD memory card slot cover
The Access indicator, Link indicator, and SD memory card error indicator inside the SD memory
card slot cover can be turned off. (Indicators are set to light or blink in the default settings.)
Turn off the indicators as required according to the installation environment. (☞Operating
Instructions (included in the CD-ROM))
SD memory card slot cover
SD memory card slot
INITIAL SET button
Access indicator
(blinks when accessing)
Link indicator
(lit when linking)
SD memory card
error indicator

17
When installing the camera on a ceiling or a wall, there are 3 methods as specified below.
• Usingatwo-gangjunctionbox(☞pages 18)
• Usingthesuppliedbasebracket(☞pages 19 to 22)
IMPORTANT:
• Procure4screws(M4)tosecuretheattachmentplate(accessory)orthebasebracket(acces-
sory) to a ceiling or a wall according to the material of the installation area. Do not use wood
screws and nails.
For mounting a camera on a concrete ceiling, use an anchor bolt (M4) or an AY plug bolt (M4)
for securing. (Recommended tightening torque M4: 1.6 N·m {1.18 lbf·ft})
• Mounttheattachmentplate(accessory)inconsiderationofthecameraangleinaccordance
with the instructions (☞pages 18 and 22).
• Requiredpull-outcapacityofasinglescrew/boltis196N{44lbf}ormore.
• Ifaceilingboardsuchasplasterboardistooweaktosupportthetotalweight,theareashall
be sufficiently reinforced.
The mounting conditions of the camera are described as follows:
Installation
place
Appropriate mount
bracket
Recommended
screw
Number of
screw
Minimum pull-out
strength (per 1 pc.)
Ceiling/wall Two-gang junction box M4 4 pcs. 196 N {44 lbf}
Ceiling/wall* Base bracket (accessory) M4 4 pcs. 196 N {44 lbf}
* The conditions for securing the base bracket to a ceiling or a wall are described here.
Preparations

18
Method of camera installation
Using a two-gang junction box
Secure the attachment plate (accessory) to the two-gang junction box built in a ceiling or wall using
the fixing screws (locally procured).
TOP
TOP
46 mm {1-13/16 inches}
Two-gang junction box
Attachment plate (accessory)
Fixing screws
(4 pcs., locally procured)
Direction marker for installation
83.5 mm {3-9/32 inches}
[Mounting hole pattern]
Note:
• The directionof“⇧TOP” on the attachment plate (accessory) determines the upwards direc-
tion of the image on the PC monitor.
• Forceilingmounting:
Determine the direction that you want images to be displayed upwards on the PC monitor, and
then mount the attachment plate with “⇧TOP” facing this direction.
• Forwallmounting:
The attachment plate (accessory) shall be mounted with “⇧TOP” facing upward.
IMPORTANT:
• Formountingacameraonaconcretesurface,useananchorbolt(M4)oranAYplugbolt(M4)
for installing.
(Recommended tightening torque M4: 1.6 N·m {1.18 lbf·ft})

19
Using the base bracket (accessory)
Note:
• Whenthecameraismountedontheceilingorwallwithaholeforcablerunning,orthecamera
is mounted using open wiring, the base bracket (accessory) is used.
IMPORTANT:
• If open wiring is conducted, be sure to use conduits
and run the cables inside the tubes to protect the
cables from direct sunlight.
• Installationworkshallbesuchthatthereisnoexposure
to water into the architecture through the conduits hav-
ing been joined.
1Loosen two fixing screws on both ends of the base cover (accessory) by using the bit for tam-
perproof screw (accessory), and remove the base cover (accessory).
When using a conduit, use a hexagon wrench (ISO 2936, width across flats S=5 mm
{5/64inches})orothertoolandalsoremovethecapforthefemalethreadfortheconduit.
Note:
• The female thread for the conduit is compliant with ANSI NPSM (parallel pipe threads)
3/4inchorG3/4ofISO228-1.
Conduit
20
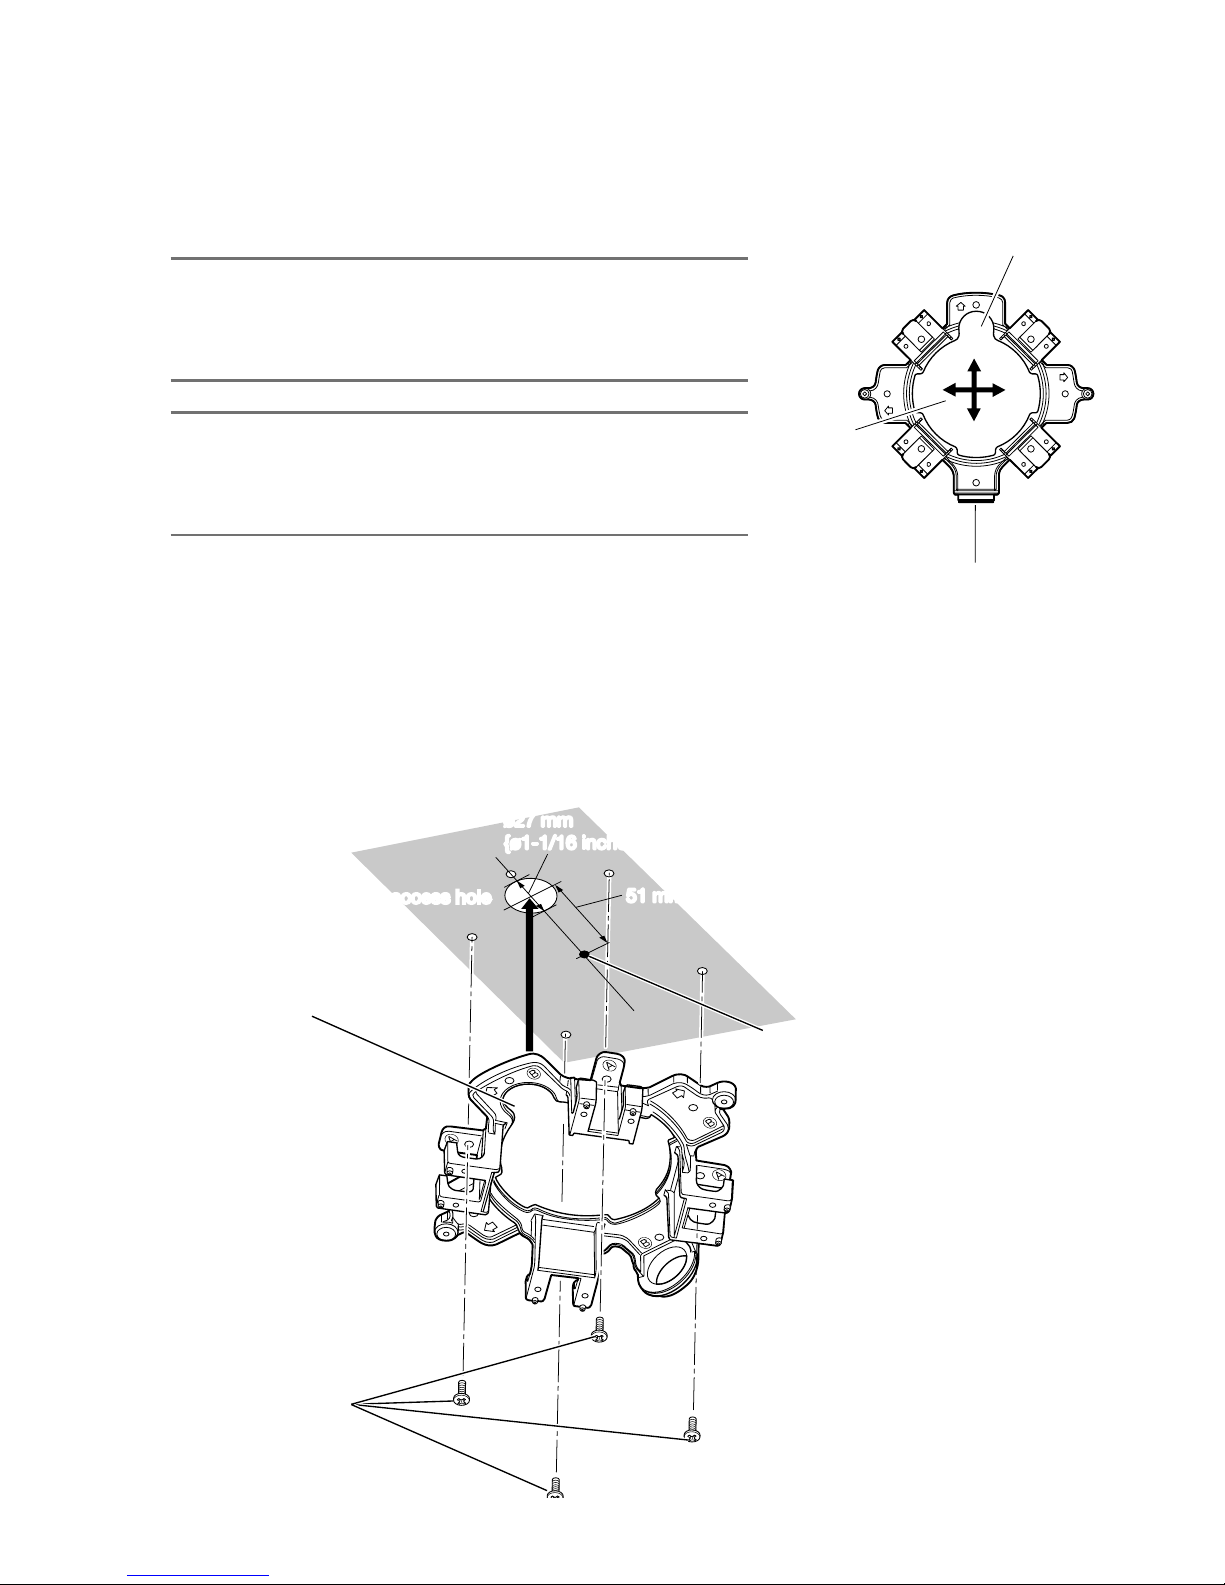
2Determine the direction of the base bracket according to the installation environment (how the
cables are wired, etc.) before mounting it to a ceiling or a wall by fixing 4 screws (locally pro-
cured).
The direction of the camera in relation to the base bracket is the 4 directions as shown in the
illustration.
IMPORTANT:
• For mounting a camera on a concrete surface, use an
anchor bolt (M4) or an AY plug bolt (M4) for installing.
(RecommendedtighteningtorqueM4:1.6N·m{1.18lbf·ft})
Note:
• Thecamera'sdirectionisdeterminedbythedirectionof
the attachment plate (accessory) mounted to the base
bracket 3.
<Using the cable access hole>
Open the camera access hole on the ceiling or wall as shown in the illustration. Align the cable hole
of the base bracket (accessory) to the hole, and mount the bracket to hole Ⓐor hole Ⓑon the
ceiling or wall.
[For use of the hole Ⓐ]
Female thread for the conduit
Cable hole
The dir
ection
of the camera
(4 dir
ections)
ø27 mm
{ø1-1/16 inches}
51 mm {2 inches}51 mm {2 inches}
Cable access holeCable access hole
Center of base bracket
Base bracket
(accessory)
Fixing scr
ews
(4 pcs., locally pr
ocured)
Cable hole
ø27 mm
{ø1-1/16 inches}
Table of contents
Other advidia Security Camera manuals

advidia
advidia A54 OD User manual

advidia
advidia M-46-FW-V2 User manual

advidia
advidia M-44-V-T-V2 User manual

advidia
advidia A-15 User manual

advidia
advidia M-24-FW-T User manual

advidia
advidia P-24 User manual

advidia
advidia A-200 User manual

advidia
advidia A64 User manual

advidia
advidia M-46-F User manual

advidia
advidia M-29-FW User manual

advidia
advidia A-28-Z User manual

advidia
advidia A-17 User manual

advidia
advidia A-44 User manual

advidia
advidia B-5360 5MP User manual

advidia
advidia A-18 User manual

advidia
advidia A-14 User manual

advidia
advidia "A" Series User manual

advidia
advidia M-26-FW User manual

advidia
advidia B-5360 User manual

advidia
advidia M-87-V User manual


