AgaMatrix Liberty User manual

©2005 AgaMatrix, Inc. 10 Manor Parkway Salem, NH 03079
Liberty™ Customer Service Toll Free: 1 (877) 542-3610
© 2004 – 2006 AgaMatrix, Inc.
Meter Firmware © 2004 AgaMatrix, Inc.
US and International Patents Pending
All trademarks are the properties of their respective owners.
8100-00683 Rev D
Distributed by:
LibertyTM
10045 S. Federal Highway
Port St. Lucie, FL 34952
Manufactured by:
AgaMatrix, Inc.
10 Manor Parkway
Salem, NH 03079

LibertyTM Blood Glucose Monitoring System
1Liberty™ Blood Glucose Monitoring System
TM

Important Information
About Your Liberty™ System ..............................................
Important Health-Related Information ..........................
About the Liberty™ System .................................................
Getting Started ........................................................................
Performing a Control Solution Test ...................................
How to Test Your Blood Glucose Levels ...........................
Testing on Your Palm ...............................................................
14, 30 and 90 Day Averages ..................................................
Time-of-Day Averages and Individual Test Results ....
Display Messages ......................................................................
Table of Contents
4
8
9
20
22
29
39
41
48
53
2TableofContents
57
62
65
70
76
78
79
80
81
86
Alarms .............................................................................................
Settings ..........................................................................................
Time/Date ......................................................................................
Error Messages and Troubleshooting ...............................
Batteries .........................................................................................
Caring For Your Meter and Lancing Device ....................
Specifications ...............................................................................
Symbols ..........................................................................................
Index ................................................................................................
My Liberty™ Meter and Target Ranges .............................
3Table of Contents

4
The Liberty™ System should be used:
For measuring blood glucose levels from fresh capillary
whole blood samples taken from the fingertips or the
palm (at the base of the thumb).
With Liberty™ Test Strips and Liberty™ Control Solution
only. Using other brands of test strips and control solu-
tion with this meter may produce inaccurate results.
Outside of the body (i.e., in vitro diagnostic use only).
Do not use the Liberty™ System for:
The diagnosis of diabetes.
Testing the glucose levels of neonates.
Testing glucose levels of arterial or venous blood.
Testing glucose from sites other than the fingertip or
the palm (at the base of the thumb).
Important Information about Your Liberty™ System
Important Information About Your Liberty™ System 5Important Information About Your Liberty™ System
Possible test sites:
The LibertyTM System requires only 0.5 microliters of
blood to perform a glucose test.
For the best results, test glucose from the tips of any
finger. The palm (at the base of the thumb) is an alternate,
but less accurate, test site. Only select soft and fleshy
areas on the fingertips or palm to lance, and avoid any
bony areas.

6 Important Information About Your Liberty™ System 7Important Information About Your Liberty™ System
CAUTION: Please read all the instructions provided in
this Owner’s Booklet and practice the testing procedures
before using the Liberty™ Blood Glucose Monitoring
System. Blood glucose monitoring should be done under
the guidance of a health care professional.
Physiological differences in circulation between the fin-
gertip and palm (at the base of the thumb) may result
in differences in blood glucose measurements between
these sites. Differences in glucose concentrations may
be observed after eating, taking insulin medication, or
exercise. Changes in blood glucose may be detected
in the fingertips before the palm (at the base of the
thumb).
It is recommended that you use a fingertip sample if:
You are testing for hypoglycemia or if you suffer from
hypoglycemia unawareness,
You are testing your blood glucose within 2 hours of
eating, taking insulin, diabetes pills, exercise, or
Your blood glucose results obtained from the palm (at
the base of the thumb) are not consistent with the way
you feel.

9
About the Liberty™ System
Your Liberty™ System Includes:
Liberty™ Meter
Carrying Case
Owner’s Booklet
Quick Start Guide (Poster)
Reference Guide (Fold-Out)
Two pre-installed CR2032, 3 volt
lithium batteries not shown
8
Important Health-Related Information
Please Read the Following:
Always follow your physician’s recommendations.
Severe dehydration and excessive water loss may yield
inaccurate results. If you believe you are suffering from
severe dehydration, consult your physician immediately.
Results below 60 mg/dL (3.3 mmol/L) may mean low
blood glucose levels (hypoglycemia).
Results over 240 mg/dL (13.3 mmol/L) may mean high
blood glucose levels (hyperglycemia). Checking ketones
may be advisable .
If you get results below 60 mg/dL (3.3 mmol/L) or above
240 mg/dL (13.3 mmol/L) and do not have symptoms of
hypoglycemia or hyperglycemia, repeat the test. If you
have symptoms or continue to get results that fall below
60 mg/dL (3.3 mmol/L) or rise above 240 mg/dL (13.3
mmol/L), follow your physician’s recommendations.
If you are experiencing symptoms that are not consistent
with your blood glucose test and you have followed all
instructions described in the Liberty™ Owner’s Booklet,
follow your physician’s recommendations.
Patients undergoing oxygen therapy may receive inaccu-
rate results.
Important Health-Related Information
This system does not include:
Test Strips
Lancing Device
Lancets
Control Solutions
The test strips, lancing device,
lancets and control solution must
be purchased separately.

11
Store the Liberty™ Test Strip vial in a cool, dry place at
46° F to 86° F (8° C to 30° C).
Use Liberty™ Test Strips only within the system operat-
ing temperature range of 50° F to 104° F (10° C to 40° C).
Keep away from direct sunlight and heat.
Store your Liberty™ Test Strips in their original vial only;
never store them in another vial, in any other container
or outside the vial.
After removing a Liberty™ Test Strip from the vial, im-
mediately close the vial cap tightly.
With clean, dry hands, you may gently handle the
Liberty™ Test Strip when removing it from the vial or
inserting it into the meter.
Do not use Liberty™ Test Strips beyond the expiration
date or 90 days after first opening the vial. This may
cause inaccurate results. Write the discard date (90 days
from the first opening) on the test strip vial.
Do not bend, cut, or alter Liberty™ Test Strips.
Apply only fresh capillary blood or control solution to
the sample area of the Liberty™ Test Strip.
Important Test Strip Information:
About the Liberty™ System10 About the Liberty™ System
CAUTION: Discard used test strips properly.
IMPORTANT: Use Liberty™ Test Strips only once.
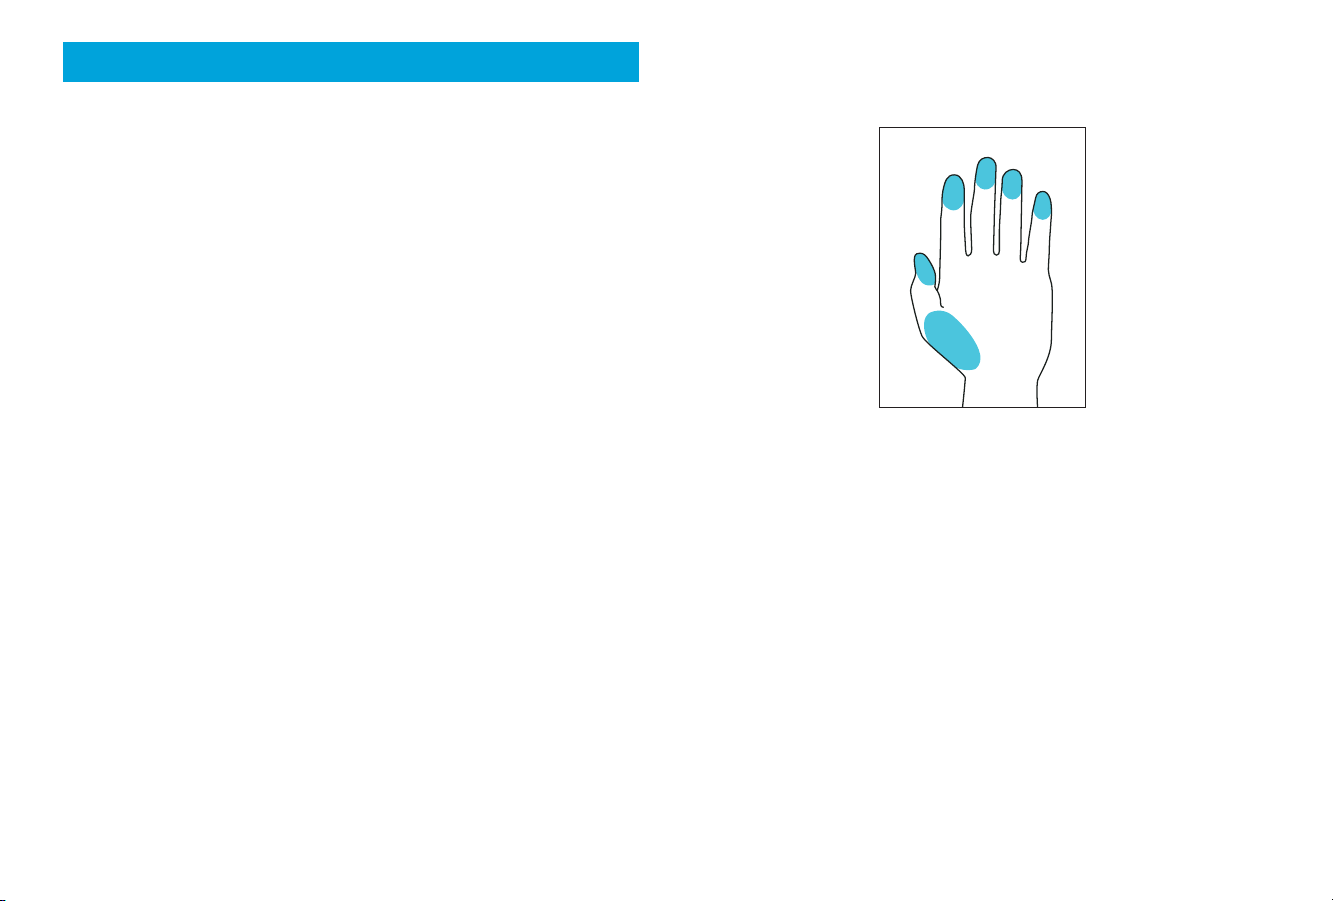
With your Liberty™ System, you can test your blood
glucose on your fingertips or the palm (at the base of the
thumb). Testing with the Liberty™ System requires a small
sample size (0.5 microliters of blood) about the size of a
pinhead (approximate size: •).
WARNING: The test strip vial contains drying agents that
may be harmful if inhaled or swallowed and may cause
skin or eye irritation.
Visual Fill Window
The window will turn
red when enough blood
has been applied or blue
when enough control
solution has been applied.
Contact Bars
Insert this end, facing up,
into the meter’s strip port.
Sample Area
Apply blood or control
solution to the edge of
the test strip (located
here).
The Liberty™ Test Strip

13
1
2
3
Ketone CONTROL
code
AM
30
90
14
:
PM
mg /dL
2
5
4
3
1
About the Liberty™ System12
The Liberty™ Meter
Display: Glucose test results, symbols, messages and
graphs appear here.
CENTER Button: Use the CENTER button to confirm an
option or make a selection in a menu.
RIGHT Arrow Button: Use the RIGHT arrow button to
scroll forward through options.
Strip Port: Insert the Liberty™ Test Strip, with the contact
bars facing up, into the strip port.
LEFT Arrow Button: Use the LEFT arrow button to scroll
backward through options.
About the Liberty™ System
1.
2.
3.
4.
5.

1
2
3
Ketone CONTROL
code
AM
30
90
14
:PM
mg /dL
15About the Liberty™ System
1
2
3
4
5
6
7
8
14
The Liberty™ Meter Display Segments
About the Liberty™ System
Date and Time: The date and time will appear here.
Glucose Test Results: Your glucose test results will appear
here.
Low Battery: The low battery symbol appears when the
batteries in your meter are running low.
Temperature Symbol: The temperature symbol appears
when the meter is outside its operating temperature range
of 50° F to 104° F (10° C to 40° C).
Code Symbol: The word “code” appears when displaying
the code number of the test strip.
Ketone Symbol: The word “Ketone” appears when your
glucose test results are higher than 240 mg/dL (13.3 mmol/L).
Control Solution Symbol: The word “control” appears
after you have performed a control solution test.
Units of Measurement: Results will be displayed in mg/dL.
1.
2.
3.
4.
5.
6.
7.
8.

1
2
3
Ketone CONTROL
code
AM
30
90
14
:PM
mg /dL
9
10
11
12
13
14 15
16
17About the Liberty™ System
Apply Sample to Test Strip: The test strip symbol and
flashing droplet symbol will signal you to apply your
blood sample or control solution to the test strip.
Sample Entering Test Strip: The three droplet symbols
will appear within the test strip symbol when blood or
control solution enters the test strip.
High Volume: The large bell symbol indicates the high-
est volume setting.
Low Volume: The small bell symbol indicates the low
volume setting.
Volume OFF: The small bell symbol with a line across it
indicates the volume has been muted.
14, 30, and 90 Day Indicators: The appropriate number
of days will appear when viewing graphical averages.
1,2,3 Countdown: The 1, 2 and 3 symbols will appear
during a test.
Graphing Area: Areas of the dot matrix will appear dur-
ing a test and when displaying graphical averages.
16 About the Liberty™ System
9.
10.
11.
12.
13.
14.
15.
16.

5
2
19About the Liberty™ System18
The Liberty™ Lancing System
Cocking Handle: Cocks the device so it is ready to lance.
Depth Adjustment Dial: Adjusts how deep the lancet
will lance the skin.
Depth Indicator: Displays the depth setting of the
lancing device.
Release Button: Fires the lancet.
Lancet: Lances the skin to produce a drop of blood.
Lancet Cover: Covers the lancet for safety.
Lancing Device Cap: Covers the lancet when installed on
the lancing device.
About the Liberty™ System
1.
2.
3.
4.
5.
6.
7.
3
1
4
5
6
7

21
[2] Setting Time and Date
Set Time and Date
Once in SET Mode, press the CENTER
button to move past the Volume Settings.
Press CENTER button again to move past
the Backlight Settings and into the Time
Format, Time and Date Settings.
Power OFF Meter
If you want to power OFF the meter, press and hold the
CENTER button for 2 seconds. If left inactive for 3 minutes,
the meter will shut OFF automatically.
Getting Started
Hour:
Minute:
Month:
Day:
Year:
:PM
:PM
For more detailed instructions, see the Settings Section beginning on page 62.
Select a 12 or 24 hour clock format
with the RIGHT or LEFT arrow buttons.
Press CENTER button to confirm
your selection. The hour is flashing.
If incorrect, you can set it with the
LEFT and RIGHT arrow buttons. Press
CENTER button to confirm and to set
the minute, month, day and year set-
tings. For faster scrolling, hold down
the RIGHT or LEFT arrow buttons.
:PM
20 Getting Started
Getting Started
Unpack your Liberty™ System Kit. Dispose of the packing
material properly.
[1] Switching On Your Liberty™ Meter
IMPORTANT: To ensure accurate use of meter, verify the
time, date and units of measure by following the steps
listed below.
Enter MENU Mode
Press and hold any button for 2 seconds to
enter the MENU mode. During the meter
system check, all display segments and the
display backlight will turn ON. The MEM
symbol appears. Pressing the LEFT arrow
once brings you directly to the SET symbol.
The main steps covered in this section are:
[1] Switching On Your Liberty™ Meter
[2] Setting Time and Date
Enter SET Mode
If you don’t see the SET symbol, press the
RIGHT or LEFT arrow buttons until the SET
symbol is displayed. Press the CENTER
button to select SET mode.
12 Hour Example:

23Performing A Control Solution Test
Important LibertyTM Control Solution information:
IMPORTANT: Control Solution should only be used for 90
days after first opening the bottle or until the expiration
date printed on the label, whichever comes first. Count
forward 90 days from the date you open a new bottle of
Liberty™ Control Solution. This is your discard date. Write
the discard date on the Liberty™ Control Solution bottle.
Use only Liberty™ Control Solution with your Liberty™
System.
Replace the cap onto the Control Solution bottle immedi-
ately after using.
Do not add water or any other liquid to Control Solution.
Control Solution tests should be performed within the
system operating temperature range of 50° F to 104° F
(10° C to 40° C).
22 Performing A Control Solution Test
Performing A Control Solution Test
The control solution is used to:
Control solution tests should be performed when you:
First get your Liberty™ Meter.
Begin using a new vial of Liberty™ Test Strips.
Suspect that your Liberty™ Meter or Test Strips are not
working properly.
Think your test results are not accurate.
Have dropped or damaged your meter or exposed your
meter to liquids other than blood samples.
Are advised by your physician to do so.
The main steps covered in this section are:
[1] Inserting a Liberty™ Test Strip
[2] Adjusting Code Number
[3] Applying Control Solution
[4] Viewing Control Solution Test Result
Ensure that your Liberty™ Meter and Test Strips are
working together properly.
Practice testing without having to use your own blood.
The Liberty™ system has 2 levels of control solution; Normal
and High. Select the level of control solution you want to use.

25Performing A Control Solution Test
[3] Applying Control Solution
Shake the control solution bottle. Discard the first drop of
control solution onto a clean, unused tissue or paper towel
and wipe the bottle tip to ensure that a good sample is
introduced into the meter. Dispense a second drop onto
a clean surface, such as an unused resealable plastic
bag. Bring the tip of the test strip to the control solution
sample.
[2] Adjusting Code Number
Once the system check is completed,
the Liberty™ Meter will display a test
strip code number for 2 seconds. If this
is not the same as the code number
printed on the test strip vial, press the
LEFT or RIGHT buttons until the meter
displays the same code number as
printed on the test strip vial.
code
N
O
R
M
A
L
M
G
D
,
H
I
G
H
M
G
D
,
C
O
D
E
The Liberty™ System
will automatically
detect if a test is
performed with
Liberty™ Control
Solution.
24 Performing A Control Solution Test
During the meter system check,
all display segments and the
display backlight will turn ON.
1
2
3
Ketone CONTROL
code
AM
30
90
14
:PM
mmgl/dL
?
[1] Inserting a Liberty™ Test Strip
Gently insert a new Liberty™ Test Strip into the meter.
The meter will power ON.
IMPORTANT: If all the display segments DO NOT turn ON,
do not use the meter. Call customer service immediately.

27Performing A Control Solution Test
Compare the result of your
Control Solution test to the
range printed on the Liberty™
Test Strip vial label for the
Control Solution level (normal
or high) that you used. Your
Control Solution result should
fall within this range. The Con-
trol Solution test result will be
stored in memory.
If your control solution test results are out of the
range, repeat the test. If the results from the Control
Solution tests continue to fall outside of the specified
range, do not use the Liberty™ System to test your
blood glucose. Contact Liberty™ Customer Service
Toll Free: 1 (877) 542-3610.
CONTROL
AM
:
N
O
R
M
A
L
M
G
D
,
H
I
G
H
M
G
D
,
C
O
D
E
High 220 - 320
To turn the meter OFF, remove
the used Liberty™ Test Strip.
Dispose of used materials
properly.
26 Performing A Control Solution Test
[4] Viewing Control Solution Test Result
The display should show:
The Control Solution test result will ap-
pear on the display, and if the volume
is enabled, your meter will beep once.
The word “control” will also appear on
the display.
CONTROL
AM
:
If the volume is enabled in SET
Options, your meter will beep
once indicating a successful fill
of Control Solution. Remove the
control solution bottle from the
tip of the Liberty™ Test Strip.
When Control Solution is applied,
the visual fill window on the
Liberty™ Test Strip turns blue.
On the Liberty™ Meter display,
drop symbols appear on the test
strip symbol to indicate that the
Control Solution is filling the Lib-
erty™ Test Strip. This visual fill window
will turn blue.
Normal 80 - 120

29How to Test Your Blood Glucose Level
How to Test Your Blood Glucose Level
CAUTION: To ensure accurate results, wash your hands
with warm, soapy water and dry before every test. Make
sure there is no grease, oil, or lotion on the test site. Inter-
fering substances (see test strip insert sheet for interfering
substances) on unwashed hands may lead to inaccurate
results. Use lancets only once. Do not use any lancet that
has been used by another person.
[1] Preparing the Liberty™ Lancing Device
Remove Lancing Device Cap
Unscrew the cap and remove it from the
lancing device.
The main steps covered in this section are:
[1] Preparing the Liberty™ Lancing Device
[2] Calibrating Your Liberty™ Meter
[3] Lancing
[4] Applying Blood Sample
[5] Final Steps
28 Performing a Control Solution Test
IMPORTANT:
Out-of-range test results may be caused by:
Expired or defective Control Solution.
Expired or defective test strip.
Error in performing test.
Diluted Control Solution.
Code number on Liberty™ Test Strip vial does not match
the code number set in the meter.
Meter malfunction.
Control Solution test done outside the operating
temperature of 50° F to 104° F (10° C to 40° C).
Failure to shake the Control Solution bottle vigorously.
Failure to discard the first drop of Control Solution and
to wipe the bottle tip clean.
CAUTION: Results from Control Solution tests do not re-
flect your blood glucose level. The Control Solution range
is a target range for the Control Solution only. It is not a
target range for your blood glucose level.
5
5

31How to Test Your Blood Glucose Level
Cock the Handle
Pull the cocking handle out until it
clicks. You may have already cocked
the handle accidentally while insert-
ing the lancet; this is OK. The lancing
device is now ready for use.
[2] Calibrating Your Liberty™ Meter
Insert a Liberty™ Test Strip
Insert a new Liberty™ Test Strip into the
meter. Make sure you insert the test strip
into the strip port with the contact bars
facing up. The meter will power ON auto-
matically.
During the meter system check, all dis-
play segments and the display backlight
should turn ON. If any of the segments fail
to turn ON, retry. If the meter fails to turn
ON, stop and call customer service.
Note: If you do not start the test within 3
minutes, the meter will turn OFF. To restart
your meter, remove the unused Liberty™
Test Strip and reinsert it into the meter.
1
2
3
Ketone CONTROL
code
AM
30
90
14
:PM
mmgl/dL
?
30 How to Test Blood Your Glucose Level
Twist the Lancet Cover Off
Hold the lancet firmly in place with
one hand and use your other hand
to twist off the lancet cover. Do not
discard it. It should be used when
discarding your used lancet.
Replace Lancing Device Cap
Twist the lancing device cap until it locks
into place. Be careful not to touch the
exposed needle on the lancet.
Set the Lancing Level Depth
The Liberty™ Lancing Device offers 5
depth settings. Rotate the dial to the
desired setting as shown on the depth
indicator. Level 1 is the most shallow;
level 5 is the deepest. If you have never
lanced before, it is recommended that
you start at level 3.
Insert New Lancet
Insert a new Liberty™ Lancet firmly
into the lancet holder cup. Pushing
the lancet into the lancet holder cup
may cock the device; this is OK.
5
5
5
5
5

33How to Test Your Blood Glucose Level
[3] Lancing
Lance Test Site
To ensure accurate results, wash
hands with warm, soapy water
and dry before every glucose
test. For details on possible test
sites, see pages 5-6.
For instuctions on how to test
on your palm, please refer to
page 39 before continuing.
Lightly press the lancing device
against the test site and press
the release button.
Express Blood Drop
Gently squeeze the lanced site,
and wipe away the first blood
drop that appears using a clean
tissue or paper towel. Squeeze
your finger until a second small
blood drop forms (approximate
size: •).
Note: Keep your hand warm
or gently massage the site
you are lancing to stimulate
blood flow.
32 How to Test Your Blood Glucose Level
The meter now displays the blink-
ing blood drop and test strip sym-
bols. The Liberty™ System is now
ready for you to apply blood.
Note: You can still change the code number as long as
you have not applied blood to the Liberty™ Test Strip by
pressing the LEFT and RIGHT arrow buttons.
Adjust Code Number
The Meter displays a test strip
code number for 2 seconds.
If this is not the same as the code
number printed on the test strip
vial, press the LEFT or RIGHT but-
tons until the meter displays the
same code number as printed on
the test strip vial.
code
N
O
R
M
A
L
M
G
D
,
H
I
G
H
M
G
D
,
C
O
D
E
code
The meter should display:
WARNING: If the calibration code is set incorrectly, you
may get inaccurate results.

35How to Test Blood Your Glucose Level
IMPORTANT:
Do not press the Liberty™ Test Strip against the test site.
Do not scrape blood onto the Liberty™ Test Strip.
Do not apply blood to the top side of the Liberty™
Test Strip.
Do not apply blood to the Liberty™ Test Strip when
the test strip is out of the meter.
Do not put blood or foreign objects into the Liberty™
strip port.
Do not apply more blood after beep.
Carefully read the test results on the screen before
making any treatment decisions.
The visual fill window of the
Liberty™ Test Strip will turn red.
The visual fill window
will turn red.
Bring Test Strip to Blood Sample
[4] Applying Blood Sample
The Liberty™ Test Strip acts like a
sponge and draws the blood into
the test strip through the sample
area.
Introduce the blood sample in the
orientation shown. The test strip
fills from the tip. Avoid introducing
blood on the top surface of the test
strip.
34 How to Test Your Blood Glucose Level
Blood Drop
CAUTION: Be sure not to press the RIGHT or LEFT arrow
buttons while applying blood. You might change the
calibration code number accidentally.
WARNING: If the visual fill window does not completely
fill, you may get an inaccurate result. Retest and ensure
that the visual fill window is completely full.

37How to Test Your Blood Glucose Level
Your test is completed when your
blood glucose test result with time
and date is shown on the display.
If the volume is enabled in SET
Options, you will hear a beep. Your
test result is now stored in the
memory.
[5] Final Steps
Remove the Test Strip
Remove the used Liberty™
Test Strip and discard prop-
erly. The Liberty™ Meter will
automatically turn off.
AM
:
#&&1
AM
:
36 How to Test Your Blood Glucose Level
As the meter is calculating your results, the 1-2-3 symbol
and the graphing area will progressively appear until your
results are displayed.
Remove Test Strip from Blood Sample
The beep (if the volume is enabled in SET Options) or the
moving dot bar indicates that you can remove your finger
from the Liberty™ Test Strip.
1
2
3
1
2
3
1
2
3
While the meter is calculating your results the display shows:
On the display, blood drop symbols
appear on the test strip symbol
to indicate that blood is filling the
Liberty™ Test Strip.
The display shows:
#&&1
If the volume is enabled in SET
Options, the meter will beep
once when blood is applied to
the Liberty™ Test Strip.
WARNING: The lancing device should only be used by one
patient. Do not re-use lancets.
Table of contents
Other AgaMatrix Blood Glucose Meter manuals

AgaMatrix
AgaMatrix Presto User manual

AgaMatrix
AgaMatrix Jazz User manual

AgaMatrix
AgaMatrix Jazz Wireless 2 User manual

AgaMatrix
AgaMatrix Presto User manual

AgaMatrix
AgaMatrix JAZZ DoseCoach User manual

AgaMatrix
AgaMatrix WaveSense JAZZ User manual

AgaMatrix
AgaMatrix WaveSense JAZZ User manual

AgaMatrix
AgaMatrix WaveSense JAZZ User manual

AgaMatrix
AgaMatrix iBGStar User manual

AgaMatrix
AgaMatrix WaveSense Keynote User manual