AEG CS FMP 550IR User manual

1
CS FMP 550IR
- PLL Synthesizer Stereo Radio
- RDS (Radio Data System) operation
- CD Player / MP3 Player / WMA Player
- Automatically Memory Storing
- Full Detachable Panel
- Preset Equalization
- USB Interface
- Steering Wheel Remote Control
OWNER’S MANUAL

2
Table of Contents
Installation .................................................................................. 4
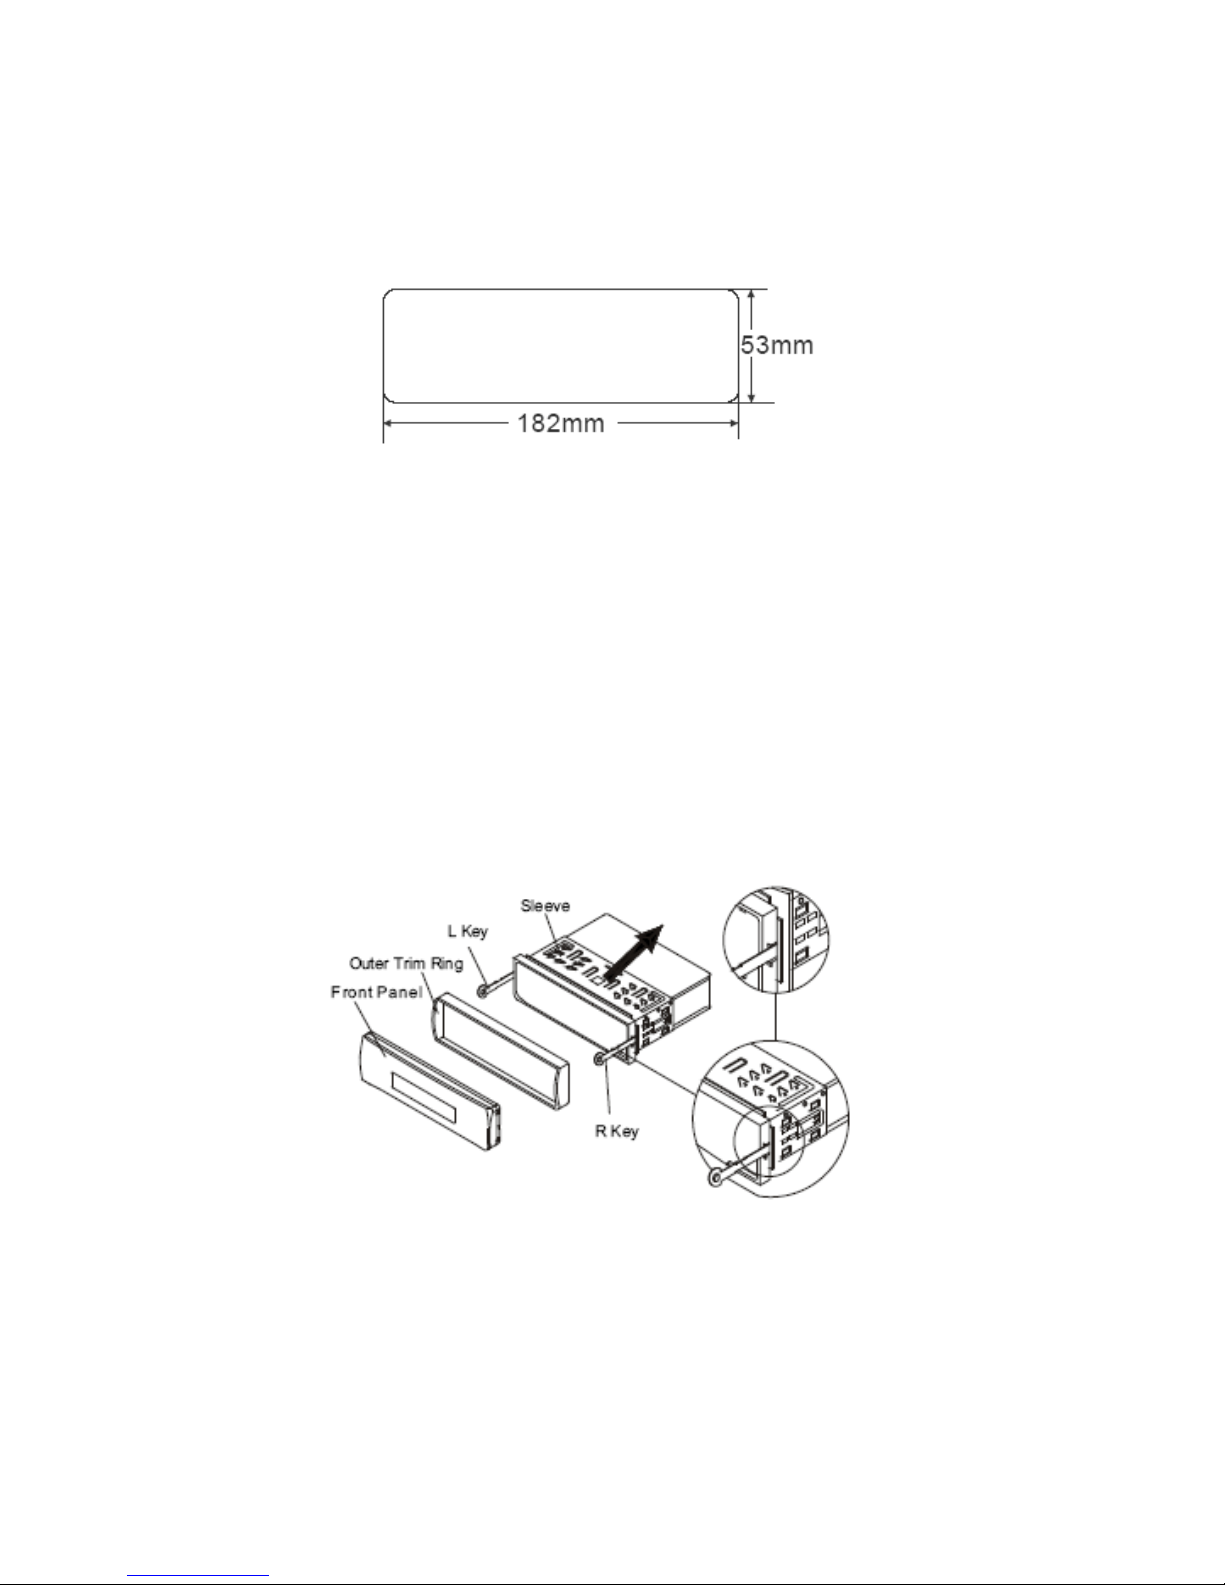
DIN FRONT/REAR-MOUNT ....................................................................... 4
DIN FRONT-MOUNT (Method A) ............................................................... 5
DIN REAR-MOUNT (Method B) ................................................................. 7
USING THE DETACHABLE FRONT PANEL .............................. 8
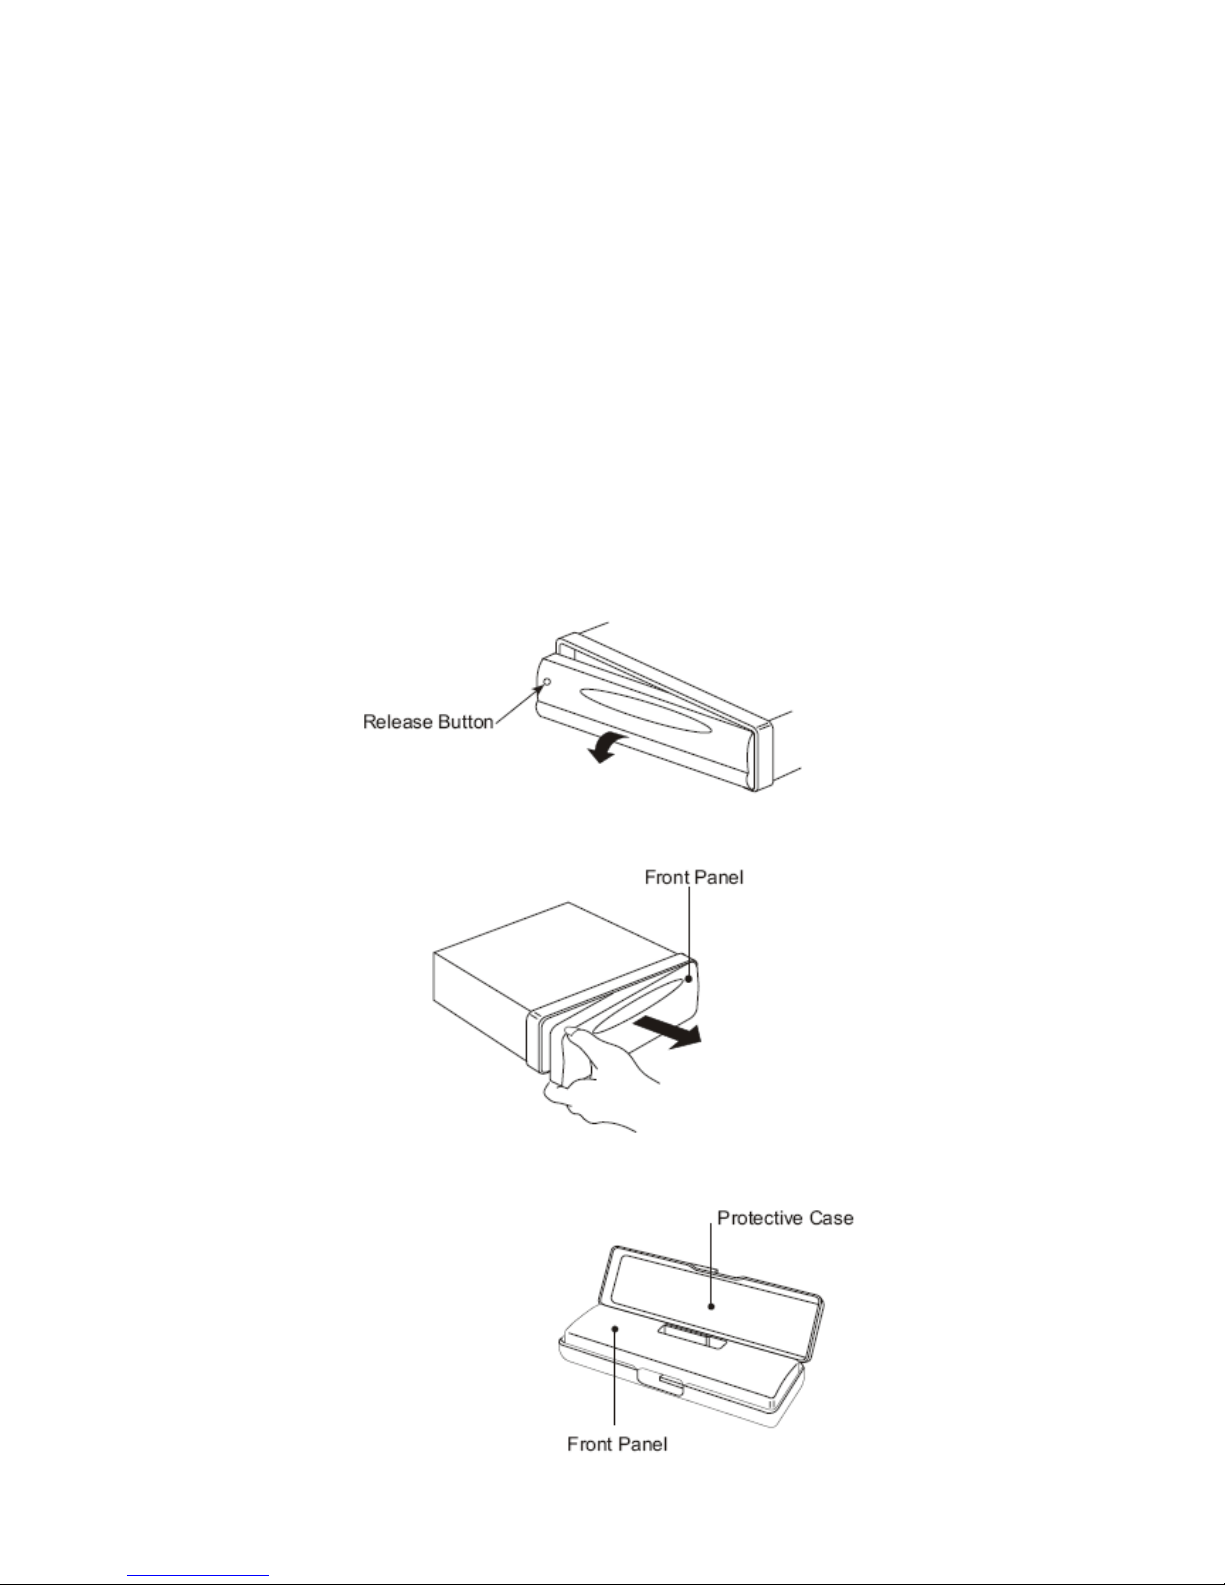
Removing the front panel.......................................................................... 8
Installing the front panel ........................................................................... 9
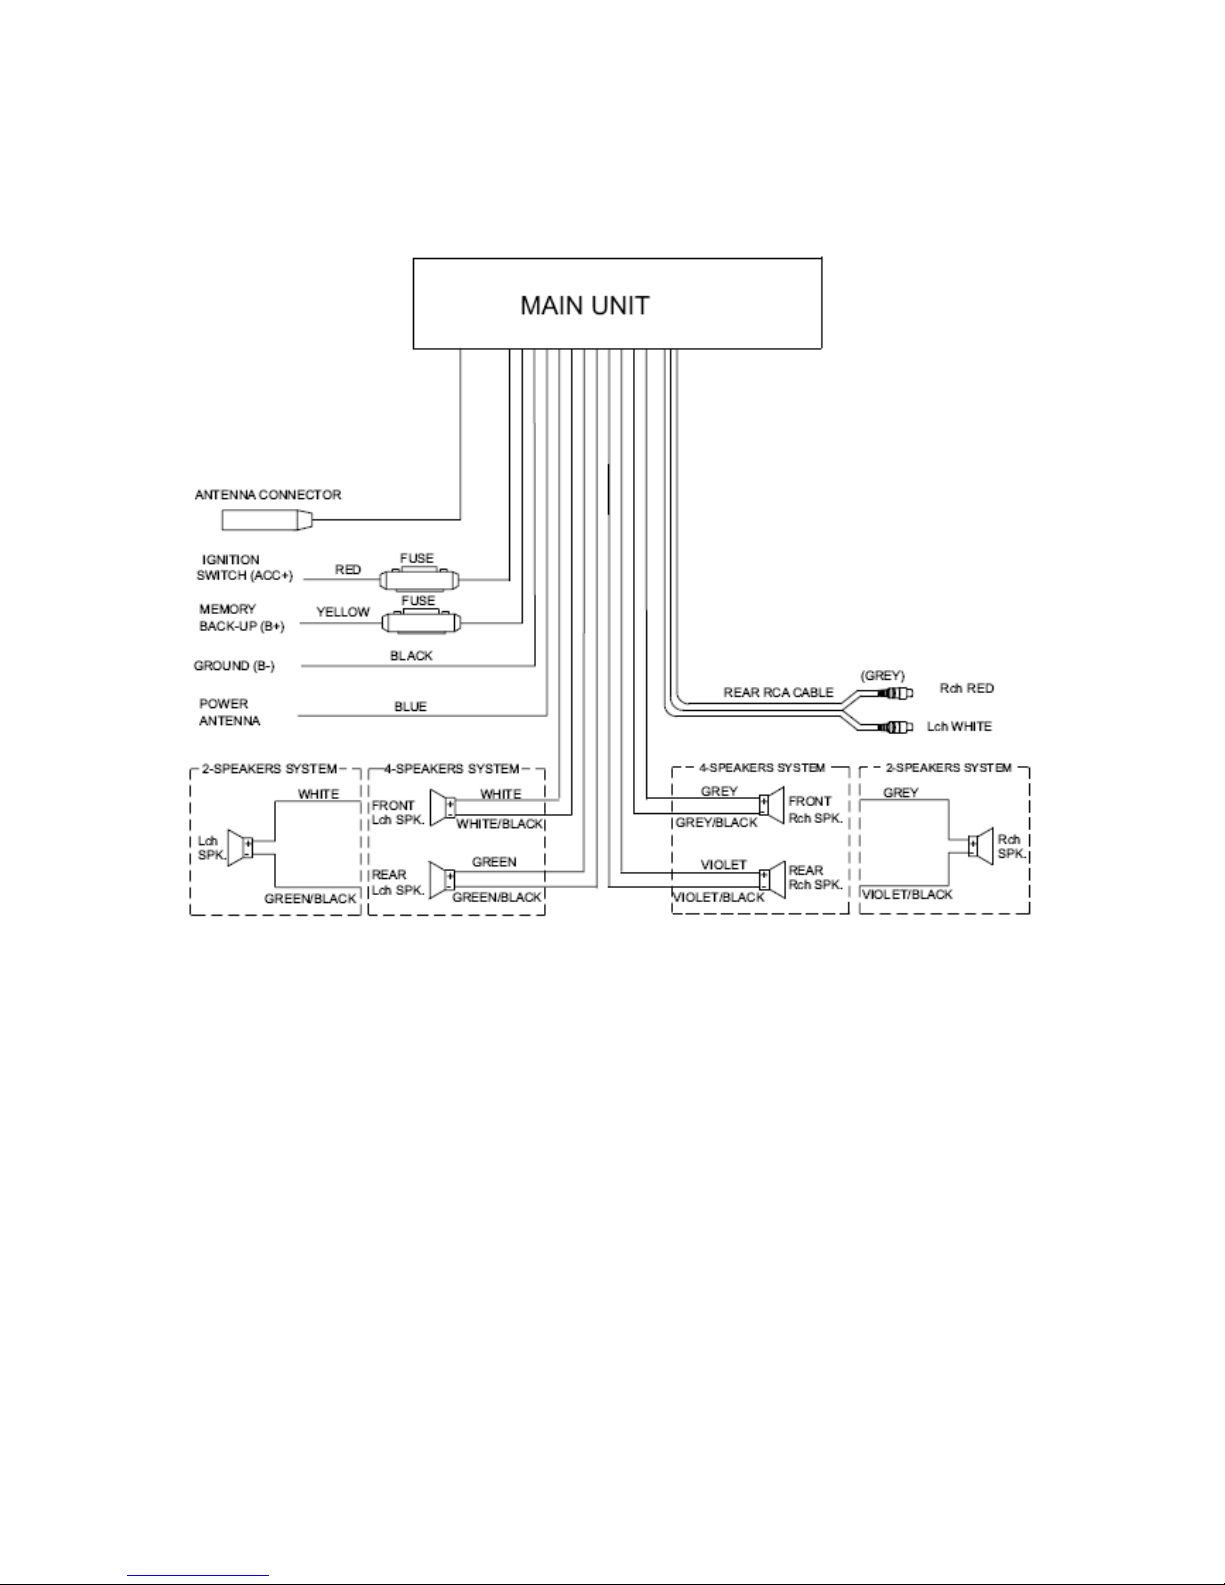
WIRING CONNECTION............................................................. 10
OPERATIONS .............................................................................11
LOCATION OF KEYS ............................................................................... 11
SWITCHING ON/OFF THE UNIT .............................................................. 11
FACEPLATE RELEASE............................................................................ 11
SOUND ADJUSTMENT ............................................................................ 12
LOUDNESS .............................................................................................. 14
DISPLAY ................................................................................................... 14
EQUALIZATION ........................................................................................ 15
LIQUID CRYSTAL DISPLAY ..................................................................... 15
REMOTE SENSOR ................................................................................... 15
RESET FUNCTION ................................................................................... 15
RADIO OPERATION .................................................................. 16
SWITCHING TO RADIO MODE................................................................ 16
SELECTING THE FREQUENCY BAND ................................................... 16
SELECTING STATION .............................................................................. 16
AUTOMATIC MEMORY STORING &PROGRAM SCANNING ................. 17
STATION STORING .................................................................................. 17
RDS (RADIO DATA SYSTEM) OPERATION ............................................ 17
CD OPERATION ........................................................................ 19
SWITCHING TO CD MODE ...................................................................... 19
SELECTING TRACKS .............................................................................. 20
PAUSING PLAYING .................................................................................. 20
REPEATING THE SAME TRACK ............................................................. 20
PLAYING ALL TRACKS IN RANDOM ...................................................... 20
EJECTING A DISC.................................................................................... 20
MP3 OPERATION ...................................................................... 21
SWITCHING TO CD (MP3) MODE ........................................................... 21
EJECTING A DISC.................................................................................... 21
SELECTING TRACKS IN SINGLE STEP ................................................. 21
PAUSING PLAYING .................................................................................. 21
PREVIEWING ALL TRACKS .................................................................... 21

3
PREVIEWING THE SAME TRACK .......................................................... 22
PLAYING ALL TRACK IN RANDOM ........................................................ 22
Searching Directory or file Name ........................................................... 22
Searching From Root Directory.............................................................. 23
Searching From Current Directory ......................................................... 23
DISPLAY INFORMATION ......................................................................... 23
WMA operation ......................................................................... 24
USB PLAY OPERATION............................................................ 24
RECORD OPERATION.............................................................. 25
SUPPORTED MP3/WMA DECODING MODES........................ 25
SD/MMC OPERATION .............................................................. 26
REMOTE CONTROL ................................................................. 27
LOCATION OF KEYS ............................................................................... 27
INSTALLING THE REMOTECONTROL ................................................... 27
INSERTING THE BATTERY ..................................................................... 29
DISC NOTES ............................................................................. 30
SPECIFICATION ........................................................................ 31
TROUBLE SHOOTNG............................................................... 32
NOTICE...................................................................................... 33
WARRANTY .............................................................................................. 33
EC TYPE-APPROVAL CERTIFICATE..................................................... 33
HOTLINE................................................................................................... 34
RETRACTION OF OLD DEVICES.............................................................34
Index .......................................................................................... 35

4
Installation
Notes:
- Choose the mounting location where the unit will not interfere with the
normal driving function of the driver.
- Before finally installing the unit, connect the wiring temporarily and make
sure it is all connected up properly and the unit and the system work
proberly.
- Use only the parts included with the unit to ensure proper installation. The
use of unauthorized parts can cause malfunctions.
- Consult with your nearest dealer if installation requires the drilling of holes
or other modifications of the vehicle.
- Install the unit where it does not get in the driver's way and cannot injure
the passenger if there is a sudden stop, like an emergency stop.
- If installation angle exceeds 30from horizontal, the unit might not give its
optimum performance.
- Avoid installing the unit where it would be subject to high temperature,
such as from direct sunlight, or from hot air, from the heater, or where it
would be subject to dust, dirt or excessive vibration.
DIN FRONT/REAR-MOUNT
This unit be can properly installed eitherfrom "Front"(conventional DIN
Front-mount) or "Rear"(DIN Rear-mount installation, utilizing threaded screw
holes at the sides of the unit chassis). For details, refer to the following
illustrated installation methods.
LBefore install the unit, please remove the two screws .

5
DIN FRONT-MOUNT (Method A)
Installation OpeningThis unit can be installed in any dashboard having an
opening as show below:
Installing the unit
Be sure you test all connections first, and then follow these steps to install
the unit.
1.Make sure the ignition is turned off, and then disconnect the cable from
the vehicle battery's negative (-) terminal.
2.Disconnect the wire harness and the antenna.
3.Press the release button on the frontpanel and remove the control panel.
4.Life the top of the outer trim ring then pull it out to remove it.
5.The two supplied keys release tabs inside the unit's sleeve so you can
remove it. Insert the keys as far as middle left and right sides of the unit.
Then slide the sleeve off the back of the unit.
6.Mount the sleeve by inserting thesleeve into the opening of the dashboard
and bend open the tabs located around the sleeve with a screwdriver. Not
all tabs will be able to make contact, so examine which ones will be most
effective. Bending openthe appropriate tabs behind the dashboard to
secure the sleeve inplace.

6
7.Reconnect the wire harness and the antenna and be careful not to
pinchany wires or cables.
8.Slide the unit into the sleeve until it Locks into place.
9.To further secure the unit, use the supplied metal strap to secure the back
of the unit in place. Use the supplied hardware (Hex Nut (5mm) and Sp-
ring Washer) to attach one end of the strap to the mounting bolt on the
back of the unit. If necessary, bend the metal strap to fit your vehicle's
mounting area.
Then use the supplied hardware(Tapping Screw (5x25mm) and Plain
Washer) to attach the other end of metal strap to a solid metal part of
thevehicle under the dashboard. This strap also helps ensure proper
electrical grounding of the unit. Note to install the short threading terminal
of the mounting bolt to the back of the unit and the other long threading
terminal to the dashboard.
10. Reconnect the cable to the vehicle battery's negative (-) terminal. Then
replace the out trim ring and installthe unit's front panel (see the step of
"installing the front panel").

7
Removing the unit
1.Make sure the ignition is turned off, then disconnect the cable from the
vehicle battery's negative (-) terminal.
2.Remove the metal strap attached the back of the unit (if attached).
3.Press the release button to remove the front panel.
4.Lift the top of the outer trim ring then pull it out to remove it.
5.Insert both of the supplied keys into the slots at the middle left and right
sides of the unit, then pull the unit out of the dashboard.
DIN REAR-MOUNT (Method B)
If your vehicle is a Nissan, Toyota, follow these mounting instructions.Use
the screw holes marked T (Toyota), N (Nissan) located on both sides of the
unit to fasten the unit to the factory radiomounting brackets supplied with
your vehicle.

8
To fasten the unit to the factory radio mounting brackets.
1.Align the screw holes on the bracket with the screw holes on the unit, and
then tighten the screws (5x5mm)on each side.
Lthe outer trim ring, sleeve and the metal strap are not used for method
B installation.
USING THE DETACHABLE FRONT PANEL
Removing the front panel
1.Press the release button on the front panel and pull of the front panel.
2.Keep front panel into the case.

9
Installing the front panel
To install the front panel, insert the panel into the housing and make sure
the panel is properly installed. Otherwise, abnormality occurs on the display
or some keys will not function properly.
Precautions when handling
1.Do not drop the front panel.
2.Do not put pressure on the display or control buttons when removing or
installing the front panel.
3.Do not touch the contacts on the front panel or on the main unit body. It
may result in poor electrical contact.
4.If any dirt or foreign substances adhered on the contacts, they can be
removed with a clean and dry cloth.
5.Do not expose the front panel to high temperatures or direct sunlight in
anywhere.
6.Keep away any volatile agents (e.g. benzene, thinner, or insecticides) from
touching the surface of the front panel.
7.Do not attempt to disassemble the front panel.

10
WIRING CONNECTION

11
OPERATIONS
LOCATION OF KEYS
SWITCHING ON/OFF THE UNIT
Switch on the unit by pressing any button (except RELEASE button (7) and
EJECT button (4) When system is on, press POWER button (9) to turn off
the unit.
FACEPLATE RELEASE
Press RELEASE button (7) to detach the removable faceplate.

12
SOUND ADJUSTMENT
Press SEL button (10) to select the desired adjustment mode. The
adjustment mode will change in thefollowing order:
By rotating the knob (10) clockwise or counter-clockwise, it is possible to
adjust the desired sound quality.
Press SEL button (10) for several seconds, it is activated as cyclical mode
of following functions for user's selection.
a) TA SEEK OR TA ALARM
- TA SEEK mode:
When newly tuned station does not receive TP information for several
seconds, the radio retunes to next station which has not the same station
(PI) as the last station, but has the TP information. When TP information
gets lost at the current station for retune time which is set by RETUNE
SHORT (30 sec.) or RETUNE LONG (90 sec.), the radio start to retune to
next same PI station.
When same PI station doesnot catch in 1 cyclic search, theradio retunes
to next station with TP information.
- TA ALARM mode:
When this mode is selected, any automatic retune mode is not activated.
Only double beep sound (ALARM) is output.
When newly tuned station does not have TP information for several
seconds, beeps come out. When TP information gets lost at the current
station for retune time, the beep sound is out-putted.
When newly tuned station has no RDS signal, "PI SEEK" is suppressed
somewhat.
b) PI SOUND or PI MUTE
While AF switching is implemented in C201 station, AF can switch to 100
MHz, which is non genuine AF (where, different PI with same AF) in short
"DIP".
If a car cruises that critical area back and forth, an oscillation

13
phenomenon can be occurred, because the different PI code can be
received from 100 MHz with "XXX"PI.
The car radio has special procedure to reduce even this kind of
unavoidable situation however there is a limit to be escaped from this
serious case perfectly.
In that serious case, 2 mode is selectable as follows:
- PI SOUND mode:
When above different PI sound (DIP) is heard once in a while, the DIP's
sound will be heard for a short time.
- PI MUTE mode:
Under above same situation, a mute sound will be heard for a short time.
c) RETUNE L or RETUNE S mode
The initial time of automatic TA search or PI search modes is selected.
When PI information is not caught for retune time, the radio starts to
retune to next same PI station.
When same PI station does not catch 1 cyclic search, the radio goes to
last station and waits for several minutes until PI code is received.
- RETUNE L mode:
Selected as 90 seconds.
- RETUNE S mode:
Selected as 30 seconds.
d) MASK DPI or MASK ALL mode
The AF frequency (which has different PI or NO RDS signal with high field
strength) is masked during checking PI when the unit searches AF. The
unit doesn't search this AF (DIP) for few minutes. In the case of the AF of
NO RDS signal with high field strength, if the real AF is wrongly masked
as DIP by some interference, the unit hesitates to search real Afs.
For this reason, the unit has the user option (MASK DPI) which doesn't
mask the AF of NO RDS signal with high field strength. In MASK DPI
mode, the wrong sound or long mute (according to PI SOUND or PI
MUTE) can be heard from the AF station which has NO RDS signal and of
which the field strength is higher than that of the currently tuning AF
(station).

14
But, these phenomenons are rare and the user will hardly hear the wrong
sound in whole Europe.
- MASK DPI mode:
Masked only the AF which has different PI.
- MASK ALL mode:
Masked the AF which has different PI and NO RDS signal with high field
strength.
e) BEEP 2'ND, BEEP ALL, BEEP OFF mode
The situation of beep sound is selected.
The 3 mode is selected a also rotating VOLUSE knob (10) clockwise or
counter-clockwise.
- BEEP 2'nd mode:
The beep is only generated when all allowed double key is pressed long (1
sec).
e.g.
When preset button (14) is pressed.
When BND/LOU button (13) is pressed. When AS/PS button (18) is
pressed.
- BEEP ALL mode:
The beep is generated when every key is pressed.
- BEEP OFF mode:
The beep is disabled.
LOUDNESS
Press BND /LOU/ENT button (13) for several seconds to reinforce the bass
output. Press it for several seconds again to release this function.
DISPLAY
Press DSP button (15) to operate as theconversion of each display mode
asfollows:
- In case of receiving a RDS station
In radio mode:
->PS ->CT ->FREQ ->PTY ->
In CD mode:
->CD ->CT ->PS ->FREQ ->PTY ->

15
- In case of no receiving CT or PTY information, the display shows as "NO
CLOCK" or "NO PTY".
- In case of receiving a non RDS station
In radio mode:
->"NO CLOCK" ->FREQ -> "NO PTY" ->
In CD mode:
-> CD -> CT -> FREQ -> "NO PTY" ->
Each displaying time is several seconds, stand come back to 1 position after
several seconds.
Notes:
- CT = clock time
- FREQ = frequency
EQUALIZATION
Press EQ button (19) to turn onequalization function and to select desired
audio mode.
There are five kinds of mode as below:
LIQUID CRYSTAL DISPLAY
Exhibit current frequency and activatedfunctions on the display (8).
REMOTE SENSOR
Point the remote control handset to the remote sensor IR (24). Press the
functionkeys on the handset to control the system.
RESET FUNCTION
RESET button (25) must be activated with either a ballpoint pen or thin
metalobject.

16
The RESET button is to be activated for the following reasons:
- Initial installation of the unit when all wiring is completed.
- All the function buttons do not operate.
- Error symbol on the display.
Lif press RESET button (25), the unit can't work yet, please use a cotton
swab soaked in isopropyl alcohol to clean the socket on the front panel.
RADIO OPERATION
SWITCHING TO RADIO MODE
Press MOD button (6) shortly to select radio mode, the radio mode appears
in the display together with the memory band and frequency.
SELECTING THE FREQUENCY BAND
At radio mode, press BND/LOU/EN button (13) shortly to select the desired
band.
The reception band will change in thefollowing order:
SELECTING STATION
Press nbutton(17) or button o(16) shortly to activate automatic seek
function. Press for several seconds until "MANUAL" appears on the display,
the manual tuning mode is selected. If both buttons have not been pressed
for several seconds, they will return to seek tuning mode and "AUTO"
appears on the display.

17
AUTOMATIC MEMORY STORING &PROGRAM SCANNING
- Automatic memory storing
Press AMS button (18) for several seconds, the radio searches from the
current frequency and checks the signal strength until one cycle search is
finished. And then 6 strongest stations are stored into the corresponding
preset number button.
- Program scanning
Press AMS button (18) shortly to scan preset station, When the field
strength level is more than the threshold level of stop level, the radio is
holding at that preset number for several seconds with release mute, then
searches again.
STATION STORING
Press any one of the preset buttons (14) (1 to 6) to select a station, which
had been stored in the memory. Press this button for several seconds (until
2ND beeps come out), current stationis stored into the number button.
RDS (RADIO DATA SYSTEM) OPERATION
- Setting RDS mode
Press AF/REG button (3) and release immediately to switch on or off RDS
mode. Whenever RDS is switch on, symbol AF appears on the display.
Program name is displayed on receiving a RDS station.
AF starts blinking if the broadcasting signal getting worse.
ALARM will be displayed when an emergency broadcasting is received,
meanwhile sound output level will be adjusted to the preset output level
automatically when the volume control is set at minimum.
- Regional Program Operation
Press AF button (3) for several seconds to switch on or off region mode.
Some broadcasting stations change their program from normal
broadcasting to regional broadcasting for a certain time period.
When region is on, the current listening program remains unchanged.
When region is off, it allows the reception moves to the regional station.
- Using PTY to Select Program PTY button (1) is operated as follows:

18
While selecting PTY engagement, its selection is implemented by preset
buttons as described in notes.When PTY is selected, the radio starts to
search corresponding PTY information, and stops if the corresponding
PTY information is detected. If corresponding PTY information isnot
existed any more, PTY engagingis automatically exit to normal mode.
LWhen PTY mode is engaged, the PTY switch is shared as follows:
According to above 2 allotted group, the preset number is used for
PTYselection as follows:
MUSIC group
* POP M, ROCK M *EASY M, LIGHT M *CLASSICS, OTHER M
*JAZZ, COUNTRY *NATION M, OLDIES *FOLK M
SPEECH group
*NEWS, AFFAIRS, INFO *SPORT, EDUCATE, DRAMA *CULTURE,
SCIENCE, VARIED *WEATHER, FINANCE, CHILDREN *SOCIAL,
RELIGION, PHONE IN *TRAVEL, LEISURE, DOCUMENT
- Listening to Traffic Announcement TA button (2) is operated as follows:
When pressed short, it is engaging whether TA mode on or off.
When TA mode is on and a traffic announcement is transmitted:
When the unit was in CD (MP3), it will switch temporarily to radio mode.
Temporary switch over to an EON linked station when EON detects a
traffic announcement on that other program.
If the volume level was under the threshold point it will be raised to the
threshold point. But the user changed the volume level, which was more
than the threshold point (min. TA volume level), it will be set to the last
level. When TA mode is on, TA of individual segment is turned on.
When a TP station is received, TP of individual segment is turned on.
TA interruption function
The current traffic announcement is cancelled by pressing this key. But
the TA mode will not be off. When pressed long, it is selected EON TA
LOCAL/EON TA DISTANCE mode.
The purpose of this key is to reduce unwanted EON TA switching, which
EON TA information was received from current station and the radio
switched to that EON linked station, but no information could not be
received because the EON linked station is located too far from that area.
So the radio is switched back to current station again. In above operation,
a customer listens to a wrong program or mute sound for a while.

19
EON TA LOCAL mode
When the filed strength level of EON linked is less than threshold level,
the radio does not switch that station, and a customer can hardly listen to
any disturbances.
When EON TA LOCAL mode is selected, „EON TA Lo“ on numeric
display is indicated for a few seconds.
EON TA DISTANCE mode
EON TA switch is tried to implemented by the information of current
station.
When EON TA DISTANCE mode is selected, „EON TA Dx“ on numeric
display is indicated for a few seconds.
The RDS data used are the PI, PS, AF, TP, TA, EON and PTY data.
PI: Program Identification code (Code for identifying programs)
PS: Program Service Name (Broadcast station name data expressed in
alphanumerically characters)
AF:A lternative Frequencies (Frequency list of broadcasting stations
transmitting the same program)
TP: Traffic Program Identification (Identification data for traffic
information-broadcasting station)
TA: Traffic Announcement Identification (Identification data showing traffic
information is being transmitted or not)
EON: Enhanced Other Networks Information (Broadcasting information on
PI, AF, TP, TA, etc, relating to networks other than the network used for
current reception)
PTY: Program Type Code (Contents of programs such as news, light
music, sports etc.)
CD OPERATION
SWITCHING TO CD MODE
If there is no CD inserted in the driver: Gently insert the CD with the printed
side uppermost into the CD compartment until you feel some resistance,.
The CD is drawn into the driver automatically , CD playback begins.
If a CD is already inserted in the driver: Keep pressing MOD button (6)
shortly until the CD mode display appears.

20
SELECTING TRACKS
Press obutton (16) or nbutton (17) to move to the previous track or the
following track. Track numbershows on display. Hold nbutton (17) or o
button (16) to fast reverse of fast forward, CDplay starts from when you
releasethe button.
PAUSING PLAYING
Press PAU button (20) to pause CDplayer, Press it again to resume
play.PREVIEWING ALL TRACKS Press SCN button (21) to play firstseveral
seconds of each track on the current disc, Press again to stop introand
listen to track.
REPEATING THE SAME TRACK
Press RPT button (22) to continuouslyrepeat the same track, Press it
againto stop repeat.
PLAYING ALL TRACKS IN RANDOM
Press SHF button (23) to play all tracks on CD in random order. Pressagain
to cancel the function.
EJECTING A DISC
Press EJECT button (4) to stop CDplaying and eject the disc from the disc
slot.
Table of contents
Other AEG Car Receiver manuals
Popular Car Receiver manuals by other brands

Volvo
Volvo 31659996 Installation instructions, accessories

Sony
Sony CDX-GT55UIW - Fm/am Compact Disc Player Specifications

Kenwood
Kenwood DDX771WBT instruction manual

Denon
Denon RCD-CX1 owner's manual

Jensen
Jensen cd3010x Operation manual

JVC
JVC KW-ADV792 - Arsenal 2-DIN 7" TouchScreen DVD/MP3/CD... Installation & connection manual

Rockford Fosgate
Rockford Fosgate RFX9700CD instruction manual

Pioneer
Pioneer DEH-1100MP owner's manual

Clarion
Clarion DB265MP Installation/wire connection guide

Alpine
Alpine CDE-103BT Manual de operación

Discount Car Stereo
Discount Car Stereo A2D-BLAU10 installation guide

Blaupunkt
Blaupunkt Madrid 210 Operating and installation instructions