AEG VAMPYR CE Series User manual

VAMPYR®CE . . .
Bodenstaubsauger
Vacuum Floor Cleaner
Aspirateur-traîneau
Bodemstofzuiger
Aspirapolvere
Aspirador de polvo para suelos
Aspirador de pó para chão
Golvdammsugare
Støvsuger
Gulvstøvsuger
Lattiamallin pölynimuri
Podlahový vysavaè
Fekvõporszívó
Odkurzacz pod³ogowy
ÇëåêôñéêÝò óêóýðåò äáðÝäïõ
Íàïîëüíûé ïûëåñîñ
Gebrauchsanweisung
Operating Instructions
Mode d’emploi
Gebruiksaanwijzing
Istruzioni per l’uso
Instrucciones para el uso
Instruções de utilização
Bruksanvisning
Brugsanvisning
Bruksanvisning
Käyttöohje
Návod k použití
Használati útmutató
Instrukcja obs³ugi
ÏäçãßÝò ÷ñÞóçò
Èíñòðóêöèÿ ïî ýêñïëóàòàöèè

2
A = Öffnungstaste für Papierfilterfach
B = Leistungsregulierung *
C = Zubehörfach
D=Ein-/Aus-Taste
E = Parkschiene
F = Filterwechselanzeige
G = Kabeleinzugstaste
H = Ordnungsschiene
I=Düse
J=Tragegriff
K = Taste für Schlauchabnahme
L = Saugrohr/Teleskoprohr*
M=Griff
N = Saugschlauch
*je nach Ausführung

3
Inhalt
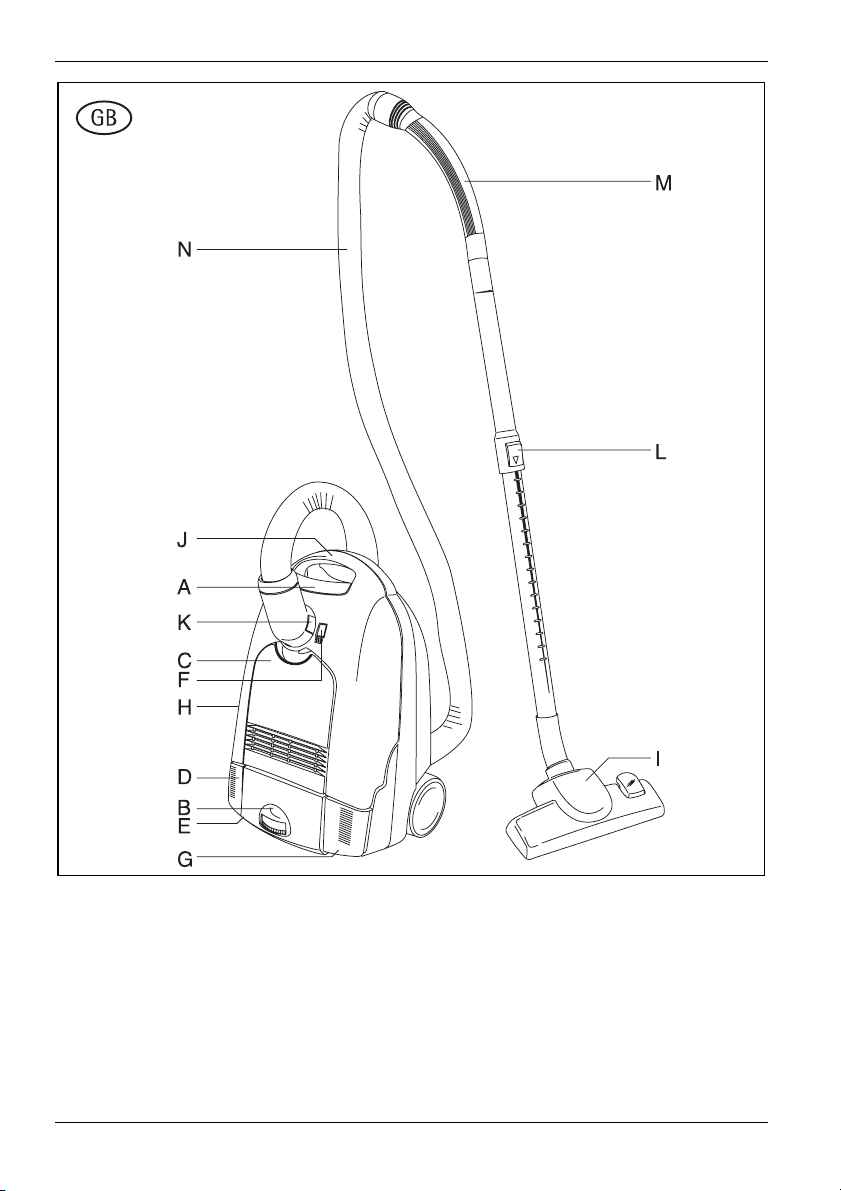
Gerätebeschreibung . . . . . . . . . . . . . . . . . . . . . .2
Vor der ersten Inbetriebnahme . . . . . . . . . . . .3
Der Umwelt zuliebe. . . . . . . . . . . . . . . . . . . . . . .3
Sicherheitshinweise für den Benutzer . . . . . .3
Staubsauger betriebsbereit machen . . . . . . . .4
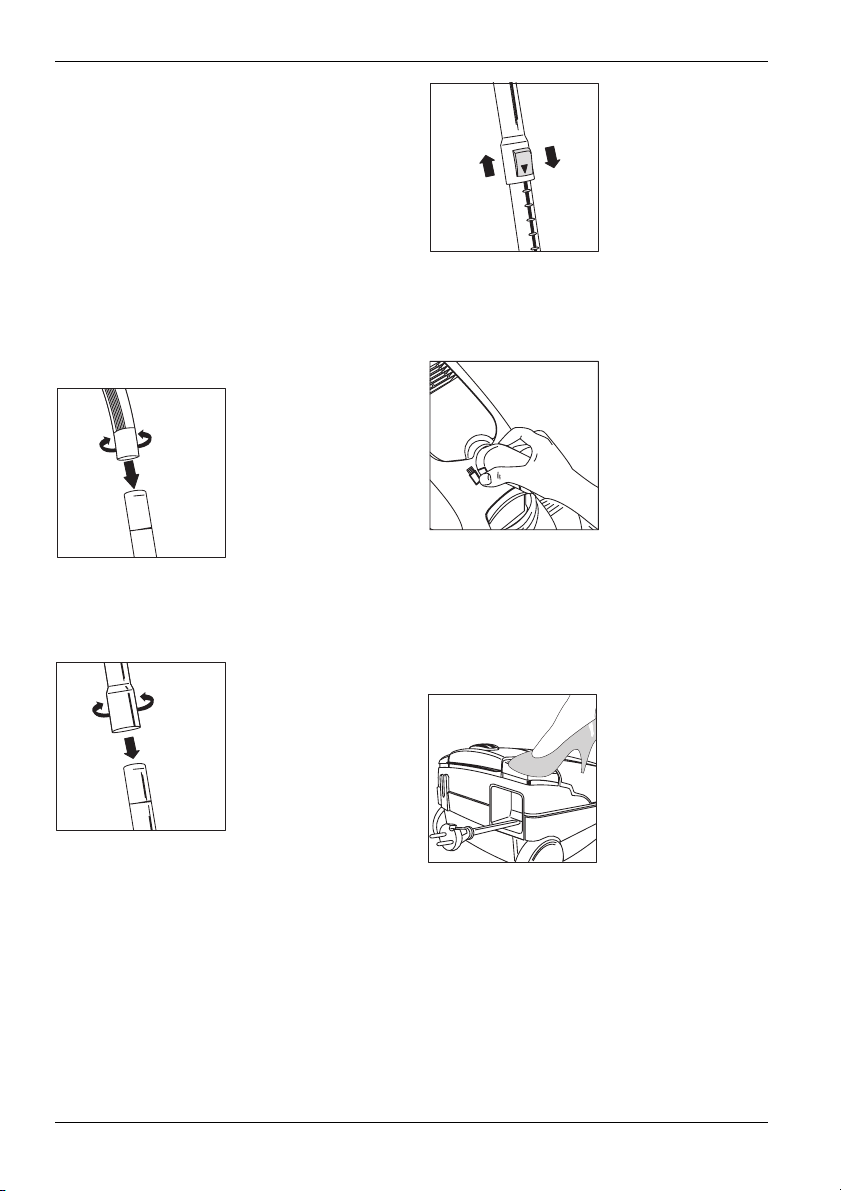
Das Arbeiten mit den Düsen . . . . . . . . . . . . . . .5
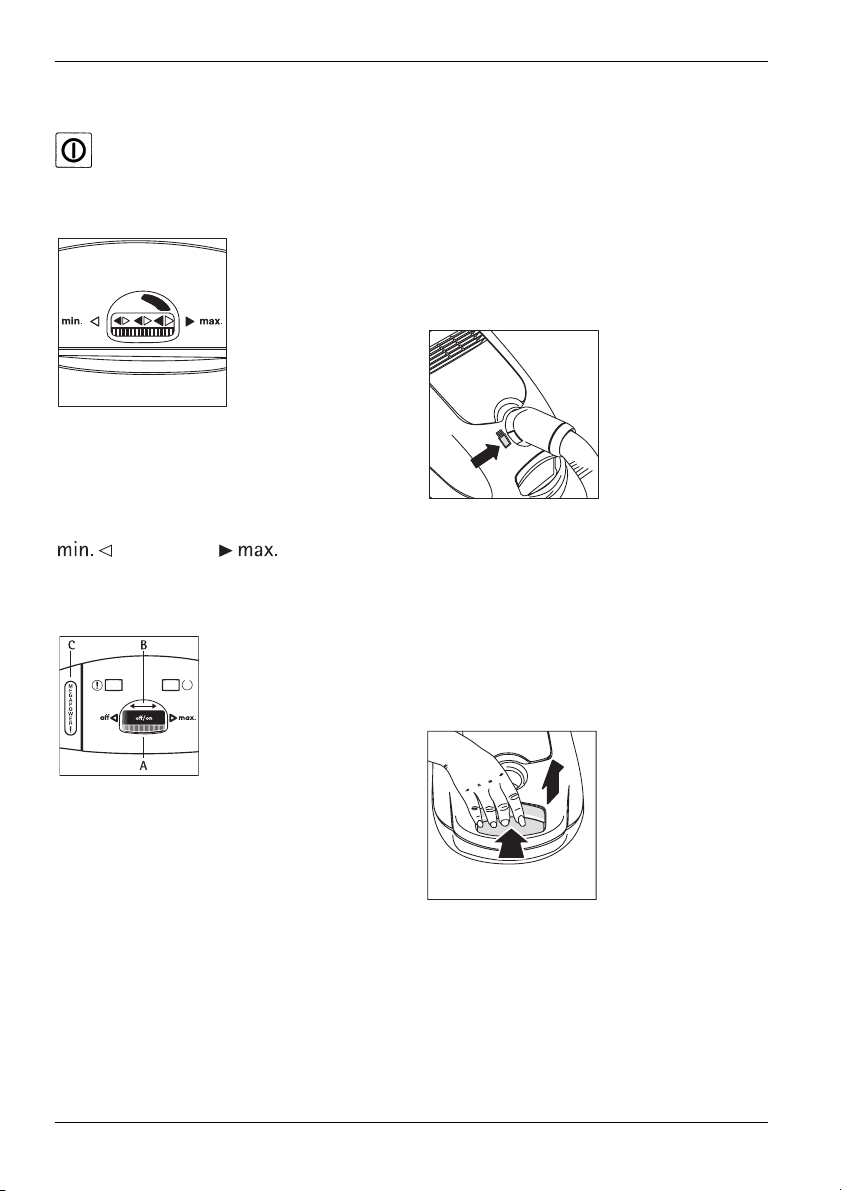
In Betrieb nehmen . . . . . . . . . . . . . . . . . . . . . . .6
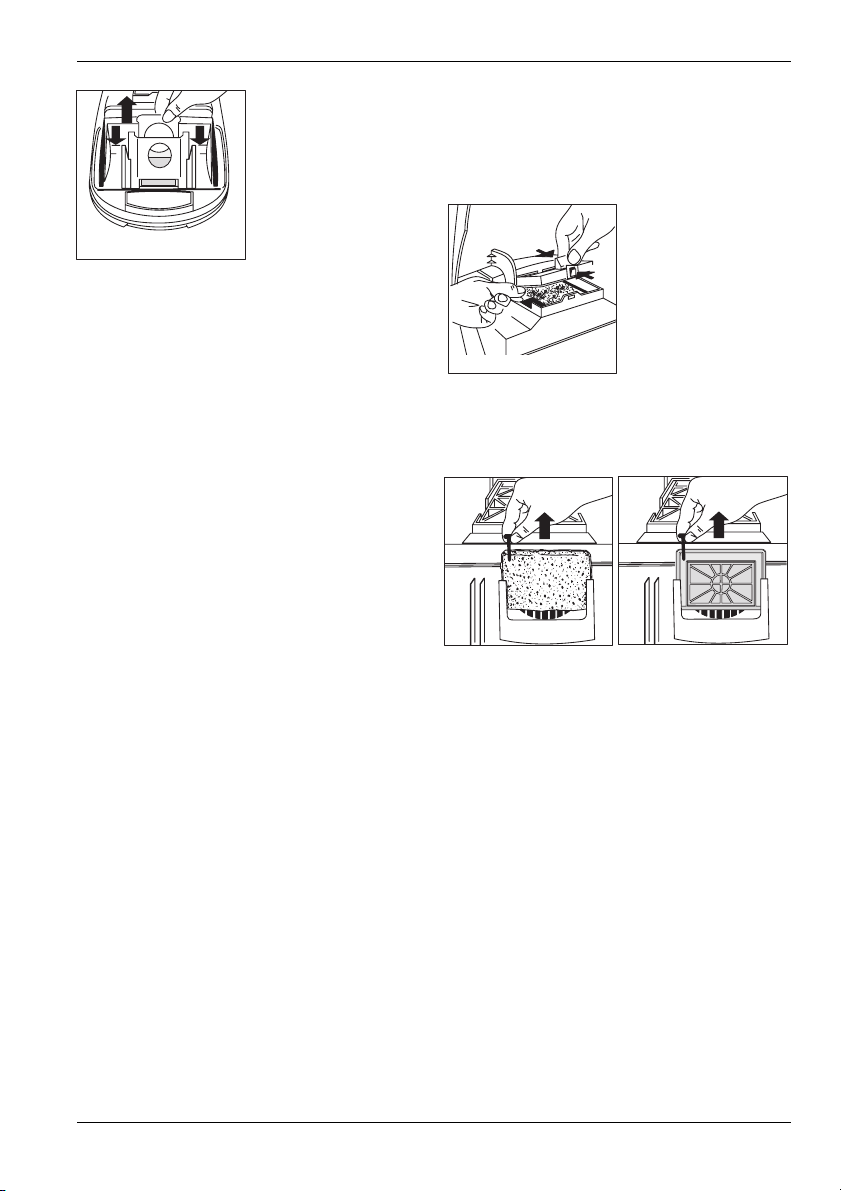
Wartung und Reinigung . . . . . . . . . . . . . . . . . .6
Papierfilter . . . . . . . . . . . . . . . . . . . . . . . . . . . . . .7
Transportieren und Aufbewahren . . . . . . . . . .8
Was tun wenn . . . . . . . . . . . . . . . . . . . . . . . . . . .8
Sonderzubehör. . . . . . . . . . . . . . . . . . . . . . . . . . .9
AEG Kundendienst in Europa . . . . . . . . . . . 135
Vor der ersten Inbetriebnahme
Bitte lesen Sie alle im folgenden aufgeführten
Informationen aufmerksam durch. Sie geben wi-
chtige Hinweise für die Sicherheit, den Ge-
brauch und die Wartung des Gerätes. Bewahren
Sie die Gebrauchsanweisung sorgfältig auf und
geben Sie diese gegebenenfalls an Nachbesitzer
weiter.
Der Umwelt zuliebe
Verpackungsmaterial und ausgediente Geräte
nicht einfach wegwerfen!
Geräteverpackung:
• Der Verpackungskarton kann der Altpapier-
Sammlungugeführt werden.
• Den Kunststoffbeutel aus Polyethylen (PE) zur
Wiederverwertbarkeit an PE-Sammelstellen
geben.
Verwertung des Gerätes nach dem Ende sei-
ner Lebenszeit:
• Die Kunststoffteile sind mit einer Material-
kennzeichnung versehen, so daß sie am Ende
der Lebensdauer des Gerätes, wie die übrigen
Werkstoffe auch, einer Wiederverwertung
zugeführt werden können.
Bitte erfragen Sie bei Ihrer Kommunalverwal-
tung den für sie zuständigen Recyclinghof.
Sicherheitshinweise
;Dieses Gerät entspricht den folgenden EG-
Richtlinien: – 73/23/EWG vom 19. 02. 1973 –
Niederspannungsrichtlinie – 89/336/EWG vom
03. 05. 1989 (einschließlich Änderungsrichtlinie
92/31/EWG) – EMV-Richtlinie.
• Gerät nur an Wechselstrom – 220/230 Volt –
anschließen.
• Der Stromkreis für die verwendete Steckdose
muß mindestens mit 10 A Sicherung abgesi-
chert sein.
• Den Netzstecker nie an der Zuleitung aus der
Steckdose ziehen.
• Das Gerät nicht in Betrieb nehmen wenn:
– Die Zuleitung beschädigt ist.
– das Gehäuse sichtbare Beschädigungen
aufweist.
• Vermeiden Sie das Überfahren der Zuleitung
mit dem Gerät oder der Saugbürste. Die Iso-
lierung könnte beschädigt werden.
• Wenn kein Papierfilter eingesetzt ist, kann
die Abdeckung nicht geschlossen werden.
Bitte keine Gewalt anwenden!
• Darauf achten, daß stets ein Papierfilter sowie
ein MICROFILTER und Motorschutzfilter ein-
gelegt ist.
• Der bei Laserdruckern und Kopiergeräten an-
fallende Toner-Staub darf mit normalen Haus-
haltsstaubsaugern nicht abgesaugt werden.
• Dieser Staubsauger darf nur im Haushalt für
trockenes Sauggut eingesetzt werden. Men-
schen oder Tiere dürfen mit dem Gerät nicht
abgesaugt werden.
Kinder von Elektrogeräten fernhalten.
• Der Hersteller haftet nicht für evtl. Schäden,
die durch nicht bestimmungsgemäßen Ge-
brauch oder falsche Bedienung verursacht
werden.
• Lassen Sie feucht gereinigte Teppichböden
vollständig trocknen. Niemals mit dem Staub-
sauger Flüssigkeiten aufsaugen – der Staub-
sauger nimmt sonst Schaden. Außerdem kann
der Schutz gegen elektrischen Schlag beein-
trächtigt werden.
• Saugen Sie keine Streichhölzer, glühende
Asche oder Zigarettenkippen mit dem Gerät
auf. Vermeiden Sie die Aufnahme harter, spit-
zer Gegenstände, da diese das Gerät oder den
Papierfilter beschädigen können.
• Das Gerät keinen Witterungseinflüssen, keiner
Feuchtigkeit und keinen Hitzequellen ausset-
zen.

4
• Bei defekter Zuleitung ist der komplette
Kabelroller vom AEG Kundendienst oder einer
autorisierten Werkstatt auszutauschen.
• Reparaturen an Elektrogeräten dürfen nur
von Fachkräften durchgeführt werden. Durch
unsachgemäße Reparaturen können erhebli-
che Gefahren für den Benutzer entstehen.
• Im Störungsfall wenden Sie sich daher bitte
an Ihren Fachhändler oder direkt an den AEG
Kundendienst.
Staubsauger betriebsbereit machen
Das Zubehör kann jeweils durch Druck und Dre-
hung zusammengesteckt und durch Zug und
Drehung gelöst werden:
Saugschlauch und Saugrohr zusammenstek-
ken.
Griffrohr des Saugschlauches fest mit dem
Saugrohr verbinden.
Saugrohre zusammenstecken
(je nach Ausführung)
Die beiden Rohre miteinander verbinden.
Teleskoprohr einstellen (je nach Ausführung)
Die Taste am Rohr nach unten schieben und das
Rohr auf die gewünschte Arbeitsstellung ein-
stellen.
Saugschlauch anschließen
Anschlußstutzen des Saugschlauchs in die Saug-
öffnung stecken. Er rastet ein und ist rundum
drehbar.
Zum Abnehmen des Saugschlauchs die Entriege-
lungstaste drücken und den Anschlußstutzen
herausziehen.
Netzanschluß/Kabeleinzug
Das Netzkabel befindet sich im Kabelfach. Kabel
herausziehen und Stecker in die Steckdose stek-
ken.
Stecker aus der Steckdose ziehen. Fußtaste
drücken, das Kabel rollt nach dem Saugen auto-
matisch ein.

5
Das Arbeiten mit den Düsen
Die Düsen werden jeweils durch Druck und Dre-
hung auf das Saugrohr aufgesteckt und durch
Zug und Drehung wieder abgenommen.
Nutzung der Bodendüse VARIO 500
Für die tägliche Pflege von Teppich- und Hart-
fußböden. Die Bodendüse ist manuell umschalt-
bar. Mit ausgefahrenen Bürsten für glatte Böden
und mit eingezogenen Bürsten für Teppiche.
Spezialbodendüsen siehe Sonderzubehör.
Fugen- und Polsterdüse im Gerät
Für die individuellen Anforderungen der Raum-
pflege liegen dem Staubsauger in einem inte-
grierten Zubehörfach zwei verschiedene Teile
bei.
In Griffmulde den Zubehördeckel nach oben
öffnen.
Die Düsen können sowohl am Saugrohr als auch
am Griff des Saugschlauches aufgesteckt wer-
den, je nach Anwendungsbedarf.
Fugendüse
Zum Absaugen von Fugen, Ecken und Ritzen.
Polsterdüse
Zum Saugen aller Polstermöbel, Matratzen etc.
Durch die Fadenheberstreifen an der Düse wer-
den auch Fäden und Fusseln gut aufgenommen.

6
In Betrieb nehmen
Ein- und Ausschalten
Mit Druck auf die Ein-/Aus-Taste schalten
Sie das Gerät ein bzw. aus.
Leistungsregulierung*:
Leistungsregulierung – Drehregler
Mit der elektronischen Leistungsregulierung
kann die Saugleistung der jeweiligen Saugsitua-
tion angepaßt werden.
Leistungsregulierung - Mega-Power
A Ein- und Ausschal-
ten (on / off).
Schalten Sie Ihren
Staubsauger mit dem
Leistungsstellrad ein,
indem Sie das Lei-
stungsstellrad in Pfeil-
richtung Ømax. drehen.
Die Betriebsleuchte (grün) zeigt an, dass der
Staubsauger an der Netzspannung angeschlos-
sen und betriebsbereit ist.
B Einstellung der Saugleistung.
Mit dem Leistungsstellrad können Sie die Lei-
stung Ihres Staubsaugers auf einen für die
jeweilige Reinigungsarbeit optimalen Wert ein-
stellen. HINWEIS: Ist das Leistungsstellrad ganz
nach rechts gedreht, bietet Ihnen diese Einstel-
lung für die meisten Reinigungsarbeiten eine
saugstarke und energiesparende Leistungsstufe.
C Mega-Power-Taste.
Für Reinigungsarbeiten, die eine besonders hohe
Saugleistung erfordern, betätigen Sie die Mega-
Power-Taste. Ihr Staubsauger läuft dann mit
maximaler Leistung. Solange die Mega-Power-
Stufe eingeschaltet ist, leuchtet die Mega-
Power-Signalleuchte (orange).
In dieser Leistungsstufe hat das Stellrad nur die
Funktion des Ein- und Ausschalters. Eine Lei-
stungsregulierung ist in dieser Stufe nicht mög-
lich.
Wartung und Reinigung
Vor Wartung oder Reinigung darauf achten, daß
das Gerät ausgeschaltet und der Netzstecker
gezogen ist:
Wechsel des Papierfilters
Der Wechsel des Papierfilters ist erforderlich,
wenn bei eingeschaltetem Gerät auf höchster
Saugstufe und vom Boden abgehobener Düse
das Sichtfenster der Filterwechselanzeige voll-
kommen rot ausgefüllt ist.
Auch wenn dann der Papierfilter nicht gefüllt
erscheint, so sollte ein Wechsel des Filters erfol-
gen, da bereits durch Feinstaub die Poren der
Filteroberfläche verstopft sind.
Durch Drücken der Taste läßt sich der Deckel
öffnen und bis zum Einrasten aufklappen.
*je nach Ausführung

7
Hygienischer Filterwechsel: Bei Entnahme der
vollen Filtertüte ziehen Sie an der Verschlußla-
sche die Öffnung automatisch zu, Dabei müssen
Sie den leichten Widerstand beim Ziehen über-
winden.
Gefüllte Staubbeutel mit normalem Hausstaub
können problemlos mit dem Hausmüll entsorgt
werden.
Den neuen Papierfilter bis zum unteren
Anschlag (Markierung beachten) in die Füh-
rungsschienen einschieben, nur dann läßt sich
der Deckel schließen. Wenn kein Papierfilter ein-
gesetzt ist, kann die Abdeckung nicht geschlos-
sen werden. Bitte keine Gewalt anwenden!
Wechsel des Microfilters
Wir empfehlen den Microfilterwechsel bei
jedem fünften Papierfilterwechsel, spätestens
jedoch dann, wenn bei sauberem Staubbeutel
und angehobener Düse die Staubfüllanzeige rot
ausgefüllt ist..
Deckel öffnen und bis zum einrasten aufklap-
pen. Den verbrauchten Microfilter (Bild) an der
Lasche herausnehmen und mit dem Hausmüll
entsorgen. Den neuen Microfilter einsetzen.
Motorschutzfilter
Der Motorschutzfilter ist ein Permanentfilter
und muß nicht regelmäßig gewechselt werden.
Ausgenommen der Papierfilter wird beschä-
digt und der Motorschutzfilter ist ver-
schmutzt: Motorschutzfilter entnehmen, rei-
nigen (nur ausklopfen) und wieder einsetzen.
Neuen Papierfilter einlegen.
HEPA Filter
Hochwirksamer Spezialfilter der Klasse „S“. Die-
ser Filter ist erleichternd und hilfreich für Aller-
giker. Der HEPA Filter sollte nach einem Jahr
ausgewechselt werden.
Reinigung
Das Gehäuse und das Papierfilterfach bei Bedarf
mit einem feuchten Tuch abwischen und
nachtrocknen. Keine Scheuermittel und keine
Lösungsmittel verwenden. Die Bodendüse und
die Büstenstege gelegentlich mit der Fugendüse
absaugen.

8
Papierfilter
VAMPYR CE...
TE-Nr. 900.087.600
ET-Nr. 668.901.268
Papierfilter Größe 28
Microfilter
ET-Nr. 668 100 151
Transportieren und Aufbewahren
Zur leichteren Unterbringung und zum Trans-
port des Gerätes die Bodendüse in die Ord-
nungsschiene einschieben.
Park-System
Zum Abstellen von Saugrohr und Düse bei kur-
zen Arbeitsunterbrechungen. Die Halterung an
der Düse wird in die Parkschiene des Gerätes
geschoben.
Was tun wenn...
... die Düse sich schwer schieben läßt
Verringerung Sie die Leistung des Gerätes. Die
Reinigungswirkung wird in diesem Fall nicht
verschlechtert.
... der Motor-Überhitzungsschutz einschaltet
Bei Überlastung des Motor, z. B. durch volle Fil-
terbeutel oder verstopftes Zubehör, schaltet der
Überhitzungsschutz den Motor ab. Gerät dann
ausschalten, Netzstecker ziehen und den Motor
abkühlen lassen.
Papierfilterbeutel, Saugrohr und Saugschlauch
kontrollieren, eventuelle Verstopfung beseitigen.
Nach ca. 30 Minuten kann das Gerät wieder ein-
geschaltet werden.
... die Sicherung ausgelöst wurde
Sollten Sie andere elektrische Geräte mit hohem
Anschlußwert am gleichen Stromkreis ange-
schlossen haben und sie gleichzeitig mit dem
Staubsauger benutzen, kann die Sicherung aus-
gelöst werden.
Dies ist vermeidbar, indem Sie vor dem Einschal-
ten die elektronische Leistungsregulierung auf
die kleinste Leistungsstufe stellen und erst nach
dem Einschalten eine höhere Stufe wählen.
Ihr Staubsauger ist mit einer elektronischen
Sanftanlaufsteuerung ausgestattet, die den
Anlaufstrom des Motors herabsetzt und somit
unter normalen Bedingungen ein Auslösen
der Stromkreissicherung verhindert. Dadurch
ist eine Anlaufverzögerung des Gerätes bei
niedrigster Leistungsstufe von ca. 4 Sekun-
den möglich.
... der Papierfilter einmal beschädigt werden
sollte und der HEPA Filter verschmutzt ist
HEPA Filter entnehmen, reinigen (ausklopfen)
und wieder einsetzen.
Neuen Papierfilter einlegen.

9
... die Fadenheber verschlissen sind
Sind die Fadenheber an der Saugöffnung abge-
rieben oder verklebt, können Sie neue Fadenhe-
ber einsetzen.
Fadenheber können Sie beim AEG-Kundendienst
unter der ET-Nr. 668 901 690 bestellen.
... der Deckel aus dem Scharnier springt
Sollte der Gehäusedeckel durch zu weites Öff-
nen über den Anschlag hinaus einmal aus den
Scharnieren springen, setzen Sie ihn wieder auf
das Gehäuse auf und drücken ihn zu, bis er ein-
rastet.
Sonderzubehör
Turbobürste ROTOSOFT 1200
Die ROTOSOFT 1200 erleichtert die Pflege von
Teppichen und glatten Böden. Durch ihre rotie-
rende Bewegung lockert die Bürste kurzflorige
Teppiche an festgetretenen Stellen schonend
wieder auf.
Spezialdüse
Für die besondere Pflege von Parkett, Fliesen
und Hartböden.
Möbelpinsel mit Drehgelenk
Zum Absaugen empfindlicher Stoffe und
Gegenstände.
Bezug nur über den Kundendienst.
Heizkörperbürste
Zum Entstauben von Heizkörperrippen, engen
Regalflächern oder Fugen. Auf die Fugendüse
aufstecken.

10
A = Button to Open the
Paper Filter Compartment
B = Power Regulation *
C = Accessories Compartment
D = On/Off Button
E = Parking Rail
F = Filter Replacement Indicator
G = Cable Rewind Button
H = Tool Rail
I = Nozzle
J=CarryingHandle
K=HoseReleaseButton
L=SuctionTube/Telescopic Tube*
M= Handle
N=SuctionHose
*depending on model

11
Contents
Appliance Description. . . . . . . . . . . . . . . . . . . .10
Before Using for the First Time . . . . . . . . . . .11
Protecting the Environment . . . . . . . . . . . . . .11
User Safety Instructions. . . . . . . . . . . . . . . . . .11
Making the Vacuum Cleaner Ready for Use12
Using the Nozzles . . . . . . . . . . . . . . . . . . . . . . .13
Switching On . . . . . . . . . . . . . . . . . . . . . . . . . . .14
Maintenance and Cleaning . . . . . . . . . . . . . . .14
Paper Filter. . . . . . . . . . . . . . . . . . . . . . . . . . . . .15
Carrying and Storage . . . . . . . . . . . . . . . . . . . .16
What to do, if . . . . . . . . . . . . . . . . . . . . . . . . . .16
Additional Accessories . . . . . . . . . . . . . . . . . . .17
AEG Customer Service in Europe . . . . . . . . 135
Before Using for the First Time
Please read all the following information
carefully. It provides important instructions on
appliance safety, operation and maintenance.
Keep these operating instructions in a safe place
and pass them on to any subsequent owners.
Protecting the Environment
Do not simply throw away packaging material
and old appliances.
Equipment Packaging:
• The cardboard packaging can be deposited in
the waste paper collection.
• Deposit the recyclable polyethylene (PE) bag
at a PE collection point.
Recycling the Appliance at the End of its Life:
• The plastic components all carry a material
identification marking so that, like the other
materials, they can be recycled at the end of
the life of the appliance.
Please inquire with your local authority about
your local recycling centre.
Safety Instructions
;This device complies with the following EU
Directives: – 73/23/EWG dated 19 Feb. 1973 –
Low Voltage Directive – 89/336/EWG dated
3 May 1989 (including Directive Amendment
92/31/EWG) – EMC Directive.
• Only connect the appliance to 220/230 V AC.
• The electric circuit for the socket used must
have at least a 10 A fuse.
• Never remove the mains plug from the socket
by pulling on the cable.
• Do not use the appliance if:
– the cable is damaged.
– the housing shows visible signs of damage.
• Avoid pulling the appliance or suction brush
over the mains lead. The insulation could be
damaged.
• The cover cannot be closed if a paper filter
is not inserted. Please do not use force!
• Always ensure that a paper filter as well as a
MICROFILTER and a motor protection filter
are inserted.
• This vacuum cleaner may only be used for
vacuuming dry materials in households. Peo-
ple and animals must not be vacuumed with
appliance.
Keep children away from electrical appliances.
The manufacturer shall not be liable for any
damage that may be caused by improper use
or operation.
• Leave wet shampooed carpets to completely
dry. Never vacuum liquids with the vacuum
cleaner – otherwise the vacuum cleaner will
be damaged. Furthermore, electric shock pro-
tection may be impaired.
• Under no circumstances should the appliance
be used to vacuum matches, glowing ashes or
cigarette ends. Avoid vacuuming hard, sharp
objects as they may damage the appliance or
the paper filter.
• Do not expose the appliance to weather,
moisture or heat.
• In the event of a cable defect, the entire cable
roller should be replaced by AEG customer
service or an authorised repair shop.
• Repairs to electrical appliances may only be
performed by qualified service engineers.
Improper repairs may lead to serious hazards
for the user.
• Therefore if your appliance needs repairing,
please contact your retailer or AEG customer
service.

12
Making the Vacuum Cleaner
Ready for Use
The accessories can be connected by pressing
together and turning, and separated by pulling
and turning:
Connect Together the Suction Hose and
Suction Tube.
Firmly connect the suction tube handle to the
suction tube.
Connect the Suction Tubes Together
(depending on model)
Connect the two tubes together.
Adjust the Telescopic Tube
(depending on model)
Push down the button on the tube and adjust
the tube to the desired working position.
Connect the Suction Hose
Plug the suction hose connector into the suc-
tion inlet. The connector clips into place and is
free to rotate.
Press the release button and pull out the con-
nector in order to remove the suction hose.
Mains Connection/Cable Rewind
The mains cable is stored in the cable compart-
ment. Pull out the cable and plug into a mains
socket.
Unplug from the mains socket. Press the foot
button, the cable is automatically rewound after
vacuuming.

13
Using the Nozzles
The nozzles are connected to the suction tube
by pressing and turning, and removed by pulling
and turning.
Using the VARIO 500 Floor Nozzle
For daily care of carpets and hard floors. The
floor nozzle is manually adjustable. Extended
brushes for smooth floors, retracted brushes for
carpets.
See additional accessories for special floor noz-
zles.
Crevice and Upholstery Nozzle Stored in the
Appliance
To meet individual cleaning requirements two
accessories are included with the appliance,
these are stored in an integrated accessories
compartment.
Open the lid of the accessories compartment
upwards at the recessed handle.
The nozzles can be fitted to both the suction
tube and the suction hose handle as required.
Crevice Nozzle
For vacuuming crevices, gaps and corners.
Upholstery Nozzle
For vacuum cleaning all upholstered furniture,
mattresses, etc.
The thread lifting strips on the nozzle even pick
up thread and lint.

14
Switching On
Switch On and Off
The appliance is switched on and off by
pressing the On/Off button.
Power Regulation*:
Power Regulation – Rotary Regulator
The suction power can be adjusted to suit the
specific situation using the electronic power
regulator.
Output control, Mega-Power
A Switching on and
off.
Switch on you vacuum
cleaner with the power
adjustment wheel by
turning the power
adjustment wheel in the
direction of the arrow
Ømax. The operating lamp indicates that the
vacuum cleaner is connected to the mains volt-
age and is ready for operation.
B Suction power adjustment.
With the power adjustment wheel you can set
the power of your vacuum cleaner to the opti-
mum value for the relevant cleaning work.
NOTE: If the power adjustment wheel is turned
fully to the right, this setting gives you a strong
suction, economical power setting for most
cleaning work.
C Mega-Power button.
Press the Mega-Power button for cleaning work
which requires a particularly high suction
power. The vacuum cleaner then runs at maxi-
mum power. The Mega-Power indicator lamp
lights up for as long as the Mega-Power stage is
activated. In this power stage, the adjustment
wheel only has the function of the on / off
switch. Power adjustment is not possible in this
stage.
Maintenance and Cleaning
Be sure that the appliance is turned off and that
the mains plug has been removed from the
socket before performing maintenance or clean-
ing.
Changing the Paper Filter
The paper filter must be replaced if the window
on the filter replacement indicator is completely
red when the appliance is operating at maxi-
mum power and the nozzle is raised from the
floor.
The paper filter should be replaced even if it
does not appear to be full because fine dust can
block the pores in the surface of the filter.
The cover can be opened by pressing the button
and folding back until it locks.
*depending on model

15
Hygiene filter replacement: When removing the
full filter bag, pull the closing tab to automati-
cally close the bag. During this process you must
overcome slight resistance when pulling the tab.
Full dust bags with normal household dust may
be disposed of with household rubbish.
Insert the new paper filter in the guide rails and
slide down to the lower stop (note marking),
only then can the lid be closed. If a paper filter
is not placed in the appliance, the lid cannot be
closed. Please do not use force!
Changing the Microfilter
We recommend replacing the microfilter on
every fifth paper filter replacement, at the latest
when the dust level indicator is completely red
with a clean dust bag and the nozzle raised.
Open the lid and fold back until it locks. Remove
the used microfilter (Figure) by the tab and dis-
pose of with household rubbish. Insert the new
microfilter.
Motor Protection Filter
The motor protection filter is a permanent filter
and does not have to be regularly replaced.
The only exception is if the paper filter has
been damaged and the motor protection fil-
ter soiled: remove the motor protection filter,
clean (only tap out) and refit.
Insert new paper filter.
HEPA filter
A highly effective special filter belonging to
Class “S”. This filter offers relief and assistance to
allergy sufferers. The HEPA filter should be
replaced after one year.
Cleaning
Use a damp cloth to wipe off the housing and
paper filter compartment as required. Do not
use solvents or scourers. Clean the floor nozzle
and the brush holder periodically using the
crevice nozzle.

16
Paper Filter
VAMPYR CE...
TE No. 900.087.600
ET No. 668.901.268
Paper Filter Size 28
Microfilter
ET No. 668 100 151
Carrying and Storage
To make the appliance easier to store and carry,
slide the floor nozzle into the tool rail.
Parking System
For storing the suction tube and nozzle during
short pauses in use. The bracket on the nozzle is
slid into the parking rail on the appliance.
What to do, if ...
... the nozzle is hard to push
Turn down the power. Cleaning performance
will not be affected in this case.
... the motor thermal overload protection
device triggers
If the motor becomes overloaded, e.g. as the
result of the filter bag being full or a blocked
accessory, the thermal overload protection
device will shut down the motor. Turn off the
appliance, unplug from the mains, and allow the
motor to cool down.
Check paper filter bag, suction tube and suction
hose, remove any blockage.
The appliance can be turned on again after
approximately 30 minutes.
... the fuse has blown
The fuse may blow if you use other high power
electrical appliances on the same electrical cir-
cuit at the same time as the vacuum cleaner is
in use.
This may be prevented by setting the electronic
power regulator to minimum before turning on
the appliance and increasing the power setting
after switching on.
Your vacuum cleaner is equipped with an
electronic soft start controller that reduces
the start up current of the motor, this avoids
the mains fuse blowing under normal circum-
stances. As a result, at the lowest power set-
ting the appliance may have a start delay of
approx. 4 seconds.
… the paper filter is damaged at some stage
and the HEPA filter is dirtied
Remove the HEPA filter, clean (tap out) and
replace.
Insert new paper filter.

17
... the thread lifters are worn
If the thread lifters on the suction inlet are worn
or matted, you can replace them with new
thread lifters.
You can order new thread lifters from AEG cus-
tomer service under ET No. 668 901 690.
... the lid jumps out of its hinge
If the housing lid jumps out of its hinge due to
being opened too far, place it back on the hous-
ing and press until it snaps back into place.
Additional Accessories
ROTOSOFT 1200 Turbo Brush
The ROTOSOFT 1200 makes the care of carpets
and smooth floors easier. The rotary motion of
the brushes loosens matted areas of short pile
carpets and improves their appearance.
Special Nozzle
For special care of parquet, tiles and hard floors.
Furniture Brush with Knuckle Joint
For vacuuming delicate materials and objects.
Only available from customer service.
Radiator Brush
For cleaning radiators, narrow shelves or gaps.
Attach to crevice nozzle.

18
A = Touche d’ouverture pour logement
du sac en papier
B = Réglage de la puissance *
C = Logement pour accessoires
D = Touche marche/arrêt
E = Rail de parcage
F = Indication de changement du
sac à poussières
G = Touche d’enroulement du câble
H = Rail de rangement
I=Suceur
J = Poignée de transport
K = Touche d’enlèvement du tuyau souple
L = Tube d’aspiration/tube télescopique*
M= Poignée
N = Tuyau souple d’aspiration
*suivant exécution

19
Table des matières
Description de l’appareil . . . . . . . . . . . . . . . . .18
Avant la première mise en service. . . . . . . . .19
Pour le respect de l’environnement. . . . . . . .19
Consignes de sécurité pour l’utilisateur . . . .19
Mettre l’aspirateur en état de fonctionner .20
Travailler avec les suceurs . . . . . . . . . . . . . . . .21
Mettre en service . . . . . . . . . . . . . . . . . . . . . . .22
Entretien et nettoyage. . . . . . . . . . . . . . . . . . .22
Sac à poussières. . . . . . . . . . . . . . . . . . . . . . . . .24
Transport et rangement . . . . . . . . . . . . . . . . . .24
Que faire si. . . . . . . . . . . . . . . . . . . . . . . . . . . . .24
Accessoires spéciaux. . . . . . . . . . . . . . . . . . . . .25
Service après vente AEG en Europe. . . . . . 135
Avant la première mise en service
Lisez attentivement les informations qui vous
sont données dans ce mode d’emploi. Elles vous
donnent des renseignements importants sur la
sécurité, l’utilisation et l’entretien de votre
appareil. Conservez bien ce mode d’emploi et
remettez-le à l’éventuel propriétaire ultérieur.
Pour le respect de l’environnement
Ne jetez pas l’emballage ni les appareils usagés
n’importe où!
Emballage de l’appareil:
• Le carton d’emballage peut être remis à la
collecte des vieux papiers.
• Le sac en polyéthylène (PE) peut être remis à
un point de collecte de PE pour recyclage.
Recyclage de l’appareil à la fin de sa vie:
• Les parties en plastique du matériau sont
codifiées et pourront donc, tout comme les
autres matériaux utilisés, être recyclées à la
fin de la vie de l’appareil.
Renseignez vous auprès des services administra-
tifs de votre commune sur le centre de recyclage
dont dépend votre domicile.
Consignes de sécurité
;Cet appareil est conforme aux directives sui-
vantes de la C.E.: – 73/23/CEE du 19/02/1973 –
Directive relative à la basse tension – 89/336/
CEE du 03/05/1989 (y compris directive modifi-
catrice 92/31/CEE) – Directive EMV.
• Ne brancher l’appareil que sur du courant
alternatif – 220/230 Volts.
• Le circuit pour la prise de courant utilisée
devra comporter au moins un fusible à 10 A.
• Ne jamais tirer sur le cordon pour sortir la
fiche de la prise de courant.
• Ne pas mettre l’appareil en marche si:
– le cordon est endommagé.
– le traîneau présente des détériorations visi-
bles.
• Evitez de rouler sur le cordon d’alimentation
avec l’appareil ou la brosse d’aspiration. L’iso-
lation pourrait en souffrir.
• Si vous n’avez pas mis de sac à poussière, le
couvercle ne pourra pas se fermer. Ne le
fermer pas de force!
• Veiller à ce qu’un sac à poussières ainsi qu’un
MICROFILTRE et un filtre de protection du
moteur soient toujours placés dans l’appareil.
• Cet aspirateur ne devra être utilisé qu’à
l’usage domestique pour aspirer des matières
sèches. Ne pas utiliser l’appareil pour aspirer
sur des personnes ou des animaux.
Tenir les appareils électroménagers hors de
portée des enfants.
Le fabricant décline toute responsabilité pour
les dommages éventuels dus à une utilisation
de l’appareil non conforme à sa destination
ou à un maniement incorrect.
• Laissez sécher complètement les moquettes
nettoyées par voie humide. Ne jamais aspirer
de liquides avec l’aspirateur – l’aspirateur en
subirait des dommages. De plus, la protection
contre l’électrocution ne serait plus garantie.
• N’aspirez pas d’allumettes, de cendres incan-
descantes ou de mégots de cigarettes avec
l’appareil. Evitez d’aspirer des objets durs et
pointus, ceux-ci risquant d’abîmer l’appareil
ou le sac à poussière.
• Ne soumettre l’appareil ni aux intempéries, ni
à l’humidité ni aux sources de grande chaleur.
• Si le cordon est défectueux, l’enrouleur devra
être entièrement changé par le service après-
vente AEG ou par un atelier qualifié.

20
• Seul un personnel qualifié sera autorisé à
effectuer des réparations sur les appareils
électroménagers. Des réparations non confor-
mes peuvent entraîner des risques importants
pour l’utilisateur.
• En cas de dérangement, adressez-vous à votre
revendeur ou directement au service après-
vente AEG.
Mettre l’aspirateur en état de fonc-
tionner
Les accessoires peuvent être assemblés par pres-
sion et rotation et détachés par traction et rota-
tion:
Assembler le tuyau souple d’aspiration et le
tube d’aspiration.
Assembler le tube-poignée du flexible et le tube
aspirateur.
Assembler les tubes d’aspiration
(selon le modèle)
Assembler les deux tubes rigides.
Régler le tube télescopique (selon le modèle)
Pousser la touche se trouvant sur le tube vers le
bas et régler le tube dans la position de marche
souhaitée.
Raccorder le tuyau souple d’aspiration
Insérer la tubulure de raccordement du tuyau
souple d’aspiration dans l’embouchure d’aspira-
tion. Elle se verrouille et peut pivoter dans tou-
tes les directions.
Pour retirer le tuyau souple, appuyer sur la tou-
che de déverrouillage et tirer sur la tubulure de
raccordement.
Raccordement électrique/
enrouleur de cordon
Le cordon d’alimentation se trouve dans le loge-
ment du cordon d’alimentation. Extraire le cor-
don d’alimentation et mettre la fiche dans la
prise de courant.
Other manuals for VAMPYR CE Series
2
Table of contents
Languages:
Other AEG Vacuum Cleaner manuals

AEG
AEG X PERFORMANCE RX7 User manual

AEG
AEG AirMAX User manual

AEG
AEG VX7 X POWER User manual

AEG
AEG AVC-1530-G User manual

AEG
AEG VAMPYRETTE 315 User manual

AEG
AEG PowerForce APF6130 User manual

AEG
AEG Twin Technology User manual

AEG
AEG NT 1200 User manual

AEG
AEG HX6 X CONVENIENCE HX6-13WR User manual

AEG
AEG Rapido plus lithium User manual