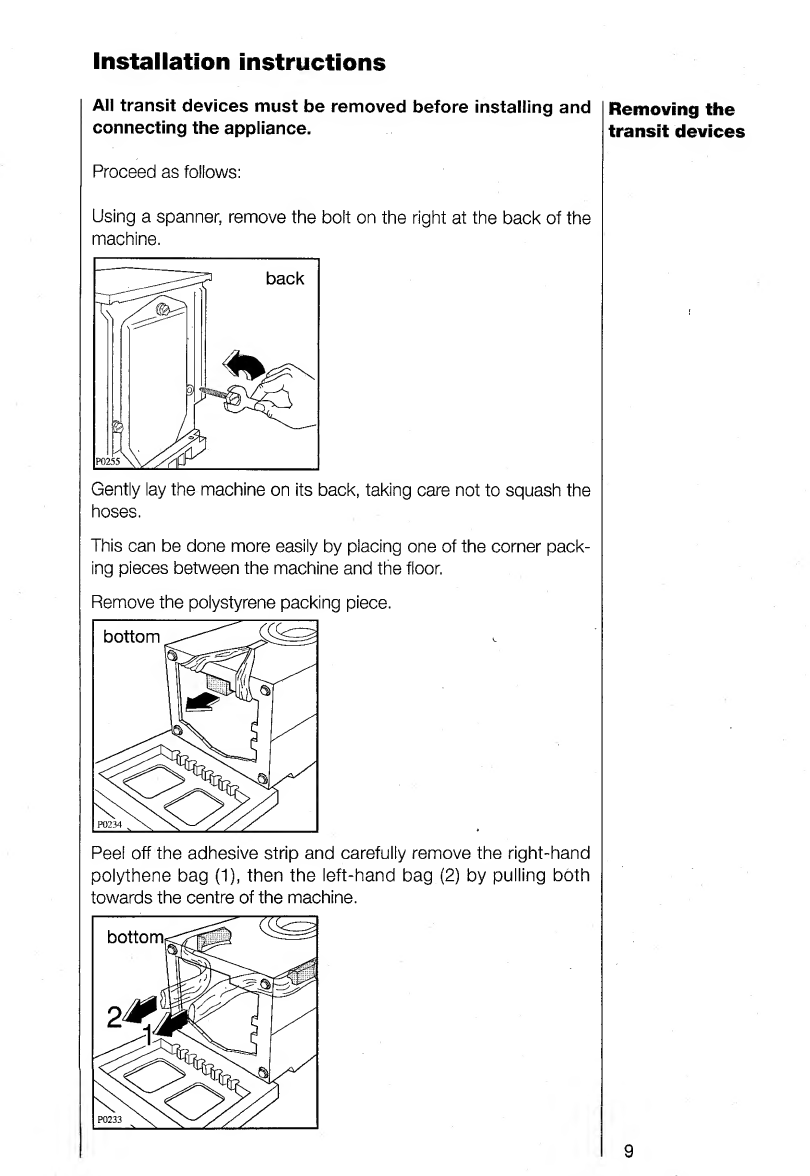
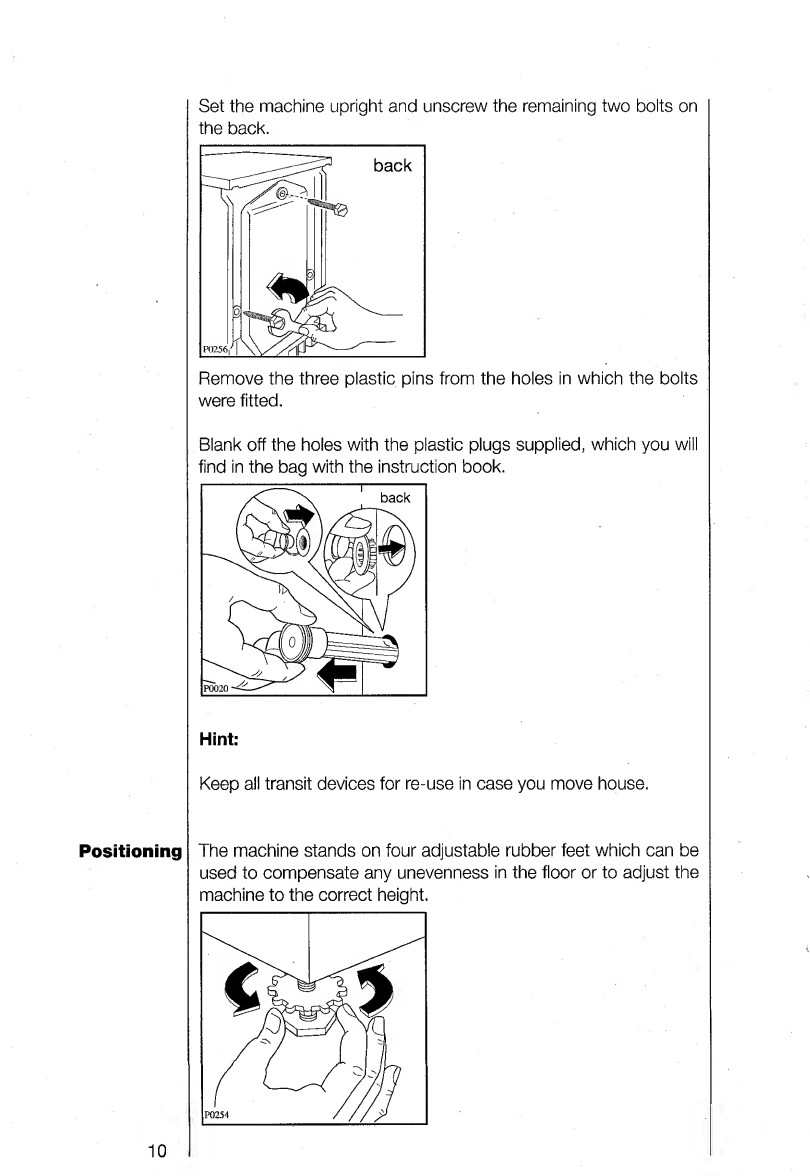
AEG TURBO sensortronic OKO LAVAMAT 1480 User manual

OKO_LAVAMAT
1480
TURBO
sensortronic
The
ecological
washer-dryer
User
Instruction
Book

Allow
me
to
introduce
myself
I
am
AEG’s
0K0
LAVAMAT
washer-dryer.
I’m
very
economical
with
electricity,
gentle
with
your
laundry,
particularly
quiet
when
Pm
working,
simple
to
use
and
easy
to
care
for.
If,
before
using
me,
you
read
and
carefully
follow
the
instructions
in
this
book,
you
are
sure
to
be
very
happy
with
the
way
I
wash
and
dry
your
laundry!
Printed
on
recycled
paper-
Ecological
in
practice,
not
just
theory

Contents
Warnings
4
Before
installing
4
Warnings
(washing)
4
Warnings
(drying)
5
The
AEG
Oko-System
/
Ecological
hints
7
Installation
instructions
9
Removing
the
transit
devices
9
Positioning
10
Connection
12
Electrical
connection
12
Connection
to
the
mains
water
supply
13
Water
drainage
14
Brief
instructions
15
Preliminary
operations
for
washing
16
Sorting
and
selecting
garments
16
Pre-treatment
16
Precautions
17
Load
sizes
17
Selecting
the
programme
18
Programme
selector/switching
on
18
Programme
phase
indicator
19
Option
buttons
and
functions
20
Detergents
23
Choice
of
detergent
23
Amount
of
detergent
24
Preliminary
water
softening
24
Using
the
detergent
25
Programme
chart
(washing)
26
End
of
programme
28
Special
rinse
28
Preliminary
operations
for
tumble
drying
29
Protect
the
environment
29
Preparation
for
tumble
drying
29
Items
not
suitable
for
tumble
drying
30
Drying
code
symbols
30
Selecting
the
drying
programme
31
Drying
only
31
Automatic
washing
and
drying
33
Drying
time
chart
34
Maintenance
and
cleaning
36
Detergent
dispenser
drawer
36
Cleaning
the
filter/Emergency
emptying
37
Other
38
How
to
deal
with
problems...
39
Customer
service
42
Technical
specifications
43

Before
installing...
Warnings
(washing)
Warnings
-
Follow
the
instructions
for
installation
and
electrical
connection.
-
Do
not
connect
the
appliance
if
it
is
damaged
(for
example
dur¬
ing
transport).
-
Any
water
found
in
the
detergent
dispenser
drawer
is
there
as
a
result
of
factory
testing.
-
To
remove
any
manufacturing
residues
from
the
drum
and
detergent
dispenser
drawer,
carry
out
a
wash
cycle
without
any
laundry,
with
the
machine
set
on
the
60°C
coloureds
pro¬
gramme
and
with
1/2
a
measure
of
detergent.
AEG
household
electrical
appliances
comply
with
general
techni¬
cal
safety
manufacturing
standards
and
with
all
safety
regulations
on
the
use
of
electrical
appliances.
However,
the
manufacturer
is
obliged
to
bring
the
following
safety
points
to
the
attention
of
the
user:
-
Before
using
the
appliance,
make
sure
that
the
voltage
and
type
of
current
indicated
on
its
rating
plate
correspond
to
the
mains
voltage
and
type
of
current
in
the
place
where
it
is
to
be
installed.
The
rating
plate
also
gives
details
of
the
electrical
pro¬
tection
required.
-
If
the
appliance
is
installed
in
a
location
which
is
not
insulated
against
frost,
the
emergency
emptying
procedure
(see
“Emer¬
gency
emptying”)
should
be
used
whenever
there
is
any
risk
of
the
temperature
dropping
below
zero.
-
Always
disconnect
the
appliance
before
cleaning
it
or
carrying
out
any
maintenance.
To
be
absolutely
safe,
check
that
the
plug
is
removed
from
the
socket
or
that
the
mains
switch
or
safety
circuit
breaker
are
in
the
OFF
position
(see
instructions
for
installation
and
electrical
connection).
-
Avoid
spraying
the
appliance
with
water.
-
Never
remove
the
plug
from
the
socket
by
pulling
the
cable;
always
take
hold
of
the
plug
itself!
-
Never
start
the
appliance
if:
■
the
power
supply
cable
is
damaged
■
there
are
obvious
signs
of
damage
in
the
control
panel
area,
to
the
top
or
along
the
base.
-
Repairs
must
only
be
carried
out
by
qualified
persons.
Inexperienced
repairs
can
seriously
endanger
the
user.
Always
contact
the
Service
Centre
or
an
authorized
dealer.
Only
genuine
AEG
spares
comply
with
all
standards!
4

-
If
the
appliance
is
to
be
installed
under
a
worktop
in
a
fitted
kitchen
or
laundry
room,
the
appliance
cover
must
first
be
removed
and
a
protective
piate
must
then
be
fitted,
as
described
in
the
installation
instructions.
-
Do
not
allow
children
to
play
with
the
appliance
and
keep
pets
well
away
from
it.
-
For
safety,
when
disposing
of
the
appliance
make
sure
that
the
door
catch
is
inoperative
and
cut
off
the
power
supply
cable.
-
The
Manufacturer
accepts
no
liability
for
damage
caused
by
incorrect
or
improper
use
of
the
appliance
for
purposes
for
which
it
was
not
originally
designed.
-
Never
put
your
hands
in
the
drum
whilst
it
is
still
rotating.
-
Never
touch
the
glass
in
the
porthole
door
when
the
appliance
is
being
used
on
a
high-temperature
programme;
the
glass
gets
very
hot
and
can
cause
burns.
-
There
is
a
danger
of
scalding
if
the
porthole
door
or
filter
cover
are
opened
during
operation.
-
The
water
drain
hose
must
be
properly
fixed
to
avoid
any
risk
of
scalding
or
flooding.
-
In
the
event
of
a
fault,
close
the
mains
water
taps
and
discon¬
nect
the
appliance
from
the
power
supply
by
pulling
out
the
plug
or
switching
the
safety
circuit
breaker
(or
breakers)
to
the
OFF
position.
-
Keep
packaging
materials
away
from
children,
especially
cello¬
phane
which
is
particularly
dangerous.
-
If
washing
garments
which
have
previously
been
dry
cleaned,
first
make
sure
that
any
remaining
inflammable
solvents
have
completely
evaporated.
-
If
the
appliance
is
to
be
connected
to
a
rainwater
or
other
simi¬
lar
source
of
water
instead
of
the
mains
water
supply,
follow
the
Water
Board
regulations.
-
If
the
machine
is
overfilled
(more
than
2,75
Kg
for
cottons/linens
and
2
kg
for
easy
cares)
there
is
danger
of
fire.
-
The
appliance
must
only
be
used
to
tumble
dry
normal
house¬
hold
laundry.
-
Dry
only
laundry
which
has
previously
been
washed
in
water.
-
It
is
quite
normal
for
the
sides
of
the
appliance
to
get
hot
during
drying.
Avoid
touching
them!
Warnings
(drying)
5

-
Never
tumble
dry
quilted
garments
containing
foam
rubber
or
similar
materials;
they
could
catch
fire.
-
Never
tumble
dry
fabrics
stained
with
hair
lacquer,
nail
varnish
remover
or
other
similar
substances
which
would
give
off
toxic
fumes.
-
Laundry
dried
in
a
tumble
dryer
comes
out.
soft
to
the
touch.
This
means
you
can
help
protect
the
environment
by
using
less
fabric
softener
in
the
wash.
-
If
so-called
“ecological”
or
“perfume-free”
detergents
are
used,
tumble-dried
laundry
may
not
have
the
typical
“smell
of
fresh¬
ness”.
This
is
not
due
to
a
fault
in
your
appliance,
but
simply
to
the
natural
smell
of
the
fabric
which
is
not
neutralised
during
washing
because
the
detergent
contains
no
deodorants.
The
Manufacturer
accepts
no
responsibility
for
accidents
resulting
from
failure
to
observe
the
above
safety
recom¬
mendations.

The
AEG
OKO-System
/
Ecological
hints
This
new
machine
is
part
of
AEG’s
OKO-System
range,
which
meets
aii
requirements
for
modern
handling
of
laundry
with
reduced
consumption
of
water,
energy
and
detergent.
This
is
a
rinsing
and
spinning
process
developed
by
AEG
which
ensures
the
best
washing
results
with
reduced
water
consump¬
tion.
The
automatic
metering
device
automatically
regulates
the
amount
of
water
used
according
to
the
size
of
load
and
type
of
fabric.
The
drum
is
fitted
with
special
paddles
which
keep
the
water
moving
upwards.
In
this
way,
the
laundry
is
soaked
more
evenly
and
faster.
Preliminary
softening
of
the
water,
achieved
by
means
of
a
two-
stage
device
for
dispensing
the
softener
and
detergent,
ensures
ecological
operation
even
in
very
hard
water
areas.
All
the
materials
used
for
packaging
are
non-polluting!
They
may
be
disposed
of
quite
safely.
Plastic
materials
can
be
recycled
and
are
marked
with
the
follow¬
ing
symbols:
>PE<
polyethylene
>PS<
polystyrene
>PP<
polypropylene
You
are
advised
to
dispose
of
all
cardboard
packaging
in
special
paper
collection
containers
so
that
it
can
be
recycled.
Sensortronic
Automatic
metering
Drum
paddies
Preliminary
water
softening
Packaging
information
7

Ecological
suggestions
for
economical
washing
For
medium
soiling,
use
programmes
without
prewash.
This
will
save
detergent
and
water.
Make
full
use
of
aii
the
advantages
offered
by
two-part
deter¬
gents.
Always
wash
full
loads
for
maximum
savings.
Use
the
“ENERGY
SAVING”
(Economy)
programme
for
nor¬
mally
or
lightly
soiled
cottons
and
coloureds.
For
best
results,
even
at
low
temperatures,
remove
individual
stains
from
laundry
before
washing.
Use
minimum
amounts
of
detergent.
Follow
the
instructions
on
the
pack.
8

Installation
instructions
All
transit
devices
must
be
removed
before
installing
and
connecting
the
appliance.
Proceed
as
follows:
Using
a
spanner,
remove
the
bolt
on
the
right
at
the
back
of
the
machine.
Gently
lay
the
machine
on
its
back,
taking
care
not
to
squash
the
hoses.
This
can
be
done
more
easily
by
placing
one
of
the
corner
pack¬
ing
pieces
between
the
machine
and
the
floor.
Remove
the
polystyrene
packing
piece.
Peel
off
the
adhesive
strip
and
carefully
remove
the
right-hand
polythene
bag
(1),
then
the
left-hand
bag
(2)
by
pulling
both
towards
the
centre
of
the
machine.
Removing
the
transit
devices
9

Set
the
machine
upright
and
unscrew
the
remaining
two
bolts
on
the
back.
Remove
the
three
plastic
pins
from
the
holes
in
which
the
bolts
were
fitted.
Blank
off
the
holes
with
the
plastic
plugs
supplied,
which
you
will
find
in
the
bag
with
the
instruction
book.
Hint:
Keep
all
transit
devices
for
re-use
in
case
you
move
house.
Positioning
The
machine
stands
on
four
adjustable
rubber
feet
which
can
be
used
to
compensate
any
unevenness
in
the
floor
or
to
adjust
the
machine
to
the
correct
height.
10

Lock
the
feet
in
position
by
fully
tightening
up
the
locknuts.
The
appliance
must
be
level
and
resting
on
all
four
feet.
It
must
not
tilt
when
pressure
is
exerted
on
one
side
only.
If
necessary,
use
a
spirit
level
to
check
that
it
is
perfectly
level.
The
floor
must
be
clean,
dry
and
free
of
any
wax
residue
or
other
polish
to
prevent
any
risk
of
sliding.
Never
use
viscous
substances
to
move
the
appliance
by
sliding
it
across
the
floor!
It
is
inadvisable
to
stand
the
appliance
on
long
pile
carpet
or
rugs
or
on
layers
of
foam
rubber,
as
this
could
make
it
unstable.
Place
a
rubber
mat
beneath
the
appliance
if
the
floor
is
made
of
very
small
tiles.
If
the
appliance
is
to
be
placed
on
non-solid
flooring,
especially
made
of
wooden
joists
and
flexible
boards,
a
waterproof
wood
panel,
15
mm
thick,
must
be
secured
with
screws
to
at
least
two
of
the
floor
joists.
If
possible,
the
machine
should
be
placed
in
a
corner
of
the
room,
as
this
is
where
the
joists
are
most
firmly
fixed
and
have
less
tendency
to
flex.
Never
use
wedges
of
wood,
cardboard
or
other
similar
materials
to
compensate
for
unevenness
in
the
floor.
If
space
is
tight
and
you
cannot
avoid
placing
the
machine
next
to
a
gas
oven
or
coal
burning
stove,
a
sheet
of
insulating
material
(85
x
57
cm),
covered
with
aluminium
foil
on
the
side
facing
the
oven
or
stove,
must
be
fitted
between
the
two
appliances.
Before
building
the
machine
in
under
a
fitted
kitchen
worktop,
remove
the
cover
and
install
a
special
protective
plate,
which
is
available
from
your
local
Service
Centre,
part
number
645
426
133.

Connection
Electrical
connection
Details
of
the
mains
voltage,
type
of
current
and
protection
required
are
given
on
the
appliance
rating
plate
which
can
be
found
on
the
frame,
after
opening
the
porthole
door.
WARNING:
THIS
APPLIANCE
MUST
BE
EARTHED.
The
manufacturer
declines
any
liability
should
this
safety
measure
not
be
observed.
If
the
plug
that
is
fitted
to
your
appliance
is
not
suitable
for
your
socket
outlet,
it
must
be
cut
off
and
the
appropriate
plug
fitted.
Remove
the
fuse
from
the
cut
off
plug.
The
cut
off
plug
should
then
be
disposed
of
to
prevent
the
hazard
of
shocks
in
case
it
should
be
plugged
into
a
13amp
socket
in
another
part
of
your
home.
IMPORTANT
The
wires
in
the
mains
lead
are
coloured
in
accordance
with
the
following
code:
Green
and
Yellow
-
Earth
Blue
-
Neutral
Brown
-
Live
If
you
fit
your
own
plug,
the
colours
of
the
wires
in
the
mains
lead
of
your
appliance
may
not
correspond
with
the
markings
identify¬
ing
the
terminals
in
your
plug,
proceed
as
follows:
Connect
the
Green
and
Yellow
(earth)
wire
to
the
terminal
in
the
plug
which
is
marked
with
the
letter
«E»
or
the
earth
symbol
®
,
or
coloured
green
and
yellow.
Connect
the
blue
(neutral)
wire
to
the
terminal
in
the
plug
which
is
marked
with
the
letter
«N»
or
coloured
black.
Connect
the
brown
(live)
wire
to
the
terminal
in
the
plug
which
is
marked
with
the
letter
«L»
or
coloured
red.
The
plug
moulded
onto
the
lead
incorporates
a
fuse.
For
replace¬
ment,
use
a
13amp
BS1362
fuse.
Only
ASTA
or
BSI
approved
fuses
should
be
used.
The
plug
must
not
be
used
if
the
fuse
cover/carrier
is
lost.
The
cover/
carrier
is
indicated
by
the
coloured
insert
at
the
base
of
the
plug.
12

A
replacement
cover/carrier
must
be
obtained
from
your
local
AEG
Service
Centre.
C
€
This
appliance
complies
with
the
following
E.E.C.
Directives:
73/23/EEC
and
89/336/EEC:
If
the
appliance
is
to
be
permanently
connected
to
the
power
supply
you
must
install
a
circuit
breaker
with
a
gap
of
at
least
3
mm
between
the
contacts,
which
enables
the
appliance
to
be
completely
isolated
from
the
mains
supply.
The
mains
supply
cable
must
not
be
extended.
If
it
is
not
long
enough,
replace
it
with
a
new,
longer
cable
or
move
the
appliance
closer
to
the
power
socket.
The
appliance
has
two
inlet
valves,
hot
and
cold,
with
female
3/4"
BSP
thread
connectors.
The
water
inlets
on
the
back
of
the
machine
are
colour
coded,
blue
for
cold
and
red
for
hot.
Before
connecting
the
hoses
be
sure
to
fit
the
mesh
filters
supplied.
Connection
to
the
mains
water
supply
If
only
a
cold
water
supply
is
available,
connect
the
two
hoses
to
a
cold
water
outlet
by
means
of
a
«Y»
connection
piece.
Installation
should
comply
with
local
water
authority
and
building
regulations’
requirements.
The
appliance
must
be
given
a
separate
cold
water
supply
and
not
be
connected
to
a
mixer
tap,
a
single
outlet
water
heater
or
a
booster
pump.
A
minimum
water
pressure
of
7psi
is
required
for
safe
operation
of
the
appliance.
If
you
cannot
make
the
cold
water
connection
direct
from
the
ris¬
ing
mains,
you
may
be
able
to
operate
the
appliance
from
your
cold
water
storage
system.
There
should
be
a
minimum
distance
of
5.02m
(16
\
ft)
between
the
appliance’s
inlet
and
the
bottom
of
the
tank.
There
will
be
sufficient
pressure
for
the
hot
water
supply
from
the
hot
water
cylinder
if
the
height
between
the
appliance’s
inlet
and
the
bottom
of
the
cold
water
storage
cistern
(not
between
the
appliance
and
hot
water
cylinder)
is
at
least
2.74m
(9ft).
13

The
end
of
the
hose
connected
to
the
back
of
the
machine
can
be
turned
in
any
direction.
Simply
slacken
the
connector
fitting,
position
the
hose
as
required
and
fully
tighten
the
connector
to
avoid
leakage
of
water.
Water
drainage
Every
appliance
is
fitted
with
a
pump
for
discharging
the
wash
and
rinse
water.
This
pump
is
controlled
by
the
programme
selec¬
tor
mechanism
and
is
capable
of
pumping
water
through
the
drain
hose
to
a
height
of
up
to
1
m
above
the
surface
on
which
the
machine
is
standing.
The
curved
end
of
the
drain
hose
can
be
positioned
in
two
ways:
Hooked
over
the
edge
of
the
sink.
In
view
of
the
speed
with
which
the
water
comes
out
during
the
discharge
phase,
it
is
important
to
ensure
that
the
curved
end
of
the
hose
cannot
slip
off
the
edge
of
the
sink.
It
should
therefore
be
tied
to
the
tap
with
a
piece
of
string
or
secured
to
the
wall
with
a
hook,
by
inserting
the
hook
into
the
hole
provided
in
the
curved
part
of
the
hose.
Joined
into
a
branch
of
the
sink
waste
pipe.
The
branch
must
be
above
the
sink
trap
and
at
least
60
cm
above
the
floor.
The
drain
hose
may
be
extended
up
to
a
maximum
length
of
180
cm.
Use
an
extension
with
an
internal
diameter
the
same
as
that
of
the
original
hose.
Use
a
suitable
connector.
The
hose
extension
must
rest
on
the
floor
and
only
the
part
near
the
drainage
point
must
be
raised.
14

Brief
instructions
■
Prepare
the
laundry
Sort
and
select
garments,
carry
out
any
pre-treatment.
■
Switch
the
machine
on
Press
the
ON/OFF
button
■
Select
the
programme
Turn
the
selector
dial
to
the
required
programme
Press
any
option
buttons
required
■
Open
the
porthole
door
■
Load
the
laundry
into
the
machine
■
Close
the
porthole
door
■
Measure
out
the
detergent
■
Press
the
START/PAUSE
button
■
At
the
end
of
the
programme
Open
the
porthole
door
and
remove
the
laundry.
■
Release
the
ON/OFF
button

Sorting
and
selecting
garments
Pre-treatment
Preliminary
operations
for
washing
■
Check
that
garments
are
machine-washable
by
looking
at
the
international
wash
code
symbols
on
the
label.
Whites
Coloureds
Synthetics
Delicate
fabrics
Wool
■
Sort
clothing
according
to
type
of
fabric,
degree
of
soiling
and
wash
temperature.
■
Wool
garments
marked
with
only
the
A
symbol
should
not
be
washed
in
your
machine,
but
those
on
which
the
symbol
is
accompanied
by
the
words
“non
felting”
or
“machine-washa¬
ble”
may
be
machine-washed.
■
Never
machine-wash
garments
labelled
with
the
following
symbols:
Hand
wash
only
Do
not
wash
in
water
Dry
clean
only
Do
not
dry
clean
May
be
bleached
Do
not
use
bleach
■
Always
follow
the
instruction
“Wash
separately”.
■
New
coloured
items
often
contain
excess
dye
which
could
run
and
stain
other,
lighter
items
in
the
wash.
It
is
advisable
to
wash
these
items
separately
the
first
time.
t
ti-
®
®
®
8
A
QB
tso/\jE/
If
possible,
treat
stains
when
they
are
still
new.
Use
water,
soap
or
suitable
detergents
(stain
remover
spray,
stick,
paste,
etc.).
16

Precautions
■
Empty
all
pockets
Be
particularly
careful
to
remove
metal
objects
(paper
clips,
safety
pins,
loose
change,
etc..).
■
Do
up
buttons
and
hooks,
close
zips
and
press
studs.
■
Tie
up
loose
belts
or
long
apron
strings.
■
Turn
woollen
garments,
coloured
embroidered
garments
and
those
with
sewn-on
designs
inside
out.
■
Very
small
or
delicate
items
(e.g.
baby
socks,
tights)
can
be
protected
by
placing
them
inside
a
pillowcase
with
zip
fas¬
tener,
or
inside
long
socks.
■
Treat
net
curtains
with
special
care.
The
fabric
may
be
damaged
by
opening
the
window
or
when
removing
the
curtains
for
washing
(pulled
threads).
Remove
metal
or
plastic
hooks
or
enclose
in
a
net
or
cloth
bag.
The
manufacturer
accepts
no
responsibility
for
any
damage.
Net
curtains
should
be
spin
dried
only
if
the
manufacturer’s
label
states
that
this
may
be
done.
Whites/coloureds
(cotton
and
linen)
5.5
kg
Soak
5.5
kg
Easy
care
fabrics
2.3
kg
Delicate
fabrics
2.3
kg
Curtains
15-20
m
2
depending
on
type
of
material
Woollens
1.0
kg
Quick
wash
programme
for
cottons/coloureds
2.75
kg
Quick
wash
programme
for
easy
care/delicate
fabrics
2.3
kg
Whenever
possible,
load
the
machine
to
maximum
capacity;
full
loads
are
more
economical.
Do
not
however
exceed
the
maximum
load
as
this
could
lead
to
poor
washing
results.
Reduce
the
load
when
washing
fabrics
which
are
particularly
sub¬
ject
to
creasing.
Load
sizes
(Maximum
load
of
dry
laundry)
17

Selecting
the
programme
ECONOMY
SOAKING
°?2
f
■
®
o
EXTRA
pJP80AR0
IRON
QUICK
O
QOOOOOO
PREWASH
©-
MAIN
WASH
©-
RINSE
HOLD
©
PUMPOUT
©-
SPIN
©-
DRYING
©-
ON/OFF
button
Display
Option
buttons
Programme
selector
Delayed
Drying
start
button
buttons
Programme
phase
indicator
Programme
selector/Switching
on
The
programme
selector
knob
may
be
turned
clockwise
or
anti¬
clockwise.
When
the
ON/OFF
button
is
pressed
the
machine
switches
on
(power
ON)
or
off.
You
may
select
normal
washing
and
drying
programmes,
or
the
following
special
programmes:
For
normally
or
lightly
soiled
cotton
and
linen
whites
the
ECONOMY
(E)
programme
may
be
used
instead
of
the
95°C
pro¬
gramme.
The
duration
of
the
programme
will
be
prolonged,
but
the
washing
temperature
is
reduced
to
about
67°C,
so
saving
energy.
For
heavily
soiled
fabrics
(except
woo!)
the
SOAK
programme
may
be
selected.
The
cycle
is
performed
at
40°C
and
ends
with
water
in
the
drum.
To
drain
the
water
depress
the
START/PAUSE
button.
After
18
hours
soaking
the
water
is
drained
automatically.
18

This
programme
allows
you
to
rinse
and
spin
separately,
items
which
have
been
washed
by
hand.
This
programme
is
for
garments
which
have
just
been
washed
and
need
starching.
Dissolve
,powdered
starch
or
dilute
liquid
starch,
then
pour
it
into
the
dispenser
compartment
marked
with
the
®
symbol.
Water
may
be
pumped
out
at
the
end
of
a
programme,
without
spinning.
Spin
for
cottons
and
coloureds.
Spin
for
easy
care/delicate
fabrics
and
for
woolens.
Cancels
the
previously
selected
functions
Programme
phase
indicator
PREWASH
H
MAIN
WASH
©
RINSE
©
RINSE
HOLD
©
PUMP
OUT
©
SPIN
DRYING
©
_
END
S
_
When
a
programme
is
selected,
the
lights
corresponding
to
the
phases
making
up
the
programme
come
on.
When
the
programme
starts,
the
light
corresponding
to
the
pro¬
gramme
phase
in
progress
comes
on.
The
end
of
the
programme
is
indicated
by
the
END
light.
GENTLE
RINSE
STARCHING
PUMP
OUT
SPIN
GENTLE
SPIN
CANCEL
19

Option
buttons
and
functions
O
IN/OFF
DELAYED
START
When
these
buttons
are
pressed,
the
corresponding
pilot
lights
come
on.
When
they
are
pressed
again,
the
lights
go
out.
If
a
button
whose
function
is
not
compatible
with
the
programme
selected
is
pressed,
all
the
lights
will
start
to
flash.
After
about
1
second,
they
will
go
out.
ON
DELAY
DRYING
OFF
TIMER
TIME
700
900
1200
1400
SPIN
®(
)
()
1
^
o
®
m
^
^
extra
cupboard
iron
DRY
DRY
DRY
QUICK
VARIO-
PRE-
START
WASH
MATIC
WASH
INTENSIVE
PAUSE
#
#
#
@
®
©'
©
#
oooooooo
■
ON/OFF
button
When
this
button
is
pressed,
the
machine
switches
on.
The
pilot
light
on
the
left
comes
on.
The
pilot
light
corresponding
to
the
Start/Pause
button
flashes
and
the
programme
phase
indicator
shows
the
different
phases
that
make
up
the
cycle.
When
the
button
is
pressed
again,
the
machine
switches
off.
■
Delayed
start
Depressing
this
button
results
in
a
delay
in
starting
up
of
the
machine.
This
delay
can
be
of
up
to
19
hours.
This
button
must
be
depressed
before
activating
the
Start/
Pause
button.
The
display
shows
the
selected
time.
After
1
minute,
the
machine
starts
an
hourly
count
down
to
the
selected
programme
start
up
time.
This
time
appears
in
the
display.
By
depressing
the
button
again
(until
the
display
goes
out)
this
function
is
cancelled
and
the
programme
previously
selected
begins.
20
Table of contents
Other AEG Washer Dryer manuals

AEG
AEG Lavamat 2060 TURBO User manual

AEG
AEG L76685NWD User manual

AEG
AEG L7WEC166R User manual

AEG
AEG Lavamat 2000 User manual

AEG
AEG LAVAMAT 11842 VIT User manual

AEG
AEG L7WEG74BI User manual

AEG
AEG L7WEE862S User manual

AEG
AEG lavamat 2000 E User manual

AEG
AEG L 76684 NWD User manual

AEG
AEG LAVAMAT 2050 TURBO User manual

AEG
AEG L9WEC163C User manual

AEG
AEG LWR7416U6UD User manual

AEG
AEG LAVAMAT 2004 User manual

AEG
AEG LAVAMAT 12700 VI TURBO User manual

AEG
AEG LWR7316O4O User manual

AEG
AEG LAVAMAT 14700 VIT TURBO User manual

AEG
AEG KO-LAVAMAT 1271 User manual

AEG
AEG LAVAMAT 63742 VI User manual

AEG
AEG OKO-Lavamat 16800 TURBO ELECTRONIC User manual

AEG
AEG LAVAMAT 12710 User manual