Aerogen Pro User guide
System Instruction Manual
www.aerogen.com


Aerogen®Pro System Instruction Manual 1
Contents
Introduction 2
Indications for Use 2
System Warnings 5
Assembly & Installation 9
Installation For Use With A Ventilator 12
Nebulisation 16
Installation For Use Off-Ventilator 17
Functional Test 19
Cleaning, Disinfection and Sterilisation 20
Troubleshooting 26
Warranty 28
Life Of Product 28
Specifications 29
Performance 30
Symbols 31
Appendix 1 32
Appendix 1: EMC Tables 34

2Aerogen®
Introduction
The Aerogen®Pro System is a portable medical device for multiple patient
use that is intended to aerosolise physician-prescribed medications for
inhalation that are approved for use with a general purpose nebuliser. This
device can be used by patients on and off mechanical ventilation or other
positive pressure breathing assistance.
Aerogen®Pro is suitable for use by neonate, paediatric to adult patients
as described in this manual. It incorporates the Aerogen Vibronic®aerosol
generator.
Aerogen®Pro is intended for hospital use only. It is designed to operate in-
line with standard ventilator circuits and mechanical ventilators. It operates
without changing patient ventilator parameters and can be refilled without
interrupting ventilation.
The controller operates from the AC/DC adapter and can be operated on
its internal rechargeable battery for up to 45 minutes when fully charged.
The product operates without compressed gas, making it suitable for
portable applications.
Indications for Use
The Aerogen Pro System is a portable medical device for multiple patient
use that is intended to aerosolise physician-prescribed solutions for
inhalation to patients on and off ventilation or other positive pressure
breathing assistance. The Aerogen Pro System is suitable for use in adult,
paediatric and neonate patients.
Aerogen®Pro System Instruction Manual 3
Aerogen Pro System
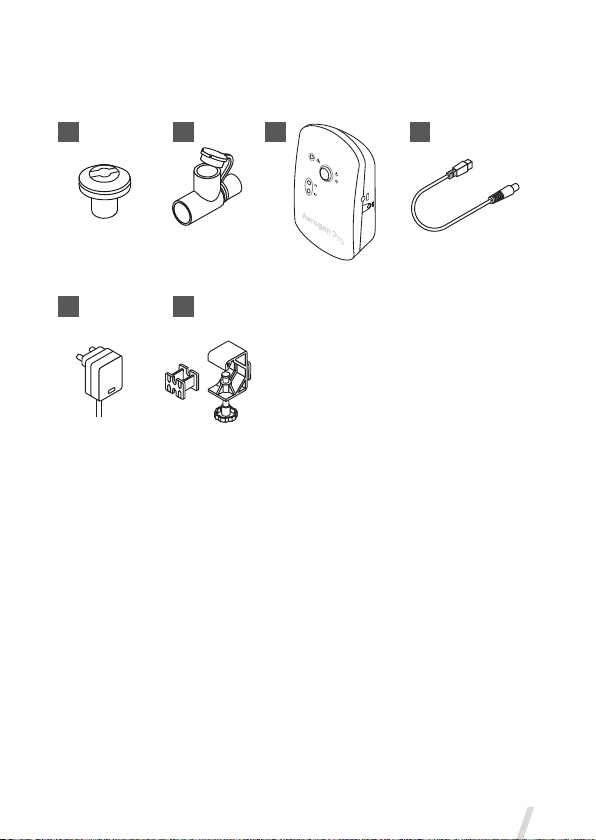
The Aerogen Pro System includes the following components:
Figure 1. Aerogen Pro System
1. Nebuliser with Filler Cap
2. T-Piece (Adult) with Plug
3. Aerogen Pro Controller
4. Controller Cable
5. AC/DC Adapter
6. Universal Mounting Bracket & Equipment Mount Adapter
Note: Visit www.aerogen.com for full parts list.
1 2 3 4
5 6

4Aerogen®
1. The nebuliser holds up to 10 mL of liquid medication. The nebuliser
is translucent to allow visual monitoring of medication levels and
aerosolisation. When the nebuliser is connected into the breathing
circuit, the filler cap can be opened or removed from the nebuliser
without causing loss of circuit pressure.
Within the nebuliser is the Aerogen Vibronic®aerosol generator, which
consists of a domed aperture plate with precision-formed holes that
control the size of the aerosol droplets and a vibrational element that
creates micro-pumping action to aerosolise medication. Gravity brings
the medication in contact with the aerosol generator; the liquid is then
drawn through the aperture plate and converted into an aerosol.
2. The T-piece securely connects the nebuliser into the breathing circuit
and can be easily removed for cleaning. The T-piece connections are
standard male and female 22 mm ISO conical ports and connect to
standard patient breathing circuits.
3, 4, 5.
The controller can operate from the AC/DC Adapter or the internal
rechargeable battery. The controller includes an On/Off power button
and sockets for the controller cable and the AC/DC Adapter. The
controller also includes indicators for nebulisation cycle selection (15
or 30 minutes), battery charge status and fault conditions.
6. A Universal Mounting Bracket clamps the controller to standard IV
poles and medical rail systems.
7. An Equipment Mount Adapter mounts the controller on Standard
Equipment Mounts.
Note: Paediatric T-piece, Neonate Adapters, Mask Adapter Kits, Elbow
Connectors and Mouthpiece are sold separately.

Aerogen®Pro System Instruction Manual 5
System Warnings
Read and study all instructions before using the Aerogen Pro System
and accessories. Only trained medical personnel should operate the
device.
During use observe for correct functioning of the nebuliser by regularly
verifying aerosol is visible and no flashing indicator lights.
Do not use a filter or heat-moisture exchanger (HME) between the nebuliser
and patient airway.
Do not attach a continuous supply of medication to the nebuliser; the
device operates in 15 or 30 minute cycles.
Clean, sterilise, assemble and perform a functional test (page 19)
according to the instructions in this manual before first use and between
patients.
Do not place the controller in an incubator during use.
To avoid exhaled medication affecting the ventilator, follow ventilator
manufacturer’s recommendations for use of a bacterial filter in the
expiratory limb of a breathing circuit.
To ensure optimum drug administration, consult the drug manufacturer’s
instructions regarding suitability for nebulisation.
Do not use in the presence of flammable substances or a flammable
anaesthetic mixture combined with air or with oxygen or nitrous oxide.
To avoid the risk of fire do not use to aerosolise alcohol-based medications,
which can ignite in oxygen-enriched air and under high pressure.
Do not modify this equipment without the authorisation of the manufacturer.
Disconnect the nebuliser from controller before cleaning.

6Aerogen®
Inspect all parts before use, and do not use if any parts are missing,
cracked or damaged. In case of missing parts, malfunction or damage,
contact your sales representative.
Do not immerse or autoclave the controller or AC/DC adapter.
Disassemble all parts before autoclaving.
Use only with components specified by Aerogen.
Do not use or store outside of specified environmental conditions.
To avoid mechanical or electrical damage, do not drop the nebuliser or
the controller.
Do not use in the presence of devices generating high electromagnetic
fields such as magnetic resonance imaging (MRI) equipment.
The Aerogen Pro controller contains a nickel metal hydride (NiMH)
rechargeable battery, which should be disposed of in accordance with
local governing restrictions at the end of its useful life.
To avoid damage to the nebuliser:
•Prior to use, autoclave according to specified directions and
temperature given in the Cleaning, Disinfection and Sterilisation
section of this Instruction Manual only. Any deviation from directions
given in this Instruction Manual may cause damage to the nebuliser
and render it inoperable.
•Do not apply undue pressure to the domed aperture plate in the centre
of the nebuliser.
•Do not push out the Aerogen Vibronic®aerosol generator.
•Do not use a syringe with a needle to add medication.
•Do not use abrasive or sharp tools to clean the nebuliser.
Aerogen®Pro System Instruction Manual 7
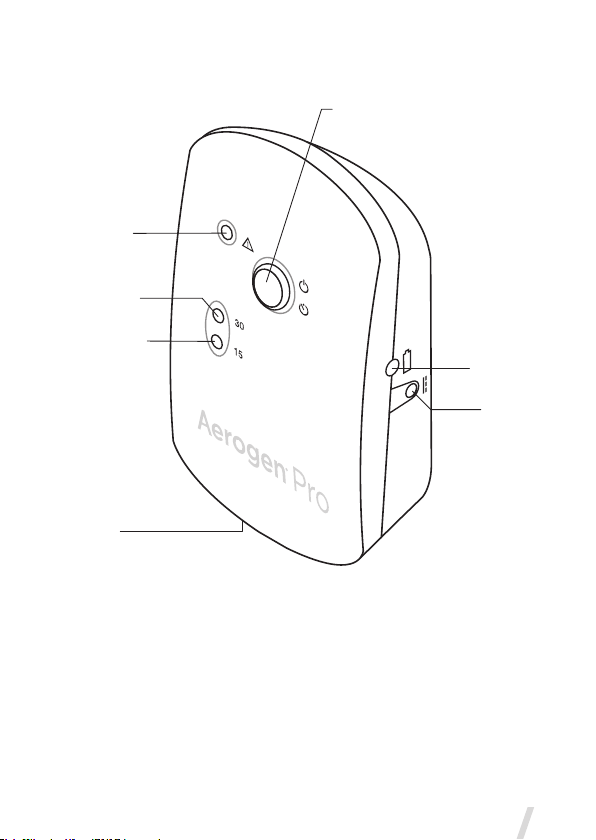
Aerogen Pro Controller
Controller
Cable Input
Error Indicator
30 Minute Mode
Indicator light
15 Minute Mode
Indicator light
On/Off Power
• 15 Min. - Press & Release
• 30 Min. - Press & hold for 3 Sec.
Battery Status
Indicator
9V DC Input
Figure 2. Aerogen Pro Controls & Indicators

8Aerogen®
Control / Indicator Function
15 Min. Indicator
• Green (steadily lit) = 15 Minute
nebulisation cycle on
• Green (flashing) = Low battery
power
• Nebuliser automatically powers off after
15 minutes have elapsed
30 Min. Indicator
• Green (steadily lit) = 30 Minute
nebulisation cycle on
• Green (flashing) = Low battery
power
• Nebuliser automatically powers off after
30 minutes have elapsed
Error Indicator • Amber = Faulty electrical
connection
On/Off Power Button
• To operate in 15 Minute Mode, press
and immediately release the On/Off
button
• To operate in 30 Minute Mode, press
and hold the On/Off button for at least 3
seconds from off
• Pressing during nebulisation turns off
power to the nebuliser
Battery Status Indicator
• Green = Battery fully charged
• Amber = Battery charging
• No light = Battery in operation
Recharging the Battery
To recharge the battery, connect the AC/DC Adapter to the controller and
connect to AC power source. The battery status indicator is amber while
charging and green when fully charged.
If the controller is placed in long-term storage, it is recommended that the
battery be recharged every 3 months.
Allow a minimum of four hours for the internal battery to fully recharge.
Table 1. Aerogen Pro Controls & Indicators
Aerogen®Pro System Instruction Manual 9
Assembly & Installation
Aerogen Pro System Set-Up
Clean and sterilise the nebuliser and T-piece(s) as described in the
Cleaning, Disinfection and Sterilisation section of this manual.
Note: The nebuliser and T-piece, as packaged, are not sterile.
Perform a functional test of Aerogen Pro before use and between
patients as described in the Functional Test section of this manual
(see page 19).
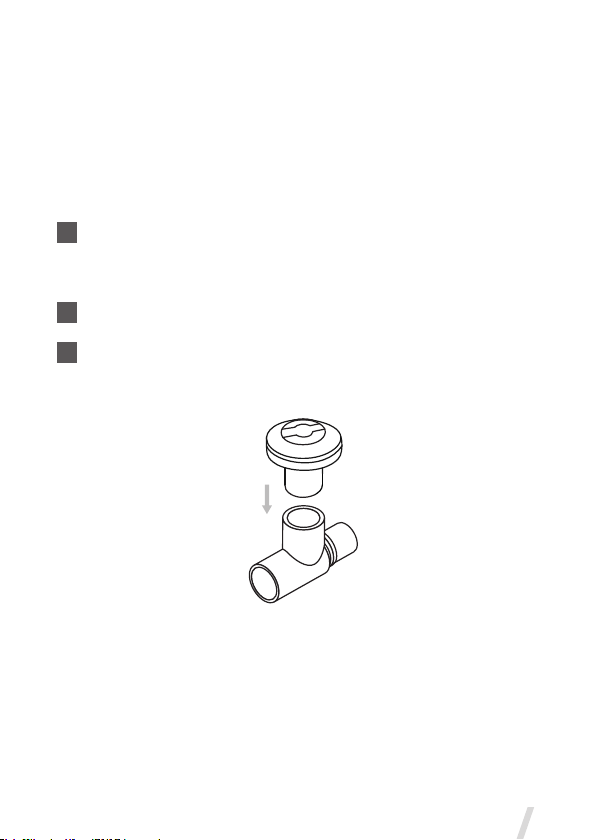
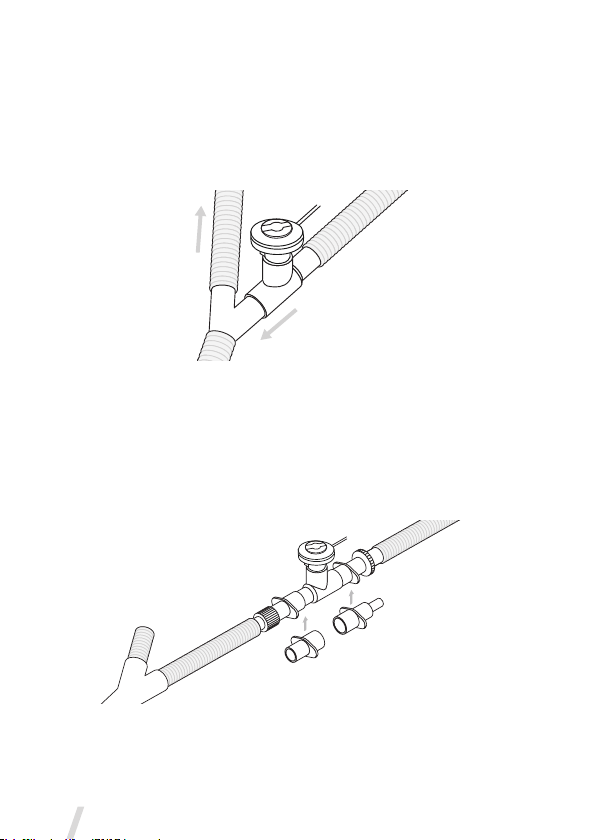
Insert the filler cap into the opening on the nebuliser.
Connect the nebuliser to the T-piece by pushing the nebuliser firmly
onto the T-piece (Figure 3).
Figure 3. Connecting nebuliser to T-piece
1
2
3
10 Aerogen®
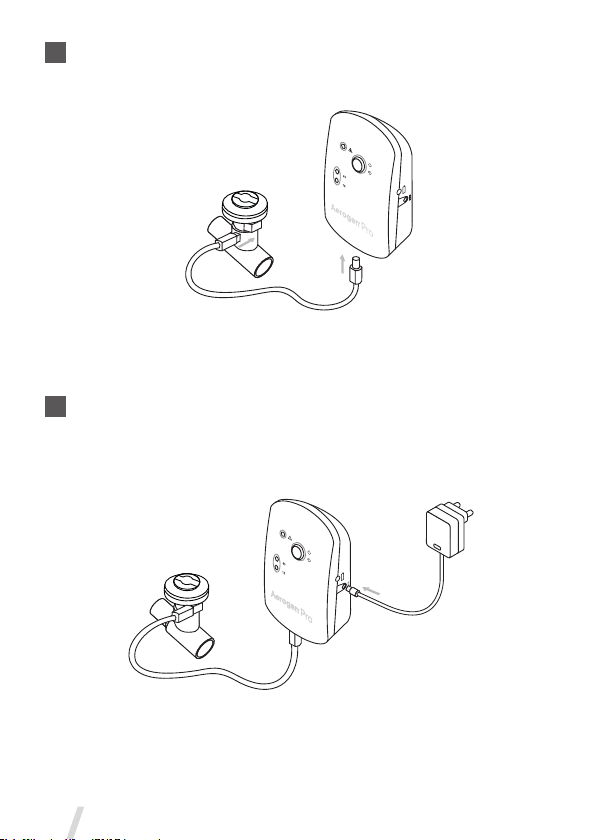
Connect the Aerogen Pro controller and the nebuliser together using
the controller cable (Figure 4).
Figure 4. Connecting controller and nebuliser
To operate on AC power (the primary mode of operation), connect
the Aerogen Pro AC/DC adapter to the Aerogen Pro controller
and plug the adapter into an AC power source (Figure 5).
Figure 5. Connecting the AC/DC Adapter
5
4

Aerogen®Pro System Instruction Manual 11
The Aerogen Pro can be battery-operated for portable applications.
The rechargeable battery can power the System for up to 45 minutes
when fully charged. In the case of AC power failure the controller will
automatically switch to battery operation.
Note: Allow a minimum of four hours for the internal battery to fully
recharge.
Note: To ensure uninterrupted operation of the Aerogen Pro, secure both
the AC/DC adapter cable and the controller cable so they cannot become
disconnected during treatment. If clips are available on patient circuits, run
the cables through the eyes of the clips. If clips are not available, ensure
that all cables are routed safely.
6
12 Aerogen®
Installation for use with a Ventilator
Connection to a Breathing Circuit
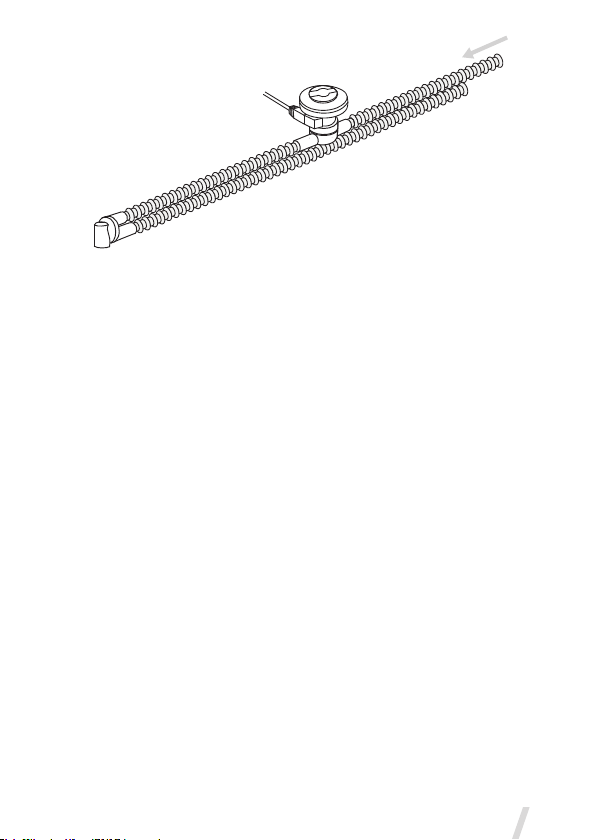
1. For adult breathing circuits, connect the nebuliser with adult T-piece
into the inspiratory limb of the breathing circuit before the patient Y
(Figure 6).
Figure 6. Connecting the Aerogen Pro to an adult breathing circuit
Note: Figure 6 shows adult configuration only
2. For paediatric breathing circuits, connect the nebuliser with the
paediatric T-piece into the inspiratory limb of the breathing circuit
before the patient Y (Figure 7).
Figure 7. Connecting to a paediatric breathing circuit
Aerogen®Pro System Instruction Manual 13
Figure 8. Connecting to a neonatal breathing circuit using neonate T-piece
1. For neonatal breathing circuits, connect the nebuliser with the
paediatric T-piece and the neonate adapters approximately 30 cm
(12 in.) back from the patient Y (Figure 7). Alternatively connect the
nebuliser with the Neonate T-piece 30 cm (12 in.) back from the patient
Y (Figure 8).
2. Always perform a leak test of the breathing circuit after inserting or
removing the nebuliser. Follow ventilator manufacturer instructions for
performing a leak test.
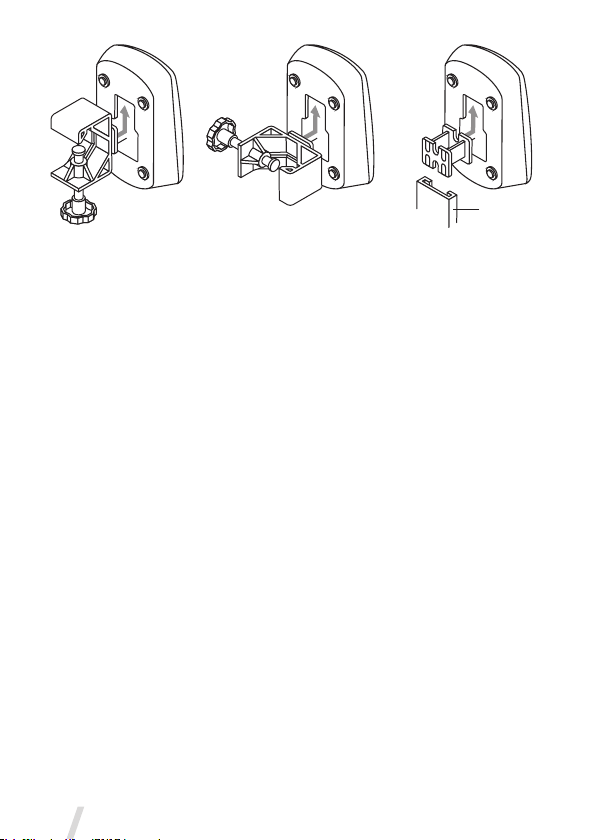
3. Use the universal mounting bracket to attach the controller to an IV
pole or bed rail in either a vertical or horizontal orientation (Figure 9). Do
not over-tighten knob.
Where a standard equipment mount is available, use the equipment
mount adapter to support the controller (Figure 9).
14 Aerogen®
Controller and Vertical
Universal Mounting Bracket
Controller and Horizontal
Universal Mounting Bracket
Equipment
Mount Adapter
Standard
Equipment Mount
Figure 9. Aerogen Pro controller and universal mounting bracket
configurations
Warnings
• Always maintain the nebuliser in a vertical orientation (with the filler cap
uppermost) while in the patient circuit (Figures 6, 7, & 8). This orientation
prevents condensate from blocking the nebuliser and ensures proper
nebulisation. Always visually inspect the nebuliser prior to placing
in the ventilator circuit to assure that no secretions are blocking the
Aerogen Vibronic®aerosol generator.
• When removing the nebuliser from the patient circuit always replace
the T-piece plug to maintain circuit pressure.
• Always connect a bacteria filter to the expiratory inlet of the ventilator.
Otherwise the function of the expiratory channel may be degraded.
• Do not use a filter or heat-moisture exchanger (HME) between the
nebuliser and patient airway.
Aerogen®Pro System Instruction Manual 15
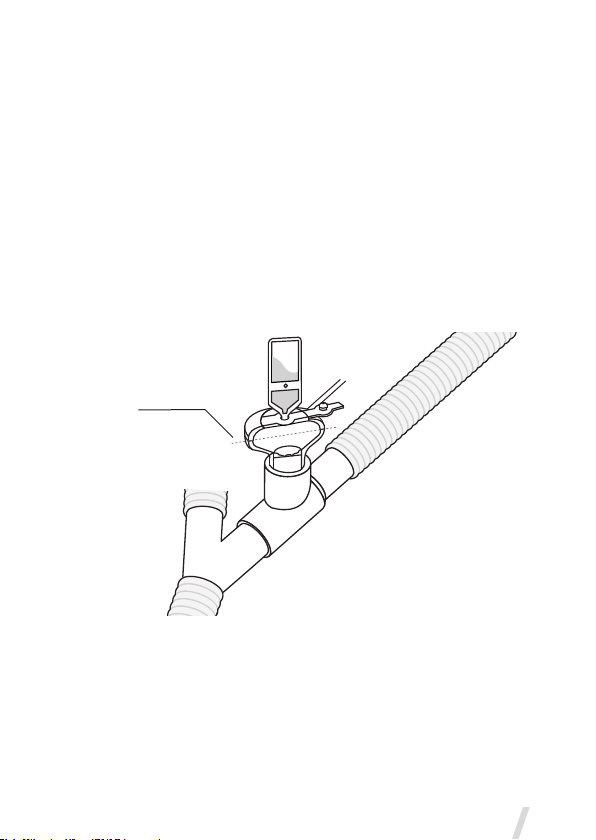
Adding Medication
•Open the filler cap tab on the nebuliser.
•Use a pre-filled ampoule or syringe to add medication into the filler port
of the nebuliser (Figure 10).
•Close the filler cap tab.
Warning: To avoid damage to the nebuliser, do not use a syringe with a
needle.
The maximum capacity of the nebuliser is 10 mL. Do not fill the nebuliser
beyond the maximum fill indication point (Figure 10). The underside of the
filler cap represents maximum fill indication point.
Max. fill
indication
point
Figure 10. Filling the nebuliser with a pre-filled ampoule
Note: Medication can be added in this manner during nebulisation. This
does not interrupt nebulisation or ventilation.

16 Aerogen®
Nebulisation
For doses less than or equal to 3 mL.
1. To start a 15 Minute nebulisation cycle, add the medication and press
and release the blue On/Off power button (Figure 2). The green 15 Min.
indicator lights to indicate that the 15 Minute nebulisation cycle is in
progress.
For doses greater than 3 mL.
2. To start a 30 Minute nebulisation cycle, add the medication and press
and hold the blue On/Off power button for at least three seconds. The
green 30 Min. indicator lights to indicate that the 30 Minute nebulisation
cycle is in progress.
3. To stop the nebuliser at any time, press the On/Off power button. The
indicator turns off to indicate that nebulisation has stopped.
Note: When delivering a dose greater than 3 mL, select the 30 Minute
cycle.
Aerogen®Pro System Instruction Manual 17
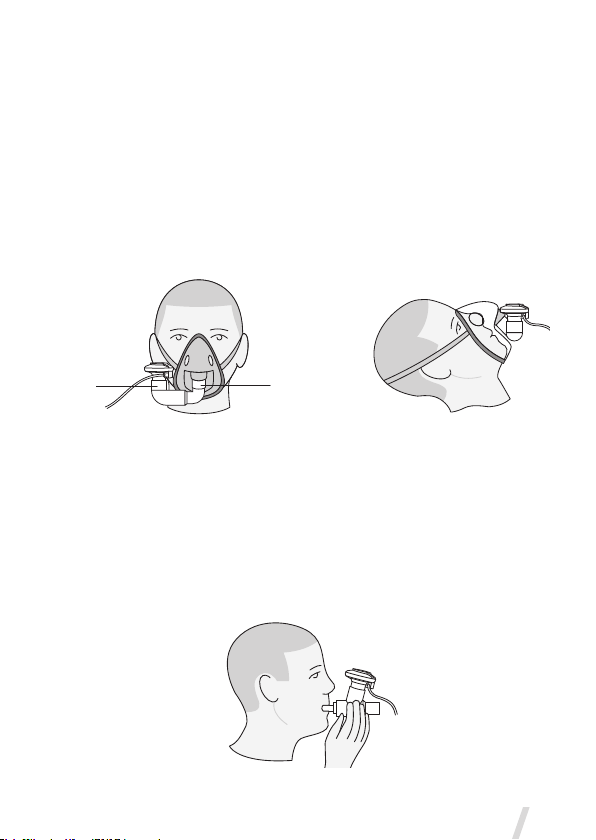
Installation for use Off-Ventilator
Use with a Face Mask
Mask kits, which include a vented elbow and mask elbow, are available
separately (visit www.aerogen.com for full parts list). Contact your sales
representative for ordering information.
1. When using a mask, connect the vented elbow, mask elbow and mask
to the nebuliser by firmly pushing the parts together.
2. Rotate the vented elbow to suit the position of the patient (Figure 11).
Figure 11. Connecting to a mask
Warning: To ensure correct nebulisation, maintain the nebuliser in a
vertical orientation (Figure 11).
Use with a Mouthpiece
The Aerogen Pro works with any standard ISO 22 mm nebuliser mouthpiece
inserted into the adult T-piece.
Figure 12. Connecting to a mouthpiece
Patient Upright
Patient Reclined
Face Mask
Elbow
Vented
Elbow
Patient Upright
Patient Reclined
Face Mask
Elbow
Vented
Elbow

18 Aerogen®
When using a mouthpiece, connect the nebuliser to the T-piece as shown
in Figure 3 and then connect the T-piece to the mouthpiece by pushing the
parts firmly together (Figure 12).
Warning: To ensure correct nebulisation, maintain the nebuliser in a
vertical orientation (Figure 12).
Other manuals for Pro
1
Table of contents
Other Aerogen Medical Equipment manuals


Popular Medical Equipment manuals by other brands


Getinge
Getinge Arjohuntleigh Nimbus 3 Professional Instructions for use

Mettler Electronics
Mettler Electronics Sonicator 730 Maintenance manual

Pressalit Care
Pressalit Care R1100 Mounting instruction

Denas MS
Denas MS DENAS-T operating manual

bort medical
bort medical ActiveColor quick guide

AccuVein
AccuVein AV400 user manual


