Aerpro AM9XFW User manual
INSTALL/USER MANUAL
AM9XFW
DISCLAIMER: We recommend using an Authorised Dealer that offers an installation service
to install this product. Never cut or modify a harness as this could damage the head unit and
vehicle, as well as void the warranty of the product.
Android Auto, Google Play, Android, are registered trademarks of
Google, Inc. Bluetooth is a registered trademark of Bluetooth SIG, Inc.
Apple, Apple Car Play, Apple iPhone, Apple Music and Siri are registered
trademarks of Apple, Inc.
Android Auto and Apple CarPlay is not owned or controlled by any car manufacturer and are not
responsible for the privacy practices of third parties or the terms and conditions under which they offer
such products. We strongly encourage you to read the Android Auto or Apple CarPlay privacy policies
and terms and conditions to make sure they are acceptable to you.
9” FLOATING MULTIMEDIA RECEIVER
Wireless Apple CarPlay & Android AutoTM
INCLUSIONS: Head unit, GPS antenna, microphone, wiring harness,
mounting sleeve, trim ring, release keys, side panel covers, AV cable & screws
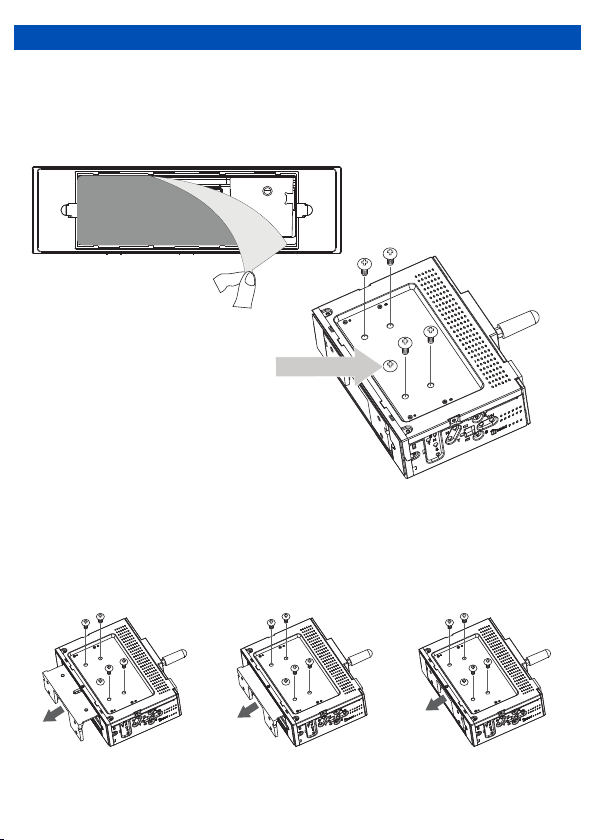
Step #1 Adjusting the LCD Extension (optional)
• Depending on the vehicle, it may be necessary to use the LCD extension to adjust the
screen position when mounting the unit. The default setting is all the way forward, but if
adjustment is necessary, the following steps show how to adjust it to the desired position.
• Depending on your vehicle’s dash, the LCD mounting bracket can be adjusted to 3 positions
(Flush ,1/2" and 1"). The bracket comes in the Flush setting when purchased. To adjust the
bracket to either the 1/2" or 1" setting, gently pull the LCD bracket out from the chassis, adjust
it to the desired position and lock it in place by inserting the screws to the top of the chassis.
(see below images for reference)
1
INSTALLATION
Peel off the label before
installation.
1“ (25mm) 1/2“ (12.5mm) Flush
Remove the 4 screws located
on top of the unit.
Note: Do not remove the center screw.
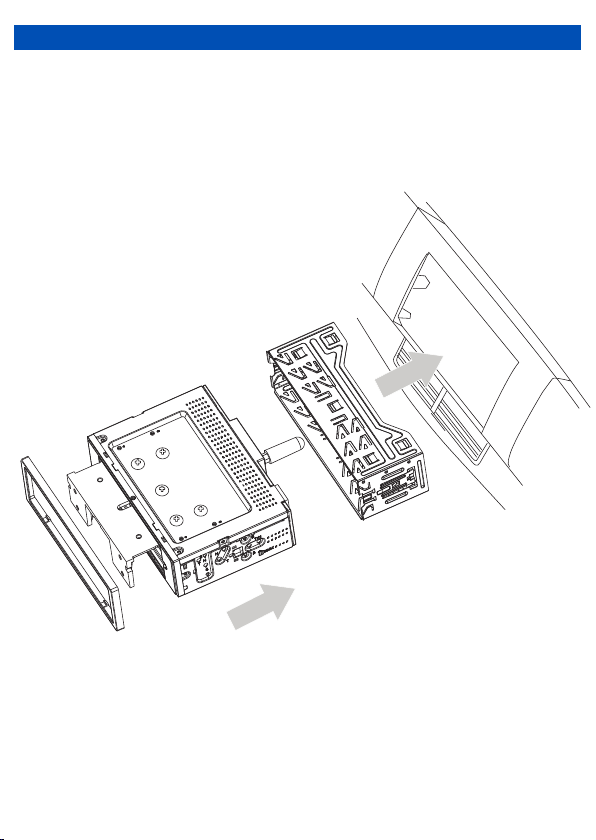
Step #2 Install Mounting Sleeve and Trim Ring
1) Install the mounting sleeve into a dash kit (sold separately) or dash opening, bending the
tabs to secure the mounting sleeve.
2) Connect the wiring harness, microphone and antenna to the chassis of the headunit.
3) Snap trim ring into place making sure the notched area is on the bottom.
4) Slide the head unit into the mounting sleeve to secure.
INSTALLATION
2

Step #3 Connecting the LCD to the Head Unit
• To connect the LCD to the unit, carefully push the LCD wiring harness into the LCD
connector of receiver's chassis as shown below.
• Use the hinge hooks on the back of the monitor to hold the LCD in place.
INSTALLATION
3
6
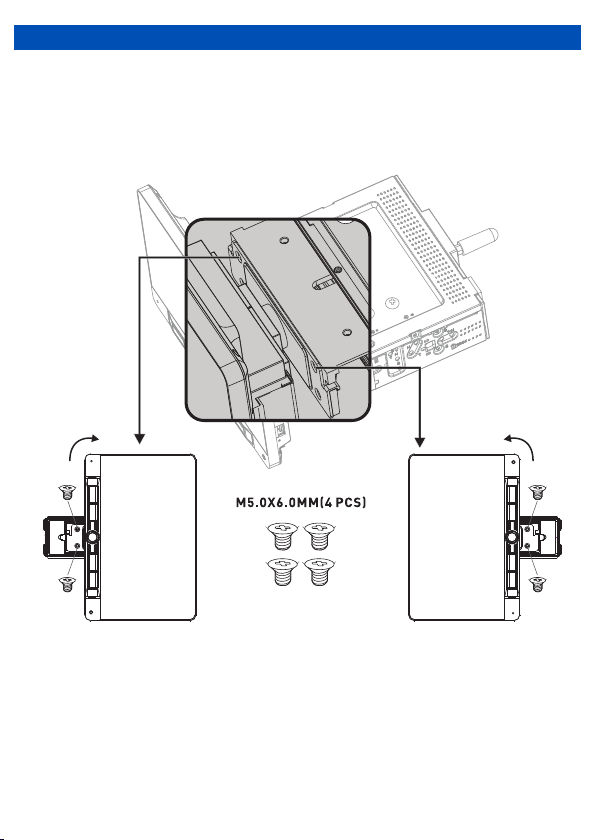
Step #4 Securing the LCD
• Once the LCD is on the hinge hooks (step #3), use 2 hands to rotate the LCD 90° to the left,
and secure one side using 2 LCD mounting screws. Then rotate the LCD to right 90° and
secure the other side using the additional 2 LCD mounting screws.
INSTALLATION
4
1
2
90°
3
4
90°

Facias are vehicle specific and their installation may differ, and may have additional
supplied brackets or parts and fittings. Refer to the QR code on the product box or visit our
website and search for your vehicle/product for vehicle specific facia installation procedures
if applicable.
We recommend the use of hand tightening tools only as over-tightening may damage the
facia plastics.
Step #4 Side Panel Covers
• Once all four screws have been fastened, cover the LCD extension areas with the side panel
covers to complete youre installation.
Note: There are three cover options. One to fit each of the three LCD depth extension
settings. ( A-Flush , B-1/2” (12.5mm) or C- 1”(25mm)
INSTALLATION
5
7
1“ (25mm)
1/2“ (12.5mm)
Flush
6
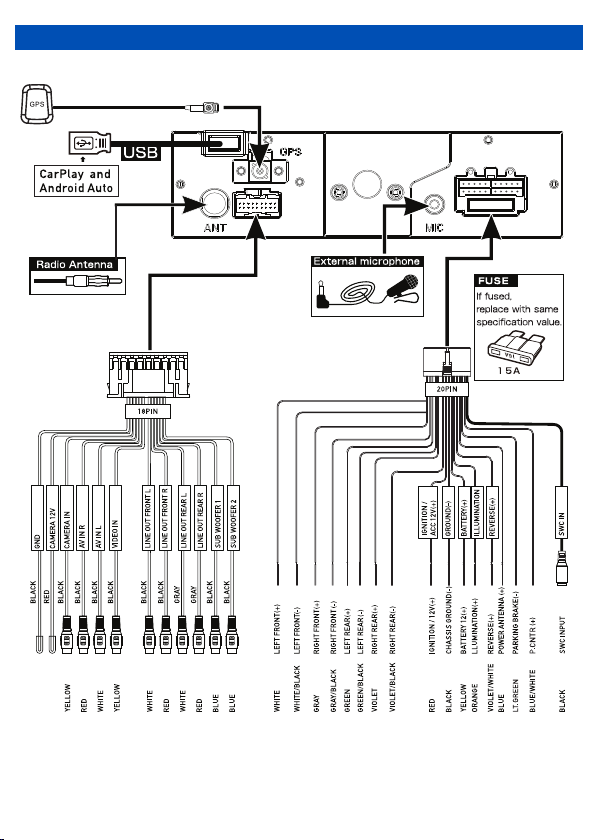
WIRING DIAGRAM - INPUTS/OUTPUTS
GPS antenna

INTERFACE ICONS
FEATURES
• Large touchscreen LCD (1024 x 600)
• Works with Apple CarPlay (wireless or wired)
• Supports Android Auto (wireless or wired)
• Built-in Bluetooth (A2DP, AVRCP, HFP, PBAP)
• AM / FM Tuner with RDS & presets (18FM/12AM)
• Reverse camera input (AHD 720P compatible)
• Rear A/V input
• 4V / 6CH RCA Preout
• MP3 / AAC / FLAC / MPEG 1,2,4 Media formats
• Subwoofer level control
• Time alignment capabilities
• Dual USB Front/Rear (2.1A/1.5A)
• 8 Band graphic EQ
• 8 EQ Presets
• 40W x 4 Max built-in amplifier
• Shallow 1-DIN chassis mounting design
• Steering wheel control ready
• External microphone included
• Hema Maps Ready, Aerpro AMHXD3
Integrated Navigation Module required
(sold separately) © Hema Maps 2022. Copyright
7
1. Voice Activation Button
2. SOURCE/HOME
3. Power/Volume/Mute
4. Previous Button
5. Next Button
6. RESET / USB Media/Charge port
4 5 61211 3

RADIO MODE
To enter Radio Mode, touch “Radio” icon on the Main Menu
Seek down
Home screen/back button
Radio frequency
Seek up
AF and TA settings
Display On/Off
FM Band button
AM Band button
Auto Store button
EQ Mode button
Keypad button
or
or
4 5
7
6
8
12
10
12
11
3
9
11
Auto Tuning
Press the seek icon ( ) on the TFT Monitor screen to increase / decrease the
tuning frequency one step at 0.05MHz increments for FM and 9KHz increments for AM.
Press and hold the seek icon ( ) on the TFT Monitor screen to seek the available
channel by increasing or decreasing the tuning frequency.
FM and AM
Touch the “FM1” or “AM1” on the screen to change among the following bands: FM1,
FM2, FM3 or AM1 and AM2.
Preset Stations
Six(6) stored stations for the current band appear on the screen, touch the preset directly
for use or press the number buttons located on the head unit.
Storing a Station
1. Select a station. (Example: FM1 103.6MHz)
2. Touch and Hold the desired preset number for 3 seconds to store the Radio station.
Recalling a Stored Station
1. Select a Band (If needed).
2. Touch the preset button on which the corresponding radio station is stored or press the
number button on the Radio panel.
8
Preset station list
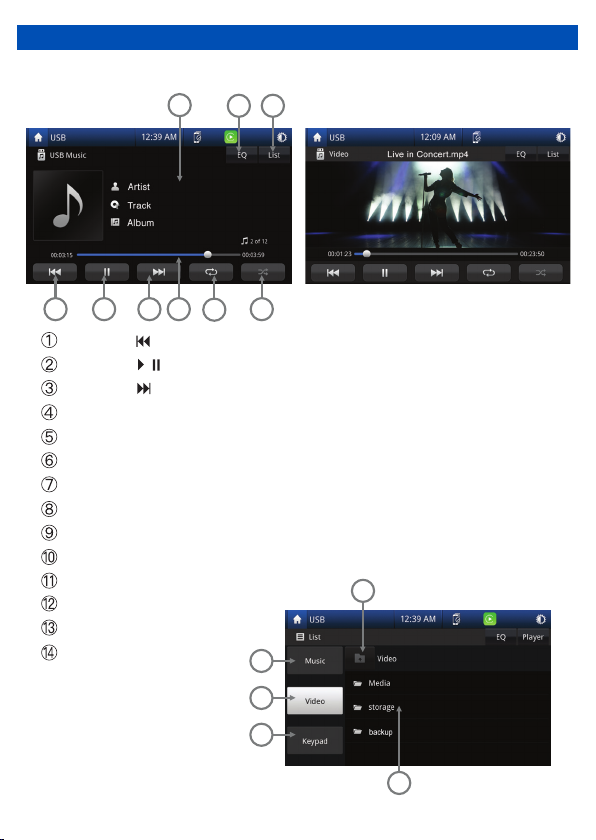
MEDIA PLAYING MODE
1
6
2
3
4
5
9
This operation allows you to play various compatible formats.
/
10
8
7
11
12
13
14
Touch the icon to return to previous track or press and hold the icon to fast rewind
Touch the icon to play or pause the track
Touch the icon to go to next track or press and hold the icon to fast forward
Touch the end of the progress bar line and drag it left or right to the desired track time
Touch the icon to repeat a folder or track
Touch the icon to activate / deactivate the track in random mode
Touch the icon to show the track list
Touch the icon to display the equalizer settings
Playing track ID3 info (needs media file support)
Touch to go back to previous folder
Touch for music list
Touch for video list
Touch for keypad for quick search
File List
9
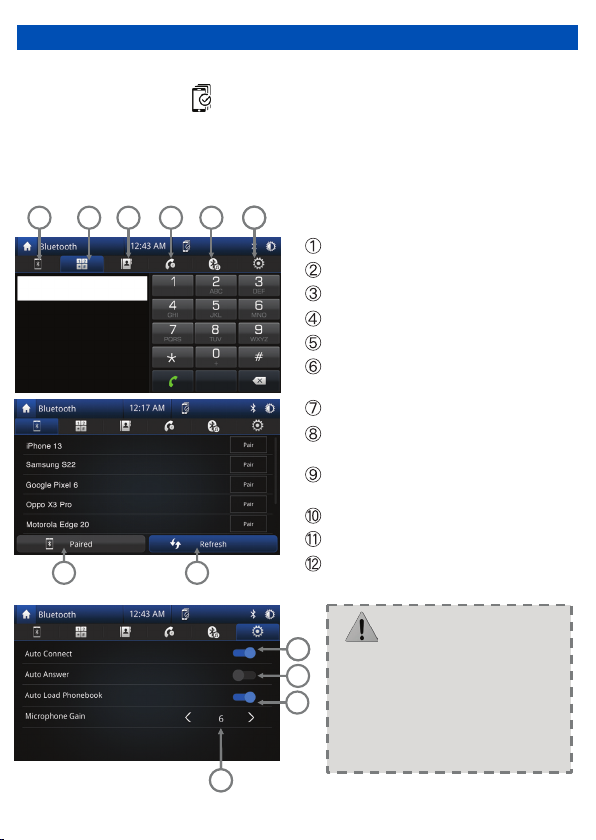
BLUETOOTH MODE
7
89
10
1234 556
5555
11
8
When the phone connects to the unit successfully, all of the phone’s Bluetooth enabled
options will be active.
This unit can be paired with 5 mobile phones, but only one can be active at a time.
The unit Bluetooth name is AERPRO
Touch the icon to enter pairing mode
Touch the icon to keypad
Touch to open the phone book
Touch to open the phone interface
Touch the icon to enter Bluetooth music
Touch the icon to enter Bluetooth
settings
Touch to go to connected device screen
Touch “Refresh” to search for bluetooth
devices
Auto connect to your previously paired
bluetooth device
Auto answer for incoming calls
Sync Call logs and Contacts
Microphone gain volume control
> Some mobile phones may not
support the download function.
> Depending on the music player
you are using, streaming may not
be supported.
5
8
12
NOTE: Bluetooth mode can only be accessed when not connected to Android Auto
or Apple Carplay. Press icon to go to connected devices screen.
10
•
•
•

CONNECTED DEVICES SCREEN
Touch the icon to access the connected devices screen
This screen displays paired devices and allows the user to turn Android Auto/Apple Carplay
or other bluetooth features on or off. (If applicable to the device)
2 3 4 5
7
1
6
Paired devices
Apple Carplay activate/deactivate
Android Auto activate/deactivate
Bluetooth calling activate/deactivate
Bluetooth music activate/deactivate
Remove paired device
Add a new compatible device
NOTE: Only one device can be active at any given time
Bluetooth Calling and Bluetooth Music is deactivated on this screen when using
Apple Car Play however Bluetooth Calling and Music work through Apple Car Play
as intended.
Android Auto requires Bluetooth Calling and Bluetooth Music to be connected and
activated for Android Auto to function correctly.
11
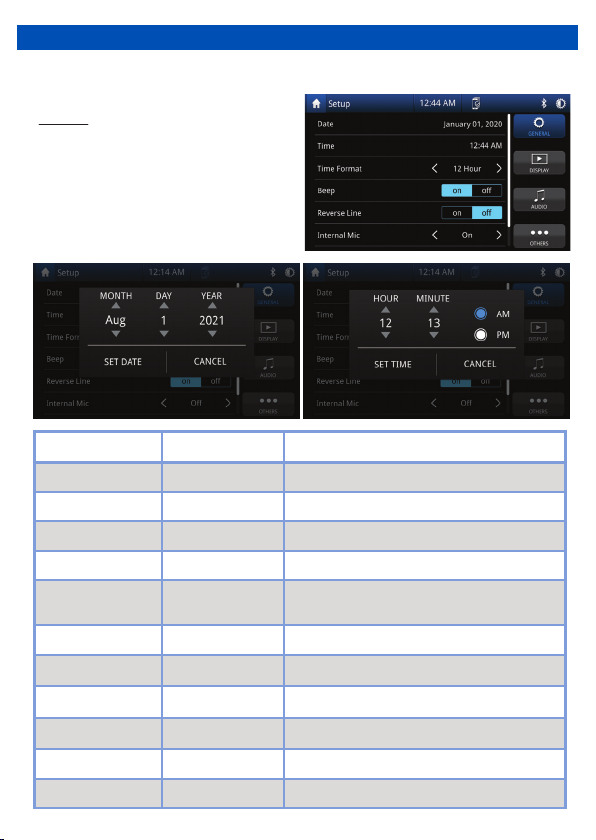
SETUP MENU
12
Microphone Gain 0 to 12 Adjust microphone sensitivity
Radio Region AU / EUR
Time 12 Hour / 24 HourTime 12 Hour / 24 Hour
Select your radio region
Beep On / Off
Right hand Drive On / Off Changes indicator bar to left or right of display
Setting Options Functions
Date Day / Month / Year Select to adjust calendar date
Time Hour / Minutes
Time 12 Hour / 24 HourTime 12 Hour / 24 Hour
Select to adjust time
Beep On / Off
Car Life
On / Off
•
Setup menu allows you to change the settings within unit, General, Display, Audio and
Others
Touch “General” on the Setup Menu
display for general settings
General
On / OffRear Cam Vert Flip On / Off Flips rear camera vertically
Time Format 12 Hour / 24 Hour Choose clock mode 12H/24H
Beep On / Off Activation / Deactivation of touch screen beep
Reverse Line On / Off
Rear Cam Horz Flip On / Off
Adds reversing lines to the reverse camera
Flips rear camera horizontally
On / OffInternal Mic On / Off On uses internal Mic / Off uses external Mic
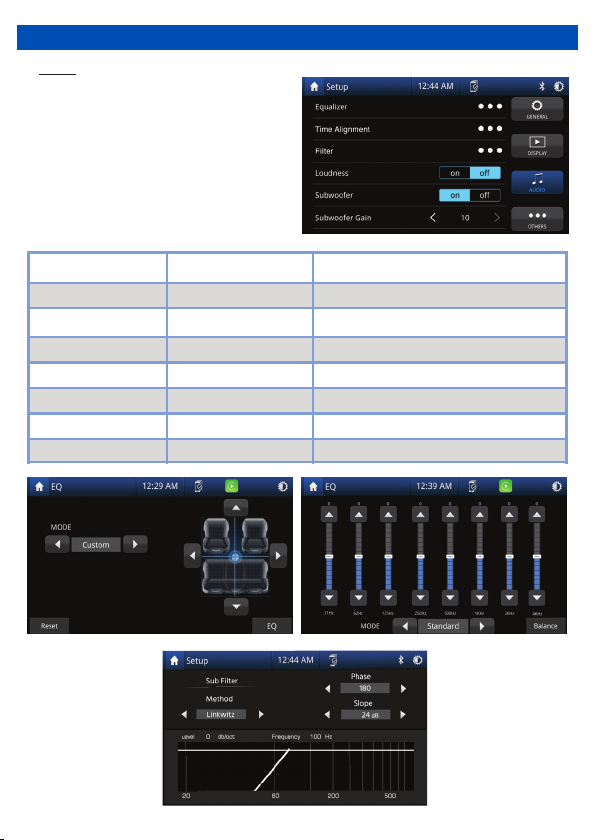
SETUP MENU
Setting Options Functions
Equalizer Balance and EQ setting
Subwoofer On / Off
Subwoofer Gain
0 to -10
Heavy bass increases and decreases
Audio
• Touch “Audio” on the Setup Menu
display for audio adjustment settings
-
Loudness
Subwoofer Gain
Reversing volume
Subwoofer
Filter
Time Alignment
On / Off
0 to 10
On / Off / Half
On / Off
-Sub filter settings
Sound boost
Heavy bass increases and decreases
Controls music volume when reversing
Bass switch
Default / Presets / Reset Speaker delay
13
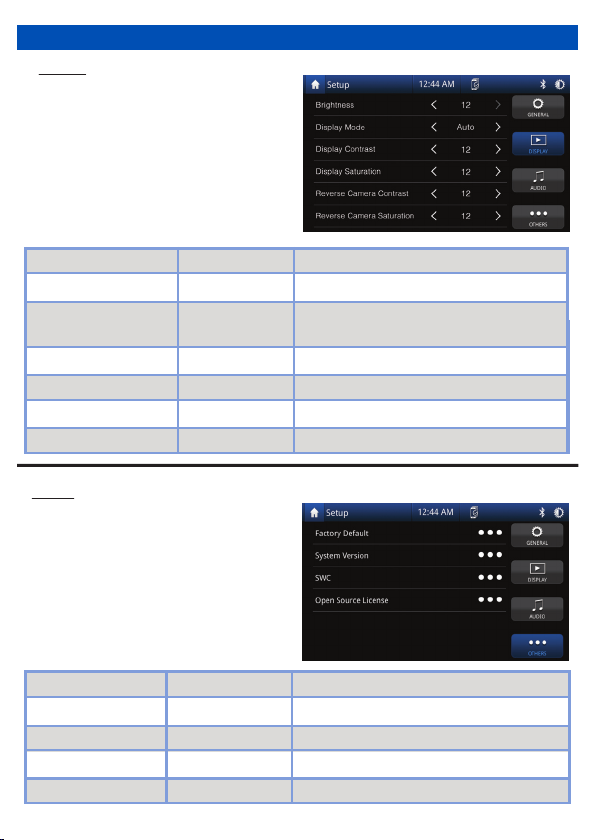
SETUP MENU
Others
Touch “Others” on the Setup Menu
display, then select for information and
factory reset.
Setting
Options
Functions
- Touch to manually adjust SWC functions
-
Steering Wheel Controls
Factory Default No / Yes Touch to return to the factory setting
Open Source License
-
Displays license information
•
System Version - Software version of the radio
14
Setting
Options
Functions
Brightness 0 to 20 Touch the desired screen brightness
Dimmer Mode
Auto / Day / Night
Touch the desired screen preset
(Auto changes brightness when headlights on*)
Display
• Touch “Display” on the Setup Menu
display, then select a feature you want
to adjust.
Touch to adjust
desired camera contrast
Version
-
Software version of the radio.
Display Contrast
0 to 24
0 to 24
0 to 24
0 to 24
Touch to adjust
desired screen contrast
Touch to adjust
desired camera saturation
Display Saturation Touch to adjust
desired screen saturation
* Requires an illumination wire to be present in the
vehicle (Usually orange wire in ISO harness needs
to have a connection)
Reverse Camera Saturation
Reverse Camera Contrast
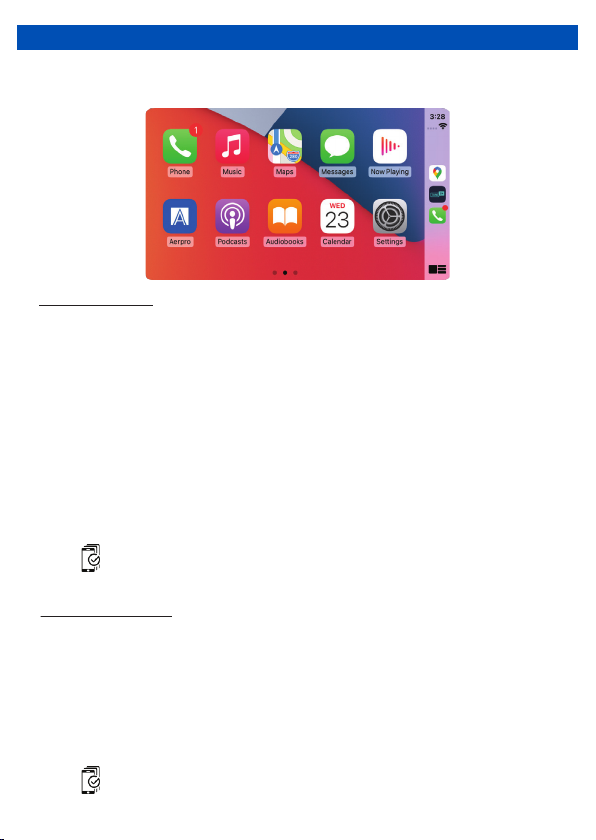
Wired & Wireless CarPlay Operation
Wireless connection
1. Before using Apple CarPlay wirelessly, turn on the Bluetooth and WiFi function on the
compatible device
2. Navigate to the Bluetooth settings on your compatible device and select Aerpro for
pairing
3. A pair message and a pairing request code may appear on your compatible device and
head unit. Click allow to accept
4. Apple CarPlay automatically displays on screen, if not press the home button,
press icon and press the Apple CarPlay icon
15
Wired connection
NOTE: We recommended that the wired connection method be used for new devices.
The park brake needs to be connected for Apple CarPlay to function.
1. Turn on Bluetooth and WiFi on your compatible device
2. Connect an Apple CarPlay compatible device to this unit via rear USB (CP/AA/USB
Media)
3. A pair message and a pairing request code may appear on your compatible device and
head unit. Click allow to accept
4. An ‘Allow CarPlay with Aerpro while phone is locked’ message may appear on your
device. Click allow to accept
5. Click to enable wireless CarPlay or use USB only option
6. Once connection is enabled for wireless carplay, connection via the USB connection is
no longer required and wireless connection will be automatic
7. The Apple CarPlay automatically displays on screen, if not press the home button,
press icon and press the Apple CarPlay icon

Wired & Wireless Android Auto™ Operation
Wired connection
1. Connect an Android Auto™ compatible device to this unit via rear USB (CP/AA/USB
Media)
2. Follow on-screen instructions that may appear on your device and head unit
3. Press the Android Auto icon to initiate a connection. The Android Auto home screen
appears
4. Once an initial wired connection has been made, connection via the USB connection is
no longer required and wireless connection will be automatic.
Wireless connection
1. Before using Android Auto wirelessly, turn on the Bluetooth and WiFi function on the
compatible device.
2. Navigate to the Bluetooth settings on your compatible device and select Aerpro for
pairing
3. A pair message and a pairing request code may appear on your compatible device and
head unit. Click allow to accept
4. Android Auto automatically displays on screen, if not press the home button,
press icon and press the Android Auto icon
5. Follow on-screen instructions that may appear on your device and head unit
16
NOTE: We recommended that the wired connection method be used for new devices.
The park brake needs to be connected for Android Auto to function.

HOW TO USE CARPLAY ®
Phone Setup (Before you begin):
Requirements
1. Apple CarPlay ® features may operate differently than on your Apple iPhone ®
2. Message and data charges may apply when using Apple CarPlay. Please check with
your carrier
3. Apple CarPlay ® relies on the performance of your phone. If you experience
performance issues:
Close all apps and then restart them again
Disconnect and then reconnect your phone using the Apple Lightning cable that was
provided with your phone is recommended.
4. When Apple CarPlay ® is active, your voice recognition system is disabled and you will
be using Siri ® to make your requests
5. On your phone, go to Settings > General > Siri and ensure Siri is turned ON
• Lightning Data Cable
• iPhone 5 or later
• iPhone with iOS 7.1 or later
• Data Plan for in app content
• Siri activated
NOTE: For details about Apple CarPlay,
refer to the manual supplied with your
iPhone, or visit the website of Apple
CarPlay.
17

USING SIRI ®
USING GOOGLE VOICE ®
NOTE:
Ensure Siri feature is set to ON in your
phone (Go to Settings> General > Siri).
º
“Text <Name> Call you later” to send a
text message.
º
“Read text messages” to read available
text message.
º
“Call <Name>” to make a phone call.
º
“Find <POI/Destination>” to locate a
POI/Destination.
Voice button
Android Auto uses Google voice actions for many functions. A Google voice
action session can be initiated on any screen by:
Voice button
Apple CarPlay uses Siri to perform many
actions like sending messages, placing calls,
and looking up/setting POI/Destinations.
A Siri session can be initiated on any screen
by:
• Touching and holding the Home icon on
the CarPlay screen or
• Pressing the Voice button on the panel or
the Steering Wheel, then say any of the
following commands:
• Touching the Microphone icon on any
screen.
• Pressing the Voice Recognition Button
on panel or Steering Wheel.
Making a Call
Touch the Phone icon to access recent call list. Or you can initiate a voice action and
then say “Call <Name>” or “Dial <number>” to make phone calls from any screen.
18

HOW TO USE ANDROID AUTO ®
• USB Data Cable
• Compatible Android® phone with
OS Android 6.0 or higher
• Data Plan for in app content
• Android Auto App download from the
Google Play® store if not on your device
• Android Auto must be available in your
country or region
• Wireless Android Auto requires
5GHz(802.11/ac) Wi-Fi support
(refer to page 18 of this manual)
Requirements
1. Android Auto ® features may operate differently than on your Android ® phone.
2. Message and data charges may apply when using Android Auto. Please check with
your carrier
3. Android Auto relies on the performance of your phone. If you experience performance
issues:
Close all apps and then restart them again
Disconnect and then reconnect your phone using the USB cable that was provided
with your phone is recommended
When Android Auto is active, your in-vehicle voice recognition system is disabled and
you will be using Google® voice actions to make your requests
Phone Setup (Before you begin):
Overview
NOTE: For details about Android Auto, refer to the manual supplied with your
Android phone, or visit the website of Android Auto.
19
• Android Auto organizes recent actions
and information into simple icons on
the Android Auto Home screen.
Touching an actionable icon will take
you to the app.
Other manuals for AM9XFW
1
Table of contents
Popular Car Stereo System manuals by other brands


JL Audio
JL Audio Stealthbox SB-D-DAKCC/10W3v3 installation guide

Academy Dragster
Academy Dragster ADSP 8 instruction manual

Alpine
Alpine PSU-300CMV installation manual

Autotek
Autotek Street Machine A62CX installation guide

NAPOLI ELECTRONICS
NAPOLI ELECTRONICS MP3-3793 owner's manual

Pioneer
Pioneer DEH-9350SD owner's manual