Aether Biomedical Zeus Hand User guide

Distributeur
ZEUS
The Power In Your Hand
Zeus Hand
Congurator - Web
Application Instructions


Zeus Hand van Aether Biomedical, distributeur Loth Fabenim B.V.
EN
Zeus Hand Congurator - Web Application Instructions 3
Contents
1. General Information ............................................................................................................... 5
2. Intended Use ............................................................................................................................. 6
3. Control Options ........................................................................................................................ 7
4. Basics ........................................................................................................................................... 8
5. Bluetooth Low Energy Connection ..................................................................................... 9
6. Starting the Programme ...................................................................................................... 10
7. Navigation ................................................................................................................................ 11
8. Connecting the Hand Prosthesis with the Application ............................................... 12
9. Choose Grips Tab ................................................................................................................... 15
10. EMG Settings Tab ................................................................................................................... 18
11. Grip Conguration Tab ........................................................................................................ 22
12. Prosthesis Settings Tab ....................................................................................................... 23
13. Update Firmware .................................................................................................................. 29
14. Service Menu .......................................................................................................................... 30
15. Application Settings Tab ...................................................................................................... 31
16. Side Buttons ............................................................................................................................ 32
17. Top Bar ..................................................................................................................................... 35
18. Closing the Software ............................................................................................................. 36
19. Troubleshooting .................................................................................................................... 37
20. Security ..................................................................................................................................... 39
21. Other Information ................................................................................................................. 40

Zeus Hand van Aether Biomedical, distributeur Loth Fabenim B.V.
EN
Zeus Hand Congurator - Web Application Instructions4
Warning!
»Date of the last update of this Software instruction: 2022-07-12.
»We highly recommend reading this document carefully before
installing the software.
»This document contains information about the proper and safe use
of the software.
»This document is regarding Zeus Congurator v. 1.0.3. web software
application
»We highly recommend keeping this document in a safe place.
»If you have any questions about the product please contact us on
WARNING: Clinicians certied by Aether Biomedical can connect with the Zeus
prosthetic hand by opening the Zeus Congurator application through the Patient
Management panel. If you are testing/evaluating the Zeus hand and are a demo
user, use the application available under the url: https://www.zeus-congurator.
com/. Do not use any third party software to connect with the Zeus hand.
WARNING: Only certied clinicians can use Zeus Congurator to make changes in
the Zeus prosthesis settings.

Zeus Hand van Aether Biomedical, distributeur Loth Fabenim B.V.
EN
Zeus Hand Congurator - Web Application Instructions 5
General Information
1
Aether Biomedical’s software is only compatible with the Zeus bionic hand. All
required functions are available in the Zeus Congurator application. There is
no requirement to download anything from a website to launch the program.
The Zeus Congurator must be accessed via Google Chrome web browser
(version 56 or higher) or Microsoft Edge web browser (version 90 or higher)
from the device using system Windows (version 10 or higher) or Mac OS
(version 11 or higher).
Zeus congurator allows clinicians to adjust various settings and parameters of
the Zeus hand, allowing clinicians to customize the device for their patients.

Zeus Hand van Aether Biomedical, distributeur Loth Fabenim B.V.
EN
Zeus Hand Congurator - Web Application Instructions6
Intended Use
2
The Zeus Congurator is designed to be used solely by clinicians certied by
Aether Biomedical Patients, as the users of the prosthesis, are not allowed to
make any changes to it via this software.
The software provided by Aether Biomedical is designed exclusively for the
Zeus hand conguration.
The Zeus Congurator is intended to be used to congure the Zeus hand and
customize it for the user. Additionally, the software also provides the required
tools to service and repair the Zeus hand.

Zeus Hand van Aether Biomedical, distributeur Loth Fabenim B.V.
EN
Zeus Hand Congurator - Web Application Instructions 7
The Zeus hand comes out of the box in its primary conguration - the resting
non-opposed grip.
Zeus typically utilizes typically two sensors that detect and amplify raw EMG
signals from the skin that come from muscle movements. To create those
signals, the patient has to contract their muscles.
Depending on the dierent levels of amputation, there are specic types of
signals to change the grips. Co-contraction can be made by the majority of
the users and provides a very reliable control of the prosthesis. Therefore it
was chosen as the default option.
Control Options
3

Zeus Hand van Aether Biomedical, distributeur Loth Fabenim B.V.
EN
Zeus Hand Congurator - Web Application Instructions8
Basics
4
With the Zeus Congurator, it is possible to change the control settings - Input
options, Input sites, Control strategy, Grip switching modes, Soft-grip settings,
Ignore EMG spikes settings and Autograsp settings.
There are a number of grips which the user can choose. Co-contraction
(default option) allows the user to switch between grips.
The clinician can view the user’s muscle contractions in real-time graphs and
adjust the activation levels/thresholds.
REMEMBER: Changes should be made to the settings that are not optimal
for the user, the previous settings can be restored simply by loading a previous
conguration from the database.

Zeus Hand van Aether Biomedical, distributeur Loth Fabenim B.V.
EN
Zeus Hand Congurator - Web Application Instructions 9
Bluetooth Low Energy Connection
5
The Zeus hand uses BLE (Bluetooth Low Energy) to communicate with the Zeus
Congurator.
To start conguring the Zeus, it is necessary to turn on the Bluetooth on your
computer device.
If your device does not come with a Bluetooth modem inbuilt, you can use
a BLE dongle. You will need to install its drivers according to the provider’s
instructions.

Zeus Hand van Aether Biomedical, distributeur Loth Fabenim B.V.
EN
Zeus Hand Congurator - Web Application Instructions10
Starting the Programme
6
To run the program, it is necessary to open a Google Chrome web browser or
Microsoft Edge web browser.
If you are a clinician certied by Aether Biomedical open the Zeus Congurator
application by going through the Patient Management panel. If you are testing/
evaluating the Zeus hand an are a demo user, follow the next steps.
Open the following url in the chosen web browser:
https://zeus-congurator.com/
To log in as a clinician (and have acess to all settings of the prosthesis) you
need to provide the following password: Zeus2021 and click the Next button.

Zeus Hand van Aether Biomedical, distributeur Loth Fabenim B.V.
EN
Zeus Hand Congurator - Web Application Instructions 11
Navigation
7
After launching the programme, the main screen of the Zeus Congurator will
show up.
This main screen is divided into 4 parts:
1. Main Menu
2. Setting Area
3. Side Buttons
4. Top Bar
In the Main Menu you can select dierent tabs which wil change the settings
displayed on the Settings Area. These tabs are described below. You can
also enable the connection process with the prosthesis or return to the patient
management panel.
In the Settings Area you can change the settings of the Zeus hand. Its content
depends on the currently chosen tab in the main menu.
Side Buttons enable you to save settings to the prosthesis, load seved versions
of the settings, return to the default settings and undo the last change in the
settings. They are desribed in detail in the section titled ’Side Buttons’.
On every page there is also the Top Bar. On the Top Bar, information is
displayed about the currently connected device and the processes it’s going
through. There is also a Help button and language option button. There are
also a Help button and a language button.
Zeus Hand van Aether Biomedical, distributeur Loth Fabenim B.V.
EN
Zeus Hand Congurator - Web Application Instructions12
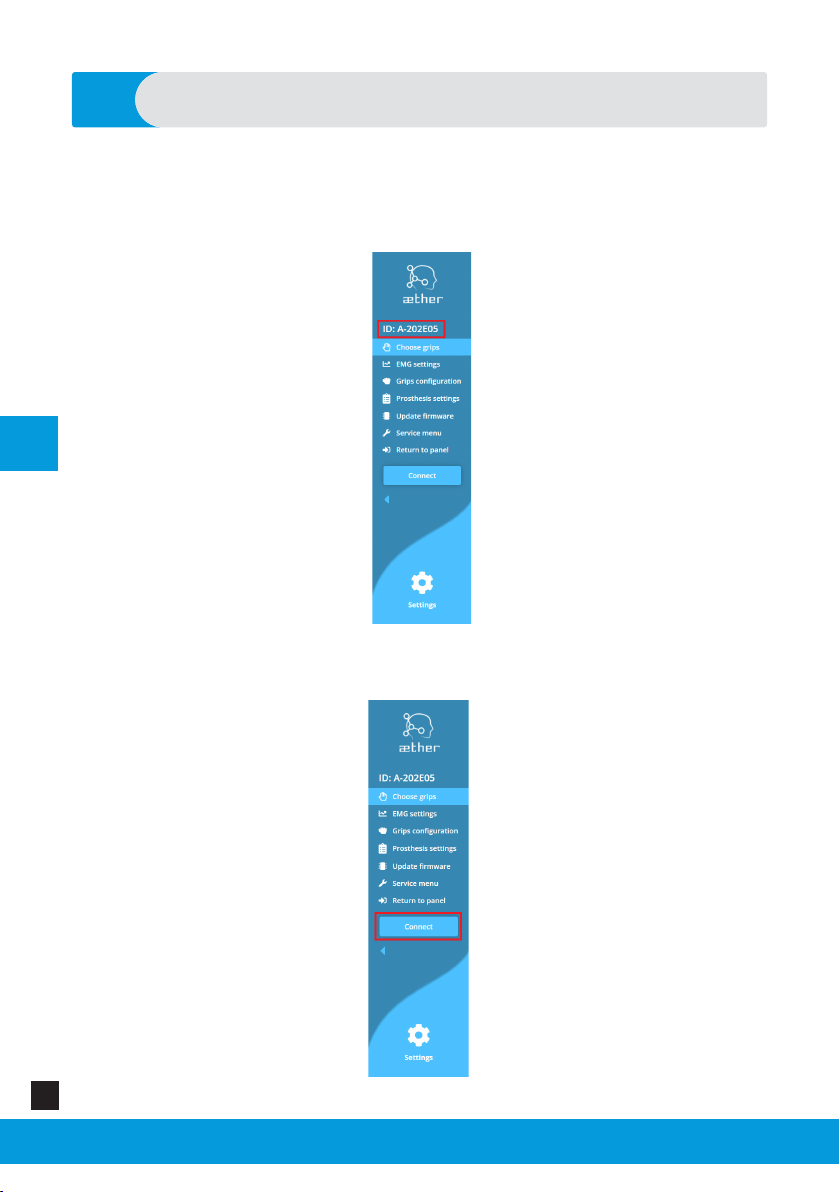
Connecting the Hand Prosthesis with the Application
8
If you are a clinician certied by Aether Biomedical, open the Zeus Congurator
application through the Patient Management panel and follow the steps below:
On the top of the Main Menu, the chosen device is displayed.
Turn on the battery of the prosthesis.
To connect to this device, press the Connect button.

Zeus Hand van Aether Biomedical, distributeur Loth Fabenim B.V.
EN
Zeus Hand Congurator - Web Application Instructions 13
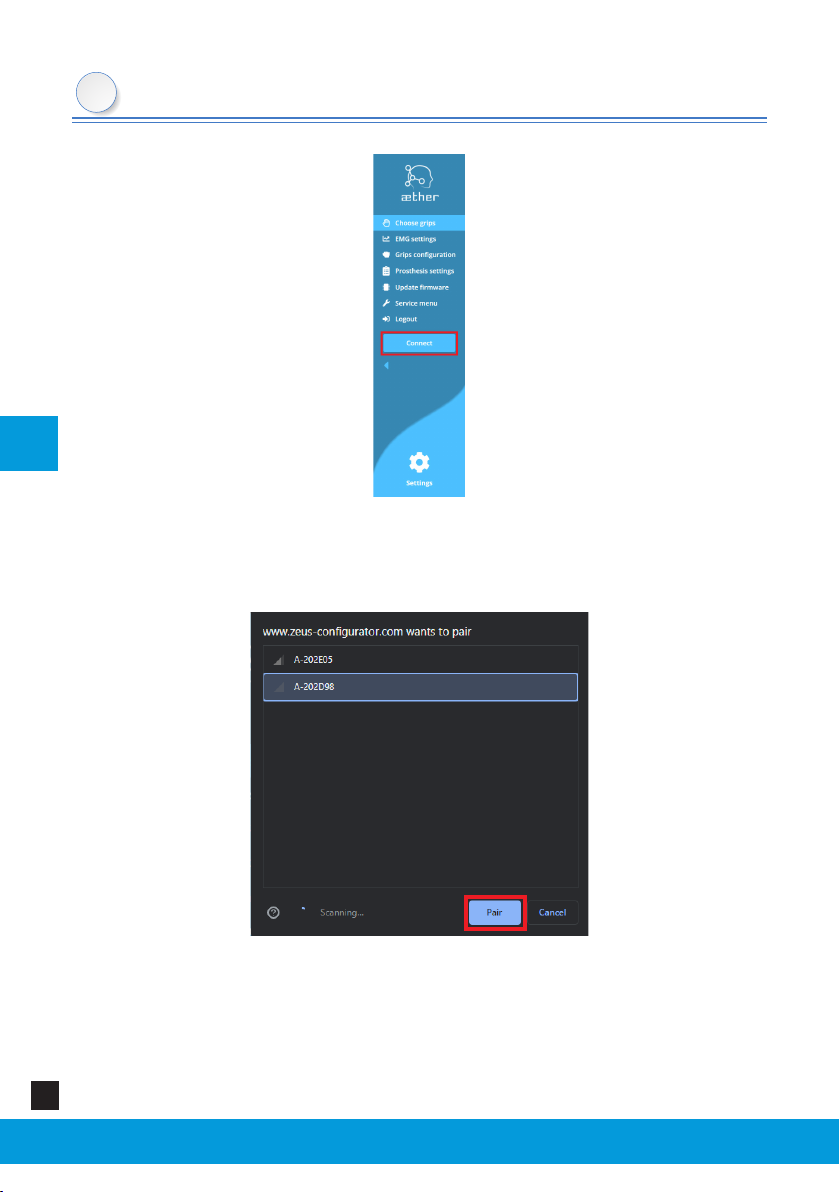
Connecting the Hand Prosthesis with the Application
8
The process of scanning for the prosthetic devices will begin. Your device
should show up on the popup screen. The scanning process might take up to
several seconds. If your device does not appear on the list, make sure that the
battery of the prosthesis is turned on.
Select the device and click on the Pair button.
The application should now connect with the Zeus hand. It will retrieve its
settings and display them on the screen. If you cannot connect to the
prosthesis check if you selected the correct prosthesis and turn its battery o
and on.
If you are testing/evaluating the Zeus hand and are a demo user open Zeus
Congurator application and follow the steps below:
Turn on the battery of the prosthesis.
To connect to this device, press the Connect button.
Zeus Hand van Aether Biomedical, distributeur Loth Fabenim B.V.
EN
Zeus Hand Congurator - Web Application Instructions14
Connecting the Hand Prosthesis with the Application
8
The process of scanning for the prosthetic devices will begin. Your device
should show up on the popup screen. The scanning process might take up to
several seconds. If your device does not appear on the list, make sure that the
battery of the prosthesis is turned on.
Select the device that you want to connect to and click on the Pair button.
The application should now connect with the Zeus hand. It will retrieve its
settings and display them on the screen. If you cannot connect to the
prosthesis check if you selected the correct prosthesis and turn its battery o
and on.

Zeus Hand van Aether Biomedical, distributeur Loth Fabenim B.V.
EN
Zeus Hand Congurator - Web Application Instructions 15
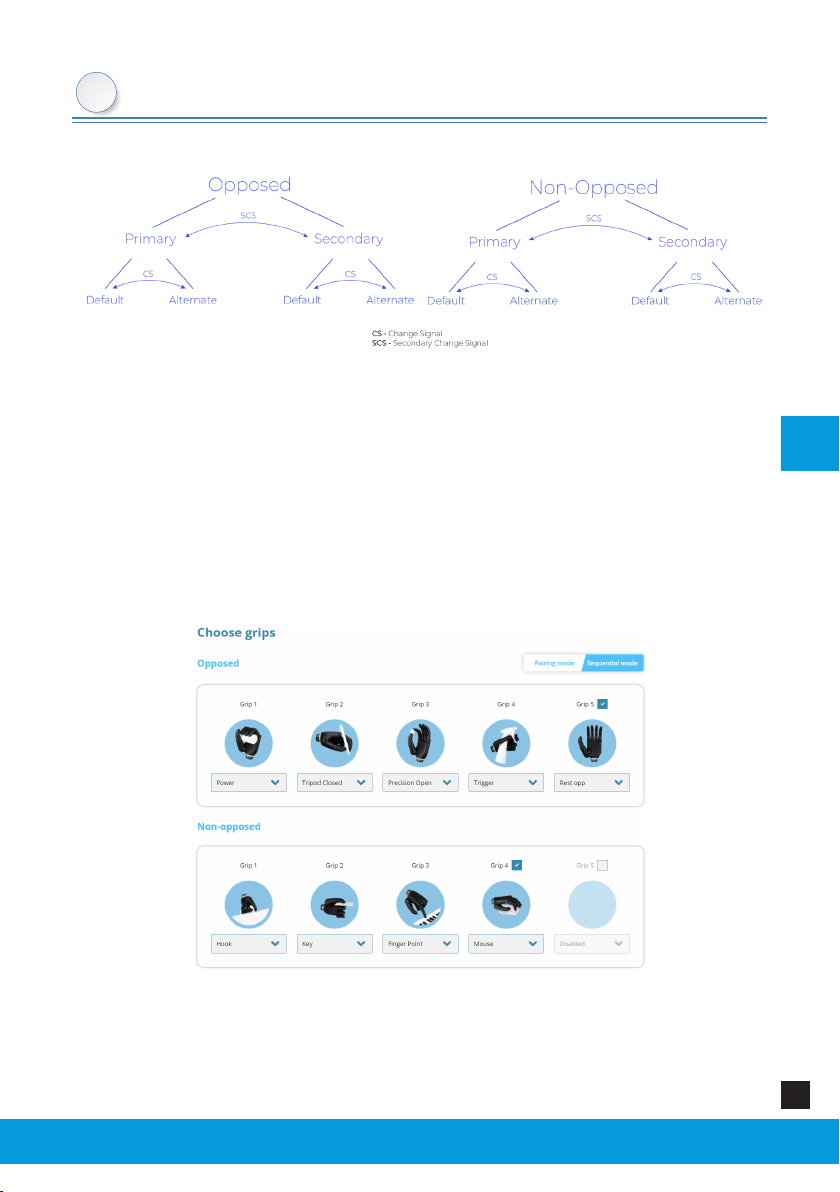
Choose Grips Tab
9
In the upper right corner of the Settings Area you will nd the Pairing mode /
Sequential mode switch. Changing this switch will select the corresponding
control mode setting in the prosthesis.
Choosing the control mode changes the displayed graphics in the Settings
Area. There you can select the order in which the grips will be accessed in each
of the control modes.

Zeus Hand van Aether Biomedical, distributeur Loth Fabenim B.V.
EN
Zeus Hand Congurator - Web Application Instructions16
Choose Grips Tab
9
The Zeus has 12 grip patterns. The clinician can choose the grips that are the most
useful in the patient’s daily life.
Pairing mode
In the paring mode, the grips are arranged in a hierarchical manner, allowing for
quick access. The rst level of division is based on the position of the thumb. When
the thumb is in the opposed position, the opposed group of grips is active and when
the thumb is in the non-opposed position, the non-opposed group of grips is active.
To switch between the opposed group of grips and the non-opposed group of
grips, the user has to move the thumb in the desired position and then provide
a Change Signal.
Within each group of grip, there are two subgroups - the primary group and the
secondary group. Each subgroup has two grips within it, the default grip and the
alternate grip.
To switch between the default grip and the alternate grip, provide a Change
Signal.
To switch between the subgroups, primary group and the secondary group,
provide a Secondary Change Signal.
When you change the position of the thumb, provide a Change Signal to allow
the prosthesis to change between the opposed and non-opposed group of grips.
REMEMBER This works only with Control Modes - Pairing Mode
Zeus Hand van Aether Biomedical, distributeur Loth Fabenim B.V.
EN
Zeus Hand Congurator - Web Application Instructions 17
Choose Grips Tab
9
Sequential mode
In the sequential mode you can cycle between the grips in the loop. Using the
Change Signal (CS) you go forward in the loop; using the Secondary Change Signal
(SCS), you go back. The grips are split into two groups: with the thumb opposed
and non-opposed. To switch between the groups, you need to manually adjust the
thumb position and a Change Signal or a Secondary Change Signal.
The order and number of grips of each of the groups can be modied after selecting
“sequential mode” in the Settings Area.
In sequential mode there can be a maximum of 5 grips in each of the groups dened
by the thumb position. This number can be decreased by unchecking the last grip
in the group - the unused grip will be grayed out. You can re-activate the grip by
checking the box over it.

Zeus Hand van Aether Biomedical, distributeur Loth Fabenim B.V.
EN
Zeus Hand Congurator - Web Application Instructions18
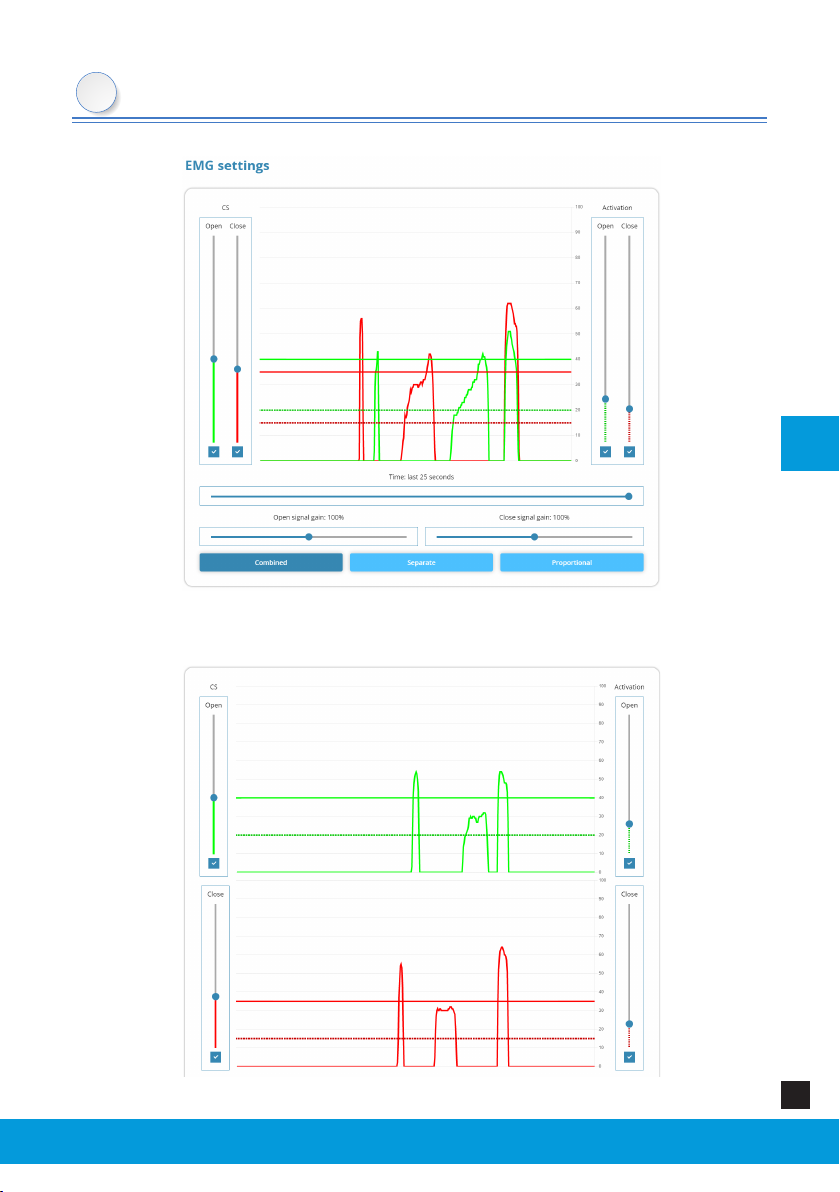
EMG Settings Tab
10
In the EMG Setting tab you can visualize the graph depicting the signals and their
strength acquired from the patient’s muscles.
To accommodate for varying levels of signal strength and electrode sensitivity,
there are special slider adjustments to change the threshold levels for the grip
change signal and the activation levels to open and close the hand.
On the left side of the screen there are 2 sliders with a scale. They can be easily
adjusted to establish a suitable grip change signal threshold for each patient
individually.
On the right side of the screen there are 2 additional sliders. They can be used
to adjust a suitable activation level for the open and close signal.
You can adjust the timescale on the graph by slider at the bottom of Settings
Area.
You can hide or show the thresholds on the graph by toggling the checkbox
beneath their sliders.
You can adjust the gain of the electrodes to change the strength of the signals
by moving the sliders on the bottom of the screen. It is recommended to change
the gains on the electrodes rst, and adjust the software gains for ne-tuning.
There are a couple of options that aect the appearance of the graphs.
Combined - in this option, both muscle signals (Flexion and Extension)
are shown on the same graph
Zeus Hand van Aether Biomedical, distributeur Loth Fabenim B.V.
EN
Zeus Hand Congurator - Web Application Instructions 19
EMG Settings Tab
Separate - in this option, both muscle signals (Flexion and Extension) are
shown on the separate graphs.
10
Zeus Hand van Aether Biomedical, distributeur Loth Fabenim B.V.
EN
Zeus Hand Congurator - Web Application Instructions20
EMG Settings Tab
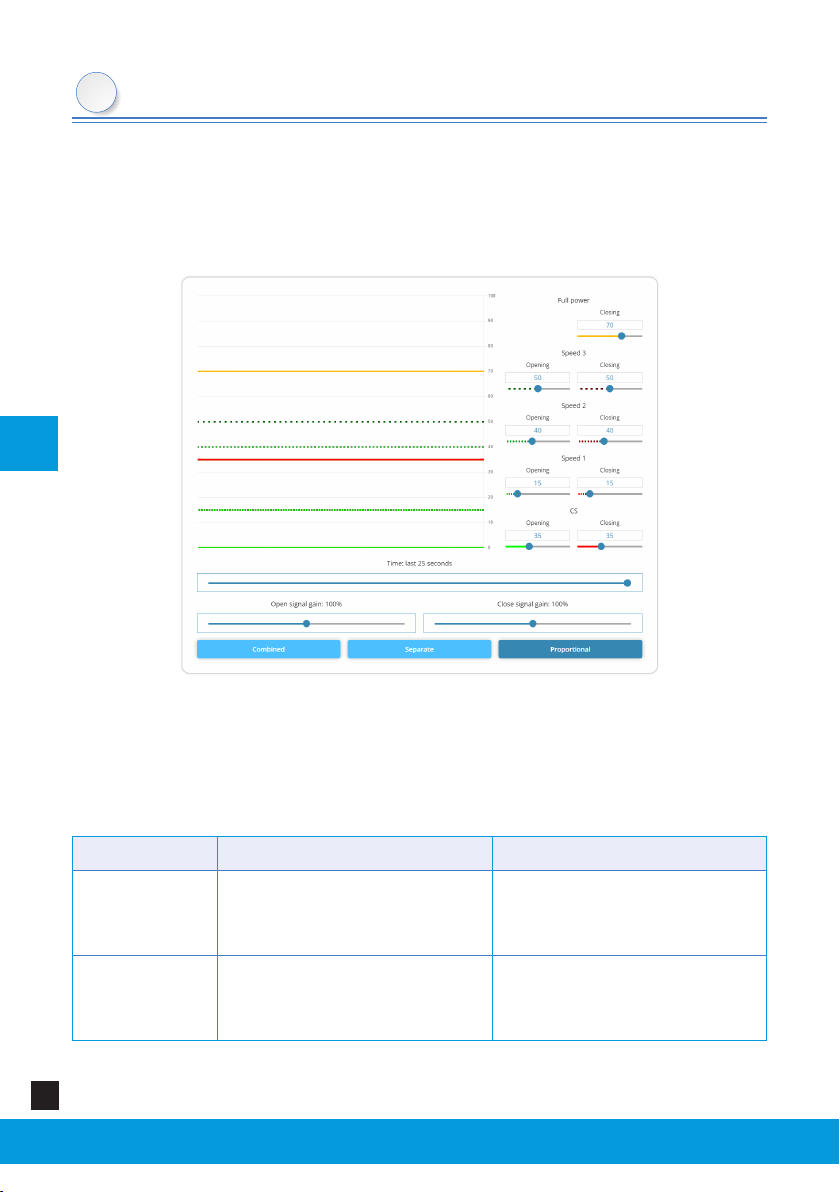
Proportional - this option enables you to change the thresholds for
proportional control of the hand. Both of the signals are visible on the
same screen. The thresholds are available on the right-hand side of the
Settings Area. Ther is also a special “Full power” threshold which is used
for Soft-grip functionality.
The threshold bar reects how high each signal must reach to register as a valid
signal. It veries if the signal the patient made is strong enough to be read and
for the hand to start moving.
If the patient has problems controlling the hand, the threshold bar can be
adjusted.
Adjustment Eect Consequence
Raising
Patient needs a higher signal
in order for the hand to start
moving
Patient must work harder
+ hand may seem slow to
respond
Lowering Patient needs weaker signal
for the hand to start moving
More potential for
inadvertent operation /
accidental opening
10
Other manuals for Zeus Hand
1
Table of contents
Other Aether Biomedical Medical Equipment manuals


Popular Medical Equipment manuals by other brands

Ossur
Ossur Miami Jr Instructions for use

BioSphere Medical
BioSphere Medical Sequitor manual

Accu-Chek
Accu-Chek Combo Series manual

SSCOR
SSCOR DCell Suction Operating Instructions & Maintenance Manual

Lowenstein Medical
Lowenstein Medical prisma VENT AQUA quick start guide

Abbott
Abbott FreeStyle Libre Software update

Dinamap
Dinamap 7300 manual

Body Clock
Body Clock Profile TENS Instructions for use

CHART
CHART CAIRE AirSep SeQual Eclipse 5 Quick reference guide

Sizewise
Sizewise Behavioral Health Bed Quick reference guide

Pari
Pari eflowrapid 178G1005 Instructions for use

Restore The Floor
Restore The Floor INNOVO quick start guide


