manuals.online logo
Brands
  1. Home
  2. •
  3. Brands
  4. •
  5. Agriweld
  6. •
  7. Farm Equipment
  8. •
  9. Agriweld TRANSPORT BOX User manual

Agriweld TRANSPORT BOX User manual

1
TRANSPORT BOX for John Deere 8RX
Tombstone
Agriweld Ltd
Main Street
Garton-on-the-Wolds
Driffield
YO25 3ET
2
Contents
Page 3
General Safety & Qualifications & Training
Page 4
Unit Weight & Risks of Overloading
Page 5
Pre-Use Checks & Storage
Page 6
Attachment to tractor tombstone
Page 7
Assembly
Page 8
Parts List
Page 9-10
Special Safety Instructions & Important Maintenance
Page 11-12
Connecting Your LED’s
Page 13 –15
Risk Assessment
Page 16
Warranty
Page 17
Stickers
Page 18
C E Declaration of Conformity
Page 19
Notes
3
Introduction
General Safety
This manual must be provided to all persons concerned who will be involved with the setting up,
operation, maintenance and use of the tractor and transport box. It must be available at all times.
If important safety instructions are not complied with, it can lead to the risk of injury to you and
others as well as damage to property and the environment.
NON COMPLIANCE WITH SAFETY INSTRUCTIONS CAN LEAD TO WARRANTY CLAIMS BECOMING
INVALID.
Qualifications and Training
Only personnel with the appropriate licence are authorised to use this attachment.
Statutory minimum age limits must be observed and reliable personnel only should perform
maintenance/work on this attachment.
Persons undergoing training or instruction or taking part in a general training course should only use
this implement under direct supervision of an experienced* and trained person.
The use of spare parts, accessories and ancillary equipment not supplied or approved by Agriweld
could have detrimental effects to the construction or functions of the Agriweld transport box.
Agriweld shall not be responsible for any damage caused by the use of spare parts or accessories
and ancillary equipment not supplied or approved by Agriweld.
The operator must be aware of their responsibilities with regard to observing traffic regulations. The
operator must have the authority to refuse instructions issued by third parties which contravene
safety.
Any conversions or modifications to the attachment may only be carried out after prior consultation
and written confirmation from Agriweld.
*Experienced personnel are classed as those persons with appropriate engineering knowledge and
training from an approved provider, supplemented with experience of working with this type of
activity.
4
Further Safety
Any warning signs/instructions on the machine provide important information and must be
observed.
Ensure that you are familiar with the equipment, controls and functions before starting work.
Check around the machine for any noticeable damage, or missing parts before starting work.
It is advisable that the operator wears close fitting clothing to avoid the risk of snagging and
trapping.
Ensure that you watch out for wandering individuals (particularly children!)
Always match your speed to the conditions and legal speed limits. Observe and respect traffic
regulations when using public roads.
Remember to take into account the size of any attachments to the tractor and be aware of the
sideways forces acting on the machine when turning and negotiating corners. Always ensure you
have adequate all-round visibility.
The driving characteristics of the forklift/loader/tractor are influenced and altered by the
attachment of mounted machines and it is important to ensure adequate steering and braking ability
as required.
Unit Weight –Excludes additional concrete
•8RX Transport Box 265kg
•Bespoke sizes = Please refer to individual serial plate for details
Please note dimensions and weights may be subject to change without prior notification.
RISKS OF OVERLOADING
It is your responsibility to check the maximum load capacity of your tractor chassis/front linkage,
before ordering your transport to ensure that you do not exceed the recommendations advised by
the tractor/front linkage manufacturer.
Agriweld accepts no responsibility for damage or injury occurred by attaching a transport box that
exceeds the maximum capacity advised by the tractor/front linkage manufacturer.
It is important to ensure any additional weight imposed when carrying tools/spares stored within
the transport box is also accounted for and the additional weight does not exceed the overall
maximum capacity of the tractor’s linkage/chassis.
IMPORTANT: The max capacity of any ancillary options (such as front hooks) must also be
accounted for. Any additional load imposed must also be included within the overall max weight that
the transport box imposes on the tractor chassis.
5
PRE-USE CHECKS & STORAGE
Before operational use, it is important to inspect the tractor and attachment with the recommended
pre-use checks to prevent damage or danger.
•Check that the tractor is in full working order.
•Check all mounting/securing pins are present and do not appear to be worn or missing.
Replace as required.
•Check any lights on the attachment are in full working order.
•Physically check all nuts and bolts or other fixings are present and tight. Do not use if any are
missing or broken.
•Visually check welds for cracks - this can compromise the strength and operational use of
the product and may pose a health and safety risk.
•If relevant, check round all hydraulic hose and connections for leaks and damaged hydraulic
pipe. Replace as required. Do not attempt to repair hydraulic hose.
•Check for any potential damage to the serial plate as this helps to identify the product, its
origin of manufacture and will be required to order spare parts if needed.
•Check all ancillary parts are present, in good condition and that none are defective or
missing.
•When products are to be stored away when not in use, correct storage methods are
important in protecting the paintwork. The product should be cleaned down thoroughly and
stored inside where possible, always detach any other attachments from the Agriweld
product when you have finished using them.
•Always store your product in an area free from obstruction so not to cause hazard to others
or damage to it.
•Always follow and record a regular greasing /lubrication routine. Essential greasing points
are marked and easy to see on the product.
6
ATTACHMENT TO TRACTOR TOMBSTONE
Ball
Use a forklift to pick up the transport box and position
as shown so the attachment hooks are located over the
tractors tombstone weight carrier and lower the box
until the tractor is supporting its full weight. Proceed to
fit the centre bolt (8) and secure on the underside of
the tombstone with the washer (11) and nut (10)
provided.
Before fully tightening the centre bolt, tighten the two
outside bolts (9) against the underside of the
tombstone & proceed to tighten the nut (10) for the
centre securing bolt (8) after.
9
Tractor tombstone
8
11
10
7
Transport Box Assembly
3
5
2
6
8
4
11
1
7
10
9
12
13
8
Transport Box Parts List
NO
DESCRIPTION
PART NUMBER
QTY PER BOX
1
Transport box body
-
1
2
Logo
-
1
3
Light cover
2018_TB_HNG_0414NO
CUT.SLDPRT
2
4
LED Side Marker
AW_AMB_SM
2
5
Lid
2020_JD8RX_TB_Ass03NO
CUT.SLDASM
1
6
Chevron
AW_CHV_STL
2
8
Center securing bolt
AW_M24x280_B
1
9
Outer securing bolts
AW_M24x200_B
2
10
M24 Nuts
AW_M24_NL
5
11
Centre securing washer
2020_JD8RX_TB_1201_NO
CUT.SLDPRT
1
12
Junction Box
-
1
13
Lid Seal
Under lid marked purple
1
9
Special Safety Instructions
Take extra care when connecting or disconnecting the transport box to/from the tractor. Be aware
of what is under the transport box (such as your feet) before dropping it off. Do not work under a
suspended load.
Ensure that the tractor’s hydraulic system is in full working order.
Never allow any person to stand between the tractor and the transport box during connection or at
any time unless the tractor is secured against rolling away by use of a parking brake and/or wheel
chocks.
It is forbidden to allow any persons to ride or sit on the transport box at any time. Observers should
maintain a safe distance when machine is in use.
When performing any adjustments to the machine the tractor engine must be switched off for
safety.
Ensure that any items stored in the transport box are secured by closing the lids.
Important maintenance/visual safety checks
Ensure the transport box is correctly attached to the tractor front end correctly.
Check all securing pins/bolts for wear and ensure that none show significant signs of wear, damage
or are missing. Do not use until rectified/replaced.
Check that any ancillary options are fitted and function correctly and all fixings are present and
secure.
Ensure that all LED’s are working prior to driving on the highway.
Only *experienced/trained individuals should perform the attachment of bolster mounted
attachments.
Keep the transport box clean at all times to help you perform visual checks easily.
To avoid the risk of accidents, and if applicable, individual parts and larger subassemblies being
moved for replacement purposes should be carefully securely attached to lifting tackle. Use only
suitable hoisting and lifting gear with adequate load capacity, which is in proper working condition.
Never work or stand under suspended loads!
The securing of loads and the instruction of crane operators should only be entrusted to experienced
persons. A signaller giving instructions must be within sight of the crane operator or must be
provided with a radio link.
For carrying out any overhead work, if applicable, always use specially designed facilities or safe
ladders/ platforms. Never climb on the attachment! Wear a safety harness when carrying out
maintenance work at greater heights.
Clean the attachment, especially connections and threaded unions (if relevant), of any traces of oil,
fuel or preservatives before carrying out maintenance/repairs! Never use aggressive detergents. Use
lint-free cleaning cloths.
10
Before cleaning the attachment with water or steam jets (high-pressure cleaners) or other cleaning
agents, cover or tape all openings and electrical components which –for safety and operational
reasons –must be protected against ingress of water, steam or cleaning agents (if applicable).
After cleaning, if applicable, examine all fuel, lubricant and hydraulic oil lines for leaks, loose
connections, scuffing marks and damage. Any defects found must be rectified without delay.
Always retighten any screwed connections that have been unscrewed during maintenance and
repairs.
Any safety devices removed for setting-up, maintenance or repair purposes must be refitted and
checked immediately upon completion of the maintenance and repair work and prior to operation.
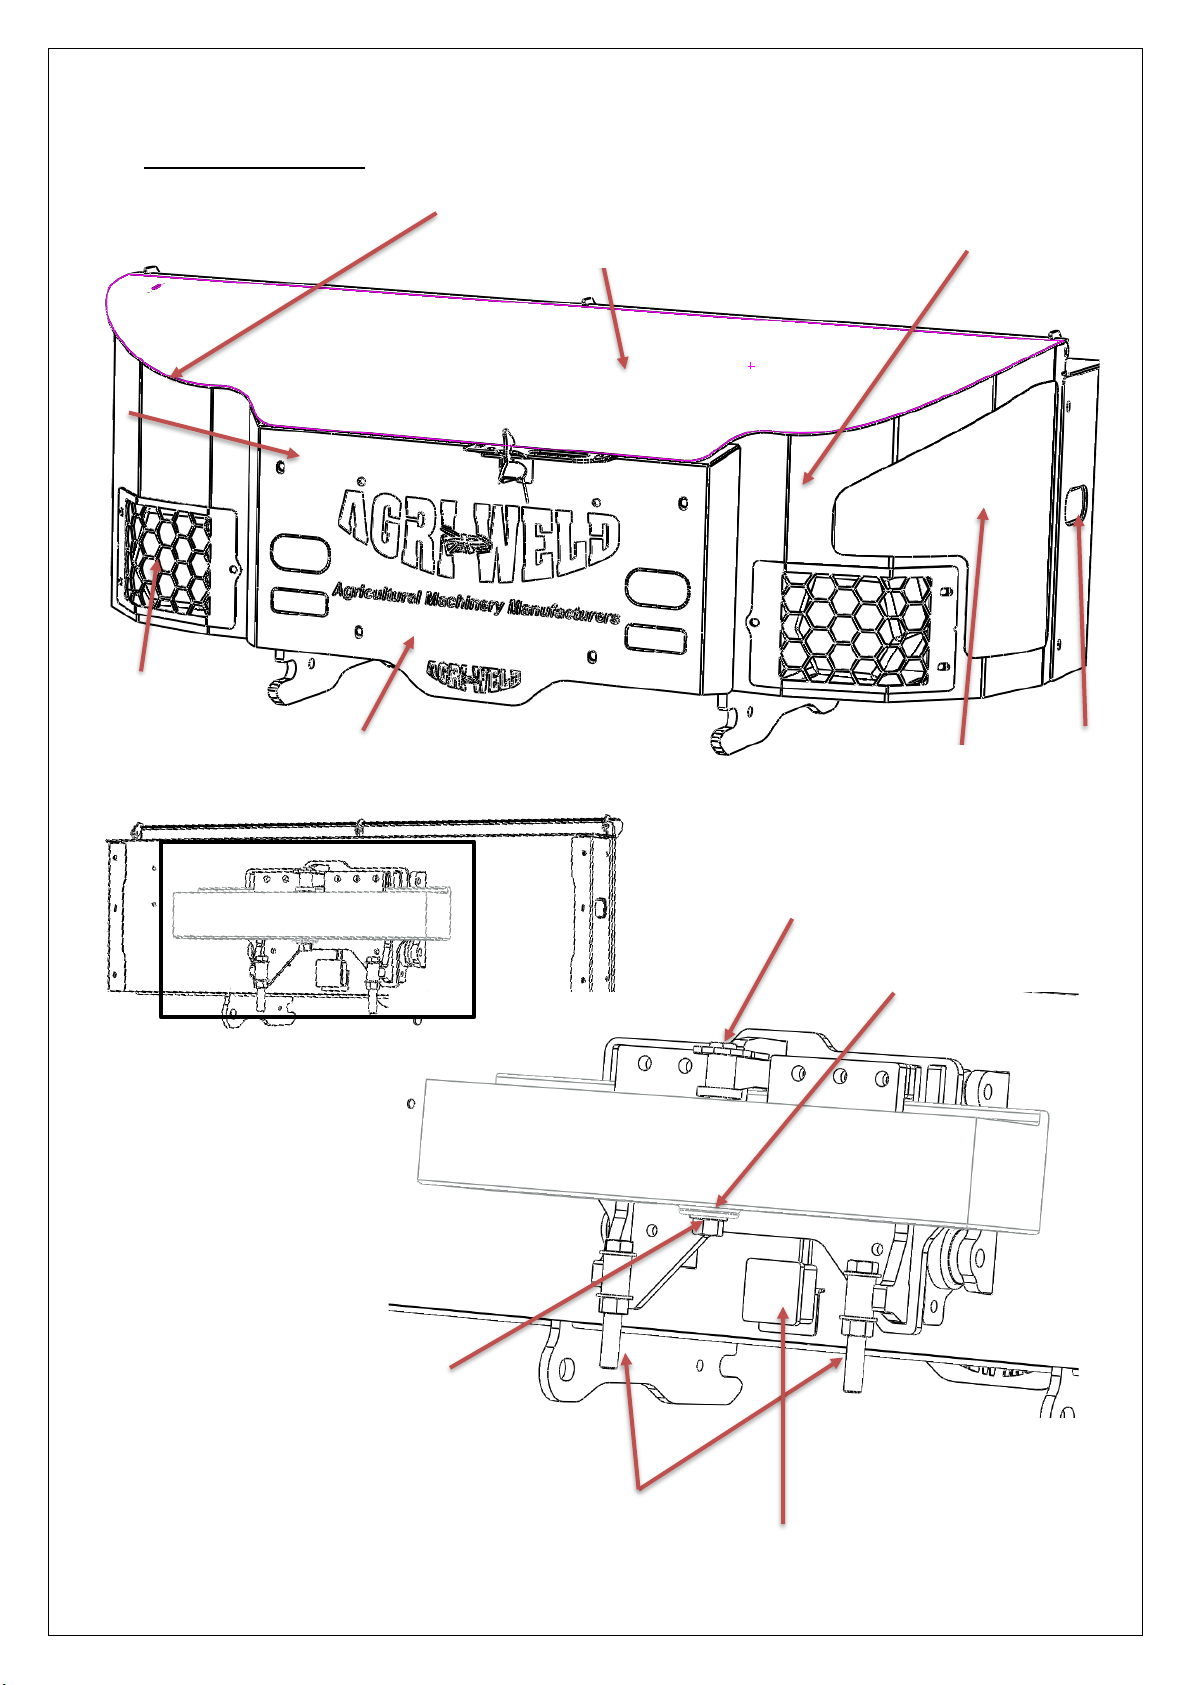
There are no operational parts associated with your transport box although please follow the
checks below regularly to ensure that any noticeable damage or faults are noticed.
•Before use, always check round the transport box to ensure no damage has occurred and
that the attachment appears safe to use.
•Keep the transport box clean at all times to enable users to perform easy visual check for
damage/faults.
Acquiring spare parts
Please quote the details on the type plate(s) as well as the machine’s serial no. on every order for
spare parts or accessories, or enquiries of a technical nature.
The use of spare parts supplied by others shall only be permitted after consultation with the
manufacturer. Original spare parts and accessories authorised by the manufacturer ensure safe and
reliable operation. The use of other parts may invalidate the liability of the manufacturer for any
consequences arising from such use.
Disposing of replaced parts
The following points should be observed before replacing or disposing of parts.
-Replaced parts, which still function, should be cleaned and stored in an orderly manner.
-Machine parts, which cannot be repaired should only be disposed of at appropriate
collecting points or be collected by a scrap metal dealer.
-So-called “valuable” materials should be disposed of in a proper way, i.e. plastics, rubber,
scrap metal, etc. should be recycled.
-Collect and dispose of old oil in accordance with the current regulations.
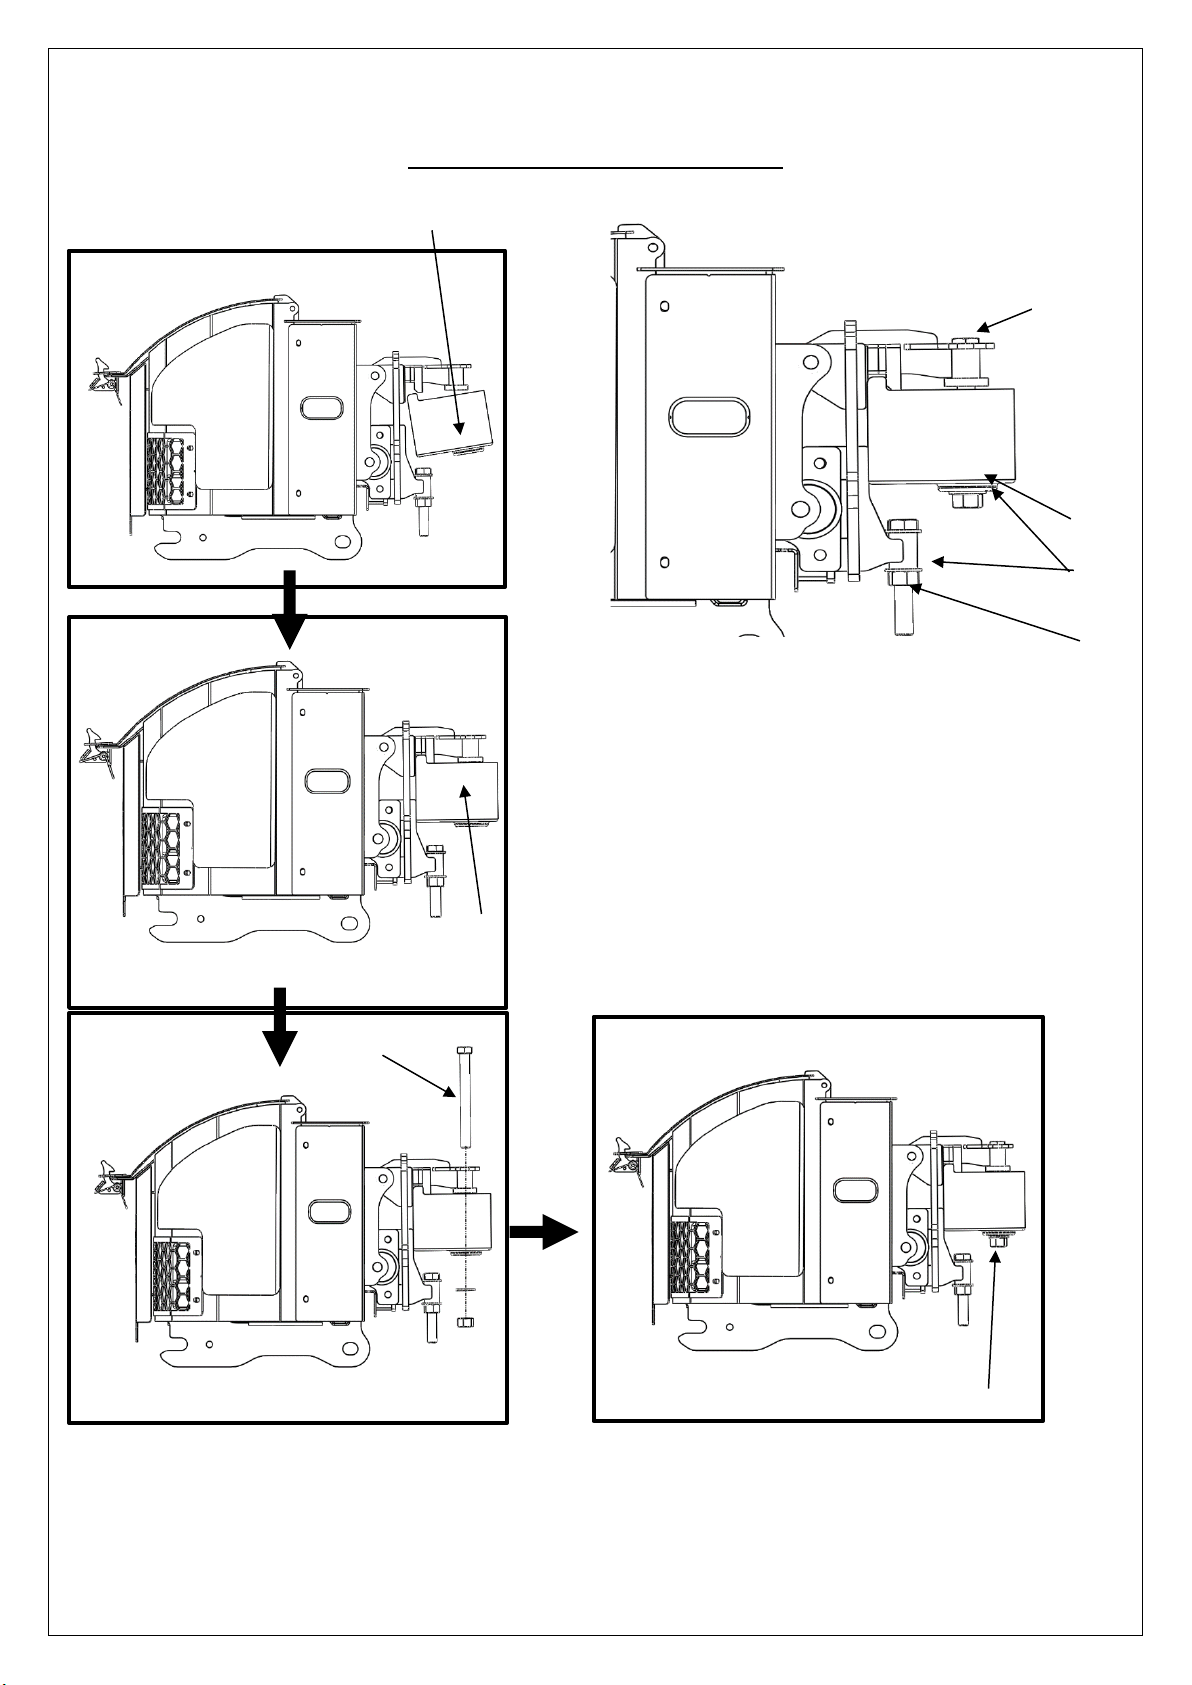
CONNECTING LEDS
The transport boxes are fitted with amber side marker lights as standard, however, it is not supplied
with the relevant 12-24V electrical plug which can vary, to suit the connection to your tractor.
Please check that your LEDs are working correctly before use in the dark and especially when in use
on public roads. Please note that you are responsible for ensuring the LEDs are in full working order
before each use and this should form part of your routine maintenance checks.
11
STANDARD FIXED AMBER LED SIDE MARKER LIGHTS
To connect your amber LED side marker lights, fitted as standard, you will need to wire them up to a
relevant 12-24 V electrical plug, suitable for your tractors electrical supply.
BLUE WIRE = EARTH (NEGATIVE -)
BROWN WIRE = LIVE (POSITIVE +)
AMBER LED3DV FLASHING MARKER LIGHTS:
If ordered as an extra option, the amber flashing LED side marker lights are set to pattern PA1 before
delivery. If you wish to change this, you will need to work your way down the list of patterns
following the instructions below before fitting the plug and connecting to the tractor.
1. Using the GREY wire to make the change you will need a 12V battery on hand to alter the
flashing pattern.
2. Connect the BROWN wire to Live (+POSITIVE) on the battery.
3. Connect the BLACK wire to Earth (-NEGATIVE) on the battery.
4. Touch the GREY wire once to Earth (-NEGATIVE) which will produce the next pattern in the
sequence.
5. Keep touching the GREY wire in this way until the desired pattern is achieved.
6. When happy you can fit your 12-24V plug using only the BROWN LIVE (+POSITIVE) wire and
BLACK Earth (-NEGATIVE) wire.
7. Cut excess GREY and YELLOW/GREEN wires down to within the sheath to prevent further
contact.
12
Pattern
Number
Pattern
Synchronise
Alternate
PA1
Single Alert 150 –Phase 1
✓
✓
PA2
Single Alert 150 –Phase 2
✓
PA3
Single Alert 75 –Phase 1
✓
✓
PA4
Single Alert 75 –Phase 2
✓
PA5
Single Alert 375 –Phase 1
✓
✓
PA6
Single Alert 375 –Phase 2
✓
PA7
Single Flash 150 –Phase 1
✓
✓
PA8
Single Flash 150 –Phase 2
✓
PA9
Single Flash 75 –Phase 1
✓
✓
PA10
Single Flash 75 –Phase 2
✓
PA11
Double Flash 150 –Phase 1
✓
✓
PA12
Double Flash 150 –Phase 2
✓
PA13
Double Flash 75 –Phase 1
✓
✓
PA14
Double Flash 75 –Phase 2
✓
PA15
Comet Flash 75
-
PA16
Action Flash
-
-
PA17
Module Flash
-
-
PA18
Comet Alert
-
PA19
Action Scan
-
-
PA20
Single Alert
-
-
PA21
Steady –High
N/A
N/A
PA22
Steady –Low
N/A
N/A
PA23
Off
N/A
N/A
13
14
15
16
Manufacturer’s Warranty/Guarantee
Your Agriweld transport box is covered for a period of 12 months from the date of dispatch (which is
recorded on our files) against faulty components and/or bad workmanship.
Guarantees for overseas orders will begin when the product reaches its delivery destination as
advised on the delivery/collection paperwork. We ask that you register this date with us to active
the products 12 months manufacturer’s warranty.
Our welders are coded to ISO 9606-1 and our welding procedures are approved in accordance with
ISO 15614-1 to manufacture your equipment. All products are checked for quality prior to
delivery/collection.
Agriweld Ltd accepts no liability for instances arising from ignorance, occurrences outside our
control, such as accidents or malicious damage and through non-compliance with
safety/maintenance instructions and/or by failure to set up the hydraulic reset system (if applicable)
in accordance to the ground conditions at the time.
All wearing parts and certain hydraulic fittings/hoses are not covered under warranty.
Please see our standard T’s & C’s for full details, available on our website www.agriweld.co.uk
DAMAGES DURING TRANSIT:
Damage occurred during transit arranged on your behalf by Agriweld Ltd must be reported to
Agriweld before signing for the item from the haulier to enable us to enter any claim with them
directly. The limit of our liability to undertake repairs to products damaged during transit is
dependent on signing for any damaged product upon delivery as “DAMAGED”. Thank you
If you have arranged your own collection/haulage and the order has been received damaged, you
will need to follow the same procedure as above to report it, however, Agriweld will not be able to
enter any claim with a haulier where transport has been arranged by your own methods. Thank you
17
Stickers
Sticker
Part number
Description
Quantity per
Machine
AW_WB_AS
(185 mm x 85mm)
Agriweld Sticker
3
AW_WB_GB
(85mm x 50mm)
Great Britain
Sticker
3
Serial plate
(76mmX51mm)
Serial plate
1
AW_CV_STL
Standard
Chevron
2
AW_OM_S
Read operator
manual sticker
1
18
CE DECLARATION OF CONFORMITY
The equipment which accompanies this declaration is in conformity with EU Directive(s):
2006/42/EC Machinery Directive
Manufacturer Name: Agriweld Ltd
Manufacturer Address: Main Street, Garton-on-the-Wolds, Driffield, YO25 3ET
Product: JD8RX Transport Box
Product Options: Tombstone/bolster mounting
Individual Serial Number:
Individual Product Description: Transport Box for John Deere 8RX - Tombstone
Supplementary Information: Weight approx. 265kgs
Date of Last Load Test: N/A
Authorised Signatory on Behalf of Manufacturer:
Dawn Foster
Position in Company: Director
Date of Issue:
19
Notes
This page is blank for your own notes such as servicing & fault finding

Other Agriweld Farm Equipment manuals

Agriweld ASL User manual

Agriweld

Agriweld ASL User manual

Agriweld DIRECT DRIVE Series User manual

Agriweld

Agriweld DIRECT DRIVE Series User manual

Agriweld Bale Rotator User manual

Agriweld

Agriweld Bale Rotator User manual

Agriweld 3M Multi Till 5T User manual

Agriweld

Agriweld 3M Multi Till 5T User manual

Agriweld Prevent 4-Leg User manual

Agriweld

Agriweld Prevent 4-Leg User manual

Popular Farm Equipment manuals by other brands

Sulky HR 160 Original instructions

Sulky

Sulky HR 160 Original instructions

Checchi & Magli FOX DRIVE PLUS Use and maintenance manual

Checchi & Magli

Checchi & Magli FOX DRIVE PLUS Use and maintenance manual

greenhouse sensation Hydropod Assembly and maintenance instructions

greenhouse sensation

greenhouse sensation Hydropod Assembly and maintenance instructions

Powerfix Profi KH 2910 operating instructions

Powerfix Profi

Powerfix Profi KH 2910 operating instructions

MacDon DWA Operation and parts manual

MacDon

MacDon DWA Operation and parts manual

Tatu Marchesan DCA DC 2500 instruction manual

Tatu Marchesan

Tatu Marchesan DCA DC 2500 instruction manual

Baumalight MS972 Operator's manual

Baumalight

Baumalight MS972 Operator's manual

H&S HD Operator's manual / parts book

H&S

H&S HD Operator's manual / parts book

MacDon M155E4 Assembly instruction

MacDon

MacDon M155E4 Assembly instruction

Jay-Lor 2300 Operator's manual

Jay-Lor

Jay-Lor 2300 Operator's manual

Mahindra BBSST4 owner's manual

Mahindra

Mahindra BBSST4 owner's manual

LEMKEN Karat 9 K operating instructions

LEMKEN

LEMKEN Karat 9 K operating instructions

Landoll 2210 Operator's manual

Landoll

Landoll 2210 Operator's manual

MacDon M155 2022 Operator's manual

MacDon

MacDon M155 2022 Operator's manual

SiliconForm Multilactor Premium manual

SiliconForm

SiliconForm Multilactor Premium manual

Peco Estate 795001 Operator's manual

Peco

Peco Estate 795001 Operator's manual

MacDon D65 installation instructions

MacDon

MacDon D65 installation instructions

Demco TRUSS-T BOOM 21 Operator's manual

Demco

Demco TRUSS-T BOOM 21 Operator's manual

manuals.online logo
manuals.online logoBrands
  • About & Mission
  • Contact us
  • Privacy Policy
  • Terms and Conditions

Copyright 2025 Manuals.Online. All Rights Reserved.