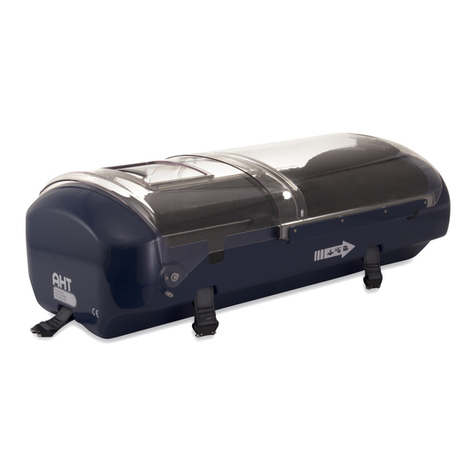
AHT BABY POD 20 Operating instructions

Operating and maintenance manual
Infant Transport Device

Table of contents
2© 2017 • Advanced Healthcare Technology Ltd. • Baby Pod 20 ®
BABY POD 20
Operating and maintenance manual
This is Version 1.0, 03/17 of the Baby Pod 20
Operator’s Manual, introduced March 2017
Manufactured in Europe by:
Advanced Healthcare Technology Ltd.
Northern Road, Chilton Industrial Estate
Sudbury, Suolk CO10 2ZB • United Kingdom
Tel: +44-(0)1787-376493
Fax: +44-(0)1787-312707
Web: www.babypod.com
3
3
3
3
4
4
4
4
4
5-6
5
6
7
8-13
8
8
9-12
13
14-17
14
14
15
15
15
16
17
17
17
18
19
19
20
21
22-23
Section 1
1.1
1.2
1.3
Section 2
2.1
2.2
2.3
2.4
Section 3
3.1
3.2
Section 4
Section 5
5.1
5.2
5.3
5.4
Section 6
6.1
6.2
6.3
6.4
6.5
6.6
6.7
6.8
6.9
Section 7
Section 8
Section 9
Section 10
Section 11
General warnings and cautions
Introduction
Warnings
Cautions
Indications for use
Product description
Indications
Specications
Accessories
Getting to know Baby Pod 20
Product diagram
Product components and descriptions
Environmental conditions
Safety inspection of Baby Pod 20
Unpacking Baby Pod
Inspecting Baby Pod
Re-assembly of Baby Pod
Testing the vacuum mattress
Operating instructions
Securing Baby Pod to stretcher or gurney
Opening Baby Pod
Activating the Transwarmer Mattress
Placing baby inside Baby Pod
Operating the vacuum mattress
Securing baby inside Baby Pod
Closing Baby Pod with baby inside
Monitoring baby inside Baby Pod
Removing baby from Baby Pod
Cleaning Baby Pod 20
Maintenance of Baby Pod 20
Storage of Baby Pod 20
Troubleshooting
Summary
User notes
Page

3© 2017 • Advanced Healthcare Technology Ltd. • Baby Pod 20 ®
Section 1.1 - Introduction
This manual contains instructions for initial set-up and inspection of baby Pod 20, proper operator use of the
device, and care and maintenance of Baby Pod 20.
Section 1.2 - Warnings
• Only properly trained personnel who are aware of potential hazards or misue should use Baby Pod 20. Patients
may be harmed by the incorrect use of this device.
• DO NOT leave baby unattended at any time whole using Baby Pod 20.
• DO NOT place a baby directly onto the printed side of the TransWarmer Infant Transport Mattress.
TransWarmer’s soft, non-woven surface is designed to be easy on baby’s skin and provide nesting during
transport.
• DO NOT lean on Baby Pod 20 or place weight on top of Baby Pod 20’s lid sections.
• DO NOT leave open containers of liquid on or near Baby Pod 20. Baby Pod 20’s lid section will not prevent
uids from spilling onto the baby.
• DO NOT activate the TransWarmer Infant Transport Mattress in ambient temperatures greater than 28.0
degrees celcius. Ambient temperatures greater than 28.0 degrees celcius may cause the mattress to become
too hot and cause injury to the infant.
Section 1.3 - Cautions
• Always check the security of the Stretcher Fixing Straps prior to transport with Baby Pod 20. Strap buckles
make an audible click when fully engaged.
• DO NOT modify or make additions to any part of Baby Pod 20.
• Only Baby Pod 20 parts and accessories available through customer services and authorised representatives
should be used to replace any components or accessories.
• Use only non-abrasive cleansers to clean Baby Pod 20. Abrasive cleaners may damage the surface of Baby Pod
20.
• Protect Baby Pod 20 from the impact of sharp or hard objects that may cause internal damage that is not
visible on the surface of the unit.
• Baby Pod 20 should be inspected before each use for signs of damage to its carbon ber Outer Shell. Remove
Infant Positioning Straps, Vacuum Mattress and Shock Absorbent Foam and carefully inspect the inner surface
of the carbon ber shell for signs of stress, including cracks, pockmarks or irregularities. Discontinue use of
Baby Pod 20 if signs of stress or damage are present.
• Chips in the outer shell’s surface due to normal wear and tear generally do not aect the performance of the
Baby Pod 20. Damage due to abrasive or rubbing actions may aect the perfomance and should be carefully
inspected. Discontinue use of Baby Pod 20 if signs of abrasive damage are present.
Section 1
General warnings and cautions
Caution
Please read entire instruction manual prior to using Baby Pod 20.
Warning
Patients may be harmed by the incorrect use of this device.

4© 2017 • Advanced Healthcare Technology Ltd. • Baby Pod 20 ®
Baby Pod 20 consists of a lightweight carbon ber outer shell, which is lined with a shock absorbent foam inner
layer, and has a transparent lid for viewing the baby. Baby Pod 20 contains a patient positioning vacuum mattress,
stretcher xing straps to secure the device for transport, and safety straps to position the infant inside the device
during transport. Accessories available for Baby Pod 20 include the Single-use TransWarmer Infant Transport
Mattress. Baby Pod 20 is designed to provide safe conveyance of patient whose weight does not exceed 17.5 lbs
(8 kg.)
Section 2.2 - Indications
Baby Pod 20 is designed to safely convey a pediatric patient to or from a medical facility, between facilities or
between departments within a single medical facility. Baby Pod 20 is designed to provide safe conveyance of a
patient whose weight does not exceed 17.5 lbs (8 kg.)
Baby Pod 20 has been designed to exceed the standard CEN 1789 (10g in six directions).
Section 2.3 - Specications
Part Number Component Description
BP20-001 Baby Pod 20 Infant Transport Device
BP20-002 Vacuum Mattress
BP20-003 Infant Positioning Strap Set
BP20-005 Shock Absorbent Foam Set
BP20-006 9kn Stretcher Fixing Strap Set
BP20-007 Viewing Lid
BP20-013 Protective Storage Bag
BP20-020 Vacuum Pump
Section 2.4 - Accessories
USE ONLY Baby Pod 20 approved accessories with this device. Patients may be harmed by the incorrect use of this
device.
Part Number Description
TRANS06 TransWarmer Infant Transport Mattress (Set of 6pcs)
Section 2
Indications for use
Section 2.1 - Product Description

5© 2017 • Advanced Healthcare Technology Ltd. • Baby Pod 20 ®
Section 3.1 - Product diagram
Section 3
Getting to know Baby Pod 20
Viewing Lid
Tubing Access Ports
Co2 Evacuation
Inlet
Foot access port
Lid Closing
Catch
Viewing Lid
Hinge
“End” Stretcher
Fixing Anchor
“Side” Stretcher
Fixing Anchors

6© 2017 • Advanced Healthcare Technology Ltd. • Baby Pod 20 ®
Outer Shell
The outer shell of Baby Pod 20 is constructed of carbon ber, producing a strong yet lightweight and durable
material.
Shock Absorbent Foam
Baby Pod 20’s internal shock absorbent foam is contructed of polyeurethane foam with a PUNL® removeable cover,
which remains breathable yet impervious to liquids and solutions. The foam interior surrounds the infant’s head,
feet and sides during transport and is designed to help protect the infant in event of impact, and reduce vibrations
that might reach the patient from movements of the transporting vehicle. The covers can be removed and washed,
allowing for increased infection control.
Vacuum Mattress
Baby Pod 20’s vacuum mattress is manufactured from a soft foil and is lled with ame-retardant polystyrene
beads. Removal of the air from the vacuum mattress via the attached valve allows positioning of the baby within
the Baby Pod 20.
TransWarmer Infant Transport Mattress (Accessory)
Baby Pod 20 incorporates the Transwarmer Infant Transport Mattress which is designed to provide radiant heat
and shock absorption to the infant during transport. TransWarmer is manufactured using the patented WarmGel
technology, which provides even heating via non-migrating gel in a non-electric infant transport mattress. Infants
may be placed directly on the TransWarmer’s soft, non-woven surface.
Infant Positioning Straps
Baby Pod 20’s Infant Positioning Straps are manufactured from bands of soft foam which are attached to loop
velcro. Each set is SINGLE PATIENT USE ONLY. Baby Pod 20 contains one set of 4 Infant Positioning Straps, each
33cm in length, with 8cm of velcro loop pre-stitched to the ends for ease of use.
Stretcher Fixing Straps
The Stretcher Fixing Straps come in a set of two Side Straps, for xing the Baby Pod 20 width-wise to any stretcher
or gurney, and one End Strap, for xing the device length-wise to a stretcher or gurney. Baby Pod 20’s Stretcher
Fixing Straps are composed of a high-tensile polyester webbing with attached metal quick-connect and release
buckles.
Viewing Lid
The Baby Pod 20’s viewing lid is made from formed PETG, with a metallic sliding mechanism that contains no
bearings, allowing it to easily be cleaned and maintain durability. The large viewing area allows good visibility of
the patient during transport. The front section slides backwards allowing unhindered access to the baby’s head
and chest. For foot access, there is a sliding access port on the top of the Viewing Lid. When stationary, the entire
viewing lid can be lifted backwards over the end of the Baby Pod 20, allowing total access to the entire patient
compartment.
Co2 Evacuation System
If concerned about Co2 buildup in the patient compartment, this can be evacuated from the Baby Pod 20 via the
Entainment System. An air supply can be attached to the inlet on the “Head” end of the Baby Pod 20, which, using
only low pressure and jet ow and mixing principles, will draw the Co2 from the Baby Pod 20 interior and evacuate
it via an outlet at the base of the Baby Pod 20 “Head” section.
Section 3.2 - Component descriptions
Section 3
Getting to know Baby Pod 20 cont...

7© 2017 • Advanced Healthcare Technology Ltd. • Baby Pod 20 ®
Section 4
Environmental conditions
Environmental conditions may alter the use of Baby Pod 20 slightly. Read the following specic instructions for
more information.
• DO NOT leave Baby Pod 20 in direct sunlight or near other radiant heat sources. Outside radiant heat sources
may cause the baby to overheat.
• DO NOT use the TransWarmer Infant Transport Mattress in ambient termperatures greater than 28.0 degreees
celcius.
• DO NOT place a baby directly on the printed side of the TransWarmer mattress. An infant should be placed on
TransWarmer’s soft, non-woven surface.
• Secure Baby Pod 20 to a stretcher or gurney when possible.
• Baby Pod 20 may be hand-carried if no stretcher or gurney is available (e.g. Search and Rescue recovery). If
Baby Pod 20 is to be used in the absence of a stretcher or gurney, attachone Side Strap to both Stretcher Fixing
Strap anchors on the same side of Baby Pod 20. Repeat for the other Side Strap. Pull Side Straps up above the
viewing area and hand-carry the device if necessary.
Section 4 - Environmental conditions
Warning

8© 2017 • Advanced Healthcare Technology Ltd. • Baby Pod 20 ®
Section 5
Safety inspection of Baby Pod 20
Please read the following instructions carefully and completely to minimise injury to Baby Pod 20 operators and
attendants.
Carefully and completely remove the packing material surrounding the Baby Pod 20 and place the device (in its
protective storage bag) on a smooth surface for inspection.
Section 5.2 - Inspecting Baby Pod 20
Careful inspection of Baby Pod 20 prior to use is critical. Follow these steps in order to avoid overlooking important
visual inspections.
1. Place Baby Pod 20 on a smooth surface for inspection
2. Remove Baby Pod 20 carefully from its protective storage bag
3. Release the black lid lock mechanism at the Head end of Baby Pod 20 and gently slide the front section of the
viewing lid towards the back of the device. When the lid is fully retracted and cannot slide any further, carefully
lift the entire viewing area upwards and over the back of the device until it rests on the surface on which the
device is placed, being careful not to bump the viewing lid on any surrounding objects.
4. Remove the loose contents of the Baby Pod 20, including the TransWarmer Mattress and loose Stretcher Fixing
Straps.
5. Note: Infant Positioning Straps are already fastened into position and should not be removed until they require
replacement for a new patient and during cleaning.
6. Inspect the Side and End Stretcher Fixing Straps for integrity, making sure that the metal buckle is securely
attached to the straps. DO NOT use any component that does not pass visual inspection.
7. Remove Vacuum Mattress from Baby Pod 20. Inspect the mattress for holes or other obvious aws.
8. Remove Shock Absorbent Foam interior. Inspect covers for any cuts or abrasions. Lay foam aside for re-
assembly later.
9. Inspect Outer Shell for cracks or abrasions. First, inspect the inner carbon ber surface of Baby Pod 20’s Outer
Shell.
10. Check the security of the Stretcher Fixing Strap Anchors on each side of Baby Pod 20 and at the foot of the
device (total of 5). Anchors should be rmly axed to the device.
11. Carefully close Viewing Lid back over the Baby Pod 20, checking operationg of each hinge mechanism, and
gently slide forward the Head section and relocate on the lid locking mechanism. Check that the mechanism
is securely closed. Inspect Viewing Lid sections carefully for cracks or irregularities. When the Baby Pod 20 is
closed, the Viewing Lid should be evently aligned along the lengthwise axis of the device.
12. Inspect the Sliding Access Cover towards the Foot section of the lid, checking that it slides freely and locates
securely when it it’s closed position.
Section 5.1 - Unpacking Baby Pod 20
Note: Smoothness is not a requirement. Natural irregularities in texture due to the
nature of the manufacturing process and materials are normal. Second, inspect the
outer surface of Baby Pod 20. Look for signs of stress due to abrasions.
Warning
Carefully inspect Baby Pod 20 between each use. A damaged device may harm patient.
Warning
Patients may be harmed by the incorrect use of this device.

9© 2017 • Advanced Healthcare Technology Ltd. • Baby Pod 20 ®
Section 5
Safety inspection of Baby Pod 20 cont...
Section 5.3 - Re-assembly of Baby Pod 20
Once Baby Pod 20 has been thoroughly inspected and cleared for use, the device must be re-assembled. Re-
assemble Baby Pod 20 according to the following instreuctions.
Release the black lid lock mechanism at the Head end of Baby Pod 20 and gently slide the front
section of the viewing lid towards the back of the device.
Place Baby Pod 20 on a smooth surface for re-assembly.

10 © 2017 • Advanced Healthcare Technology Ltd. • Baby Pod 20 ®
Section 5
Safety inspection of Baby Pod 20 cont...
Section 5.3 - Re-assembly of Baby Pod 20 cont...
When the lid is fully retracted and cannot slide any further, carefully lift the entire viewing area
upwards and over the back of the device until it rests on the surface on which the device is placed,
being careful not to bump the viewing lid on any surrounding objects.
Beginning with the “Head” and “Foot” sections, place Shock Absorbent Foam pieces back inside the
interior of Baby Pod 20.
Attach the 4 Infant Positioning Straps, one at each end of each interior locating rail using the pre-
stitched hook material, sliding under the rail and back onto itself.

11© 2017 • Advanced Healthcare Technology Ltd. • Baby Pod 20 ®
Section 5
Safety inspection of Baby Pod 20 cont...
Section 5.3 - Re-assembly of Baby Pod 20 cont...
Pass each Infant Positioning Strap through it’s corresponding slot in the Vacuum Mattress. There are
two available slots for each strap to cater for larger or smaller patients.
Insert the “Side” foam panels, being sure to locate the end of each into the recesses in both the
“Head” and the “Foot” sections already in place. When foam is properly located, secure “Side”foam to
the Baby Pod 20 interior via the “popper” located on the back (blue) side of each “Side” section.
Insert the “Base” foam section into the bottom of the Baby Pod, making sure to keep the 4 Infant
Positioning Straps Accessible. On top of this, place Vacuum Mattress with the vacuum port at the
Foot end of Baby Pod 20 with the valve facing up. The valve should be in the open position (tubing
sections fully engaged with the black “O” ring hidden from view) to allow air to enter the mattress.
Spread the polystyrene bead contents of the mattress evenly by hand.

12 © 2017 • Advanced Healthcare Technology Ltd. • Baby Pod 20 ®
Section 5
Safety inspection of Baby Pod 20 cont...
Section 5.3 - Re-assembly of Baby Pod 20 cont...
At this stage, the Vacuum Mattress should be tested according to the instructions in Section 5.4.
Once the Vacuum Mattress has been tested, place the TransWarmer Infant Transport Mattress with
the printed side up so that it is ready to be activated. Once activated, the TransWarmer should be
turned so that the soft, non-woven side faces up. DO NOT place a baby directly on the printed side of
the TransWarmer Infant Transport Mattress.
Attach one End, and two Side Stretcher Fixing Straps to Baby Pod 20. Insert male latch into female
anchor buckle. Listen for the click to indicate a secure connection.
Carefully close Viewing Lid back over the Baby Pod 20, and gently slide forward the Head section
and relocate on the lid locking mechanism, checking that the mechanism is fully engaged and the
Viewing Lid secure.
Baby Pod 20 is now ready for use.

13© 2017 • Advanced Healthcare Technology Ltd. • Baby Pod 20 ®
Section 5
Safety inspection of Baby Pod 20 cont...
The Vacuum Mattress valve consists of one long tubing section, and one short tubing section (marked by a black
“O” ring).
To open the valve prior to vacuum suctioning, press the short tubing section into the long section. An audible
click will sound when the sections are properly engaged and the “O” ring will no longer be visible. Vacuum may be
applied once the two sections are engaged.
Valve open = Black “O” ring NOT visible
Valve closed = Black “O” ring visible
Check the integrity of the Vacuum Mattress valve by applying vacuum to the open valve (long and short tubing
sections properly engage with the black “O” ring hidden from view) to suction air from inside the mattress.
If operating properly, the Vacuum Mattress should lose its moldability and become sti. Once the Vacuum Mattress
has been suctioned successfulkly, depress grey tab on the Vacuum Mattress valve to close valve. Check mattress
to see that it does not re-inate but retains its molded shape. Re-connect the valve sections (listen for the click to
indicate successful engagement) to open the vacuum valve and allow air to re-enter the mattress. This will prepare
the mattress for use.
Section 5.4 - Testing the Vacuum Mattress
Warning
Do not use the Vacuum Mattress if it does not pass this inspection
Black “O” ring
Connect the two sections of tubing until an audible “click” is heard
and the black “O” ring disappears from view. This opens the valve,
allowing air to be removed from the mattress via suction.

14 © 2017 • Advanced Healthcare Technology Ltd. • Baby Pod 20 ®
Section 6.1 - Securing Baby Pod 20 to Transport Stretcher or Gurney
The Side Straps attached to the Stretcher Fixing Strap Anchoirs are used to secure Baby Pod 20 to the stretcher or
gurney or to hand carry the device.
Position Baby Pod 20 in the center of the stretcher making sure that it is facing in the proper direction. The Head
end of Baby Pod 20 should be placed at the head of the stretcher.
Note: See direction of travel arrow on the outer shell of Baby Pod 20.
Feed one Side Stretcher Fixing Strap at the Head and one at the Foot of the Baby Pod 20 underneath the stretcher
base and attach the male latch on the strap to the female anchor buckle axed to the opposite side of Baby Pod
20. Connections are secure when a click is heard. Pull on the webbing away from the slider buckle to tighten
straps.
Feed the long portion of the End Stretcher Fixing Strap underneath the foot bar of the stretcher and back through
the metal slider buckle. Grasp the webbing and pull away from the slider buckle to tighten the strap. Make sure
that the End Strap is securely tightened around the stretcher foot bar.
Re-check the security of all Stretcher Fixing Straps to ensure patient safety before transport!
Section 6.2 - Opening Baby Pod 20
Release the black lid lock mechanism at the Head end of Baby Pod 20 and gently slide the front section of the
viewing lid towards the back of the device.
When the lid is fully retracted and cannot slide any further, carefully lift the entire viewing area upwards and over
the back of the device until it rests on the surface on which the device is placed, being careful not to bump the
viewing lid on any surrounding objects.
Section 6 - Operating instructions
Section 6
Operating instructions
Caution
Always use two hands to lift Viewing Lid and exercise extreme caution
not to drop the lid onto the Baby Pod 20 from its raised position.
Warning
Improper handling and use of the Viewing Lid mechanism risks harm to the device and to the patient.
Warning
Carefully inspect Baby Pod 20 between each use. A damaged device may harm patient.
Warning
Patients may be harmed by the incorrect use of this device.

15© 2017 • Advanced Healthcare Technology Ltd. • Baby Pod 20 ®
Section 6
Operating Instructions cont...
1. Locate metal disc and grasp with thumb and forengers of both hands.
2. Flex (bend) disc rapidly until crystals begin to form.
3. Massage pack to soften and to increase the activation rate.
4. After pack is fully activated, indent center with palm to form a small nest.
5. Lay infant in nest on fabric surface.
6. Check infant skin for redness and monitor core temperature regularly.
Note: The TransWarmer Infant Transport Mattress is a single-use, disposable product. Discard after
each patient use. To order more TransWarmer Infant Transport Mattress, contact our Customer Service
Department at:
Section 6.4 - Placing baby inside Baby Pod 20
Place baby into Baby Pod 20 making sure that the baby’s head is nearest the end marked “Head” and towards the
direction of travel denoted by the arrow on the outer shell. Incorrect positioning of the patient may cause injury
during transport.
Place baby face-up on the non-woven surface of the TransWarmer Infant Transport Mattress. DO NOT place a baby
directly onto the printed side of the TransWarmer mattress.
Section 6.5 - Operating Vacuum Mattress
Check to see that the Vacuum Mattress valve is at the baby’s feet. Valve should be open with the long and short
tubing sections engaged (black “O” ring hidden).
Check to see that the baby is in the desired position for transport.
Place vacuum source into short tubing section on Vacuum Mattress valve and slowly suction air from the mattress
while hand shaping the mattress around the baby. As air is removed, the Vacuum Mattress acts as a positioning
and retaining shell for the baby.
Once the Vacuum Mattress is in the desired position, remove the vacuum source and close the mattress valve by
depressing the grey tab and disengaging the long and short tubing sections. Once disengaged, the short tube’s
black “O” ring is visible.
Section 6.3 - Activating the TransWarmer Infant Transport Mattress
Warning
Patients may be harmed by the incorrect use of this device.
Warning
Improper use of the Vacuum Mattress may cause injury to the patient during transport.
Warning
DO NOT use the TransWarmer Infant Transport Mattress in ambient temperatures greater than 28.0 degrees celcius.
Ambient temperatures greater than 28.0 degrees Celcius may cause Warmer Mattress to become
too hot and cause injury to the infant.

16 © 2017 • Advanced Healthcare Technology Ltd. • Baby Pod 20 ®
Section 6
Operating Instructions cont...
Once the baby is properly positioned and the air removed from the Vacuum Mattress, position the baby into the
Baby Pod 20 using the Infant Positioning Straps.
Making sure that the straps have been passed through its corresponding slot on the Vacuum Mattress, take one
Infant Positioning Strap from the foot end of the Baby Pod 20 and the strap from the head end on the opposite
side and cross them over the baby’s torso. Secure the straps together using the pre-stitched hook velcro tab.
Repeat this procedure with the corresponding head and foot straps on the opposite side. The two Infant
Positioning Straps, when properly engaged, should form an “X” across the baby’s torso. Infant Positioning Straps
should be snug across the baby’s torso, but not apply undue pressure. Improper use of the Infant Positioning
Straps may cause injury to the patient during transport.
Section 6.6 - Securing baby inside Baby Pod 20
Warning
Patients may be harmed by the incorrect use of this device.
Warning
Each set of Infant Positioning Straps are SINGLE PATIENT USE ONLY

17© 2017 • Advanced Healthcare Technology Ltd. • Baby Pod 20 ®
Section 6
Operating Instructions cont...
Check baby’s positioning before closing Baby Pod 20. Re-check the security of the Infant Positioning Straps before
closing the device.
Carefully close Viewing Lid back over the Baby Pod 20 Outer Shell, using two hands at all times until the Lid
locates against the sides of the Outer Shell. Take care at all times that any ventilator or IV tubing passing through
the Tubing Access Ports on the sides of the Baby Pod 20 do not become trapped under the Viewing Lid. Gently
slide the front lid section forwards towards the Head of Baby Pod 20, and relocate on the lid locking mechanism,
checking that the mechanism is securely closed and that the lid cannot slide backwards of its own accord.
DO NOT transport a baby without verifying the security of the Viewing Lid.
Re-check the security of the Stretcher Fixing Straps before transporting baby. If straps have become loose, tighten
by grasping the webbing and pulling away from the slider buckles.
Re-check the security of Baby Pod 20’s closure to ensure patient safety.
Section 6.8 - Monitoring baby inside Baby Pod 20
Monitor baby visually while using Baby Pod 20.
Check baby’s skin occasionally for redness or irritation while TransWarmer Infant Transport Mattress is in use.
Monitor infant’s temperature while TransWarmer Infant Transport Mattress is in use.
To minimise heat loss during transport, leave patient access port in Viewing Lid in the closed position during
transport unless the baby requires active care.
Section 6.9- Removing baby from Baby Pod 20
To remove baby from Baby Pod 20, release the black lid lock mechanism at the Head end of Baby Pod 20 and
gently slide the front section of the viewing lid towards the back of the device. When the lid is fully retracted and
cannot slide any further, carefully lift the entire viewing area upwards and over the back of the device, using two
hands at all times, until it rests on the surface on which the device is placed, being careful not to bump the viewing
lid on any surrounding objects.
Remove Infant Positioning Strap from across the baby’s torso, being careful not to disturb any ventilator or IV
tubing.
Open the Vacuum Mattress vacuum valve by pressing the two valve sections together. The click indicates proper
engagement. The mattress should ll with air and become soft and moldable.
Carefully lift the baby from Baby Pod 20, making sure that any ventilator or IV tubing clears the patient
compartment.
Section 6.7 - Closing Baby Pod 20 with baby enclosed
Warning
Patients may be harmed by the incorrect use of this device.
Warning
Patients may be harmed by the incorrect use of this device.

18 © 2017 • Advanced Healthcare Technology Ltd. • Baby Pod 20 ®
Abrasive, harsh or non water-based cleansers may damage Baby Pod 20’s carbon ber Outer Shell. USE ONLY mild
water-based, non-abrasive cleansers and a soft, absorbent cloth to clean the Outer Shell. Dry Baby Pod 20 with a
soft, absorbent cloth.
Clean Baby Pod 20’s internal component using only mild water-based cleansers in accordance with hospital
protocol.
Section 8 - Maintenance of Baby Pod 20
Follow cleaning instructions in Section 7 for general care of Baby Pod 20. Special care is needed for both the
carbon ber Outer Shell and the Vacuum Mattress as noted below:
• Outer Shell
Baby Pod 20 should be inspected at regular intervals for signs of damage to its carbon ber Outer Shell (see
Section 5.2 for step-by-step instructions). For best results, remove Infant Positioning Straps, Vacuum Mattress and
Shock Absorbent Foam and carefully inspect the inner surface of the carbon ber shell for signs of stress, including
cracks, pockmarks or irregularities.
Discontinue use of Baby Pod 20 if signs of damage are present.
Baby Pod 20’s Outer surface does not aect the integrity of the carbon ber shell. Chips or scraches to Baby Pod
20’s nished outser surface due to normal wear and tear do not aect the performance of the unit. Even with
normal use, Baby Pod 20 may eventually need to be refurbished. Contact our Customer Service Department for
further information on refurbishment of Baby Pod 20.
Inspect Baby Pod 20’s Outer Shell for cracks and abrasions. First, inspect the inner carbon ber surface of Baby Pod
20’s Outer Shell.
Note: Smoothness is not a requirement. Natural irregularities in texture due to the manufacturing process are
normal.
Note: Cracks in the carbon ber Outer Shell may not be apparent by visual inspection of the outer surface. Always
check the inside surface of the Outer Shell for accurate visual assessment.
DO NOT use any component that does not pass visual inspection.
Inspect the integrity of the carbon ber rods inside Baby Pod 20’s Outer Shell. Check the security of the attached
Infant Positioning Straps before re-inserting the Shock Absorbent Foam interior panels. Infant positioning straps
should be connected at an angle so that straps secure in a cross-wise “X” fashion over the baby’s torso.
Protect Baby Pod 20 from the impact of sharp or hard objects that may cause internal damage that is not visible on
the surface of the unit.
Section 7 - Cleaning Baby Pod 20
Caution
Baby Pod 20 should be thoroughly cleaned and inspected after each patient use.
See Section 5 for Step-by-step Safety Inspection Instructions
Warning
Each set of Infant Positioning Straps are SINGLE PATIENT USE ONLY
Section 7 and 8
Maintenance and Storage of Baby Pod 20

19© 2017 • Advanced Healthcare Technology Ltd. • Baby Pod 20 ®
Under NO circumstances should modications or additions be made to Baby Pod 20.
Clean Baby Pod 20’s Outer Shell with only a soft, absorbent cloth or wipe.
• Vacuum Mattress
Baby Pod 20’s Vacuum Mattress is constructed of a soft foil material which can be easily damaged by sharp objects.
Keep all sharp objects away from the Vacuum Mattress to protect its internal components.
Test the Vacuum Mattress between each patient use. See Section 5.2 for step-by-step safety inspection instructions
and Section 5.4 for testing procedures.
Note: Only genuine Baby Pod 20 parts and accessories should be used to replace any components or accessories.
For replacement or additional parts, contact our customer service department at:
Section 9 - Storage of Baby Pod 20
Baby Pod 20 should be stored in its protective storage bag when not in use. To minimise component material
breakdown, Baby Pod 20 should be stored in a temperature-controlled environment between 18 degrees and 24
degrees Celcius.
Section 8 - Maintenance of Baby Pod 20 cont...
Section 8
Maintenance and storage of Baby Pod 20 cont...

20 © 2017 • Advanced Healthcare Technology Ltd. • Baby Pod 20 ®
Section 10
Troubleshooting
Section 10 - Troubleshooting
Basic troubleshooting for Baby Pod 20 appears below. If there are questions or concerns not addressed below, take
Baby Pod 20 out of service and contact our Customer Service Department.
Problem
Baby too cold
Baby too cold
Baby too hot
Visual damage
to Baby Pod 20
Outer Shell
Buckle not fully
engaged
Baby not secure
within patient
compartment
Baby not secure
within patient
compartment
Lid opens during
transport
Possible cause
Disposable warmer mat-
tress not in use
Disposable warmer mat-
tress used in excess of two
hours
Baby Pod 20 used outside
prescribed environmental
conditions
Damaged due to sharp
objects or blunt force
Inadequate connection
Vacuum Mattress not cor-
rectly suctioned
Infant Positioning Straps
not properly secured
Baby Pod 20 Viewing Lid
not properly secured
Correction
Activate TransWarmer Mattress before placing baby
in Baby Pod 20.
Activate new TransWarmer Mattress after two hours
of transport.
DO NOT use the TransWarmer Mattress in ambient
temperatured greater than 28.0 degrees Celcius.
Inspect inside of carbon ber Outer Shell for cracks;
replace if necessary.
Listen for audible click to engage fully.
Suction air from Vacuum Mattress with baby in
place.
Secure Infant Positioning Straps
Check that viewing lid securing latch is properly
engaged.
Section
6.3
6.3
6.3
8
6.1
6.6
6.6
6.7
This manual suits for next models
1
Table of contents
Other AHT Medical Equipment manuals
Popular Medical Equipment manuals by other brands

Argus
Argus Green Stream VO-P ARGUS 414 Service manual

Siem Nova
Siem Nova 6110-A1 MAX User and maintenance manual

B. Braun
B. Braun Aesculap 009442 Instructions for use/Technical description

Nu-Tek
Nu-Tek UT1032 instruction manual

B-K Medical
B-K Medical Falcon Premium 2101EXL Extended user guide

Care Fusion
Care Fusion Snowden-Pencer manual