Aim Solo 2 DL User manual

Solo 2 DL GPS Lap Timer
USER GUIDE 1.00
www.aim-sportline.com
Made in Italy
MANUALE SOLO 2DL .qxp_Layou 1 13/04/18 16:20 Pagina 1

1 Solo 2 DL in a few words
2 What is in the kit?
3 Installation, powering and accessories
4 What is multiple configurations feature?
5 At power on
6 What you can do via key oard
6.1 Type of racing
6.2 Track management
6.2.1 Creating a track with Solo 2
6.3 acklight
6.4 WiFi
6.5 System settings
6.5.1 Configurations
6.5.2 Unit of measure
6.5.3 Date Time
6.5.4 Language
6.5.5 System info
7 Solo 2 DL and the PC
7.1 Connection to the PC
7.1.1 WiFi configuration
7.1.2 Configuring Solo 2 DL as an access point AP
7.1.3 Adding Solo 2 DL to an existing network
7.1.4 WiFi network settings
7.1.5 The Internet connectivity
7.1.6 Connection issues
7.1.7 Working on MacTM with virtualized WindowsTM
7.1.8 Connected device visualization issues
Solo 2 DL GPS Lap Timer
02
04
06
07
12
13
14
16
17
18
18
19
19
20
20
21
21
22
22
23
25
28
30
32
32
33
36
37
38
39
40
41
42
44
46
47
48
53
54
55
55
56
57
57
58
59
60
62
63
63
63
66
68
01
7.2 Configuration of Solo 2 DL
7.2.1 Channels configuration
7.2.2 ECU Connection and configuration
7.2.3 LCUOne CAN setting
7.2.4 Parameters settings
7.2.5 Led ars setting
7.2.6 Display settings
7.2.7 SmartyCam stream setting
7.3 Transmitting multiple configurations
7.4 Managing a track on Solo 2 DL with Race Studio 3
7.5 ECU Driver builder
7.6 The device window
8 On the track
8.1 Track page
8.2 Other pages
9 Data recall
9.1 Data recall “Speed” mode
9.2 Data recall “Performance” mode
10 Data download
11 Data Analysis
12 New firmware upgrade
13 RPM
13.1 RPM from ECU
13.2 RPM via a 550V square wave or coil 150400V
14 Connection with SmartyCam and LCUOne
15 Technical specifications and drawings
MANUALE SOLO 2DL .qxp_Layou 1 13/04/18 16:20 Pagina 3

What is Solo 2 DL?
Solo 2 DL is the new AiM GPS
log-timer (laptimer with internal data
logger) that combines small dimensions,
usability and logging capability.
Why Solo 2 DL?
ecause it features:
n ECU connection
n up to 8 configurable display pages
in addition to all Solo 2 DL features,
to say:
n integrated GPS + Glonass receiver
n a huge tracks database that
Solo 2 DL manages to automatically
select the track where you are racing
n a powerful and comfortable Wi-Fi
connection
n different type of races: speed and
performance
n 10 RG LEDs that clearly show if you
are improving or not
n a huge amount of internal memory
(four gigabytes) capable of
recording a lot of tests
1. Solo 2 DL in a few words
02 03
CHAPTER 1 SOLO 2 DL
What about ECU connection?
Solo 2 DL manages all the hardware
ECU connections as well as all the
communication lines: CAN, K-Line,
RS232. Its huge database includes
more than 1500 protocols you can
load in your Solo 2 DL.
If the vehicle does not have
an ECU?
In case your vehicle does not have an
ECU, you can anyway connect
Solo 2 DL to an RPM wave to
synchronize RPM to the position on
the track thanks to the RPM power
cable.
Anything else?
Of course yes.
An app for iPhone is coming! In a few
weeks you will be able to analyse
essential data on your iPhone;
furthermore, you will be able to see in
real time all the values Solo 2 DL
samples, upgrade its firmware, create
new tracks as well as update your da-
tabase and modify Wi-Fi settings.
MANUALE SOLO 2DL .qxp_Layou 1 13/04/18 16:20 Pagina 5

04
CHAPTER 2 SOLO 2 DL
Solo 2 DL kit includes:
1- Solo 2 DL
2- Solo 2 cable to choose among:
CAN/K-Line/External power cable with
O DII connector
CAN/RS232 external power cable
RPM/External power cable
(if your vehicle has no ECU)
3 - Solo 2 DL battery charger, available in
four versions with Australian, UK, USA
and European adaptor
4 - Solo 2 DL mounting bracket with screws
Solo 2 DL user manual
Race Studio 3 software installation CD
AiM sticker and AiM 2018 Racing Guide
2. What is in the kit?
1
2
2
2
4
3
MANUALE SOLO 2DL .qxp_Layou 1 13/04/18 16:20 Pagina 7

CHAPTER 3
06 07
CHAPTER 4 SOLO 2 DL
Thanks to its small dimensions and to the different accessories available for installation
Solo 2 DL can be installed on almost any kind of motorsport vehicle.
Solo 2 DL is powered by the vehicle battery and its switches off with the vehicle engine.
AiM provides different installation accessories, to say:
n support for roll-bar:
X46KSTG00
n support for generic tube:
X46KSTP00
n support for suction cup:
X46KSVS00
3. Installation, powering and accessories 4. What is multiple configurations feature?
Solo 2 DL can receive up to 10 configurations, allowing you to select the one you
need in each situation. This is also very helpful for a team manager, that can customize
the configuration(s) for each racer.
Multiple configurations can be transmitted to Solo 2 DL and selected using Solo 2 DL
keyboard as explained in the related paragraphs.
MANUALE SOLO 2DL .qxp_Layou 1 13/04/18 16:20 Pagina 9

CHAPTER 3
08 09
Solo 2 DL
SOLO 2 DL
ylon body
Integrated GPS
RGB predictive lights Power and battery charge
Wide display Magnets
MANUALE SOLO 2DL .qxp_Layou 1 13/04/18 16:20 Pagina 11

10 11
MANUALE SOLO 2DL .qxp_Layou 1 13/04/18 16:20 Pagina 13

5. At power O 6. What you can do via keyboard
When switched on Solo 2 DL shows satellite page.
To optimize the display management, the keyboards disappears when not necessary.
Please simply press one of the pushbuttons for making it show up again.
Solo 2 DL is mainly configurable using Race Studio 3 software but some functions
are settable via keyboard as explained here below.
Press “MENU” and this page shows up.
The icons are to manage:
CHAPTER 5 CHAPTER 6
12 13
SOLO 2 DL
System
settings
Wi-FiacklightType
of racing
Tracks
Management
MANUALE SOLO 2DL .qxp_Layou 1 13/04/18 16:20 Pagina 15

CHAPTER 6
14 15
SOLO 2 DL
Solo 2 DL features two different type of races, each of them with different options:
n speed (left image below)
n performance (right image below)
Speed racing
Solo 2 DL automatically selects the track in which you are performing. After having
found the proper track, it may calculate and show:
n the lap times
n the predictive lap time: the time at the end of the current lap computed looking
at the actual speed, compared with a reference lap; the predictive lap time may
be shown as an A solute Time (i.e. 1:34:45) or as a Gap (i.e. +/- 0.25 sec) between
the actual lap and a reference lap. The reference lap may be:
n the best lap of the test or
n the best lap of the day
“Memo trigger” ” option allows you to decide when your Solo 2 DL starts recording.
Available options are:
n RPM or Speed values: Solo 2 DL starts recording when one of the
following condition is first met: RPM higher than 500 or speed higher
than 10 km/h
n Speed value: Solo 2 DL starts recording when speed is higher than 10 km/h
Performance racing:
This racing mode shows you different performance options according to the measure
unit you set in “System settings” –> “Unit of measure” menu:
n using imperial unit of measure (mph) the available performance options are:
- 0 - 60 mph
- 60 - 0 mph
- 1/8 miles
- 1/4 miles
n using decimal unit of measure (km/h) the available options are:
- 0 -100 km/h
- 0 -160 km/h
- 100 m
- 150 m
- 400 m
- 1000 m
6.1 Type of racing
MANUALE SOLO 2DL .qxp_Layou 1 13/04/18 16:20 Pagina 17

CHAPTER 6 SOLO 2 DL
Solo 2 DL built in GPS receiver is used for:
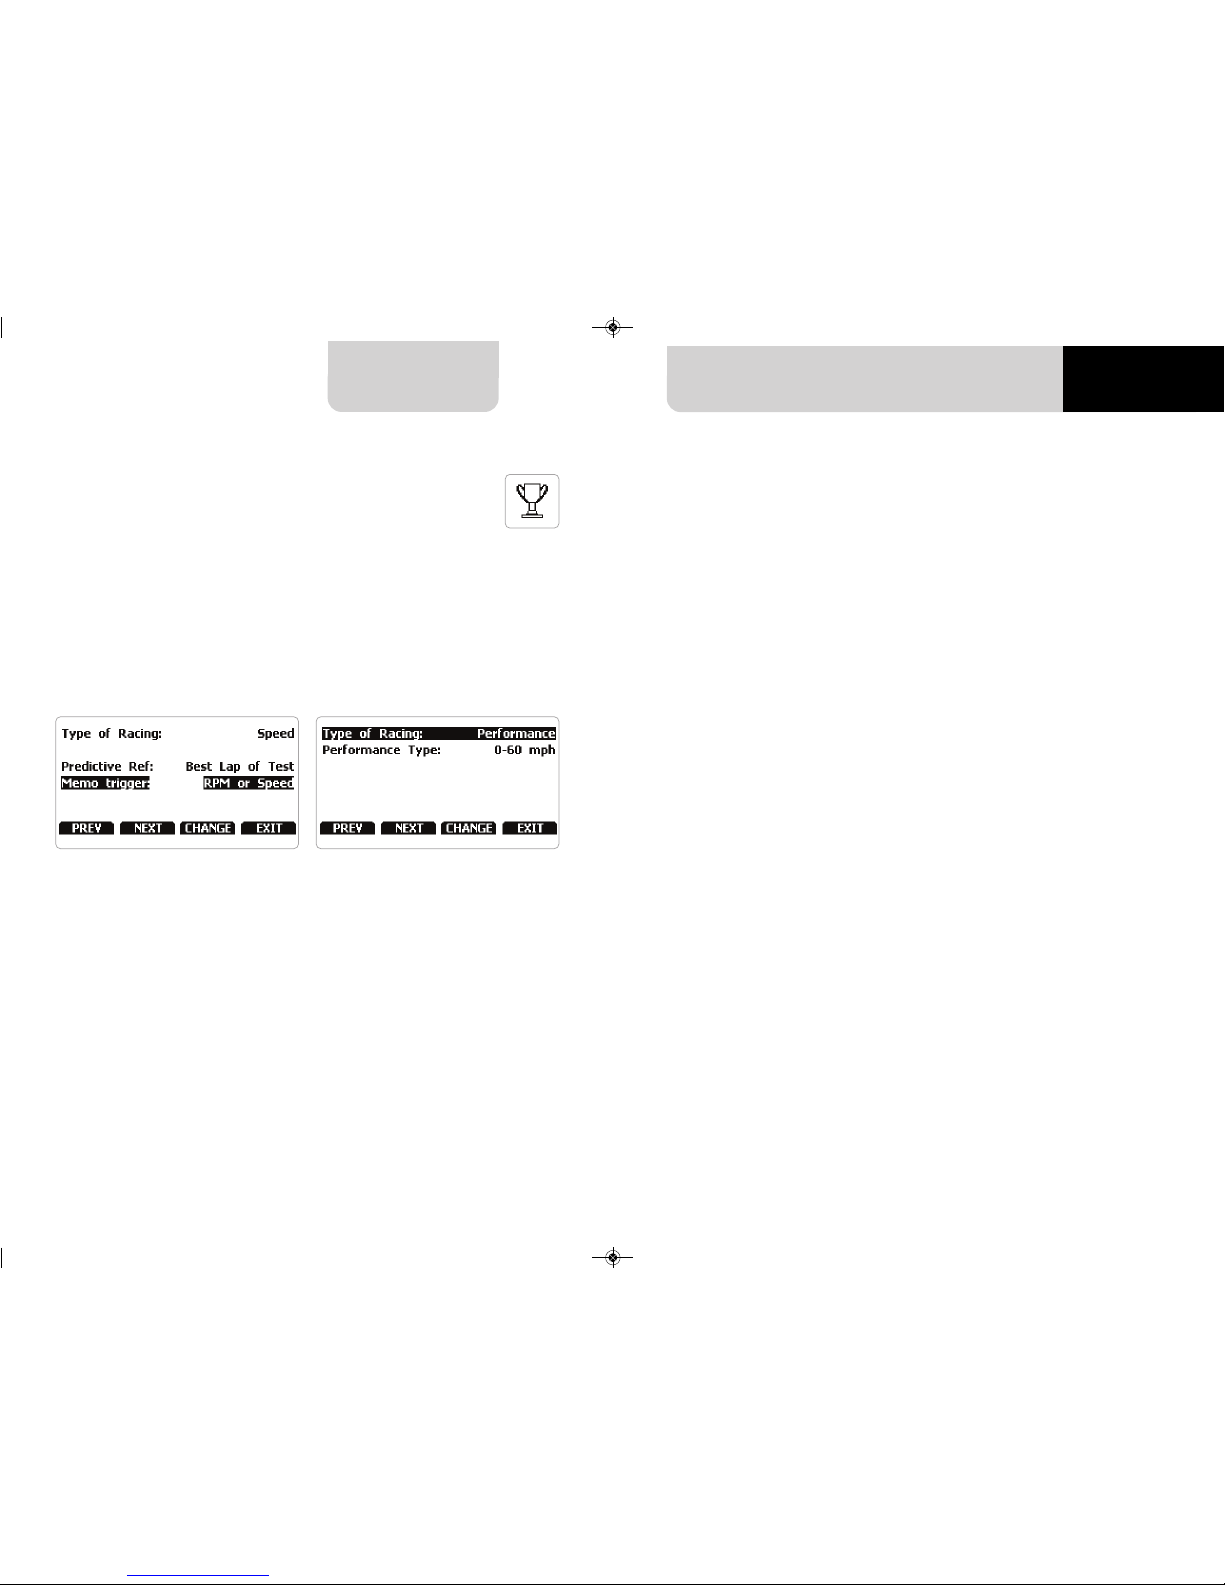
n Lap time calculation
n Speed calculation
n Predictive lap time calculation
n Position on the track in Analysis.
To calculate these data the system needs to know the Start/Finish line coordinates.
Solo 2 DL comes with a long list of the world main tracks, list that is constantly
updated by our technicians and is downloaded on your PC when you run our Analysis
software and an Internet connection is available.
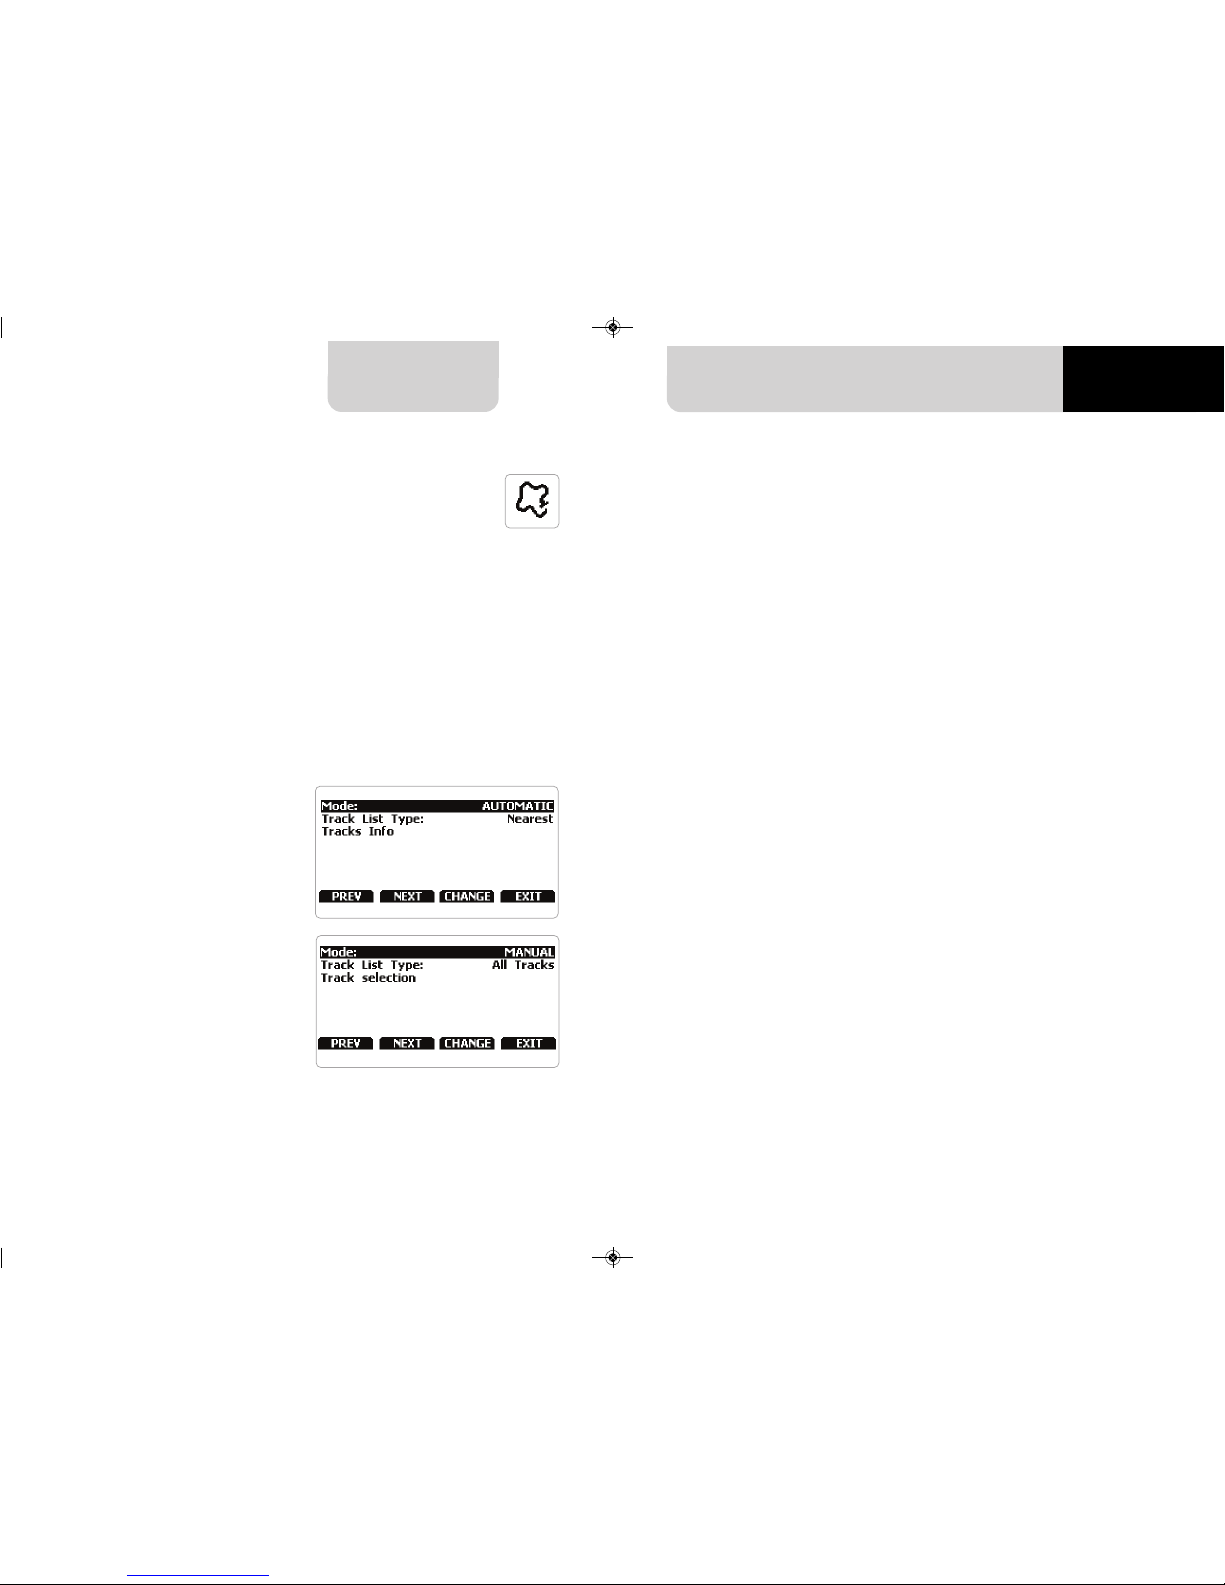
Solo 2 DL provides two track selection modes: automatic and manual.
Automatic:
The system automatically recognizes the
track you are running on, loads
start/finish line and calculates lap times.
This is the best mode in most cases.
Manual:
allows you to manually select the track
from the internal database.
This mode is to be preferred when
multiple track configurations are availa-
ble nearby. In this case Solo 2 DL would
anyway recognize the track but would
need at least one complete track lap.
To be ready from the first lap manual
mode would be helpful.
6.2 Track management
If you are running in a track NOT included in Solo 2 DL database the device switches
to “learning” mode and behave this way:
n it starts sampling all track points
n when detects that it is crossing the same points for the second time it realizes that
the track is closed and sets a temporary start/finish line showing lap time each time
it crosses that point;
n at the end of the session the system shows the track map with start/finish line: you
can move start/finish line using Solo 2 DL bottom buttons;
n you can add this new map to Solo 2 DL database, modify start/finish line
coordinates, name the track and transmit it to the PC at first PC-Solo 2 DL
connection
You find a deeper explanation of track management with Race Studio 3 in the related
chapter and a “Track manager” user manual is available in documentation area,
firmware/software of www.aim-sportline.com.
6.2.1 Creating a track with Solo 2 DL
oth track modes provide three
track list type:
n nearest: shows only tracks in a 10 km distance with max 50 tracks shown
n all tracks: shows all tracks stored in the system in alphabetical order
n custom: shows only the tracks you have previously created (learning mode)
16 17
MANUALE SOLO 2DL .qxp_Layou 1 13/04/18 16:20 Pagina 19

CHAPTER 6
18 19
SOLO 2 DL
6.3 Backlight
Selecting this icon you enter this page:
n The system asks for confirmation:
press ”YES”
In case you transmitted multiple configurations (max allowed number of configura-
tion is 10 – see the related paragraph) this page shows the one currently in use. To
change it:
n press “CHANGE”
n use “PREV” and “NEXT” button to select the configuration to set and press “EXIT”
You can set Solo 2 DL backlight as “ON” (default setting) or “OFF” as well as choose
among eight different colours: white, purple, red, green, yellow, blue, magenta and
cyan.
6.5 System settings
6.5.1 Configurations
6.4 Wi-Fi
Here you can manage Wi-Fi as well as reset its configuration. Wi-Fi modes are:
n ON
n Auto: switches Wi-Fi on when the vehicle is stopped and automatically switches
it off when Solo 2 DL starts recording (according to “Memo” trigger setting)
n OFF
“Wi-Fi Reset CFG” allows you to reset Wi-Fi configuration and is very useful if you do
not remember Wi-Fi password.
MANUALE SOLO 2DL .qxp_Layou 1 13/04/18 16:20 Pagina 21

SOLO 2 DL
20 21
CHAPTER 6
Here you can set the time zone of your Solo 2 DL as well as enable/disable “Daylight
Saving time” option. Time zone is always set manually. Date and time can be shown
in different format.
Time is automatically synchronized as Solo 2 DL receives the GPS signal.
You can set Solo 2 DL language. Default setting is English.
At present available languages are (in this order):
n English
n Italian
n German
n Spanish
n French
n Dutch
n Danish
n Portuguese
n Japanese
n Czech
6.5.3 Date Time
6.5.4 Language
This page shows serial number as well as firmware and boot version of your Solo 2 DL.
6.5.5 System info
You can set the measure unit of:
n speed: km/h or mph: please remember that the measure unit you set here will
make you see different options in “Type of Race” menu if selecting “Performance”
type (refer to the related paragraph for further information)
n temperature: Celsius/Fahrenheit
n pressure: bar/PSI
6.5.2 – Unit of measure
MANUALE SOLO 2DL .qxp_Layou 1 13/04/18 16:20 Pagina 23

CHAPTER 7
22 23
SOLO 2 DL
Using AiM Race Studio 3 software you can configure Solo 2 DL, manage its tracks as
well as check other device functions using the device window.
7. Solo 2 DL and the PC
7.1 Connection to the PC
Solo 2 DL can be connected to the PC
only via Wi-Fi. To do it:
n check that Solo 2 DL Wi-Fi is set
on “AUTO” or on “ON”
n read your Solo 2 DL name
– mid of Solo 2 DL home page
bottom line – or look for it in
“System Information” page.
n click Race Studio 3 Wi-Fi icon and
select your Solo 2 DL.
7.1.1 Wi-Fi configuration
Solo 2 DL configuration can be made only using Race Studio 3 software. Two possible
Wi-Fi modes are available.
1 – As an Access Point (AP – default)
This is the ideal configuration if you have one only device and one only computer.
In this situation your Solo 2 DL creates a Wi-Fi network and works as an Access Point
you can connect your PC to.
MANUALE SOLO 2DL .qxp_Layou 1 13/04/18 16:20 Pagina 25

CHAPTER 7
24 25
SOLO 2 DL
When working in WLAN mode Solo 2 DL has two available security levels:
n network authentication: network password
n device authentication: Solo 2 DL password
oth levels allow you to use different strategies. A PC in WLAN, for example, can see
several AiM devices but can communicate only with those he knows the password of.
If you forget the password you can reset Wi-Fi configuration from Solo 2 DL menu as
explained before.
2 – Existing network (to connect to an existing Wi-Fi network – WLA )
This mode is complex and implies an external access point (AP) but it is also more
flexible and powerful because allows you to communicate with more than one device
and with more than one computer in the same network. Solo 2 DL and the PC must
connect to an existing Wi-Fi network made by a device that works as an external ac-
cess point.
7.1.2 Configuring Solo 2 DL as an access point (AP)
This is Solo 2 DL default configuration and is the easiest and most direct connection
mode, ideal if you want to communicate with one Solo 2 DL using one PC. It is free
and so completely accessible by anyone. Please set an access password as soon as
possible.
To establish a Wi-Fi connection:
n ensure that the Wi-Fi is enabled
n read your Solo 2 DL Name
n run Race Studio 3
n click Wi-Fi icon and select your
device
n in a few seconds the connection
is established
MANUALE SOLO 2DL .qxp_Layou 1 13/04/18 16:20 Pagina 27

CHAPTER 7
26 27
SOLO 2 DL
To set other parameters create a unique password to protect your device/your
network.
With a password the communication is safe and encrypted using WPA2-PSK
standard.
Characters allowed in the password are all letters, also capital, all digits and these
characters: ‘+-_()[]{}$£!?^#@*\\\”=~.:;/%"
“Space” type can be used if it is not the first one because this could cause
incomprehension in some WindowsTM versions.
This AP or SSID name is unique for your device.
An example of name is:” AiM-Solo2DL-00103” where:
n “AiM” is the prefix of all AiM devices
n“Solo 2DL” is the device identifier
n “00103” is your device serial number assigned by the factory.
To make your device more recognizable you can add a name to the SSID. The limit is
of eight characters. Allowed characters are all letters, capital too, all digits and these
characters: ‘+ - _ () [] {}!.
“Space” type can be used provided that it is not the first one because it can cause in-
comprehension in some WindowsTM versions.
If, for example you add the driver’s name, Tom Wolf, the network name (SSID) becomes:
”AiM-Solo2DL-00103-TomWolf”
Once all parameters set click “Transmit”. Solo 2 DL reboots and is configured with the
new parameters. If Solo 2 DL is protected by a password, as recommended, Race
Studio 3 will ask that password to authenticate.
Please Note: the same Wi-Fi connection can be created with the operative system tool.
Once the device has been authenticated in the Wi-Fi network you can communicate
with it using Race Studio 3.
MANUALE SOLO 2DL .qxp_Layou 1 13/04/18 16:20 Pagina 29

CHAPTER 7
28 29
SOLO 2 DL
This situation is ideal for a team with multiple drivers and staff members and is desired
to communicate with one or more AiM devices using the same PC network.
Each Solo 2 DL can have its password that adds another security and privacy level to the
network.
Race Studio 3 will show all Solo 2 DL connected to the same network under “
Connected devices” label, bottom left of the software page: click your device.
Enter “Wi-Fi and properties” tab and set it on “Existing Network”; fill in network name,
network password and device password. Transmit the network settings to your device
clicking “Transmit”: your device reboots and joins that network.
Please note: the only admitted password are those following WPA2-PSK standard.
To complete this procedure use Race Studio 3 software as here explained.
Here above you see a device “Solo2 DL-600103” that switched from AP to WLAN mode
(Existing Network).
Network name is “AiM” and does not work with free access because is protected by a
password.
7.1.3 Adding Solo 2 DL to an existing network To obtain connectivity on the device the PC has to be authenticated to the same
network as shown here below.
When the PC is authenticated to the network called “AiM” it can see all devices you
configured to access the same network. In the image below three AiM devices are
connected to the same “AiM” WLAN.
MANUALE SOLO 2DL .qxp_Layou 1 13/04/18 16:20 Pagina 31

CHAPTER 7
30 31
SOLO 2 DL
In this chapter you find a short description of how to configure a WLAN including
AiM devices and a PC.
Here below is an example of configuration.
For better network performances, we suggest the use of a network device equipped
with a DHCP server and using 3x3 MIMO technology like, for example a Linksys
AS3200.
To maximize the bandwidth, you should not allow the Internet on this WLAN; this
means the DHCP server should be configured without any DNS address nor gateway
by default.
7.1.4 Wi-Fi network settings The parameters for the device network configuration in this example are:
n Wireless network name: network_1
It means that the WLAN network name is “network_1.” A PC has to be authenticated
in this network to interact with any AiM device of this network.
n Gateway address: 192.168.0.1
primary DNS server: 0.0.0.0
secondary DNS server: 0.0.0.0
(These settings prevent Internet connectivity on this WLAN.)
n Subnet mask: 255.255.255.248
Enable DHCP server: yes
DHCP IP address range: 192.168.0.2 to 192.168.0.6
These settings enable a DHCP server running on this WLAN and provide an IP address
in a 2-6 range. This means that this network allows 5 network hosts.
The number of devices on a WLAN network depends on the subnet mask.
Here below you see typical examples of network masks and IP addresses range.
The configuration in bold is the one we suggest (if a greater number of devices is not
needed), being the one that makes it easier and quicker for Race Studio 3 the
identification of the devices in the network.
Subnet mask:
255.255.255.0
255.255.255.128
255.255.255.192
255.255.255.224
255.255.255.240
255.255.255.248
IP address range:
192.168.0.1 – 254
192.168.0.1 – 126
192.168.0.1 – 62
192.168.0.1 – 30
192.168.0.1 – 14
192.168.0.1 – 6
umber of devices:
254
126
62
30
14
6
MANUALE SOLO 2DL .qxp_Layou 1 13/04/18 16:20 Pagina 33

CHAPTER 7
32 33
SOLO 2 DL
For an optimal speed of your AiM device(s) we recommend not to allow the Internet
on the same network and to set the WLAN in the same way.
You can of course allow the Internet access on your network but this would degrade
the communication.
This slightly slower speed can be suitable for your needs but you can also have a se-
cond Wi-Fi connection using an additional hardware (NIC).
This configuration would provide an optimal speed of the data network of your AiM
device(s) and at the same time would provide an internet connectivity with the se-
cond NIC.
7.1.5 The Internet connectivity
It can occur that Solo 2 DL is correctly connected to Race Studio 3 via Wi-Fi but the
user interface does not show it.
This may be because Wi-Fi port setting is set with a static IP. To switch it to dynamic
(DHCP):
n open “Network and sharing centre” in the WindowsTM research engine
n right click on the Wi-Fi connection and a panel shows up
n select “Properties” option
n double click on “Internet Protocol version 4 (TCP/IPv4)”
n verify that option “Obtain an IP address” is active
For further information refer to FAQ section, Wi-Fi of www.aim-sportline.com.
7.1.6 Connection issues
7.1.7 Working on Mac™ with virtualized Windows™
Race Studio 3 only works on WindowsTM operative systems; Mac users can use a
virtualized WindowsTM machine.
The main problem is that the host OS (Mac) must share its Wi-Fi interface with the
virtualized operative system (Windows) as Ethernet interface and not as Wi-Fi
interface.
Configuring Parallels(™)
Select “Menu –> Configure…”
in Parallels.
Press “Hardware” – top on the page
that shows up – and select “Network”
in the drop-down menu on the left.
Right on the configuration panel set
"Type" field on “Wi-Fi”.
Then select the device you want to
communicate with.
MANUALE SOLO 2DL .qxp_Layou 1 13/04/18 16:20 Pagina 35

CHAPTER 7
34 35
SOLO 2 DL
To ensure that the communication
works select
“Open Network preferences”
menu.
Verify that the status in the window that shows up is “Connected”
and that the IP address associated is, for example, 10.0.0.10 (could be 10.0.0.11,
10.0.0.12, or generically 10.0.0.x).
To enable Race Studio 3 correctly working on a Mac with virtualized WindowsTM:
n press Wi-Fi icon
n select “Wi-Fi Settings” icon
n enable the checkbox shown here below.
MANUALE SOLO 2DL .qxp_Layou 1 13/04/18 16:20 Pagina 37

CHAPTER 7
36 37
SOLO 2 DL
7.1.8 Connected device visualization issues
It may occur that using Race Studio 3 on an iMac with virtualized Windows the device
connected via Wi-Fi takes some time to be shown in the network or is not shown at
all. This is why we always suggests using an Wi-Fi (WLAN) router.
This router work as an Access Point allowing more external devices to connect to its
network. Solo 2 DL Wi-Fi configuration is to be set on Existing Network as explained
before.
7.2 Configuration of Solo 2 DL
Once Solo 2 DL connected to the PC
n click “Configurations” icon and configurations page appears
n click “New” and new configuration panel appears: select “Solo 2-DL” and press “OK”.
MANUALE SOLO 2DL .qxp_Layou 1 13/04/18 16:20 Pagina 39
Table of contents
Other Aim Automobile Accessories manuals