manuals.online logo
Brands
  1. Home
  2. •
  3. Brands
  4. •
  5. SAFARI
  6. •
  7. Automobile Accessories
  8. •
  9. SAFARI SS662HF User manual

SAFARI SS662HF User manual

Copyright Safari 4x4 Engineering Pty Ltd Melbourne Victoria Australia – www.safari4x4.com.au
Page 1 of 8
SS662HF
SAFARI V-SPEC SNORKEL
MITSUBISHI MQ TRITON (Jan 2015 onwards)
2.4L Turbo Diesel (4N15 Engine)
05/02/2016
Parts List
ITEM
PART NO.
DESCRIPTION
QTY
1
530-133-000
BODY - SNORKEL (SS662HF)
1
2
000-135-800
3 ½" AIR RAM ASSEMBLY
1
3
530-032-000
BRACKET - UPPER MOUNTING
1
4
000-002-100
BOLT - HEX - 6mm x 1.0 x 14mm (SEMS)
2
5
000-951-300
SCREW - S/T - 4.2mm x 16mm - S/S
3
6
000-960
INSERT - PLASTIC
3
7
000-110
STUD - 8mm x 1.25 x 25mm - S/S
5
8
000-311-300
WASHER - BODY - 8mm x 30mm - S/S
5
9
000-205-300
NUT - NYLOC - 8mm x 1.25mm - S/S
5
10
530-023-000
ADAPTOR – AIR CLEANER INLET
1
11
000-958-450
POP RIVET - 4.8mm x 21mm
2
12
530-024-000
HOSE - AIR ENTRY
1
13
000-909
CLAMP - HOSE - 80/100mm
1
14
000-910
CLAMP - HOSE - 90/110mm
1
15
000-914/B
CLAMP - HOSE - SIZE 56 (BLACK)
1
16
530-017-000
TEMPLATE - GUARD PANEL
1
Copyright Safari 4x4 Engineering Pty Ltd Melbourne Victoria Australia – www.safari4x4.com.au
Page 2 of 8
SS662HF
SAFARI V-SPEC SNORKEL
MITSUBISHI MQ TRITON (Jan 2015 onwards)
2.4L Turbo Diesel (4N15 Engine)
Installation Guide
Fitment to:
 Right Hand Side
Fitting Time:
 150min
Special Tools:
 114mm Hole Saw
 Step Drill
 5.0mm & 6.0mm Drill Bits
 Pop Rivet Gun
 Sikaflex 227 Adhesive Sealant
 Loctite 243 (thread lock)
 Masking Tape
 Touch-up paint
Prior to commencing the installation, it is the installer's responsibility to verify that all
components and particularly the template (Item 16) are correct.
1
Remove the following in accordance with the factory service manual:
 Air Cleaner Assembly
 RHS Mud Flap
 RHS Guard Liner
2
Remove and discard
 Air Deflector
Remove and
discard
Copyright Safari 4x4 Engineering Pty Ltd Melbourne Victoria Australia – www.safari4x4.com.au
Page 3 of 8
3
Using a sharp knife remove and
discard the perforated section
from the guard panel template
(item 16) as shown.
4
Align the guard panel template
(Item 16) to the upper and rear
edges of the RHS guard panel as
shown.
Tape the template to the guard
panel with masking tape.
Mark all hole positions with a felt
tip pen.
Remove the template.
5
Drill a pilot hole for each of the
marked hole positions.
Use a 114mm diameter hole saw
to drill the snorkel body outlet
hole.
Use a step drill to drill the five
mounting holes to 16mm
diameter.
Deburr and paint all holes.
Hint: Place masking tape over
the join between the flare and
guard panel prior to drilling to
prevent any swarf from
entering the join.
Remove & Discard
Mark
Align
Align
Mark
Step Drill 16mm Dia
Drill 114mm Dia
Copyright Safari 4x4 Engineering Pty Ltd Melbourne Victoria Australia – www.safari4x4.com.au
Page 4 of 8
6
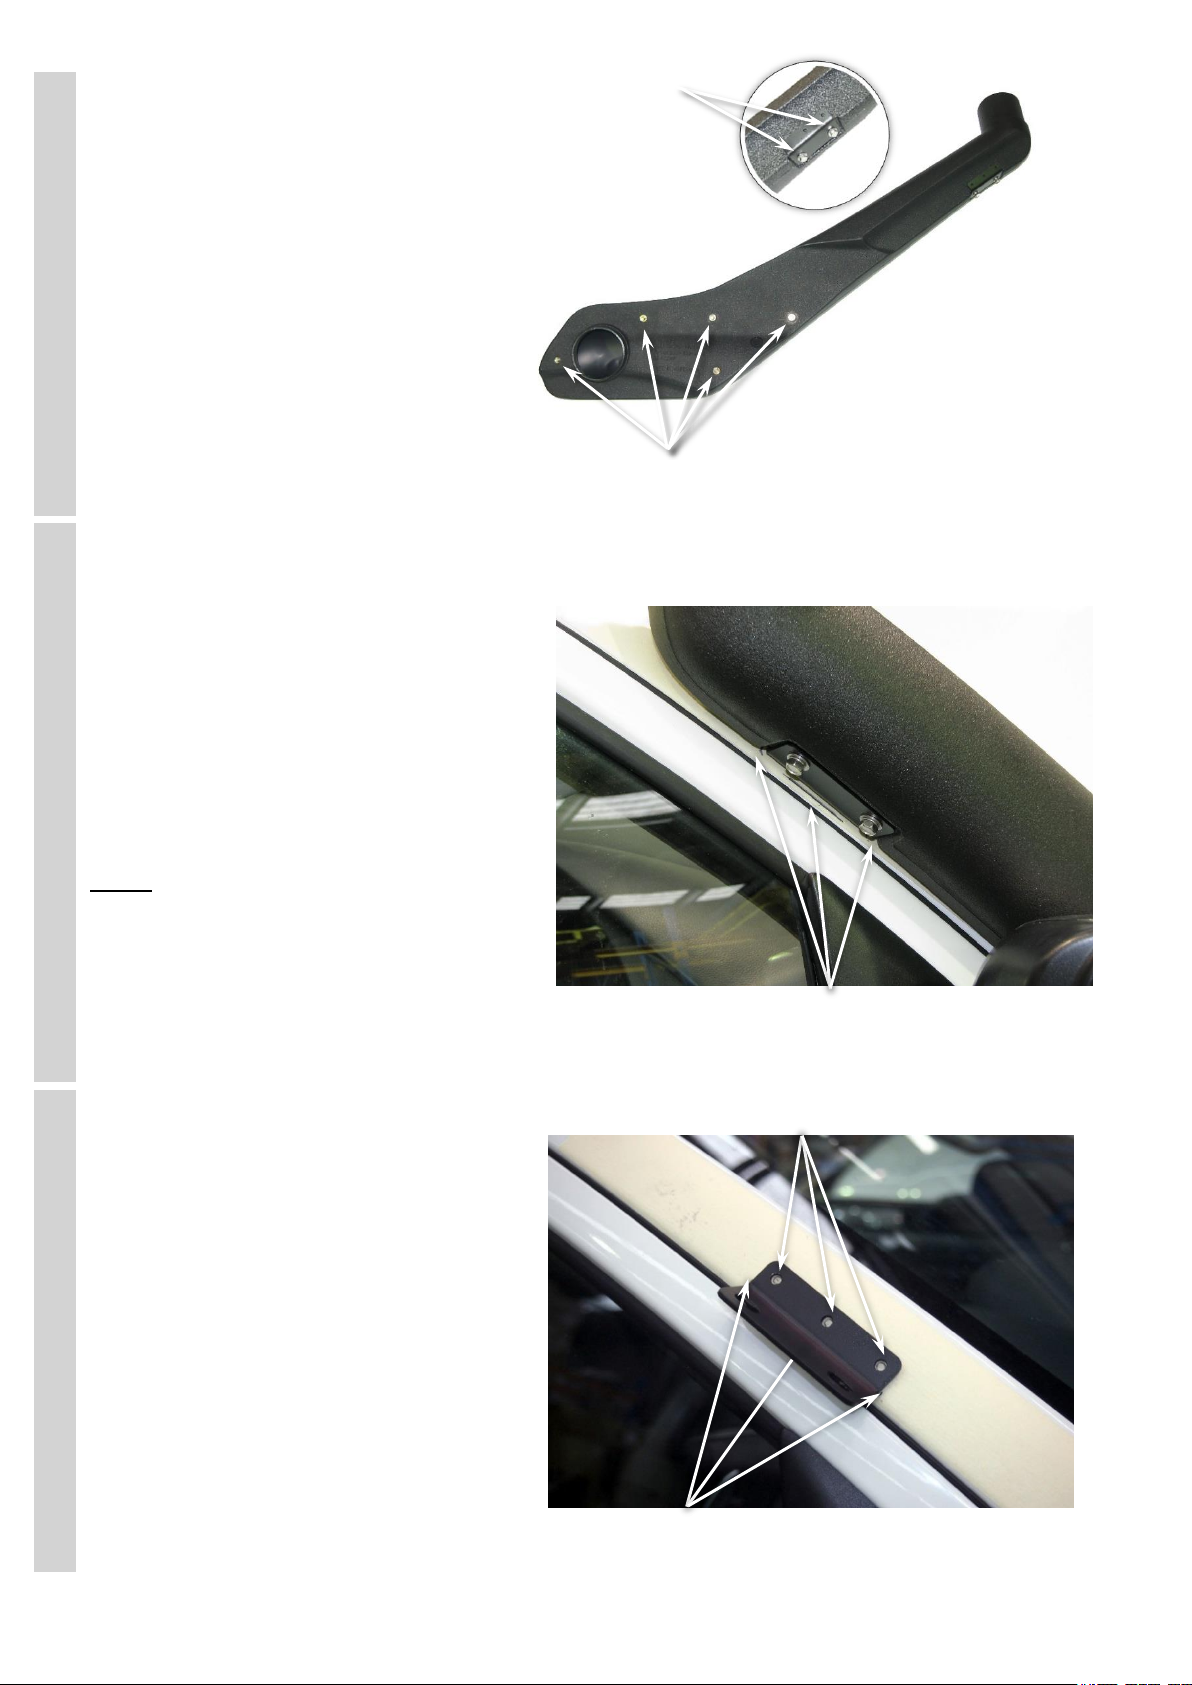
Install the upper mounting bracket
(Item 3) to the snorkel body (Item
1) with hex bolts (Item 4).
Apply Loctite 243 to each of the
stainless steel mounting studs
(Item 7) and install the studs
finger tight into the snorkel body
(Item 1) mounting inserts as
shown.
7
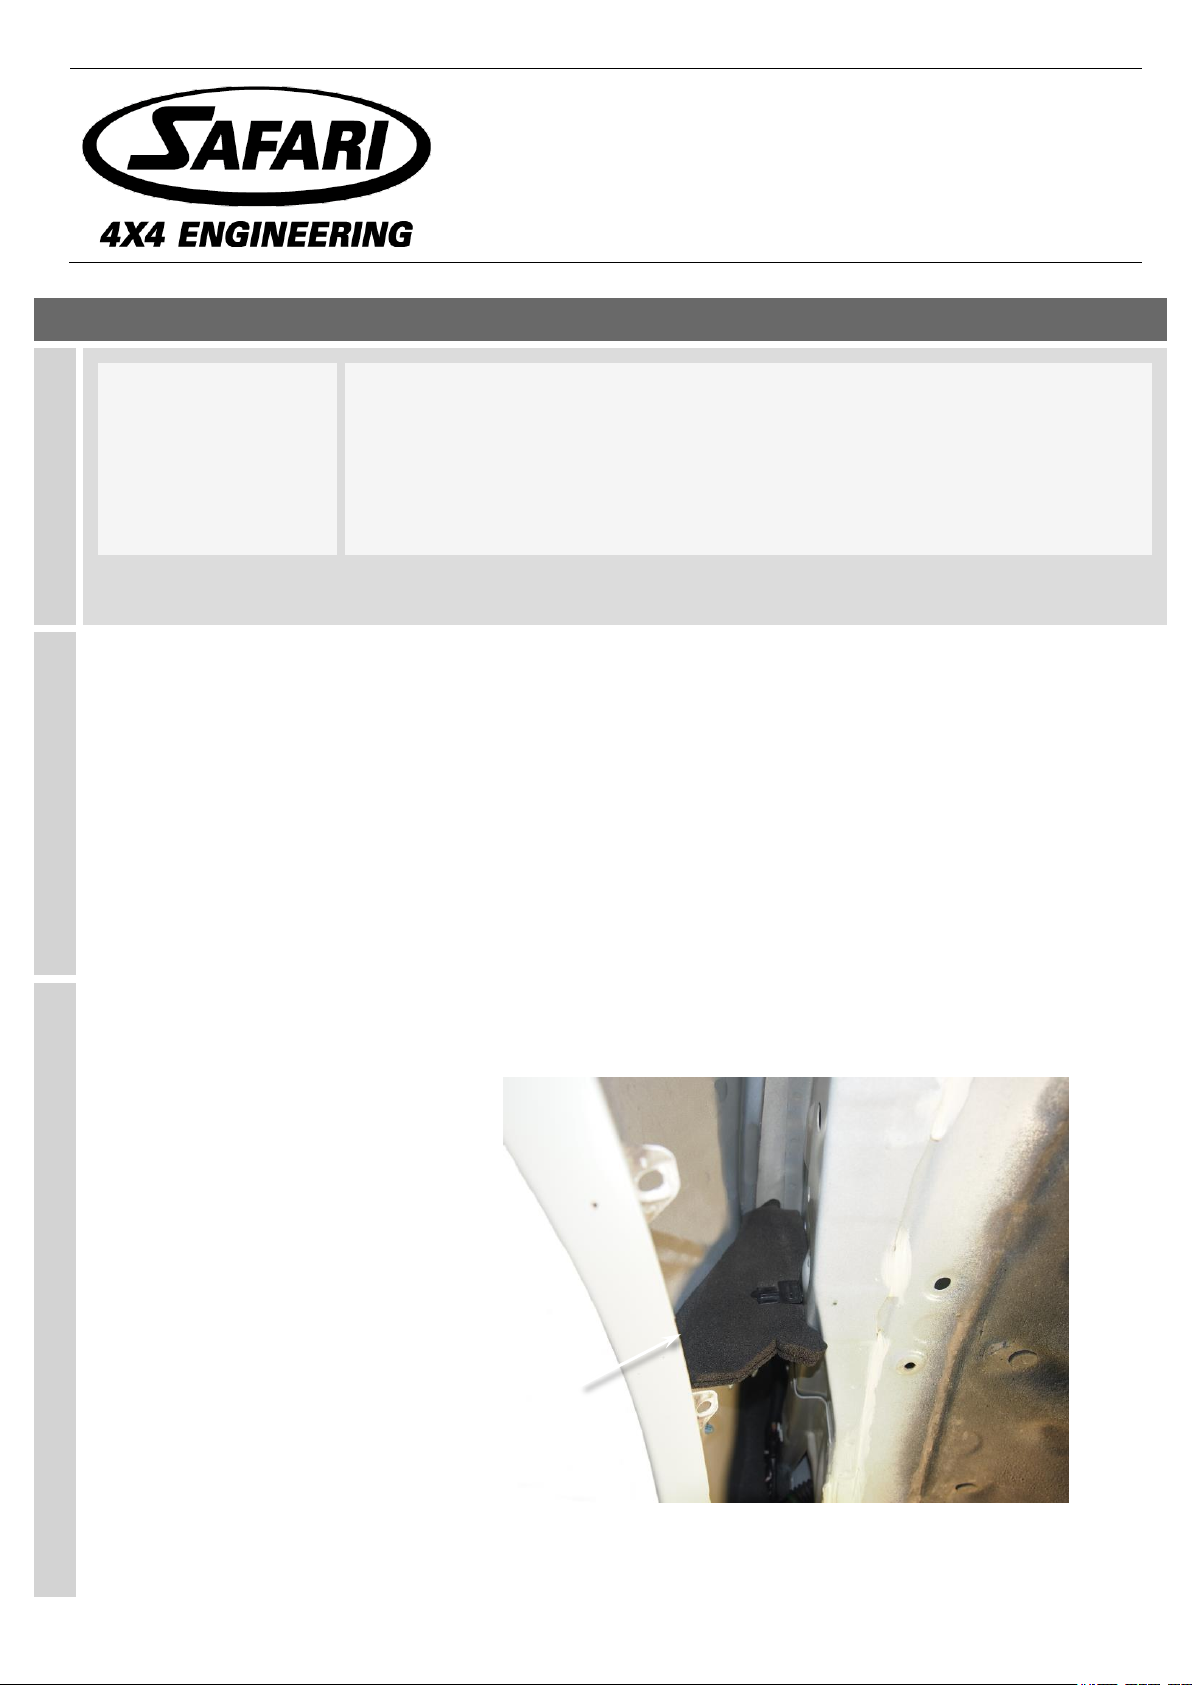
Place a strip of masking tape
along the A-pillar panel.
Carefully install the snorkel body
(Item 1) to the guard panel.
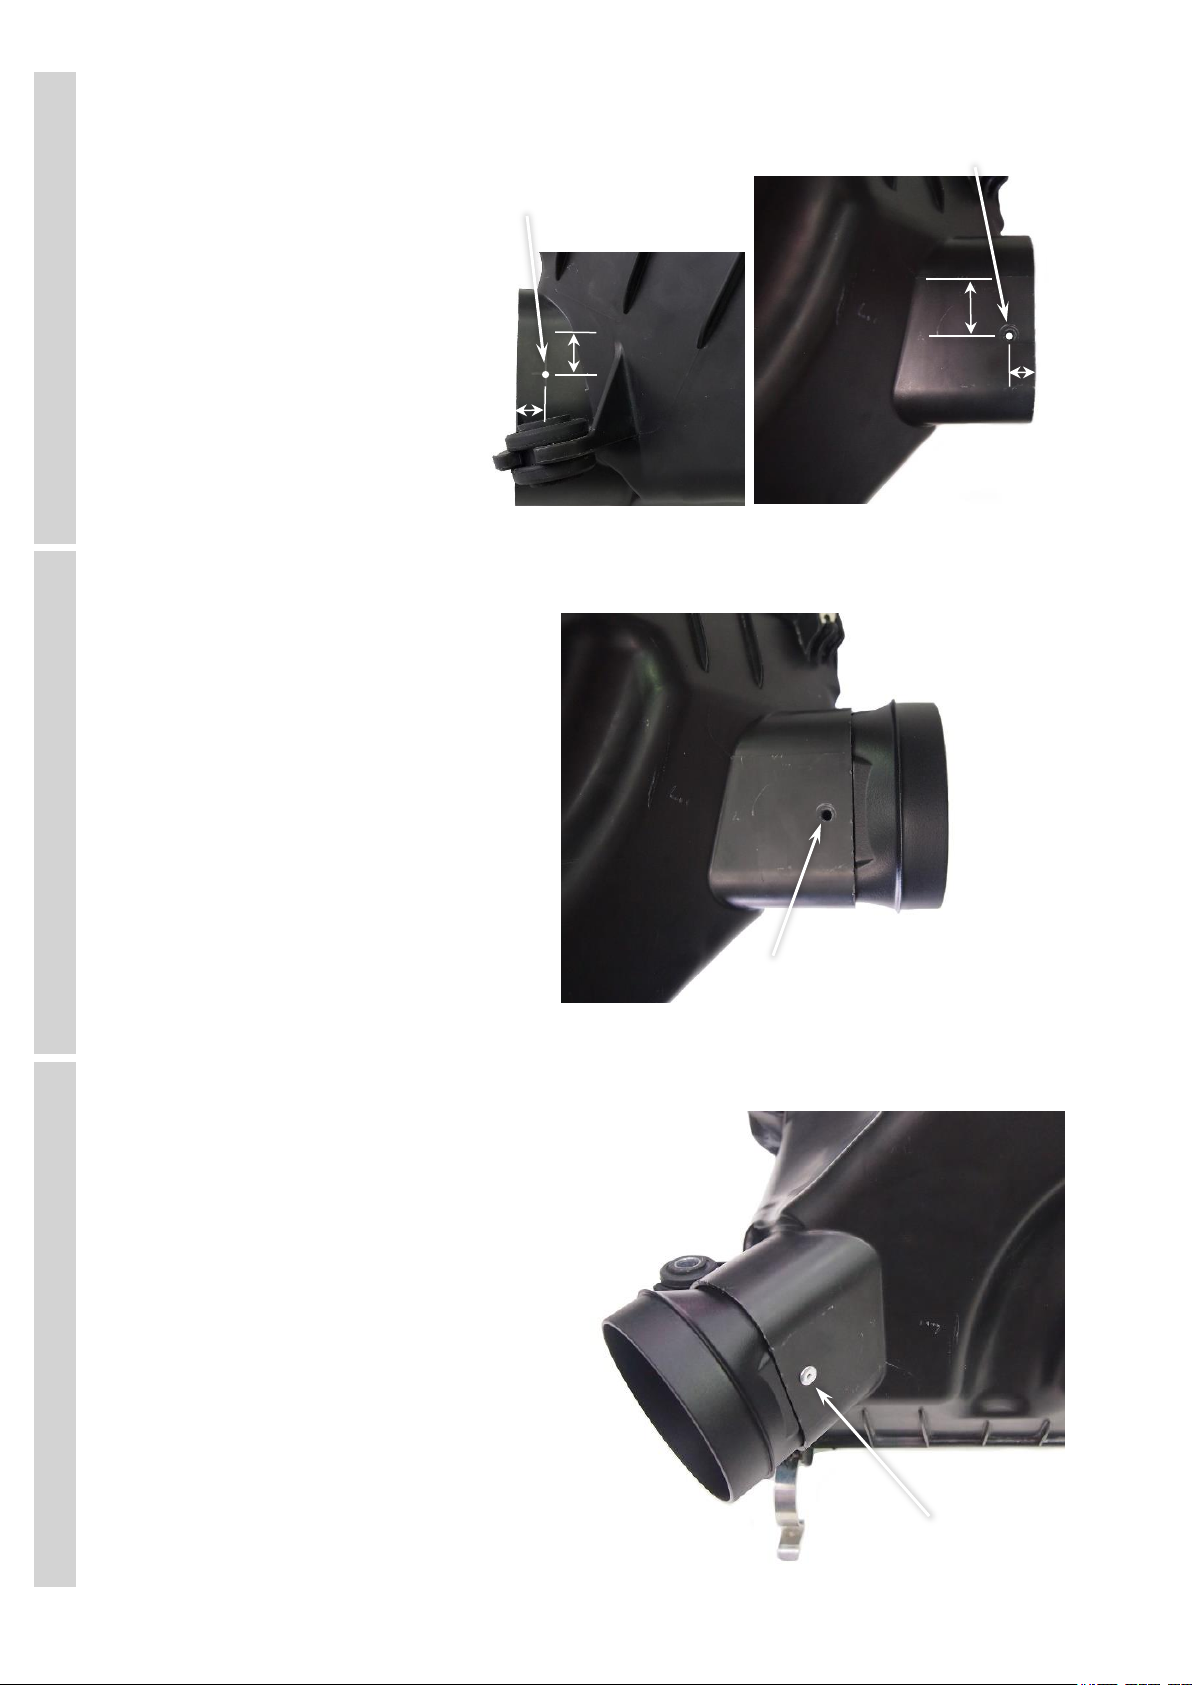
With the snorkel body correctly
positioned on the vehicle,
accurately mark the position of
the upper mounting bracket (Item
3) onto the masking tape.
Note: open/close the front door
and check the clearance
between the door rubber and
hex bolts (item 4). If necessary
raise the position of the snorkel
body on the A-pillar to achieve
adequate clearance.
8
Remove the snorkel body (Item
1) from the vehicle and remove
the upper mounting bracket
(Item 3) from the snorkel body.
Position the upper mounting
bracket (Item 3) onto the A-
pillar and align the bracket with
the marked bracket outline.
Mark the three mounting hole
positions with a felt tip pen.
Stainless Mounting Studs
Hex Bolts
Upper Mounting
Bracket
Mark
Mark
Align
Copyright Safari 4x4 Engineering Pty Ltd Melbourne Victoria Australia – www.safari4x4.com.au
Page 5 of 8
9
Drill a pilot hole at each of the
three marked positions, drilling
through both the A-pillar panel
and inner panel.
Drill both the A-pillar panel and
inner panel holes to 6mm.
Drill the three A-pillar panel
holes to 8mm diameter with a
step drill or 8mm drill bit.
Deburr and paint holes.
10
Install the plastic inserts (Item
6) into the 8mm diameter holes
in the A-pillar.
Secure the upper mounting
bracket (Item 3) to the A-pillar
with three self-tapping screws
(Item 5).
11
Remove and discard the air
intake duct from the air cleaner
base.
Remove
and discard
Drill A-pillar Panel 8mm, Inner Panel 6mm
Marked Hole Positions
Plastic Inserts
Upper Mounting Bracket
Self-Tapping Screws
Copyright Safari 4x4 Engineering Pty Ltd Melbourne Victoria Australia – www.safari4x4.com.au
Page 6 of 8
23mm
10mm
12
Measure and mark two hole
positions on the air cleaner
base inlet approximately 10mm
in from the air cleaner base
inlet and 23mm (long side) and
15mm (short side) down from
the radius of the inlet as shown.
Drill the two marked hole
positions using a 5.0mm drill
bit.
13
Install the air cleaner inlet
adaptor (item 10) into the air
cleaner base inlet, drill the two
5.0mm holes through the air
cleaner base and into the air
cleaner inlet adaptor.
Remove the adaptor and
deburr the holes.
14
Apply adhesive sealant to the
inside of the air cleaner base
inlet and the outside of the air
cleaner inlet adaptor (item 10).
Install the air cleaner inlet
adaptor into the air cleaner
base inlet.
Using the pop rivets (item 11)
secure the inlet adaptor to the
air cleaner base.
Apply sealant over the pop
rivets to seal the pop rivets.
Clean-up excess sealant to
ensure a neat finish.
Drill 5.0mm
10mm
15mm
Drill 5.0mm Dia
Drill 5.0mm Dia
Pop Rivet
Copyright Safari 4x4 Engineering Pty Ltd Melbourne Victoria Australia – www.safari4x4.com.au
Page 7 of 8
15
INSTALLER OPTION :
The air cleaner base contains a
drain valve as shown. The drain
valve can permit water to enter
the air intake.
Safari advises that the drain
valve should be sealed to
ensure a watertight installation.
16
From inside the engine bay,
squash and install the air entry
hose (item 12) through the hole
in the inner guard panel.
Loosely install the 80/100mm
hose clamp (item 13) onto the
end of the air entry hose inside
the engine bay and the
90/110mm hose clamp (item 14)
to the snorkel end of the air
entry hose.
17
Re-install the air cleaner base,
guiding the air cleaner inlet
adaptor into the air entry hose,
fasten the air cleaner housing
using standard mounting bolts.
Air Cleaner Base
Hose Clamp
90/110 Hose Clamp
Air Entry Hose
80/100 Hose Clamp
Drain Valve
Copyright Safari 4x4 Engineering Pty Ltd Melbourne Victoria Australia – www.safari4x4.com.au
Page 8 of 8
18
Carefully install the snorkel body
(Item 1) to the guard panel, align
the snorkel body to guard panel
and upper mounting bracket.
When correctly aligned, fasten
the snorkel body to the guard
panel with body washers (Item
8) and nyloc nuts (Item 9).
Fasten the snorkel body to the
upper mounting bracket with
hex bolts (Item 4).
19
Align the air entry hose (item
12) for best fitment (Ensure the
air entry hose is installed hard
up against the shoulder of the
snorkel body outlet), correctly
position the hose clamps at
either end of the air entry hose
and tighten.
20
Install the black hose clamp
(Item 15) loosely over the base
of the air ram assembly (Item
2).
Install the air ram assembly
onto the snorkel body.
Align the air ram assembly and
tighten the black hose clamp
(Item 15).
21
Install the guard liner, mud flap, air cleaner element, air cleaner lid, reconnect sensor wiring and any
other items that may have been removed during the snorkel installation process.
22
N.B: It is the installer's responsibility to ensure that all connections are water tight.
Hex Bolts
Snorkel Body
Body Washer & Nyloc Nuts
Hose Clamps
80/100
Air Ram
Black Hose Clamp

Other SAFARI Automobile Accessories manuals

SAFARI SS18HF User manual

SAFARI

SAFARI SS18HF User manual

SAFARI SS667HF User manual

SAFARI

SAFARI SS667HF User manual

SAFARI SS25R User manual

SAFARI

SAFARI SS25R User manual

SAFARI SS650R User manual

SAFARI

SAFARI SS650R User manual

SAFARI SS35R User manual

SAFARI

SAFARI SS35R User manual

Popular Automobile Accessories manuals by other brands

Let's Go Aero GearCage Ramp product manual

Let's Go Aero

Let's Go Aero GearCage Ramp product manual

Silvercrest SBTF 10 C2 operating instructions

Silvercrest

Silvercrest SBTF 10 C2 operating instructions

Horn Tools AHBRGUBOX01 Mounting instructions

Horn Tools

Horn Tools AHBRGUBOX01 Mounting instructions

USASPEC PA 12-TOY owner's manual

USASPEC

USASPEC PA 12-TOY owner's manual

Silvercrest SBTF 10 B2 operating instructions

Silvercrest

Silvercrest SBTF 10 B2 operating instructions

Horn Tools HFOTRL2RR02FIT Mounting instructions

Horn Tools

Horn Tools HFOTRL2RR02FIT Mounting instructions

Adaptiv Mini CAM-MB7-AD user guide

Adaptiv

Adaptiv Mini CAM-MB7-AD user guide

OEM Tools 26682 Operating instructions and parts manual

OEM Tools

OEM Tools 26682 Operating instructions and parts manual

Steelcraft 60-11380 installation instructions

Steelcraft

Steelcraft 60-11380 installation instructions

Pro-gard Products LLC. B5702T07 installation guide

Pro-gard Products LLC.

Pro-gard Products LLC. B5702T07 installation guide

Air Lift LoadLIFTER5000 manual

Air Lift

Air Lift LoadLIFTER5000 manual

Horn Tools ExRoof HBRRF3015 Mounting instructions

Horn Tools

Horn Tools ExRoof HBRRF3015 Mounting instructions

Silvercrest SFA 40 A1 Operating	 instruction

Silvercrest

Silvercrest SFA 40 A1 Operating instruction

MRHANDSFREE Blue Easy CK300 user manual

MRHANDSFREE

MRHANDSFREE Blue Easy CK300 user manual

Caraudio-Systems c.LOGiC C1-PHAETON manual

Caraudio-Systems

Caraudio-Systems c.LOGiC C1-PHAETON manual

AUTO-HAK J53A Fitting instructions

AUTO-HAK

AUTO-HAK J53A Fitting instructions

Matt:e ARD-3-32-M installation manual

Matt:e

Matt:e ARD-3-32-M installation manual

Dirtydog 4x4 J2TR07R1BK installation instructions

Dirtydog 4x4

Dirtydog 4x4 J2TR07R1BK installation instructions

manuals.online logo
manuals.online logoBrands
  • About & Mission
  • Contact us
  • Privacy Policy
  • Terms and Conditions

Copyright 2025 Manuals.Online. All Rights Reserved.