Air Science PURAIR-PCR Troubleshooting guide

AIR SCIENCE®
PURAIR®-PCR
CABINETS
USER & SERVICE
MANUAL
Air Science Manual Revision No. PURAIR-PCR-SERIES.V3.2014
Specifications subject to change without notice.

120 6th Street, Fort Myers, Florida, 33907 USA, www.Airscience.com, Tel: 239-489-0024, Fax: 239-489-0922
- 1 -
TABLE OF CONTENTS
Table of Contents 1
Safety Warnings 2
Limitations of Liability 2
European Union Directive on WEEE and RoHS 2
Symbols 3
Freight Claim Information 4
Warranty Terms and Conditions 5
USER SECTION
I. Basic Product Information 7
II. Unpacking Your Cabinet 8
2.1 Step-by-Step Procedure 8
2.2 Packaging Contents 9
III. Installing Your Cabinet. 10
3.1 Choosing a Suitable Location 10
3.2 Environmental/Electrical Condition. 10
3.3 Installing Your Cabinet 11
3.4 Performance Validation/Certification 11
3.4.1 The importance of performance validation/certification 11
3.4.2 Re certification 11
3.4.3 Disclaimer 11
IV. Operating Your Cabinet 12
4.1 Laminar Flow Control System 12
4.2 Cabinet Start-Up Procedure 12
4.3 Working in the Cabinet 12
4.4 Cabinet Shutdown Procedure 13
4.5 Ergonomics 13
V. Maintaining Your Cabinet 14
5.1 Maintenance Schedule 14
5.2 Disinfecting Agents 14
5.3 User Maintenance Form 15
SERVICE SECTION
I. Maintenance by Service Personnel 17
1.1 Cabinet Airflow Balancing 17
1.2 Filter Changing 17
1.3 Recertification 17
1.4 Leak testing of HEPA Filters 18
II. Product Specification 19
2.1 Engineering Details 19
2.2 Optional Accessories 19
2.3 Technical Specification 19
III. Troubleshooting of Common Problems 20
IV. CFL’s 21
Warranty Registration Form 22
Copyright Information 23
Event Log Form 24
Monitair Controller Addendum 25

120 6th Street, Fort Myers, Florida, 33907 USA, www.Airscience.com, Tel: 239-489-0024, Fax: 239-489-0922
- 2 -
SAFETY WARNINGS
This cabinet offers no operator protection (only product protection)
This cabinet is capable of achieving ISO Class 3 air cleanliness within work zone as per ISO
14644.1 (equivalent to Class 1 as per US Federal Standard 209E)
Read all instructions before proceeding and observe the installation procedure and
environmental/electrical requirements
NEVER OPERATE UV LAMP WITHOUT EYE AND SKIN PROTECTION
Anyone working with, on or around this equipment should read this manual. Failure to read,
understand and follow the instructions given in this documentation may result in damage to the
unit, injury to operating personnel, and / or poor equipment performance.
Any internal adjustment, modification or maintenance to this equipment must be undertaken by
qualified service personnel.
The use of any hazardous material in the cabinet must be monitored by an industrial hygienist,
safety officer or some other suitably qualified individual.
Explosive or inflammable substances should never be used in the cabinet unless a qualified
safety professional has evaluated the risk involved.
If chemical, radiological or other non-microbiological hazards are being used in the cabinet,
additional protective measures should be taken. Besides that, the operation should be monitored
by a suitably trained individual.
Before you proceed, you should thoroughly understand the installation procedures and take note
of the environmental/electrical requirements of the cabinet.
In this manual, important safety related points will be marked with this symbol.
If the equipment is used in a manner not specified by this manual, the protection provided by this
equipment may be impaired.
LIMITATION OF LIABILITY
The disposal and / or emission of substances used in connection with this cabinet may be governed by
various local regulations. Familiarization and compliance with any such regulation are the sole
responsibility of the users of the cabinet. Air Sciences’ liability is limited with respect to user compliance
with such regulations.
EUROPEAN UNION DIRECTIVE ON WEEE AND RoHS
The European Union has issued two directives:
• Directive 2002/96/EC on Waste Electrical and Electronic Equipment (WEEE)
The objective of the WEEE directive is to promote “….the reuse, recycling and other forms
of recovery of such wastes (WEEE) so as to reduce the disposal of waste besides
improving the environmental performance of all operators involved in the life cycle
of electrical and electronic equipment, e.g. producers, distributors and
consumers….” and hence this directive refers to the disposal of this cabinet within
the EU. A “wheelie bin” sticker (shown alongside) has to be pasted on all products
covered by this directive, indicating that at the time of disposing of the product, it
should not be grouped together with general unsorted municipal waste. Instead,
distributors of electrical and electronic equipment should be responsible for the collection and
scrapping of the products they have sold Please note that this cabinet has been classified as

120 6th Street, Fort Myers, Florida, 33907 USA, www.Airscience.com, Tel: 239-489-0024, Fax: 239-489-0922
- 3 -
“fixed industrial equipment” and hence the WEEE directive is not applicable to its disposal.
• Directive 2002/95/EC on Restriction on the use of Hazardous Substances (RoHS)
With respect to the directive on RoHS, please note that this cabinet falls under category 9
(monitoring and control instruments) and is therefore exempted from requirement to comply with
the provisions of this directive.
SYMBOLS
Warning of hazardous area or situation
Warning of dangerous electric voltage
Earth (ground) protective conductor
Local government may require proper lamp disposal

120 6th Street, Fort Myers, Florida, 33907 USA, www.Airscience.com, Tel: 239-489-0024, Fax: 239-489-0922
- 4 -
FREIGHT CLAIM INFORMATION
Air Science inspects each product for defects before shipment. Air Science products are then carefully
packed in compliance with carrier regulations and thoroughly inspected before leaving our plant.
Responsibility for their safe delivery is assumed by the carrier upon acceptance of the shipment.
Occasionally damage occurs in transit. Claims for loss or damage sustained in transit must be made upon
the carrier.
Please remember that you are responsible for all freight claims and the cost of all replacement pieces for
each shipment you accept. Inspect each shipment very carefully before acceptance.
Carefully inspect each pallet or crate upon arrival. If a shipment is found to be damaged upon delivery, be
sure to have the driver/carrier note all damage details on the delivery receipt.
This is essential or your claim may be denied. Also if pallets are stacked, please note "Stacked
Pallets" on the delivery receipt (pallets are not stacked when shipped, unless otherwise stated for
certain products). Air Science is not responsible for pallets stacked at carrier terminal. Any unloading
difficulties or damages due to stacked materials are carrier's responsibility.
If freight damage is discovered, please refer to the following guidelines in order to
process and effective freight claim:
ACCEPTED FREIGHT WITH NOTED/VISIBLE LOSS OR DAMAGE
Any external evidence of loss or damage must be noted on the freight bill or delivery receipt and
signed by the courier's agent or delivery driver
NOTE: Failure to properly describe evidence of loss or damage may result in the carrier
refusing to honor a claim
Contact delivering terminal to arrange for a claim form and inspection report to be faxed or mailed to
you
Notify Air Science regarding which items need replacement
Keep all damaged items and packing material until claim is resolved between you and the carrier
ACCEPTED FREIGHT WITH CONCEALED LOSS OR DAMAGE
When a damage or loss is discovered during unpacking:
Contact the carrier immediately upon discovery of damage and request for inspection by the carrier's
agent.
Carrier will determine inspection needs based on value and time elapsed
Notify Air Science regarding which items require replacement
Air Science will fax to you an order acknowledgment that includes value of items for claim (less freight
amount)
Air Science will invoice you for replacement materials
Air Science standard payment terms will apply
UNACCEPTED FREIGHT
oted upon inspection you have the right to refuse part or all of a
shipment. Do not unpack pallets or crates with damaged materials. Individual items cannot be
refused. You must refuse the entire pallet or accept the freight with noted damage (see above)
Air Science will handle all freight claim procedures and process a replacement order for your
company for the damaged pieces at no charge. (if the original order was shipped under CIF
terms i.e. Air Science had covered the insurance)
NOTE: Any correspondence with Air Science regarding loss or damage must be accompanied by
a copy of the shipping carrier's report. Air Science will not accept returns that have not been
authorized.
In the event of accepted freight with damage or loss, notification of loss or damage must
be sent to the carrier within 10 days of receiving the freight. Notification outside the 10-day
time frame may result in shipping damage claim being denied.

120 6th Street, Fort Myers, Florida, 33907 USA, www.Airscience.com, Tel: 239-489-0024, Fax: 239-489-0922
- 5 -
WARRANTY TERMS AND CONDITIONS
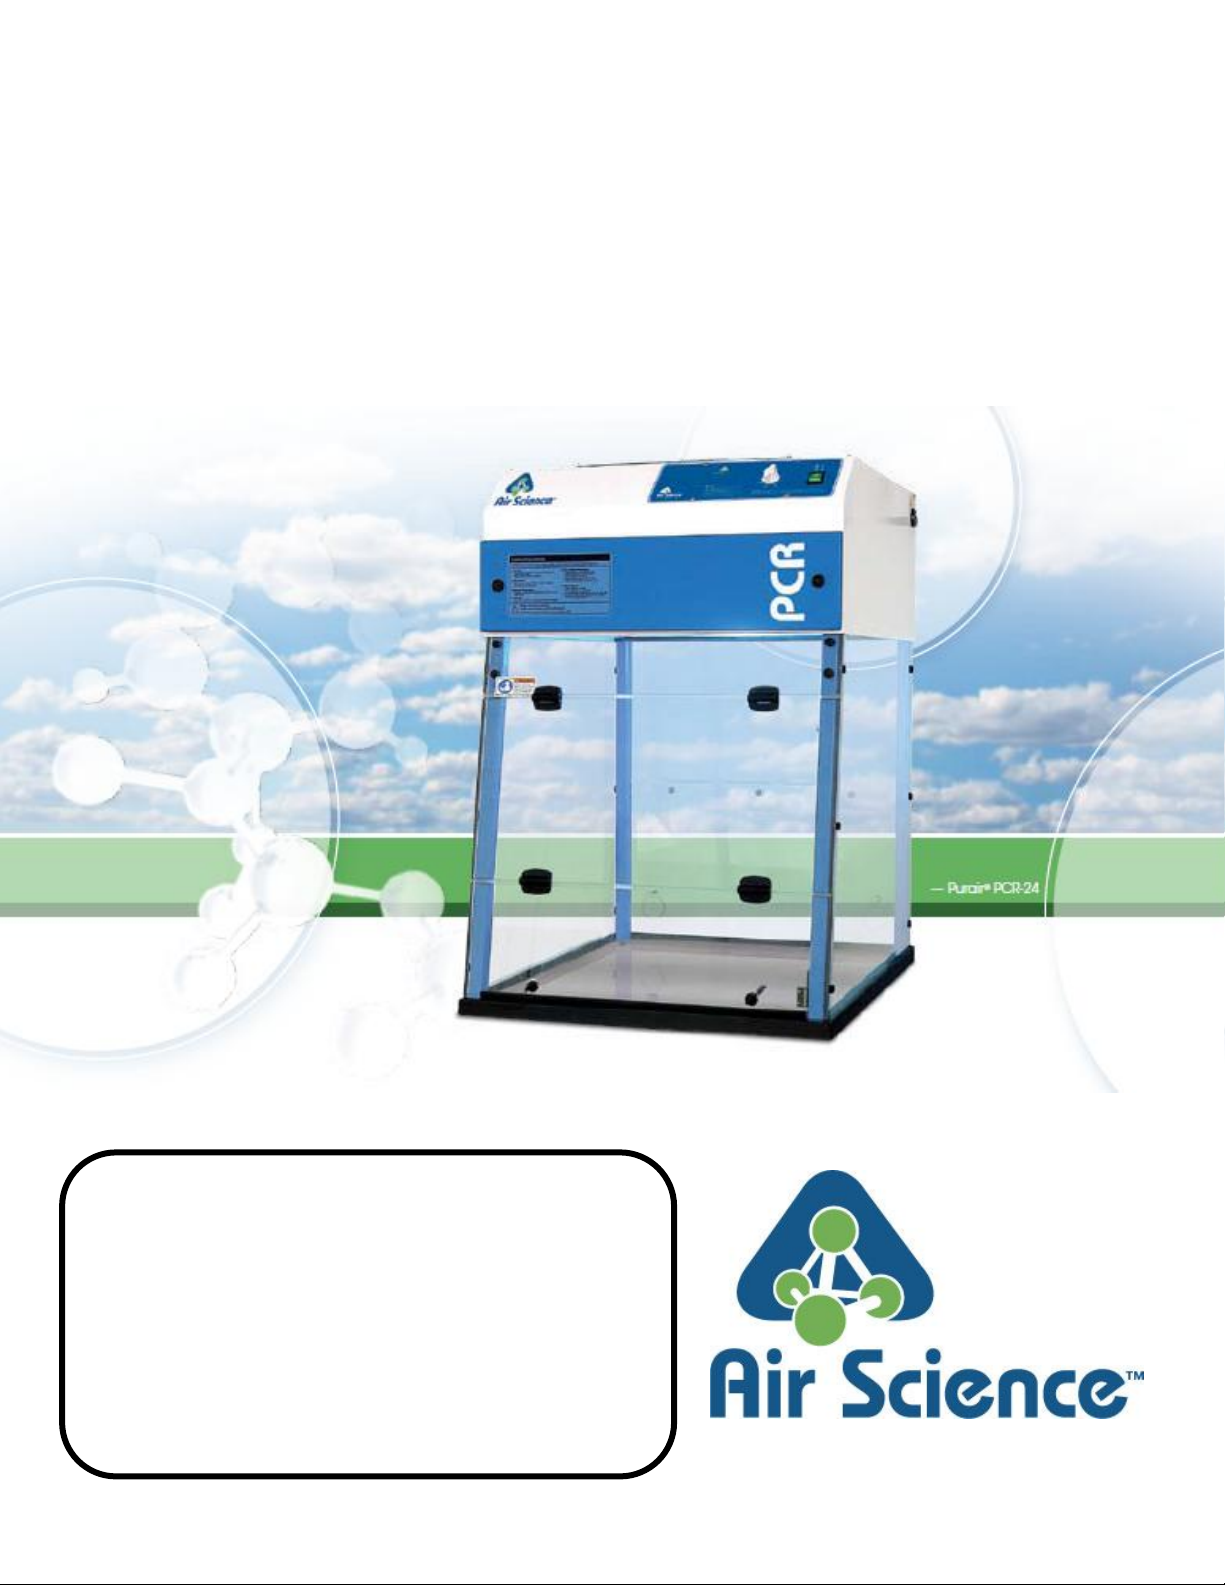
Our laminar flow cabinets have been designed to provide operator safety with an easy to use cabinet.
You can rest assured that with proper maintenance, these hoods will reward you with years of trouble free
service and protection.
Air Science value your business, so your satisfaction is important to us, so please complete and return
our customer satisfaction survey at the end of this manual.
Should you be unfortunate to receive product that appears to be damaged or defective or does not
appear to be working satisfactorily, then please contact our experienced technicians for assistance at the
address shown at the foot of this page.
The Air Science range of cabinets has been carefully designed to produce a system that will provide
product safety in an easy to use system. However, basic safety precautions should always be followed
when:
Using an electrical product; and
Handling hazardous substances.
Air Science products come with a 2-year limited warranty beginning on the date of shipment from the Air
Science. Air Science's limited warranty covers defects in materials and workmanship. Air Science's
liability under this limited warranty shall be, at our option, to repair or replace any defective parts of the
equipment, provided if proven to the satisfaction of Air Science that these parts were defective at the time
of being sold.
This limited warranty does not cover:
Installation (inside delivery handling) damage.
Products with missing or defaced serial numbers
Consumables such as filters (HEPA, ULPA, carbon, pre-filters) and fluorescent / UV bulbs
Problems that result from:
External causes such as accident, abuse, misuse, problems with electrical power, improper
operating environmental conditions
Servicing that is not carried out by Air Science personnel or their appointed agents, or in the case
of electrical work by a qualified electrician
Usage that is not in accordance with these product instructions
Failure to follow these product instructions
Failure to perform preventive maintenance
Problems caused by using accessories, parts, or components not supplied or approved by Air
Science
Damage by fire, floods, or acts of God
Customer modifications to the product
ALL EXPRESS AND IMPLIED WARRANTIES FOR THE PRODUCT, INCLUDING BUT NOT LIMITED
TO ANY IMPLIED WARRANTIES AND CONDITIONS OF MERCHANTABILITY AND FITNESS FOR A
PARTICULAR PURPOSE ARE LIMITED IN TIME TO THE TERM OF THIS LIMITED WARRANTY. NO
WARRANTIES, WHETHER EXPRESS OR IMPLIED, WILL APPLY AFTER THE LIMITED WARRANTY
PERIOD HAS EXPIRED. AIR SCIENCE DOES NOT ACCEPT LIABILITY BEYOND THE REMEDIES
PROVIDED FOR IN THIS LIMITED WARRANTY OR FOR SPECIAL, INDIRECT, CONSEQUENTIAL
OR INCIDENTAL DAMAGES, INCLUDING, WITHOUT LIMITATION, ANY LIABILITY FOR THIRD-
PARTY CLAIMS AGAINST YOU FOR DAMAGES, FOR PRODUCTS NOT BEING AVAILABLE FOR
USE, OR FOR LOST WORK. AIR SCIENCE LIABILITY WILL BE NO MORE THAN THE AMOUNT
YOU PAID FOR THE PRODUCT THAT IS THE SUBJECT OF A CLAIM. THIS IS THE MAXIMUM
AMOUNT FOR WHICH AIR SCIENCE IS RESPONSIBLE. FLORIDA LAW GOVERNS THIS
WARRANTY

120 6th Street, Fort Myers, Florida, 33907 USA, www.Airscience.com, Tel: 239-489-0024, Fax: 239-489-0922
- 6 -
USER SECTION

120 6th Street, Fort Myers, Florida, 33907 USA, www.Airscience.com, Tel: 239-489-0024, Fax: 239-489-0922
- 7 -
CHAPTER I
BASIC PRODUCT INFORMATION
Based on our vertical laminar flow cabinet product line, our PCR cabinet has been designed specifically
for polymerase chain reaction (PCR) applications. The cabinet isolates critical steps in the PCR process
by providing a particulate-free work environment and can be operated effectively as “mini-environments”
in the laboratory. Vertical laminar flow cabinet offers proven protection for your sample and processes
where operator protection is not required. They are suitable for application which requires ISO Class 3 air
cleanliness within work zone as per ISO 14644-1 (equivalent to Class 1 per US Federal Standard 209E)
AIRFLOW PATTERN INSIDE THE CABINET
Room air is taken in from the top of the cabinet through a disposable pre-filter with 85% arrestance; this
serves to trap larger particles and increase the life of the main filter. Air is forced evenly across an
HEPA/ULPA-filtered vertical laminar flow air stream within the cabinet; the result is a stream of clean
laminar air within the work zone of the cabinet; this dilutes and flushes all airborne contaminants from the
interior. A nominal filter face velocity of 0.45 m/s or 90fpm ensures that there is sufficient number of air
changes within the enclosed are of the cabinet in order to maintain cleanliness. The purified air travels
across the internal work zone of the cabinet in a vertical, unidirectional stream and leaves the main work
chamber across the entire open front of the cabinet.
PURAIR-PCR Airflow Pattern

120 6th Street, Fort Myers, Florida, 33907 USA, www.Airscience.com, Tel: 239-489-0024, Fax: 239-489-0922
- 8 -
CHAPTER II
UNPACKING YOUR CABINET
This chapter aims to provide relevant information on how to handle the cabinet properly
upon receipt. Failure to follow the following instructions may damage the cabinet. We strongly
advise you to read this chapter carefully before proceeding further.
2.1 STEP-BY-STEP PROCEDURE
1. Inspecting the crate, pallet, boxes
Upon receipt of your new cabinet, inspect all cartons. If there is any visible damage to the
exterior please refer to freight claim information.
2. Moving the Pallet
The pallet is designed to protect our cabinet from any foreseeable circumstances. However,
excessive impact onto the boxes or pallet may also damage the cabinet. Prevent any direct
impact or hitting to the pallet when moving.
b. When lifting the pallet, please always ensure that the floor jack or mechanical lift truck has
always entered fully under the pallet in order to achieve stability. Failure to do so will increase the
risk of the pallet falling off the floor jack or mechanical lift truck during handling. Please use a
suitable extension bar when the situation arises.
3. Opening the Boxed
If you did not receive one or more of the parts listed on the packing checklist, or if any of the
items are damaged, please contact your distributor or Air Science immediately for further
instructions.
4. Removing the packaging material
The cabinet is protected by Styrofoam, cardboard, and or and shrink-wrap.
If you find any damage during this stage of unpacking please refer to freight claim information.
t is the best practice to leave the cabinet secured with straps to the pallet until the cabinet is
located in its approximate final position to facilitate ease and safety in handling.
Choosing the best location for your cabinet in order to achieve optimum operating
performance of your cabinet is determined by a number of factors. Please refer to the next
chapter for some guidelines.
5. Moving the cabinet
When lifting the pallet with the cabinet, please always ensure that the floor jack or mechanical lift
truck has always entered fully under the pallet. This is to increase the stability of the cabinet and
reduce the risk of the cabinet falling down. Please use extension bar when necessary. During the
moving of the cabinet, please ensure there is enough distance between the supports of pallet and
the ground. Dragging the pallet against the ground (at one side or otherwise) will damage the
pallet and possibly your new cabinet.
When removing cabinet from pallet or placing cabinet onto pallet, use at least two people.
6. Removing the strapping
Remove the strapping by cutting it at a safe position to prevent any scratch on the surface of your
new cabinet.
Do not discard the packaging material for your cabinet until you have checked all of the
components, installed and tested the unit.
7. Lifting the cabinet
The Cabinet can be lifted in two sections: The HEAD unit and ENCLOSURE.
Install the cabinet on the existing work surface or Air Science support stand (if ordered)
NOTE:

120 6th Street, Fort Myers, Florida, 33907 USA, www.Airscience.com, Tel: 239-489-0024, Fax: 239-489-0922
- 9 -
When installing the cabinet onto an existing work surface, ensure that the structure can safely
support the combined weight of the cabinet and any related equipment. Some modifications to
the work surface may be necessary.
2.2 PACKAGING CONTENTS
The following items are included together with your manual:
Test certificate
Test report
In case this manual and/or test report is lost or misplaced, Air Science retains a copy in our files. A
replacement copy can be obtained by contacting Air Science and stating the cabinet
model, serial number and a brief description of the information desired.

120 6th Street, Fort Myers, Florida, 33907 USA, www.Airscience.com, Tel: 239-489-0024, Fax: 239-489-0922
- 10 -
CHAPTER III
INSTALLING YOUR CABINET
3.1 CHOOSING A SUITABLE LOCATION
Location impacts the nature and extent of external airflow disturbances, which may affect performance of
the clean bench when it is exposed to these disturbances.
When installing the clean bench, it should be located as far away as possible from sources of airflow
disturbance and in an orientation which optimally shields the clean bench’s airflow from all external airflow
disturbances. Please note that the clean bench should not be placed close to another clean bench.
Please follow these guidelines when choosing a suitable location for your cabinet:
The location must be far away from :
a. personnel traffic flows
b. air vents (in and out)
c. door and window
d. any other sources of disruptive air currents or air drafts
If drafts or other disruptive air currents exceed the face velocity of the filter, the potential exists for
contaminated air to enter the work zone of the cabinet.
A minimum distance of 50 cm to the top of the ceiling is recommended for blower changing purpose.
A clearance of 183 cm (6ft) in front of cabinet is strongly advised in order to maintain proper airflow.
Please permit adequate space for cleaning behind the cabinet.
3.2 ENVIRONMENTAL/ELECTRICAL CONDITIONS
This cabinet is designed to be used under the following conditions:
1. Indoor use.
2. Altitudes up to 2000 meters or 6600 ft.
3. 20% - 60% relative humidity.
4. Temperature range from 20 deg C to 30 deg C (68 deg F to 86 deg F).It is recommended that the
temperature in the laboratory be maintained within +/-2 deg C under all conditions.
5. Main supply voltage fluctuations not to exceed +/- 10% of the nominal voltage. It is recommended that
the voltage fluctuation doesn't exceed +/- 2% of the nominal voltage at all times.
6. Installation Category: 2.0
Installation category (over voltage category) defines the level of transient over voltage which the
instrument is designed to withstand safely. It depends on the nature of the electricity supply and its over
voltage protection means. For example, in CAT II, which is the category used for instruments in
installations supplied from a supply comparable to public mains such as hospital and research
laboratories and most industrial laboratories, the expected transient over voltage is 2500 V for a 230 V
supply and 1500 V for a 120 V supply.
7. Pollution Degree: 2.0
Pollution degree describes the amount of conductive pollution present in the operating environment.
Pollution degree 2 assumes that normally only non-conductive pollution such as dust occurs with the
exception of occasional conductivity caused by condensation.
8. Power Cord: 1) For units intended to be operated at 120 volts (North America): Use a UL-listed and
CSA-certified cord set consisting of a minimum 18 AWG, Type SVT or SJT, three-conductor cord, a
maximum of 15 feet in length and a parallel blade, grounding-type attachment plug rated 15 amperes,
125 volts. 2) For units intended to be operated at 230 volts. Use a cord set with a grounding-type
attachment plug. The cord set should have the appropriate safety approvals for the country in which the
equipment will be installed.

120 6th Street, Fort Myers, Florida, 33907 USA, www.Airscience.com, Tel: 239-489-0024, Fax: 239-489-0922
- 11 -
3.3 INSTALLING YOUR CABINET
1. Please refer to the unpacking your cabinet on the previous chapter section on lifting the cabinet
2. Inspect your cabinet carefully, should you find any defect please refer to the freight claim
information and our warranty terms and conditions
3. Wipe down the interior and exterior of the cabinet with water or a mild household detergent
4. Connect cabinet to the main power supply and turn on the blower. Please leave the cabinet on
for 5 minutes in order to purge airborne contamination from the work area. Each cabinet requires its own
dedicated 13A (230V) or 15A (115V) power outlet which should not be shared with other appliances. For
some cabinets which required 2 power sources, 2 separate and dedicated power outlets are needed.
NOTE:
DO NOT MOVE THE CABINET WITHOUT OBSERVING THE FOLLOWING PRECAUTIONS:
1. Observe the necessary precautions when relocating the cabinet as it is heavy
3.4 PERFORMANCE VALIDATION/CERTIFICATION
After installation and prior to use, cabinet performance must be validated and certified to factory
standards.
The following tests should be performed:
Airflow velocity
The testing methods and equipment required are specified on the test report. It is recommended
that these tests be performed only by a qualified technician who is familiar with the methods
and procedures for certifying laminar flow cabinets.
3.4.1 THE IMPORTANCE OF PERFOMANCE VALIDATION/CERTIFICATION
1. Airflow velocity value that falls below the value specified inside the test report will not provide
adequate product protection.
2. Possible product contamination when the filter is leaking.
3.4.2 RECERTIFICATION
After the initial certification, the cabinet shall be recertified at the following situations:
1. Relocation of cabinet
2. When the performance is suspected
3. Major maintenance or service (filter changing, blower changing, etc.)
4. At least annually
3.4.3 DISCLAIMER
The performance of the cabinet, while rigorously evaluated at the factory, cannot be guaranteed
once after transit and installation. Therefore the on-site testing is always recommended.

120 6th Street, Fort Myers, Florida, 33907 USA, www.Airscience.com, Tel: 239-489-0024, Fax: 239-489-0922
- 12 -
CHAPTER IV
OPERATING YOUR CABINET
4.1 LAMINAR FLOW CONTROL SYSTEM (for units equipped with optional Controller see Section
Monitair Controller Addendum)
Fan/Light Button
To turn on and turn off the fan and lights
UV Timer Dial
Allows UV to be activated.
Eyes and skin should not be exposed to direct ultraviolet light. Front door/sash must be
completely closed before activating.
4.2 CABINET START-UP PROCEDURE
1. Adjust the seating position so that the user's face is above the front opening. Adjustable stool is
recommended.
2. Turn on the fan. Please leave the cabinet on for 5 minutes before start working in order to
purge airborne contamination from the work area.
3. Prepare a written checklist of materials/apparatus necessary for immediate usage and surface
decontaminate them before loading them into the work zone. This is to prevent overloading
and minimize the number of arm movement that might disrupt the airflow.
Keep the back air grilles unobstructed by arms or objects
Always surface-decontaminate everything before inserting them into the work zone
4. Load and arrange the materials/apparatus to minimize the movement of contaminated items
over clean items by segregating the contaminated items from the clean items.
5. A clean long-sleeves laboratory coat may be used to protect personal clothing.
6. Wash hands thoroughly using germicidal soap. Wear gloves for hand protection. Gloves
should be pulled over the knitted wrists of the gown rather than worn inside.
7. Minimize room activity (personnel movements, closing and opening of doors, etc.).
4.3 WORKING IN THE CABINET
1. Work from clean to dirty by following the segregation of clean and dirty materials/apparatus
as described in the start-up procedure on top
2. Particularly critical objects may be arranged such that air flows directly against them and keep
the back air grilles unobstructed by arms or objects.
3. Do not use a gas flame whenever possible as it interferes with airflow
Do not use writing materials inside the work area as they generate aerosols
measured air velocity. Adjustment should be made only by a qualified technician. Do not operate
the cabinet if fan fails to run

120 6th Street, Fort Myers, Florida, 33907 USA, www.Airscience.com, Tel: 239-489-0024, Fax: 239-489-0922
- 13 -
Do not cough or sneeze into the work zone
4. Minimize arm movement. Move arms in and out of the cabinet slowly to avoid disrupting cabinet airflow
5. Use absorbent pads on the work surface where appropriate to minimize splatter and aerosol
generation in case of spillage.
6. Clean materials should be at least 150 mm away from aerosol generating objects to minimize the
chance for cross contamination.
7. Hold lids/covers above dishes/sample plates in order to prevent air impingement where appropriate.
8. Arrange objects to avoid airflow turbulence
9. Keep your arms as far away as possible from items in the work zone
10. Keep heads (large potential for aerosol generation) out of the work zone
11. It is recommended that the cabinet be operated continuously whenever possible to ensure and
cleanliness.
4.4 CABINET SHUTDOWN PROCEDURE
1. Close front cover/sash and activate UV lamp cycle
Eyes and skin should not be exposed to direct ultraviolet light
Ultraviolet light should not be relied upon as the sole disinfecting agent
Check the UV interlock regularly for correct operation
The use of UV lamp in laminar flow cabinets is explicitly discouraged in all major international
standards and recommendations.
2. Once complete, turn off the cabinet, remove laboratory coat and gloves and wash hands using
germicidal soap thoroughly.
4.5 ERGONOMICS
During the operation of your cabinets, you will be more likely to do it in the sitting position.
Advantages of sitting position:
1. The physiological energy cost and fatigue are reduced
2. It provides the body with a stable support
However, sitting position also has some drawbacks:
1. Limited working area
2. Possible risk of being constrained in a fix posture for a long time
3. One of the most stressful position for the back
Fortunately, it is possible to create a more comfortable and healthier working condition by following these
simple steps:
1. Ensure there is enough space for your leg and feet
2. Keep the lower back comfortably supported by your chair. Adjust the chair or use a pillow behind your
back when necessary
3. Position your fleet flat on the floor or a footrest. Don't dangle your feet and compress your thighs
4. Vary your sitting position throughout the day. Don't sit in one fixed posture all day
5. Eyes , some guidelines:
a. Give your eyes frequent breaks. Periodically look away from the work area and focus at a distant point.
b. Keep your glasses clean
6. Arrange and position your frequently used work materials to minimize the possibility of straining
yourself

120 6th Street, Fort Myers, Florida, 33907 USA, www.Airscience.com, Tel: 239-489-0024, Fax: 239-489-0922
- 14 -
CHAPTER V
MAINTAINING YOUR CABINET
5.1 MAINTENANCE SCHEDULE
Please kindly follow the suggested maintenance schedule in order to maintain your Air Science cabinet
at its optimum performance.
Daily
1. Thoroughly surface-decontaminate the work surface, inner back walls, and interior surface of
the window using a mild soap or other disinfectant depending on the user's requirement.
Do not use any disinfectant containing alcohol or chlorine-based substance as this will cause
irreparable damage to the cabinet structure.
When cleaning the interior, the operator should not insert any part of his/her body into the work zone
(except hands).
Monthly
1. Using a damp cloth, clean the exterior surfaces of the cabinet, particularly the front and top of
the cabinet, to remove any accumulated dust.
2. Check all the service fixtures (when present) for proper operation.
3. All daily activities
Quarterly
1. Replace pre-filters
2. All monthly activities
Annually
1. Have the cabinet recertified by a qualified certification technician.
2. Replace the UV lamp
3. All quarterly activities
Biannually
1. Replace the fluorescent lamps
2. All annual activities
5.2 DISINFECTING AGENTS
1. For polycarbonate, all common polycarbonate cleaners or disinfecting agents except alcohol or
chlorine-based agents are suitable.
2. For powder coated surfaces, all common disinfecting agents are suitable

120 6th Street, Fort Myers, Florida, 33907 USA, www.Airscience.com, Tel: 239-489-0024, Fax: 239-489-0922
- 15 -
USER MONTHLY MAINTENANCE SCHEDULE
Model:
Year
Serial Number:
Responsible Person:
Month
Clean exterior surface
Check all service fixtures
By Who
Jan
Feb
Mar
Apr
May
Jun
Jul
Aug
Sep
Oct
Nov
Dec
Daily
Surface Decontamination
Quarterly
Replace Pre-filters
Annually
Re-certification
Change UV lamp
Bi-annually
Replace all lamps
Replace HEPA/ULPA

120 6th Street, Fort Myers, Florida, 33907 USA, www.Airscience.com, Tel: 239-489-0024, Fax: 239-489-0922
- 16 -
SERVICE SECTION

120 6th Street, Fort Myers, Florida, 33907 USA, www.Airscience.com, Tel: 239-489-0024, Fax: 239-489-0922
- 17 -
CHAPTER I
MAINTENANCE BY SERVICE PERSONNEL ONLY
1.1 CABINET AIRFLOW BALANCING
After some period of usage, the pressure drop across HEPA/ULPA filters will increase, otherwise known
as “filter loading”. By increasing the fan speed, we can compensate this effect. However, there is a limit
to this increment in speed which is the maximum supply voltage according to the fan performance curve.
If this happens, and the required cabinet performance cannot be achieved, the filters must be changed.
(Please refer to the filter changing section below) Please follow the steps described below to adjust the
fan speed:
1. Remove Front control panel.
2. Adjust the speed control to achieve the required velocity.
3. Recertify the cabinet after speed is adjusted
1.2 FILTER CHANGING
The HEPA/ULPA filter under normal usage and barring an accident (a puncture), do not need
replacement until the airflow velocity cannot be maintained at the specifications required by the test report
even though the fan has been set to maximum speed. The filter changing procedure is described in detail
at the end of this chapter. The cabinet must undergo recertification after filter changing. Before the new
filters are installed, all surfaces should be thoroughly cleaned of silicon and/or adherent gasket material.
The new filter should be carefully handled and examined prior to fitting. It is important that the filters and
the gaskets be checked for leaks prior to use.
Filter Change out:
1. Remove blue filter door with key provided.
2. Remove the filter/blower plenum via filter clamps by releasing the bolts.
3. Take off the supply filter carefully. Replace new filter by reversing the above steps.
Note: The following applies for both Horizontal and Vertical Laminar Flow Clean Benches.
The nuts that are used to clamp the filter have to be tightened until 50% compressed with alternating
pattern after the new filter is installed. The nuts must be equally tightened to give uniform compression.
This is to prevent over compression on one side of the filter that can cause filter leakage
Pre-filters (all units) - Remove pre-filter from top of cabinet and replace
1.3 RECERTIFICATION
The following tests should be performed:
1. Airflow velocity
2. Filter leak test (filter media leak test and filter gasket leak test)
The testing methods and equipment required are specified in details on the test report. It is recommended
that these tests be performed only by a qualified technician who is familiar with the methods and
procedures for certifying laminar flow cabinets

120 6th Street, Fort Myers, Florida, 33907 USA, www.Airscience.com, Tel: 239-489-0024, Fax: 239-489-0922
- 18 -
1.4 LEAK TESTING OF HEPA FILTERS
A LEAK IS FOUND
IF GASKET LEAKS
IF FILTER MEDIA LEAKS
TIGHTEN CLAMPS OR
SEAL WITH SILICONE
EXAMINE FILTER
FOR DAMAGE
EXAMINE
FRAME
FOR
BYPASS
SEAL WITH
SILICONE
VERIFY
THAT LEAK
IS NOT A
CABINET
LEAK
RE-
EXAMINE
FRAME
ROTATE
FILTER
END-FOR-
END 180
DEGREES
REPLACE FILTER
AND RE-TEST
IF
FRAME
LEAKS
IF FRAME
DEFECT IS
FOUND
IF GASKET
STILL
LEAKS
IF NO
FRAME
DEFECT IS
FOUND
IF LOCATION OF LEAK IS UNCHANGED
IF NOT A CABINET LEAK
IF LEAKS MOVES
WITH FILTER
IF
DAMAGE
TO MEDIA
IS FOUND
IF CABINET
LEAK IS
FOUND
IF NO DAMAGE
TO MEDIA IS
FOUND

120 6th Street, Fort Myers, Florida, 33907 USA, www.Airscience.com, Tel: 239-489-0024, Fax: 239-489-0922
- 19 -
CHAPTER II
PRODUCT SPECIFICATION
2.1 ENGINEERING DETAILS
PLEASE KINDLY REFER TO THE BROCHURE
2.2 OPTIONAL ACCESSORIES
1. Support To enable mobility of the cabinet within the lab and for users without bench space
Types available:
a. Standard (with castors)
b. With leveling feet
2. IV Bar with 6 hooks For IV bags filling applications
3. Service Fixtures (both European and American style fixtures available) - To provide supplies of gas,
vacuum, water and compressed air to the cabinet
For vacuum fixture, please install a filter between the work zone and the fixture.
4. Electrical outlets (total 6A rating for all outlets in cabinet)
To allow users to use electrical devices, such as ultra-sonic bath, hotplate and electronic weighing scale
inside the work-zone.
2.3 TECHNICAL SPECIFICATION
PLEASE KINDLY REFER TO THE BROCHURE
Table of contents
Other Air Science Laboratory Equipment manuals
Popular Laboratory Equipment manuals by other brands

Agilent Technologies
Agilent Technologies G1367A Reference manual

Julabo
Julabo EH operating manual

Sutter Instrument
Sutter Instrument TRIO MP-245A Operation manual

Sherwood Scientific
Sherwood Scientific M860 operating manual

Holland Green Science
Holland Green Science 10305001 user manual

Struers
Struers Discotom-100 instruction manual