Elmi CM-50MP User manual

USER MANUAL
elminorthamerica.com
Centrifuge-Mixer CM-50MP

USER MANUAL
Centrifuge-Mixer CM-50MP
2
Content
Introduction .................................3
General information ..........................3
Technical specications........................3
Delivery package .............................3
General safety................................4
Electrical safety...............................4
During operation .............................4
Biological safety ..............................4
Preparation for use ...........................4
CarbonSpinTM ................................6
Control panel ................................7
Control keys .................................7
Additional commands of the buttons ...........8
Operating fugamix in centrifugation mode “CN” ..9
Operating fugamix in “SP” mode...............10
Operating fugamix in “Miniprep 1” and “Miniprep
2” modes Advantages of the Fugamix 3.........10
Operating fugamix in “Miniprep” mode
Understanding the interface ..................11
Operating fugamix in “Miniprep 1” mode .......12
Operating fugamix in “Miniprep 2” mode .......14
Operating fugamix in “Custom” mode
Understanding the interface ..................16
Operating fugamix in “Custom” mode
Creating a program ..........................17
Operating fugamix in “Custom” mode
Running a program ..........................18
Operating fugamix in “Mixer” mode ...........19
Error codes and solutions ....................20
Emergency opening of the lid .................20
Restoring factory settings using special
“TO” menu ..................................21
Understanding the screen readouts............21
Safety features ..............................22
Disinfection and cleaning .....................22
Transportation and storage ...................22
Warranty statements.........................22
Certicate of approval........................23

3
USER MANUAL
Centrifuge-Mixer CM-50MP
Dear user!
Fugami-3 CM-50MP is a revolutionary system that
guides you every step of the way to a faster and bet-
ter plasmid DNA miniptep. We ask you to carefully
read the user manual and follow the instructions
for proper operation and maintenance of the CM-
50MP. This will insure excellent results and endur-
ing performance.
General information
The Fugamix is used with a specially designed Car-
bonSpin(TM) rotor for 12 x 1.5/2ml tubes. This mi-
croprocessor-controlled system provides smooth
rotor acceleration and braking during all segments
of the operation. A big graphical display oers in-
stant readout of all the relevant parameters, in-
cluding time, braking level, mixing level and rotor
speed (simultaneous RPM and RCF). The centrifuge
lid locks during rotation and unlocks at the end of
each run. Adjustable sound alarm , brightness and
sleep mode are also standard. Imbalance detection
and a temperature sensor protect the unit from im-
balancing and overheating.
Technical specication
Rotor rotation speed, RPM..................................................................13500
Speed step selection, RPM .................................................................... 100
Centrifugal force, RCF ......................................................................12388
Centrifugal force step selection, RCF ............................................................ 10
Timer settings, Min ........................................................................0.1-99
Number of braking levels ........................................................................5
Number of mixing levels....................................................................... 12
Total possible imbalance of test tubes: ..........................................................0.7
Environmental temperature,°C ..............................................................10 - 40
Relative air moisture at 20°C,% ................................................................. 80
Power supply adapter..................................................................... 24V-5A
Max power consumption, W .................................................................. 120
Size of the device (length x width x height), mm .........................................200х180х145
Weight ......................................................................................3.1
Delivery Package
Item Quantity
Fugamix .......................................................................................1
Rotor nut ......................................................................................1
Rotor key ......................................................................................1
Power supply adapter 24V- 5A 120W ..............................................................1
Power cord ....................................................................................1
User manual ...................................................................................1
Packaging material .............................................................................1

USER MANUAL
Centrifuge-Mixer CM-50MP
4
General safety
•Use only as specied in the operating instruc-
tions provided.
•The unit should not be used if it has encoun-
tered a physical shock or has been dropped.
•The unit must be stored and transported in a
horizontal position (see package label).
•After transport or storage, allow the unit to dry
out (2-3 hrs) before connecting to mains power.
•It is necessary to observe the safety area of 300
mm around the centrifuge in accordance with
EN-61010-2-20. Persons and hazardous materi-
als must not be located in the safety area whilst
the centrifuge is in operation.
•Use only original accessories (rotors, adaptors,
etc.) provided by the manufacturer and ordered
specically for this model.
Electrical safety
•Connect to the mains only with a voltage cor-
responding to that on the serial number label.
•Ensure that the switch and plug are easily ac-
cessible during use.
•Do not plug the unit into the main outlet with-
out grounding, and do not use extension lead
without grounding.
•Before moving the unit, disconnect it from the
mains. To turn o the unit, disconnect the pow-
er plug from the mains outlet.
•It is the user’s responsibility to carry out appro-
priate decontamination if hazardous material is
spilt on or inside the equipment. If liquid is split
inside the unit, disconnect it from the mains
and have it checked by a competent person.
During operation
•Do not centrifuge ammable or chemically vig-
orously reactive materials. If such liquids are
spilled in the rotor or rotor chamber, the centri-
fuge must be cleaned with a moist cloth and a
mild soap solution.
•Do not use rotors with visible signs of corrosion,
wear or mechanical damage.
•Do not ll in the containers after they are insert-
ed in the rotor.
•Do not leave the operating unit unattended.
•Do not operate the unit in environments with
aggressive or explosive chemical mixtures.
•Do not operate the unit if it is faulty or has been
incorrectly installed.
•For indoor use only.
•Do not use outside laboratory rooms.
•Before using any cleaning or decontamination
method except those recommended by the
manufacturer, check with the manufacturer
that the proposed method will not damage the
equipment.
•Do not make modications to the unit.
Biological safety
•Without bioseal, the centrifuge is not a biosafe-
ty system in accordance with EN61010-2-20 and
cannot be used for centrifuging hazardous ma-
terials contaminated with toxic, radioactive or
pathogenic microorganisms.
•It is the user’s responsibility to carry out appro-
priate decontamination if hazardous material is
spilt on or inside the equipment.
Preparation for use
•Unpack the device.
•Inspect the appearance of the device, the adapt-
er and the power cord for damage.
•Open the lid of the CM-50MP with the emergen-
cy lid opening lever and remove the packaging
material.( see emergency opening of the centri-
fuge lid).
•In the cold season keep fugamix at room tem-
perature for at least 2 hours.
•Assembly the rotor.
•Rotor must rotate freely without jamming.
•Connect the fugamix to the adapter and the
adapter to the socket.
•Thus the light indicators will light up.
•In the absence of faults or damage the centri-
fuge can be considered ready to work.
•In the presence of faults and damage, do not
use the fugamix without consulting a specialist.
ATTENTION! Network socket must correspond to the adapter plug. In case of non compliance with this condition
the rules of electrical safety are violated.

5
USER MANUAL
Centrifuge-Mixer CM-50MP
Casing Control panel
Lid
Network switch
Power plug
USER MANUAL
Centrifuge-Mixer CM-50MP
6
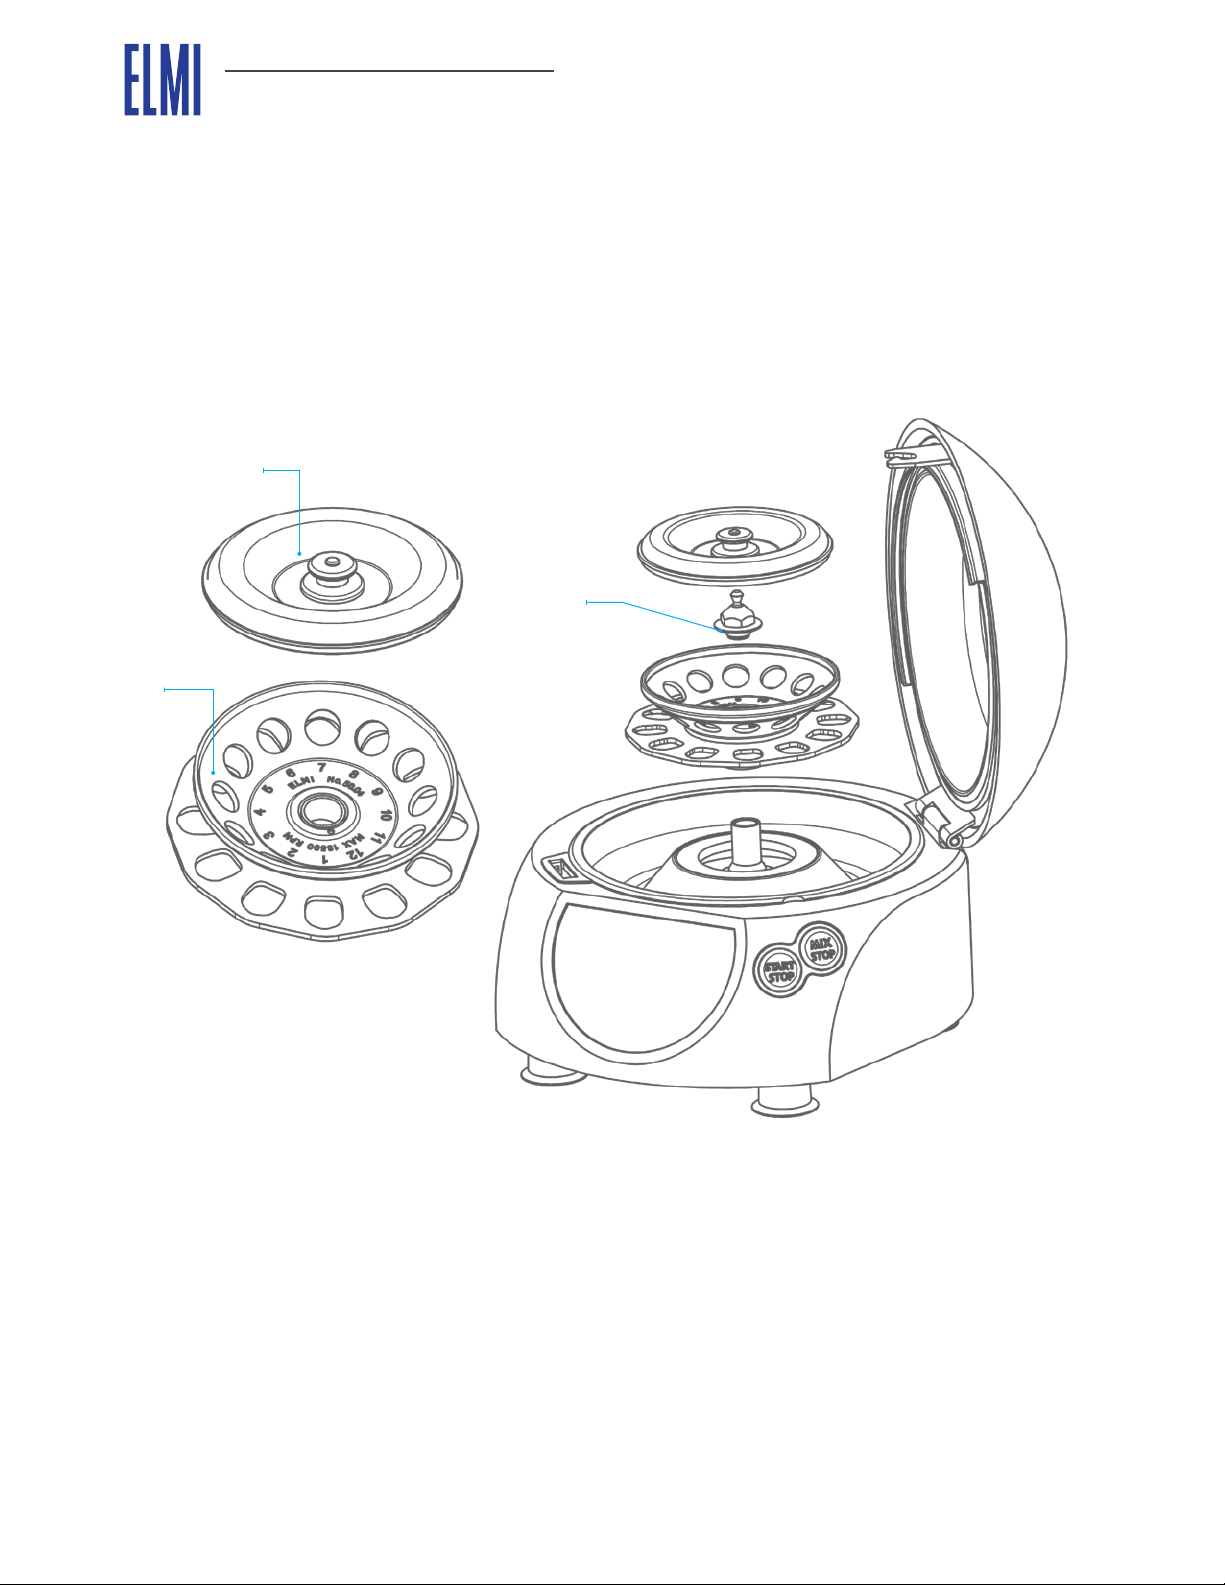
CarbonSpinTM
The CM-50MP fugamix features our patented Car-
bonSpinTM rotor.
The rotor is composed of precisely machined pro-
prietary aluminum alloy, signicantly improving ef-
ciency and ventilation.
To reduce the rotors weight while simultaneously
increasing eciency during intensive shake cycles,
a custom carbon ber layer stability ring was imple-
mented. The dependable design allows the user to
spin and vigorously shake any substance, including
heavy beads, for as long as the experiment requires.
Assembly: Put the rotor on the shaft rst and then tighten the nut with a provided hand driven key.
Usage: always load the rotor symmetrically. By minimizing the dierence of weight between the lled test tubes,
you reduce the wear of mechanical parts of the centrifuge. If the overall imbalance of test tubes exceeds 0.7 gram,
centrifuge will stop and the display will show “DISBALANCE” error code.
Note: The lid is specially designed to allow spinning down the tubes with the caps open.
Lid
Nut
Rotor
7
USER MANUAL
Centrifuge-Mixer CM-50MP
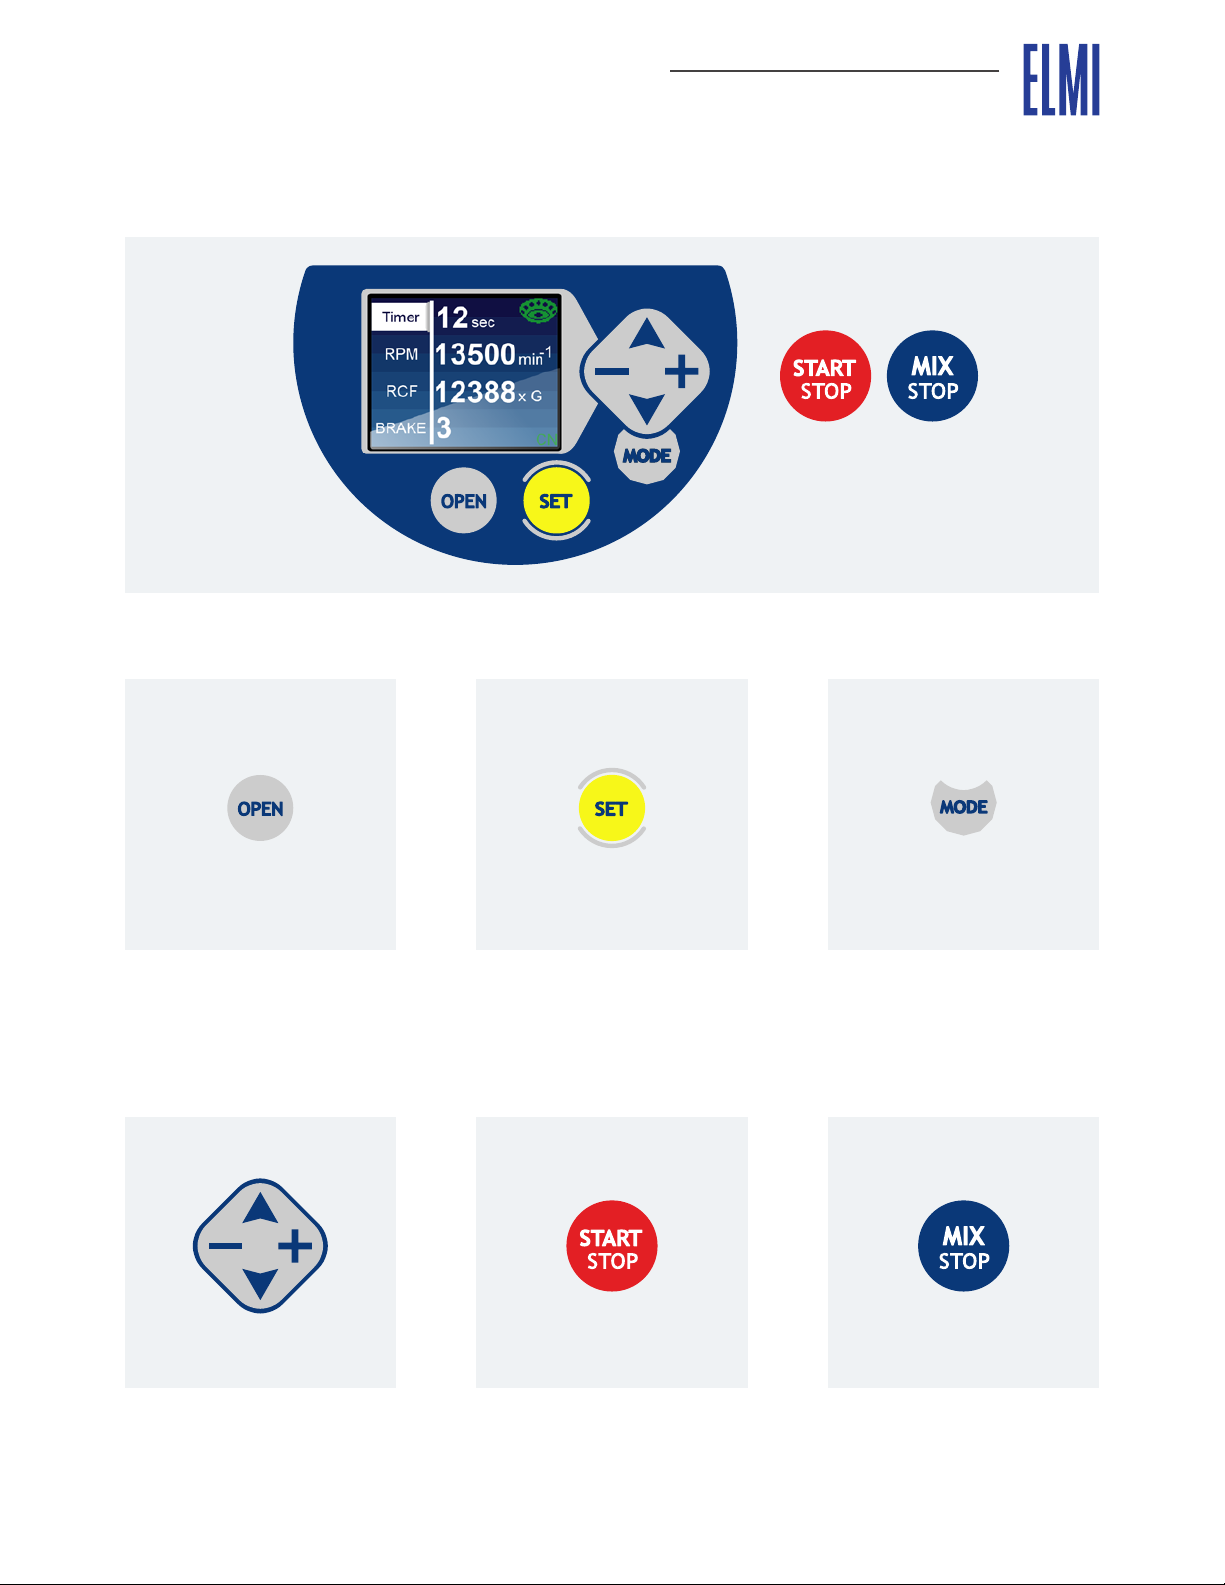
Lid opening. Mode selection.
Start/stop and custom
program launch.
“Custom”, “Miniprep 1” and
“Miniprep 2” mode view and
conguration.
Up and Down menu scroll
and parameter change. Mixer start/stop.
Control keys
Control panel

USER MANUAL
Centrifuge-Mixer CM-50MP
8
Additional commands of the buttons
By pressing and holding down “MODE” for 3 sec-
onds you enter “Options” menu to adjust screen
brightness, beeper volume and more.
When timer is set to “Short run” you can push and
spin the centrifuge. Operation will stop when but-
ton released.
When timer is set to “Short run” you can push and
mix. Operation will stop when button released.
Use “START/STOP” and “MIX/STOP” buttons to
switch between centrifugation “CN” and vortexing
“Mixer” modes swiftly. One single click takes to the
given mode immediately.

9
USER MANUAL
Centrifuge-Mixer CM-50MP
Rotor icon has a color code.
All the parameters are dis-
played clearly.
Red color means the lid is
closed and you can now run
the fugamix.
To run centrifugation just
press “START/STOP” button.
Green color means that the
lid is opened.
Settings are made using the
“+/- up/down” keyboard. Pa-
rameters can only be changed
while the centrifuge is not
running.
By reducing the timer to the
minimum you will reach a
“Short run” mode. This mode
allows using “START/STOP”
button to manage the dura-
tion of the spindown. Centri-
fuge will run while the button
is depressed and will stop au-
tomatically when released.
Operating fugamix in centrifugation mode “CN”

USER MANUAL
Centrifuge-Mixer CM-50MP
10
Operating fugamix in “Miniprep 1” and “Miniprep 2” modes Advantages
of the Fugamix 3
“Miniprep 1” and”Miniprep 2” are preprogrammed
and optimized to work semiautomatically with a
standard kit for DNA extraction. Every step of the
protocol is optimized for best performance in mix-
ing and spin down and all you need to do is to follow
the protocol and press START/STOP.
These modes are compatible with all DNA extrac-
tion kits available on the market.
Using the Fugamix 3 for miniprep and FAST-mini-
prep signicantly reduces the time spent extracting
DNA. The result is also more consistent preps with
less eort required.
Here is a list of major advantages of using Fugamix
3 for DNA extraction:
1. All 12 tube pellets are resuspended automati-
cally and simultaneously. No need for manual
pipetting and vortexing.
2. Mixing of lysis and neutralizing buers is done
automatically and simultaneously.
3. Plasmid DNA extraction is reproducible, rapid
and ecient.
4. Higher quality of DNA is the result of this inno-
vative method of resuspending bacterial cell
pellets, lysis, and instant neutralization in all 12
samples.
“Timer” Controls the overall
duration of the procedure.
“RPM / RCF” - Variable spin
down speed.
“Mixer” - Vortexing speed.
When timer is done operation
will stop and automatically
open up the lid. Rotor indica-
tor will change from Red to
Green and a sound notica-
tion will beep.
When all the setting are made,
just press “START/STOP” to
start the program.
Operating fugamix in “SP” mode
Sample preparation is a programmable sequence
of mixing and spin down that allows eectively mix
small volumes of reagents and collect them on the
bottom of a test tube.
Fugamix 3 has two special
modes for doing DNA extrac-
tion from E-coli in miniprep
and FAST-miniprep format.

11
USER MANUAL
Centrifuge-Mixer CM-50MP
Fully programmed both Mix-
ing and RPM part of a step.
This step will do 12 second
mixing with a level 9 speed
and then do 30 sec spin down
with 12500 RPM speed.
This step has both parts dis-
activated “O” and will appear
on a main screen as a grey cell
with grey number “Empty”.
Programm will just skip this
step.
This step is programmed to
do only the spin down and
skip the mixing part. It will do
30 sec spin down with 12500
RPM speed. Same way you
can disable the spin down
part and do only the Mixing.
Operating fugamix in “Miniprep” mode Understanding the interface
Examples of dierent steps:
Miniprep plasmid DNA extraction mode is a se-
quence of preprogrammed steps that follow the
standard protocol.
Understanding the color code for program steps.
F3 Yellow eld: selection marker. This step is
currently selected for execution.
F9 Grey eld, grey letters: this step is empty and
is not in use for this protocol.
F5 Grey eld, white letters: this step is not yet
executed.
F2 Grey eld, black letters: this step has already
been executed
Every step has two parts :
• Mixer: Preset speed vortexing
• RPM: Spin down with an preset speed.
Mixer
RPM

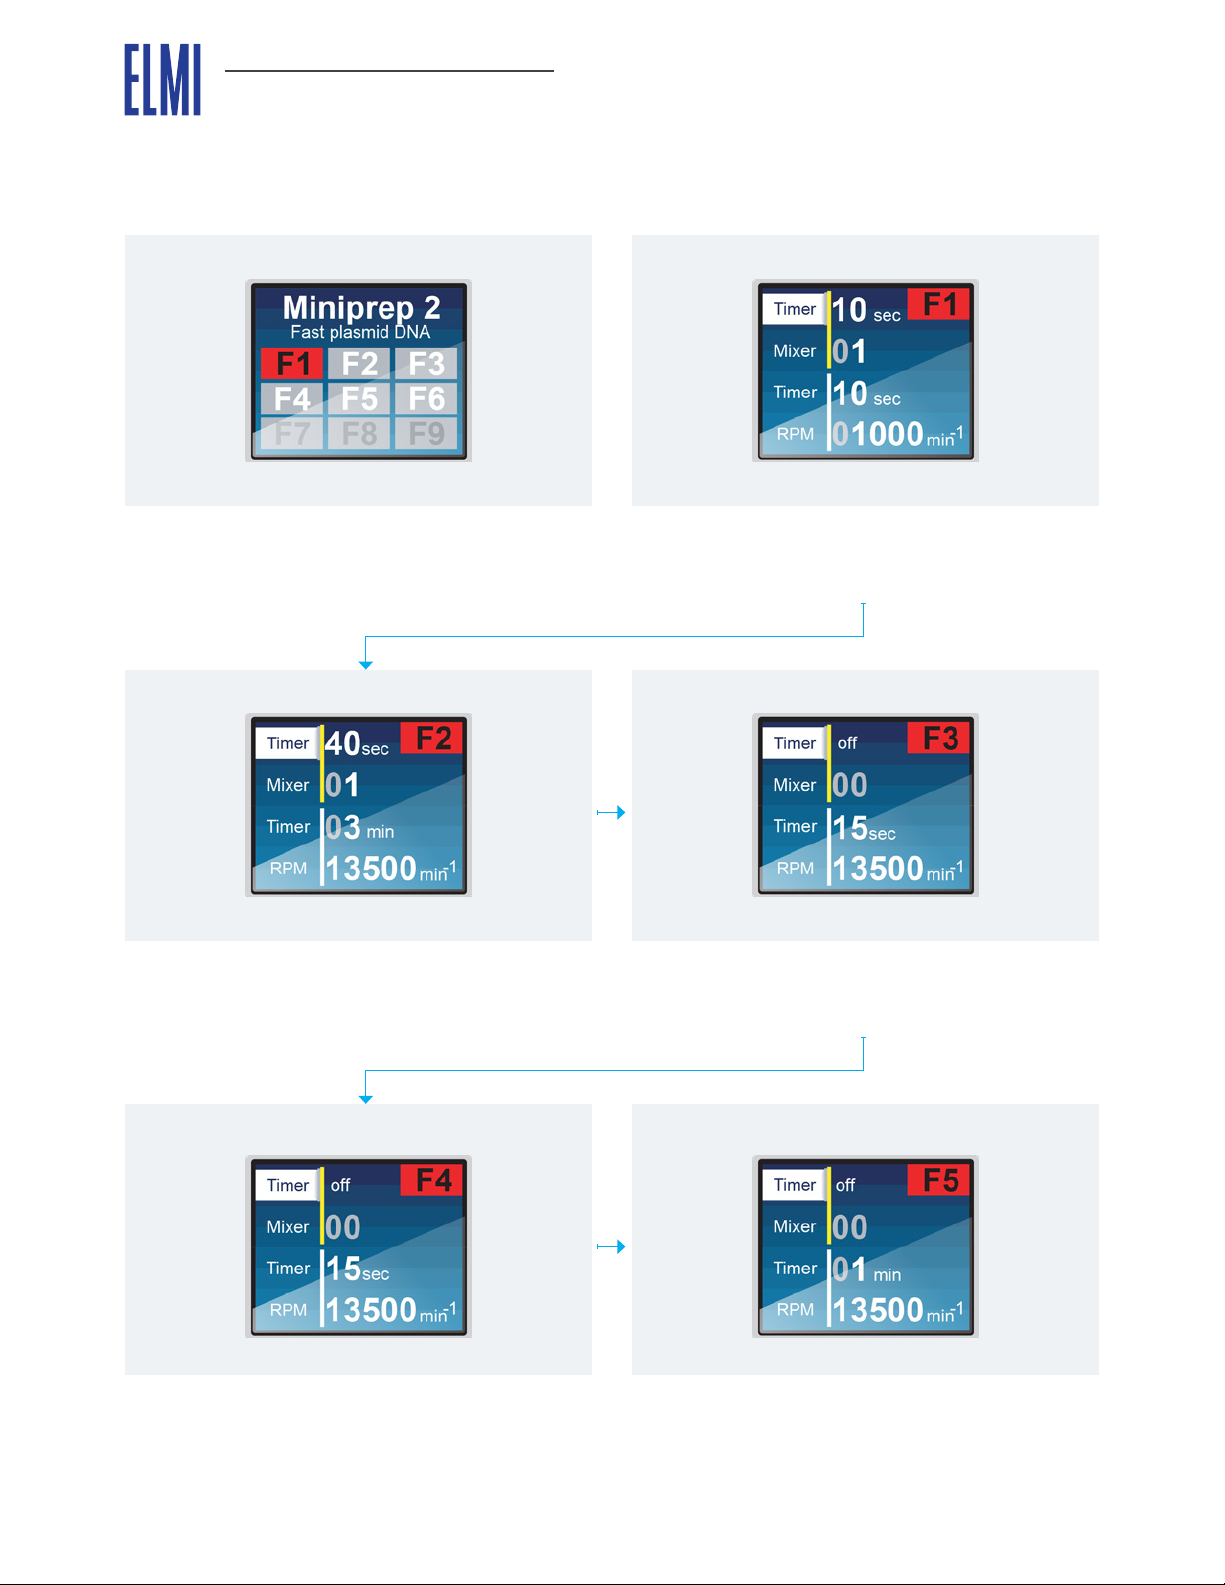
Operating fugamix in “Miniprep 1” mode
Miniprep plasmid DNA extraction mode mapped
on a standard protocol and a standard kit.
Step 2 Add 250 μl of resuspension buer. Press
Start/Stop. Within 20 sec all the precipitate will re-
suspend.
Step 4 Add 350 μl of neutralization buer. Press
Start/Stop. Two solutions will mix homogeneously
and neutralize. Followed by 5 min spin down. Pro-
teins and DNA is now separated.
Step 1 Load test tubes containing bacteria in to the
rotor. Press Start/Stop and wait 1 min until the cells
will be separated. Remove supernatant.
Step 3 Add 250 μl of lysys buer.Press Start/Stop.
Two solutions will now mix homogeneously while
cell lyses.
Step 5 Transfer the supernatant to a spin column
and press Start/Stop. 20 sec spindown will gather
plasmid DNA on the column.
USER MANUAL
Centrifuge-Mixer CM-50MP
12
Operating fugamix in “Miniprep 1” mode
Step 6 Remove elution. Apply 700 μl of washing
buer on the spin column. Press Start/Stop and
spin down for 20 sec.
Characteristics of an extracted plasmide DNA.
• Plasmid DNA obtained by the FugamixTM is very
pure and do not contain any RNA or chromo-
some DNA.
• More then 95% of plasmid is in CCC format.
• Plasmid DNA extracted can be used for se-
quencing, cloning, transformation and molecu-
lar biology studies.
• Ratio OD 260/280 – 1.85-1.9
Step 8 Move the spin columns to the elution test
tubes. Add 50 μl of elution buer to the center of
a spin columns’ membrane. Press Start/Stop and
spin down for 1 min.
Step 7 Remove elution and press Start/Stop. 1 min
spin down will clear out the remaining wash buer
and dry the membrane.
13
USER MANUAL
Centrifuge-Mixer CM-50MP
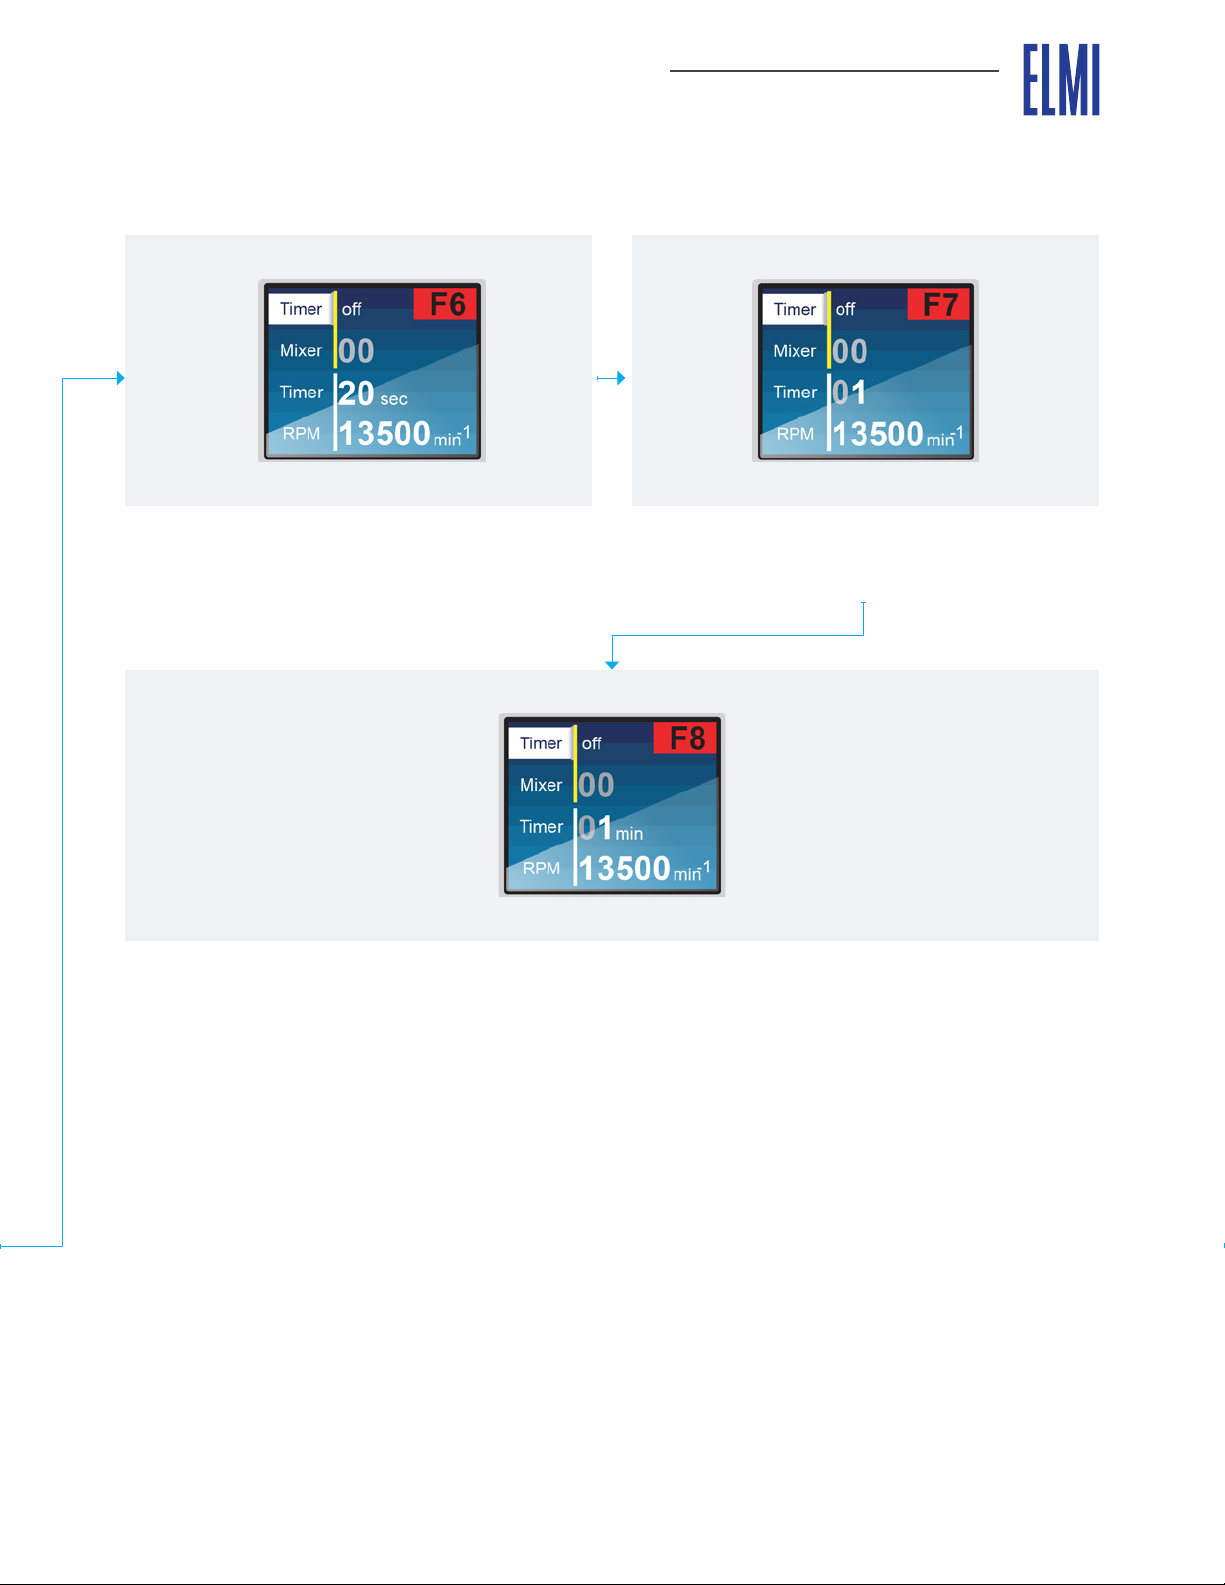
Operating fugamix in “Miniprep 2” mode
Fast plasmid DNA extraction mode mapped on a
standard protocol and a standard kit.
Step 2 Add 350 μl of neutralization buer. Press
Start/Stop.Two solutions will mix homogeneously
and neutralize. Followed by 3 min spin down. Pro-
teins and DNA is now separated.
Step 4 Remove elution. Apply 700 μl of washing
buer on the spin column. Press Start/Stop and
spin down for 15 sec.
Step 1 Add 20 μl RNaseA (10mg/ml) 100 μl of resus-
pension buer and press Start/Stop. Two solutions
will mix homogeneously while cells lyses.
Step 3 TTransfer the supernatant to a spin column
and press Start/Stop. 15 sec spindown will gather
plasmid DNA on the column.
Step 5 Remove elution and press Start/Stop. 1 min
spin down will clear out the remaining wash buer
and dry the membrane.
USER MANUAL
Centrifuge-Mixer CM-50MP
14

Operating fugamix in “Miniprep 2” mode
Characteristics of an extracted plasmide DNA.
• Plasmid DNA obtained by the Fugamix(TM) is
very pure and do not contain any RNA or chro-
mosome DNA.
• More then 95% of plasmid is in CCC format.
• Plasmid DNA extracted can be used for se-
quencing, cloning, transformation and molecu-
lar biology studies.
• Ratio OD 260/280 – 1.85-1.9
Step 6 Move the spin columns to the elution test tubes. Add 50 μl of elution buer to the center of a spin
columns’ membrane. Press Start/Stop and spin down for 1 min.
Now puried plasmid DNA is eluted.
15
USER MANUAL
Centrifuge-Mixer CM-50MP
USER MANUAL
Centrifuge-Mixer CM-50MP
16
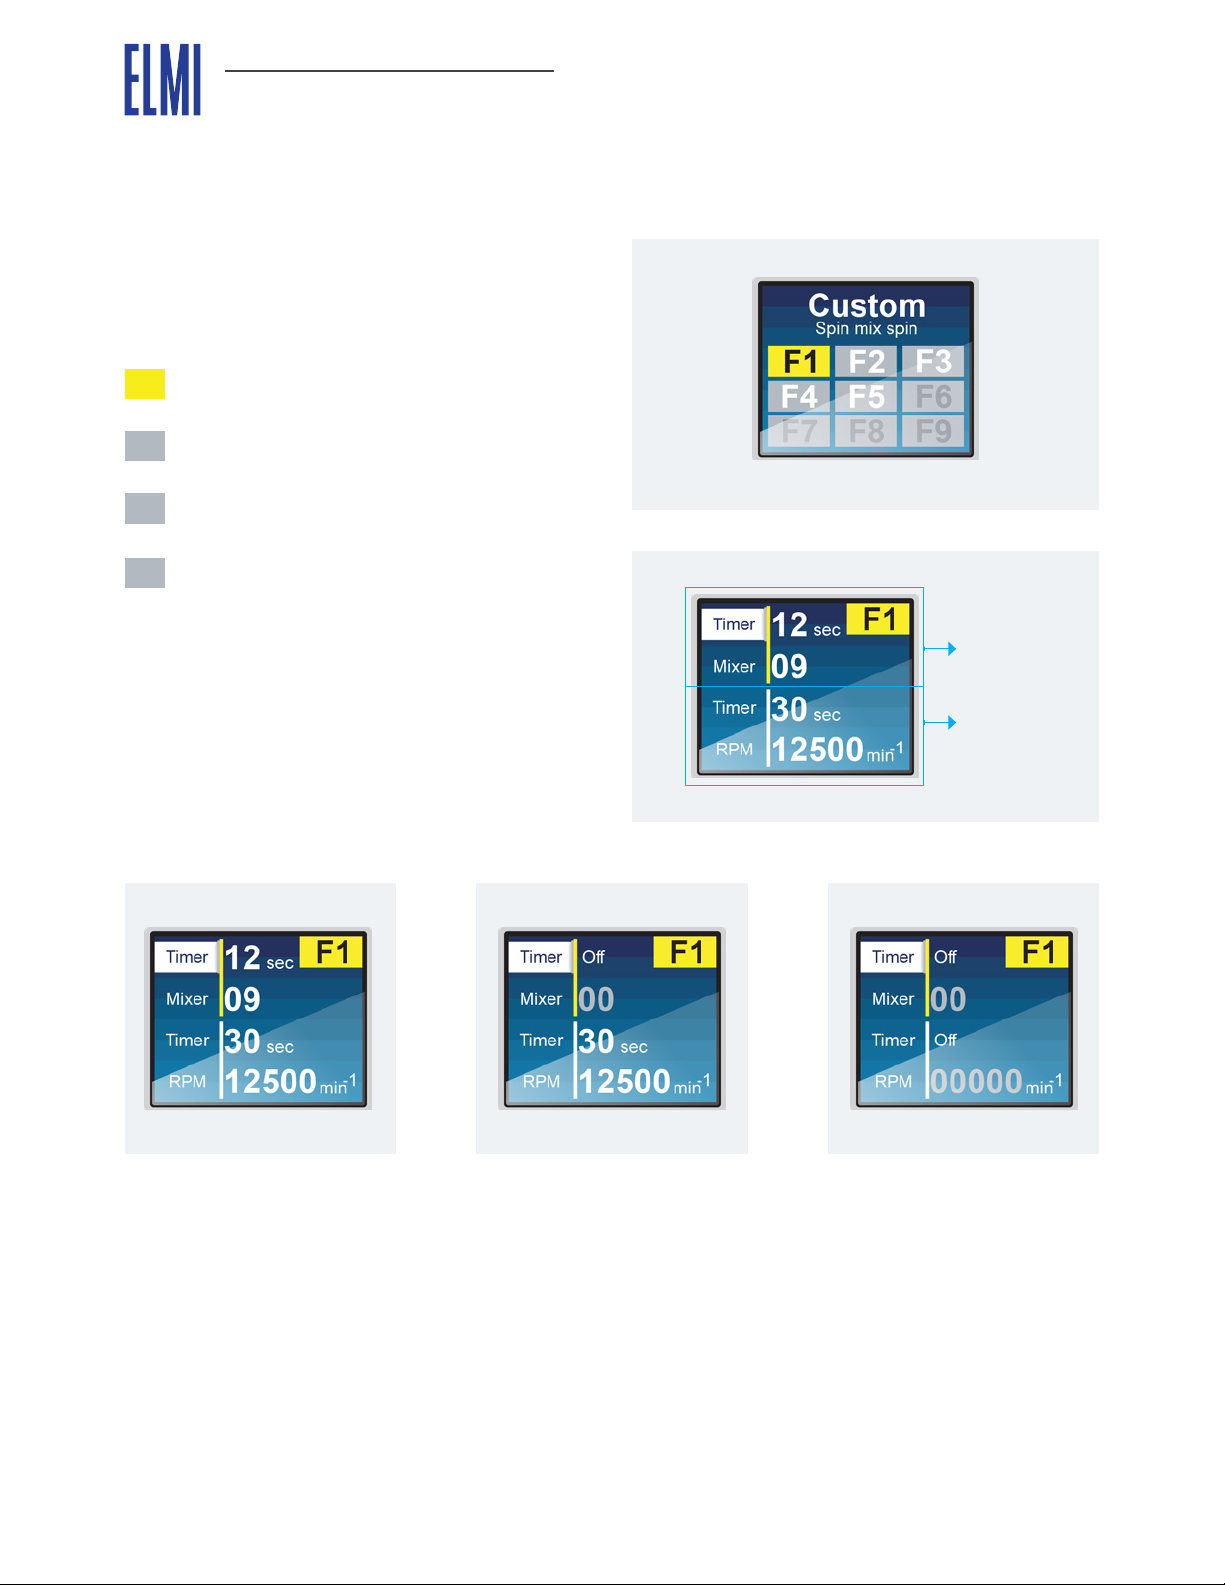
Fully programmed both Mix-
ing and RPM part of a step.
This step will do 12 second
mixing with a level 9 speed
and then do 30 sec spin down
with 12500 RPM speed.
This step has both parts di-
sactivated “O” and will ap-
pear on a main screen as a
grey cell with grey number
“Empty”. Programm will just
skip this step.
This step is programmed to
do only the spin down and
skip the mixing part. It will do
30 sec spin down with 12500
RPM speed. Same way you
can disable the spin down
part and do only the Mixing.
Operating fugamix in “Custom” mode Understanding the interface
Way to program individual steps.
Custom mode is a step by step program with 9 inde-
pendently programmable steps F1-F9.
Understanding the color code for program steps.
F3 Yellow eld: selection marker. This step is
currently selected for editing or running.
F9 Grey eld, grey letters: this step is empty and
has no user settings.
F5 Grey eld, white letters: this step contains
user created program.
F2 Grey eld, black letters: this step contains
user created program and it has already
been executed.
Every step has two parts :
• Mixer: Variable speed vortexing
• RPM: Spin down with an optional speed.
Mixer
RPM
17
USER MANUAL
Centrifuge-Mixer CM-50MP
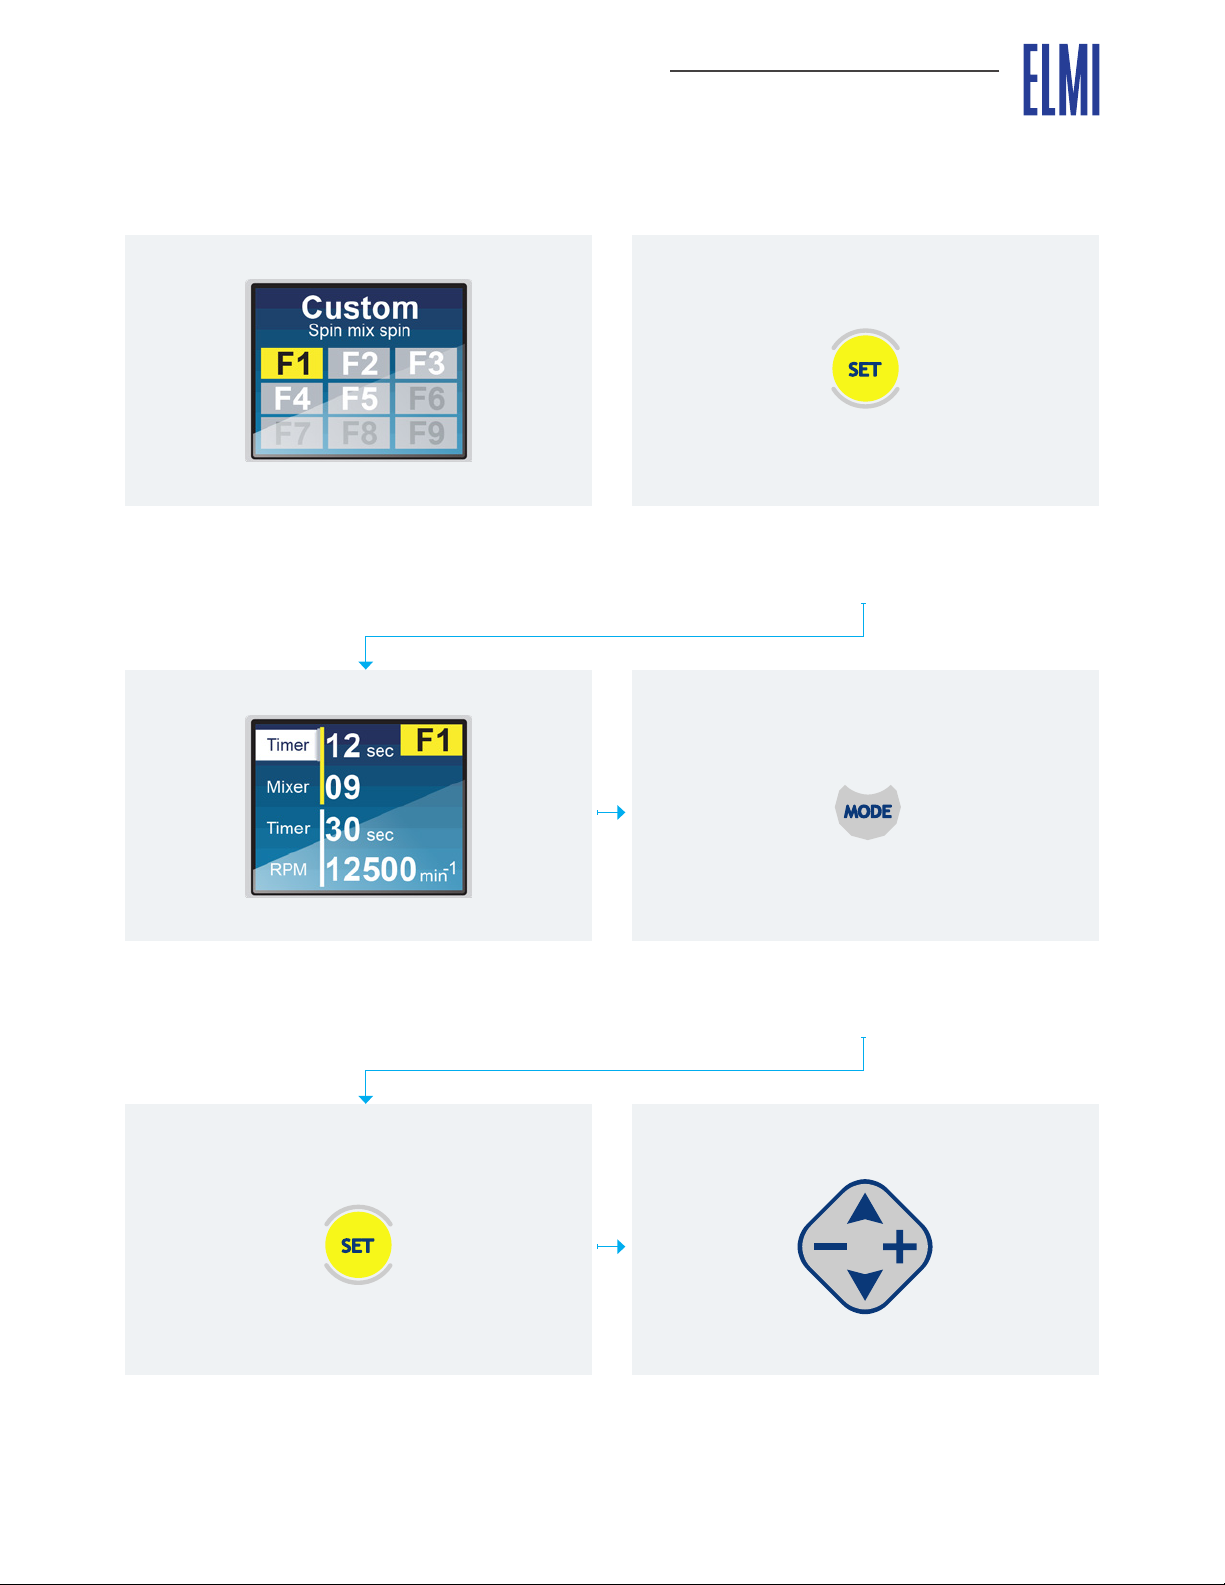
Operating fugamix in “Custom” mode Creating a program
Find mode “Custom” in a mode list by pressing
“MODE” button.
Cell editing screen will open up. Here you can mod-
ify the settings of Mixer and RPM by using “+/- up/
down” keyboard.
When all the steps are edited press “SET” and return
to main screen of the “Custom” mode. You will see
your edited steps as a grey cells with white letters.
n order to start programming steps of the program
press “SET”.
When the rst F1 step editing is nished press
“MODE” to proceed to step F2 then F3 and so on.
You can also move between steps by pushing “up
and down” buttons on the control keyboard.

USER MANUAL
Centrifuge-Mixer CM-50MP
18
Operating fugamix in “Custom” mode Running a program
Selector is automatically placed at the beginning of
the program to the st step F1.
Upon completion of every step centrifuge will stop,
open the lid and wait to proceed to the next step F2.
Steps that are already completed are marked black
color.
If needed you can move selector from one step to
another to change the sequence using the “+/- up/
down” keyboard.
Press START/STOP to run the program.
To proceed to step two F2 press START/STOP.
When all the steps are completed the system will
return to main screen of the “Custom” mode. You
can now repeat the program again.

19
USER MANUAL
Centrifuge-Mixer CM-50MP
Operating fugamix in “Mixer” mode
Mixer mode is a fully functional vortexer. Easy to set vibration speed from 1 to 12.
Settings adjustments are made using the “+/- up/
down” keyboard. Parameters can also be change
while the centrifuge is running.
Vortexing level RPM
1105
2375
3525
4575
5732
6945
71082
81220
91332
10 1400
11 1540
12 1620
By reducing the timer to the minimum you will reach
a “Short run” mode. This mode allows using “MIX/
STOP” button to manage the duration of vortexing.
Vortexer will run while the button is depressed and
will stop automatically when released.
To run vortexing just press “MIX/STOP” button.
Centrifuge lid can be either open or shut while vor-
texer is running.
Vortexing mode 1 is a Smart function which resem-
bles hand shaking motion!
Relative speed in rounds per minute from level 2 to
lever 12.
Vortexing levels explained.

USER MANUAL
Centrifuge-Mixer CM-50MP
20
Error codes and solutions
Error code Cause Solution
No main power connection.
Power failure
Check connection of the power cable.
Check if the power supply adapter is func-
tioning.
Centrifuge lid is left open. Close and press on the lid till you hear a
click.
Total imbalance of test tubes
is more than 7 gram. Load rotor symmetrically.
Processor Control Board is
overheated.
Give a little time and centrifuge will cool
down automatically.
Motor is overheated. Give a little time and centrifuge will cool
down automatically.
Rotor detection fails.
Centrifuge does not
start. Power supply
cuts o. Disbalance
detection failure.
Controller factory settings
mismatch.
Go to “TO” special menu.
Emergency opening of the lid
To open the lid of centrifuge in case of power failure
or lock damage of the lid it is necessary to raise the
centrifuge and move the lever, which is located on
the bottom of a centrifuge under the control panel,
to the side as it is shown on the gure.
Table of contents
Other Elmi Laboratory Equipment manuals


