Air Vent UV-C FiltAir User manual

UV-C FiltAir
UV-C Air Sterilizer Series for Indoor Applications
Instruction Manual

2
Airvent UV-C FiltAir Instruction Manual
Table of Contents
General information ...................................... 3
Commissioning and maintenance ......................... 3
Replacement parts........................................ 3
Features of the UV-C FiltAir ............................. 4
UV-C FiltAir............................................... 4
UV-C FiltAir-S ............................................. 5
Unit Description......................................... 6
Operation ................................................ 6
UV-C Sterilization ......................................... 6
Installation of the Unit ...................................7
Determining the installation location of the unit .............7
Unpacking ................................................7
Removing Doors ..........................................7
Separately Packed Accessories ............................. 8
Remove the Filter ......................................... 8
Preparing Mounting Holes ................................ 8
Mounting the unit to the wall.............................. 9
Inserting UV-C Fluorescent Tubes .......................... 9
Inserting the Air Filter ..................................... 9
Fitting the Doors ........................................10
Installation and Use of UV-C FiltAir ........................10
Maintenance ............................................11
Cleaning the Outer Casing........................11
Filter Replacement ............................11
Cleaning the UV-C Reactor Surface........... 12
Replacement of UV-C Lamps................ 12
Replacing the Top Activated Carbon Filter Plate 12
Parts...................................... 14
Replacement Parts ................ 14
Optional Parts..................... 14
Notes ............................ 15

3
www.airvent.eu
8
Warning! High level of UV-C radiation inside! Danger of eye
and skin damage! It is not permitted for the user to open the
reactor space and to insert or replace the UV-C lamps! The unit
may only be installed and maintained by an Airvent-trained
technician. Unplug the unit before removing the doors. Use UV
protection to protect your eyes and skin during service! It is for-
bidden to remove the door of the UV reactor when the power
is on, or to operate the unit without a door! It is forbidden to
continue using the unit with any kind of mechanical damage
of the housing!
General information
People with reduced physical, sensory or mental capabilities, or
lacking experience and knowledge can only use the unit if it is
done under supervision or if they have been instructed on how
to safely use it and understand the dangers of using it. The unit
can be used by children from the age of 8. Children should be
supervised to ensure that they do not play with the unit. Children
are not to clean or service the appliance even with supervision!
Commissioning and maintenance
The operator is responsible for the installation and regular main-
tenance of the unit.
Replacement parts
Replacement parts can be ordered at Airvent Zrt.’s branches.
When ordering replacement parts, the name of the product as
well as your order and/or serial number is required.

4
Airvent UV-C FiltAir Instruction Manual
Features of the UV-C FiltAir
UV-C FiltAir
UV-C FiltAir 15
Width (mm) 560
Depth (mm) 200
Height (mm) 2180
Airflow (m3/h) 50-200
Recommended room area for 5 times/hour
complete air filtering (m2) 15
Filter type and size (mm) M6 502x502-22
Supply voltage (V) 230
Consumption (W) 71-78
Net weight without lamps and feet (kg) 29
UV-C FiltAir 30
Width (mm) 820
Depth (mm) 200
Height (mm) 2180
Airflow (m3/h) 50-400
Recommended room area for 5 times/hour
complete air filtering (m2)30
Filter type and size (mm) M6 756x502-22
Supply voltage (V) 230
Consumption (W) 133-154
Net weight without lamps and feet (kg) 35
UV-C FiltAir 45
Width (mm) 820
Depth (mm) 250
Height (mm) 2180
Airflow (m3/h) 100-600
Recommended room area for 5 times/hour
complete air filtering (m2)45
Filter type and size (mm) M6 756x502-22
Supply voltage (V) 230
Consumption (W) 130 -206
Net weight without lamps and feet (kg) 37
UV-C FiltAir 75
Width (mm) 1200
Depth (mm) 300
Height (mm) 2180
Airflow (m3/h) 200-1000
Recommended room area for 5 times/hour
complete air filtering (m2) 75
Filter type and size (mm) M6 502x502-22 2 pcs
Supply voltage (V) 230
Consumption (W) 210-283
Net weight without lamps and feet (kg) 57
UV- C Filt Air 1 5
UV- C Filt Air 4 5 UV- C Filt Air 75UV- C Filt Air 3 0
UV-C FiltAir 15 UV-C FiltAir 30 UV-C FiltAir 45 UV-C FiltAir 75

5
www.airvent.eu
UV-C FiltAir-S
UV-C FiltAir-S 15
Width (mm) 560
Depth (mm) 200
Height (mm) 2270
Airflow (m3/h) 50-200
Recommended room area for 5 times/hour
complete air filtering (m2) 15
Filter type and size (mm) M6 502x502-22
Supply voltage (V) 230
Consumption (W) 71-78
Net weight without lamps and feet (kg) 31
UV-C FiltAir-S 30
Width (mm) 820
Width (mm) 200
Height (mm) 2320
Airflow (m3/h) 50-400
Recommended room area for 5 times/hour
complete air filtering (m2)30
Filter type and size (mm) M6 756x502-22
Supply voltage (V) 230
Consumption (W) 133-154
Net weight without lamps and feet (kg) 43
UV-C FiltAir-S 45
Width (mm) 820
Depth (mm) 250
Height (mm) 2370
Airflow (m3/h) 100-600
Recommended room area for 5 times/hour
complete air filtering (m2)45
Filter type and size (mm) M6 756x502-22
Supply voltage (V) 230
Consumption (W) 130 -206
Net weight without lamps and feet (kg) 50
UV-C FiltAir-S 75
Width (mm) 1200
Depth (mm) 300
Height (mm) 2420
Airflow (m3/h) 200-1000
Recommended room area for 5 times/hour
complete air filtering (m2) 75
Filter type and size (mm) M6 502x502-22 2 pcs
Supply voltage (V) 230
Consumption (W) 210-283
Net weight without lamps and feet (kg) 75
UV- C Filt Air -S 15
UV- C Filt Air -S 30 UV- C Filt Air -S 45 UV- C Filt Air -S 75
UV-C FiltAir-S 15 UV-C FiltAir-S 30 UV-C FiltAir-S 45 UV-C FiltAir-S 75

6
Airvent UV-C FiltAir Instruction Manual
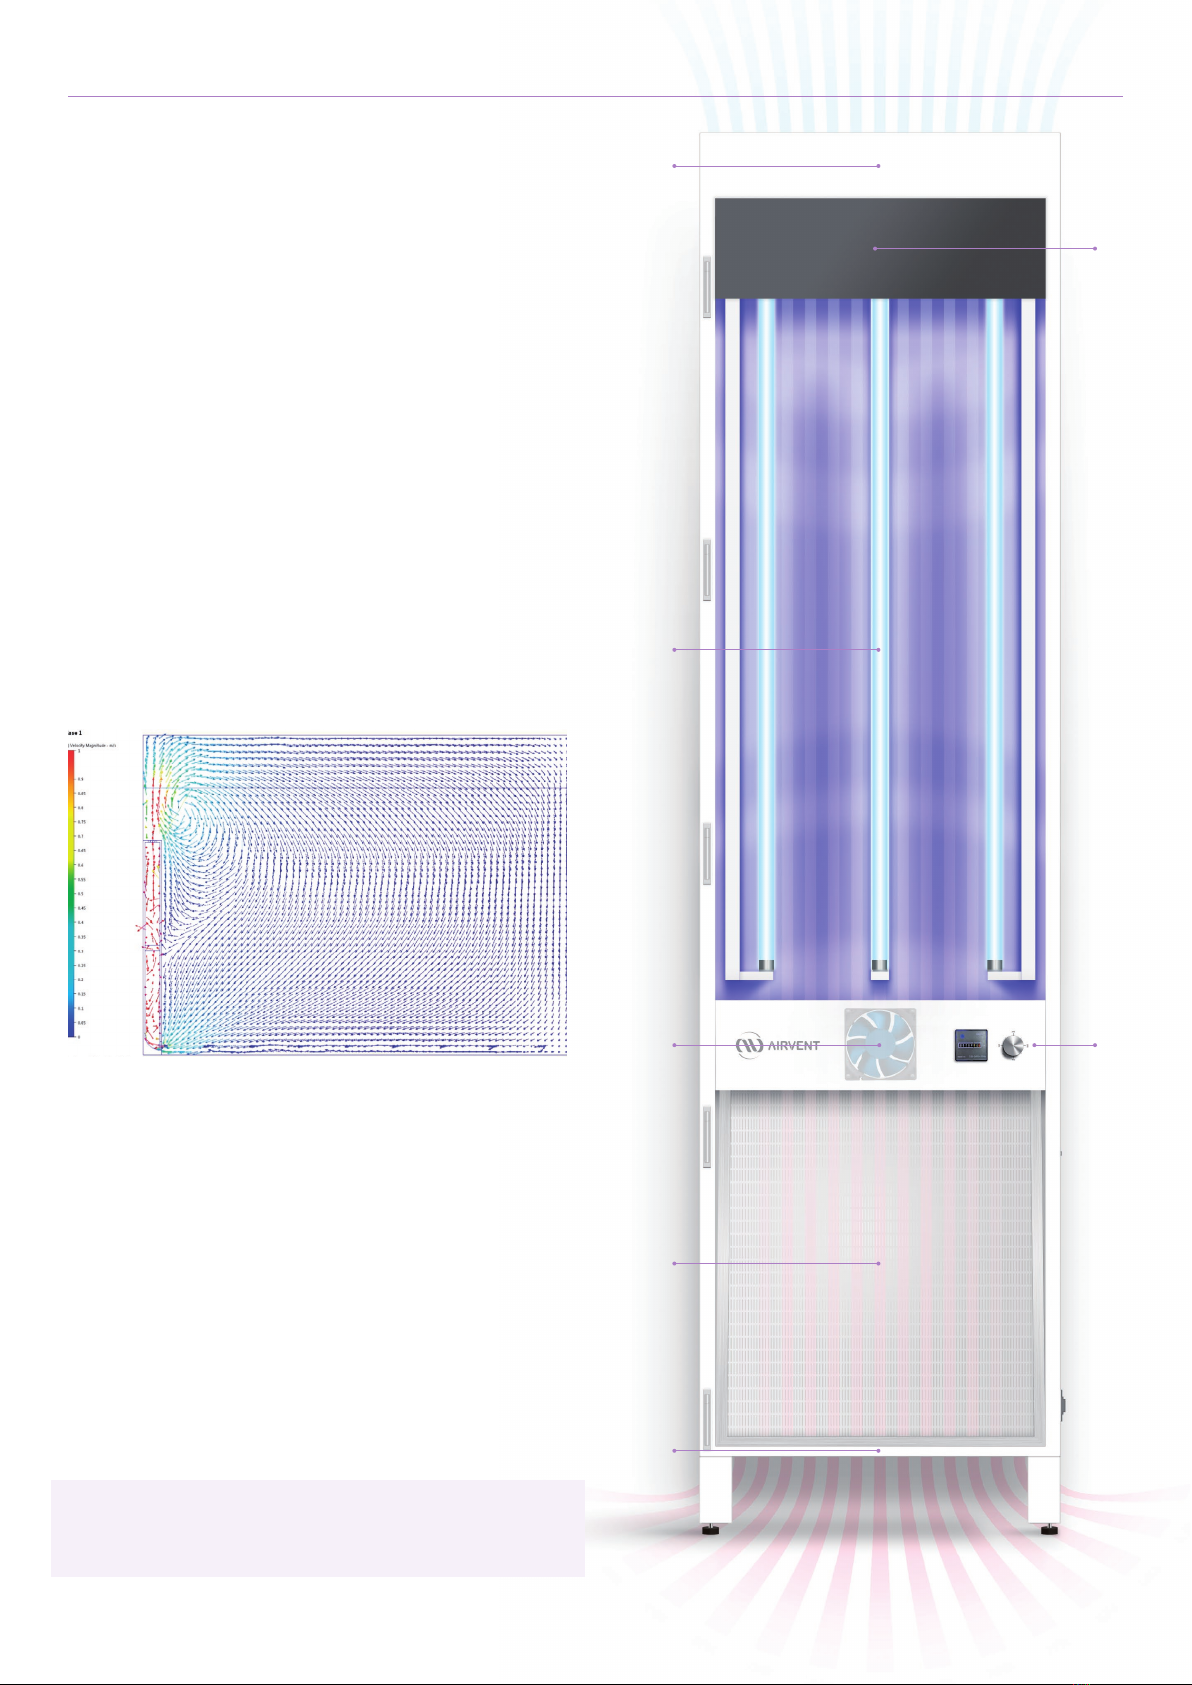
Sterilized air exhaustUV-C reactorFan
Airflow control
Air filterRoom air intake
Sound attenuator
Unit Description
Operation
The unit is used for efficient sterilization of indoor air. The unit
works as follows (from bottom to top):
1 The air is drawn into the unit at the bottom with the help of
the EC fans.
2 The air then goes through the filter which removes the
majority of airborne contaminants from the air.
3 The UV reactor sterilizes even the smallest remaining parti-
cles with UV-C radiation.
4 The sterilized air is then returned to the room through the
top of the unit. Please note that the unit has been designed
for rooms with internal height of 3 m. In case of higher inter-
nal height, please contact our sales team.
Infection carriers in aerosols from exhalation, sneezing and
coughing are particularly dangerous because they do not settle
due to their small size and can cause infection by floating in the
air for many hours. The advantageous airflow created by the
UV-C FiltAir sweeps down the airborne particles without vor-
tices and continuously sterilizes the room air through the unit.
CFD simulation of air moved by a UV-C FiltAir placed next to a wall in a room
with a ceiling height of 3 m.
UV-C Sterilization
In the first phase of operation, the device performs mechanical
cleaning: it removes solid contaminants from the air, and in the
second phase, it kills the pathogens that have passed through
the filter with UV-C radiation. UV-C radiation falls in the short-
wave range of the natural light spectrum, which, when used
properly, can be used safely and effectively for sterilization, as
shortwave ultraviolet radiation at 253.7 nm destroys the hered-
itary material of pathogens, preventing them from further infec-
tion. The UV-C tubes of the UV-C FiltAir are located in an optically
enclosed space, so the device can be used continuously even in
the presence of people. UV-C FiltAir germicidal light sources do
not generate ozone, so their continuous use is safe.
Attention! The UV-C FiltAir is not to be used for sanitizing
surfaces in the room, it does not replace basic hygienic rules -
especially those described by the law -, rather complements them.

7
www.airvent.eu
Installation of the Unit
Attention! Due to the large size of the UV-C FiltAir, two people are required to move it. (For size 75, the assistance of three people is re-
quired) The unit may only be installed by a specialist trained by Airvent. The installation and maintenance of the equipment (especially
with regard to the opening of the reactor space) may only be carried out by a specialist trained by Airvent.
Determining the installation location of the unit
The device should be placed in the middle of the room’s wall, in order to ensure free and unobstructed movement of the air above and
below the unit. The UV-C FiltAir can easily tip over due to the small installation depth and therefore must be firmly secured to the wall.
Unpacking
The unit must lie on the floor whilst unpacking. Remove the protective packaging carefully, so that the cardboard does not get
damaged. The cardboard contains marking patterns on the inside for drilling the mounting holes.
Removing Doors
The unit is delivered with germicide lamps, placed separately inside the unit, therefore the doors must be removed before the unit can
be used. The doors are held in place by hooks and a safety screw. Before removing the doors, unscrew the safety screw on the side of
the unit with the Allen key that is provided. Then push the door approx. 3 cm in an upward motion and lift the door off.
Temporary removal of safety screws Remove the filter door after removing the safety screw
Remove the UV reactor door after removing the safety screw Removing the sound attenuator panel: push the fixing springs horizontally to-
ward the middle, once the panel is released, it can be removed.

8
Airvent UV-C FiltAir Instruction Manual
Separately Packed Accessories
The UV-C lamps, screws, dowels and power cord can be found in
a seperate package inside the UV reactor. These must be removed
from the inside and placed in a safe place until the installation.
Remove the Filter
After turning the filter clamps, the filter can be tilted and re-
moved from the filter housing by reaching under the frame of
the filter.
Mounting the legs on the unit (optional accessory) The removal of the filter
Preparing Mounting Holes
A) Based on the Cardboard Template (Suggested Method)
The packaging consists of two identical corrugated cardboard
parts, which can also be used as a mounting template. On
the inside, marked points indicate where the mounting holes
should be drilled on the wall.
Size C (mm)
UV-C FiltAir 15 400
UV-C FiltAir 30 600
UV-C FiltAir 45 600
UV-C FiltAir 75 1050
Place the template on the wall at the designated location of the
unit. Make sure that the template is meeting the floor, so the unit
will be installed at the right height. Mark the mounting points on
the wall with a sharp tool (e.g. a screwdriver or a fixing screw). After
removing the template, the boreholes can then be drilled in. In
the case of damaged packaging, the holes can also be made as
shown in the figure. The fastening dowels depend on the material
of the wall. The device is supplied with dowels suitable for fixing
to solid (eg concrete, brick) wall materials. In the case of other wall
constructions, a suitable fastening element must be used.
Packaging cardboards can be used as a mounting template
Ø10 4x
1400+/–2375+/–2
C+/–2

9
www.airvent.eu
B) Marked Through the Unit
Place the unit at its designated place, and press it firmly against
the wall. Either use the optional feet, or leave at least 120 mm free
space below the unit.
Attention! After mounting the feet, the unit must be raised to a
vertical position by lifting it from two sides. Do not lift by tilting
it on its feet!
Mark the location of the boreholes on the wall through the
holes on the back sheet of the unit (marked in red), and then
put the unit aside for the duration of drilling. The machine must
be secured against tipping over during the drilling.
Size C (mm)
UV-C FiltAir 15 400
UV-C FiltAir 30 600
UV-C FiltAir 45 600
UV-C FiltAir 75 1050
Mounting the unit to the wall
The unit, standing on its feet, needs to be placed back to its des-
ignated place and then it must be firmly fixed to the wall in four
places with screws.
Mark the location of the boreholes through the holes on the back sheet of the unit
Inserting UV-C Fluorescent Tubes
The fluorescent lamps to be inserted into the socket at the bottom
and top and rotated 90 degrees to the right or left until they click. Pay
attention to holding them at the bottom and top with both hands.
Attention! It is recommended to use clean gloves or textile to
insert the fluorescent lamps, or to wipe the tubes with a slightly
damp alcohol swab after insertion. It is not permitted for the user
to open the reactor space and insert the UV-C lamps!
Inserting the Air Filter
The filter must be gently pressed into the bottom of the filter
housing until it stops and then tilted into its place. Then fix the
filter by turning the clips.
Inserting fluorescent lamps Inserting the air filter
Ø10 Ø10
Ø10 Ø10
1400
1400255120
110 C
C

10
Airvent UV-C FiltAir Instruction Manual
Fitting the Doors
Adjust the door to a height of approx 3 cm so that the hooks on the door are facing down. Then move the door down as far as it goes.
(The order is reversed as it was at dismantling.)
Attention! Once the doors have been fitted, the safety screws must be screwed back on so that nobody can remove the doors while
the unit is running.
• The device can only be connected to a 230 V power supply with protective earth.
• The UV-C FiltAir unit belongs to contact protection class I., protection class IP20.
• The 1,8 m power cable supplied as an accessory, must be installed without any risk of causing an accident, should be aesthetically
pleasing and should not constitute an obstacle during cleaning!
Installation and Use of UV-C FiltAir
UV-C Filt Air 45
1Make sure the doors and safety screws are in place. 2 Make sure that air can flow freely at the bottom and top of the
unit and that there are no objects on the top of the unit that
can obstruct the airflow.
3 Connect the machine to the mains and turn on the power
switch located on the bottom of the machine next to the socket.
4 The fan starts 10-20 seconds after the power has been turned on.
5
5 The airflow of the unit can be controlled with the potentiome-
ter on the front control panel.
6 When set to maximum airflow, the unit can recirculate the air
of the room five times an hour, in accordance with the nominal
size of the unit.
It is advisable to keep the unit running on maximum airflow for an hour after turning it on and then to set the air volume based on the
number of people in the room.

11
www.airvent.eu
Maintenance
Cleaning the Outer Casing
The cleaning of UV-C FiltAir is a basic requirement. Since the housing of the unit is C4 corrosion-resistant aluminum with UV-resis-
tant powder coating, it can be cleaned with a disinfectant with a minimum ethanol content of 70% as part of a standard cleaning
routine. For cleaning, it is recommended to wipe the outside of the entire unit with a cloth dampened slightly with alcohol to
remove any potential contaminants that may stick to the surface.
Filter Replacement
The counter on the control panel shows the operating time of the unit. It is recommended to replace the air filter every 2000 hour or in
every six month for a room with average level of pollution (e.g. office room in a smaller town). The filter door is held in place by hooks
with a safety screw. To remove the door, after disconnecting the unit, unscrew the safety screw on the side of the cover with an Allen
key 3 (supplied). Then shift the door approximately 3 cm in an upward motion, then the door can be taken off.
Attention! It is recommended to remove the used filter with rubber gloves and a suitable protective mask and dispose of it as hazard-
ous waste. After turning the filter clips, the filter can be tilted and lifted out of the filter housing by reaching under its frame.
After inserting the new filter, the doors need to be moved approximately 3 cm higher so that the hooks on the door are facing down.
Then move the door down as far as it will go. (The order is reversed as it was at dismantling.)
Attention! After the door is fitted, the safety screw must be reattached so that nobody can remove the door while the unit is running.
We recommend documenting the filter change on the Maintenance Form at the end of this manual.
Temporary removal of safety screws Lift the filter door after removing the safety screw

12
Airvent UV-C FiltAir Instruction Manual
Cleaning the UV-C Reactor Surface
The counter on the unit’s control panel shows the operating
time of the unit. It is recommended to clean the UV-C tubes and
the UV-C reactor chamber every 2000 hours. To do this, remove
the top door after unplugging the unit. To remove, first unscrew
the top of the two M5 safety screws on the right side of the unit
(seen from the front) with an Allen key 3 (supplied with the unit)
and push the door upwards by approximately 3 cm and then it
can be lifted off. During cleaning, it is advisable to wipe the UV-C
tubes and the inner surface of the UV reactor space with a cloth
dampened slightly with alcohol.
Attention! The reactor space must not be opened by the user. It
may only be opened by a professional trained by Airvent.
Replacement of UV-C Lamps
UV tubes must be replaced every 8000 hours (annually with con-
tinuous operation). After inserting new UV lamps, the doors need
to be moved approx. 3 cm higher so that the hooks on the door
are facing down. Then move the door down as far as it will go.
(The order is reversed as it was at dismantling.)
Removal of the top door
Attention! Replacement of UV-C lamps is not permitted by the user and may only be performed by a specialist trained by Airvent. After
fitting the door, the safety screw must be screwed back on so that unauthorized persons cannot remove the door. We recommend
documenting the replacement of UV-C lamps on the Maintenance Form at the end of this manual.
Replacing the Top Activated Carbon Filter Plate
It is recommended to replace the activated carbon filter plate on the top of the unit once in a year. To replace, after switching off the
unit, the UV-C reactor compartment door must be removed as described in the previous sketch. After removing the door, pull out the
filter holder below the top grille. Lift the clamping grid out of the tray and then remove the used filter plate.
Attention! it is recommended to remove the used filter with rubber gloves and a suitable protective mask and dispose of it as hazardous waste.
The tray and clamping grid must be wiped with a disinfectant containing at least 70% ethanol. You can then insert the new filter plate,
the clamping grille, then place the filter tray back and refit the door as described above.
Attention! After the door has been fitted, the safety screw must be screwed back on so that unauthorized people cannot remove the
door. We recommend documenting the filter change on the Maintenance Form at the end of this manual.
Replacing the top activated carbon filter plate

13
www.airvent.eu
Maintenance Form
Date
Counter
is at
Maintenance
done by
Filter
replacement
Every 2000 hours
or in every 6 months
Activated carbon
filter replacement
Every year
UV tubes & reactor
space cleaning
Every 2000 hours
UV tubes
replacement
Every 8000 hours
. . . . . . . . . . . . . . . . . . . . . . . . . . . . . ................ .............................
. . . . . . . . . . . . . . . . . . . . . . . . . . . . . ................ .............................
. . . . . . . . . . . . . . . . . . . . . . . . . . . . . ................ .............................
. . . . . . . . . . . . . . . . . . . . . . . . . . . . . ................ .............................
. . . . . . . . . . . . . . . . . . . . . . . . . . . . . ................ .............................
. . . . . . . . . . . . . . . . . . . . . . . . . . . . . ................ .............................
. . . . . . . . . . . . . . . . . . . . . . . . . . . . . ................ .............................
. . . . . . . . . . . . . . . . . . . . . . . . . . . . . ................ .............................
. . . . . . . . . . . . . . . . . . . . . . . . . . . . . ................ .............................
. . . . . . . . . . . . . . . . . . . . . . . . . . . . . ................ .............................
. . . . . . . . . . . . . . . . . . . . . . . . . . . . . ................ .............................
. . . . . . . . . . . . . . . . . . . . . . . . . . . . . ................ .............................
. . . . . . . . . . . . . . . . . . . . . . . . . . . . . ................ .............................
. . . . . . . . . . . . . . . . . . . . . . . . . . . . . ................ .............................
. . . . . . . . . . . . . . . . . . . . . . . . . . . . . ................ .............................
. . . . . . . . . . . . . . . . . . . . . . . . . . . . . ................ .............................
. . . . . . . . . . . . . . . . . . . . . . . . . . . . . ................ .............................
. . . . . . . . . . . . . . . . . . . . . . . . . . . . . ................ .............................
. . . . . . . . . . . . . . . . . . . . . . . . . . . . . ................ .............................
. . . . . . . . . . . . . . . . . . . . . . . . . . . . . ................ .............................
. . . . . . . . . . . . . . . . . . . . . . . . . . . . . ................ .............................
. . . . . . . . . . . . . . . . . . . . . . . . . . . . . ................ .............................
. . . . . . . . . . . . . . . . . . . . . . . . . . . . . ................ .............................
. . . . . . . . . . . . . . . . . . . . . . . . . . . . . ................ .............................
. . . . . . . . . . . . . . . . . . . . . . . . . . . . . ................ .............................
. . . . . . . . . . . . . . . . . . . . . . . . . . . . . ................ .............................
. . . . . . . . . . . . . . . . . . . . . . . . . . . . . ................ .............................
. . . . . . . . . . . . . . . . . . . . . . . . . . . . . ................ .............................
. . . . . . . . . . . . . . . . . . . . . . . . . . . . . ................ .............................
. . . . . . . . . . . . . . . . . . . . . . . . . . . . . ................ .............................
. . . . . . . . . . . . . . . . . . . . . . . . . . . . . ................ .............................
. . . . . . . . . . . . . . . . . . . . . . . . . . . . . ................ .............................

14
Airvent UV-C FiltAir Instruction Manual
Parts
Replacement Parts
UV-C FiltAir 15
Part name Part code pc/unit
LTC28T8 30W UVC T8 fluorescent lamp LTC28T8 30W UVC T8 2
FP-M6-G22 panel filter with metal frame 502x502-22 FP-M6-G22 502x502x22 1
UV-C FiltAir 15 Activated carbon impregnated filter material CARBOTEX400 504x185 1
UV-C FiltAir 30
Part name Part code pc/unit
LTC28T8 30W UVC T8 fluorescent lamp LTC28T8 30W UVC T8 4
FP-M6-G22 panel filter with metal frame 756x502-22 FP-M6-G22 502x756x22 1
UV-C FiltAir 30 Activated carbon impregnated filter material CARBOTEX400 764x185 1
UV-C FiltAir 45
Part name Part code pc/unit
LTC28T8 30W UVC T8 fluorescent lamp LTC28T8 30W UVC T8 4
FP-M6-G22 panel filter with metal frame 756x502-22 FP-M6-G22 502x756x22 1
UV-C FiltAir 45 Activated carbon impregnated filter material CARBOTEX400 764x235 1
UV-C FiltAir 75
Part name Part code pc/unit
LTC28T8 30W UVC T8 fluorescent lamp LTC28T8 30W UVC T8 6
FP-M6-G22 panel filter with metal frame 502x502-22 FP-M6-G22 502x502x22 2
UV-C FiltAir 75 Activated carbon impregnated filter material A R BOT E X 4 0 0 114 4 x 285 1
Optional Parts
Part name pc/unit
UV-C FiltAir mounting feet 4
Safety Pack including Torx screws and cover plate for the potentiometer
Portable frame with wheels

15
www.airvent.eu
Notes
. . . . . . . . . . . . . . . . . . . . . . . . . . . . . . . . . . . . . . . . . . . . . . . . . . . . . . . . . . . . . . . . . . . . . . . . . . . . . . . . . . . . . . . . . . . . . . . . . . . . . . . . . . . . . . . . . . . . . . . . . . . . . . . . . . . . . . . . . . . . . . . . . . . . . . . . . . . . . . . . . . . . . . . .
. . . . . . . . . . . . . . . . . . . . . . . . . . . . . . . . . . . . . . . . . . . . . . . . . . . . . . . . . . . . . . . . . . . . . . . . . . . . . . . . . . . . . . . . . . . . . . . . . . . . . . . . . . . . . . . . . . . . . . . . . . . . . . . . . . . . . . . . . . . . . . . . . . . . . . . . . . . . . . . . . . . . . . . .
. . . . . . . . . . . . . . . . . . . . . . . . . . . . . . . . . . . . . . . . . . . . . . . . . . . . . . . . . . . . . . . . . . . . . . . . . . . . . . . . . . . . . . . . . . . . . . . . . . . . . . . . . . . . . . . . . . . . . . . . . . . . . . . . . . . . . . . . . . . . . . . . . . . . . . . . . . . . . . . . . . . . . . . .
. . . . . . . . . . . . . . . . . . . . . . . . . . . . . . . . . . . . . . . . . . . . . . . . . . . . . . . . . . . . . . . . . . . . . . . . . . . . . . . . . . . . . . . . . . . . . . . . . . . . . . . . . . . . . . . . . . . . . . . . . . . . . . . . . . . . . . . . . . . . . . . . . . . . . . . . . . . . . . . . . . . . . . . .
. . . . . . . . . . . . . . . . . . . . . . . . . . . . . . . . . . . . . . . . . . . . . . . . . . . . . . . . . . . . . . . . . . . . . . . . . . . . . . . . . . . . . . . . . . . . . . . . . . . . . . . . . . . . . . . . . . . . . . . . . . . . . . . . . . . . . . . . . . . . . . . . . . . . . . . . . . . . . . . . . . . . . . . .
. . . . . . . . . . . . . . . . . . . . . . . . . . . . . . . . . . . . . . . . . . . . . . . . . . . . . . . . . . . . . . . . . . . . . . . . . . . . . . . . . . . . . . . . . . . . . . . . . . . . . . . . . . . . . . . . . . . . . . . . . . . . . . . . . . . . . . . . . . . . . . . . . . . . . . . . . . . . . . . . . . . . . . . .
. . . . . . . . . . . . . . . . . . . . . . . . . . . . . . . . . . . . . . . . . . . . . . . . . . . . . . . . . . . . . . . . . . . . . . . . . . . . . . . . . . . . . . . . . . . . . . . . . . . . . . . . . . . . . . . . . . . . . . . . . . . . . . . . . . . . . . . . . . . . . . . . . . . . . . . . . . . . . . . . . . . . . . . .
. . . . . . . . . . . . . . . . . . . . . . . . . . . . . . . . . . . . . . . . . . . . . . . . . . . . . . . . . . . . . . . . . . . . . . . . . . . . . . . . . . . . . . . . . . . . . . . . . . . . . . . . . . . . . . . . . . . . . . . . . . . . . . . . . . . . . . . . . . . . . . . . . . . . . . . . . . . . . . . . . . . . . . . .
. . . . . . . . . . . . . . . . . . . . . . . . . . . . . . . . . . . . . . . . . . . . . . . . . . . . . . . . . . . . . . . . . . . . . . . . . . . . . . . . . . . . . . . . . . . . . . . . . . . . . . . . . . . . . . . . . . . . . . . . . . . . . . . . . . . . . . . . . . . . . . . . . . . . . . . . . . . . . . . . . . . . . . . .
. . . . . . . . . . . . . . . . . . . . . . . . . . . . . . . . . . . . . . . . . . . . . . . . . . . . . . . . . . . . . . . . . . . . . . . . . . . . . . . . . . . . . . . . . . . . . . . . . . . . . . . . . . . . . . . . . . . . . . . . . . . . . . . . . . . . . . . . . . . . . . . . . . . . . . . . . . . . . . . . . . . . . . . .
. . . . . . . . . . . . . . . . . . . . . . . . . . . . . . . . . . . . . . . . . . . . . . . . . . . . . . . . . . . . . . . . . . . . . . . . . . . . . . . . . . . . . . . . . . . . . . . . . . . . . . . . . . . . . . . . . . . . . . . . . . . . . . . . . . . . . . . . . . . . . . . . . . . . . . . . . . . . . . . . . . . . . . . .
. . . . . . . . . . . . . . . . . . . . . . . . . . . . . . . . . . . . . . . . . . . . . . . . . . . . . . . . . . . . . . . . . . . . . . . . . . . . . . . . . . . . . . . . . . . . . . . . . . . . . . . . . . . . . . . . . . . . . . . . . . . . . . . . . . . . . . . . . . . . . . . . . . . . . . . . . . . . . . . . . . . . . . . .
. . . . . . . . . . . . . . . . . . . . . . . . . . . . . . . . . . . . . . . . . . . . . . . . . . . . . . . . . . . . . . . . . . . . . . . . . . . . . . . . . . . . . . . . . . . . . . . . . . . . . . . . . . . . . . . . . . . . . . . . . . . . . . . . . . . . . . . . . . . . . . . . . . . . . . . . . . . . . . . . . . . . . . . .
. . . . . . . . . . . . . . . . . . . . . . . . . . . . . . . . . . . . . . . . . . . . . . . . . . . . . . . . . . . . . . . . . . . . . . . . . . . . . . . . . . . . . . . . . . . . . . . . . . . . . . . . . . . . . . . . . . . . . . . . . . . . . . . . . . . . . . . . . . . . . . . . . . . . . . . . . . . . . . . . . . . . . . . .
. . . . . . . . . . . . . . . . . . . . . . . . . . . . . . . . . . . . . . . . . . . . . . . . . . . . . . . . . . . . . . . . . . . . . . . . . . . . . . . . . . . . . . . . . . . . . . . . . . . . . . . . . . . . . . . . . . . . . . . . . . . . . . . . . . . . . . . . . . . . . . . . . . . . . . . . . . . . . . . . . . . . . . . .
. . . . . . . . . . . . . . . . . . . . . . . . . . . . . . . . . . . . . . . . . . . . . . . . . . . . . . . . . . . . . . . . . . . . . . . . . . . . . . . . . . . . . . . . . . . . . . . . . . . . . . . . . . . . . . . . . . . . . . . . . . . . . . . . . . . . . . . . . . . . . . . . . . . . . . . . . . . . . . . . . . . . . . . .
. . . . . . . . . . . . . . . . . . . . . . . . . . . . . . . . . . . . . . . . . . . . . . . . . . . . . . . . . . . . . . . . . . . . . . . . . . . . . . . . . . . . . . . . . . . . . . . . . . . . . . . . . . . . . . . . . . . . . . . . . . . . . . . . . . . . . . . . . . . . . . . . . . . . . . . . . . . . . . . . . . . . . . . .
. . . . . . . . . . . . . . . . . . . . . . . . . . . . . . . . . . . . . . . . . . . . . . . . . . . . . . . . . . . . . . . . . . . . . . . . . . . . . . . . . . . . . . . . . . . . . . . . . . . . . . . . . . . . . . . . . . . . . . . . . . . . . . . . . . . . . . . . . . . . . . . . . . . . . . . . . . . . . . . . . . . . . . . .
. . . . . . . . . . . . . . . . . . . . . . . . . . . . . . . . . . . . . . . . . . . . . . . . . . . . . . . . . . . . . . . . . . . . . . . . . . . . . . . . . . . . . . . . . . . . . . . . . . . . . . . . . . . . . . . . . . . . . . . . . . . . . . . . . . . . . . . . . . . . . . . . . . . . . . . . . . . . . . . . . . . . . . . .
. . . . . . . . . . . . . . . . . . . . . . . . . . . . . . . . . . . . . . . . . . . . . . . . . . . . . . . . . . . . . . . . . . . . . . . . . . . . . . . . . . . . . . . . . . . . . . . . . . . . . . . . . . . . . . . . . . . . . . . . . . . . . . . . . . . . . . . . . . . . . . . . . . . . . . . . . . . . . . . . . . . . . . . .
. . . . . . . . . . . . . . . . . . . . . . . . . . . . . . . . . . . . . . . . . . . . . . . . . . . . . . . . . . . . . . . . . . . . . . . . . . . . . . . . . . . . . . . . . . . . . . . . . . . . . . . . . . . . . . . . . . . . . . . . . . . . . . . . . . . . . . . . . . . . . . . . . . . . . . . . . . . . . . . . . . . . . . . .
. . . . . . . . . . . . . . . . . . . . . . . . . . . . . . . . . . . . . . . . . . . . . . . . . . . . . . . . . . . . . . . . . . . . . . . . . . . . . . . . . . . . . . . . . . . . . . . . . . . . . . . . . . . . . . . . . . . . . . . . . . . . . . . . . . . . . . . . . . . . . . . . . . . . . . . . . . . . . . . . . . . . . . . .
. . . . . . . . . . . . . . . . . . . . . . . . . . . . . . . . . . . . . . . . . . . . . . . . . . . . . . . . . . . . . . . . . . . . . . . . . . . . . . . . . . . . . . . . . . . . . . . . . . . . . . . . . . . . . . . . . . . . . . . . . . . . . . . . . . . . . . . . . . . . . . . . . . . . . . . . . . . . . . . . . . . . . . . .
. . . . . . . . . . . . . . . . . . . . . . . . . . . . . . . . . . . . . . . . . . . . . . . . . . . . . . . . . . . . . . . . . . . . . . . . . . . . . . . . . . . . . . . . . . . . . . . . . . . . . . . . . . . . . . . . . . . . . . . . . . . . . . . . . . . . . . . . . . . . . . . . . . . . . . . . . . . . . . . . . . . . . . . .

www.airvent.eu
ENG
Airvent Headquarters
6000 Kecskemét, Belsőnyír 150. Hungary
Phone: +36 30 938 1141 or +36 30 248 1169
Email: export@airvent.hu
Other manuals for UV-C FiltAir
1
This manual suits for next models
4
Table of contents
Other Air Vent Laboratory Equipment manuals
Popular Laboratory Equipment manuals by other brands

Thermo Scientific
Thermo Scientific Haematocrit-Rotor 7500 3473 Instructions for use

Fluke
Fluke TIP900 operating instructions

Parallax
Parallax PDT-PIN-7002-MP-I Operation manual

Prestige medical
Prestige medical Advance user manual

Integra
Integra WELLJET 5000 quick start guide

Hettich
Hettich MIKRO 185 operating manual

Izon
Izon EXOID user manual

Arjo
Arjo Ninjo FD1600 Instructions for use

nanoString
nanoString nCounter Pro user manual

Bego
Bego Nautilus CC plus Translation of the original instructions

Diesse
Diesse MINI-CUBE user manual

Barnstead Thermolyne Corporation
Barnstead Thermolyne Corporation Lab-Line 4628 Operation manual