Airlink101 AICAP650W User manual

SkyIPCam650W
Model # AICAP650W
User’s Manual
Ver. 1.0

2
Table of Contents
1. Introduction................................................................................................................................. 3
2. Getting Started............................................................................................................................ 7
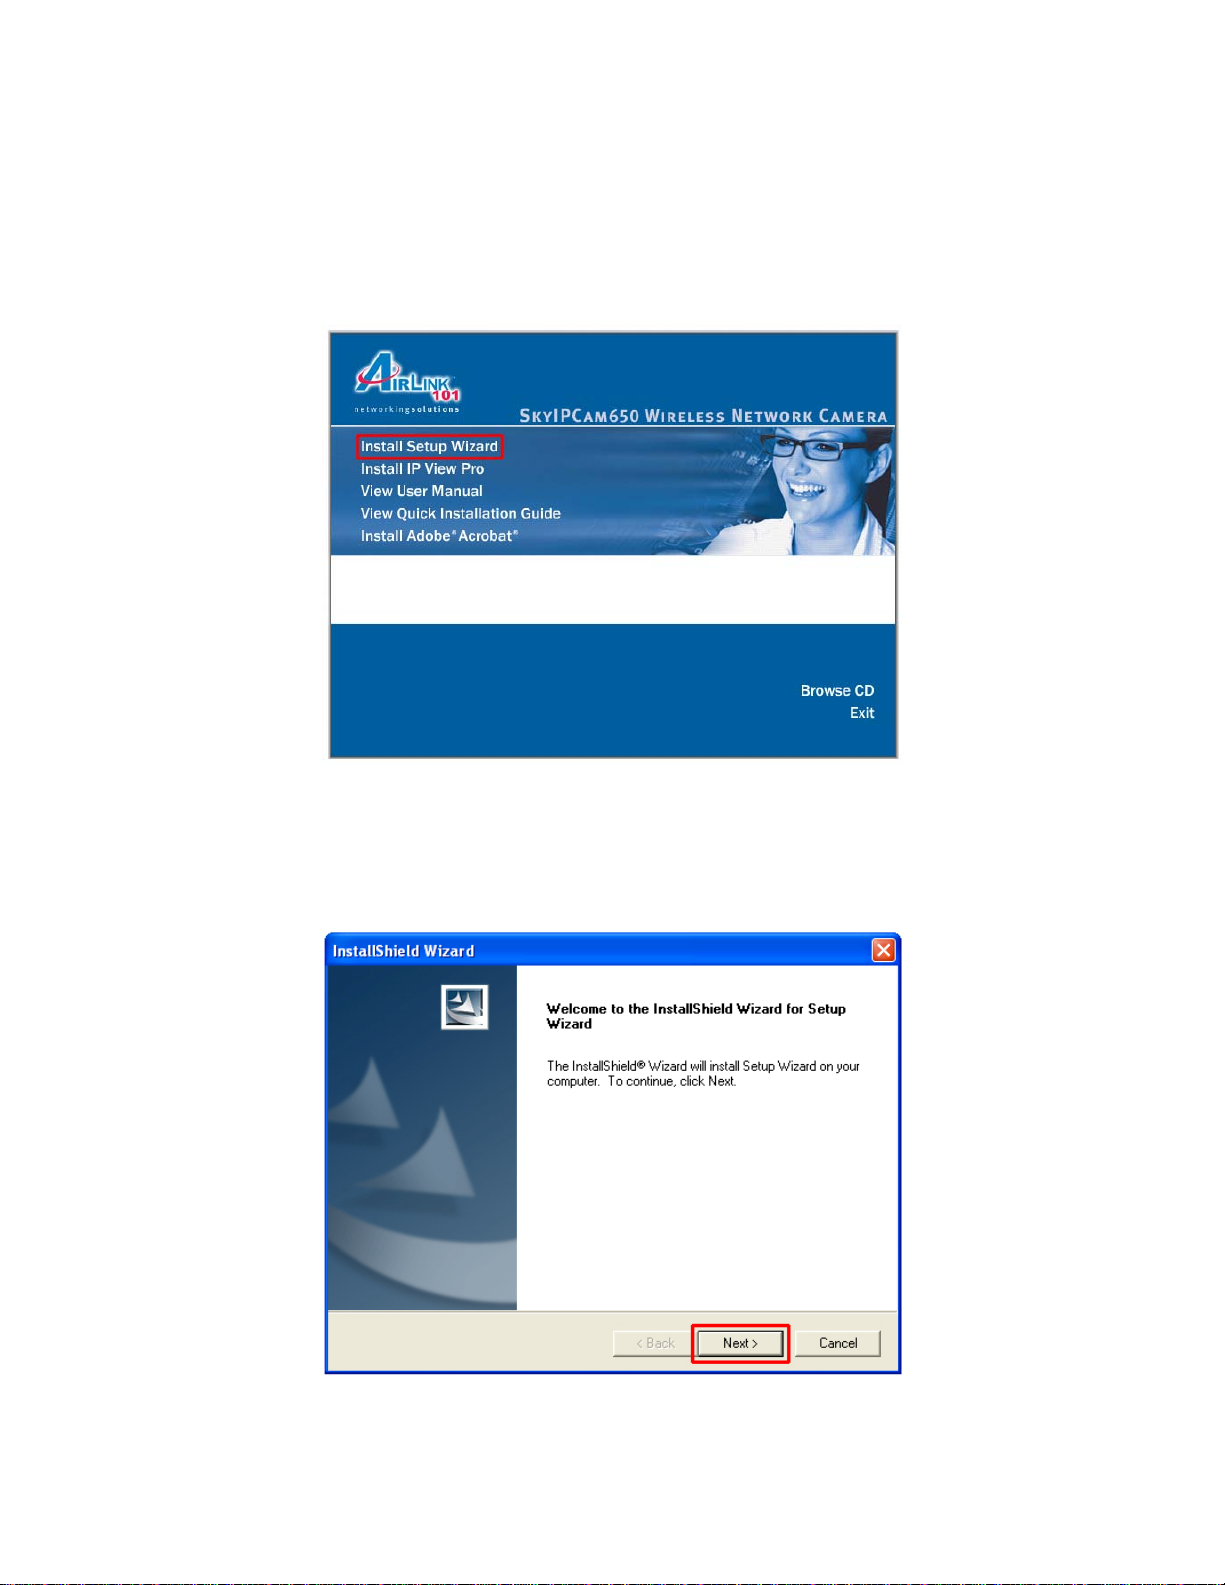
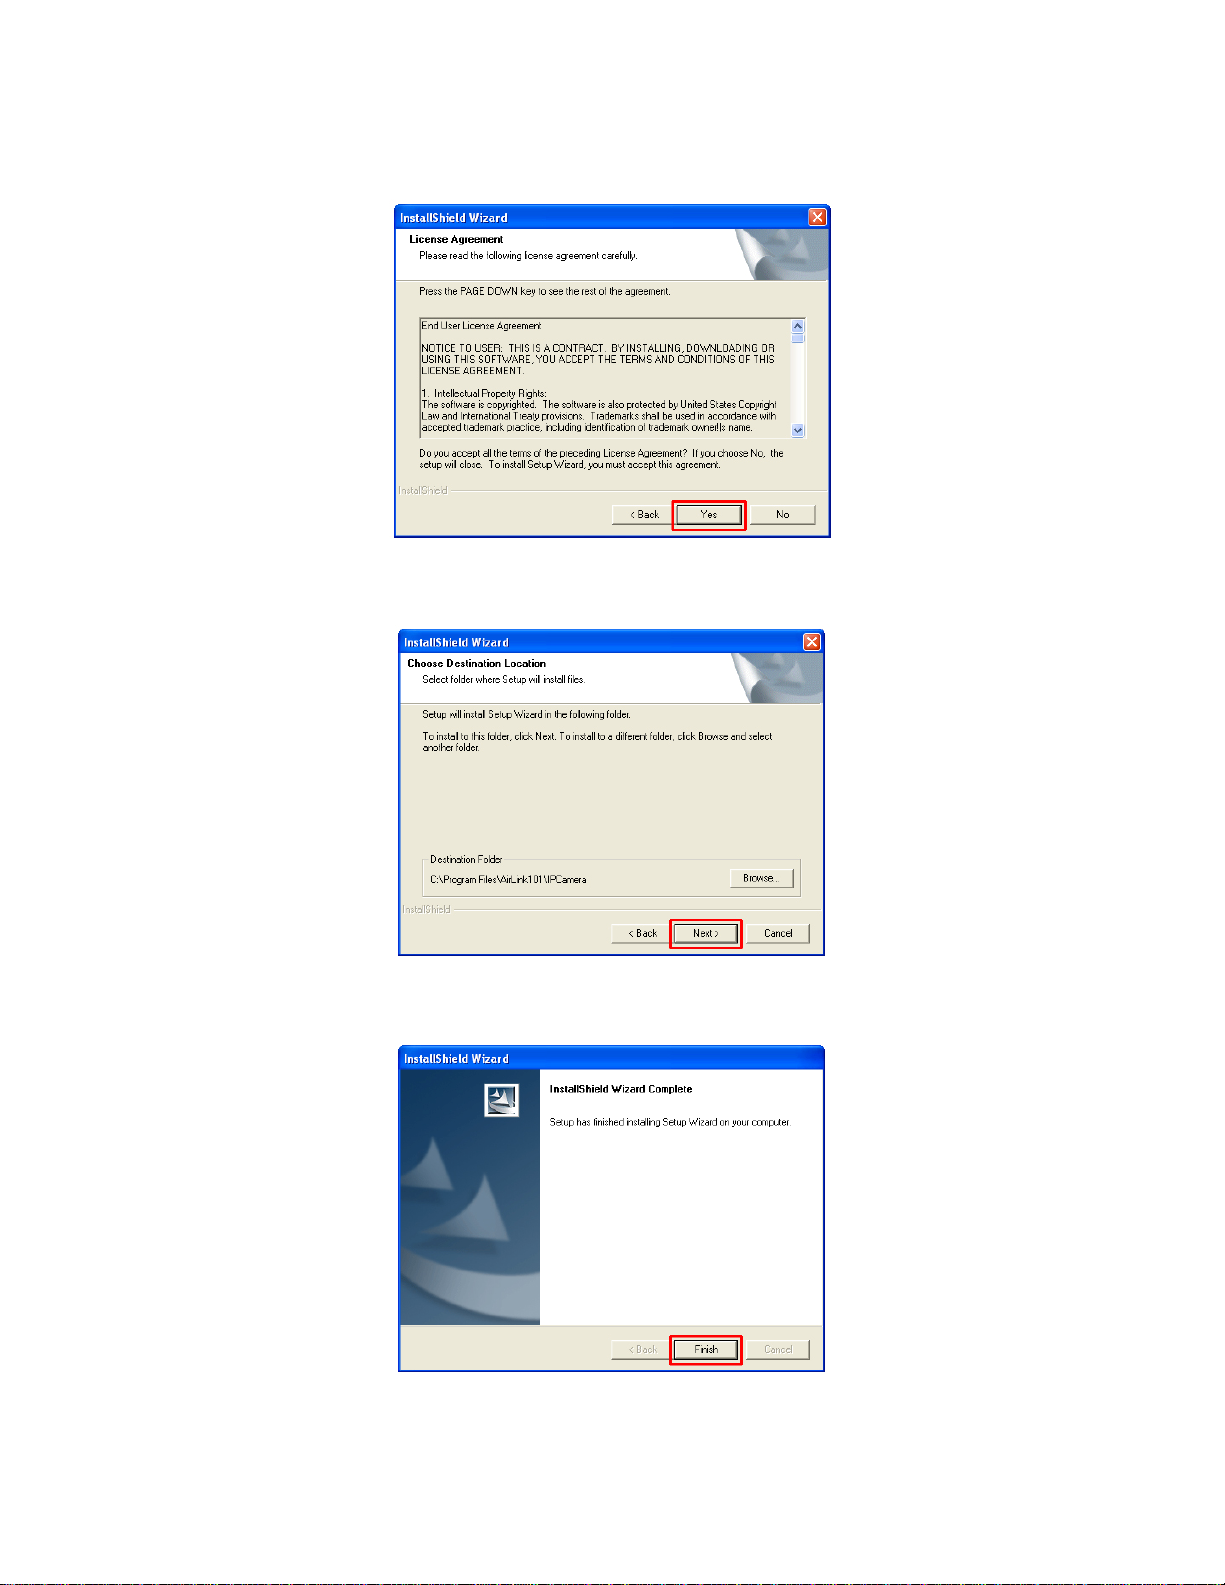
3. Installing the Setup Wizard......................................................................................................... 9
4. Using the Setup Wizard............................................................................................................ 11
5. Viewing Images........................................................................................................................ 15
6. Enabling and Installing ActiveX............................................................................................... 17
7. Web Configuration Utility........................................................................................................ 21
7.1 Main Menu.......................................................................................................................... 22
7.2 Preset Menu ........................................................................................................................ 24
7.3 Record Video and Capture Image....................................................................................... 25
7.4 Setting Menu....................................................................................................................... 26
7.5 Multiview Mode.................................................................................................................. 27
7.6 Advanced Setting................................................................................................................ 28
7.6.1 Camera Setting............................................................................................................. 28
7.6.2 Security Setting............................................................................................................ 31
7.6.3 Network Setting........................................................................................................... 34
7.6.4 System Setting ............................................................................................................. 41
7.6.5 Maintenance................................................................................................................. 44
8. Viewing Videos from External Network.................................................................................. 49
9. IPView Pro................................................................................................................................ 52
9.1 Installing IPView Pro.......................................................................................................... 52
9.2 Starting IPView Pro............................................................................................................ 54
9.2.1 Adding Camera using the Search Method................................................................... 55
9.2.2 Adding Camera using the Input IP Method................................................................. 59
9.3 Using IPView Pro............................................................................................................... 61
9.3.1 Status Mode Window................................................................................................... 61
9.3.2 View Window and View Mode Buttons...................................................................... 63
9.3.3 Control Panel ............................................................................................................... 64
9.4 System Configuration ......................................................................................................... 66
9.4.1 Web Configuration....................................................................................................... 67
9.4.2 Motion Configuration-1............................................................................................... 68
9.4.3 Motion Configuration-2............................................................................................... 70
9.4.4 Tools ............................................................................................................................ 71
9.5 Mail Configuration.............................................................................................................. 72
9.6 Proxy Server........................................................................................................................ 73
9.7 Recording Configuration .................................................................................................... 74
9.7.1 Schedule-Recording Configuration ............................................................................. 75
9.8 Others.................................................................................................................................. 77
9.9 Log List............................................................................................................................... 78
9.10 Account............................................................................................................................. 79
9.11 About................................................................................................................................. 80
Frequently Asked Questions......................................................................................................... 81
Specification ................................................................................................................................. 83
Technical Support......................................................................................................................... 85

3
1. Introduction
Congratulations on your purchase of this SkyIPCam 650. The IP Camera allows you to
view images and live videos from internal and external networks. With a built-in CPU
and Web Configuration Utility, the IP Camera is a standalone network device that
delivers high quality videos at a low cost of ownership. The built-in Web Configuration
Utility allows any computer that’s connected to the network to remotely manage the IP
Camera. Combined with the bundled Setup Wizard and IPView Pro software, managing
and viewing multiple IP Cameras is simple and efficient.
Instructions for installing and configuring this product can be found in this manual.
Before you install and use this product, please read this manual carefully for proper
operation of the product.
Package Contents
Before you begin the installation, please check the items of your package:
•SkyIPCam650W
•Camera Stand
•RJ-45 Ethernet Cable
•AC Power Adapter
•Quick Installation Guide
•Installation CD
If any item contained is damaged or missing, please contact your local dealer
immediately. Also, keep the box and packaging materials in case you need to ship the
unit in the future.
System Requirement
Please review the following system requirement.
•OS: Windows® 98SE/ME/2000/XP.
•CPU: 650MHz or above (2.4 GHz recommended when monitoring multiple
cameras simultaneously)
•Memory Size: 256MB
•Resolution: 1024x768 or above
•Web Browser: Internet Explorer 5.0 or above

4
Components Guide
This section explains the function of each component.
Front and Side View
1. Internal MIC
The built-in Omni-directional microphone allows the camera to record sound.
2. ACCESS LED
The ACCESS LED indicates the system status with:
Green light on: The camera is powered on.
Green light flashing: The camera is sending/receiving data to/from the LAN port.
Orange light flashing slowly: The camera is in Privacy Mode.
3. PIR Sensor
The Passive Infrared Sensor (PIR) Sensor detects motion of an infrared emitting source
which allows you to monitor the target area dynamically. In order to use this motion
detection feature, you have to enable the sensor from the Web Configuration Utility.

5
4. Camera Lens
To adjust the focus of the lens, turn the lens slowly in either clockwise or counter-
clockwise direction until the image is in focus. DO NOT overturn the lens in either
direction.
5. Flash LED
The Flash LED allows you to capture video images even in dark environments. You can
turn on the flash light from the Web Configuration Utility.
6. USB Port
The USB port allows you to expand the storage medium by connecting a USB storage
device via the USB port. Please refer to Section 7.6.2 Security Setting for information
about storing image files to the USB device via motion sensor triggers and/or via
scheduled settings. You can click on the Log Display sub-menu to monitor any activity
for the USB port. The Camera will stop the storage and activate the buzzer when the
USB storage device has less than 5% of remaining free space.
7. STATUS LED
The STATUS LED indicates the configuration status with:
Green light flashing: The camera is powered on and functions in normal mode.
Orange-Red light flashing: Indicates the camera cannot access DHCP within the
network.
8. Privacy Mode Button
Press this button to enter into Privacy Mode. The camera stops monitoring in this mode.
Also, you can safely remove the USB storage device from the USB port by pressing and
holding this button for 5 seconds until the camera activates the buzzer.
9. LAN Port
This RJ-45 connector is used to connect the 10Base-T Ethernet or 100Base-TX Fast
Ethernet network cable (which should be Category 5 twisted-pair cable). The port
supports the NWay protocol, allowing the camera to automatically detect or negotiate
the transmission speed of the network.
10. DC Power Connector
The DC power input is labeled DC 5V with a single jack socket to supply power to the
camera. Power will be generated when the power supply is connected to a wall outlet.
11. Camera Stand
The camera stand allows you to place the camera on a flat surface instead of hanging
on the wall or installing on a tripod.

6
Rear and Bottom View
1. Screw Hole
The screw hole is used to attach the camera to a stand or tripod.
2. Reset Button
Press the button to reboot the camera. Press and hold the button for 5 seconds will
reset the camera’ settings to the factory default. Alternatively, you can perform reboot or
factory reset from the Web Configuration Utility.
3. Hanging Hole
These two holes allow you to hang the camera on a wall.

7
2. Getting Started
Note: Before using the IP Camera, you’ll need to perform the following tasks:
1. Connect the IP Camera to your network.
2. Install the Setup Wizard.
3. Configure the IP Camera using the Setup Wizard.
Please follow the steps in this Manual carefully to ensure proper setup of the IP Camera.
Caution: The IP Camera is designed for indoor use only. Direct exposure to sunlight
may cause permanent damage to the CMOS sensor. When operating in extremely
bright environment, an iris lens or sun visor is recommended to protect the IP Camera.
Step 1 Align the camera stand with the bottom part of the camera. Then, secure the
camera stand with the screw.

8
Step 2 Connect one end of the network cable to the IP Camera and connect the other
end to one of the LAN ports of the wireless router.
Step 3 Power on the IP Camera by connecting one end of the supplied power adapter
to the power jack of the Camera and connecting the other end to an electrical outlet.
Step 4 Verify that the LED lights on the Camera are lit. If not, verify that all the
connections are secure and try again.

9
3. Installing the Setup Wizard
Step 1 Insert the provided CD and wait for the autorun screen to appear.
Step 2 Click on Install Setup Wizard.
Note: If the autorun screen does not appear automatically, go to Start, Run, type
D:\ Setup\Setup.exe (where Dis the letter of your CD drive) and click OK.
Step 3 Click Next.

10
Step 4 Click Yes to accept the License Agreement.
Step 5 Click Next to accept the default Destination Folder.
Step 6 Click Finish to complete the installation.

11
4. Using the Setup Wizard
Step 1 Go to Start > (All) Programs > AirLink101 IP Camera Setup Wizard >
AirLink101 IP Camera Setup Wizard.
Step 2 Select the IP Camera you want to configure from the list and click on the Wizard
button.

12
Step 3 If the Camera’s default IP address is on a different subnet, the following
message will appear. Click Yes to continue. If you do not receive this message, skip to
Step 6.
Step 4 Enter admin for both the Admin ID and Password and click OK.
Step 5 The Wizard will automatically generate an IP address for the camera, if this
address is not in use by any other device in your local network, click OK. Otherwise,
enter an available IP address (ex. 192.168.x.240) and click OK.

13
Step 6 Enter admin for both the Admin ID and Password field and click Next.
Optionally, you can change the password by checking on the Change box and entering
the new password.
Step 7 If you need to change the Camera’s IP address because another network device
is already using the same address, you can assign a new address here and click Next.
Step 8 Enter the SSID of your wireless router in the SSID field and click Next. If you
have encryption enabled for your wireless network, follow the subsequent steps,
otherwise skip to Step 10.

14
WEP
Step 9a Select the appropriate Key Format and enter the same WEP Code Key as
your wireless router. Click Next and skip to Step 10.
WPA
Step 9b Enter the same WPA Share Key as your wireless router and click Next.
Step 10 Verify that all the fields are correct and click Restart to save the settings and
reboot the camera.

15
5. Viewing Images
Note: The following steps describe how to view images from within the same local area
network as the IP Camera. To view images from an external network such as the
Internet, please refer to Section 8 of this manual for further instructions.
Step 1 At the Setup Wizard, select the desired camera from the list and click on the
Web Config button.
Step 2 Enter the password for the camera (Default is admin) and click OK.

16
Step 3 The welcome page appears. If you did not change the default password, you will
be prompted to do so before accessing the camera.
Step 4 The Main menu along with the live video appears on screen. The IP camera is
ready for use now.
Note: ActiveX must be installed and enabled on your Web Browser (Internet Explorer)
before you can view the live videos. For more information, please refer to the next
section.

17
6. Enabling and Installing ActiveX
If no image appears on the web browser (Internet Explorer), follow the steps below to
enable and install ActiveX
Step 1 Open Internet Explorer and go to Tools > Internet Options.
Step 2 Select the Security tab and click on Custom Level.

18
Step 3 Verify the following settings are selected. Click OK when done:
•Automatic prompting for ActiveX controls: Enable
•Download signed ActiveX controls: Prompt
•Run ActiveX controls and plug-ins: Enable
Step 4 Close Internet Explorer and re-launch the Web Config screen.

19
Step 5 Click on the ActiveX Control prompt.
Step 6 Select Install ActiveX Control.
Step 7 Click on Install to install the ActiveX Control.
Step 8 After the ActiveX Control is installed you should see the live video on Internet
Explorer.

20
Wireless Connection
After you have configured the IP Camera from the Setup Wizard, you may unplug the
camera’s network cable from the wireless router and place the Camera at the desired
location.
To access the camera from a wireless computer, open the web browser (Internet
Explorer), enter the IP Address of the camera (default is 192.168.1.240) and press
Enter.
Other manuals for AICAP650W
1
This manual suits for next models
2
Table of contents
Other Airlink101 Webcam manuals

Airlink101
Airlink101 AIC1620W User manual

Airlink101
Airlink101 AICAP650 User manual

Airlink101
Airlink101 ConnectSky AIC600W User manual

Airlink101
Airlink101 AICN1747W User manual

Airlink101
Airlink101 AICN777W User manual

Airlink101
Airlink101 AICN777W User manual

Airlink101
Airlink101 AICN1777W User manual

Airlink101
Airlink101 ConnectSky AIC600W User manual

Airlink101
Airlink101 AICAP650W User manual